fuel consumption MERCEDES-BENZ METRIS 2019 MY19 Operator’s Manual
[x] Cancel search | Manufacturer: MERCEDES-BENZ, Model Year: 2019, Model line: METRIS, Model: MERCEDES-BENZ METRIS 2019Pages: 318, PDF Size: 5.07 MB
Page 10 of 318
Climate controlAir conditioning in the rear com-
partment ........................................ 113
Control panel for dual-zone auto-
matic climate control .................... .112
Controlling automatically ...............1 15
Cooling with air dehumidification .. 114
Defrosting the windows ................. 118
Defrosting the windshield .............. 117
Important safety notes .................. 110
Information on dual-zone auto-
matic climate control ..................... 112
Information on TEMPMATIC (air-
conditioning system) ..................... 111
Overview of systems ......................1 10
Problem with the rear window
defroster ........................................ 118
Rear-compartment air condition-
ing ................................................. 113
Refrigerant ..................................... 312
Refrigerant filling capacity ............. 312
Setting the air distribution ............. 116
Setting the air vents ......................1 20
Setting the airflow ......................... 116
Setting the temperature ................ 115
Switching air-recirculation mode
on/off ............................................ 118
Switching on/off ........................... 113
Switching residual heat on/off ...... 119
Switching the rear window
defroster on/off ............................ 118
Switching the synchronization
function on and off ........................ 117
TEMPMATIC control panel (air
conditioning) .................................. 111
Clock
Setting (vehicle without steering
wheel buttons) ............................... 178
Cockpit
Instrument cluster (vehicle with
steering wheel buttons) ................... 39
Instrument cluster (vehicle with-
out steering wheel buttons) ............. 37
Overview .......................................... 36
see Instrument cluster
Coffee cup symbol
see ATTENTION ASSIST COL
LISION PREVENTION ASSIST
Activating/deactivating the dis-
tance warning function .................. 187
Adaptive Brake Assist .................... 147
Display message ............................ 216
Distance warning function ............. 146
Operation/notes ............................ 146
Collision warning
see COLLISION PREVENTION ASSIST
COMAND display
Cleaning ......................................... 270
Combination switch ............................ 98
Communications equipment
Operation ....................................... 243
Type approval/frequency .............. 305
Consumption statistics
Fuel (vehicle with steering wheel
buttons) ......................................... 181
Fuel (vehicle without steering
wheel buttons) ............................... 174
Control panel
Above the windshield ....................... 43
Center console ................................ 42
Climate control ................................ 42
Driver's door ....................................4 3
Convenience closing feature .............. 83
Convenience opening
With the SmartKey ........................ .119
Convenience opening feature ............ 83
Conversions/equipment .................... 32
Coolant (engine)
Adding ...........................................2 57
Checking the level ......................... 255
Display messages (vehicle with
steering wheel buttons) ................. 215
Display messages (vehicle with-
out steering wheel buttons) ........... 200
Displaying the temperature (on-
board computer) ............................ 175
Filling capacity ............................... 312
Notes ............................................. 311
Temperature display in the instru-
ment cluster .................................. 172
Warning lamp ................................. 227
Cooling
see Climate control
Crosswind Assist ................................. 67
8Index
Page 14 of 318
Oil level (note) ...............................254
Viscosity ........................................ 310
Equipment and conversions
see Vehicle bodies
ESC (Electronic Stability Control)
see ESP
®(Electronic Stability Program)
ESP®(Electronic Stability Pro-
gram)
Activating/deactivating (vehicle
with steering wheel buttons) ......... 186
Activating/deactivating (vehicle
without steering wheel buttons) .... 176
Crosswind Assist .............................6 7
Deactivating/activating ................... 66
Display message (vehicle with
steering wheel buttons) ................. 210
Display message (vehicle without
steering wheel buttons) ................. 196
Function/notes ................................ 65
Important safety information ........... 66
Trailer stabilization ........................... 67
Warning lamp ................................. 224
Exhaust check ................................... 138
Exterior lighting
see Lights
Exterior mirrors
Adjusting ......................................... 94
Out of position (troubleshooting) ..... 94
Eyeglasses compartment ................. 240
F
First-aid kit......................................... 274
Flat tire
Changing a wheel/mounting the
spare wheel ................................... 299
Fogged-up windows
see Climate control
Frequencies
Mobile phone ................................. 305
Two-way radio ................................ 305
Front fog lamps
Changing bulbs .............................. 102
Display messages (vehicle with
steering wheel buttons) ................. 213
Display messages (vehicle with-
out steering wheel buttons) ........... 199
Switching on/off .............................. 97 Front-passenger seat
see Seats
Fuel
Additives (gasoline) ........................ 308
Consumption information .............. 308
Consumption statistics (vehicle
with steering wheel buttons) ......... 181
Consumption statistics (vehicle
without steering wheel buttons) .... 174
Displaying the current consump-
tion (vehicle with steering wheel
buttons) ......................................... 180
Displaying the current consump-
tion (vehicle without steering
wheel buttons) ............................... 175
Displaying the range (vehicle with
steering wheel buttons) ................. 180
Displaying the range (vehicle with-
out steering wheel buttons) ........... 175
Driving abroad ............................... 139
Driving tips .................................... 138
Fuel content display (vehicle with-
out steering wheel buttons) ........... 173
Fuel gauge (vehicle with steering
wheel buttons) ................................. 39
Grade (gasoline) ............................ 307
Important safety notes .................. 307
Problem (malfunction) ................... 135
Refueling ........................................ 134
Tank content/reserve fuel ............. 307
Fuel content
Display (vehicle without steering
wheel buttons) ............................... 173
F
uel level
Gauge (vehicle with steering
wheel buttons) ................................. 39
Fuel tank
Problem (malfunction) ................... 135
Fuel tank
see Fuel tank
Fuel tank reserve level
Display messages (vehicle with
steering wheel buttons) ................. 215
Display messages (vehicle with-
out steering wheel buttons) ........... 201
Fuses .................................................. 278
12Index
Page 18 of 318
O
Occupant Classification System
(OCS)Conditions ....................................... 52
Faults ............................................... 56
Operation ......................................... 53
System self-test .............................. .55
Occupant safety
Air bags .......................................... .49
Automatic measures after an acci-
dent ................................................. 58
Belt warning .....................................4 9
Childr eninthe vehicle .................... .58
Important safety notes .................... 45
Introduction to the restraint sys-
tem .................................................. 45
Occupant Classification System
(OCS) ............................................... 52
PASSENGER AIR BAG indicator
lamps ............................................... 46
Pets in the vehicle ........................... 64
Restraint system warning lamp ........ 45
Seat belt .......................................... 46
OCS
Conditions ....................................... 52
Faults ............................................... 56
Operation .........................................5 3
System self-test ............................... 55
Odometer
Displaying (vehicle with steering
wheel buttons) ............................... 180
Displaying (vehicle without steer-
ing wheel buttons) ......................... 174
Setting the display unit (vehicle
with steering wheel buttons) ......... 188
Setting the display unit (vehicle
without steering wheel buttons) .... 177
Off-road driving
Checklist after driving off-road ...... 143
Important safety notes .................. 142
Rules for driving off-road ............... 142
Oil
see Engine oil
O
n-board computer (vehicle with
steering wheel buttons)
Assistance menu ........................... 185
Audio menu ................................... 183 Date menu ..................................... 189
Display messages .......................... 205
Factory settings ............................. 190
Important safety notes .................. 171
Instrument cluster menu ............... 188
Lights menu ................................... 189
Menu overview .............................. 180
Message memory .......................... 205
Navigation menu ............................ 182
Operating ....................................... 178
Permanent display ......................... 188
Service menu ................................. 187
Setting the date ............................. 189
Setting the display ......................... 188
Setting the display language .......... 188
Setting the language ...................... 188
Setting the time ............................. 189
Settings menu ............................... 188
Standard display ............................ 180
Telephone menu ............................ 184
Time menu ..................................... 189
Trip menu ...................................... 180
Vehicle menu ................................. 190
On-board computer (vehicle with-
out steering wheel buttons)
Coolant temperature display
menu ............................................. 175
Current fuel consumption menu .... 175
Date menu ..................................... 178
Digital speedometer menu ............. 175
Display messages .......................... 191
Distance menu ............................... 174
Factory settings ............................. 176
Important safety notes .................. 171
Menu overview .............................. 174
Message memory .......................... 191
Operating ....................................... 173
Permanent display ......................... 177
Range menu ................................... 175
Setting the date ............................. 178
Setting the display ......................... 177
Setting the display language .......... 176
Setting the language ...................... 176
Setting the time ............................. 178
Settings menu ............................... 176
Standard display menu .................. 174
Time menu ..................................... 178
Trip computer menu ...................... 174
16Index
Page 31 of 318
Proper use
Observe the following information when oper-
ating your vehicle:
Rthe safety notes in these operating instruc-
tions
Rthe technical data in these operating instruc-tions
Rtraffic laws and regulations
Rmotor vehicle laws and safety standards
There are various warning stickers affixed to the
vehicle. If you remove warning stickers, you and
others may fail to recognize the dangers. Leave
the warning stickers in their original position.
GWARNING
Modifications to electronic components, their software as well as wiring can impair their
function and/or the function of other net-
worked components. In particular, systems
relevant to safety could also be affected. As a
result, these may no longer function as inten-
ded and/or jeopardize the operating safety of
the vehicle. There is an increased risk of an
accident and injury.
Never tamper with the wiring as well as elec-
tronic components or their software. You
should have all work to electrical and elec-
tronic equipment carried out at a qualified
specialist workshop.
The general operating permit for your vehicle
could be rendered invalid if you carry out mod-
ifications to electronic components, their soft-
ware as well as wiring.
GWARNING
Gases and fluids from substances that con-
stitute a health hazard or react aggressively
can escape even from securely closed con-
tainers. When transporting such substances
in the vehicle interior, your ability to concen-
trate or your health could be affected during
the journey. Malfunctions, short circuits or
electrical component system failures may
also result. There is a risk of an accident and
fire.
Do not store or transport any substances in
the vehicle interior which are hazardous to
health or react aggressively.
These instructions must also be observed for
vehicles where the cargo compartment is not
fully separated from the driver's cab.
Partition with door/window: always keep the
door/window in the partition closed during
transport.
Examples of substances that are hazardous to
health and/or react aggressively:
RSolvents
RFuel
ROil and grease
RCleaning agents
RAcids
Protection of the environment
Economic and environmentally aware
driving
HEnvironmental note
Daimler's declared policy is one of compre-
hensive environmental protection.
The objectives are for the natural resources
that form the basis of our existence on this
planet to be used sparingly and in a manner
that takes the requirements of both nature
and humanity into account.
You too can help to protect the environment
by operating your vehicle in an environmen-
tally responsible manner.
Fuel consumption and the rate of engine,
transmission, brake and tire wear are affected
by these factors:
Roperating conditions of your vehicle
Ryour personal driving style
You can influence both factors. You should
bear the following in mind:
Introduction29
Z
Page 133 of 318
XTo shift up and extend the shift range:
briefly pull right steering wheel paddle
shifter;.
The automatic transmission shifts to the next gear up, depending on the gear currently
engaged. This derestricts the shift range at
the same time.
If the display shows only transmission posi-
tion D, the shift range restriction is canceled.
XTo derestrict the shift range: pull and hold
right steering wheel paddle shifter ;.
The automatic transmission shifts up one or
more gears depending on the gear currently
engaged. At the same time, the shift range
restriction is canceled and the display shows
transmission position D.
Shift ranges and driving situations
=Use the engine's braking effect.
5Use the braking effect of the engine
on steep downhill gradients and for
driving:
Ron steep mountain roads
Rin mountainous terrain
Rin arduous conditions
4Use the braking effect of the engine
on extremely steep downhill gradi-
ents and long downhill stretches.
Drive programs
General notes
You can use the program selector button to
choose between different drive programs for the
automatic transmission. Engine management
and the gearshifting characteristics of the auto-
matic transmission change depending on which
drive program is selected. Thus, a more comfort-
oriented or a more economical driving style is
supported, depending on the wish of the driver.
Selecting drive program Mdeactivates auto-
matic gearshifting, requiring that you change
gear manually.
After the engine is started, the automatic trans-
mission automatically switches to drive pro-
gram C(Comfort) for a comfortable and eco-
nomical driving style.
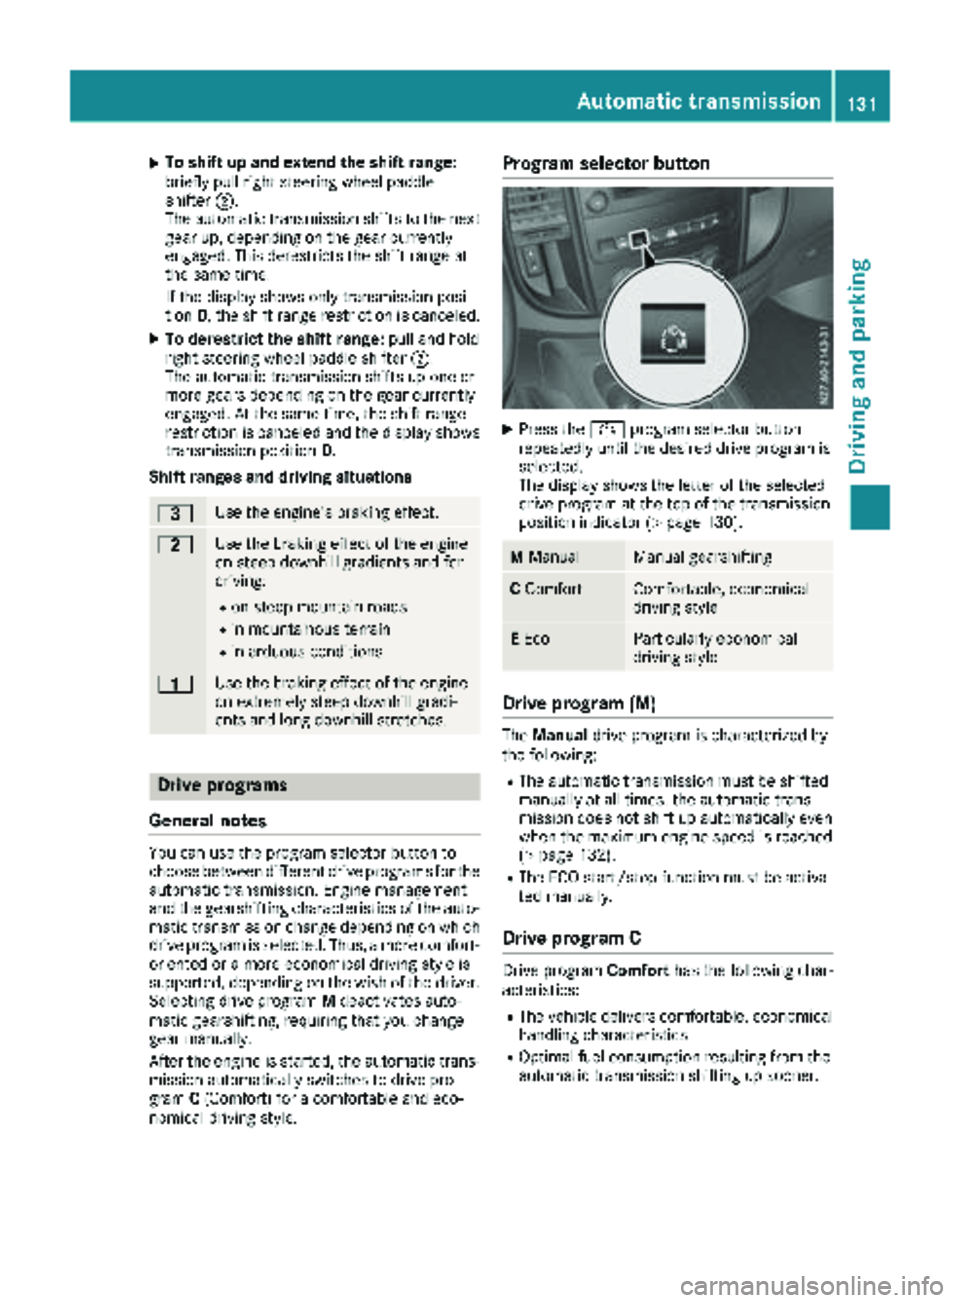
Program selector button
XPress the Éprogram selector button
repeatedly until the desired drive program is
selected.
The display shows the letter of the selected
drive program at the top of the transmission
position indicator (
Ypage 130).
M ManualManual gearshifting
CComfortComfortable, economical
driving style
EEcoParticularly economical
driving style
Drive program (M)
The Manual drive program is characterized by
the following:
RThe automatic transmission must be shifted
manually at all times. the automatic trans-
mission does not shift up automatically even
when the maximum engine speed is reached
(
Ypage 132).
RThe ECO start/stop function must be activa-
ted manually.
Drive program C
Drive program Comforthas the following char-
acteristics:
RThe vehicle delivers comfortable, economical handling characteristics.
ROptimal fuel consumption resulting from the
automatic transmission shifting up sooner.
Automatic transmission131
Driving an d parking
Z
Page 134 of 318
RIncreased sensitivity. This improves driving
stability on slippery road surfaces, for exam-
ple.
RThe automatic transmission shifts up sooner.
The vehicle thus maintains lower engine
speeds.
Drive program E
Drive programEcohas the following character-
istics:
RThe vehicle exhibits particularly economical
handling characteristics.
RThe maximum available engine torque is
reduced.
ROptimal fuel consumption resulting from the
automatic transmission shifting down signifi-
cantly later and up significantly sooner, even
at full-load operation.
No shift point adjustment for adapting to indi-
vidual, dynamic driving styles.
In kickdown, the automatic transmission
automatically shifts to drive program C.
RIncreased sensitivity. This improves driving
stability on slippery road surfaces, for exam-
ple.
Driving tips
Accelerator pedal position
Your style of driving influences how the auto-
matic transmission shifts gear:
Rlittle throttle: early upshifts
Rlots of throttle: later upshifts
Kickdown
Use kickdown for maximum acceleration:
XDepress the accelerator pedal beyond the
pressure point.
The automatic transmission shifts to the next
gear down, depending on the engine speed.
XEase off on the accelerator pedal once the
desired speed is reached.
The automatic transmission shifts up again.
Rocking the vehicle free
At speeds up to 5 mph (9 km/h) you can switch
back and forth between drive position Dand
reverse gear Rwithout applying the brakes. This
helps when rocking the vehicle out of snow or
slush.
XPush the DIRECT SELECT lever alternately up
and down beyond the first point of resistance.
Towing a trailer
XDepending on the downhill gradient, limit the
shift range (Ypage 130) or shift manually into
a lower gear (Ypage 132) in which the engine
will operate in the middle of the engine speed
range. This also applies if cruise control is
activated.
Manual gearshifting
General notes
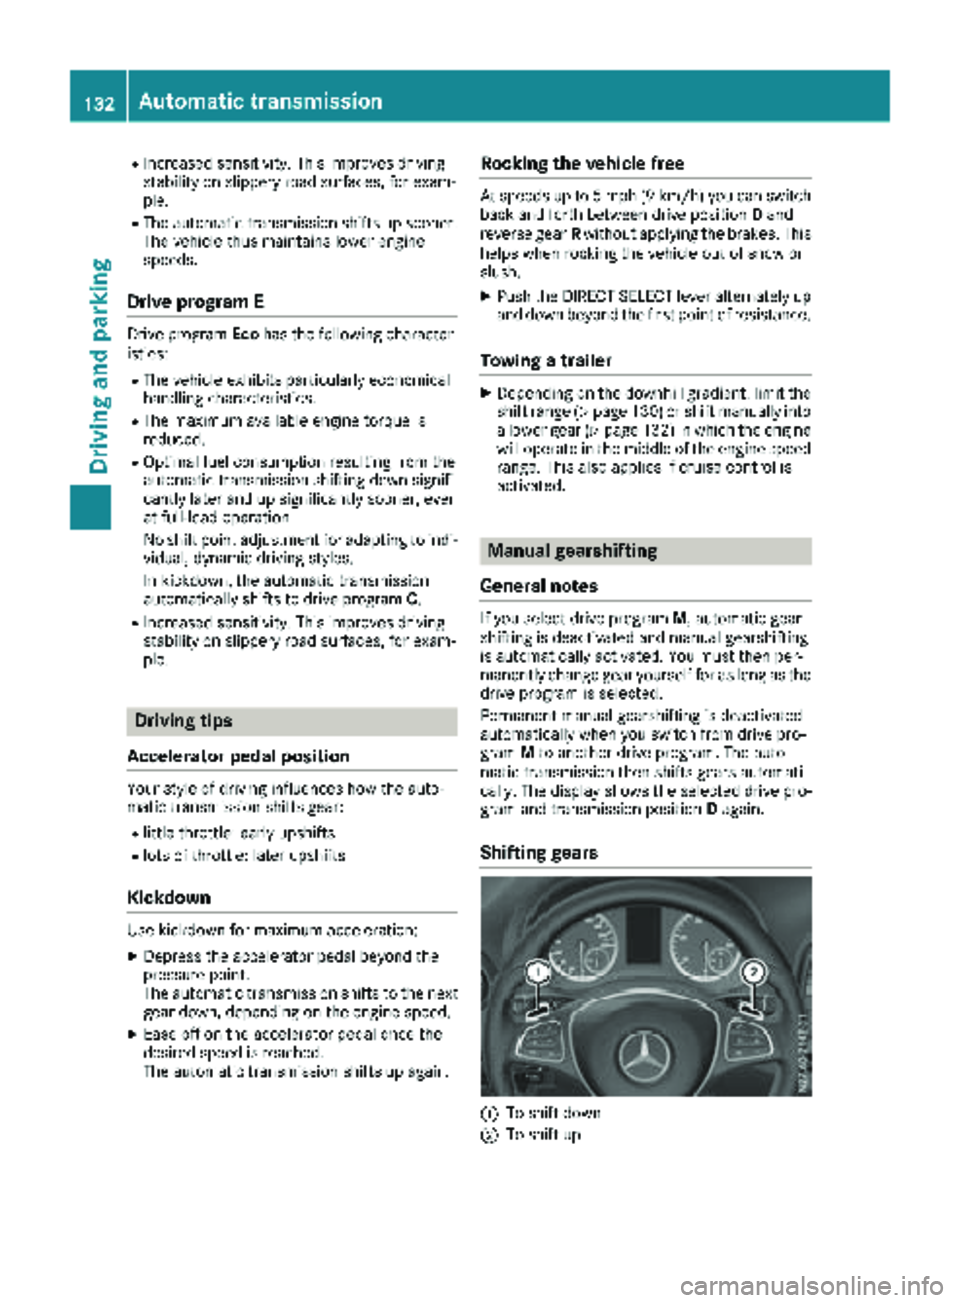
If you select drive program M, automatic gear-
shifting is deactivated and manual gearshifting
is automatically activated. You must then per-
manently change gear yourself for as long as the
drive program is selected.
Permanent manual gearshifting is deactivated
automatically when you switch from drive pro-
gram Mto another drive program. The auto-
matic transmission then shifts gears automati-
cally. The display shows the selected drive pro-
gram and transmission position Dagain.
Shifting gears
:To shift down
;To shift up
132Automatic transmission
Driving and parking
Page 140 of 318
Always use the hands-free system for telephon-
ing while driving. Only use the telephone if road
traffic conditions permit. If this is not the case,
pull over to a safe location before using the tele-
phone.
Bear in mind that at a speed of just 30 mph
(approximately 50 km/h), your vehicle is cov-
ering a distance of 44 fee t(approximately 14 m)
every second.
Drive sensibly – save fuel
In order to save fuel, observe the following tips:
XThe tires should always be inflated to the rec-
ommended tire pressure.
XRemove unnecessary loads.
XRemove roof carriers when they are not nee-
ded.
XWarm up the engine at low engine speeds.
XAvoid frequent acceleration or braking.
XHave all maintenance work carried out as
indicated by the service intervals in the Main-
tenance Booklet or by the service interval dis-
play.
Fuel consumption also increases when driving in cold weather, in stop-start traffic and in moun-
tainous terrain.
Overrun cutoff
If you are in overrun mode and take your foot off
the accelerator pedal, the fuel supply is cut off
when the engine speed is out of the idle speed
control range.
Drinking and driving
GWARNING
Drinking and driving and/or taking drugs and driving are very dangerous combinations.
Even a small amount of alcohol or drugs can
affect your reflexes, perceptions and judg-
ment.
The possibility of a serious or even fatal acci-
dent is greatly increased when you drink or
take drugs and drive.
Do not drink or take drugs and drive or allow
anyone to drive who has been drinking or tak-
ing drugs.
Emission control
GWARNING
Combustion engines emit poisonous exhaust
gases such as carbon monoxide. Inhaling
these exhaust gases leads to poisoning. There
is a risk of fatal injury. Therefore never leave
the engine running in enclosed spaces with-
out sufficient ventilation.
Certain engine systems are designed to keep
the level of poisonous substances in exhaust
fumes within legal limits.
These systems only work optimally if they are
maintained exactly in accordance with the man-
ufacturer's specifications. Any work on the
engine should therefore be carried out by quali-
fied and authorized Mercedes-Benz technicians.
The engine settings must not be changed under
any circumstances. In addition, all specific
maintenance work must be carried out at regu-
lar intervals and in accordance with the service
requirements of the dealer listed here on the
inside title page. Details can be found in the
Maintenance Booklet.
Speed limiter
GWARNING
Exceeding the stated tire load-bearing capa-
city and the approved maximum speed could
lead to tire damage or the tire bursting. There is a risk of accident.
Therefore, only use tire types and sizes
approved for your vehicle model. Observe the
tire load rating and speed rating required for
your vehicle.
As the driver, you must be aware of the maxi-
mum design speed of the vehicle and the maxi- mum permissible speed based on the tires (tire
and tire pressure). In particular, also observe the tire approval regulations for each country.
You must not exceed the speed limit for the tires
indicated by the speed rating. The speed rating
is stated in the tire tables (
Ypage 302).
You can permanently limit the permissible max-
imum speed of your vehicle, e.g. for driving on
winter tires.
138Driving tips
Driving and parking
Page 174 of 318
On vehicles with steering wheel buttons, the
light sensor in the instrument cluster automati-
cally controls the brightness of the display light-
ing.
While the lights are on, the brightness is depend-
ent upon the brightness of the ambient light.
You can also adjust the brightness of the instru-
ment lighting and the display lighting
Rby pressing thefand gbuttons on the
instrument cluster on vehicles without steer-
ing wheel buttons (not in the Settings
menu)
Rby turning brightness control knob :on vehi-
cles with steering wheel buttons
Speedometer
If you change the wheel size on your vehicle,
make sure it is assigned to the correct wheel
size category (
Ypage 279). If you change wheel
size category without recoding the control unit,
the speedometer indication will be inaccurate.
The current vehicle speed may then be higher
than the speed displayed in the speedometer.
The speed can also be shown in the display in
the form of a digital speedometer:
ROn vehicles without steering wheel buttons
(Ypage 175)
ROn vehicles with steering wheel buttons
(Ypage 181)
iIn some countries, a warning sounds and/or
the display shows a message when the vehi-
cle reaches the maximum legally permissible speed limit, e.g. at 75 mph (120 km/h).
Tachometer
!
Do not drive in the overrevving range, as this
could damage the engine.
HEnvironmental note
Avoid driving at high engine speeds. This
unnecessarily increases the fuel consumption
of your vehicle and harms the environment as
a result of increased emissions.
The red band in the tachometer indicates the
engine's overrevving range.
To protect the engine, the fuel supply is inter-
rupted when the red band is reached.
Outside temperature display
You should pay special attention to road condi-
tions when temperatures are around freezing
point.
Please bear in mind that the outside tempera-
ture display shows the air temperature meas-
ured and not the road temperature.
The display shows the outside temperature in
the header:
Ron vehicles without steering wheel buttons
(Ypage 173)
Ron vehicles with steering wheel buttons
(Ypage 179)
Changes in the outside temperature are dis-
played after a short delay.
Coolant temperature gauge
GWARNING
Opening the hood when the engine is over-
heated or when there is a fire in the engine
compartment could expose you to hot gases
or other service products. There is a risk of
injury.
Let an overheated engine cool down before
opening the hood. If there is a fire in the
engine compartment, keep the hood closed
and contact the fire department.
On vehicles without steering wheel buttons, you
can have the coolant temperature shown in the
display (
Ypage 175).
On vehicles with steering wheel buttons, an ana-
log coolant temperature gage is located in the
tachometer in the instrument cluster
(
Ypage 39).
Under normal operating conditions and with the
specified coolant level, the gauge may rise to
248 ‡ (120 †).
172Display and operation
On-board computer and displays
Page 176 of 318
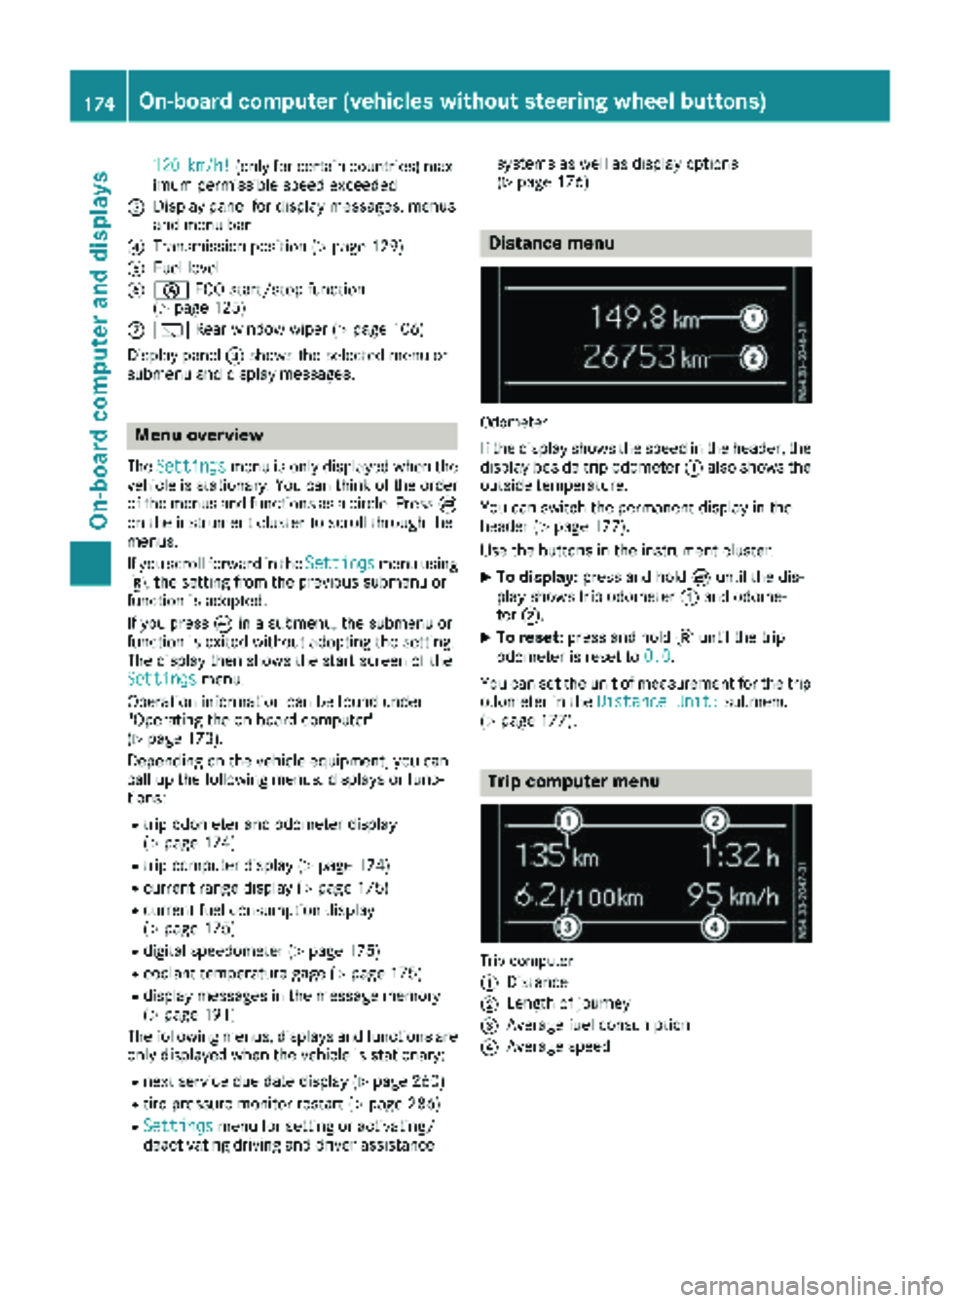
120km/h!(only for certain countries) max-
imum permissible speed exceeded
=Display panel for display messages, menus
and menu bar
?Transmission position (Ypage 129)
AFuel level
Bè ECO start/stop function
(Ypage 125)
Cè Rear window wiper (Ypage 106)
Display panel =shows the selected menu or
submenu and display messages.
Menu overview
The Settingsmenu is only displayed when the
vehicle is stationary. You can think of the order
of the menus and functions as a circle. Press È
on the instrument cluster to scroll through the
menus.
If you scroll forward in the Settings
menu using
3, the setting from the previous submenu or
function is adopted.
If you press Èin a submenu, the submenu or
function is exited without adopting the setting.
The display then shows the start screen of the
Settings
menu.
Operation information can be found under
"Operating the on-board computer"
(
Ypage 173).
Depending on the vehicle equipment, you can
call up the following menus, displays or func-
tions:
Rtrip odometer and odometer display
(Ypage 174)
Rtrip computer display (Ypage 174)
Rcurrent range display (Ypage 175)
Rcurrent fuel consumption display
(Ypage 175)
Rdigital speedometer (Ypage 175)
Rcoolant temperature gage (Ypage 175)
Rdisplay messages in the message memory
(Ypage 191)
The following menus, displays and functions are only displayed when the vehicle is stationary:
Rnext service due date display (Ypage 260)
Rtire pressure monitor restart (Ypage 286)
RSettingsmenu for setting or activating/
deactivating driving and driver assistance systems as well as display options
(
Ypage 176)
Distance menu
Odometer
If the display shows the speed in the header, the
display beside trip odometer
:also shows the
outside temperature.
You can switch the permanent display in the
header (
Ypage 177).
Use the buttons in the instrument cluster.
XTo display: press and hold Èuntil the dis-
play shows trip odometer :and odome-
ter ;.
XTo reset: press and hold 3until the trip
odometer is reset to 0.0
.
You can set the unit of measurement for the trip odometer in the Distance Unit:
submenu
(Ypage 177).
Trip computer menu
Trip computer
:
Distance
;Length of journey
=Average fuel consumption
?Average speed
174On-board computer (vehicles without steering wheel buttons)
On-board computer and displays
Page 177 of 318
Use the buttons in the instrument cluster.
XTo display:pressÈto select the trip com-
puter display.
The values displayed relate to those meas-
ured since the trip computer was last reset.
XTo reset values: press and hold3until all
values are reset.
The trip computer is automatically reset if the
value exceeds 9,999 hours or 99,999 miles.
You can set the unit of measurement for con-
sumption and distance in the Distance Unit:
submenu (Ypage 177).
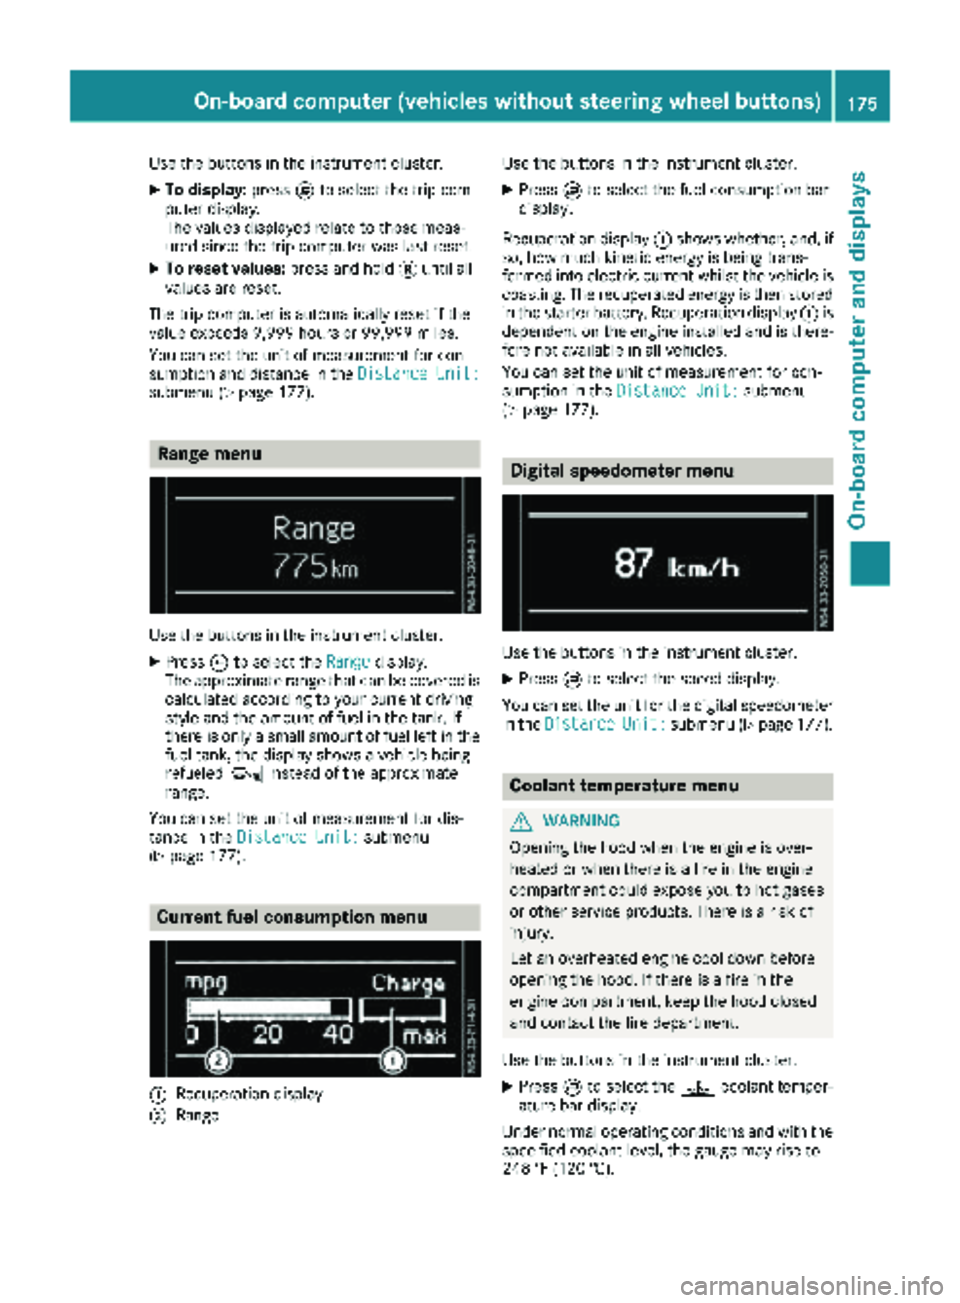
Range menu
Use the buttons in the instrument cluster.
XPressÈto select the Rangedisplay.
The approximate range that can be covered is calculated according to your current driving
style and the amount of fuel in the tank. If
there is only a small amount of fuel left in the
fuel tank, the display shows a vehicle being
refueled Ïinstead of the approximate
range.
You can set the unit of measurement for dis-
tance in the Distance Unit:
submenu
(Ypage 177).
Current fuel consumption menu
:Recuperation display
;Range Use the buttons in the instrument cluster.
XPress
Èto select the fuel consumption bar
display.
Recuperation display :shows whether, and, if
so, how much kinetic energy is being trans-
formed into electric current whilst the vehicle is
coasting. The recuperated energy is then stored in the starter battery. Recuperation display :is
dependent on the engine installed and is there-
fore not available in all vehicles.
You can set the unit of measurement for con-
sumption in the Distance Unit:
submenu
(Ypage 177).
Digital speedometer menu
Use the buttons in the instrument cluster.
XPress Èto select the speed display.
You can set the unit for the digital speedometer
in the Distance
Unit:submenu (Ypage 177).
Coolant temperature menu
GWARNING
Opening the hood when the engine is over-
heated or when there is a fire in the engine
compartment could expose you to hot gases
or other service products. There is a risk of
injury.
Let an overheated engine cool down before
opening the hood. If there is a fire in the
engine compartment, keep the hood closed
and contact the fire department.
Use the buttons in the instrument cluster.
XPress Èto select the ?coolant temper-
ature bar display.
Under normal operating conditions and with the
specified coolant level, the gauge may rise to
248 ‡ (120 †).
On-board computer (vehicles without steering wheel buttons)175
On-board computer and displays
Z