heating MERCEDES-BENZ METRIS 2019 MY19 Operator’s Manual
[x] Cancel search | Manufacturer: MERCEDES-BENZ, Model Year: 2019, Model line: METRIS, Model: MERCEDES-BENZ METRIS 2019Pages: 318, PDF Size: 5.07 MB
Page 15 of 318
G
Gasoline............................................. 307
Gearshift recommendation
Display (vehicle with steering
wheel buttons) ...............................1 79
Display (vehicle without steering
wheel buttons) ............................... 173
Genuine parts ...................................... 33
Glove box ...........................................2 40
GTW (Gross Trailer Weight) (defini-
tion) .................................................... 296
Guide rail
Maximum tensile strength ............. 315
H
Handbrakesee Parking brake
Handling control system
see ESP
®(Electronic Stability Program)
Hands-free system
see Mobile phone
Hazard warning lamps ........................ 98
Head restraints
Adjusting (electrically) ..................... 91
Adjusting (manually) ........................ 91
Important safety notes .................... 90
Removing/installing ........................ 91
Headlamps
Changing bulbs (halogen head-
lamps) ............................................ 102
Fogging up ....................................... 99
see Automatic headlamp mode
Heating
see Climate control
High-beam headlamps
Display messages (vehicle with
steering wheel buttons) ................. 212
Display messages (vehicle with-
out steering wheel buttons) ........... 199
Replacing bulbs .............................1 04
Switching on/off .............................. 98
Hill start assist .................................. 125
Hood
Closing ...........................................2 53
Display messages (vehicle with
steering wheel buttons) ................. 221 Display messages (vehicle with-
out steering wheel buttons) ........... 204
Important safety notes .................. 252
Opening ......................................... 253
Hydroplaning ..................................... 141
I
Ignition lock
see SmartKey positions (ignition lock)
Immobilizer .......................................... 67
Indicator lamps
see Warning and indicator lamps
Indicators
see Turn signals
Insect protection on the radiator ...... 33
Instrument cluster
Buttons (vehicle without steering
wheel buttons) ............................... 173
Overview (vehicle with steering
wheel buttons) ................................. 39
Overview (vehicle without steer-
ing wheel buttons) ........................... 37
Warning and indicator lamps
(vehicle with steering wheel but-
tons) ................................................ 40
Warning and indicator lamps
(vehicle without steering wheel
buttons) ...........................................3 8
Instrument cluster lighting .............. 171
Interior lighting
Automatic control ............................ 99
Delayed switch-off (on-board
computer) ...................................... 190
General notes .................................. 99
Manual control .............................. .100
Notes on changing bulbs ...............1 00
Overview .......................................... 99
Reading lamp ................................... 99
Rear interior light in the grab han-
dle ................................................. 100
Replacing bulbs .............................1 00
Switching the cargo compartment
lighting on/off (cargo compart-
ment) ............................................. 100
Switching the cargo compartment
lighting on/off (dashboard) ........... 100
Index13
Page 19 of 318
On-board computer (vehicles with
steering wheel buttons)Displaying the service message ..... 260
On-board computer (vehicles with-
out steering wheel buttons)
Displaying the service message ..... 260
On-board diagnostics interface
see Diagnostics connection
Operating Instructions
Before the first journey .................... 27
Limited Warranty ............................. 27
Operating safety
Limited Warranty ............................. 27
Operating safety and vehicle
approval
Attachments and bodies .................. 32
Changing the engine power out-
put ................................................... 31
Correct use ...................................... 29
Declaration of conformity ................ 31
Equipment and conversions ............. 32
Important safety notes .................... 30
Information about body/equip-
ment mounting directives ................ 32
Notes on operating the vehicle ........ 30
Qualified specialist workshop .......... 31
Registering your vehicle ................... 32
Operating system
On-board computer (vehicle with
steering wheel buttons) ................. 178
On-board computer (vehicle with-
out steering wheel buttons) ........... 173
Operator's Manual
General notes .................................. 27
Vehicle equipment ........................... 27
Outside temperature display ........... 172
Overhead control panel ...................... 43
Overrevving range ............................. 172
Overrun cutoff ................................... 138
P
Paint code number ............................ 305
Paintwork (cleaning instructions) ... 267
Parking ............................................... 135
Important safety notes .................. 135
Parking brake ................................ 136
Rear view camera .......................... 160 see Active Parking Assist
see PARKTRONIC
Parking aid
Active Parking Assist ..................... 156
see PARKTRONIC
see Rear view camera
Parking assistance
see PARKTRONIC
Parking brake
Display message (vehicle with
steering wheel buttons) ................. 210
Display message (vehicle without
steering wheel buttons) ................. 197
Notes/function .............................. 136
Warning lamp ................................. 136
Parking brake
see Parking brake
Parking lamps
Changing bulbs .............................. 104
PARKTRONIC
Deactivating/activating ................. 155
Display messages .......................... 216
Driving system ............................... 153
Function/notes ............................. 153
Important safety notes .................. 153
Problem (malfunction) ................... 156
Range of the sensors ..................... 154
Roll-back warning .......................... 155
Trailer towing ................................. 156
Warning display ............................. 155
PASSENGER AIR BAG OFF
Indicator lamp .................................. 46
Passenger compartment air-condi-
tioning system
see Climate control
Passenger compartment heating
see Climate control
Pedestrian protection
see Hood
Pets in the vehicle ............................... 64
Plastic trim (cleaning instruc-
tions) .................................................. 270
Power washers .................................. 266
Power windows
see Side windows
Preparing for a journey
Checks in the vehicle ..................... 123
Index17
Page 20 of 318
Visual check of the vehicle exte-
rior .................................................123
Program selector button .................. 131
Protection against theft
see ATA (Anti-Theft Alarm system)
Protection of the environment
General notes .................................. 29
Pulling away
Automatic transmission ................. 124
Hill start assist ............................... 125
Q
QR codeRescue card ..................................... 34
Qualified specialist workshop ........... 31
R
Radiator cover..................................... 33
Radio
Selecting a station ......................... 183
see separate operating instructions
Radio-wave reception/transmis-
sion in the vehicle
Declaration of conformity ................ 31
Rail transport
see Transport by rail
Rain sensor
Setting the sensitivity .................... 106
Setting the sensitivity (vehicle
with steering wheel buttons) ......... 190
Setting the sensitivity (vehicle
without steering wheel buttons) .... 177
Reading lamp ....................................... 99
Rear bench seat
EASY-ENTRY/EXIT feature ...............8 8
General notes .................................. 87
Installation options .......................... 88
Removing/installing (standard
rear bench seat) .............................. .89
Seat anchorage ................................ 87
Seat rails .......................................... 87
Seating variants ............................... 88
Rear compartment
Activating/deactivating climate
control ........................................... 113
Seating variants ............................... 88 Setting the air vents ...................... 120
Setting the temperature ................ 115
Switching the interior lighting on/
off .................................................. 100
Rear door
Display messages (vehicle with
steering wheel buttons) ................. 221
Display messages (vehicle with-
out steering wheel buttons) ........... 204
Important safety notes .................... 80
Indicator lamp ................................ 231
Opening at an angle of 180° or
270° ................................................ 81
Opening dimensions ...................... 313
Opening/closing from inside ........... 81
Opening/closing from the out-
side .................................................. 80
Rear doors ............................................ 80
Rear fog lamp
Display messages (vehicle with
steering wheel buttons) ................. 213
Display messages (vehicle with-
out ste
ering wheel buttons) ........... 199
Replacing bulbs ............................. 105
Switching on/off .............................. 97
Rear view camera
Cleaning instructions ..................... 269
Coupling up a trailer function ........ 164
Function/notes ............................. 160
General notes ................................ 160
Important safety notes .................. 161
Messages in the display ................. 162
Reverse parking ............................. 163
Switching on/off ........................... 161
Rear window defroster
Problem (malfunction) ................... 118
Switching on/off ........................... 118
Rear window wiper
Replacing the wiper blade .............. 108
Switching on/off ........................... 106
Rear-compartment air-condition-
ing system
see Climate control
Rear-compartment heating
see Climate control
Rear-view mirror
Anti-glare (manual) .......................... 94
Recuperation display ........................ 175
18Index
Page 21 of 318
Recyclingsee Protection of the environment
Refrigerant (air-conditioning sys-
tem)
Important safety notes .................. 312
Refueling
Fuel filler flap ................................. 135
Fuel gauge (vehicle with steering
wheel buttons) ................................. 39
Fuel gauge (vehicle without steer-
ing wheel buttons) ......................... 173
Refueling procedure (fuel) ............. 135
see Fuel
Remote control
see Key
Replacing bulbs
Important safety notes .................. 102
Reporting safety defects .................... 32
Rescue card ......................................... 34
Reserve (fuel tank)
see Fuel
Reserve fuel
Display messages (vehicle with
steering wheel buttons) ................. 215
Display messages (vehicle with-
out steering wheel buttons) ........... 201
Warning lamp ................................. 227
Residual heat (climate control) ........ 119
Restraint system
Display message (vehicle with
steering wheel buttons) ................. 211
Display message (vehicle without
steering wheel buttons) ................. 197
Introduction ..................................... 45
Warning lamp ................................. 226
Warning lamp (function) ................... 45
Reverse warning feature .................. 125
Reversing feature
Electric sliding door ......................... 76
Side windows ................................... 82
Roadside Assistance (breakdown) .... 28
Roof carrier
Maximum payload .......................... 315
Notes ............................................. 250
Roof lining and carpets (cleaning
guidelines) ......................................... 271
Roof load (roof carrier) ..................... 315S
Safety
Children in the vehicle ..................... 58
Operating safety .............................. 30
see Occupant safety
Safety system
see Driving safety systems
Seat belts
Adjusting the height ......................... 48
Cleaning ......................................... 271
Correct usage .................................. 48
Fastening ......................................... 48
Important safety guidelines ............. 47
Introduction ..................................... 46
Releasing ......................................... 49
Warning lamp ................................. 222
Warning lamp (function) ................... 49
Seats
Adjusting (electrically) ..................... 86
Adjusting (manually) ........................ 86
Adjusting lumbar support ................ 87
Adjusting the head restraint ............ 90
Armrest ............................................ 92
Cleaning the cover ......................... 270
Correct driver's seat position ........... 85
Important safety notes .................... 85
Seat heating .................................... 92
Storing settings (memory func-
tion) ................................................. 94
Selecting gear
see Automatic transmission
Selector lever
Cleaning ......................................... 270
see Automatic transmission
Sensors (cleaning instructions) ....... 268
Service interval display
Calling up the service due date ...... 260
Hiding service messages ............... 260
Notes ............................................. 259
Service menu (on-board com-
puter) .................................................. 187
Service phone number ...................... 274
Service products
Brake fluid ..................................... 311
Coolant (engine) ............................ 311
Engine oil ....................................... 309
Fuel ................................................ 307
Index19
Page 46 of 318
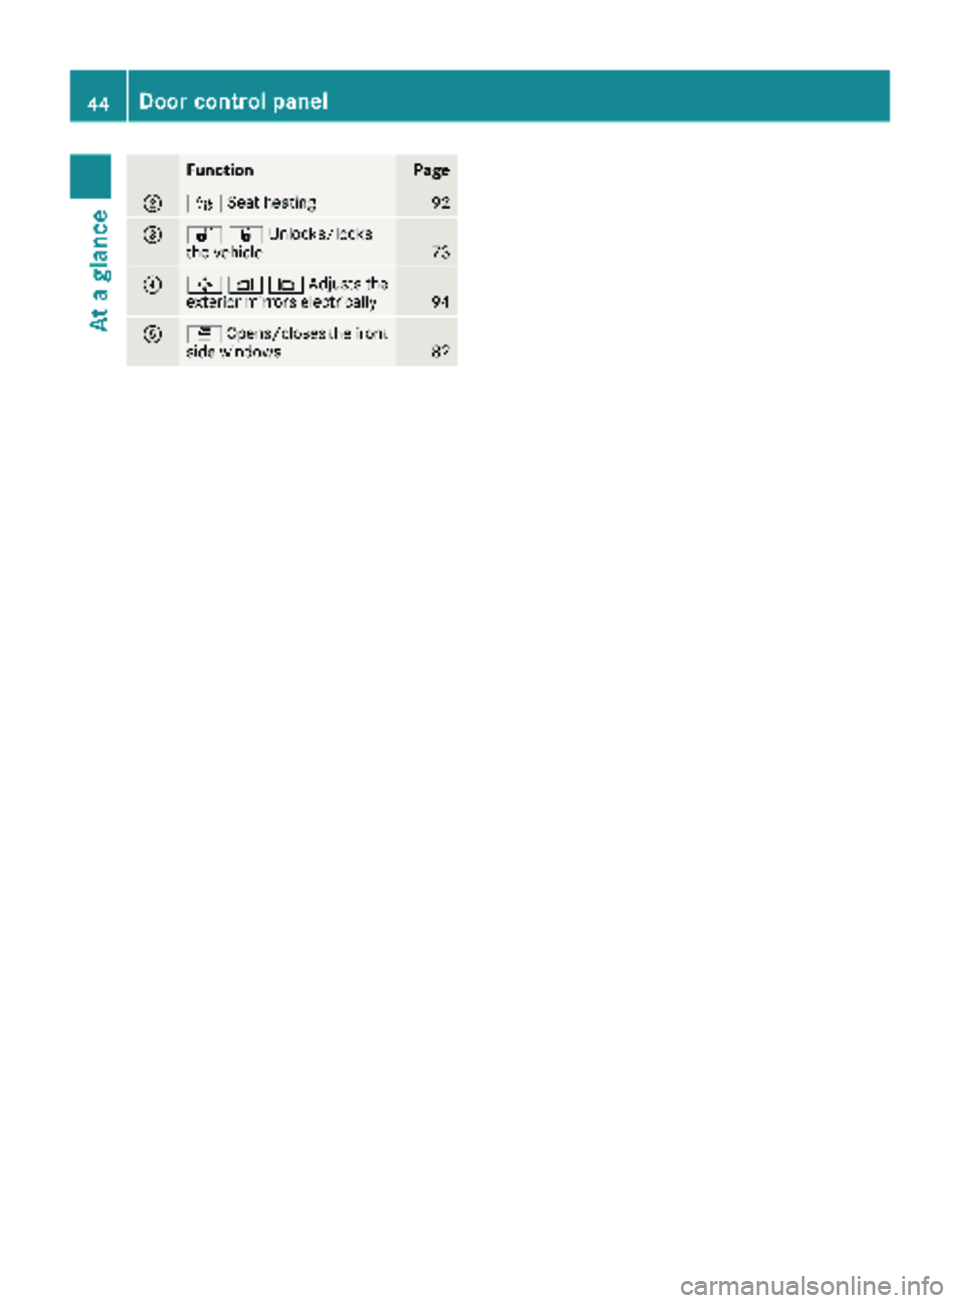
FunctionPage
;ÍSeat heating92
=%&Unlocks/locks
the vehicle73
?7Z\Adjusts the
exterior mirrors electrically94
AW Opens/closes the front
side windows82
44Door control panel
At a glance
Page 88 of 318
!To avoid damage to the seats and the seat
heating, observe the following information:
Rkeep liquids from spilling on the seats. If
liquid is spilled on the seats, dry them as
soon as possible.
Rif the seat covers are damp or wet, do not
switch on the seat heating. The seat heat-
ing should also not be used to dry the seats.
Rclean the seat covers as recommended;
see the "Interior care" section.
Rdo not transport heavy loads on the seats.
Do not place sharp objects on the seat
cushions, e.g. knives, nails or tools. The
seats should only be occupied by passen-
gers, if possible.
Rwhen the seat heating is in operation, do
not cover the seats with insulating materi-
als, e.g. blankets, coats, bags, seat covers,
child seats or booster seats.
Your seat must be adjusted in such a way that
you can wear the seat belt correctly.
Observe the following points:
RPosition the backrest in an almost vertical
position so that you are sitting virtually
upright. Do not drive with the backrest
reclined too far back.
RYour arms should be slightly bent when you
are holding the steering wheel.
RAvoid seat positions that prevent the seat belt
from being correctly routed. The shoulder
section of the belt must be routed over the
middle of your shoulder and be pulled tight
against your upper body. The lap belt must
always pass across your lap as low down as
possible, i.e. over your hip joints.
RAdjust the head restraint so that it supports
the back of the head at eye level.
RThe distance from the pedals should be such
that you can depress them fully.
Please also observe the important safety notes
on "Air bags" (
Ypage 50), "Seat belts"
(Ypage 47) and "Child restraint systems"
(Ypage 59).
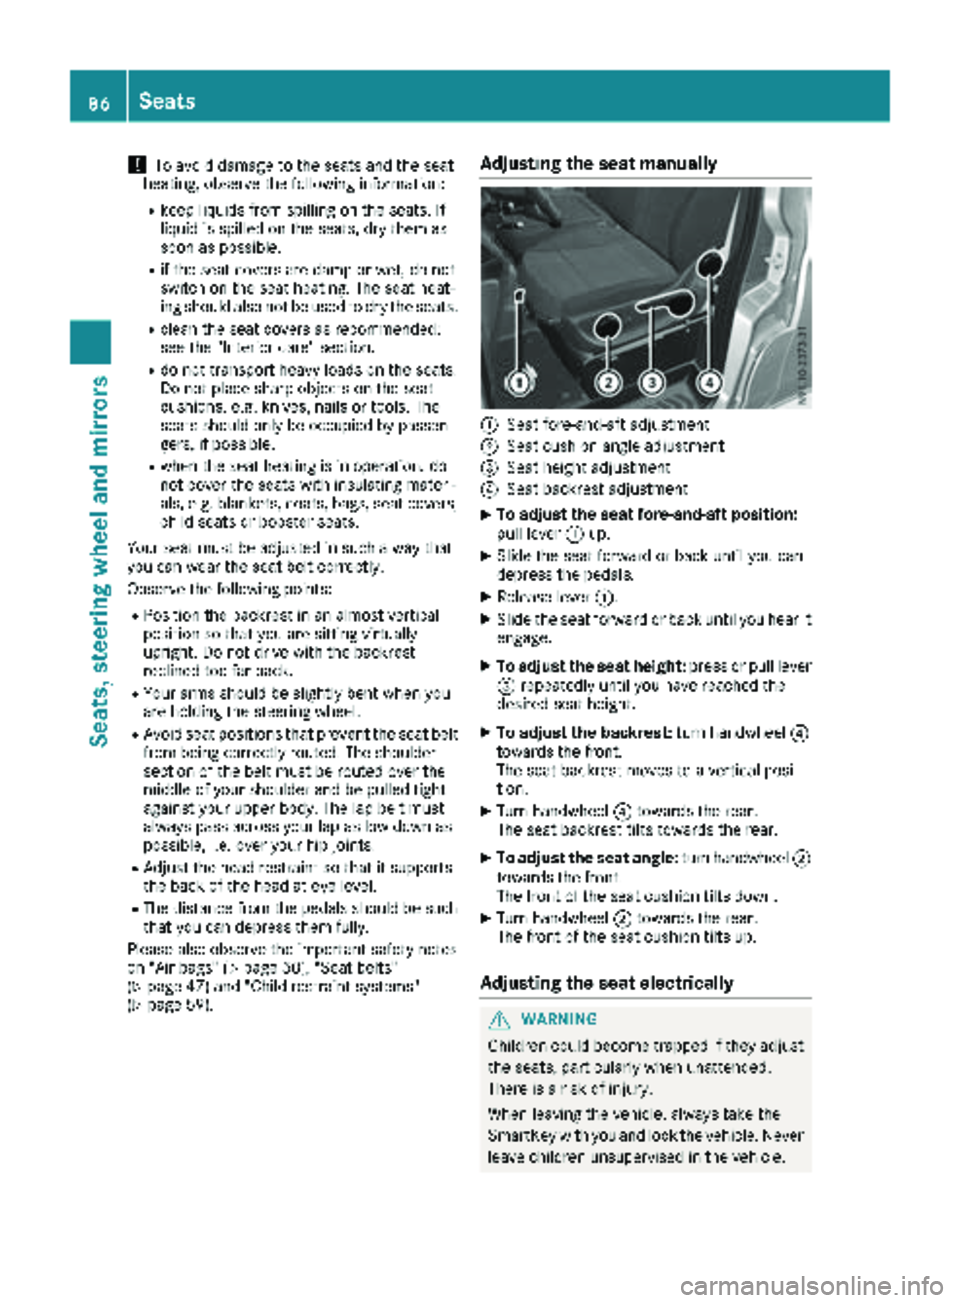
Adjusting the seat manually
:Seat fore-and-aft adjustment
;Seat cushion angle adjustment
=Seat height adjustment
?Seat backrest adjustment
XTo adjust the seat fore-and-aft position:
pull lever :up.
XSlide the seat forward or back until you can
depress the pedals.
XRelease lever :.
XSlide the seat forward or back until you hear it
engage.
XTo adjust the seat height: press or pull lever
= repeatedly until you have reached the
desired seat height.
XTo adjust the backrest: turn handwheel?
towards the front.
The seat backrest moves to a vertical posi-
tion.
XTurn handwheel ?towards the rear.
The seat backrest tilts towards the rear.
XTo adjust the seat angle: turn handwheel;
towards the front.
The front of the seat cushion tilts down.
XTurn handwheel ;towards the rear.
The front of the seat cushion tilts up.
Adjusting the seat electrically
GWARNING
Children could become trapped if they adjust
the seats, particularly when unattended.
There is a risk of injury.
When leaving the vehicle, always take the
SmartKey with you and lock the vehicle. Never
leave children unsupervised in the vehicle.
86Seats
Seats, steering wheel and mirrors
Page 94 of 318
XTo adjust the height:turn the key in the igni-
tion lock to position 2.
or
XOpen the door.
XSlide switch :up or down in the direction of
the arrow.
iIf the ignition is not switched on, you can
adjust the head restraint height within
30 seconds of unlocking the vehicle.
XTo move forward: pull the head restraint
forward until it engages in the required posi-
tion.
XTo move back: press and hold down release
knob ;and slide the head restraint back to
the desired position.
XLet go of release button ;.
XEnsure that the head restraint has engaged
properly.
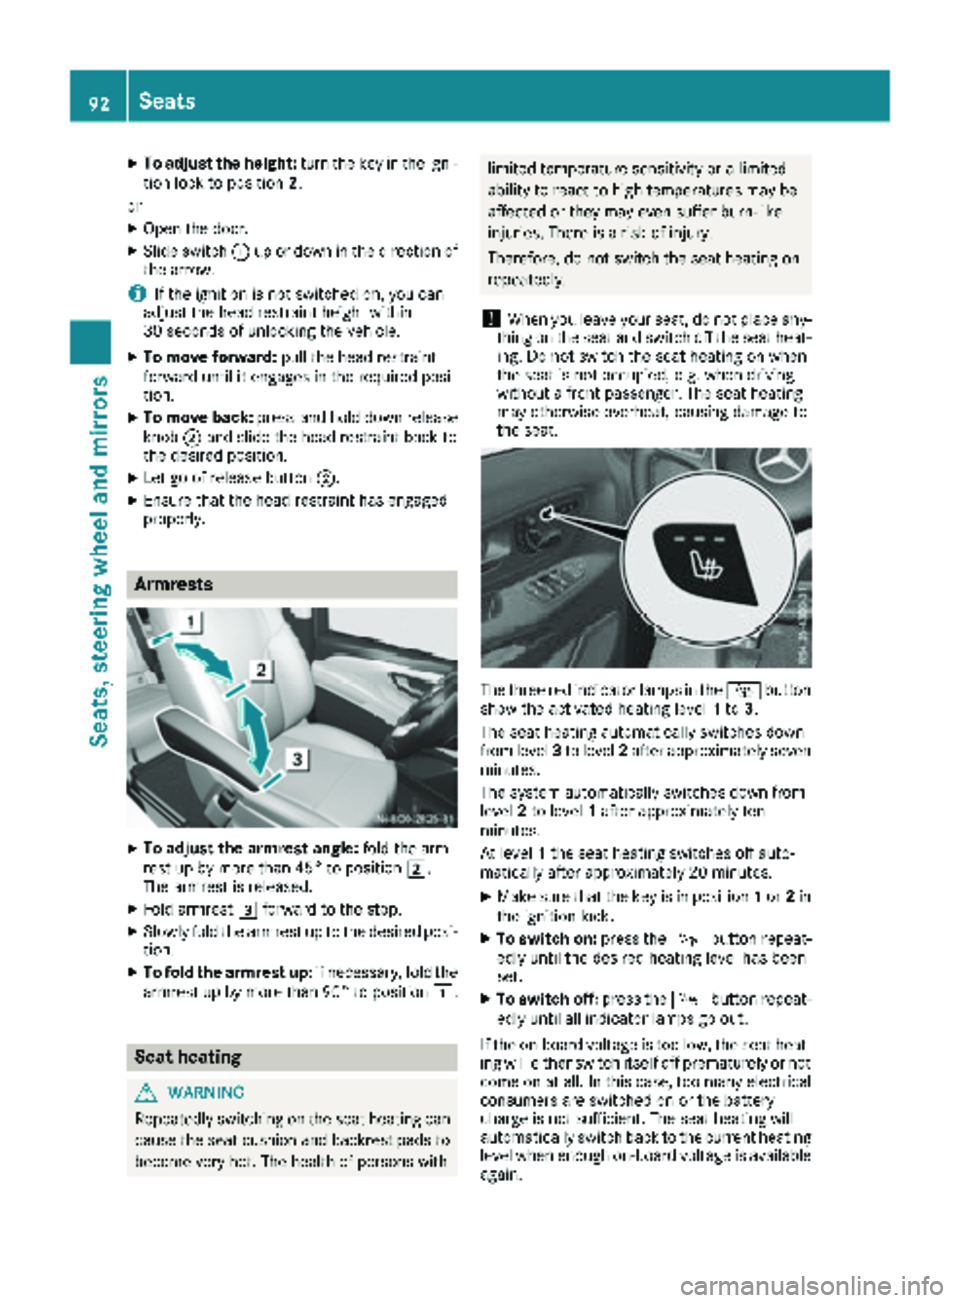
Armrests
XTo adjust the armrest angle: fold the arm-
rest up by more than 45° to position 2.
The armrest is released.
XFold armrest 3forward to the stop.
XSlowly fold the armrest up to the desired posi-
tion.
XTo fold the armrest up: if necessary, fold the
armrest up by more than 90° to position 1.
Seat heating
GWARNING
Repeatedly switching on the seat heating can
cause the seat cushion and backrest pads to
become very hot. The health of persons with
limited temperature sensitivity or a limited
ability to react to high temperatures may be
affected or they may even suffer burn-like
injuries. There is a risk of injury.
Therefore, do not switch the seat heating on
repeatedly.
!When you leave your seat, do not place any-
thing on the seat and switch off the seat heat-
ing. Do not switch the seat heating on when
the seat is not occupied, e.g. when driving
without a front passenger. The seat heating
may otherwise overheat, causing damage to
the seat.
The three red indicator lamps in the Íbutton
show the activated heating level 1to 3.
The seat heating automatically switches down
from level 3to level 2after approximately seven
minutes.
The system automatically switches down from
level 2to level 1after approximately ten
minutes.
At level 1the seat heating switches off auto-
matically after approximately 20 minutes.
XMake sure that the key is in position 1or 2in
the ignition lock.
XTo switch on: press theÍbutton repeat-
edly until the desired heating level has been
set.
XTo switch off: press theÍbutton repeat-
edly until all indicator lamps go out.
If the on-board voltage is too low, the seat heat-
ing will either switch itself off prematurely or not
come on at all. In this case, too many electrical
consumers are switched on or the battery
charge is not sufficient. The seat heating will
automatically switch back to the current heating level when enough on-board voltage is available
again.
92Seats
Seats, steering wheel and mirrors
Page 96 of 318
For this reason, always make sure of the
actual distance from the road users traveling
behind by glancing over your shoulder.
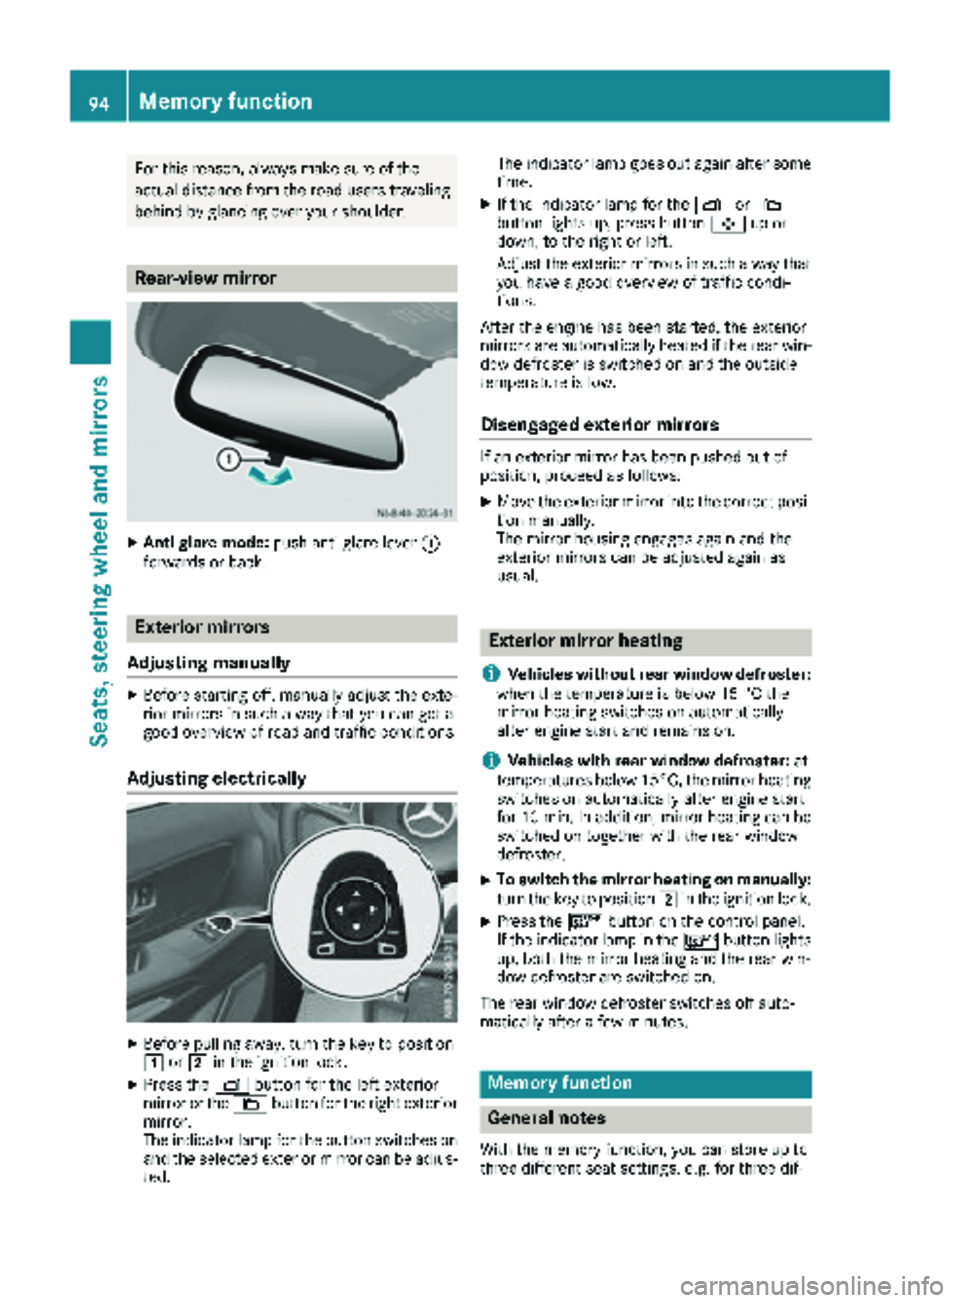
Rear-view mirror
XAnti-glare mode:push anti-glare lever :
forwards or back.
Exterior mirrors
Adjusting manually
XBefore starting off, manually adjust the exte-
rior mirrors in such a way that you can get a
good overview of road and traffic conditions.
Adjusting electrically
XBefore pulling away, turn the key to position
1 or2 in the ignition lock.
XPress the Zbutton for the left exterior
mirror or the \button for the right exterior
mirror.
The indicator lamp for the button switches on
and the selected exterior mirror can be adjus-
ted. The indicator lamp goes out again after some
time.
XIf the indicator lamp for the Zor\
button lights up, press button 7up or
down, to the right or left.
Adjust the exterior mirrors in such a way that
you have a good overview of traffic condi-
tions.
After the engine has been started, the exterior
mirrors are automatically heated if the rear win-
dow defroster is switched on and the outside
temperature is low.
Disengaged exterior mirrors
If an exterior mirror has been pushed out of
position, proceed as follows:
XMove the exterior mirror into the correct posi-
tion manually.
The mirror housing engages again and the
exterior mirrors can be adjusted again as
usual.
Exterior mirror heating
i
Vehicles without rear window defroster:
when the temperature is below 15 °C the
mirror heating switches on automatically
after engine start and remains on.
iVehicles with rear window defroster: at
temperatures below 15°C, the mirror heating
switches on automatically after engine start
for 10 min. In addition, mirror heating can be switched on together with the rear window
defroster.
XTo switch the mirror heating on manually:
turn the key to position 2in the ignition lock.
XPress the ¤button on the control panel.
If the indicator lamp in the ¤button lights
up, both the mirror heating and the rear win-
dow defroster are switched on.
The rear window defroster switches off auto-
matically after a few minutes.
Memory function
General notes
With the memory function, you can store up to
three different seat settings, e.g. for three dif-
94Memory function
Seats, steering wheel and mirrors
Page 113 of 318
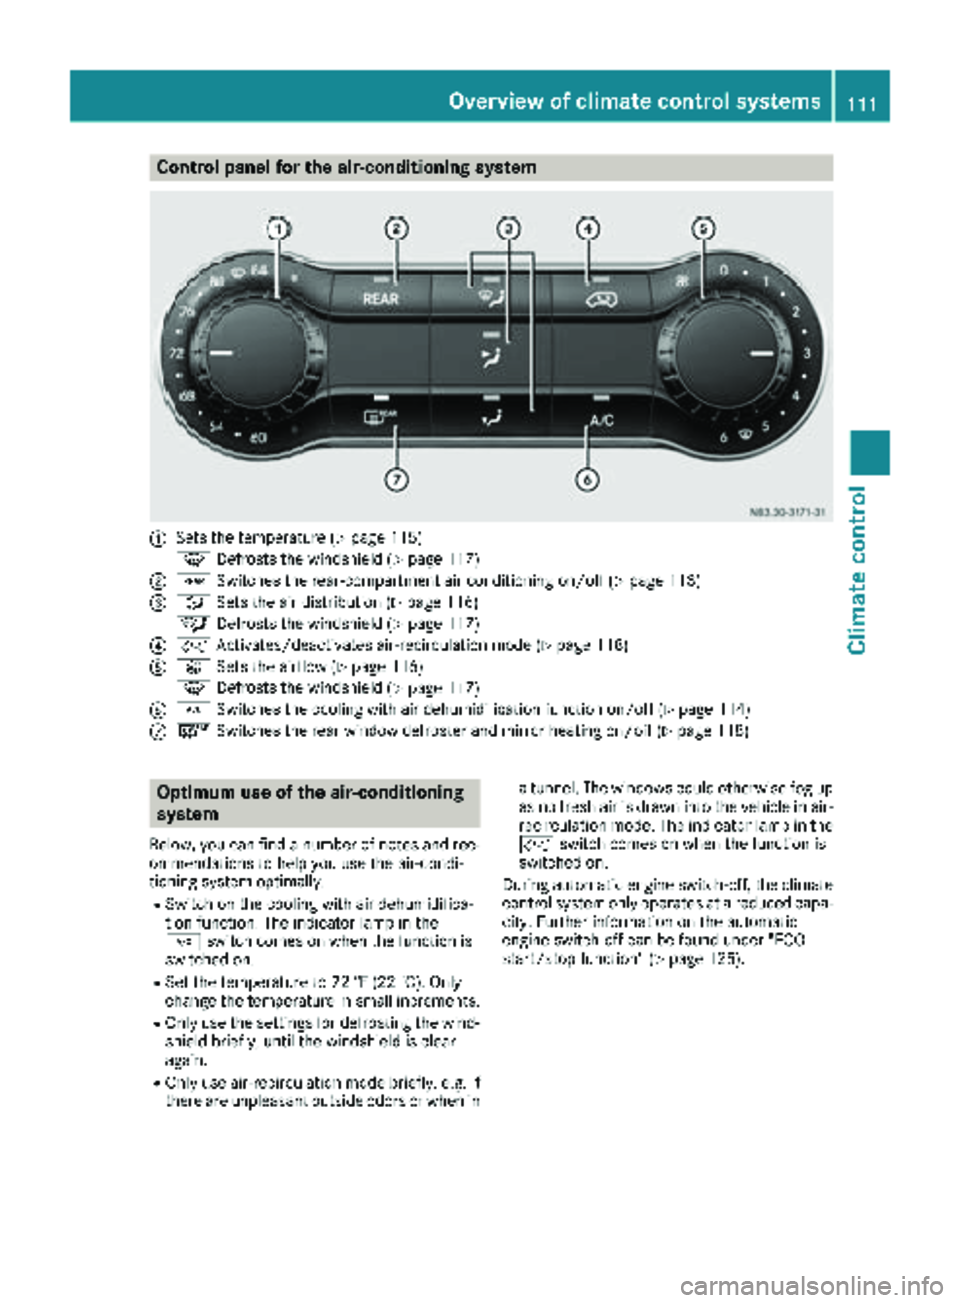
Control panel for the air-conditioning system
:Sets the temperature (Ypage 115)
z Defrosts the windshield (
Ypage 117)
;/Switches the rear-compartment air conditioning on/off (Ypage 113)
=_Sets the air distribution (Ypage 116)
¯ Defrosts the windshield (
Ypage 117)
?hActivates/deactivates air-recirculation mode (Ypage 118)
AKSets the airflow (Ypage 116)
z Defrosts the windshield (
Ypage 117)
B¿Switches the cooling with air dehumidification function on/off (Ypage 114)
C¤Switches the rear window defroster and mirror heating on/off (Ypage 118)
Optimum use of the air-conditioning
system
Below, you can find a number of notes and rec-
ommendations to help you use the air-condi-
tioning system optimally.
RSwitch on the cooling with air dehumidifica-
tion function. The indicator lamp in the
¿ switch comes on when the function is
switched on.
RSet the temperature to 72 ‡ (22 †).Only
ch ange the temperature in small increments.
ROnly use the settings for defrosting the wind-
shield briefly, until the windshield is clear
again.
ROnly use air-recirculation mode briefly, e.g. if
there are unpleasant outside odors or when in a tunnel. The windows could otherwise fog up
as no fresh air is drawn into the vehicle in air-
recirculation mode. The indicator lamp in the
h
switch comes on when the function is
switched on.
During automatic engine switch-off, the climate
control system only operates at a reduced capa-
city. Further information on the automatic
engine switch-off can be found under "ECO
start/stop function" (
Ypage 125).
Overview of climate control systems111
Climate control
Page 114 of 318
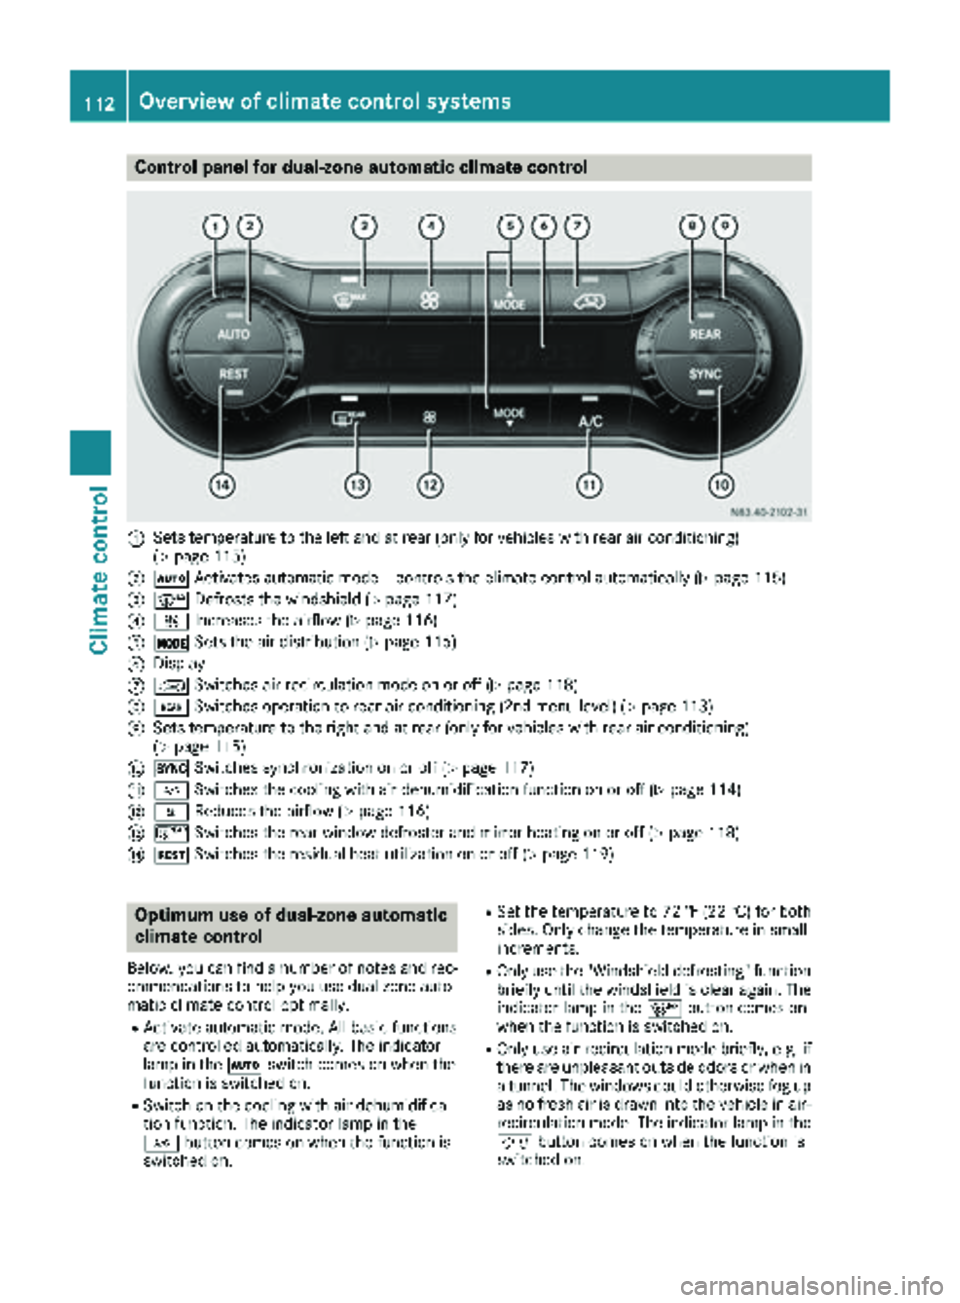
Control panel for dual-zone automatic climate control
:Sets temperature to the left and at rear (only for vehicles with rear air conditioning)
(Ypage 115)
;ÃActivates automatic mode – controls the climate control automatically (Ypage 115)
=¬Defrosts the windshield (Ypage 117)
?KIncreases the airflow (Ypage 116)
AÄSets the air distribution (Ypage 116)
BDisplay
ChSwitches air-recirculation mode on or off (Ypage 118)
D/Switches operation to rear air conditioning (2nd menu level) (Ypage 113)
ESets temperature to the right and at rear (only for vehicles with rear air conditioning)
(Ypage 115)
F0Switches synchronization on or off (Ypage 117)
G¿Switches the cooling with air dehumidification function on or off (Ypage 114)
HIReduces the airflow (Ypage 116)
I¤Switches the rear window defroster and mirror heating on or off (Ypage 118)
JÌSwitches the residual heat utilization on or off (Ypage 119)
Optimum use of dual-zone automatic
climate control
Below, you can find a number of notes and rec-
ommendations to help you use dual-zone auto-
matic climate control optimally.
RActivate automatic mode. All basic functions
are controlled automatically. The indicator
lamp in the Ãswitch comes on when the
function is switched on.
RSwitch on the cooling with air dehumidifica-
tion function. The indicator lamp in the
¿ button comes on when the function is
switched on.
RSet the temperature to 72 ‡ (22 †) for both
sides. Only change the temperature in small
increments.
ROnly use the "Windshield defrosting" function
briefly until the windshield is clear again. The
indicator lamp in the ¬button comes on
when the function is switched on.
ROnly use air-recirculation mode briefly, e.g. if
there are unpleasant outside odors or when in
a tunnel. The windows could otherwise fog up
as no fresh air is drawn into the vehicle in air-
recirculation mode. The indicator lamp in the
h button comes on when the function is
switched on.
112Overview of climate control systems
Climate control