jump cable MERCEDES-BENZ METRIS 2019 MY19 Operator’s Manual
[x] Cancel search | Manufacturer: MERCEDES-BENZ, Model Year: 2019, Model line: METRIS, Model: MERCEDES-BENZ METRIS 2019Pages: 318, PDF Size: 5.07 MB
Page 264 of 318
RIt is important that you observe the descri-
bed order of the battery terminals when
connecting and disconnecting a battery.
RWhen jump-starting, make sure that the
battery poles with identical polarity are
connected.
RIt is particularly important to observe the
described order when connecting and dis-
connecting the jumper cables.
RNever connect or disconnect the battery
terminals while the engine is running.
GWARNING
Battery acid is caustic. There is a risk of injury.
Avoid contact with skin, eyes or clothing. Do
not inhale any battery gases. Do not lean over
the battery. Keep children away from batter-
ies. Wash away battery acid immediately with
plenty of clean water and seek medical atten-
tion.
!You should have all work involving the bat-
tery carried out at a qualified specialist work-
shop.
If, in exceptional circumstances, you need to
disconnect the battery yourself, please make
sure that:
RSecure the vehicle to prevent it from rolling
away.
RYou have switched off the engine and
removed the key. Make sure the ignition is
switched off. Check to see that there are no
indicator lamps lighting in the instrument
cluster. Electronic components such as the
alternator may otherwise be damaged.
RAfter the battery has been disconnected,
the parking brake is automatically
engaged. You can then no longer move the
vehicle.
RFor vehicles with automatic transmission,
the transmission is locked in position P
after disconnecting the battery. You can
then no longer move the vehicle.
RYou have first removed the negative termi- nal and then the positive terminal. Never
mix up the terminal clamp disconnection/
connection order and never mix up the ter-
minal clamps. The vehicle's electronics
may otherwise be damaged. The battery and the cover of the positive ter-
minal clamp must be installed securely during
operation.
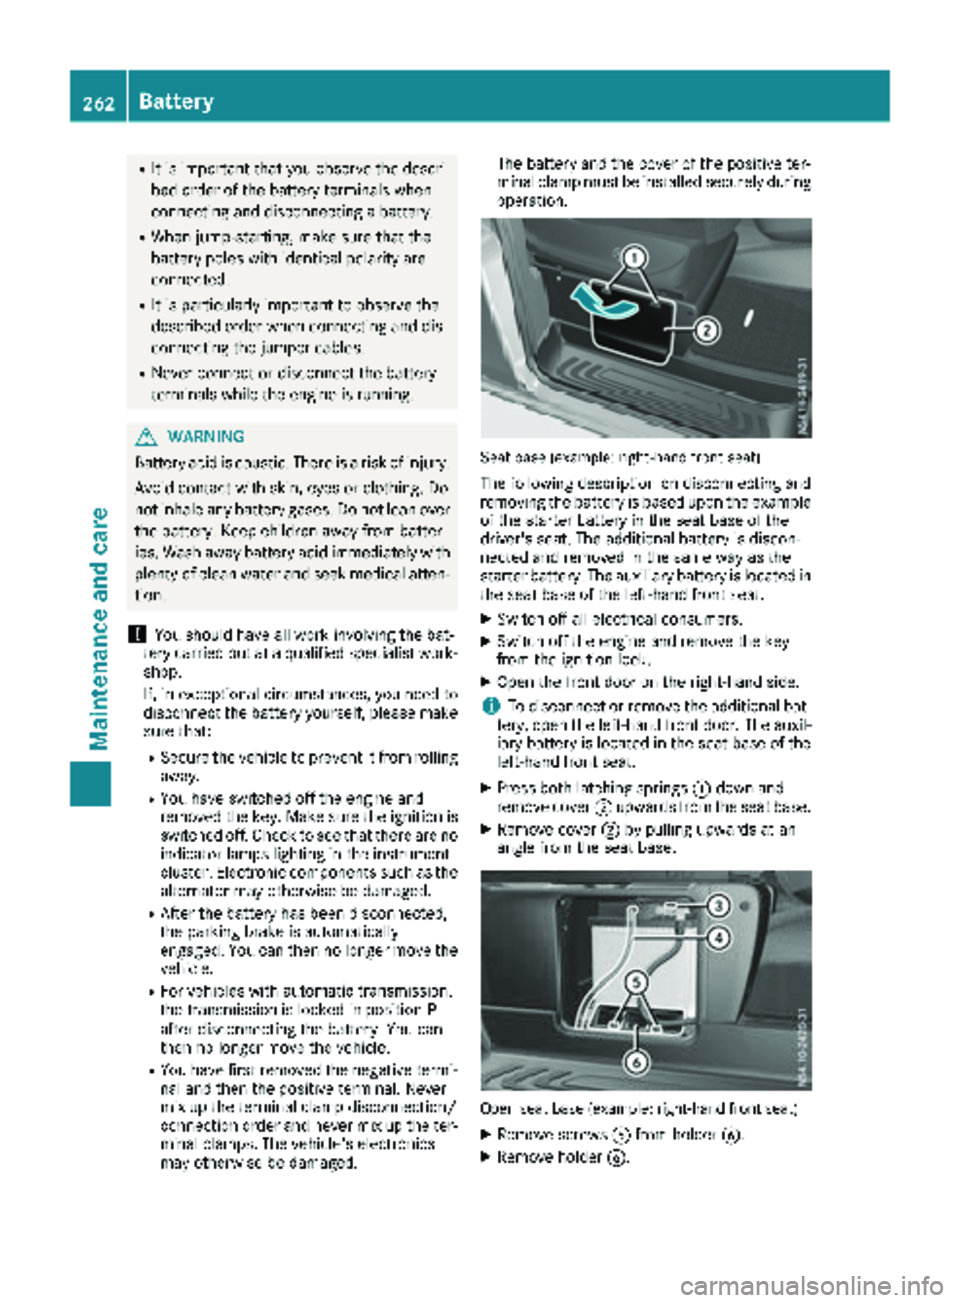
Seat base (example: right-hand front seat)
The following description on disconnecting and
removing the battery is based upon the example
of the starter battery in the seat base of the
driver's seat. The additional battery is discon-
nected and removed in the same way as the
starter battery. The auxiliary battery is located in the seat base of the left-hand front seat.
XSwitch off all electrical consumers.
XSwitch off the engine and remove the key
from the ignition lock.
XOpen the front door on the right-hand side.
iTo disconnect or remove the additional bat-
tery, open the left-hand front door. The auxil-
iary battery is located in the seat base of the
left-hand front seat.
XPress both latching springs :down and
remove cover ;upwards from the seat base.
XRemove cover ;by pulling upwards at an
angle from the seat base.
Open seat base (example: right-hand front seat)
XRemove screws Afrom holder B.
XRemove holder B.
262Battery
Maintenance and care
Page 265 of 318
XRemove breather hose? from th eto pof th e
battery.
XPull th ebattery out of th eseat base until th e
negative clam pcan be release dand removed.
XDisconnect th enegative clam pfrom negative
termina l=.
XRemove th enegative clam pin suc h away that
th ebattery cable termina lno longer touches
negative termina l=.
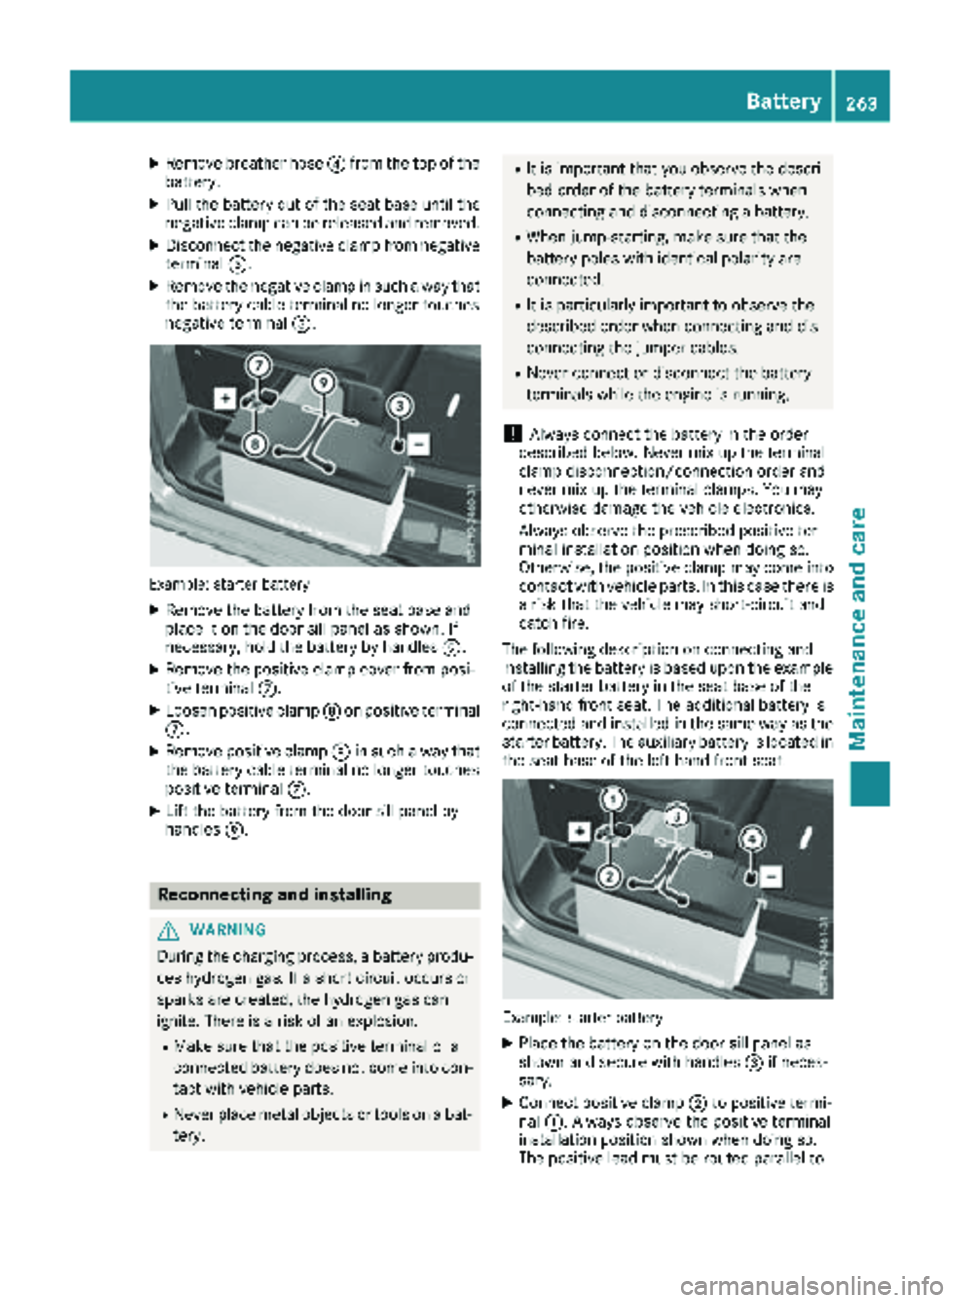
Example: starter battery
XRemove th ebattery from th eseat base and
plac eit on th edoor sill panel as shown. If
necessary, hold th ebattery by handles E.
XRemove thepositive clam pcover from posi-
tive termina lC.
XLoosen positive clam pD on positive termina l
C.
XRemove positive clam pD in suc h away that
th ebattery cable termina lno longer touches
positive termina lC.
XLif tth ebattery from th edoor sill panel by
handles E.
Reconnecting and installing
GWARNIN G
During th echarging process, abattery produ-
ce shydrogen gas. If ashort circuit occur sor
sparks are created, th ehydrogen gas can
ignite. There is aris kof an explosion .
RMakesur ethat th epositive termina lof a
connecte dbattery does no tcome int ocon-
tac twit hvehicl eparts.
RNever plac emetal objects or tools on abat -
tery.
RIt is important that you observ eth edescri-
bed order of th ebattery terminals when
connecting and disconnecting abattery.
RWhen jump-starting ,mak esur ethat th e
battery pole swit hidentical polarit yare
connected.
RIt is particularly important to observ eth e
describe dorder when connecting and dis-
connecting th ejumper cables.
RNever connec tor disconnect th ebattery
terminals while th eengin eis running.
!Always connec tth ebattery in th eorder
describe dbelow. Never mix up th etermina l
clam pdisconnection/connection order and
never mix up th etermina lclamps. You may
otherwise damag eth evehicl eelectronics .
Always observ eth eprescribe dpositive ter-
minal installation position when doin gso.
Otherwise, th epositive clam pmay come int o
contact wit hvehicl eparts. In this cas ethere is
a ris kthat th evehicl emay short-circuit and
catch fire.
The followin gdescription on connecting and
installin gth ebattery is base dupon th eexampl e
of th estarter battery in th eseat base of th e
right-hand fron tseat .The additional battery is
connecte dand installed in th esam eway as th e
starter battery. The auxil
iary battery is locate
din
th eseat base of th eleft-han dfron tseat .
Example: starter battery
XPlaceth ebattery on th edoor sill panel as
shown and secure wit hhandles =if neces-
sary.
XConnect positive clam p; to positive termi-
nal :. Always observ eth epositive termina l
installation position shown when doin gso.
The positive lead mus tbe routed parallel to
Battery263
Maintenance and care
Z
Page 267 of 318
installed in the vehicle. The vehicle's elec-
tronics system may otherwise be damaged.
!Only charge the battery using the jump-
starting connection point.
A battery charger unit specially adapted for
Mercedes-Benz vehicles and tested and
approved by Mercedes-Benz is available as an
accessory. Only this device permits the charging
of the battery in its installed position. Contact an
authorized Mercedes-Benz Commercial Van
Center for information and availability. Read the
operating instructions for your charger before
charging the battery.
Recharge the battery more frequently if you use the vehicle mainly for short trips and/or drive at
low outside temperatures.
Only charge the installed battery with a battery
charger that has been tested and approved by
Mercedes-Benz, using the jump-start connec-
tion point in the engine compartment.
XConnect the battery charger to the positive
terminal and ground terminal in the same
order as when connecting the donor battery in
the jump-starting procedure (
Ypage 274).
iIf a battery is not installed and not in service,
you should charge it every three months. This
will counter self-discharging and prevent bat-
tery damage.
Care
!
Dirty battery clamps and battery surfaces
cause leak currents which lead to the batter-
ies discharging.
!Do not use cleaning agents containing fuel.
Cleaning agents containing fuel corrode the
battery housing.
!If dirt gets into the battery cell, battery self-
discharge will increase and the battery may
be damaged.
The following points on battery care must be
observed:
XRegularly check the battery terminals and the
fastening of the negative cable to the chassis
to ensure that they are firmly seated.
XAlways keep the battery terminals and battery
surfaces clean and dry.
XLightly grease the undersides of the battery
terminals with acid-resistant grease.
XOnly clean the battery casing with a commer-
cially available cleaning product.
Care
Notes on care
GWARNING
If you use openings in the bodywork or
detachable parts as steps, you could:
Rslip and/or fall
Rdamage the vehicle and cause yourself to
fall.
There is a risk of injury.
Always use secure climbing aids, e.g. a suita-
ble ladder.
!Do not use the lower sliding door guide (car-
riage) as a step. Otherwise, you could damage
the paneling and/or the sliding door mecha-
nism.
!For cleaning your vehicle, do not use any of
the following:
Rdry, rough or hard cloths
Rabrasive cleaning agents
Rsolvents
Rcleaning agents containing solvents
Do not scrub.
Do not touch the surfaces or protective films
with hard objects, e.g. a ring or ice scraper.
You could otherwise scratch or damage the
surfaces and protective film.
!Do not park your vehicle for a long period of
time directly after cleaning, particularly after
cleaning the wheel rim with wheel cleaner.
Wheel cleaner can lead to the increased cor-
rosion of the brake discs and pads. Therefore,
drive for a few minutes after cleaning. By
heating up the brakes, the brake discs and
pads dry. The vehicle can then be parked for a
long period of time.
HEnvironmental note
Only clean your vehicle at specially designed
wash bays. Dispose of empty containers and
Care265
Maintenance and care
Z
Page 277 of 318
!Vehicles with a gasoline engine:avoid
repeated and lengthy starting attempts. Oth-
erwise, the catalytic converter could be dam-
aged by non-combusted fuel.
If the indicator and warning lamps in the instru-
ment cluster do not light up at low tempera-
tures, the discharged battery may have frozen.
In this case you may neither charge the battery
nor jump-start the vehicle. The service life of a
thawed battery may be shorter. Start-up behav-
ior may deteriorate, in particular at low temper-
atures. Have the thawed battery checked at a
qualified specialist workshop.
Do not use a rapid charging device to start the
vehicle. If your vehicle's battery is discharged,
the engine can be jump-started from another
vehicle or from a donor battery using jumper
cables. For this purpose, the vehicle has a jump-
starting connection point in the engine com-
partment.
When jump-starting, observe the following
points:
RThe battery is not accessible in all vehicles. If
the other vehicle's battery is not accessible,
jump-start the vehicle using a donor battery
or a jump-starting device.
RYou may only jump-start the vehicle when the
engine and exhaust system are cold.
Rdo not start the engine if the battery is frozen.
Let the battery thaw first.
Rjump-starting may only be performed from
batteries with a nominal voltage of 12 V.
Ronly use jumper cables that have a sufficient
cross-section and insulated terminal clamps.
Rif the battery is fully discharged, attach the
battery of another vehicle for a few minutes
before attempting to start. This charges the
empty battery a little.
Rmake sure that the two vehicles do not touch.
Make sure that:
Rthe jumper cables are not damaged.
Rbare parts of the terminal clamps do not come into contact with other metal parts while the
jumper cables are connected to the battery.
Rthe jumper cables cannot come into contact
with parts such as the V-belt pulley or the fan.
These parts move when the engine is started
and while it is running.
Jumper cables and further information regarding
jump starting can be obtained at any qualified
specialist workshop.
Before connecting the jumper cables
XApply the parking brake.
XShift the transmission to position P.
XSwitch off all electrical consumers, e.g. audio
equipment, blower.
XTurn the key to position 0in the ignition lock
and remove it.
XOpen the hood (Ypage 253).
Connecting the jumper cable
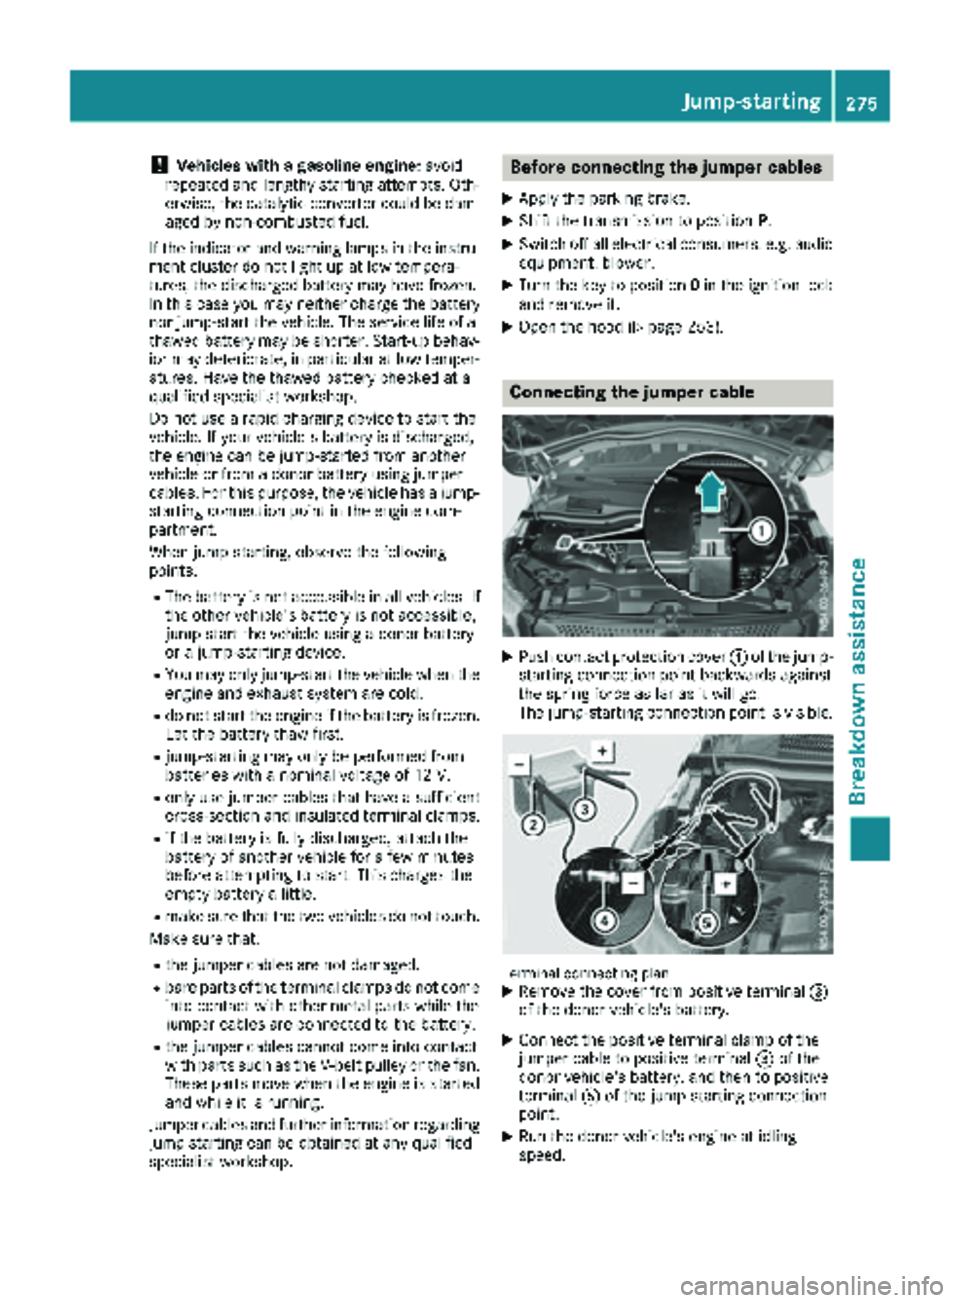
XPush contact protection cover :of the jump-
starting connection point backwards against
the spring force as far as it will go.
The jump-starting connection point is visible.
Terminal connecting planXRemove the cover from positive terminal =
of the donor vehicle's battery.
XConnect the positive terminal clamp of the
jumper cable to positive terminal =of the
donor vehicle's battery, and then to positive
terminal Aof the jump-starting connection
point.
XRun the donor vehicle's engine at idling
speed.
Jump-starting275
Breakdown assistance
Z
Page 278 of 318
XConnect the negative terminal clamp of the
jumper cable to negative terminal;of the
donor veh icle's battery, and then to earth
contact ?of your own veh icle.
XInsert the key into the ignition lock and start
the engine.
You can now switch electrical consumers
back on except the lighting system.
XBefore disconnecting the jumper cables, let
the engine run for several minutes.
XDisconnect the negative terminal of the
jumper cable from earth contact ?and then
from negative terminal ;of the donor veh i-
cle's battery.
XDisconnect the positive terminal clamp of the
jumper cable from positive terminal Aon the
jump-starting connection point, and then
from positive terminal =of the donor veh i-
cle's battery.
Contact protection cover :isautomatically
returned forwards to its original position by
the spring force and the jump-starting con-
nection pointis closed.
XPosition the cover on positive terminal =of
the donor veh icle's battery.
You can now switch on the lighting system.
XHave the battery checked at a qualified spe-
cialist workshop.
Tow-starting and towing away
Important safety notes
GWAR NING
Functions relevant to safety are restricted or
no longer availab leif:
Rthe engine isnot running.
Rthe brake system or the power steering is
malfunctioning.
Rthere isa malfunction inthe voltage supply
or the veh icle's electrical system.
If your veh icle is bein g towed, much more
force may benecessary to steer or brake.
There isa risk of an acc ident.
In such cases, use a tow bar. Before to wing,
make sure that the steering moves freely.
GWARNING
You can no longer steer the vehicle ifthe
steering wheel lock has been engaged. There
is a risk of an accident.
Alwa ysswit ch off the ignition when to wingthe
vehicle with a tow cable or a tow bar.
GWARNING
When to wingor tow-starting another vehicle
and its weight isgreater than the permissible
gross weight of your vehicle, the:
Rthe to wingeye could detach itself
Rthe vehicle /trailer combination could roll-
over.
There is a risk of an accident.
When towing or tow-starting another vehicle,
its weight should not be greater than the per- missible gross weight of your vehicle.
In formation on the gross vehicle weight can be
found on the vehicle identification plate
(
Ypage 305).
!Secure the tow rope or tow bar to the to wing
eye or trailer tow hitch only. Otherwise, the
vehicle could become damaged.
!Do not use the to wingeye for recovery, this
could damage the vehicle. If indoubt, recover
the vehicle with a crane.
!Drive slowly and smoothly when to wing.
Excessive tractive power could otherwise
damage the vehicles.
!Shift the automatic transmission to Nand
do not open the driver's or front passenger's
door during to wing. The automatic transmis-
sion may otherwise shift to position P,whic h
could damage the transmission.
!The vehicle can be towed a maximum of
30 miles (50km ).The to wingspeed of 30 mph
(50 km/h) must not be exceeded.
If the vehicle has to betowed more than
30 mile
s(50k
m) ,the entire vehicl emust be
raised and transported.
When towing away, you must observe the legal
requirements for the country in which you are
currently driving.
It is better to have the vehicle transported than
to have it towed.
276Tow-starting and towing away
Breakdown assistance
Page 280 of 318
Towing the vehicle with both axles on
the ground
Important safety notes
GWARNING
You can no longer steer the vehicle if the
steering wheel lock has been engaged. There
is a risk of an accident.
Always switch off the ignition when towing the
vehicle with a tow cable or a tow bar.
!Do not exceed the towing speed of 30 mph
(50 km/h). You could otherwise damage the
transmission.
Please observe the important safety notes
before towing your vehicle (
Ypage 276).
Towing vehicles with automatic trans-
mission
XTurn the key to position 2in the ignition lock.
XDepress the brake pedal and keep it
depressed.
XShift the automatic transmission to position
N.
XLeave the key in position 2in the ignition lock.
XSwitch on the hazard warning lamps
(Ypage 98).
XRelease the parking brake.
XRelease the brake pedal.
XDo not exceed the towing speed of 30 mph
(50 km/h).
Recovering a vehicle that is stuck
!
When recovering a vehicle that has become
stuck, pull it as smoothly and evenly as pos-
sible. Excessive tractive power could damage
the vehicles.
If the drive wheels get trapped on loose or
muddy ground, recover the vehicle with the
utmost care. This is especially the case if the
vehicle is laden.
Never attempt to recover a vehicle with a trailer
attached.
Pull out the vehicle backwards, if possible, using
the tracks it made when it became stuck.
Transporting the vehicle
!
You may only secure the vehicle by the
wheels, not by parts of the vehicle such as
axle or steering components. Otherwise, the
vehicle could be damaged.
The towing eye or trailer tow hitch can be used
to pull the vehicle onto a trailer or transporter if
you wish to transport it.
XTurn the key to position 2in the ignition lock.
XShift the transmission to position N.
XRelease the parking brake.
If the vehicle is loaded:
XShift the transmission to position P.
XTurn the key to position 0in the ignition lock
and remove it.
XMake sure the parking brake is applied.
XLash down the vehicle.
Tow-starting (emergency engine
starting)
General notes
!Vehicles with automatic transmission must
not be tow-started. You could otherwise dam-
age the automatic transmission.
You can find information on jump-starting under
"Jump-starting“ (
Ypage 274).
Electrical fuses
The fuse allocation chart and important safety
information on the fuses can be found in the
"Fuse allocation chart" supplement.
278Electrical fuses
Breakdown assistance