battery MERCEDES-BENZ ML SUV 2008 Owners Manual
[x] Cancel search | Manufacturer: MERCEDES-BENZ, Model Year: 2008, Model line: ML SUV, Model: MERCEDES-BENZ ML SUV 2008Pages: 381, PDF Size: 7.18 MB
Page 7 of 381
4Shift ranges . . . . . . . . . . . . . . . . .
.108
Trailer towing . . . . . . . . . . . . . . . . .109
Auxiliary heating . . . . . . . . . . ..184, 306
Display message . . . . . . . . . . . . . .283
Remote control . . . . . . . . . . . . . . .185
Setting (on-board computer) . . . . .128
Auxiliary ventilation . . . . . . . . . . . ..184
Axle load, maximum permissible
. . . . . . . . . . . . . . . . . . . . . . . . . .363, 364 B
Ball coupling Folding in . . . . . . . . . . . . . . . . . . . .244
Folding out . . . . . . . . . . . . . . . . . . .241
BAS (Brake Assist) . . . . . . . . . . . . . . ..58
Basic display (on-board computer) .120
Battery Changing (auxiliary heating
remote control) . . . . . . . . . . . . . . .312
Changing (key ).. . . . . . . . . . . . . . .311
Changing (KEYLESS GO key) . . . . .311
Charging . . . . . . . . . . . . . . . . . . . . .337
Checking (key ).. . . . . . . . . . . . . . .311
Checking (KEYLESS GO key) . . . . .311
Check lamp (key ).. . . . . . . . . . . . .311
Check lamp (KEYLESS GO key) . . . . . . . . . . . . . . . . . . . . . . . . .69, 311
Disconnecting . . . . . . . . . . . . . . . .335
Display message . . . . . . . . . . . . . .269
Maintenance (vehicle ).. . . . . . . ..334 Reconnecting . . . . . . . . . . . . . . . .
.338
Removing/fitting . . . . . . . . . . . . . .337
Vehicle battery . . . . . . . . . . . . . . . .334
Voltage (on-board computer) . . . . .121
Belt force limiters
Activatio n.. . . . . . . . . . . . . . . . . . . .41
Belt height adjustment . . . . . . . . . . ..91
Belt reel (Easy-Pack fix kit) . . . . . . ..200
Belt tensioners Activatio n.. . . . . . . . . . . . . . . . . . . .41
Belt warning . . . . . . . . . . . . . . . . . . . . .90
Bonnet Bonnet catch . . . . . . . . . . . . . . . . .220
Display message . . . . . . . . . . . . . .268
Opening/closing . . . . . . . . . . . . . .219
Bonnet release lever
Release lever . . . . . . . . . . . . . . . . .220
Brake
Parking brake . . . . . . . . . . . . . . . . .105
Warning lamp . . . . . . . . . . . . .289, 290
Brake Assist
see BAS
Brake fluid . . . . . . . . . . . . . . . . . . . . .372
Display message . . . . . . . . . . . . . .270
Brake lamps
Adaptive . . . . . . . . . . . . . . . . . . . . . .58
Display message . . . . . . . . . . . . . .277
Brake system
Display message . . . . . . . . . . . . . .270 Bulb
Brake lamp . . . . . . . . . . . . . . . . . . .319
Changing . . . . . . . . . . . . . . . .315, 318
Dipped-beam headlamps . . . . . . . .315
Licence plate lamp . . . . . . . . . . . . .321
Main-beam headlamps . . . . . . . . . .315
Parking lamp . . . . . . . . . . . . .316, 319
Rear foglamp . . . . . . . . . . . . .319, 320
Reversing lamp . . . . . . . . . . .319, 320
Side lamp . . . . . . . . . . . . . . . . . . . .316
Tail lamp . . . . . . . . . . . . . . . . . . . . .319
Turn signal lamp . . . . . . . . . .318, 319
see Lamp
Bulbs
Overview . . . . . . . . . . . . . . . . . . . .313 C
Calling up a malfunction see Message memory menu
Care . . . . . . . . . . . . . . . . . . . . . . . . . . .247
Automatic car wash . . . . . . . . . . . .248
Distronic . . . . . . . . . . . . . . . . . . . .251
Exhaust tail pipes . . . . . . . . . . . . . .251
Headlamps . . . . . . . . . . . . . . . . . . .249
High-pressure cleaners . . . . . . . . .248
Parktroni c.. . . . . . . . . . . . . . . . . .251
Plastic trim . . . . . . . . . . . . . . . . . . .250
Rear window . . . . . . . . . . . . . . . . .249
Reversing camera . . . . . . . . . . . . .252 Index
164_AKB; 5; 5, en-GB
wobuchh,
Version: 2.10.6 2008-05-11T11:55:12+02:00 - Seite 4Dateiname: 6515_4293_02_buchblock.pdf; preflight
Page 12 of 381
9K
Key . . . . . . . . . . . . . . . . . . . . . . . . . . . .66
Changing the battery . . . . . . . . . . .311
Checking the battery . . . . . . . . . . .311
Convenience closing . . . . . . . . . . .102
Display message . . . . . . . . . . . . . . . . . . . . . . .281, 282
Factory setting . . . . . . . . . . . . . .66, 67
Loss . . . . . . . . . . . . . . . . . . . . . . . .303
Malfunction . . . . . . . . . . . . . . . . . .303
Modifying the programming . . . . . . .66
KEYLESS GO . . . . . . . . . . . . . . . . . . . . .67
Button . . . . . . . . . . . . . . . . . . . . . . .75
Changing the battery . . . . . . . . . . .311
Checking the battery . . . . . . . . . . .311
Closing the boot lid automatically . .72
Convenience closin g.. . . . . . . . ..102
Factory settings . . . . . . . . . . . . . . . .68
Losing the key . . . . . . . . . . . . . . . .306
Malfunction . . . . . . . . . . . . . . . . . .305
Modifying the programming . . . . . . .68
Starting the engine . . . . . . . . . . . .103
Key positions
Key . . . . . . . . . . . . . . . . . . . . . . . . . .75
KEYLESS GO . . . . . . . . . . . . . . . . . .75
Kickdown . . . . . . . . . . . . . . . . . .109, 111 L
Lamp Display message . . . . . . . . . . . . . .275
Lamps
see Indicator and warning lamp
Lashing eyelets . . . . . . . . . . . . . . . . .193
Level control . . . . . . . . . . . . . . . . . . .158
Licence plate lighting Display message . . . . . . . . . . . . . .278
Lighting
see Lights
Lights
Automatic headlamp mode . . . . . . .93
Constant headlamp mod e.. . . . . ..93
Cornering light function . . . . . . . . . .96
Dipped-beam headlamps . . . . . . . . .93
Display message . . . . . . . . . . . . . .275
Foglamps . . . . . . . . . . . . . . . . . . . . .94
Hazard warning lamps . . . . . . . . . . .95
Headlamp flasher . . . . . . . . . . . . . . .95
Headlamp range . . . . . . . . . . . . . . . .95
Light switch . . . . . . . . . . . . . . . . . . .92
Main-beam headlamps . . . . . . . . . . .95
Rear fog lamp . . . . . . . . . . . . . . . . . .94
Switching off (display message) . . .278
Turn signals . . . . . . . . . . . . . . . . . . .94LIM indicator lamp
Cruise control . . . . . . . . . . . . . . . .145
Distronic . . . . . . . . . . . . . . . . . . . .149
Variable Speedtronic . . . . . . . . . . .154
Loading guidelines . . . . . . . . . . . . ..192
Locking Automatic . . . . . . . . . . . . . . . . . . . . .74
Emergency locking . . . . . . . . . . . . .309
From the inside (central locking
button) . . . . . . . . . . . . . . . . . . . . . . .74
LOW RANGE
Display message. . . . . . . . . . . . . . . . . . . . . . .273, 274
Off-road gear . . . . . . . . . . . . . . . . .141
LOW RANGE off-road gear . . . . . . ..141
Luggage compartment enlarge-
ment . . . . . . . . . . . . . . . . . . . . . . . . . .194
Luggage cover . . . . . . . . . . . . . . . . . .196
Luggage net Front-passenger footwell . . . . . . . .191
Front seats (behind) . . . . . . . . . . . .191
Lumbar support
4-way . . . . . . . . . . . . . . . . . . . . . . . .79 M
Main-beam headlamps Display message . . . . . . . . . . . . . .277
Maintenance
Battery . . . . . . . . . . . . . . . . . . . . . .334 Index
164_AKB; 5; 5, en-GB
wobuchh,
Version: 2.10.6 2008-05-11T11:55:12+02:00 - Seite 9Dateiname: 6515_4293_02_buchblock.pdf; preflight
Page 18 of 381
15U
Unladen weight . . . . . . . . . . . . . . . . .363
Unlocking Emergency unlocking . . . . . . . . . . .308
From the inside (central unlocking
button) . . . . . . . . . . . . . . . . . . . . . . .74
Up (display message) . . . . . . . . . . ..121 V
Variable Speedtronic . . . . . . . . . . . ..154
Vehicle Emergency unlocking . . . . . . .308, 309
Individual settings (on-board com-
puter) . . . . . . . . . . . . . . . . . . . . . . .127
Leaving parked up . . . . . . . . . . . . .307
Towing . . . . . . . . . . . . . . . . . . . . . .342
Transporting . . . . . . . . . . . . . . . . . .342
Vehicle battery . . . . . . . . . . . . . . . . .334
Vehicle dimensions . . . . . . . . . . . . ..361
Vehicle electronics . . . . . . . . . . . . ..349
Vehicle identification number
(VIN) . . . . . . . . . . . . . . . . . . . . . .350, 351
Vehicle identification plates . . . . ..350
Vehicle level Display message. . . . . . . . . . . . . . . . . . . . . . .271, 272
Vehicle tool kit . . . . . . . . . . . . . . . . . .255
Vehicle weights . . . . . . . . . . . . . . . . .363 W
Warning and indicator lamp ABS (yellow) . . . . . . . . . . . . . . . . . .288
LIM (Cruise control) . . . . . . . . . . . .145
LIM (Distronic) . . . . . . . . . . . . . . . .149
LIM (variable Speedtronic) . . . . . . .154
Warning signal
Audible . . . . . . . . . . . . . . . . . . . . . .293
Warning triangle . . . . . . . . . . . . . . . .254
Washer fluid Display message . . . . . . . . . . . . . .284
Wearing seat belts . . . . . . . . . . . . . . ..89
Wheel bolts Tightening torque . . . . . . . . . . . . . .332
Wheel chock
Use . . . . . . . . . . . . . . . . . . . . . . . . .258
Wheels
General notes . . . . . . . . . . . . . . . . .224
Interchanging . . . . . . . . . . . . . . . . .230
Technical data . . . . . . . . . . . .355, 358
Windowbags . . . . . . . . . . . . . . . . . . . . .46
Windows Cleaning . . . . . . . . . . . . . . . . . . . . .249
Cleaning the windscreen . . . . . . . .249
Side windows . . . . . . . . . . . . . . . . . .99
Windscreen
Cleaning . . . . . . . . . . . . . . . . . . . . .249
Infrared reflecting . . . . . . . . . . . . .214 Windscreen washer fluid
. . . . . . . ..372
Topping up . . . . . . . . . . . . . . . . . . .223
Windscreen washer fluid reservoir
. . . . . . . . . . . . . . . . . . . . . . . . . .223, 372
Windscreen washer reservoir Capacity . . . . . . . . . . . . . . . . . . . . .372
Windscreen washer system . . . . . ..372
Windscreen wipers . . . . . . . . . . . . . ..98
Cleaning . . . . . . . . . . . . . . . . . . . . .249
Malfunction . . . . . . . . . . . . . . . . . .301
Replacing the wiper blades . . . . . .321
Winter diesel . . . . . . . . . . . . . . . . . . .218
Winter driving . . . . . . . . . . . . . .231, 232
Winter tyres . . . . . . . . . . . . . . . . . . . .231
Limiting the speed (on-board com-
puter) . . . . . . . . . . . . . . . . . . . . . . .156 Index
164_AKB; 5; 5, en-GB
wobuchh,
Version: 2.10.6 2008-05-11T11:55:12+02:00 - Seite 15Dateiname: 6515_4293_02_buchblock.pdf; preflight
Page 69 of 381
Opening and closing
66 Opening and closing
Key
The vehicle's equipment includes two keys
with remote control. Each key contains an
emergency key element.
The key is configured at the factory to cen-
trally lock and unlock the following:
R the doors
R the tailgate
R the fuel filler flap G
Risk of accident
If children are left unsupervised in the vehi-
cle, they could:
R open a door from the inside at any time,
even if it has been locked
R start the vehicle using a key which has
been left in the vehicle
R release the parking brake
They could endanger themselves and oth-
ers. Never leave children unsupervised in
the vehicle. Always take the key with you
when leaving the vehicle, even if you are
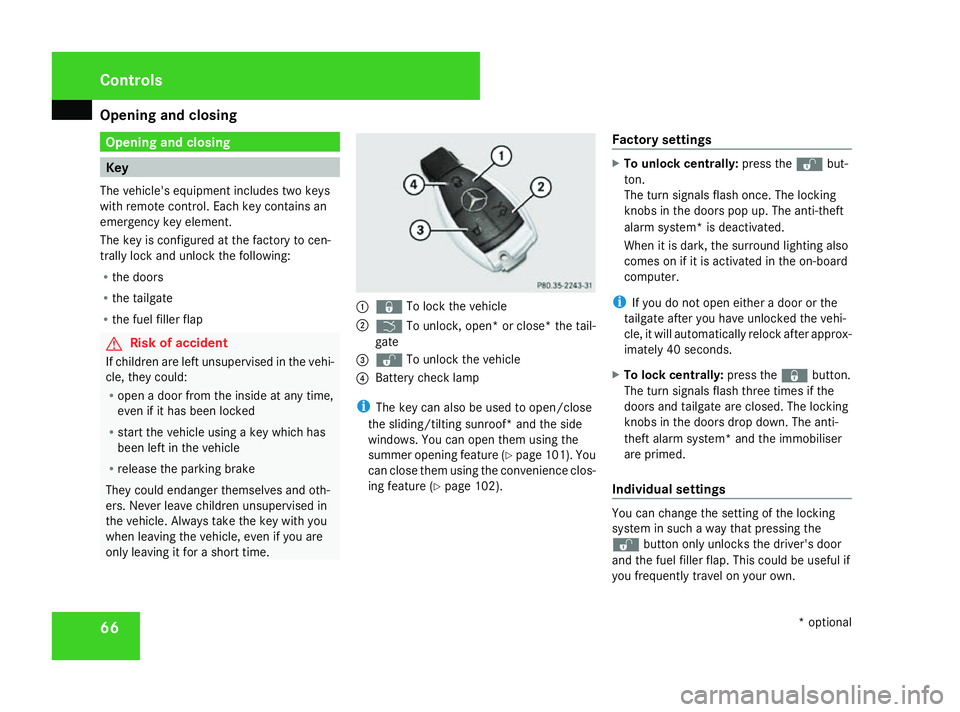
only leaving it for a short time. 1
j To lock the vehicle
2 i To unlock, open* or close* the tail-
gate
3 k To unlock the vehicle
4 Battery check lamp
i The key can also be used to open/close
the sliding/tilting sunroof* and the side
windows. You can open them using the
summer opening feature (Y page 101). You
can close them using the convenience clos-
ing feature (Y page 102). Factory settings X
To unlock centrally: press thekbut-
ton.
The turn signals flash once. The locking
knobs in the doors pop up. The anti-theft
alarm system* is deactivated.
When it is dark, the surround lighting also
comes on if it is activated in the on-board
computer.
i If you do not open either a door or the
tailgate after you have unlocked the vehi-
cle, it will automatically relock after approx-
imately 40 seconds.
X To lock centrally: press thejbutton.
The turn signals flash three times if the
doors and tailgate are closed. The locking
knobs in the doors drop down. The anti-
theft alarm system* and the immobiliser
are primed.
Individual settings You can change the setting of the locking
system in such a way that pressing the
k
button only unlocks the driver's door
and the fuel filler flap. This could be useful if
you frequently travel on your own. Controls
* optional
164_AKB; 5; 5, en-GB
wobuchh,
Version: 2.10.6 2008-05-11T11:55:12+02:00 - Seite 66Dateiname: 6515_4293_02_buchblock.pdf; preflight
Page 70 of 381
Opening and closing
67
X
To change the setting: press thek
and j buttons simultaneously for
approximately six seconds until the battery
check lamp flashes twice.
The key now functions as follows:
X To unlock the driver's door: press the
k button once.
X To unlock centrally: press thekbut-
ton twice.
X To lock centrally: press thejbutton.
Restoring the factory settings X
Press the kandj buttons simulta-
neously for approximately six seconds until
the battery check lamp flashes twice. KEYLESS GO*
The optional equipment supplied with your
vehicle includes two KEYLESS GO keys. You
can start, lock or unlock the vehicle using the
KEYLESS GO key. To do this, you need only
carry the KEYLESS GO key on your person.
When you touch the surface of the sensors on
the vehicle's door handles, KEYLESS GO
establishes a radio connection between the
vehicle and the key. The distance between
the KEYLESS GO key and the vehicle's door
handle from which you wish to lock or unlock
the vehicle, must not be greater than 1 m.
When you pull the door handle, the following
unlock centrally if the factory settings have
not been changed:
R the doors
R the tailgate
R the fuel filler flap
If you pull on the handle of the tailgate, only
the tailgate of your vehicle is unlocked.
When starting the engine and whilst driving,
KEYLESS GO also checks whether a valid
KEYLESS GO key is in the vehicle by periodi-
cally establishing radio contact. G
Risk of accident
If children are left unsupervised in the vehi-
cle, they could open a door from the inside,
even if it has been locked. Or they could
start the vehicle if a valid KEYLESS GO key
is in the vehicle and they press the KEY-
LESS GO button on the ignition lock. They
could endanger themselves and others.
Never leave children unsupervised in the
vehicle. Switch off the engine and take the
KEYLESS GO key with you, even if you are
only leaving the vehicle for a short time. 1
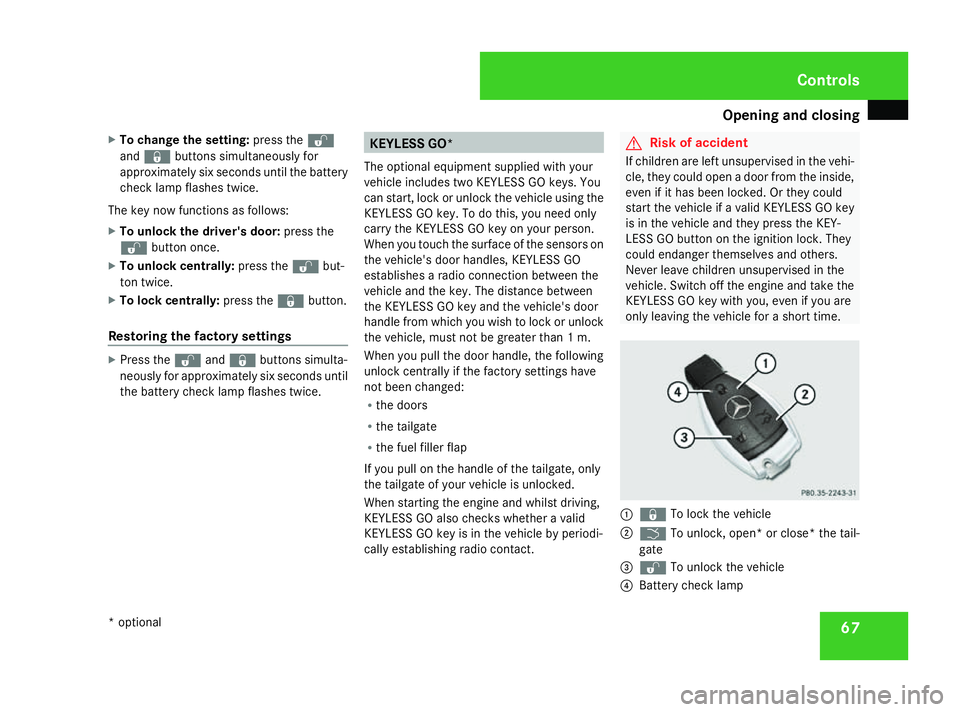
j To lock the vehicle
2 i To unlock, open* or close* the tail-
gate
3 k To unlock the vehicle
4 Battery check lamp Controls
* optional
164_AKB; 5; 5, en-GB
wobuchh,
Version: 2.10.6 2008-05-11T11:55:12+02:00 - Seite 67 ZDateiname: 6515_4293_02_buchblock.pdf; preflight
Page 72 of 381
Opening and closing
69
approximately six seconds until the battery
check lamp flashes twice.
The KEYLESS GO key will now function as fol-
lows:
X To unlock the driver's door: pull the door
handle on the driver's door.
X To unlock centrally: pull the door handle
on the front-passenger door or on the rear
doors.
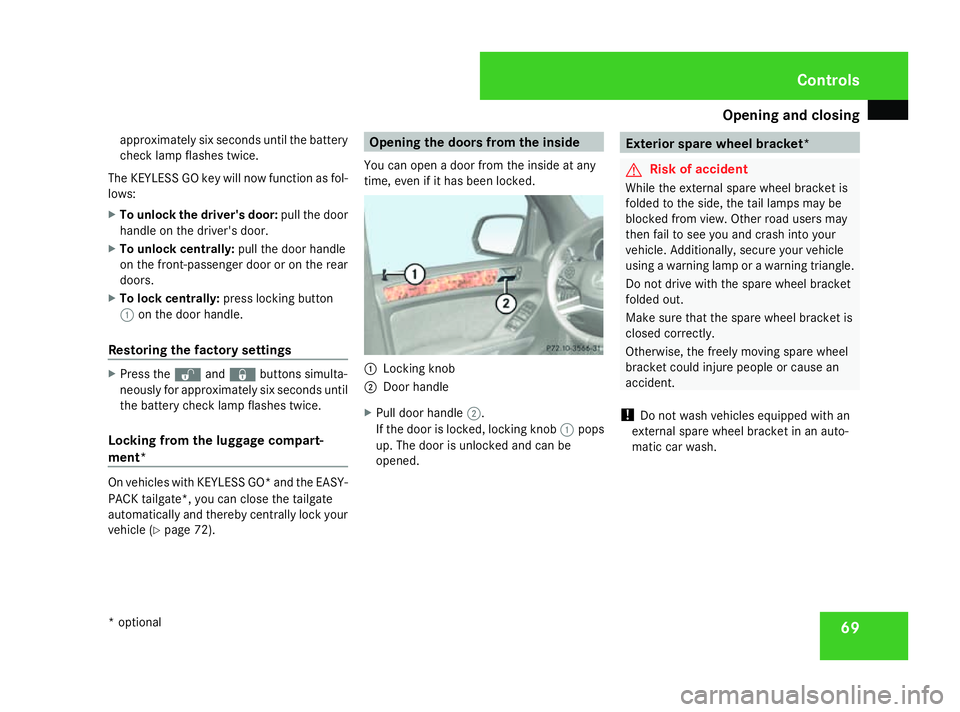
X To lock centrally: press locking button
1 on the door handle.
Restoring the factory settings X
Press the kandj buttons simulta-
neously for approximately six seconds until
the battery check lamp flashes twice.
Locking from the luggage compart-
ment* On vehicles with KEYLESS GO* and the EASY-
PACK tailgate*, you can close the tailgate
automatically and thereby centrally lock your
vehicle (Y
page 72). Opening the doors from the inside
You can open a door from the inside at any
time, even if it has been locked. 1
Locking knob
2 Door handle
X Pull door handle 2.
If the door is locked, locking knob 1pops
up. The door is unlocked and can be
opened. Exterior spare wheel bracket*
G
Risk of accident
While the external spare wheel bracket is
folded to the side, the tail lamps may be
blocked from view. Other road users may
then fail to see you and crash into your
vehicle. Additionally, secure your vehicle
using a warning lamp or a warning triangle.
Do not drive with the spare wheel bracket
folded out.
Make sure that the spare wheel bracket is
closed correctly.
Otherwise, the freely moving spare wheel
bracket could injure people or cause an
accident.
! Do not wash vehicles equipped with an
external spare wheel bracket in an auto-
matic car wash. Controls
* optional
164_AKB; 5; 5, en-GB
wobuchh,
Version: 2.10.6 2008-05-11T11:55:12+02:00 - Seite 69 ZDateiname: 6515_4293_02_buchblock.pdf; preflight
Page 85 of 381
Seats
82
X
Make sure that the key is in position 1or
2 in the ignition lock.
X To switch on: press button1repeatedly
until the required ventilation level is set.
i If you open the side windows and the slid-
ing/tilting sunroof* (Y page 101), the seat
ventilation of the driver's seat automati-
cally switches to the highest level.
X To switch off: press button1repeatedly
until all indicator lamps go out.
i If the battery voltage is too low, the seat
ventilation may switch off. Seat heating*
The three red indicator lamps in the button
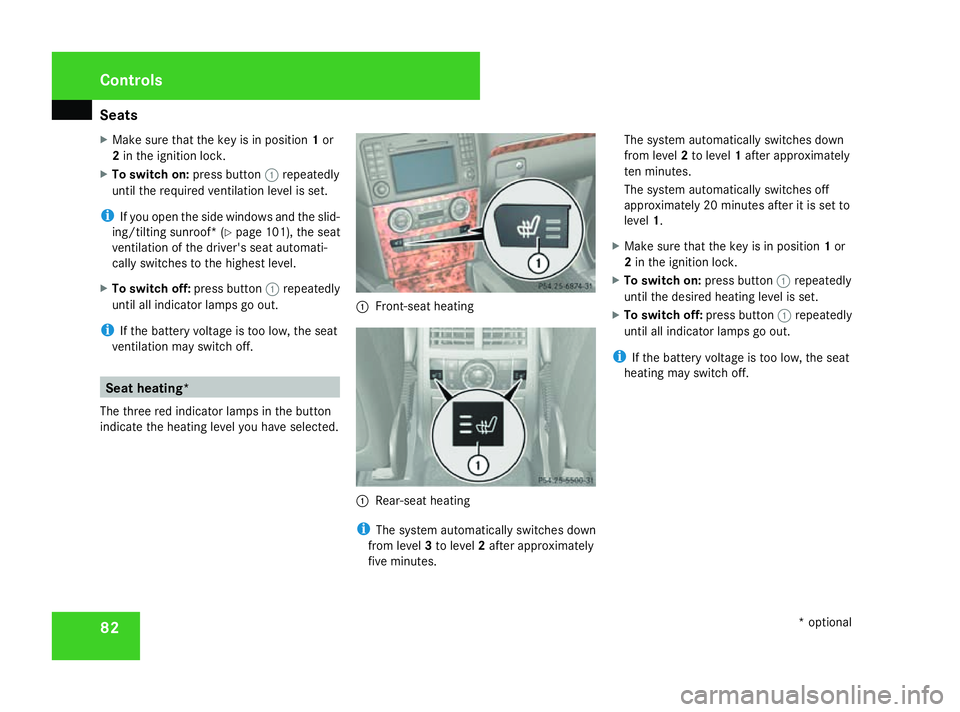
indicate the heating level you have selected. 1
Front-seat heating 1
Rear-seat heating
i The system automatically switches down
from level 3to level 2after approximately
five minutes. The system automatically switches down
from level
2to level 1after approximately
ten minutes.
The system automatically switches off
approximately 20 minutes after it is set to
level 1.
X Make sure that the key is in position 1or
2 in the ignition lock.
X To switch on: press button1repeatedly
until the desired heating level is set.
X To switch off: press button1repeatedly
until all indicator lamps go out.
i If the battery voltage is too low, the seat
heating may switch off. Controls
* optional
164_AKB; 5; 5, en-GB
wobuchh,
Version: 2.10.6 2008-05-11T11:55:12+02:00 - Seite 82Dateiname: 6515_4293_02_buchblock.pdf; preflight
Page 89 of 381
Mirrors
86ror is set to a position which provides you
with a good overview of traffic conditions.
Folding the exterior mirrors in or out
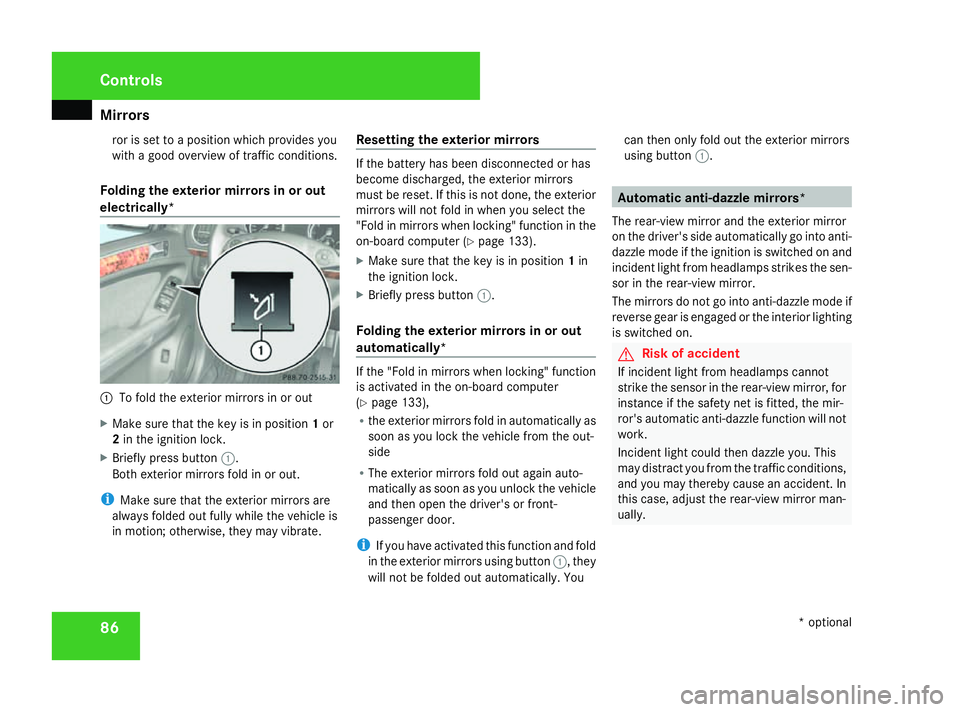
electrically* 1
To fold the exterior mirrors in or out
X Make sure that the key is in position 1or
2 in the ignition lock.
X Briefly press button 1.
Both exterior mirrors fold in or out.
i Make sure that the exterior mirrors are
always folded out fully while the vehicle is
in motion; otherwise, they may vibrate. Resetting the exterior mirrors If the battery has been disconnected or has
become discharged, the exterior mirrors
must be reset. If this is not done, the exterior
mirrors will not fold in when you select the
"Fold in mirrors when locking" function in the
on-board computer (Y
page 133).
X Make sure that the key is in position 1in
the ignition lock.
X Briefly press button 1.
Folding the exterior mirrors in or out
automatically* If the "Fold in mirrors when locking" function
is activated in the on-board computer
(Y
page 133),
R the exterior mirrors fold in automatically as
soon as you lock the vehicle from the out-
side
R The exterior mirrors fold out again auto-
matically as soon as you unlock the vehicle
and then open the driver's or front-
passenger door.
i If you have activated this function and fold
in the exterior mirrors using button 1, they
will not be folded out automatically. You can then only fold out the exterior mirrors
using button
1. Automatic anti-dazzle mirrors*
The rear-view mirror and the exterior mirror
on the driver's side automatically go into anti-
dazzle mode if the ignition is switched on and
incident light from headlamps strikes the sen-
sor in the rear-view mirror.
The mirrors do not go into anti-dazzle mode if
reverse gear is engaged or the interior lighting
is switched on. G
Risk of accident
If incident light from headlamps cannot
strike the sensor in the rear-view mirror, for
instance if the safety net is fitted, the mir-
ror's automatic anti-dazzle function will not
work.
Incident light could then dazzle you. This
may distract you from the traffic conditions,
and you may thereby cause an accident. In
this case, adjust the rear-view mirror man-
ually. Controls
* optional
164_AKB; 5; 5, en-GB
wobuchh,
Version: 2.10.6 2008-05-11T11:55:12+02:00 - Seite 86Dateiname: 6515_4293_02_buchblock.pdf; preflight
Page 96 of 381
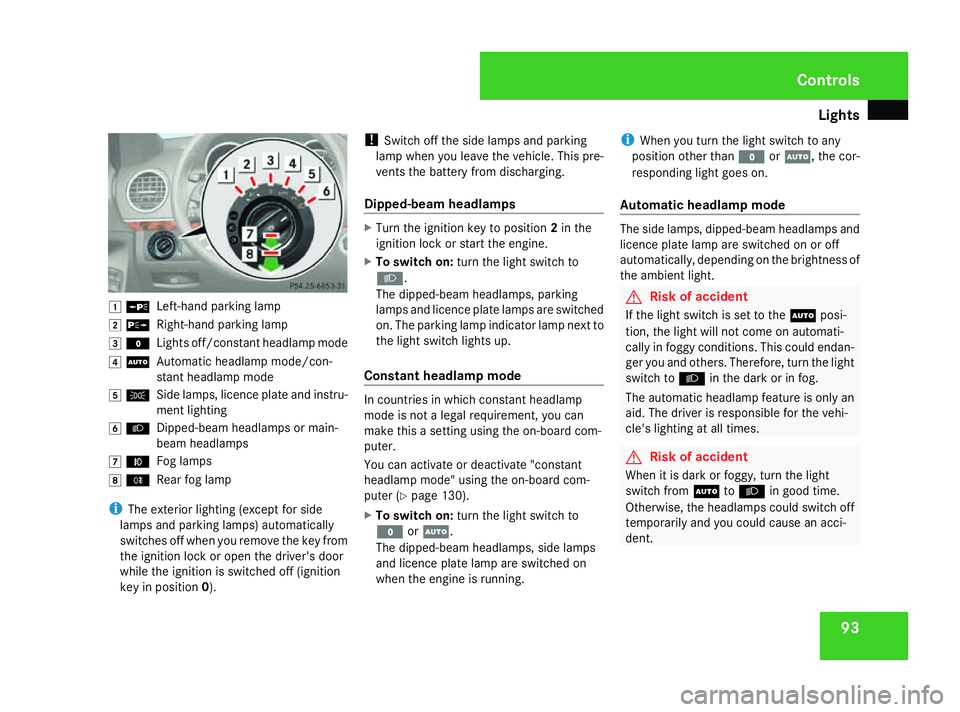
Lights
93$
a
Left-hand parking lamp
% g
Right-hand parking lamp
& M
Lights off/constant headlamp mode
( U
Automatic headlamp mode/con-
stant headlamp mode
) C
Side lamps, licence plate and instru-
ment lighting
* B
Dipped-beam headlamps or main-
beam headlamps
, ¥
Fog lamps
. †
Rear fog lamp
i The exterior lighting (except for side
lamps and parking lamps) automatically
switches off when you remove the key from
the ignition lock or open the driver's door
while the ignition is switched off (ignition
key in position 0). !
Switch off the side lamps and parking
lamp when you leave the vehicle. This pre-
vents the battery from discharging.
Dipped-beam headlamps X
Turn the ignition key to position 2in the
ignition lock or start the engine.
X To switch on: turn the light switch to
B.
The dipped-beam headlamps, parking
lamps and licence plate lamps are switched
on. The parking lamp indicator lamp next to
the light switch lights up.
Constant headlamp mode In countries in which constant headlamp
mode is not a legal requirement, you can
make this a setting using the on-board com-
puter.
You can activate or deactivate "constant
headlamp mode" using the on-board com-
puter (Y page 130).
X To switch on: turn the light switch to
M orU.
The dipped-beam headlamps, side lamps
and licence plate lamp are switched on
when the engine is running. i
When you turn the light switch to any
position other than MorU, the cor-
responding light goes on.
Automatic headlamp mode The side lamps, dipped-beam headlamps and
licence plate lamp are switched on or off
automatically, depending on the brightness of
the ambient light.
G
Risk of accident
If the light switch is set to the Uposi-
tion, the light will not come on automati-
cally in foggy conditions. This could endan-
ger you and others. Therefore, turn the light
switch to Bin the dark or in fog.
The automatic headlamp feature is only an
aid. The driver is responsible for the vehi-
cle's lighting at all times. G
Risk of accident
When it is dark or foggy, turn the light
switch from UtoB in good time.
Otherwise, the headlamps could switch off
temporarily and you could cause an acci-
dent. Controls
164_AKB; 5; 5, en-GB
wobuchh,
Version: 2.10.6 2008-05-11T11:55:12+02:00 - Seite 93 ZDateiname: 6515_4293_02_buchblock.pdf; preflight
Page 104 of 381
Side windows
101
If a side window locks up during closing and
has reopened again slightly:
X
Immediately after the window locks up, pull
the switch upwards until the window is
closed.
The side window is closed with more force.
If a side window locks up again during closing
and has reopened again slightly:
X Immediately after the window locks up, pull
the switch upwards until the window is
closed.
The side window is closed without the anti-
entrapment feature. Resetting the windows
You must reset each side window if:
R the battery has been disconnected or has
become discharged
R the side window no longer opens or closes
fully
R the side windows open again slightly after
being closed fully X
Make sure that the key is in position 2in
the ignition lock.
X Pull the corresponding switch upwards
until the window is closed.
X Hold the switch for an additional second.
If the side window opens again slightly:
X Pull the corresponding switch up again
immediately and hold it for approximately
one second. Summer opening
You can ventilate the vehicle before a journey.
To do this, you can use the key to simultane-
ously:
R open the side windows
R open the sliding/tilting sunroof*
R switch on the seat ventilation* of the driv-
er's seat
i The "Summer opening" feature can only
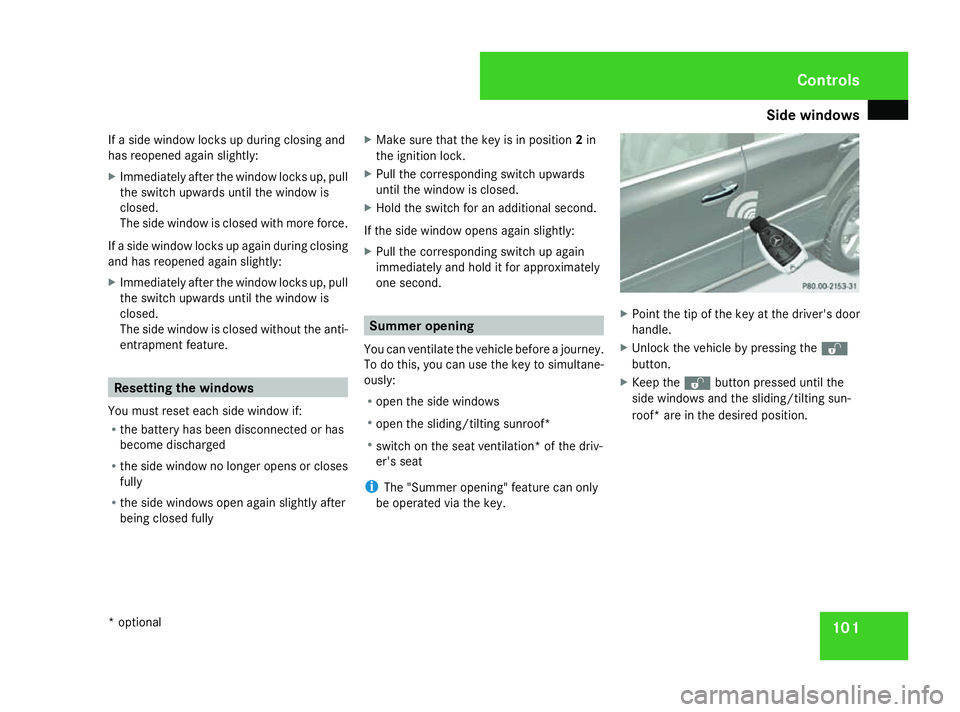
be operated via the key. X
Point the tip of the key at the driver's door
handle.
X Unlock the vehicle by pressing the k
button.
X Keep the kbutton pressed until the
side windows and the sliding/tilting sun-
roof* are in the desired position. Controls
* optional
164_AKB; 5; 5, en-GB
wobuchh,
Version: 2.10.6 2008-05-11T11:55:12+02:00 - Seite 101 ZDateiname: 6515_4293_02_buchblock.pdf; preflight