fuse MERCEDES-BENZ ML SUV 2008 Owners Manual
[x] Cancel search | Manufacturer: MERCEDES-BENZ, Model Year: 2008, Model line: ML SUV, Model: MERCEDES-BENZ ML SUV 2008Pages: 381, PDF Size: 7.18 MB
Page 11 of 381
8
Fuel filter
Display message . . . . . . . . . . . . . .270
Fuel line
Malfunction . . . . . . . . . . . . . . . . . .295
Fuel tank
Malfunction . . . . . . . . . . . . . . . . . .295
Fuse allocation chart . . . . . . . . . . ..344
Fuse box Dashboard . . . . . . . . . . . . . . . . . . .344
Engine compartment . . . . . . . . . . .344
Luggage compartment . . . . . . . . . .345
Fuses . . . . . . . . . . . . . . . . . . . . . . . . . .343 G
Garage door Opening/closing (with the remote
control) . . . . . . . . . . . . . . . . . . . . .210
Garage door opener . . . . . . . . . . . . ..209
Clearing the memory . . . . . . . . . . .210
Frequencies . . . . . . . . . . . . . . . . . .373
Programming the remote control . .209
Gear indicator (on-board computer) 121
Genuine Mercedes-Benz parts . . . ..348
Glove compartment . . . . . . . . . . . . ..201
Gradient-climbing capability (max-
imum) . . . . . . . . . . . . . . . . . . . . . . . . .238
Gross vehicle weight, maximum
permissible . . . . . . . . . . . . . . . . . . . . .363 H
Headlamps Cleaning . . . . . . . . . . . . . . . . . . . . .249
Cleaning system . . . . . . . . . . . . . . . .96
Misting up . . . . . . . . . . . . . . . . . . .301
Headlamps delayed switch-off
see Exterior lighting delayed switch-off
Head restraint
Adjusting (front) . . . . . . . . . . . . .77, 78
Adjusting (rear) . . . . . . . . . . . . . . . .80
NECK-PRO . . . . . . . . . . . . . . . . . . . .47
Removing (rear) . . . . . . . . . . . . . . . .80
Resetting triggered NECK-PRO
head restraints . . . . . . . . . . . . . . . .310
Heating
see Air conditioning
High-pressure cleaners . . . . . . . . . ..248
Hill start assist . . . . . . . . . . . . . . . . .105
HomeLink ®
see Garage door opener I
Immobiliser . . . . . . . . . . . . . . . . . . . . .62
Indicator and warning lamp Brakes (red ).. . . . . . . . . . . . .289, 290
Engine diagnostic . . . . . . . . . . . . . .291
ESP ®
. . . . . . . . . . . . . . . . . . . .58, 289
PASSENGER AIRBAG OFF . . . .50, 286
Reserve fuel . . . . . . . . . . . . . . . . . .293 Seat belt . . . . . . . . . . . . . . . . . . . .
.291
SRS . . . . . . . . . . . . . . . . . . . . .41, 290
Tyre pressure monitor . . . . . . . . . .291
Indicator and warning lamps . . . . ..288
Indicator lamp see Indicator and warning lamp
Instrument cluster . . . . . . . . . . . . ..113
Overview . . . . . . . . . . . . . . . . . . . . .26
Selecting the language (on-board
computer) . . . . . . . . . . . . . . . . . . .129
Instrument lighting . . . . . . . . . . . . ..114
Interior lighting . . . . . . . . . . . . . . . . . .97
Automatic control system . . . . . . . .97
Delayed switch-off (on-board
computer) . . . . . . . . . . . . . . . . . . .131
Emergency lighting . . . . . . . . . . . . . .97
Manual control . . . . . . . . . . . . . . . . .97
Reading lamp . . . . . . . . . . . . . . . . . .97
Interior motion sensor . . . . . . . . . . ..64
Switching on/off (on-board com-
puter) . . . . . . . . . . . . . . . . . . . . . . .135
ISOFIX child seat securing system ..53 J
Jack . . . . . . . . . . . . . . . . . . . . . . . . . . .255
Operation . . . . . . . . . . . . . . . . . . . .327
Jump-starting . . . . . . . . . . . . . . . . . . .339
Jump leads . . . . . . . . . . . . . . . . . . .339 Index
164_AKB; 5; 5, en-GB
wobuchh,
Version: 2.10.6 2008-05-11T11:55:12+02:00 - Seite 8Dateiname: 6515_4293_02_buchblock.pdf; preflight
Page 207 of 381
Features
204
X
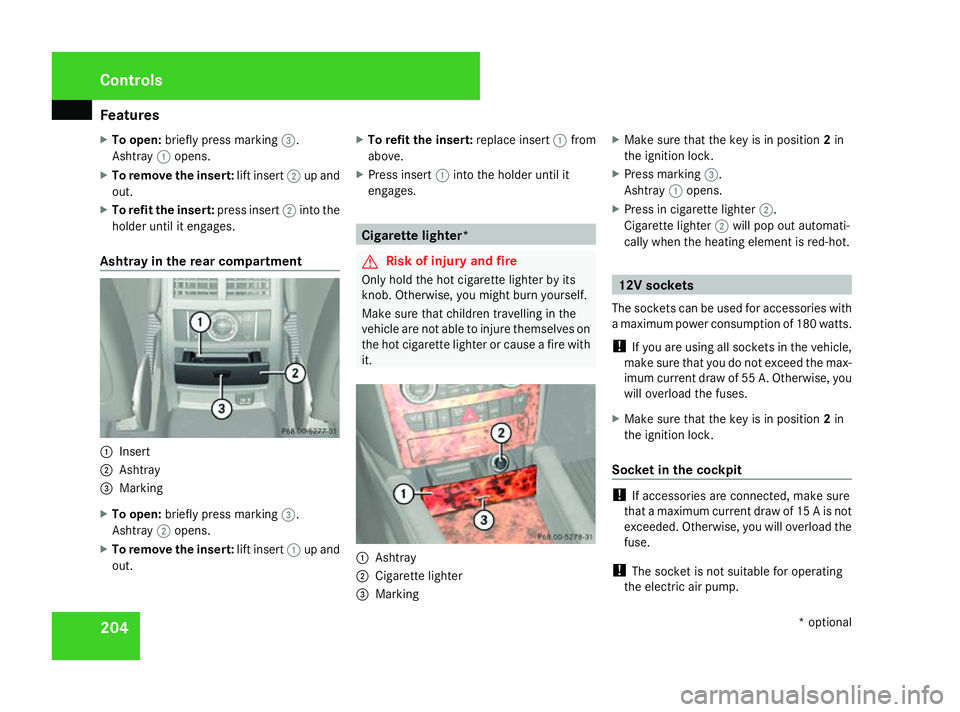
To open: briefly press marking 3.
Ashtray 1opens.
X To remove the insert: lift insert2up and
out.
X To refit the insert: press insert2into the
holder until it engages.
Ashtray in the rear compartment 1
Insert
2 Ashtray
3 Marking
X To open: briefly press marking 3.
Ashtray 2opens.
X To remove the insert: lift insert1up and
out. X
To refit the insert: replace insert1from
above.
X Press insert 1into the holder until it
engages. Cigarette lighter*
G
Risk of injury and fire
Only hold the hot cigarette lighter by its
knob. Otherwise, you might burn yourself.
Make sure that children travelling in the
vehicle are not able to injure themselves on
the hot cigarette lighter or cause a fire with
it. 1
Ashtray
2 Cigarette lighter
3 Marking X
Make sure that the key is in position 2in
the ignition lock.
X Press marking 3.
Ashtray 1opens.
X Press in cigarette lighter 2.
Cigarette lighter 2will pop out automati-
cally when the heating element is red-hot. 12V sockets
The sockets can be used for accessories with
a maximum power consumption of 180 watts.
! If you are using all sockets in the vehicle,
make sure that you do not exceed the max-
imum current draw of 55 A. Otherwise, you
will overload the fuses.
X Make sure that the key is in position 2in
the ignition lock.
Socket in the cockpit !
If accessories are connected, make sure
that a maximum current draw of 15 A is not
exceeded. Otherwise, you will overload the
fuse.
! The socket is not suitable for operating
the electric air pump. Cont
rols
* optional
164_AKB; 5; 5, en-GB
wobuchh
,V ersion: 2.10.6
2008-05-11T11:55:12+02:00 - Seite 204 Dateiname: 6515_4293_02_buchblock.pdf; preflight
Page 208 of 381
Features
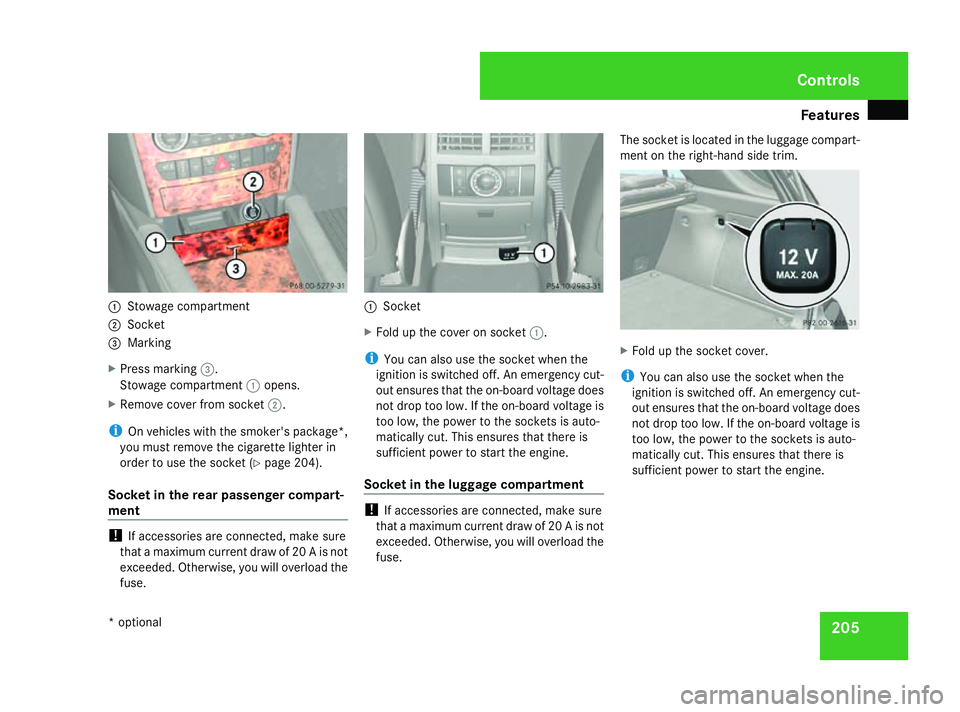
2051
Stowage compartment
2 Socket
3 Marking
X Press marking 3.
Stowage compartment 1opens.
X Remove cover from socket 2.
i On vehicles with the smoker's package*,
you must remove the cigarette lighter in
order to use the socket (Y page 204).
Socket in the rear passenger compart-
ment !
If accessories are connected, make sure
that a maximum current draw of 20 A is not
exceeded. Otherwise, you will overload the
fuse. 1
Socket
X Fold up the cover on socket 1.
i You can also use the socket when the
ignition is switched off. An emergency cut-
out ensures that the on-board voltage does
not drop too low. If the on-board voltage is
too low, the power to the sockets is auto-
matically cut. This ensures that there is
sufficient power to start the engine.
Socket in the luggage compartment !
If accessories are connected, make sure
that a maximum current draw of 20 A is not
exceeded. Otherwise, you will overload the
fuse. The socket is located in the luggage compart-
ment on the right-hand side trim.
X
Fold up the socket cover.
i You can also use the socket when the
ignition is switched off. An emergency cut-
out ensures that the on-board voltage does
not drop too low. If the on-board voltage is
too low, the power to the sockets is auto-
matically cut. This ensures that there is
sufficient power to start the engine. Cont
rols
* optional
164_AKB; 5; 5, en-GB
wobuchh
,V ersion: 2.10.6
2008-05-11T11:55:12+02:00 - Seite 205 ZDateiname: 6515_4293_02_buchblock.pdf; preflight
Page 250 of 381
Care
247Exceeding the service due date
One of the following messages appears in the
multi-function display:
Service A .. days overdue
Service A overdue by .. km
You will also hear a warning tone.
A qualified specialist workshop, e.g. a
Mercedes-Benz Service Centre, will reset the
ASSYST PLUS service interval indicator after
the necessary service work has been carried
out.
i If you fail to have the service performed
by the specified date, you may be violating
applicable laws. Your warranty may be inva-
lidated and goodwill settlements may be
refused. Calling up the service due date
Use the buttons on the multi-function steer-
ing wheel.
X Switch on the ignition.
X Press èorÿ to select the Basic
display menu (Y page 120).
X Press the jork button to select the
service information.
The 9 service symbol and the service
due date are displayed. Care
Notes on care
Regular and proper care maintains the value
of your vehicle.
i It is advisable to use Mercedes-Benz care
products.
Scratches, corrosive deposits, areas affected
by corrosion and damage caused by inade-
quate care cannot always be completely
repaired. In such cases, visit a qualified spe-
cialist workshop immediately, e.g. a
Mercedes-Benz Service Centre.
Repair damage caused by loose chippings
and remove the following substances imme-
diately, whilst avoiding rubbing too hard:
R Soak insect remains with insect remover
and rinse off afterwards.
R Soak bird droppings with water and rinse
off afterwards.
R Remove tree resin, oils, fuels and greases
by rubbing gently with a cloth soaked in
petroleum ether or lighter fluid.
R Use silicone remover to remove wax.
R Use tar remover to remove tar stains. Operation
164_AKB; 5; 5, en-GB
wobuchh,
Version: 2.10.6 2008-05-11T11:55:12+02:00 - Seite 247 ZDateiname: 6515_4293_02_buchblock.pdf; preflight
Page 256 of 381
253
Where will I find...?
...........................254
Display messages ............................. 259
Troubleshooting ................................ 285
Locking/unlocking in an emer-
gency ................................................. 308
Resetting triggered NECK-PRO
head restraints .................................. 310
Changing the batteries .....................311
Changing the bulbs ...........................312
Replacing the wiper blades ..............321
Flat tyre ............................................. 323
Battery ............................................... 334
Jump-starting .................................... 339
Towing and tow-starting ..................340
Fuses .................................................. 343 Practical advice
164_AKB; 5; 5, en-GB
wobuchh,
Version: 2.10.6
2008-05-11T11:55:12+02:00 - Seite 253 Dateiname: 6515_4293_02_buchblock.pdf; preflight
Page 259 of 381
Where will I find...?
256 able to achieve its load-bearing capacity
due to the restricted height.
Do not start the engine at any time while a
wheel is being changed.
i When using the jack, you should also
observe the safety notes in the "Flat tyre"
section (Y page 323).
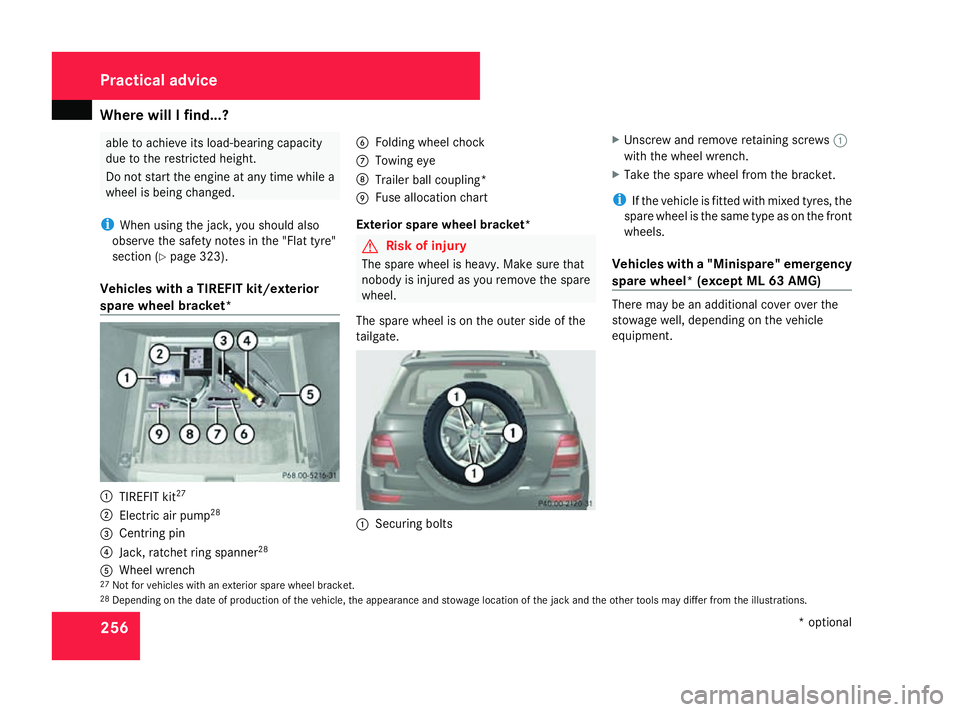
Vehicles with a TIREFIT kit/exterior
spare wheel bracket* 1
TIREFIT kit 27
2 Electric air pump 28
3 Centring pin
4 Jack, ratchet ring spanner 28
5 Wheel wrench 6
Folding wheel chock
7 Towing eye
8 Trailer ball coupling*
9 Fuse allocation chart
Exterior spare wheel bracket* G
Risk of injury
The spare wheel is heavy. Make sure that
nobody is injured as you remove the spare
wheel.
The spare wheel is on the outer side of the
tailgate. 1
Securing bolts X
Unscrew and remove retaining screws 1
with the wheel wrench.
X Take the spare wheel from the bracket.
i If the vehicle is fitted with mixed tyres, the
spare wheel is the same type as on the front
wheels.
Vehicles with a "Minispare" emergency
spare wheel* (except ML 63 AMG) There may be an additional cover over the
stowage well, depending on the vehicle
equipment.
27 Not for vehicles with an exterior spare wheel bracket.
28 Depending on the date of production of the vehicle, the appearance and stowage location of the jack and the other tools may differ from the illustrations. Practical advice
* optional
164_AKB; 5; 5, en-GB
wobuchh,
Version: 2.10.6 2008-05-11T11:55:12+02:00 - Seite 256Dateiname: 6515_4293_02_buchblock.pdf; preflight
Page 260 of 381
Where will I find...?
257
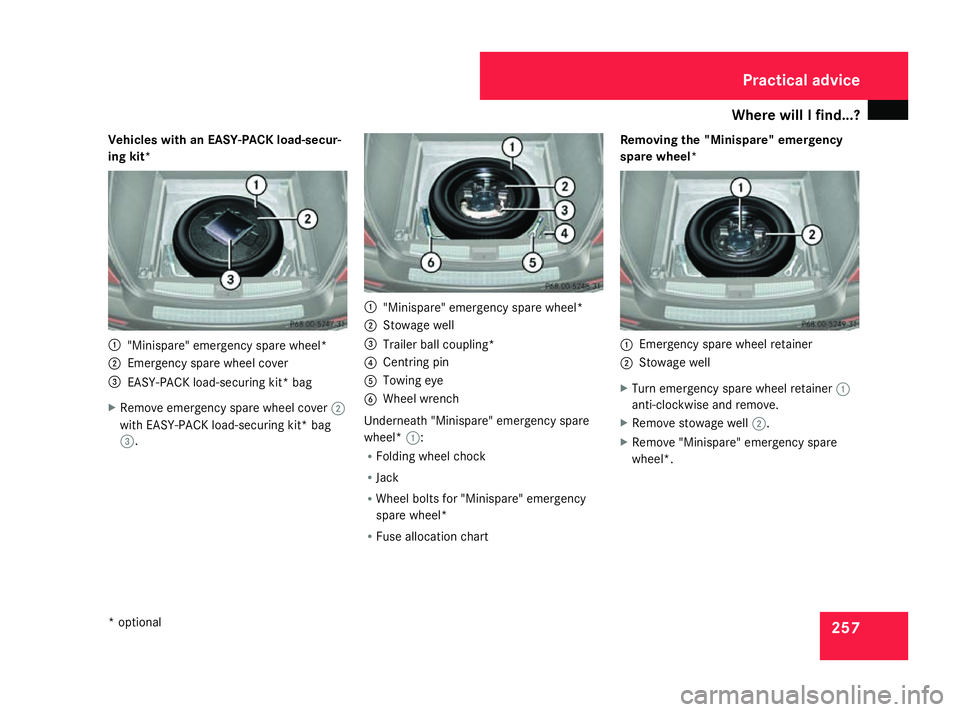
Vehicles with an EASY-PACK load-secur-
ing kit*
1
"Minispare" emergency spare wheel*
2 Emergency spare wheel cover
3 EASY-PACK load-securing kit* bag
X Remove emergency spare wheel cover 2
with EASY-PACK load-securing kit* bag
3. 1
"Minispare" emergency spare wheel*
2 Stowage well
3 Trailer ball coupling*
4 Centring pin
5 Towing eye
6 Wheel wrench
Underneath "Minispare" emergency spare
wheel* 1:
R Folding wheel chock
R Jack
R Wheel bolts for "Minispare" emergency
spare wheel*
R Fuse allocation chart Removing the "Minispare" emergency
spare wheel*
1
Emergency spare wheel retainer
2 Stowage well
X Turn emergency spare wheel retainer 1
anti-clockwise and remove.
X Remove stowage well 2.
X Remove "Minispare" emergency spare
wheel*. Practical advice
* optional
164_AKB; 5; 5, en-GB
wobuchh,
Version: 2.10.6 2008-05-11T11:55:12+02:00 - Seite 257 ZDateiname: 6515_4293_02_buchblock.pdf; preflight
Page 261 of 381
Where will I find...?
258
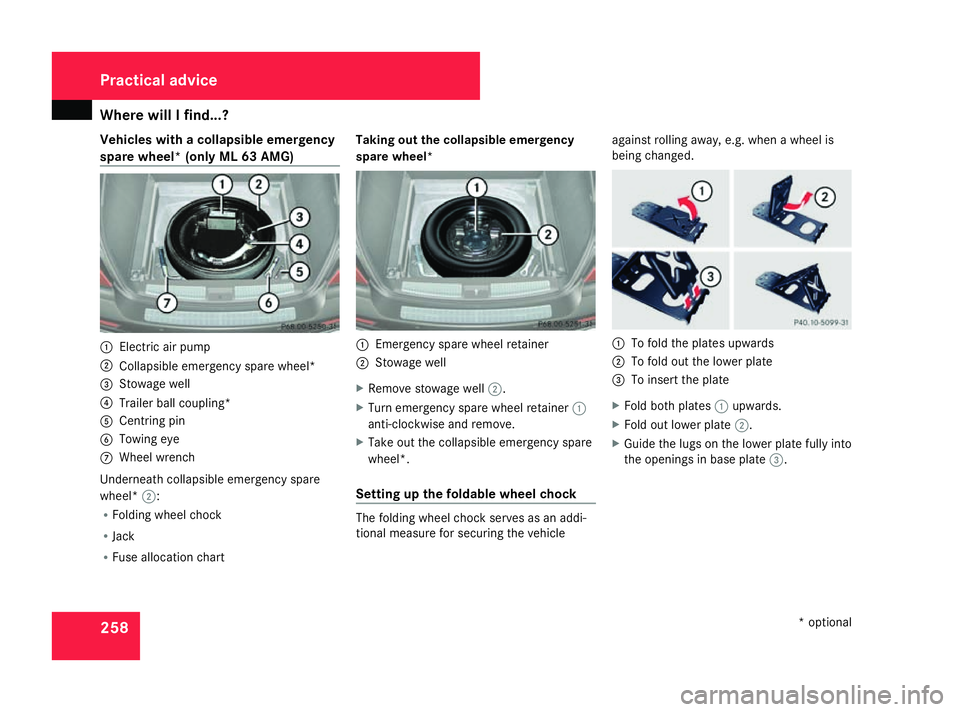
Vehicles with a collapsible emergency
spare wheel* (only ML 63 AMG) 1
Electric air pump
2 Collapsible emergency spare wheel*
3 Stowage well
4 Trailer ball coupling*
5 Centring pin
6 Towing eye
7 Wheel wrench
Underneath collapsible emergency spare
wheel* 2:
R Folding wheel chock
R Jack
R Fuse allocation chart Taking out the collapsible emergency
spare wheel*
1
Emergency spare wheel retainer
2 Stowage well
X Remove stowage well 2.
X Turn emergency spare wheel retainer 1
anti-clockwise and remove.
X Take out the collapsible emergency spare
wheel*.
Setting up the foldable wheel chock The folding wheel chock serves as an addi-
tional measure for securing the vehicleagainst rolling away, e.g. when a wheel is
being changed.
1
To fold the plates upwards
2 To fold out the lower plate
3 To insert the plate
X Fold both plates 1upwards.
X Fold out lower plate 2.
X Guide the lugs on the lower plate fully into
the openings in base plate 3.Practical advice
* optional
164_AKB; 5; 5, en-GB
wobuchh,
Version: 2.10.6 2008-05-11T11:55:12+02:00 - Seite 258Dateiname: 6515_4293_02_buchblock.pdf; preflight
Page 301 of 381
Troubleshooting
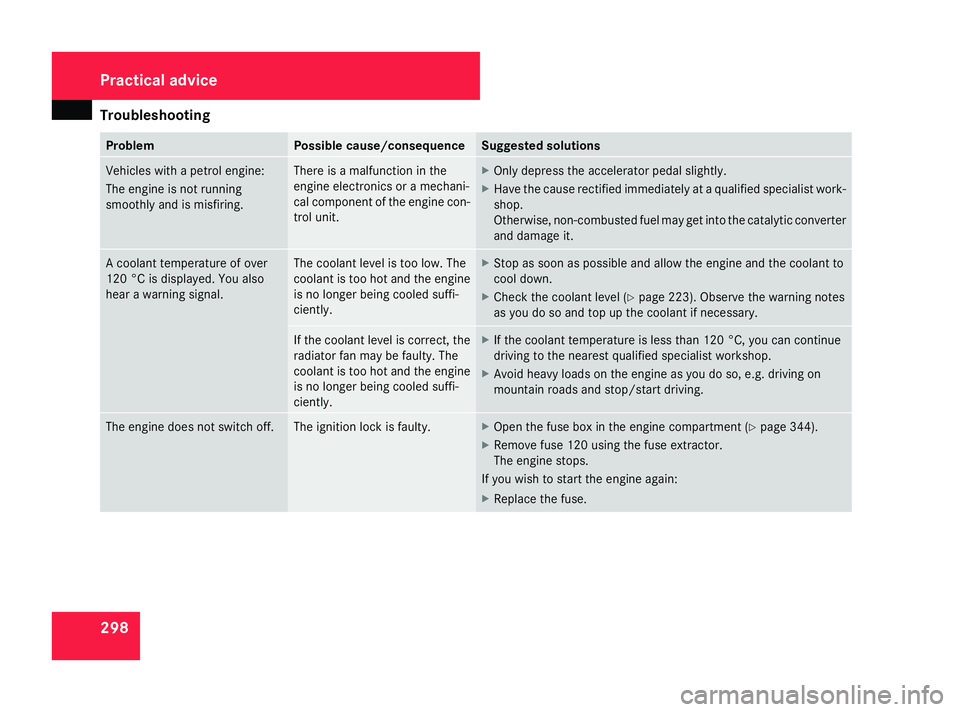
298 Problem Possible cause/consequence Suggested solutions
Vehicles with a petrol engine:
The engine is not running
smoothly and is misfiring. There is a malfunction in the
engine electronics or a mechani-
cal component of the engine con-
trol unit. X
Only depress the accelerator pedal slightly.
X Have the cause rectified immediately at a qualified specialist work-
shop.
Otherwise, non-combusted fuel may get into the catalytic converter
and damage it. A coolant temperature of over
120 °C is displayed. You also
hear a warning signal. The coolant level is too low. The
coolant is too hot and the engine
is no longer being cooled suffi-
ciently. X
Stop as soon as possible and allow the engine and the coolant to
cool down.
X Check the coolant level (Y page 223). Observe the warning notes
as you do so and top up the coolant if necessary. If the coolant level is correct, the
radiator fan may be faulty. The
coolant is too hot and the engine
is no longer being cooled suffi-
ciently. X
If the coolant temperature is less than 120 °C, you can continue
driving to the nearest qualified specialist workshop.
X Avoid heavy loads on the engine as you do so, e.g. driving on
mountain roads and stop/start driving. The engine does not switch off. The ignition lock is faulty. X
Open the fuse box in the engine compartment ( Ypage 344).
X Remove fuse 120 using the fuse extractor.
The engine stops.
If you wish to start the engine again:
X Replace the fuse. Practical advice
164_AKB; 5; 5, en-GB
wobuchh
,V ersion: 2.10.6
2008-05-11T11:55:12+02:00 - Seite 298 Dateiname: 6515_4293_02_buchblock.pdf; preflight
Page 318 of 381
Changing the bulbs
315
Observe the following points:
R
Use only the bulb types specified here.
R To prevent a short-circuit, switch off the
lights before changing a bulb.
R Only hold bulbs with a clean, lint-free cloth.
R Do not work with wet or greasy fingers.
R If the new bulb still does not light up, con-
sult a qualified specialist workshop, e.g. a
Mercedes-Benz Service Centre.
i Have the headlamp setting checked reg-
ularly at a qualified specialist workshop,
e.g. a Mercedes-Benz Service Centre. Changing the front bulbs
i ML 500: the fuse box in the engine com-
partment must be removed before a bulb is
changed in the headlamp on the right-hand
side. Have the work carried out at a quali-
fied specialist workshop, e.g. a Mercedes-
Benz Service Centre. Replacing dipped-beam headlamps
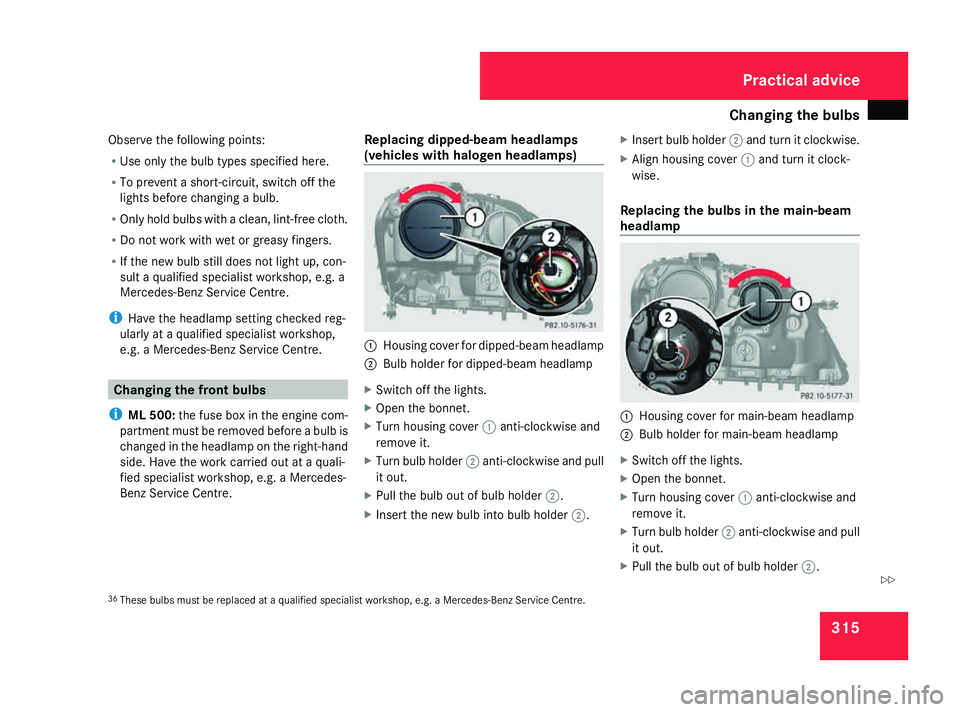
(vehicles with halogen headlamps) 1
Housing cover for dipped-beam headlamp
2 Bulb holder for dipped-beam headlamp
X Switch off the lights.
X Open the bonnet.
X Turn housing cover 1anti-clockwise and
remove it.
X Turn bulb holder 2anti-clockwise and pull
it out.
X Pull the bulb out of bulb holder 2.
X Insert the new bulb into bulb holder 2.X
Insert bulb holder 2and turn it clockwise.
X Align housing cover 1and turn it clock-
wise.
Replacing the bulbs in the main-beam
headlamp 1
Housing cover for main-beam headlamp
2 Bulb holder for main-beam headlamp
X Switch off the lights.
X Open the bonnet.
X Turn housing cover 1anti-clockwise and
remove it.
X Turn bulb holder 2anti-clockwise and pull
it out.
X Pull the bulb out of bulb holder 2.
36 These bulbs must be replaced at a qualified specialist workshop, e.g. a Mercedes-Benz Service Centre. Practical advice
164_AKB; 5; 5, en-GB
wobuchh,
Version: 2.10.6 2008-05-11T11:55:12+02:00 - Seite 315 ZDateiname: 6515_4293_02_buchblock.pdf; preflight