radio MERCEDES-BENZ ML SUV 2008 Owners Manual
[x] Cancel search | Manufacturer: MERCEDES-BENZ, Model Year: 2008, Model line: ML SUV, Model: MERCEDES-BENZ ML SUV 2008Pages: 381, PDF Size: 7.18 MB
Page 14 of 381
11
Oil
Consumption . . . . . . . . . . . . . . . . .220
Topping up . . . . . . . . . . . . . . . . . . .222
Oil level
Checking (dipstick) . . . . . . . . . . . .222
Checking (on-board computer) . . .221
On-board computer . . . . . . . . . . . . ..115
Additional functions menu . . . . . . .134
AMG menu . . . . . . . . . . . . . . . . . . .121
Audio menu . . . . . . . . . . . . . . . . . .124
Convenience submenu . . . . . . . . . .128
Display messages . . . . . . . . . . . . .259
DVD menu . . . . . . . . . . . . . . . . . . .125
Factory settings . . . . . . . . . . . . . . .127
Heating submenu . . . . . . . . . . . . . .128
Instrument cluster submenu . . . . .128
Lighting submenu . . . . . . . . . . . . .128
Message memory menu . . . . . . . . .126
Navigation menu . . . . . . . . . . . . . .125
Off-road menu . . . . . . . . . . . . . . . .126
Off-road mode . . . . . . . . . . . . . . . .123
Settings menu . . . . . . . . . . . . . . . .127
Standard display menu . . . . . . . . .120
Telephone menu . . . . . . . . . . . . . .136
Time/date submenu . . . . . . . . . . .128
Trip computer menu . . . . . . . . . . . .135
TV menu . . . . . . . . . . . . . . . . . . . . .125
Vehicle submenu . . . . . . . . . . . . . .128
On-board computer language . . . ..129 Operating system
see On-board computer
Outside temperature display . . . . ..115
On-board computer . . . . . . . . . . . .120
Own number sending (mobile
phone) . . . . . . . . . . . . . . . . . . . . . . . . .207 P
Paint code number . . . . . . . . . . . . ..350
Parking . . . . . . . . . . . . . . . . . . . . . . . .105
Parking aid Exterior mirror on the front-
passenger sid e.. . . . . . . . . . . . . . . .88
Parktronic . . . . . . . . . . . . . . . . . . .164
Reversing camera . . . . . . . . . . . . .167
Parking brake . . . . . . . . . . . . . . . . . . .105
Display message . . . . . . . . . . . . . .270
Parking lamps
Display message . . . . . . . . . . . . . .278
Parking position
Exterior mirror on the front-
passenger sid e.. . . . . . . . . . . . . . . .88
Parktronic . . . . . . . . . . . . . . . . . . . . . .164
Activating/deactivating . . . . . . . . .166
Malfunction . . . . . . . . . . . . . . . . . .300
Range of the sensors . . . . . . . . . . .165
Trailer towing . . . . . . . . . . . . . . . . .167
Warning display . . . . . . . . . . . . . . .165 PASSENGER AIRBAG OFF warning
lamp
. . . . . . . . . . . . . . . . . . . . . . .50, 286
Performance . . . . . . . . . . . . . . . . . . .353
Permanent four-wheel drive see 4MATIC
Permanent Speedtronic . . . . . . . . ..156
Petrol Minimum grad e.. . . . . . . . . . . . . .217
Plastic trim
Cleaning . . . . . . . . . . . . . . . . . . . . .250
Power supply (trailer) . . . . . . . . . . ..245
Power windows see Side window
Pre-emptive occupant safety system
see PRE-SAFE ®
PRE-SAFE ®
system . . . . . . . . . . . . . . . .47
Display message . . . . . . . . . . . . . .265
Program selector button
Automatic transmission . . . . .111, 112
Pulling away . . . . . . . . . . . . . . . . . . . .104 R
RACETIMER (on-board computer) ..1 21
Radio Changing a station (on-board
computer) . . . . . . . . . . . . . . . . . . .124
see separate operating instructions
Radio-controlled equipment
Installatio n.. . . . . . . . . . . . . . . . . .214 Index
164_AKB; 5; 5, en-GB
wobuchh,
Version: 2.10.6 2008-05-11T11:55:12+02:00 - Seite 11Dateiname: 6515_4293_02_buchblock.pdf; preflight
Page 16 of 381
13
Sliding/tilting sunroof
. . . . . . . . . ..187
Rain closing feature . . . . . . . . . . . .189
Resetting . . . . . . . . . . . . . . . . . . . .189
Sliding sunroof
see Sliding/tilting sunroof
Snow chains . . . . . . . . . . . . . . . . . . . .231
Socket . . . . . . . . . . . . . . . . . . . . . . . . .204
Cockpit . . . . . . . . . . . . . . . . . . . . . .204
Luggage compartment . . . . . . . . . .205
Rear compartment . . . . . . . . . . . . .205
Spare wheel
Storage location . . . . . . . . . . . . . . .255
Technical data . . . . . . . . . . . . . . . .359
Spare wheel bracket . . . . . . . . . . . . ..69
Emergency release . . . . . . . . . . . . .309
Speed
Technical data . . . . . . . . . . . . . . . .353
Speed limiter
Speedtronic . . . . . . . . . . . . . . . . . .154
Speedometer
Digital speedometer (on-board
computer) . . . . . . . . . . . . . . . . . . .120
Segments . . . . . . . . . . . . . . . . . . . .114
Setting the unit (on-board com-
puter) . . . . . . . . . . . . . . . . . . . . . . .128
Speedtronic . . . . . . . . . . . . . . . . . . . .154
Display message . . . . . . . . . .267, 268
Permanent . . . . . . . . . . . . . . . . . . .156
Variabl e.. . . . . . . . . . . . . . . . . . . .154 SRS (Supplemental Restraint Sys-
tem)
. . . . . . . . . . . . . . . . . . . . . . . . . . . .41
Warning lamp . . . . . . . . . . . . . . . . . .41
Station
see Radio
Status line (on-board computer) . ..1 17
Selecting the displa y.. . . . . . . . ..129
Steering wheel
Adjusting . . . . . . . . . . . . . . . . . . . . .83
Buttons (on-board computer) . . . . .115
Storing settings . . . . . . . . . . . . . . . .87
Steering wheel heating . . . . . . . . . . ..84
Malfunction indicator lamp . . . . . .286
Stowage compartment . . . . . . . . . ..201
Armrest (under) . . . . . . . . . . . . . . .202
Centre console . . . . . . . . . . . . . . . .202
Centre console (rear) . . . . . . . . . . .202
Glove compartment . . . . . . . . . . . .201
Stowage compartments
Overview . . . . . . . . . . . . . . . . . . . . .36
Stowage space
Cup holder . . . . . . . . . . . . . . . . . . .190
Submenu (on-board computer) . . ..1 27
Convenience . . . . . . . . . . . . . . . . .128
Heating . . . . . . . . . . . . . . . . . . . . .128
Instrument cluster . . . . . . . . . . . . .128
Lighting . . . . . . . . . . . . . . . . . . . . .128
Time/date . . . . . . . . . . . . . . . . . . .128
Vehicle . . . . . . . . . . . . . . . . . . . . . .128
Summer opening . . . . . . . . . . . . . . . .101 Sun visor
. . . . . . . . . . . . . . . . . . . . . . .203
Supplemental Restraint System see SRS
Supplemental Restraint System (SRS)
Display message . . . . . . . . . . . . . .270
Warning lamp . . . . . . . . . . . . . . . . .290
Surround lighting
Switching on/off (on-board com-
puter) . . . . . . . . . . . . . . . . . . . . . . .130
Switching off the alarm
ATA . . . . . . . . . . . . . . . . . . . . . . . . . .63 T
Tailgate Display message . . . . . . . . . . . . . .268
Emergency unlocking . . . . . . . . . . .309
Limiting the opening angl e.. . . . . ..73
Opening/closing (automatically) . . .71
Opening/closing (manually) . . . . . . .70
Tail lamps
Changing . . . . . . . . . . . . . . . . . . . .319
Display message . . . . . . . . . . . . . .279
Tank capacity . . . . . . . . . . . . . . . . . . .366
Tank contents Calling up the range (on-board
computer) . . . . . . . . . . . . . . . . . . .136
Technical data
Acceleration . . . . . . . . . . . . . . . . . .353
Engine . . . . . . . . . . . . . . . . . . . . . .352 Index
164_AKB; 5; 5, en-GB
wobuchh,
Version: 2.10.6 2008-05-11T11:55:12+02:00 - Seite 13Dateiname: 6515_4293_02_buchblock.pdf; preflight
Page 17 of 381
14Speed . . . . . . . . . . . . . . . . . . . . . .
.353
Trailer loads . . . . . . . . . . . . . . . . . .365
Tyres . . . . . . . . . . . . . . . . . . .355, 358
Vehicle dimensions . . . . . . . . . . . .361
Vehicle weights . . . . . . . . . . . . . . .363
Wheels . . . . . . . . . . . . . . . . . .355, 358
Telephone
see Mobile phone
Telescopic lever . . . . . . . . . . . . . . . . .241
Telescopic rod (Easy-Pack fix kit) ..2 01
Temperature Engine oil (on-board computer) . . .121
Outside temperature . . . . . . . . . . .115
Thermatic
Malfunction indicator lamp . . . . . .286
Thermotronic
Malfunction indicator lamp . . . . . .286
Third brake lamp
Display message . . . . . . . . . . . . . .277
Tightening torque . . . . . . . . . . . . . ..332
Time Lap time (on-board computer) . . . .121
Setting (on-board computer) . . . . .129
Setting the time (on-board com-
puter) . . . . . . . . . . . . . . . . . . . . . . .129
Timer (on-board computer) . . . . . ..121
TIREFIT kit Using . . . . . . . . . . . . . . . . . . . . . . .324
TopTether . . . . . . . . . . . . . . . . . . . . . . .54Total distance recorder
. . . . . ..26, 120
Resetting the trip meter . . . . . . . . .114
Tow-away protection . . . . . . . . . . . . ..63
Switching on/off (on-board com-
puter) . . . . . . . . . . . . . . . . . . . . . . .135
Towing . . . . . . . . . . . . . . . . . . . . . . . .342
Towing eye Fitting . . . . . . . . . . . . . . . . . . . . . . .341
Removing . . . . . . . . . . . . . . . . . . . .342
Trailer
7-pin connector . . . . . . . . . . . . . . .245
Coupling up . . . . . . . . . . . . . . . . . .242
Decoupling . . . . . . . . . . . . . . . . . . .242
Display message . . . . . . . . . .269, 276
Power supply . . . . . . . . . . . . . . . . .245
Trailer loads
Technical data . . . . . . . . . . . . . . . .365
Trailer tow hitch . . . . . . . . . . . . . . . .241
Notes on care . . . . . . . . . . . . . . . .252
Trailer towing
Driving tips . . . . . . . . . . . . . . . . . . .243
ESP ®
. . . . . . . . . . . . . . . . . . . . . . . .59
Mounting dimensions . . . . . . . . . . .365
Parktroni c.. . . . . . . . . . . . . . . . . .167
Transmission
Display message . . . . . . . . . . . . . .264
Transmission output (maximum)
Telephone/two-way radio . . . . . . .349
Transport (vehicle) . . . . . . . . . . . . ..342
Travelling uphill . . . . . . . . . . . . . . . . .237 Trip computer
Menu (on-board computer) . . . . . .135
Trip meter . . . . . . . . . . . . . . . . . . . . . .120
Resetting . . . . . . . . . . . . . . . . . . . .114
Turn signal lamps
Display message . . . . . . . . . .276, 277
TV
Operation (on-board computer) . . .125
Two-way radio
Installatio n.. . . . . . . . . . . . . . . . . .349
Tyre grip . . . . . . . . . . . . . . . . . . . . . . .234
Tyre pressure . . . . . . . . . . . . . . . . . .226
Calling up (on-board computer) . .228
Display message . . . . . .265, 267, 281
see Tyre pressure
Tyre pressure loss warning system 227
Tyre pressure monitor Warning lamp . . . . . . . . . . . . . . . . .291
Tyres
Direction of rotatio n.. . . . . . . . . . .225
General notes . . . . . . . . . . . . . . . . .224
Technical data . . . . . . . . . . . .355, 358
Tyre tread . . . . . . . . . . . . . . . . . . . . . .226 Index
164_AKB; 5; 5, en-GB
wobuchh,
Version: 2.10.6 2008-05-11T11:55:12+02:00 - Seite 14Dateiname: 6515_4293_02_buchblock.pdf; preflight
Page 70 of 381
Opening and closing
67
X
To change the setting: press thek
and j buttons simultaneously for
approximately six seconds until the battery
check lamp flashes twice.
The key now functions as follows:
X To unlock the driver's door: press the
k button once.
X To unlock centrally: press thekbut-
ton twice.
X To lock centrally: press thejbutton.
Restoring the factory settings X
Press the kandj buttons simulta-
neously for approximately six seconds until
the battery check lamp flashes twice. KEYLESS GO*
The optional equipment supplied with your
vehicle includes two KEYLESS GO keys. You
can start, lock or unlock the vehicle using the
KEYLESS GO key. To do this, you need only
carry the KEYLESS GO key on your person.
When you touch the surface of the sensors on
the vehicle's door handles, KEYLESS GO
establishes a radio connection between the
vehicle and the key. The distance between
the KEYLESS GO key and the vehicle's door
handle from which you wish to lock or unlock
the vehicle, must not be greater than 1 m.
When you pull the door handle, the following
unlock centrally if the factory settings have
not been changed:
R the doors
R the tailgate
R the fuel filler flap
If you pull on the handle of the tailgate, only
the tailgate of your vehicle is unlocked.
When starting the engine and whilst driving,
KEYLESS GO also checks whether a valid
KEYLESS GO key is in the vehicle by periodi-
cally establishing radio contact. G
Risk of accident
If children are left unsupervised in the vehi-
cle, they could open a door from the inside,
even if it has been locked. Or they could
start the vehicle if a valid KEYLESS GO key
is in the vehicle and they press the KEY-
LESS GO button on the ignition lock. They
could endanger themselves and others.
Never leave children unsupervised in the
vehicle. Switch off the engine and take the
KEYLESS GO key with you, even if you are
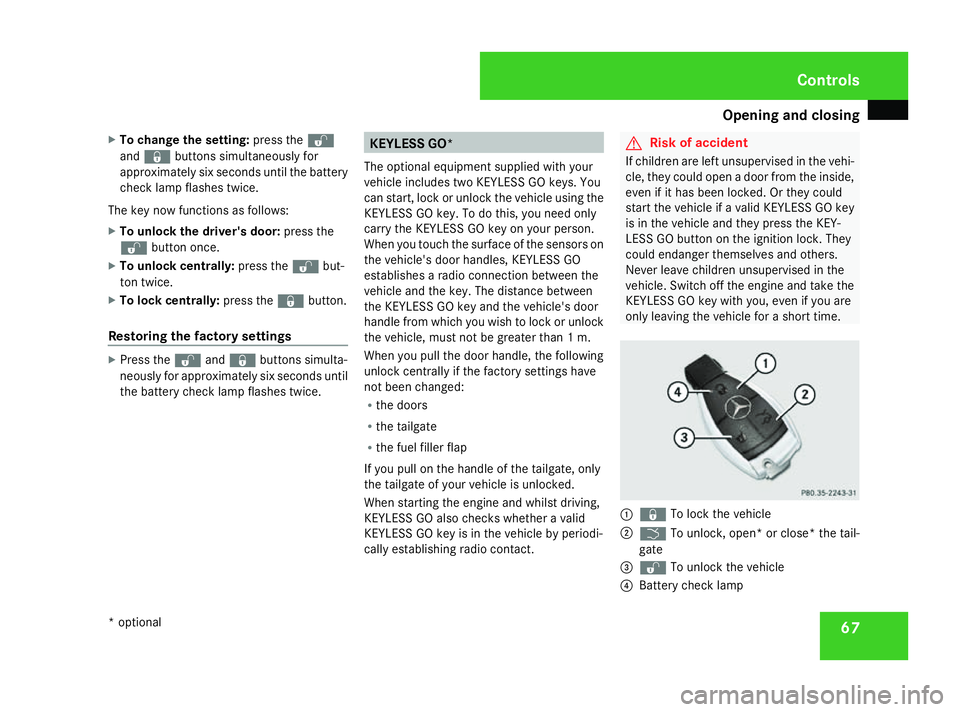
only leaving the vehicle for a short time. 1
j To lock the vehicle
2 i To unlock, open* or close* the tail-
gate
3 k To unlock the vehicle
4 Battery check lamp Controls
* optional
164_AKB; 5; 5, en-GB
wobuchh,
Version: 2.10.6 2008-05-11T11:55:12+02:00 - Seite 67 ZDateiname: 6515_4293_02_buchblock.pdf; preflight
Page 119 of 381
On-board computer
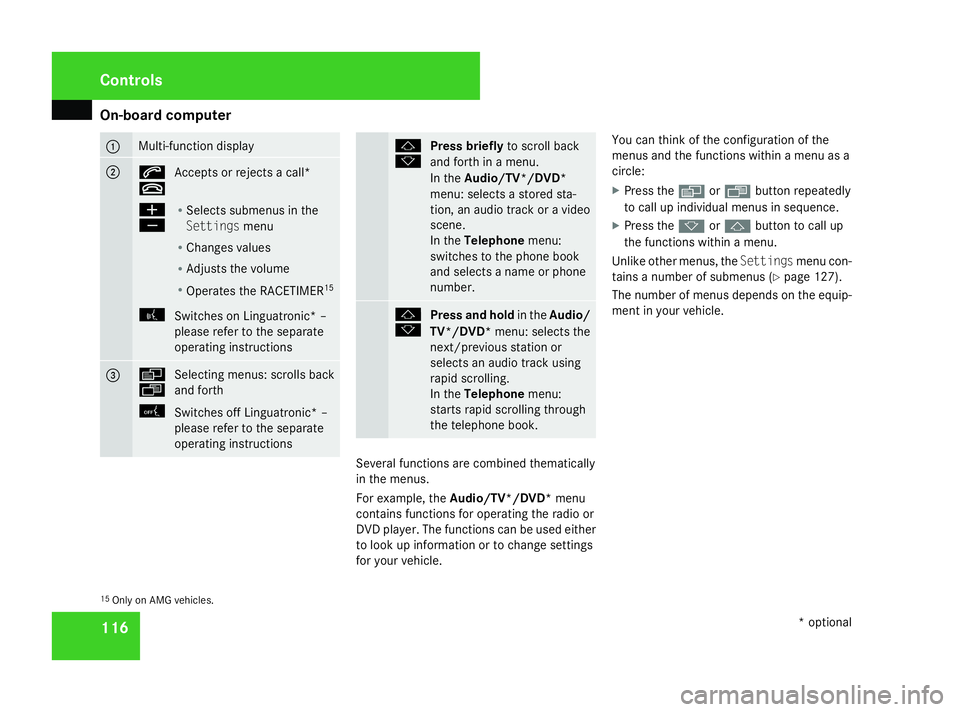
116 1 Multi-function display
2 s
t
Accepts or rejects a call*
æ
ç R
Selects submenus in the
Settings menu
R Changes values
R Adjusts the volume
R Operates the RACETIMER 15
! Switches on Linguatronic* –
please refer to the separate
operating instructions 3 è
· Selecting menus: scrolls back
and forth
0 Switches off Linguatronic* –
please refer to the separate
operating instructions j
k
Press briefly
to scroll back
and forth in a menu.
In the Audio/TV*/DVD*
menu: selects a stored sta-
tion, an audio track or a video
scene.
In the Telephone menu:
switches to the phone book
and selects a name or phone
number. j
k
Press and hold
in theAudio/
TV*/DVD* menu: selects the
next/previous station or
selects an audio track using
rapid scrolling.
In the Telephone menu:
starts rapid scrolling through
the telephone book. Several functions are combined thematically
in the menus.
For example, the
Audio/TV*/DVD* menu
contains functions for operating the radio or
DVD player. The functions can be used either
to look up information or to change settings
for your vehicle. You can think of the configuration of the
menus and the functions within a menu as a
circle:
X Press the èorÿ button repeatedly
to call up individual menus in sequence.
X Press the korj button to call up
the functions within a menu.
Unlike other menus, the Settingsmenu con-
tains a number of submenus ( Ypage 127).
The number of menus depends on the equip-
ment in your vehicle.
15 Only on AMG vehicles. Controls
* optional
164_AKB; 5; 5, en-GB
wobuchh,
Version: 2.10.6 2008-05-11T11:55:12+02:00 - Seite 116Dateiname: 6515_4293_02_buchblock.pdf; preflight
Page 122 of 381
On-board computer
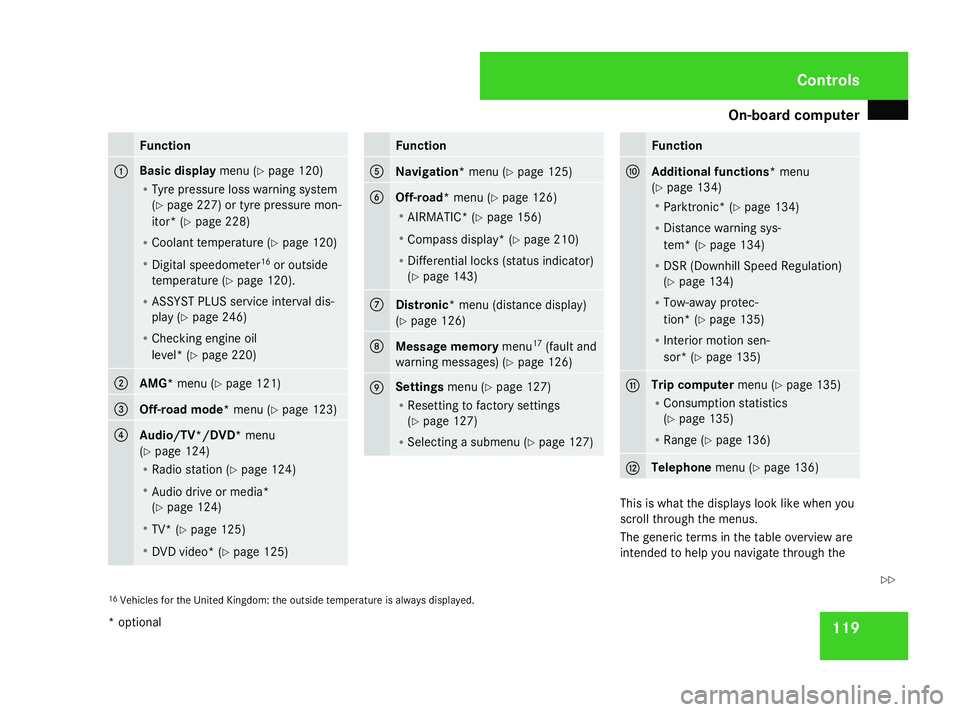
119Function
1 Basic display
menu (Ypage 120)
R Tyre pressure loss warning system
(Y page 227) or tyre pressure mon-
itor* (Y page 228)
R Coolant temperature (Y page 120)
R Digital speedometer 16
or outside
temperature (Y page 120).
R ASSYST PLUS service interval dis-
play (Y page 246)
R Checking engine oil
level* (Y page 220) 2
AMG*
menu (Y page 121) 3
Off-road mode*
menu (Ypage 123) 4
Audio/TV*/DVD*
menu
(Y page 124)
R Radio station ( Ypage 124)
R Audio drive or media*
(Y page 124)
R TV* (Y page 125)
R DVD video* (Y page 125) Function
5
Navigation*
menu (Ypage 125) 6
Off-road*
menu (Ypage 126)
R AIRMATIC* (Y page 156)
R Compass display* ( Ypage 210)
R Differential locks (status indicator)
(Y page 143) 7
Distronic
* menu (distance display)
(Y page 126) 8
Message memory
menu17
(fault and
warning messages) (Y page 126) 9 Settings
menu (Ypage 127)
R Resetting to factory settings
(Y page 127)
R Selecting a submenu (Y page 127) Function
a
Additional functions*
menu
(Y page 134)
R Parktronic* (Y page 134)
R Distance warning sys-
tem* (Y page 134)
R DSR (Downhill Speed Regulation)
(Y page 134)
R Tow-away protec-
tion* (Y page 135)
R Interior motion sen-
sor* (Y page 135) b Trip computer
menu (Ypage 135)
R Consumption statistics
(Y page 135)
R Range (Y page 136) c Telephone
menu (Ypage 136) This is what the displays look like when you
scroll through the menus.
The generic terms in the table overview are
intended to help you navigate through the
16 Vehicles for the United Kingdom: the outside temperature is always displayed. Controls
* optional
164_AKB; 5; 5, en-GB
wobuchh,
Version: 2.10.6 2008-05-11T11:55:12+02:00 - Seite 119 ZDateiname: 6515_4293_02_buchblock.pdf; preflight
Page 127 of 381
On-board computer
124 Audio/TV*/DVD* menu
Use the functions in the Audio/TV/DVD
menu to operate the audio equipment or
COMAND APS*. If the audio equipment or
COMAND APS* is switched off, the multi-
function display shows the message AUDIO
off.
i Menu overview: (Y page 118).
Use the buttons on the multi-function steer-
ing wheel.
Selecting a radio station You can only store new stations using the
audio systemor COMAND APS
*.Please refer
to the separate operating instructions for
notes on how to do this.
X Switch on the audio equipment or
COMAND APS* and select Radio (see the
separate operating instructions).
X Use the èor· button to select the
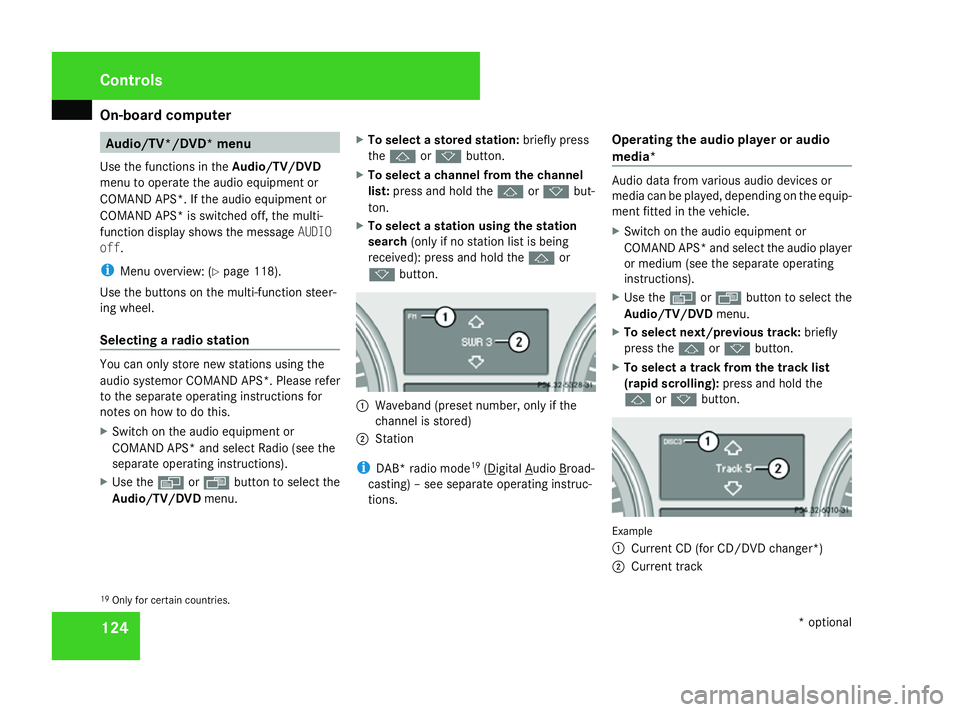
Audio/TV/DVD menu. X
To select a stored station: briefly press
the j ork button.
X To select a channel from the channel
list: press and hold the jork but-
ton.
X To select a station using the station
search (only if no station list is being
received): press and hold the jor
k button. 1
Waveband (preset number, only if the
channel is stored)
2 Station
i DAB* radio mode 19
( Digital Audio Broad-
casting) – see separate operating instruc-
tions. Operating the audio player or audio
media* Audio data from various audio devices or
media can be played, depending on the equip-
ment fitted in the vehicle.
X
Switch on the audio equipment or
COMAND APS* and select the audio player
or medium (see the separate operating
instructions).
X Use the èor· button to select the
Audio/TV/DVD menu.
X To select next/previous track: briefly
press the jork button.
X To select a track from the track list
(rapid scrolling): press and hold the
j ork button. Example
1
Current CD (for CD/DVD changer*)
2 Current track
19 Only for certain countries. Controls
* optional
164_AKB; 5; 5, en-GB
wobuchh,
Version: 2.10.6 2008-05-11T11:55:12+02:00 - Seite 124Dateiname: 6515_4293_02_buchblock.pdf; preflight
Page 188 of 381
Air conditioning
185
Activating the auxiliary heating/ventila-
tion
If the key is in position 1or 2:
X Press and hold the Xbutton for at least
two seconds.
The red or blue indicator lamp in the X
button lights up.
If the key is removed or in position 0:
X Briefly press the Xbutton.
The red or blue indicator lamp in the X
button lights up.
Deactivating the auxiliary heating/venti-
lation
X Briefly press the Xbutton.
The red or blue indicator lamp in the X
button goes out.
Switching the auxiliary heating/venti-
lation on/off using the remote control Your vehicle comes with one remote control.
You may use two additional remote controls
for your vehicle. For further information, con-
sult a qualified specialist workshop, e.g. a
Mercedes-Benz Service Centre. The remote control has a maximum range of
approximately 300 metres. This range may be
reduced by:
R sources of radio interference
R solid objects between the remote control
and the vehicle
R the remote control being in an unfavoura-
ble position in relation to the vehicle
R transmitting from an enclosed space
i The optimum range can be achieved if you
hold the remote control vertically, pointing
upwards when you press one of the but-
tons.
i A battery symbol appears in the display
when the batteries in the remote control
are low. Replace the remote control bat-
teries (Y page 312).
i More information about the auxiliary
heating can be found in the "Practical
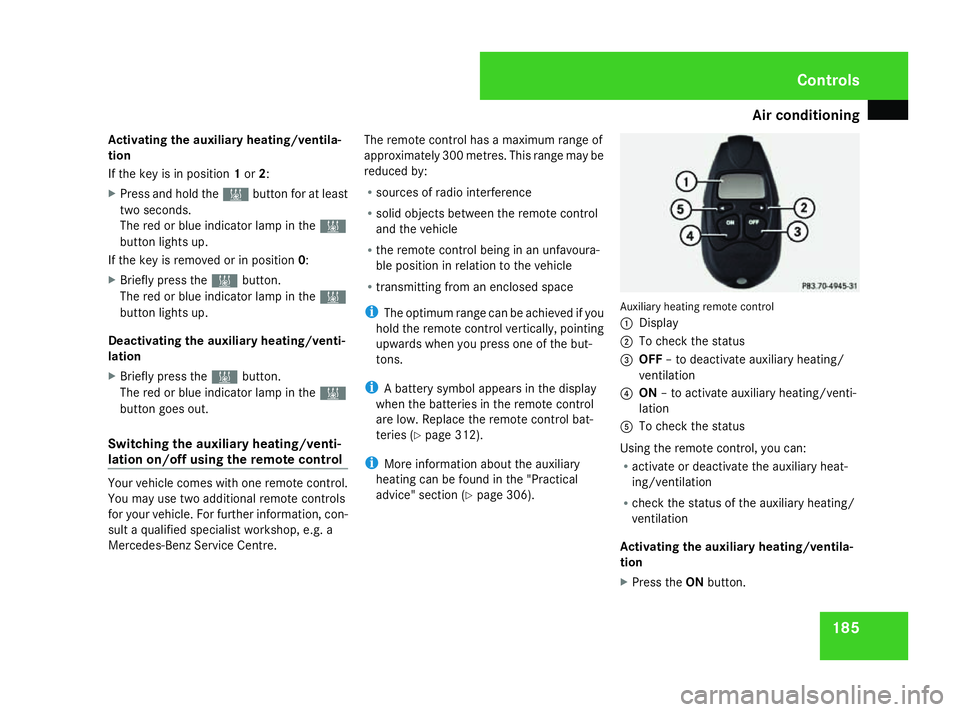
advice" section (Y page 306). Auxiliary heating remote control
1
Display
2 To check the status
3 OFF – to deactivate auxiliary heating/
ventilation
4 ON – to activate auxiliary heating/venti-
lation
5 To check the status
Using the remote control, you can:
R activate or deactivate the auxiliary heat-
ing/ventilation
R check the status of the auxiliary heating/
ventilation
Activating the auxiliary heating/ventila-
tion
X Press the ONbutton. Cont
rols
164_AKB; 5; 5, en-GB
wobuchh
,V ersion: 2.10.6
2008-05-11T11:55:12+02:00 - Seite 185 ZDateiname: 6515_4293_02_buchblock.pdf; preflight
Page 209 of 381
Features
206 Mobile phone*
G
Risk of accident
Observe the legal requirements of the
country in which you are currently driving
regarding operating mobile communica-
tions equipment in a vehicle.
If it is permitted by law to operate commu-
nications equipment while the vehicle is in
motion, you must only do so when the traf-
fic situation allows. You could otherwise be
distracted from the traffic conditions,
cause an accident and injure yourself and
others.
Two-way radios and fax equipment used
without low-reflection exterior aerials can
interfere with the vehicle's electronics and
thereby jeopardise the operating safety of
the vehicle and your safety. You must there-
fore only use this equipment if it is correctly
connected to a separate reflection-free
exterior aerial. G
Risk of injury
Excessive electromagnetic radiation may
cause damage to your health and the health
of others. Using an exterior aerial takes into
account current scientific discussions relating to the possible health risk posed by
electromagnetic fields.
i In order to ensure optimum signal quality
for mobile phones and to minimise mutual
interference between the vehicle electron-
ics and mobile phones, Mercedes-Benz rec-
ommends the use of an approved exterior
aerial. An exterior aerial conducts the elec-
tromagnetic fields generated by a wireless
device to the exterior of the vehicle; the
field strength within the vehicle interior is
lower than in a vehicle that does not have
an exterior aerial.
i There are various mobile phone brackets
that may be fitted to your vehicle; in some
cases these are country-specific. You can
obtain these mobile phone brackets from a
qualified specialist workshop, e.g. a
Mercedes-Benz Service Centre. The func-
tions and services available when you use
the phone depend on your mobile phone
model and service provider.
The mobile phone bracket is in the armrest.
X Open the telephone compartment
(Y page 202). Inserting the mobile phone into the
mobile phone bracket If the mobile phone is inserted into the mobile
phone bracket, you can only speak to the per-
son you are calling using the hands-free sys-
tem.
!
Do not attempt to remove the mobile
phone and the telephone bracket together.
You could otherwise damage the mobile
phone bracket.
X Remove the cover of the aerial plug from
the back of the mobile phone and keep it in
a safe place. Cont
rols
* optional
164_AKB; 5; 5, en-GB
wobuchh
,V ersion: 2.10.6
2008-05-11T11:55:12+02:00 - Seite 206 Dateiname: 6515_4293_02_buchblock.pdf; preflight
Page 217 of 381
Features
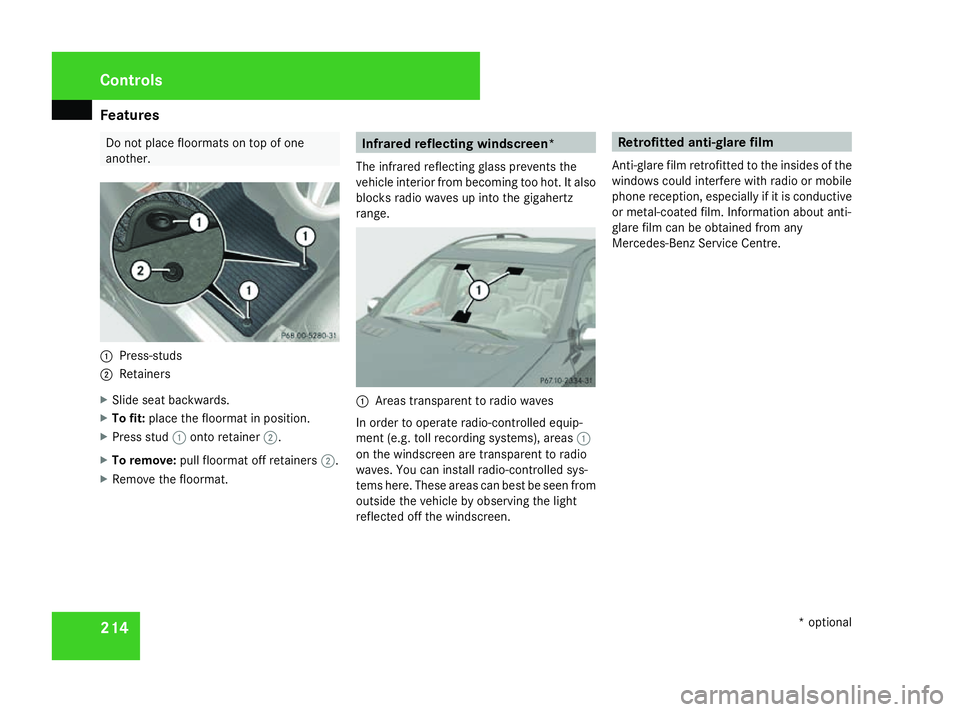
214 Do not place floormats on top of one
another. 1
Press-studs
2 Retainers
X Slide seat backwards.
X To fit: place the floormat in position.
X Press stud 1onto retainer 2.
X To remove: pull floormat off retainers 2.
X Remove the floormat. Infrared reflecting windscreen*
The infrared reflecting glass prevents the
vehicle interior from becoming too hot. It also
blocks radio waves up into the gigahertz
range. 1
Areas transparent to radio waves
In order to operate radio-controlled equip-
ment (e.g. toll recording systems), areas 1
on the windscreen are transparent to radio
waves. You can install radio-controlled sys-
tems here. These areas can best be seen from
outside the vehicle by observing the light
reflected off the windscreen. Retrofitted anti-glare film
Anti-glare film retrofitted to the insides of the
windows could interfere with radio or mobile
phone reception, especially if it is conductive
or metal-coated film. Information about anti-
glare film can be obtained from any
Mercedes-Benz Service Centre. Cont
rols
* optional
164_AKB; 5; 5, en-GB
wobuchh
,V ersion: 2.10.6
2008-05-11T11:55:12+02:00 - Seite 214 Dateiname: 6515_4293_02_buchblock.pdf; preflight