remove seats MERCEDES-BENZ ML350 1997 Complete User Guide
[x] Cancel search | Manufacturer: MERCEDES-BENZ, Model Year: 1997, Model line: ML350, Model: MERCEDES-BENZ ML350 1997Pages: 4133, PDF Size: 88.89 MB
Page 185 of 4133
135 Interior equipment
Te ch n ica l
data Instruments
and controlsOperationDrivingInstrument
cluster displayPractical hints Car care Index Installation behind rear seats
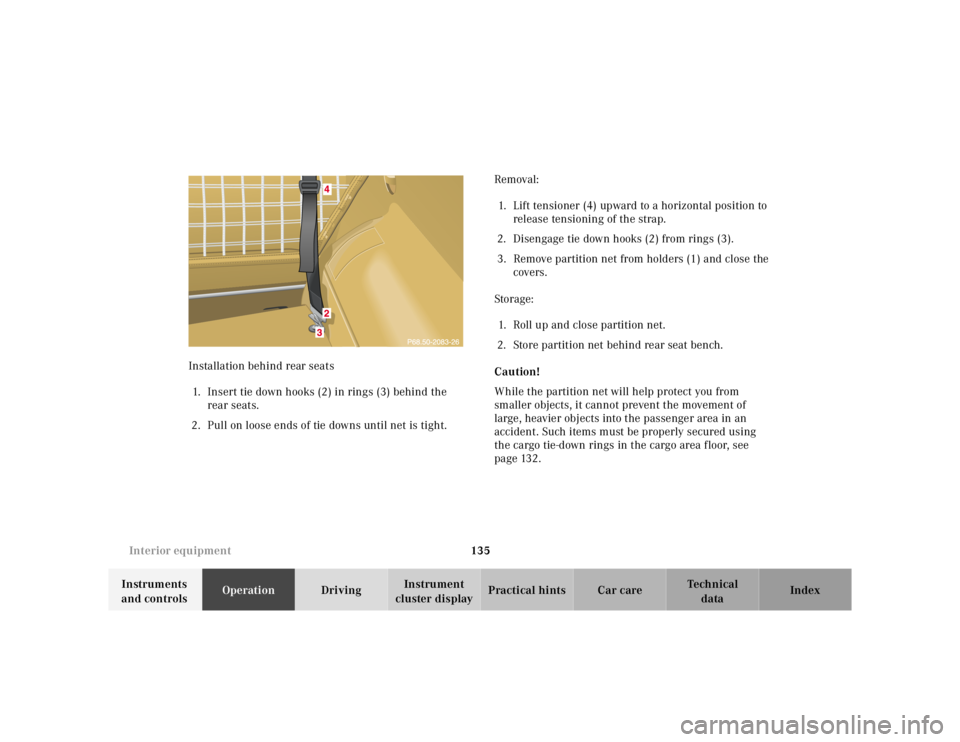
1. Insert tie down hooks (2) in rings (3) behind the
rear seats.
2. Pull on loose ends of tie downs until net is tight.Removal:
1. Lift tensioner (4) upward to a horizontal position to
release tensioning of the strap.
2. Disengage tie down hooks (2) from rings (3).
3. Remove partition net from holders (1) and close the
covers.
Storage:
1. Roll up and close partition net.
2. Store partition net behind rear seat bench.
Caution!
While the partition net will help protect you from
smaller objects, it cannot prevent the movement of
large, heavier objects into the passenger area in an
accident. Such items must be properly secured using
the cargo tie-down rings in the cargo area floor, see
page 132.
Page 188 of 4133
138 Interior equipment
Te ch n ica l
data Instruments
and controlsOperationDrivingInstrument
cluster displayPractical hints Car care Index
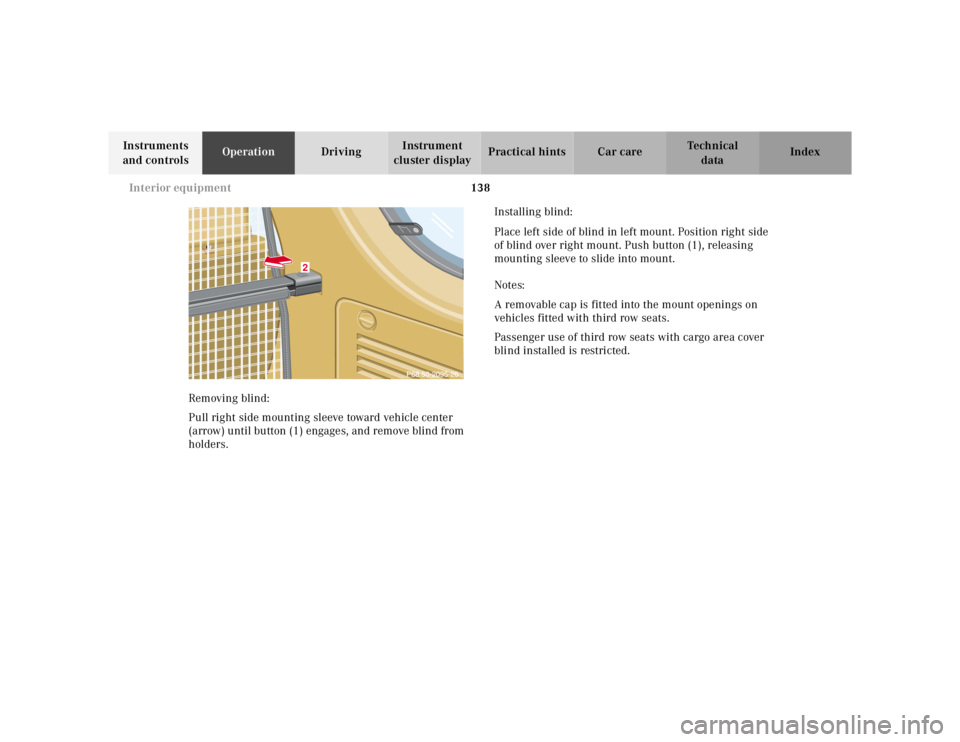
Removing blind:
Pull right side mounting sleeve toward vehicle center
(arrow) until button (1) engages, and remove blind from
holders.Installing blind:
Place left side of blind in left mount. Position right side
of blind over right mount. Push button (1), releasing
mounting sleeve to slide into mount.
Notes:
A removable cap is fitted into the mount openings on
vehicles fitted with third row seats.
Passenger use of third row seats with cargo area cover
blind installed is restricted.
2
Page 213 of 4133
163 Steering lock
Te ch n ica l
data Instruments
and controlsOperationDrivingInstrument
cluster displayPractical hints Car care Index Caution!
To prevent accelerated battery discharge and a possible
dead battery, always remove the key from the steering
lock. Do not leave the key in steering lock position 0.
Notes:
A warning sounds when the driver’s door is opened
while the key is in steering lock position 1 or 0.
With the engine at idle speed, the charging rate of the
alternator (output) is limited.It is therefore recommended that you turn off
unnecessary electrical consumers while driving in stop-
and-go traffic. This precaution helps to avoid draining of
the battery.
Unnecessary strain on the battery and charging system
may be minimized by turning off the following power
consumers, for example: Heated seats, rear window
defroster.
Page 297 of 4133
247 Tires, Wheels
Te ch n ica l
data Instruments
and controlsOperation DrivingInstrument
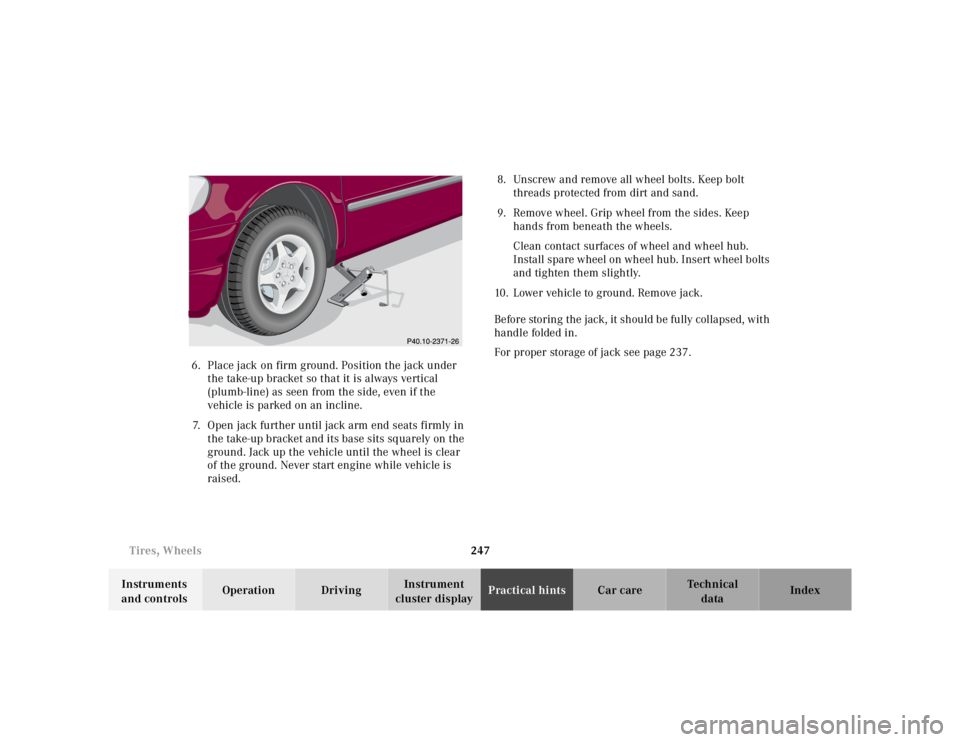
cluster displayPractical hintsCar care Index 6. Place jack on firm ground. Position the jack under
t he take-up bracket so t hat it is always ve rtical
(plumb-line) as seen from the side, even if the
vehicle is parked on an incline.
7. Open jack further until jack arm end seats firmly in
the take-up bracket and its base sits sq uarely on the
ground. Jack up the vehicle until the wheel is clear
of the ground. Never start engine while vehicle is
raised.8. Unscrew and remove all wheel bolts. Keep bolt
threads protected from dirt and sand.
9. Remove wheel. Grip wheel from the sides. Keep
hands from beneath the wheels.
Clean contact surfaces of wheel and wheel hub.
Install spare wheel on wheel hub. Insert wheel bolts
and tighten them slightly.
10. Lower vehicle to ground. Remove jack.
Before storing the jack, it should be fully collapsed, with
handle folded in.
For proper storage of jack see page 237.
Page 504 of 4133
37
Seats
Te ch n ica l
data
Instruments
and controls Operation
Driving Instrument
cluster display Practical hints Car care Index
Seats, front
Caution!
Do not remove head restraints except when mounting
seat covers. For removal see page 43. Whenever head
restraints have been removed be sure to reinstall them
before driving.
Wa r n i n g !
Do not adjust the driver’s seat while driving.
Adjusting the seat while driving could cause the
driver to lose control of the vehicle.Never ride in a moving vehicle with the backrest
reclined. Sitting in an excessively reclined position
can be dangerous. You could slide under the seat
belt in a collision. If you slide under it, the belt
would apply force at the abdomen or neck. That
could cause serious or even fatal injuries. The
backrest and seat belt provide the best restraint
when the wearer is in an upright position and the
belt is properly positioned on the body.Never place hands under seat or near any moving
parts while a seat is being adjusted.
Wa r n i n g !
When leaving the vehicle always remove the key
from the steering lock, and lock your vehicle.Do not leave children unattended in the vehicle or
with access to an unlocked vehicle. Unsupervised
use of vehicle equipment may cause serious
personal injury.
Page 507 of 4133
40
Seats
Te ch n ica l
data
Instruments
and controls Operation
Driving Instrument
cluster display Practical hints Car care Index
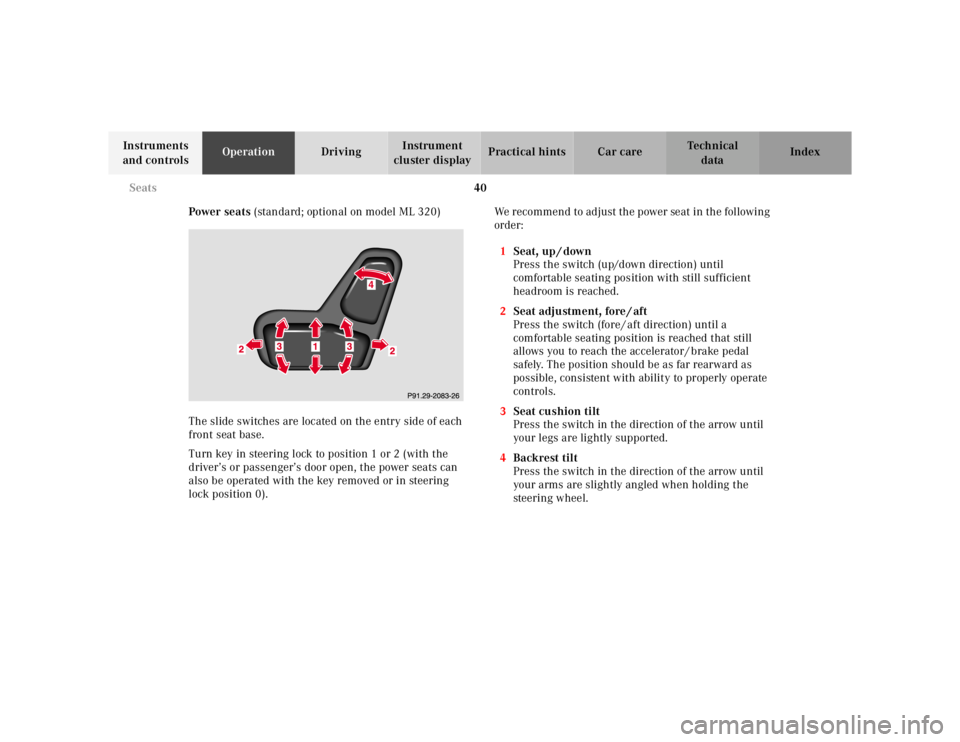
Power seats (standard; optional on model ML 320)
The slide switches are located on the entry side of each
front seat base.
Turn key in steering lock to position 1 or 2 (with the
driver’s or passenger’s door open, the power seats can
also be operated with the key removed or in steering
lock position 0). We recommend to adjust the power seat in the following
order:
1 Seat, up / down
Press the switch (up/down direction) until
comfortable seating position with still sufficient
headroom is reached.
2 Seat adjustment, fore / aft
Press the switch (fore / aft direction) until a
comfortable seating position is reached that still
allows you to reach the accelerator / brake pedal
safely. The position should be as far rearward as
possible, consistent with ability to properly operate
controls.
3 Seat cushion tilt
Press the switch in the direction of the arrow until
your legs are lightly supported.
4 Backrest tilt
Press the switch in the direction of the arrow until
your arms are slightly angled when holding the
steering wheel.
Page 508 of 4133
41
Seats
Te ch n ica l
data
Instruments
and controls Operation
Driving Instrument
cluster display Practical hints Car care Index
Only minor personal adjustments, as described below,
should then be required.
For exterior rear view mirrors, see page 73;
inside rear view mirror, see page 71;
steering wheel adjustment, see page 70.
Note:
See page 42 for instructions on storing and recalling the
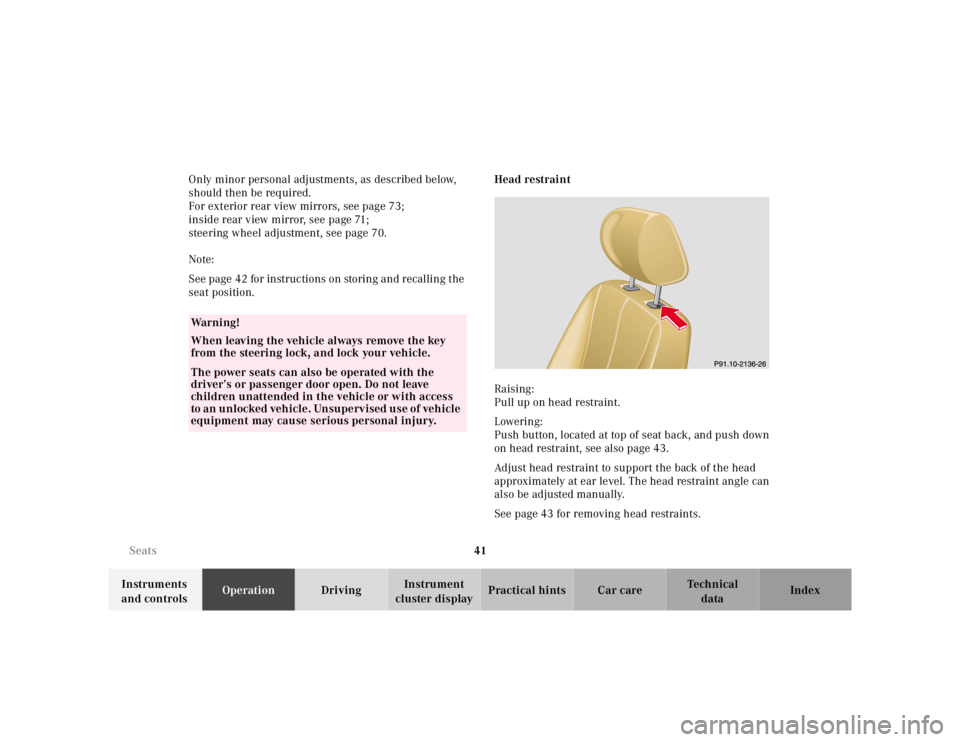
seat position. Head restraint
Raising:
Pull up on head restraint.
Lowering:
Push button, located at top of seat back, and push down
on head restraint, see also page 43.
Adjust head restraint to support the back of the head
approximately at ear level. The head restraint angle can
also be adjusted manually.
See page 43 for removing head restraints.
Wa r n i n g !
When leaving the vehicle always remove the key
from the steering lock, and lock your vehicle.The power seats can also be operated with the
driver’s or passenger door open. Do not leave
children unattended in the vehicle or with access
to an unlocked vehicle. Unsupervised use of vehicle
equipment may cause serious personal injury.
Page 520 of 4133
53
Restraint systems
Te ch n ica l
data
Instruments
and controls Operation
Driving Instrument
cluster display Practical hints Car care Index
BabySmart
TM airbag deactivation system
Special BabySmart
TM compatible child seats, designed
for use with the Mercedes-Benz system and available at
any authorized Mercedes-Benz Center are required for
use with the BabySmart
TM airbag deactivation system.
With the special child seat properly installed, the
passenger front airbag will not deploy. The 7
indicator lamp located in the instrument cluster will be
illuminated, except with key removed or in steering lock
position 0. The system does not deactivate the door
mounted side impact airbag.
Self-test BabySmart
TM
without special child seat installed
After turning key in steering lock to position 1 or 2, the
7 indicator lamp located in the instrument cluster
comes on for approximately 6 seconds, extinguishes,
then blinks once.
If the indicator lamp should not come on or is
continuously lit, the system is not functioning. You must
see an authorized Mercedes-Benz Center before seating
any child on the front passenger seat.
BabySmart
TM is a trademark of Siemens Automotive Corp.
Wa r n i n g !
The BabySmart
TM Airbag Deactivation System will
ONLY work with a special child seat designed to
operate with it. It will not work with child seats
which are not BabySmart
TM compatible.
Never place anything between seat cushion and
child seat (e.g. pillow), since it reduces the
effectiveness of the deactivation system.Follow the manufacturer’s instructions for
installation of special child seats.
The passenger side front airbag will not deploy
only if the 7 indicator lamp remains
illuminated.Please be sure to check the indicator every time
you use the special system child seat.Should the light go out while the restraint is
installed, please check installation. If the light
remains out, do not use the BabySmart
TM restraint
to transport children on the front passenger seat
until the system has been repaired.
Page 522 of 4133
55
Restraint systems
Te ch n ica l
data
Instruments
and controls Operation
Driving Instrument
cluster display Practical hints Car care Index
Emergency tensioning retractor (ETR)
The seat belts for the outboard passenger seats (except
in the optional 3rd row seats) are equipped with
emergency tensioning retractors. These tensioning
retractors are located in each belt’s inertia reel and
become operationally ready with the key in steering
lock position 1 or 2.
The emergency tensioning retractors are designed to
activate only when the seat belts are fastened during
frontal impacts exceeding the first threshold of the SRS
and in rear impacts exceeding a preset severity level.
They remove slack from the belts in such a way that the
seat belts fit more snugly against the body restricting its
forward movement as much as possible. In cases of other frontal impacts, angled impacts, roll-
overs, certain side impacts, or other accidents without
sufficient frontal or rear impact forces, the emergency
tensioning retractors will not be activated. The driver
and passengers will then be protected by the fastened
seat belts and inertia reel in the usual manner.
For seat belt and emergency tensioning retractor see
page 63.
Page 533 of 4133
66
Restraint systems
Te ch n ica l
data
Instruments
and controls Operation
Driving Instrument
cluster display Practical hints Car care Index
Wa r n i n g !
Children 12 years old and under must never ride in
the front seat, except in a Mercedes-Benz
authorized BabySmart
TM compatible child seat,
which operates with the BabySmart
TM System
installed in the vehicle to deactivate the passenger
front airbag when it is properly installed.
Otherwise they will be struck by the airbag when it
inflates in a crash. If this happens, serious or fatal
injury can result.
According to accident statistics, children are safer
when properly restrained in the rear seating
positions than in the front seating positions.
Infants and small children must ride in back seats
and be seated in an infant or child restraint system,
which is properly secured with the vehicle’s seat
belt, fully in accordance with the child seat
manufacturer’s instructions.
Infants and small children should never share a
seat belt with another occupant. During an
accident, they could be crushed between the
occupant and seat belt.Children too big for child restraint systems must
ride in back seats using regular seat belts. Position
shoulder belt across chest and shoulder, not face or
neck. A booster seat may be necessary to achieve
proper belt positioning for children from 41 lbs. to
the point where a lap / shoulder belt fits properly
without one.When the child restraint is not in use, remove it
from the vehicle or secure it with the seat belt to
prevent the child restraint from becoming a
projectile in the event of an accident.