child lock MERCEDES-BENZ ML350 1997 Complete Owner's Manual
[x] Cancel search | Manufacturer: MERCEDES-BENZ, Model Year: 1997, Model line: ML350, Model: MERCEDES-BENZ ML350 1997Pages: 4133, PDF Size: 88.89 MB
Page 489 of 4133
22
Contents - Operation
Te ch n ica l
data
Instruments
and controls Operation
Driving Instrument
cluster display Practical hints Car care Index
OperationVehicle keys ...................................... 24
Start lock-out .................................... 25
General notes on the central locking system ............... 26
Central locking system ................... 26 Radio frequency
remote control .............................. 26
Unlocking the liftgate .................. 28
Panic button .................................. 28
Mechanical keys ........................... 29
Doors .................................................. 30
Central locking switch .................... 32 Automatic central locking .......... 32
Emergency unlocking in case of accident .................................... 33
Liftgate ............................................... 34
Antitheft alarm system ................... 35
Tow - aw ay a lar m a n d glass breakage sensor ................ 36
Seats, front ........................................ 37 Manual seats ................................. 39
Power seats ................................... 40 Head restraint ...............................41
Heated seats ..................................... 44
Seat belts and integrated restraint system .......................... 46
Seat belts .......................................... 46 Seat belt nonusage
warning system ............................ 47
BabySmart
TM airbag
deactivation system ................... 53
Self-test BabySmart
TM
without special child
seat installed ................................ 53
Supplemental restraint system (SRS) ............................... 54
Emergency tensioning retractor (ETR) ............................ 55
Airbags .............................................. 56 Safety guidelines for the
seat belt, emergency
tensioning retractor
and airbag ..................................... 63
Infant and child
restraint systems ......................... 65
Adjustable steering wheel .............. 70
Inside rear view mirror ...................71 Antiglare night position .............. 71
Exterior rear view mirrors ............. 73 Exterior rear view mirror,
electrically folding ....................... 75
Instrument cluster ........................... 76
Indicator lamps in the instrument cluster ...................... 78
Trip computer ................................... 83
Flexible service system (FSS) ........ 87
Engine oil level indicator ................ 89
Exterior lamp switch ....................... 90
Fo g la mp sw itch (except Canada) .......................... 92
Fo g la mp sw itch (Canada only) .............................. 93
Hazard warning flasher switch ............................................ 94
Headlamp cleaning system ............ 94
Windshield wiper/washer switch ............................................ 95
Rear window wiper/washer ........... 96
Climate control ................................. 98
Basic setting – Heater ............... 100
Page 491 of 4133
24
Central locking system
Te ch n ica l
data
Instruments
and controls Operation
Driving Instrument
cluster display Practical hints Car care Index
Ve h i c l e k ey s
Included with your vehicle are: • 2 remote controls with folding master keys,
• 1 reserve key, Remote control with folding master key
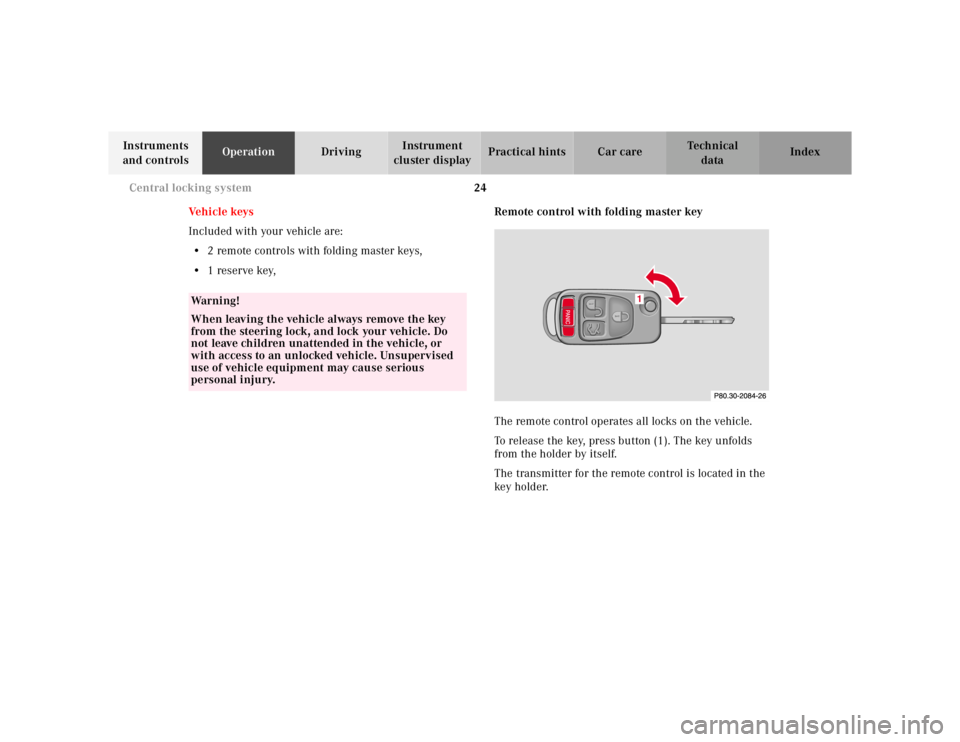
The remote control operates all locks on the vehicle.
To release the key, press button (1). The key unfolds
from the holder by itself.
The transmitter for the remote control is located in the
ke y ho ld e r.
Wa r n i n g !
When leaving the vehicle always remove the key
from the steering lock, and lock your vehicle. Do
not leave children unattended in the vehicle, or
with access to an unlocked vehicle. Unsupervised
use of vehicle equipment may cause serious
personal injury.
1
Page 504 of 4133
37
Seats
Te ch n ica l
data
Instruments
and controls Operation
Driving Instrument
cluster display Practical hints Car care Index
Seats, front
Caution!
Do not remove head restraints except when mounting
seat covers. For removal see page 43. Whenever head
restraints have been removed be sure to reinstall them
before driving.
Wa r n i n g !
Do not adjust the driver’s seat while driving.
Adjusting the seat while driving could cause the
driver to lose control of the vehicle.Never ride in a moving vehicle with the backrest
reclined. Sitting in an excessively reclined position
can be dangerous. You could slide under the seat
belt in a collision. If you slide under it, the belt
would apply force at the abdomen or neck. That
could cause serious or even fatal injuries. The
backrest and seat belt provide the best restraint
when the wearer is in an upright position and the
belt is properly positioned on the body.Never place hands under seat or near any moving
parts while a seat is being adjusted.
Wa r n i n g !
When leaving the vehicle always remove the key
from the steering lock, and lock your vehicle.Do not leave children unattended in the vehicle or
with access to an unlocked vehicle. Unsupervised
use of vehicle equipment may cause serious
personal injury.
Page 508 of 4133
41
Seats
Te ch n ica l
data
Instruments
and controls Operation
Driving Instrument
cluster display Practical hints Car care Index
Only minor personal adjustments, as described below,
should then be required.
For exterior rear view mirrors, see page 73;
inside rear view mirror, see page 71;
steering wheel adjustment, see page 70.
Note:
See page 42 for instructions on storing and recalling the
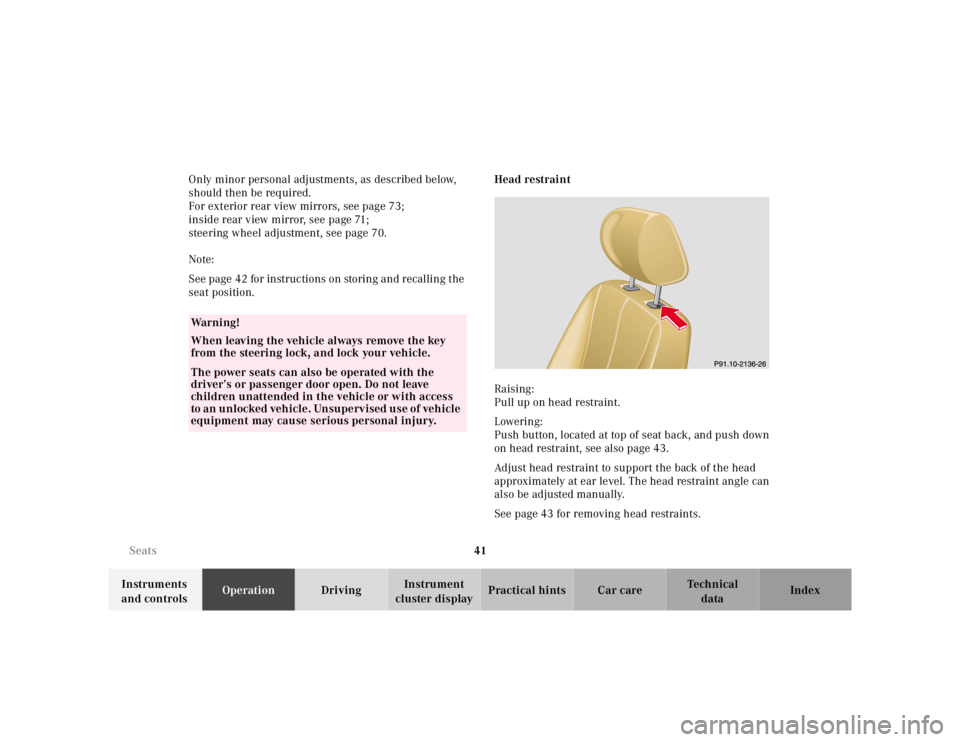
seat position. Head restraint
Raising:
Pull up on head restraint.
Lowering:
Push button, located at top of seat back, and push down
on head restraint, see also page 43.
Adjust head restraint to support the back of the head
approximately at ear level. The head restraint angle can
also be adjusted manually.
See page 43 for removing head restraints.
Wa r n i n g !
When leaving the vehicle always remove the key
from the steering lock, and lock your vehicle.The power seats can also be operated with the
driver’s or passenger door open. Do not leave
children unattended in the vehicle or with access
to an unlocked vehicle. Unsupervised use of vehicle
equipment may cause serious personal injury.
Page 520 of 4133
53
Restraint systems
Te ch n ica l
data
Instruments
and controls Operation
Driving Instrument
cluster display Practical hints Car care Index
BabySmart
TM airbag deactivation system
Special BabySmart
TM compatible child seats, designed
for use with the Mercedes-Benz system and available at
any authorized Mercedes-Benz Center are required for
use with the BabySmart
TM airbag deactivation system.
With the special child seat properly installed, the
passenger front airbag will not deploy. The 7
indicator lamp located in the instrument cluster will be
illuminated, except with key removed or in steering lock
position 0. The system does not deactivate the door
mounted side impact airbag.
Self-test BabySmart
TM
without special child seat installed
After turning key in steering lock to position 1 or 2, the
7 indicator lamp located in the instrument cluster
comes on for approximately 6 seconds, extinguishes,
then blinks once.
If the indicator lamp should not come on or is
continuously lit, the system is not functioning. You must
see an authorized Mercedes-Benz Center before seating
any child on the front passenger seat.
BabySmart
TM is a trademark of Siemens Automotive Corp.
Wa r n i n g !
The BabySmart
TM Airbag Deactivation System will
ONLY work with a special child seat designed to
operate with it. It will not work with child seats
which are not BabySmart
TM compatible.
Never place anything between seat cushion and
child seat (e.g. pillow), since it reduces the
effectiveness of the deactivation system.Follow the manufacturer’s instructions for
installation of special child seats.
The passenger side front airbag will not deploy
only if the 7 indicator lamp remains
illuminated.Please be sure to check the indicator every time
you use the special system child seat.Should the light go out while the restraint is
installed, please check installation. If the light
remains out, do not use the BabySmart
TM restraint
to transport children on the front passenger seat
until the system has been repaired.
Page 532 of 4133
65
Restraint systems
Te ch n ica l
data
Instruments
and controls Operation
Driving Instrument
cluster display Practical hints Car care Index
Infant and child restraint systems
We recommend t ha t all infa nts and children be properly
restrained at all times while the vehicle is in motion. All
lap-shoulder belts except the driver’s seat belt have
special seat belt retractors for secure fastening of child
restraints.
To fasten a child restraint follow child restraint
instructions for routing. Then pull shoulder belt out
completely and let it retract. During the seat belt
retraction a ratcheting sound can be heard to indicate
that the special seat belt retractor is activated. The belt
is now locked. Push down on child restraint to take up
any slack.
To deactivate, release seat belt buckle and let seat belt
retract completely. The seat belt can again be used in
the usual manner.
Note:
For child seats with mounting fittings for tether
anchorages refer to page 67 (installation of infant and
child restra int systems). Important!
The use of infant or child restraints is required by law in
all 50 states and all Canadian provinces.
Infants and small children should be seated in an
appropriate infant or child restraint system properly
secured by a lap-shoulder belt, and that complies with
U.S. Federal Motor Vehicle Safety Standard 213 and
Canadian Motor Vehicle Safety Standard 213.
A statement by the child restraint manufacturer of
compliance with this standard can be found on the
instruction label on the restraint and in the instruction
manual provided with the restraint.
When using any infant or child restraint system, be sure
to carefully read and follow all manufacturer’s
instructions for installation and use.
Please read and observe warning labels affixed to inside
of vehicle and to infant or child restraints.
Wa r n i n g !
Never release the seat belt buckle while vehicle is
in motion, since the special seat belt retractor will
be deactivated.
Page 572 of 4133
105
Interior equipment
Te ch n ica l
data
Instruments
and controls Operation
Driving Instrument
cluster display Practical hints Car care Index
The windows can be operated with key in steering lock
position 1 or 2.
Operation:
Press switch in to resistance point to open.
Lift switch to close.
Release switch when window is in desired position. Express opening of front door windows
Press switch past resistance point and release – window
lowers to fully open position. To interrupt procedure,
brief ly pull switch.
Blocking of rear door window operation
If no operation of the rear door windows by switch (6),
located on rear center console (for instance by children)
is desired, slide override switch (5) to right,
symbol N becomes visible.
Note:
After turning off the engine the power windows can be
operated for approximately 30 minutes or until a front
door is opened.
Wa r n i n g !
When closing the windows, be sure that there is no
danger of anyone being harmed by the closing
procedure.The closing procedure can be immediately reversed
by pressing the power window switch.When leaving the vehicle, always remove the key
from the steering lock, and lock the vehicle. Do not
leave children unattended in the vehicle, or with
access to an unlocked vehicle. Unsupervised use of
vehicle equipment can cause serious personal
injury.
Wa r n i n g !
When leaving the vehicle, always remove the key
from the steering lock, and lock the vehicle. Do not
leave children unattended in the vehicle, or with
access to an unlocked vehicle. Unsupervised use of
vehicle equipment can cause serious personal
injury.
Page 573 of 4133
106
Interior equipment
Te ch n ica l
data
Instruments
and controls Operation
Driving Instrument
cluster display Practical hints Car care Index
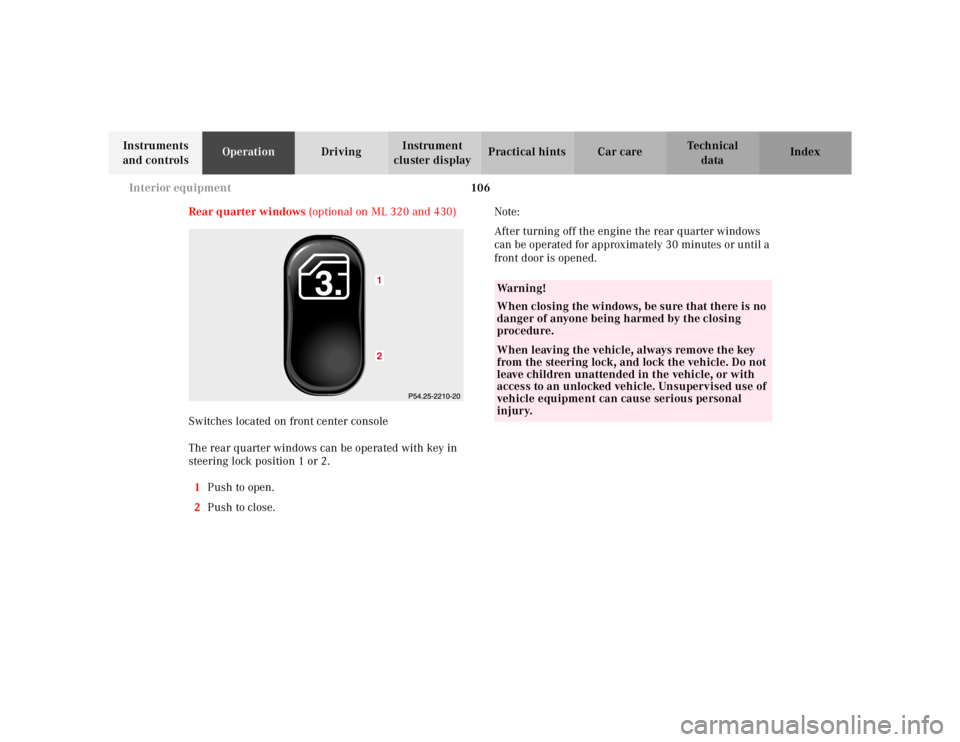
Rear quarter windows (optional on ML 320 and 430)
Switches located on front center console
The rear quarter windows can be operated with key in
steering lock position 1 or 2.
1 Push to open.
2 Push to close. Note:
After turning off the engine the rear quarter windows
can be operated for approximately 30 minutes or until a
front door is opened.
12
Wa r n i n g !
When closing the windows, be sure that there is no
danger of anyone being harmed by the closing
procedure.When leaving the vehicle, always remove the key
from the steering lock, and lock the vehicle. Do not
leave children unattended in the vehicle, or with
access to an unlocked vehicle. Unsupervised use of
vehicle equipment can cause serious personal
injury.
Page 574 of 4133
107
Interior equipment
Te ch n ica l
data
Instruments
and controls Operation
Driving Instrument
cluster display Practical hints Car care Index
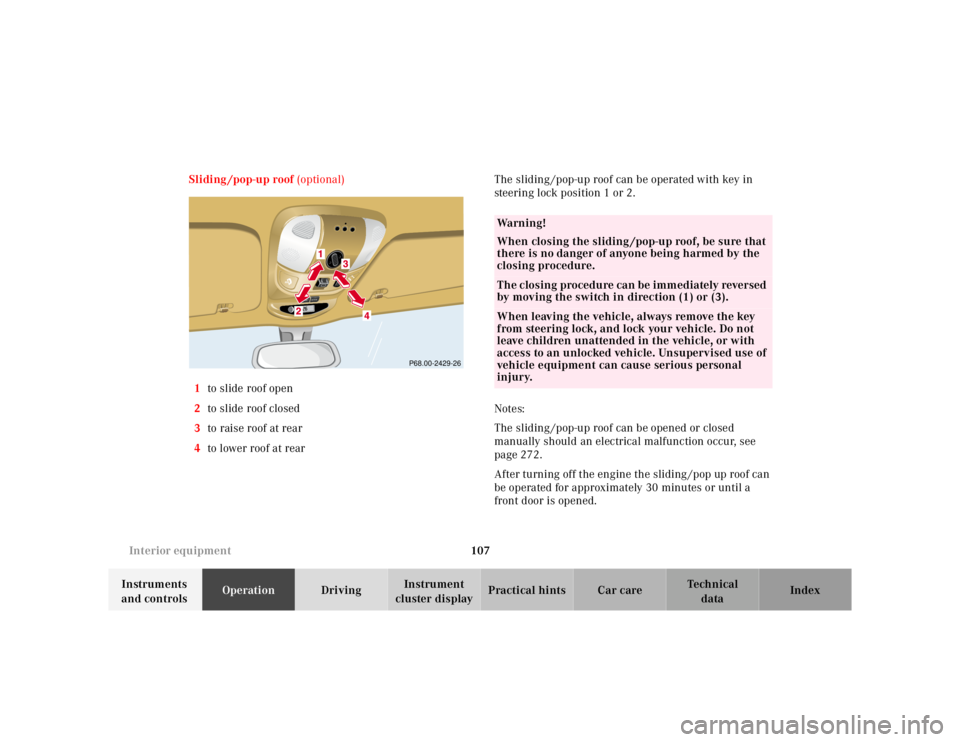
Sliding /pop-up roof
(optional)
1 to slide roof open
2 to slide roof closed
3 to raise roof at rear
4 to lower roof at rear The sliding /pop-up roof can be operated with key in
steering lock position 1 or 2.
Notes:
The sliding /pop-up roof can be opened or closed
manually should an electrical malfunction occur, see
page 272.
After turning off the engine the sliding /pop up roof can
be operated for approximately 30 minutes or until a
front door is opened.
RESETMODE
P68.00-2429-26
Wa r n i n g !
When closing the sliding /pop-up roof, be sure that
there is no danger of anyone being harmed by the
closing procedure.The closing procedure can be immediately reversed
by moving the switch in direction (1) or (3).When leaving the vehicle, always remove the key
from steering lock, and lock your vehicle. Do not
leave children unattended in the vehicle, or with
access to an unlocked vehicle. Unsupervised use of
vehicle equipment can cause serious personal
injury.
Page 576 of 4133
109
Interior equipment
Te ch n ica l
data
Instruments
and controls Operation
Driving Instrument
cluster display Practical hints Car care Index
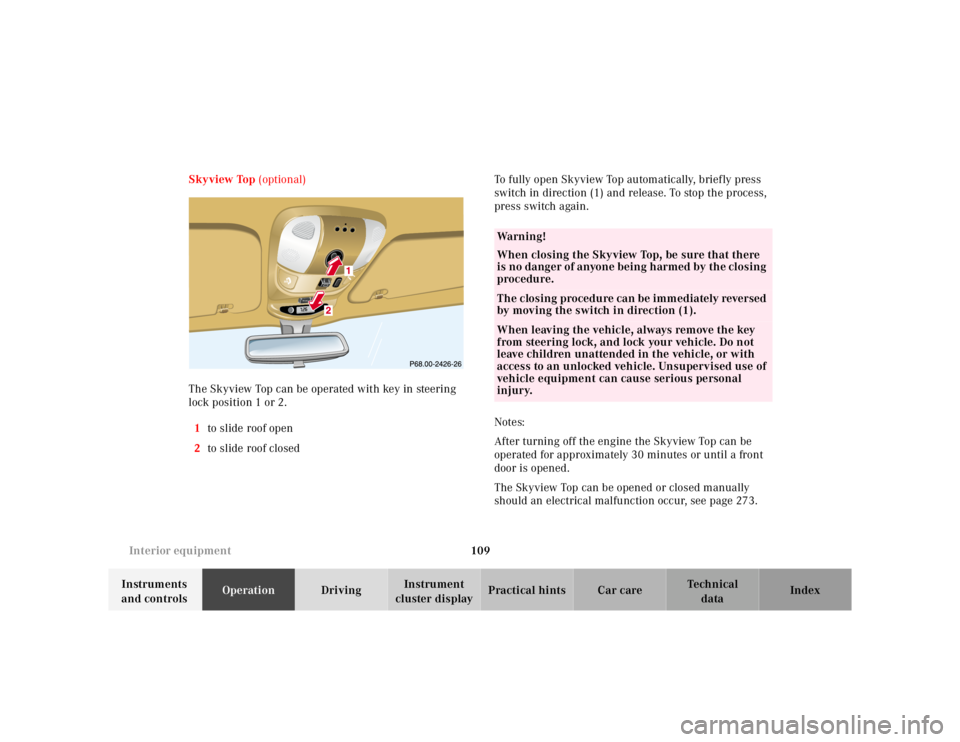
Skyview Top
(optional)
The Skyview Top can be operated with key in steering
lock position 1 or 2.
1 to slide roof open
2 to slide roof closed To fully open Skyview Top automatically, brief ly press
switch in direction (1) and release. To stop the process,
press switch again.
Notes:
After turning off the engine the Skyview Top can be
operated for approximately 30 minutes or until a front
door is opened.
The Skyview Top can be opened or closed manually
should an electrical malfunction occur, see page 273.
RESETMODE
Wa r n i n g !
When closing the Skyview Top, be sure that there
is no danger of anyone being h armed by th e closing
procedure.The closing procedure can be immediately reversed
by moving the switch in direction (1).When leaving the vehicle, always remove the key
from steering lock, and lock your vehicle. Do not
leave children unattended in the vehicle, or with
access to an unlocked vehicle. Unsupervised use of
vehicle equipment can cause serious personal
injury.