air filter MERCEDES-BENZ ML430 1997 Complete Owner's Manual
[x] Cancel search | Manufacturer: MERCEDES-BENZ, Model Year: 1997, Model line: ML430, Model: MERCEDES-BENZ ML430 1997Pages: 4133, PDF Size: 88.89 MB
Page 2093 of 4133

AR01.30-P-5800MV
Remove/install cylinder head
22.7.98
ENGINE
112.942 in MODEL 163.154
ENGINE
112.970 in MODEL 163.157
ENGINE
113.942 in MODEL 163.172
ENGINE
113.981 in MODEL 163.174
ENGINE
113.965 in MODEL 163.175
P01.30-2032-06
Shown on model 163.154 with engine 112
1
Air baffle
2
Viscous fan
3
Fan shroud
4
Bolts
5
Air cleaner housing
6
Air intake manifold
7
Resonance unit
8
Poly-V-belt
9
Fender liner
10
Shield
11
Exhaust bracket
P01.30-2033-06
12
Right and left ignition coils
13
Left and right cylinder head covers
14
Intake manifold
15
Camshaft position sensor
16
Coolant line
17
Chain tensioner
18
Oil filter housing
19
Camshaft sprockets
28
Camshaft bearing bridges
Copyright DaimlerChrysler AG 20.05.2006 CD-Ausgabe G/10/04 . This WIS print-out will not be recorde
d by Modification services.
Page 1
Page 2193 of 4133

version FB6 with code ZS6, -
special protection version FB7
with code ZS7, additional battery
100 Ah incl. cutoff relay code E26.
Model 463.248 with: special
protection version, code 979, -
special protection version FB6,
code ZS6, -special protection
version FB7, code ZS7, -additional
battery 100 Ah including cutoff
relay, code E26.AR54.10-P-0003PM
3.1Unclip cover on front
side of engineModel 211, 215, 220, 230.475/476
4.1Remove engine cover
with integrated air filterExcept model 170.466,
203.065/076/265/276, 209.376/476
from 24.4.04, 211.076/276,
215.374, 220.074/174, 230.474,
463.270/271
The air filter is integrated in the
engine cover. Remove the engine
cover or the air filter housing by
pulling it from the cylinder head
covers vertically in the upward
direction.
4.2Remove air filter housingModel 170.466, 203.065/265,
211.076/276, 215.374,
220.074/174, 230.474AR09.10-P-1150SVK
Model 203.076 /276, 209.376 /476
from 24.4.04, 171.473AR09.10-P-1150AC
Model 463.270/271AR09.10-P-1150GX
5Unscrew screw (5/3) *BA15.10-P-1001-
04A
6Detach spark plug
connector (5/1) from the
spark plugs Pry off spark plug connector
(5/1) using open-end wrench,
double over the cylinder head
cover of the spark plugs.
Installation: Observe the
identification of the connector
(arrow) on the cylinder head cover
and the ignition coil of cylinders 1
to 6 or 1 to 8 for the corresponding
spark plug connector (5/1).
Double open-ended wrenchFig. 24
7Separate electrical
connector of ignition coil
of cylinder 1 to 6 (T1/1 Installation: Install new cable
ties.
2001 Mercedes-Benz ML320
1998-2005 ENGINE Electrical System - Engine - 163 Chassis
me
Saturday, October 02, 2010 3:18:54 PMPage 39 © 2006 Mitchell Repair Information Company, LLC.
Page 2197 of 4133

Fig. 25: Identifying Crankshaft Position Sensor - Shown On Engine 113 In Model 220
Remove/install
1.1Remove engine cover with
integrated air filterAll except Engine 112.960
in Model 170.466, Engine
112.961 in Model
203.065 /265
Remove air filter
housing by lifting
vertically up and off the
cylinder head covers.
Installation: Slightly
moisten rubber retainers on
cylinder head covers and
sealing ring of hot film
mass air flow sensor in the
air filter housing with
lubricating paste
Lubricating paste*BR00.45-Z-1002-06A
1.2Remove air filter housingEngine 112.960 in model
170.466AR09.10-P-1150SVK
Engine 112.961 in model
203.065/ 265
2Remove crankshaft position
sensor (L5) *BA15.10-P-1001-03A
3Install in the reverse order
4Re-initialize crankshaft
position sensor (L5) using
STAR DIAGNOSIS If crankshaft position
sensor (L5)was replaced, a
re-initialization must be
2001 Mercedes-Benz ML320
1998-2005 ENGINE Electrical System - Engine - 163 Chassis
me
Saturday, October 02, 2010 3:18:54 PMPage 43 © 2006 Mitchell Repair Information Company, LLC.
Page 2226 of 4133

Fig. 47: Identifying Spark Plugs And Cylinder 4 Ignition Coil
Remove/install and
replacing
Risk of death due to
contact with high-voltage
conductive partsDo not touch parts which
conduct high voltages.
Persons who are carriers
of electronic implants
(e.g. cardiac pacemaker)
may not carry out any
work on the ignition
systemAS15.10-Z-0001-01A
Notes on avoiding damage
to ignition systemEngine 104, 111, 112,
113, 119, 120,271AH15.10-P-0002-01D
1Remove/install air filter
upper section
2
Remove ignition coils
Remove/install ignition
coils
AR15.12-P-2003A
3Disconnect spark plug
connectors Prise over cylinder
head cover.
Double open-ended
wrenchFig. 24
Checking
4Check spark plug Replace, if necessary.
2001 Mercedes-Benz ML320
1998-2005 ENGINE Electrical System - Engine - 163 Chassis
me
Saturday, October 02, 2010 3:18:55 PMPage 72 © 2006 Mitchell Repair Information Company, LLC.
Page 2234 of 4133

BA01.20-P-1002-01A
Screw of trim panel of cylinder head cover
to cylinder head cover
Nm
1010
8
BA01.20-P-1003-01A
Screw attaching cover panel to charge air
distribution pipe
Nm
1010
-
Designation
Engine
612.961
Engine 612.962/
967
Engine
612.963/966
BF18.00-P-1001-01A
Engine oil
Filling capacity
(oil and filter change)
Liter
7,06.57.5
Specifications for Operating
Fluids
SheetBB00.40-P-0228-01ABB00.40-P-0228-01ABB00.40-P-0228-01A
SheetBB00.40-P-0228-03ABB00.40-P-0228-03ABB00.40-P-0228-03A
SheetBB00.40-P-0228-05ABB00.40-P-0228-05ABB00.40-P-0228-05A
SheetBB00.40-P-0229-01ABB00.40-P-0229-01ABB00.40-P-0229-01A
SheetBB00.40-P-0229-03ABB00.40-P-0229-03ABB00.40-P-0229-03A
SheetBB00.40-P-0229-05ABB00.40-P-0229-05ABB00.40-P-0229-05A
Engine lubrication system
Number
Designation
Engine 612.990
BF18.00-P-1001-01A
Engine oil
Filling capacity
(oil and filter change)
Liter
6.5
Specifications for Operating
Fluids
SheetBB00.40-P-0228-01A
SheetBB00.40-P-0228-03A
SheetBB00.40-P-0228-05A
SheetBB00.40-P-0229-01A
SheetBB00.40-P-0229-03A
SheetBB00.40-P-0229-05A
120 589 07 21 00
Measuring rod
Socket wrench bit
103 589 02 09 00
Commercially available tools
(see Workshop Equipment Manual)
Number
Designation
Make (e. g.)
Order number
WH58.30-Z-1007-16A
Engine oil extractor
Deutsche Tecalemit
Am Metallwerk 11
33659 Bielefeld
1.386950.2
Copyright DaimlerChrysler AG 20.05.2006 CD-Ausgabe G/10/04 . This WIS print-out will not be recorde
d by Modification services.
Page 3
Page 2239 of 4133

AF07.00-P-9000B
Engine runs rough, surges or does not turn over
29.4.02
ENGINE
611 in MODEL 203, 202, 210
ENGINE
612 in MODEL 163, 203, 210, 209
ENGINE
613 in MODEL 210, 220
ENGINE
628 in MODEL 163, 220, 211
ENGINE
646 in MODEL 203, 211
ENGINE
647 in MODEL 211
ENGINE
648 in MODEL 220, 211
ENGINE
668 in MODEL 168
ENGINE
612, 628 in MODEL 463
Modification notes
23.3.01
Supersedes STIP 07.16-014 dated 11.12.00
Damage code
Cause
Remedy
07 206 D5
High-pressure pump
To verify whether high pressure pump is
damaged.
#
High pressure pump of common rail
injection system is damaged mechanically.
1
Remove/install/replace high pressure
pump.
When the high pressure pump of the common
rail injection system is damaged metal chips
and/or damage to the pump drive (timing
drive) can occur due to contamination of the
injection system components.
2
Turn high pressure pump by hand with
driver.
If mechanical resistance can be felt,
perform the following tests. Clarify additional
work with ESKULAB by specifying repair work:
#
3
Check driver of high pressure pump or
mount in sprocket for damage (visual
check).
If high pressure pump is locked:
#
4
Check timing
5
Check timing drive for damage.
In each case:
#
6
Remove/install/replace timing chain.
If timing deviates by a crankshaft angle of
more than 20 degrees (corresponding to one
tooth skipped):
#
7
Check pressure loss.
8
Open low pressure connection on high
pressure pump return (plastic line in
area of pressure regulator valve) and
check connection point in rail for chips.
If chips are present when checking
injection system:
#
9
Thoroughly clean all fuel low pressure
lines as well as feed and return lines.
Flush and blow out with compressed air.
10
Remove fuel preheater and fuel filter
with filter housing, replace.
Fuel preheater is only installed in models
202, 203 and 163.
11
Remove/install/replace fuel cooler at
vehicle and engine end.
Not installed in model 210 up to 6/99 and
model 168.
12
Remove fuel tank, replace.
On engine 628:
#
13
Remove/install/replace electric supply
pump.
14
Remove/install/replace injectors, rail
(including pressure regulation valve and
rail pressure sensor), high pressure
lines and injector leak oil rail.*
Copyright DaimlerChrysler AG 28.05.2006 CD-Ausgabe G/10/04 . This WIS print-out will not be recorde
d by Modification services.
Page 1
Page 2254 of 4133
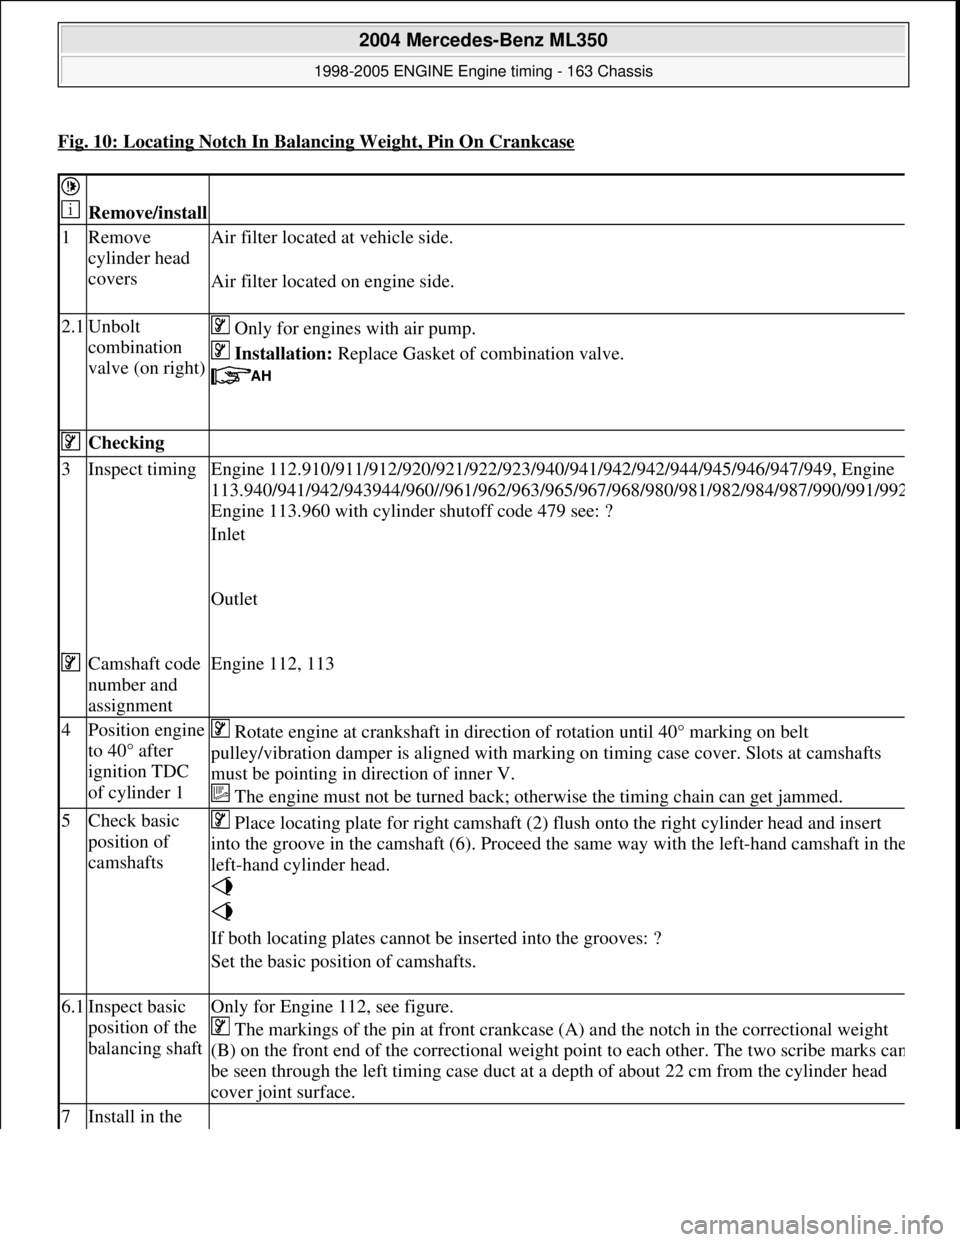
Fig. 10: Locating Notch In Balancing Weight, Pin On Crankcase
Remove/install
1Remove
cylinder head
covers Air filter located
at vehicle side.
Air filter located on engine side.
2.1Unbolt
combination
valve (on right) Only for engines with air pump.
Installation: Replace Gasket of combination valve.
Checking
3Inspect timing Engine 112.910/911/912/920/921/ 922/923/940/941/942/942/944/945/946/947/949, Engine
113.940/941/942/943944/960//961/962/963/965/ 967/968/980/981/982/984/987/990/991/99
2
Engine 113.960 with cylinder shutoff code 479 see: ?
Inlet
Outlet
Camshaft code
number and
assignmentEngine 112, 113
4Position engine
to 40° after
ignition TDC
of cylinder 1 Rotate engine at crankshaft in direct ion of rotation until 40° marking on belt
pulley/vibration damper is aligned with mark ing on timing case cover. Slots at camshafts
must be pointing in di rection of inner V.
The engine must not be turned back; otherwise the timing chain can get jammed.
5Check basic
position of
camshafts Place locating plate for right camshaft (2) fl
ush onto the right cylinder head and insert
into the groove in the camshaft (6). Proceed the same way with the left-hand camshaft in th
e
left-hand cylinder head.
If both locating plates cannot be inserted into the grooves: ?
Set the basic position of camshafts.
6.1Inspect basic
position of the
balancing shaftOnly for Engine 112, see figure.
The markings of the pin at front crankcase (A) and the notch in the correctional weight
(B) on the front end of the corr ectional weight point to each ot her. The two scribe marks ca
n
be seen through the left timing case duct at a depth of about 22 cm from the cylinder head
cover joint surface.
7Install in the
2004 Mercedes-Benz ML350
1998-2005 ENGINE Engine timing - 163 Chassis
me
Saturday, October 02, 2010 3:39:37 PMPage 13 © 2006 Mitchell Repair Information Company, LLC.
Page 2270 of 4133

Models 211.061/065/070AR54.10-P-0003T
Model 215, 220AR54.10-P-0003I
Model 230.474 /475AR54.10-P-0003R
All models 463 except
463.241/248 with code 979.AR54.10-P-0003G
Model 463.241 with code
979AR54.10-P-0003PV
Model 463.248 with code
979AR54.10-P-0003PM
Notes on batteryAll modelsAH54.10-P-0001-01A
2Remove spark plugsTo ensure that the engine
can be easily cranked when
drawing in the timing chain,
and to avoid the timing
chain jumping across.
Remove only once spark
plug of each cylinder.
Replace spark plugsModel 163AP15.10-P-1580GH
Models 220, 230.474/475AP15.10-P-1580AB
Models 210, 208, 202AP15.10-P-1580A
Models 203, 170, 209, 211
with engine 112
Models 209, 211 with
engine 113
3Remove cylinder head
coversAir filter mounted on
vehicleAR01.20-P-5014B
Air filter mounted on
engineAR01.20-P-5014BV
4.1Remove fan shroud Not models
211.061/065/070, 230.475
Models 220, 230.474
AR20.40-P-6800AB
4.2Remove electric fanModel 170AR20.40-P-5000SV
Models 203, 209AR20.40-P-5000PV
Model 163.174AR20.40-P-5000GH
5Position engine to 40°
after TDC of first
cylinder. Engine must not be
cranked backwards. The
notches of the camshafts
must be pointing in the
direction of the inner V.
It must be possible to easily
insert the two locking
plates.
If this is not possible: ?
Set the basic position of AR05.20-P-6020AU
2004 Mercedes-Benz ML350
1998-2005 ENGINE Engine timing - 163 Chassis
me
Saturday, October 02, 2010 3:39:37 PMPage 29 © 2006 Mitchell Repair Information Company, LLC.
Page 2273 of 4133

Intake manifold
211.061/065/070, 230.475
Models 220, 230.474
22.2Install electric fanModel 170AR20.40-P-5000SV
Models 203, 209AR20.40-P-5000PV
Model 163.174AR20.40-P-5000GH
23Install cylinder head
coversAir filter locat ed at vehicle
side.AR01.20-P-5014B
Air filter locat ed on engine
side.AR01.20-P-5014BV
24Install spark plugs
Replace spark plugsModels 220, 230.474/475AP15.10-P-1580AB
Models 210, 208, 202AP15.10-P-1580A
Models 170, 203, 209, 211
with engine 112
Models 209, 211 with
engine 113
Model 163AP15.10-P-1580GH
25Connect ground cableModel 203AR54.10-P-0003P
Models 129, 163, 170, 202,
208, 210AR54.10-P-0003A
Model 209AR54.10-P-0003Q
Models 211.061/065/070AR61.20-P-1105T
Model 215, 220AR54.10-P-0003I
Model 230.474/475AR54.10-P-0003R
All models 463 except
463.241/248 with code 979AR54.10-P-0003G
Model 463.241 with code
979AR54.10-P-0003PV
Model 463.248 with code
979AR54.10-P-0003PM
Risk of accident caused
by vehicle starting off by
itself when engine is
running. Risk of injury
caused by contusions and
burns during starting
procedure or when
working near the running
engineSecure vehicle to prevent it
from moving by itself.
Wear closed and snug-
fitting work clothes.
Do not grasp hot or rotating
parts.AS00.00-Z-0005-01A
26Run engine and inspect
for leaks
NumberDesignationEngines 112, 113
2004 Mercedes-Benz ML350
1998-2005 ENGINE Engine timing - 163 Chassis
me
Saturday, October 02, 2010 3:39:37 PMPage 32 © 2006 Mitchell Repair Information Company, LLC.
Page 2277 of 4133

2Remove spark plugs To ensure that the
engine can be easily
cranked when drawing in
the timing chain, and to
avoid the timing chain
jumping across.
Remove only one spark
plug at each cylinder.
Replace spark plugsModel 463.AP15.10-P-1580GA
Model 129.AP15.10-P-1580A
Models 202, 208, 210 with
engine 112.
Models 163.AP15.10-P-1580GH
3Remove cylinder head
coversAir filter locat ed at vehicle
side.AR01.20-P-5014B
Air filter located on
engine side.AR01.20-P-5014BV
4Remove viscous-drive fan. Right-hand thread!AR20.40-P-5660C
5Remove fan shroud On model 163 unscrew
bolts at bottom of fan
shroud.
Model 463.AR20.40-P-6800V
6Position engine at a 40°
crank angle before
ignition TDC of cylinder
1. Engine must not be
cranked back.
The notches of the
camshafts must be
pointing in the direction of
the inner V.
It must be possible to
easily insert the two
locking plates.
If this is not possible: ?
Set the basic position of
camshafts.AR05.20-P-6020AU
The copper tabs of the
timing chain must be
aligned with the markings
on the camshaft sprockets.
Because of the unevenly
long travel of the timing
chain it may be necessary
to crank the engine as
much as 14 times until the
copper tabs are aligned
with the markings on the
2004 Mercedes-Benz ML350
1998-2005 ENGINE Engine timing - 163 Chassis
me
Saturday, October 02, 2010 3:39:37 PMPage 36 © 2006 Mitchell Repair Information Company, LLC.