ABS MERCEDES-BENZ ML500 1997 Complete Repair Manual
[x] Cancel search | Manufacturer: MERCEDES-BENZ, Model Year: 1997, Model line: ML500, Model: MERCEDES-BENZ ML500 1997Pages: 4133, PDF Size: 88.89 MB
Page 3806 of 4133

9
Install inner cover (E) at 60 % bench
Insert cover past the springs from the rear
and rotate into position in a clockwise
direction. Insert locating tabs (19). Press the
front cover down and reset so that locating
tabs (20) engage. Press rear cover down until
locating tabs (18) engage.
10
Install outer cover (D) at 60 % bench
Guide the cover past the lateral curtain.
Insert locating tab (17), push front cover down
and reset so that locating tabs (16) engage.
Press the outer edge of the cover down and
insert lateral locating tabs (15). Raise rear
cover on the inside, press down until locating
tab (14) and rear locating tab (13) engage.
11
Install curtain at front 60 % bench
12
Install inner cover (C) at 40 % bench
Insert cover from the front and insert
locating tabs (11). Press the front cover down
and reset so that locating tabs (12) engage.
13
Install outer cover (B) at 40 % bench
Guide the cover past the lateral curtain.
Insert locating tab (10), push front cover down
and reset so that locating tab (9) engages.
Press the outer edge of the cover down and
insert lateral locating tabs (8). Insert locating
tab (7), push cover down at locating tab (6)
and engage.
14
Install curtain at front 40 % bench
15
Install rear cover (A)
Insert cover from the rear and press down
and forwards so that locating tabs (5) engage.
Press front ends of the cover down, so that
locating tabs (2, 3, 4) engage. Insert locating
tabs (1) into covers (C, E).
Copyright DaimlerChrysler AG 14.06.2006 CD-Ausgabe G/10/04 . This WIS print-out will not be recorde
d by Modification services.
Page 2
Page 3910 of 4133
GENERAL NOTES: PASSENGER CARS: SUSPENSION - AH32.00-Z-9999AZ
MODEL all
SAFETY PRECAUTIONS
SAFETY INFORMATION: SUSPENSION - AS32.00-Z-9999ZZ
MODEL all
TESTING AND REPAIR
Special information on AIRmaticMODEL 164...AH32.22-P-
1000-02GZ
Special information on AIRmaticMODEL 240AH32.22-P-
1000-02H
Special information on AIRmaticMODEL 251AH32.22-P-
1000-02RT
Notes on AIRmaticMODEL 221, 216AH32.22-P-
1000-02SX
Notes on checking oil level on
vehicles with level control/ADSMODEL all...AH32.00-P-
0003-01A
Springs; general background
information.MODEL 129, 140, 170, 171, 202, 203, 208,
209, 210, 211, 219, 230...AH32.20-P-
9404-01A
Notes on Active Body Control
suspensionMODEL 215, 216, 220, 221, 230...AH32.50-P-
0001-01N
Notes on AIRmaticMODEL 220 except CODE (487a) Active
body control (ABC)AH32.22-P-
1000-02I
General notes on working on
vehicles with level control/ADSMODEL all...AH32.00-P-
0002-01A
Notes on air suspensionMODEL 211.2 except CODE (489) Airmatic
(semi-active air suspension) MODEL 211.6AH32.22-P-
1000-01T
Special information on AIRmaticMODEL 211.0/2, 219 with CODE (489)
Airmatic (semi-active air suspension)AH32.22-P-
1000-02T
Observe removal and installation
position of shock absorber/ADSMODEL 210 with CODE (217a) Level Control
at Rear Axle with ADSAH32.32-P-
0001-01A
General notes on repair work on
vehicles with ADSMODEL 129, 140, 210 with CODE (217a)
Self-levelling suspension on rear axle with
ADSAH32.32-P-
9406-01A
Notes on fitting hydraulic lines and
hosesMODEL 215, 216, 220, 221, 230...AH32.50-P-
0001-02A
Risk of death caused by lowering vehicle when working between wheels
and body. Risk of injury caused by pinching or jamming when working on
the air suspension.MODEL
allAS32.22-Z-
0001-01A
2001 Mercedes-Benz ML320
1998-2005 SUSPENSION Suspension - 163 Chassis
me
Saturday, October 02, 2010 3:37:35 PMPage 2 © 2006 Mitchell Repair Information Company, LLC.
Page 3911 of 4133
TESTING AND REPAIR WORK: PASSENGER CARS: SUSPENSION - AR32.00-Z-9163AA
MODEL 163
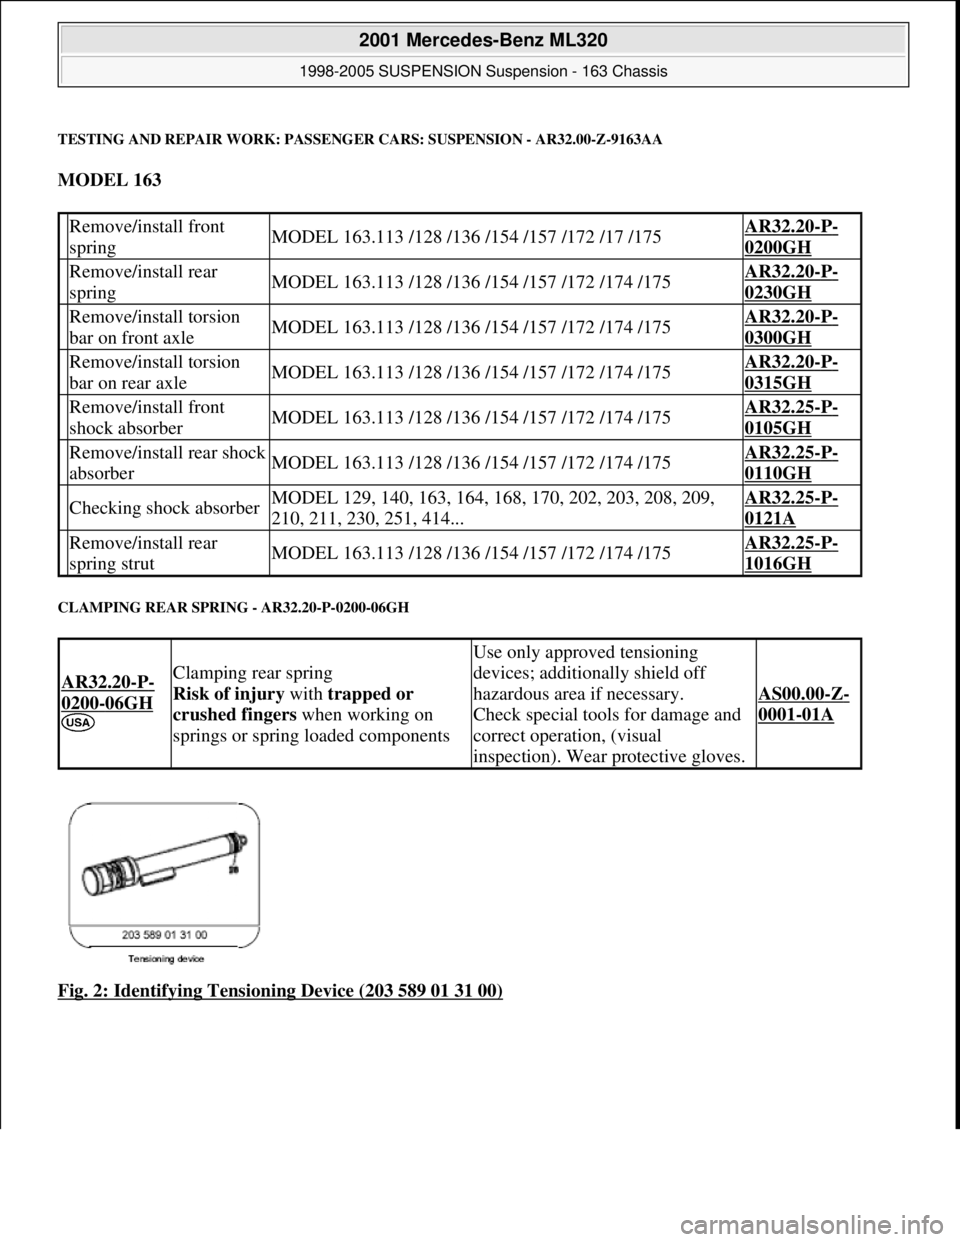
CLAMPING REAR SPRING - AR32.20-P-0200-06GH
Fig. 2: Identifying Tensioning Device (203 589 01 31 00)
Remove/install front
springMODEL 163.113 /128 /136 /154 /157 /172 /17 /175AR32.20-P-
0200GH
Remove/install rear
springMODEL 163.113 /128 /136 /154 /157 /172 /174 /175AR32.20-P-
0230GH
Remove/install torsion
bar on front axleMODEL 163.113 /128 /136 /154 /157 /172 /174 /175AR32.20-P-
0300GH
Remove/install torsion
bar on rear axleMODEL 163.113 /128 /136 /154 /157 /172 /174 /175AR32.20-P-
0315GH
Remove/install front
shock absorberMODEL 163.113 /128 /136 /154 /157 /172 /174 /175AR32.25-P-
0105GH
Remove/install rear shock
absorberMODEL 163.113 /128 /136 /154 /157 /172 /174 /175AR32.25-P-
0110GH
Checking shock absorberMODEL 129, 140, 163, 164, 168, 170, 202, 203, 208, 209,
210, 211, 230, 251, 414...AR32.25-P-
0121A
Remove/install rear
spring strutMODEL 163.113 /128 /136 /154 /157 /172 /174 /175AR32.25-P-
1016GH
AR32.20-P-
0200-06GH
Clamping rear spring
Risk of injury with trapped or
crushed fingers when working on
springs or spring loaded components
Use only approved tensioning
devices; additionally shield off
hazardous area if necessary.
Check special tools for damage and
correct operation, (visual
inspection). Wear protective gloves.
AS00.00-Z-
0001-01A
2001 Mercedes-Benz ML320
1998-2005 SUSPENSION Suspension - 163 Chassis
me
Saturday, October 02, 2010 3:37:35 PMPage 3 © 2006 Mitchell Repair Information Company, LLC.
Page 3916 of 4133
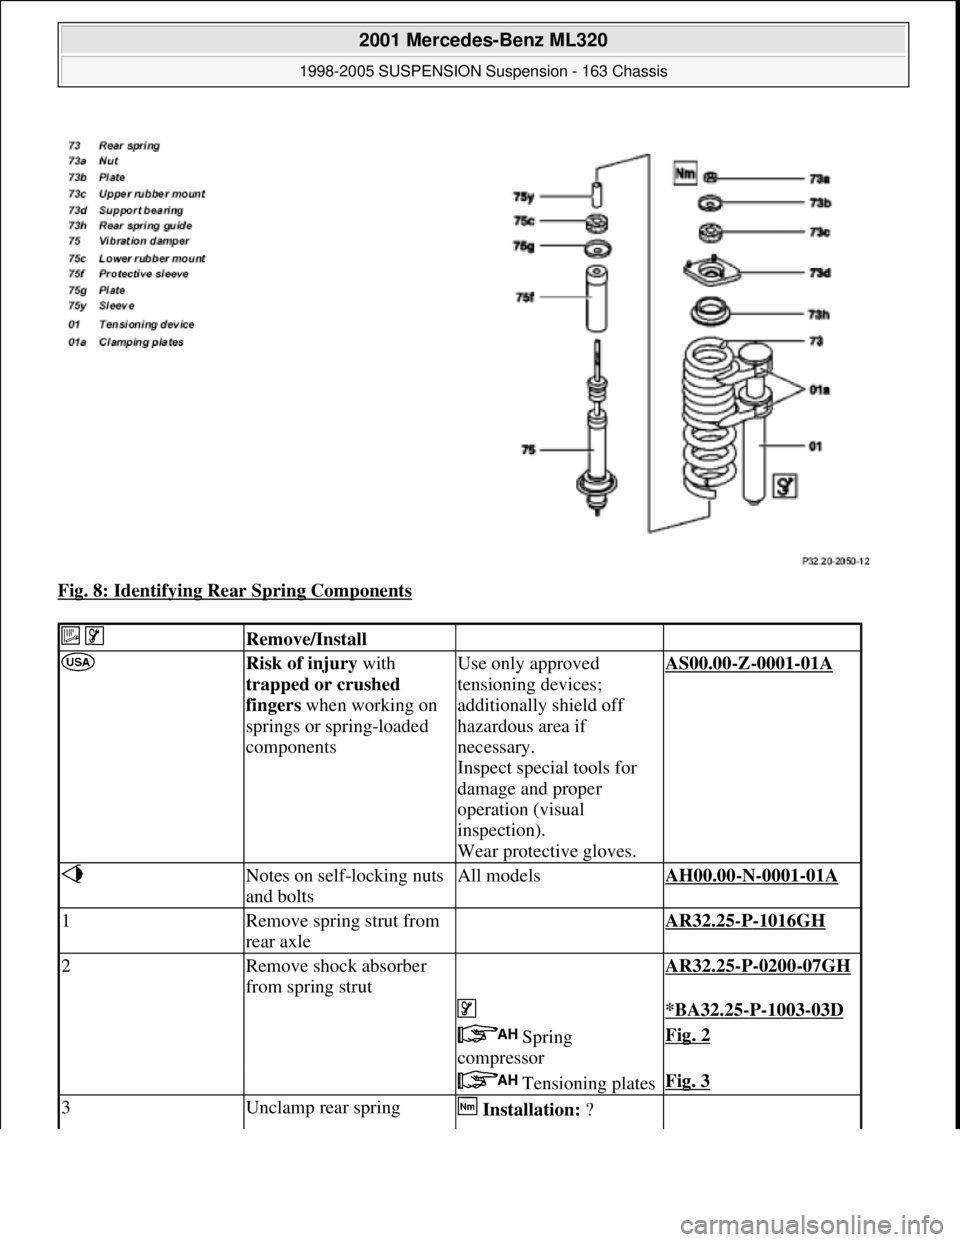
Fig. 8: Identifying Rear Spring Components
Remove/Install
Risk of injury with
trapped or crushed
fingers when working on
springs or spring-loaded
componentsUse only approved
tensioning devices;
additionally shield off
hazardous area if
necessary.
Inspect special tools for
damage and proper
operation (visual
inspection).
Wear protective gloves.AS00.00-Z-0001-01A
Notes on self-locking nuts
and boltsAll modelsAH00.00-N-0001-01A
1Remove spring strut from
rear axle AR32.25-P-1016GH
2Remove shock absorber
from spring strut AR32.25-P-0200-07GH
*BA32.25-P-1003-03D
Spring
compressorFig. 2
Tensioning platesFig. 3
3Unclamp rear spring Installation: ?
2001 Mercedes-Benz ML320
1998-2005 SUSPENSION Suspension - 163 Chassis
me
Saturday, October 02, 2010 3:37:35 PMPage 8 © 2006 Mitchell Repair Information Company, LLC.
Page 3917 of 4133
Rear axle shock absorber
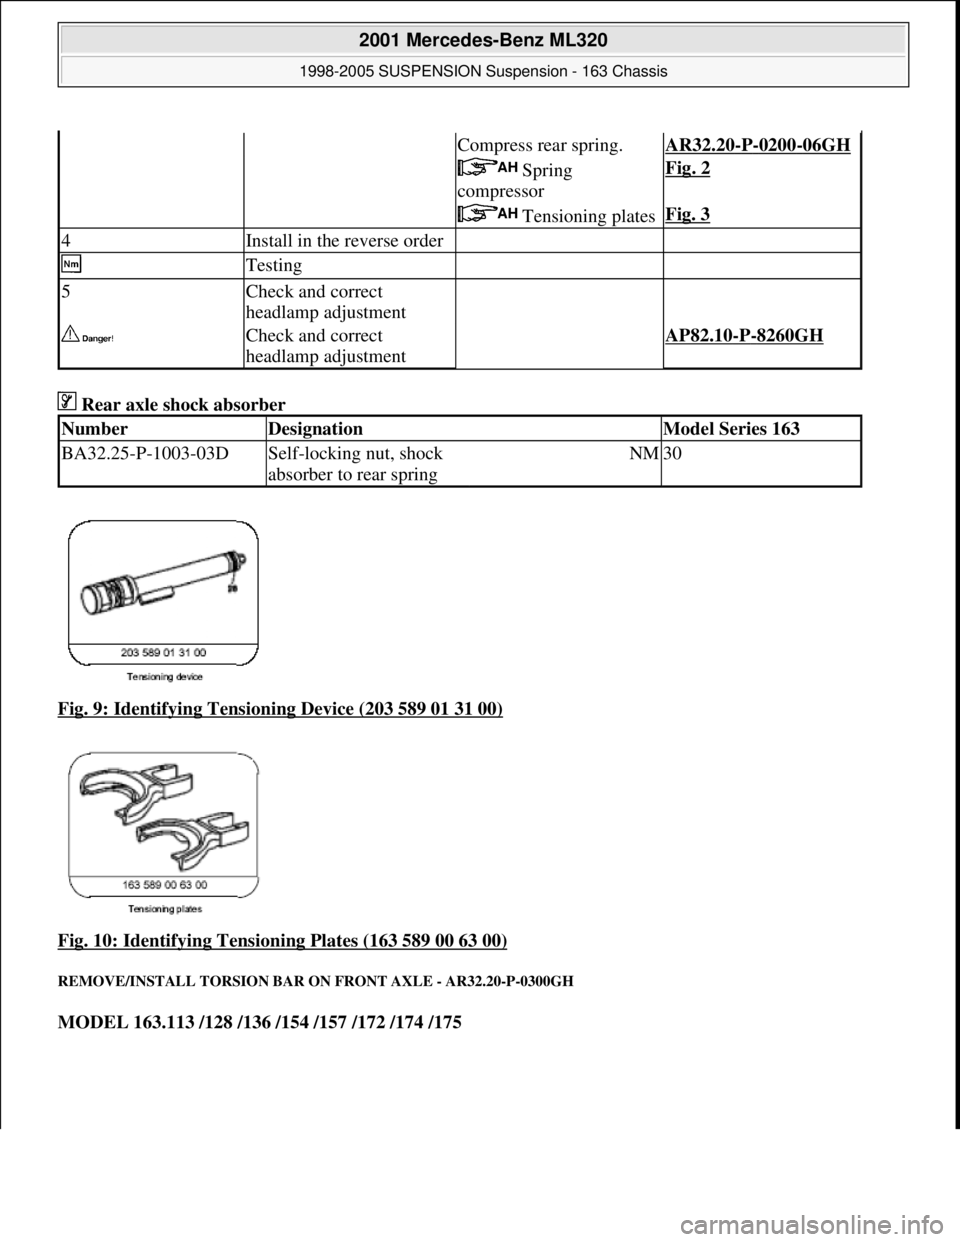
Fig. 9: Identifying Tensioning Device (203 589 01 31 00)
Fig. 10: Identifying Tensioning Plates (163 589 00 63 00)
REMOVE/INSTALL TORSION BAR ON FRONT AXLE - AR32.20-P-0300GH
MODEL 163.113 /128 /136 /154 /157 /172 /174 /175
Compress rear spring.AR32.20-P-0200-06GH
Spring
compressorFig. 2
Tensioning platesFig. 3
4Install in the reverse order
Testing
5Check and correct
headlamp adjustment
Check and correct
headlamp adjustmentAP82.10-P-8260GH
NumberDesignationModel Series 163
BA32.25-P-1003-03DSelf-locking nut, shock
absorber to rear springNM30
2001 Mercedes-Benz ML320
1998-2005 SUSPENSION Sus pension - 163 Chassis
me
Saturday, October 02, 2010 3:37:35 PMPage 9 © 2006 Mitchell Repair Information Company, LLC.
Page 3919 of 4133
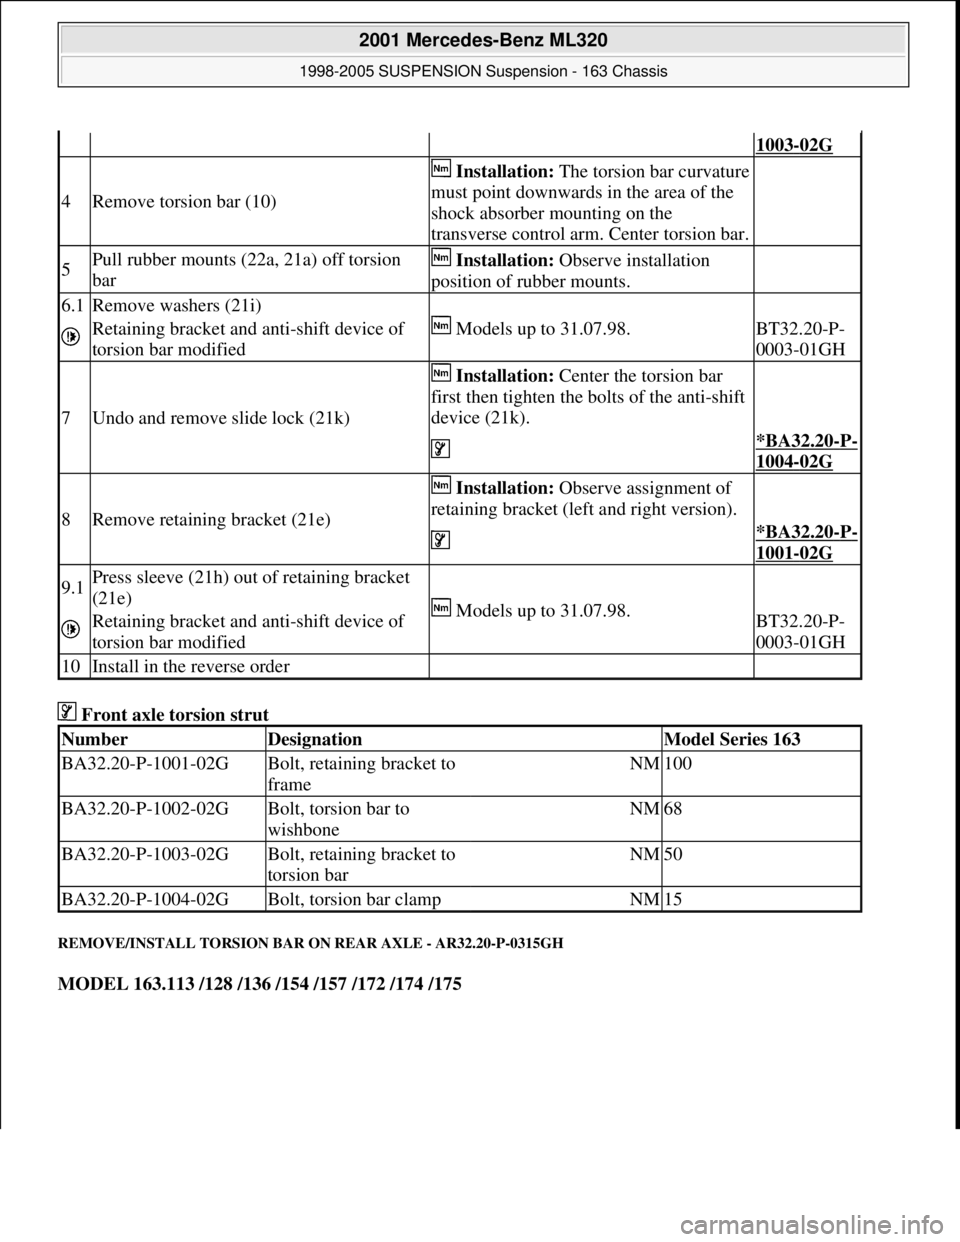
Front axle torsion strut
REMOVE/INSTALL TORSION BAR ON REAR AXLE - AR32.20-P-0315GH
MODEL 163.113 /128 /136 /154 /157 /172 /174 /175
1003-02G
4Remove torsion bar (10)
Installation:The torsion bar curvature
must point downwards in the area of the
shock absorber mounting on the
transverse control arm. Center torsion bar.
5Pull rubber mounts (22a, 21a) off torsion
bar Installation: Observe installation
position of rubber mounts.
6.1Remove washers (21i)
Models up to 31.07.98.
Retaining bracket and anti-shift device of
torsion bar modifiedBT32.20-P-
0003-01GH
7Undo and remove slide lock (21k)
Installation: Center the torsion bar
first then tighten the bolts of the anti-shift
device (21k).
*BA32.20-P-
1004-02G
8Remove retaining bracket (21e)
Installation: Observe assignment of
retaining bracket (left and right version).
*BA32.20-P-
1001-02G
9.1Press sleeve (21h) out of retaining bracket
(21e)
Models up to 31.07.98.
Retaining bracket and anti-shift device of
torsion bar modifiedBT32.20-P-
0003-01GH
10Install in the reverse order
NumberDesignationModel Series 163
BA32.20-P-1001-02GBolt, retaining bracket to
frameNM100
BA32.20-P-1002-02GBolt, torsion bar to
wishboneNM68
BA32.20-P-1003-02GBolt, retaining bracket to
torsion barNM50
BA32.20-P-1004-02GBolt, torsion bar clampNM15
2001 Mercedes-Benz ML320
1998-2005 SUSPENSION Suspension - 163 Chassis
me
Saturday, October 02, 2010 3:37:35 PMPage 11 © 2006 Mitchell Repair Information Company, LLC.
Page 3920 of 4133
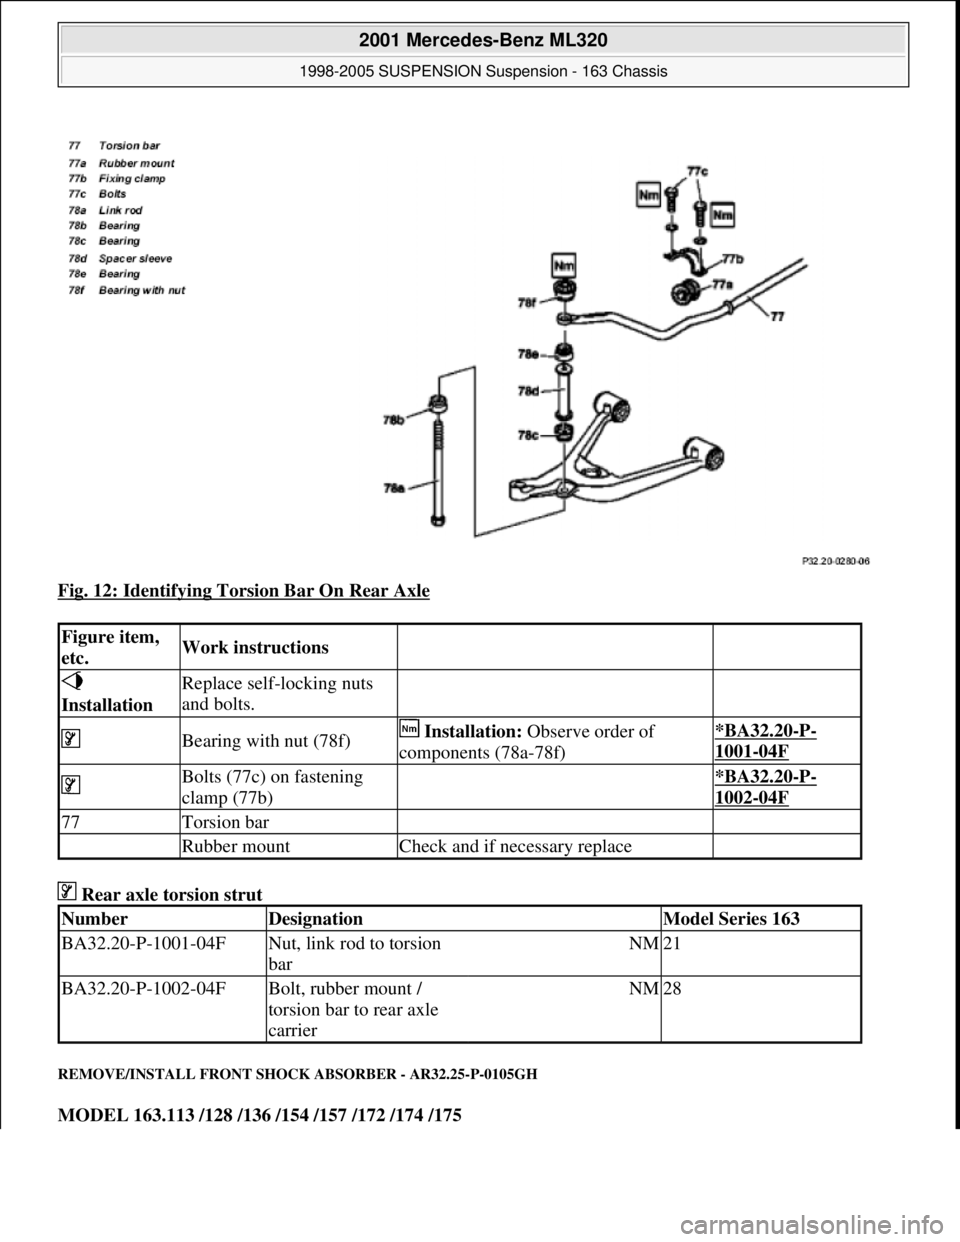
Fig. 12: Identifying Torsion Bar On Rear Axle
Rear axle torsion strut
REMOVE/INSTALL FRONT SHOCK ABSORBER - AR32.25-P-0105GH
MODEL 163.113 /128 /136 /154 /157 /172 /174 /175
Figure item,
etc.Work instructions
Installation Replace self-locking nuts
and bolts.
Bearing with nut (78f) Installation: Observe order of
components (78a-78f)*BA32.20-P-
1001-04F
Bolts (77c) on fastening
clamp (77b) *BA32.20-P-
1002-04F
77Torsion bar
Rubber mountCheck and if necessary replace
NumberDesignationModel Series 163
BA32.20-P-1001-04FNut, link rod to torsion
barNM21
BA32.20-P-1002-04FBolt, rubber mount /
torsion bar to rear axle
carrierNM28
2001 Mercedes-Benz ML320
1998-2005 SUSPENSION Suspension - 163 Chassis
me
Saturday, October 02, 2010 3:37:35 PMPage 12 © 2006 Mitchell Repair Information Company, LLC.
Page 3921 of 4133
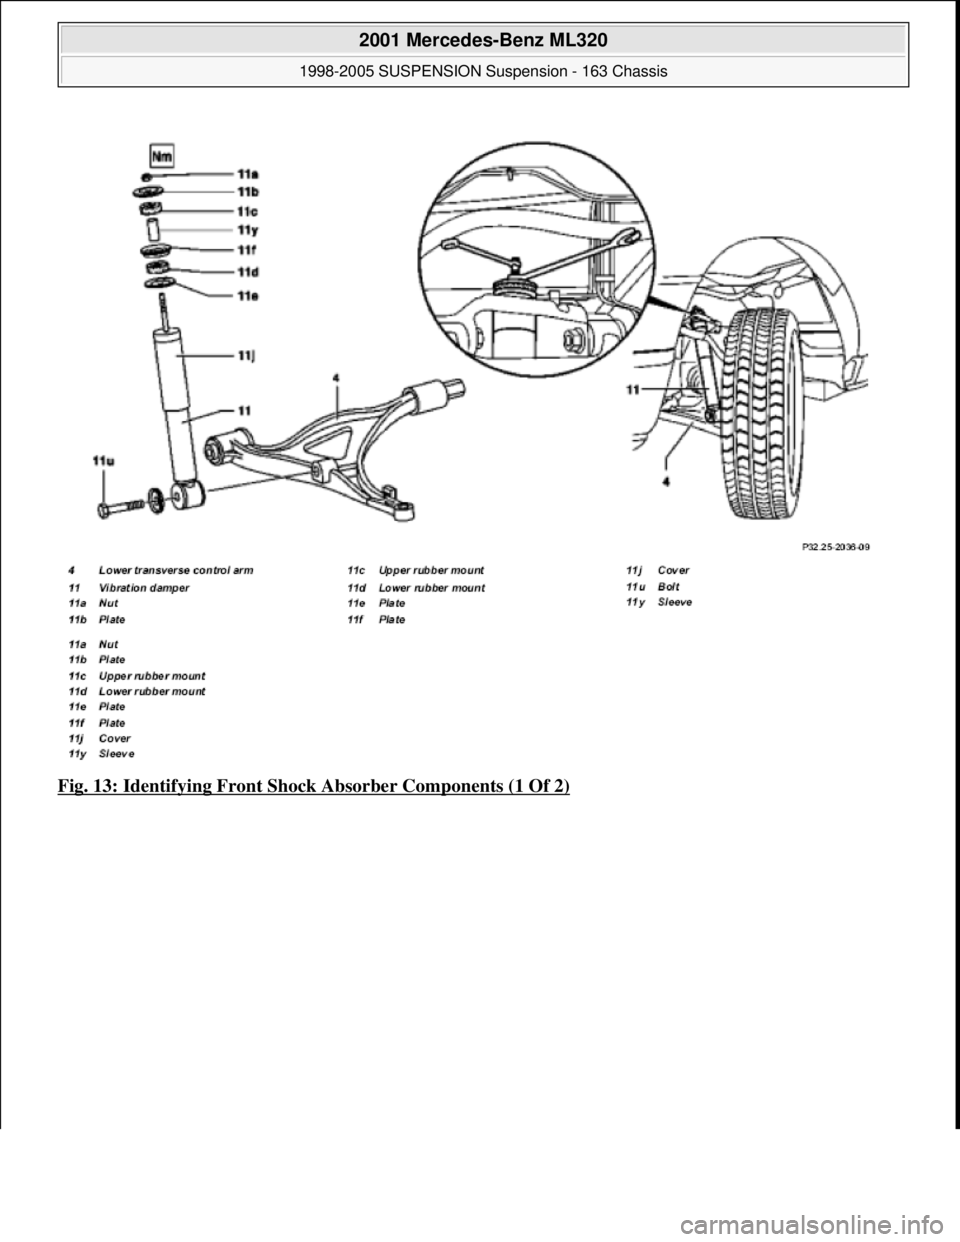
Fig. 13: Identifying Front Shock Absorber Components (1 Of 2)
2001 Mercedes-Benz ML320
1998-2005 SUSPENSION Suspension - 163 Chassis
me
Saturday, October 02, 2010 3:37:35 PMPage 13 © 2006 Mitchell Repair Information Company, LLC.
Page 3922 of 4133
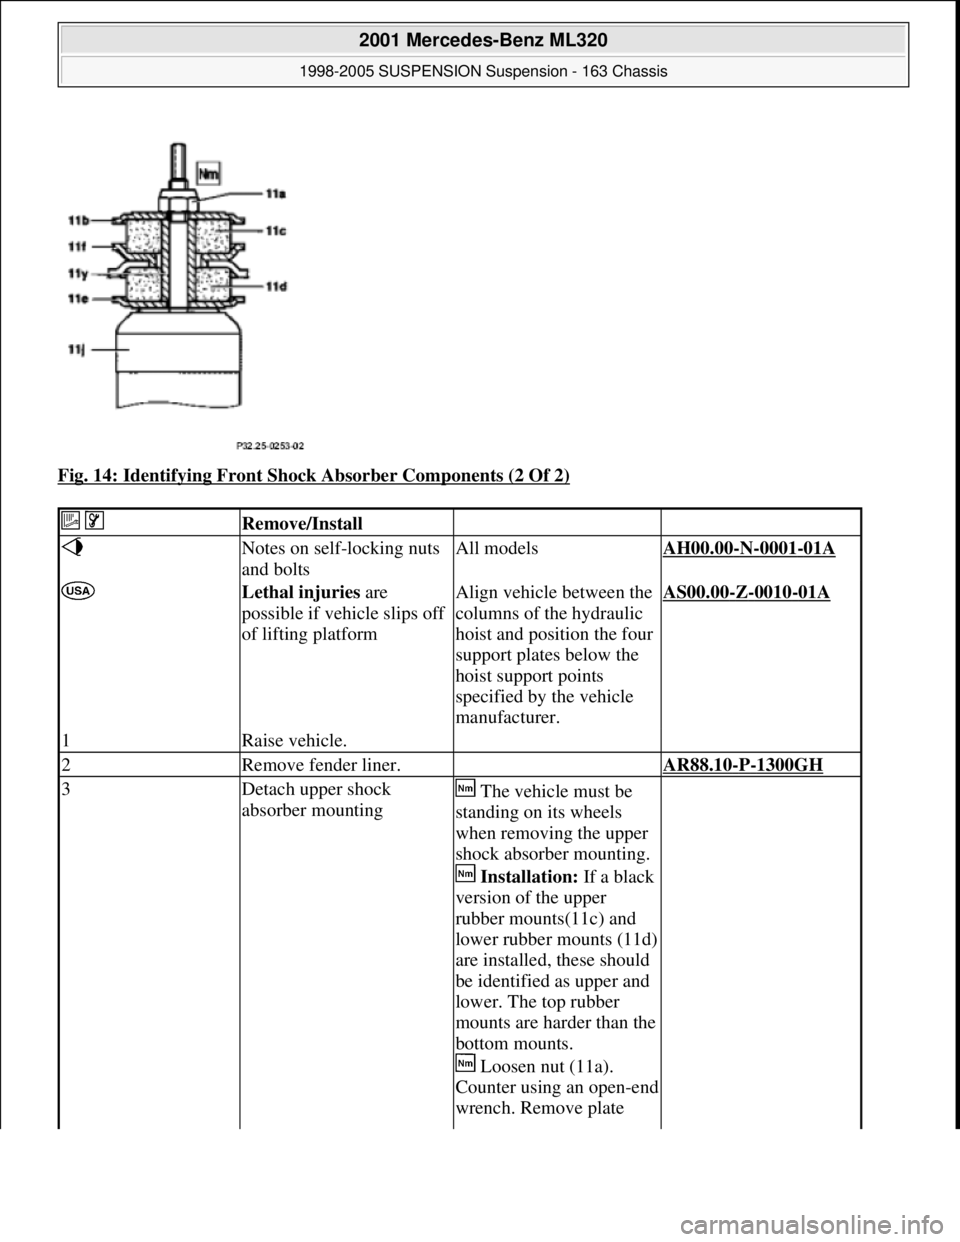
Fig. 14: Identifying Front Shock Absorber Components (2 Of 2)
Remove/Install
Notes on self-locking nuts
and boltsAll modelsAH00.00-N-0001-01A
Lethal injuries are
possible if vehicle slips off
of lifting platformAlign vehicle between the
columns of the hydraulic
hoist and position the four
support plates below the
hoist support points
specified by the vehicle
manufacturer.AS00.00-Z-0010-01A
1Raise vehicle.
2Remove fender liner. AR88.10-P-1300GH
3Detach upper shock
absorber mounting The vehicle must be
standing on its wheels
when removing the upper
shock absorber mounting.
Installation: If a black
version of the upper
rubber mounts(11c) and
lower rubber mounts (11d)
are installed, these should
be identified as upper and
lower. The top rubber
mounts are harder than the
bottom mounts.
Loosen nut (11a).
Counter using an open-end
wrench. Remove plate
2001 Mercedes-Benz ML320
1998-2005 SUSPENSION Suspension - 163 Chassis
me
Saturday, October 02, 2010 3:37:35 PMPage 14 © 2006 Mitchell Repair Information Company, LLC.
Page 3923 of 4133
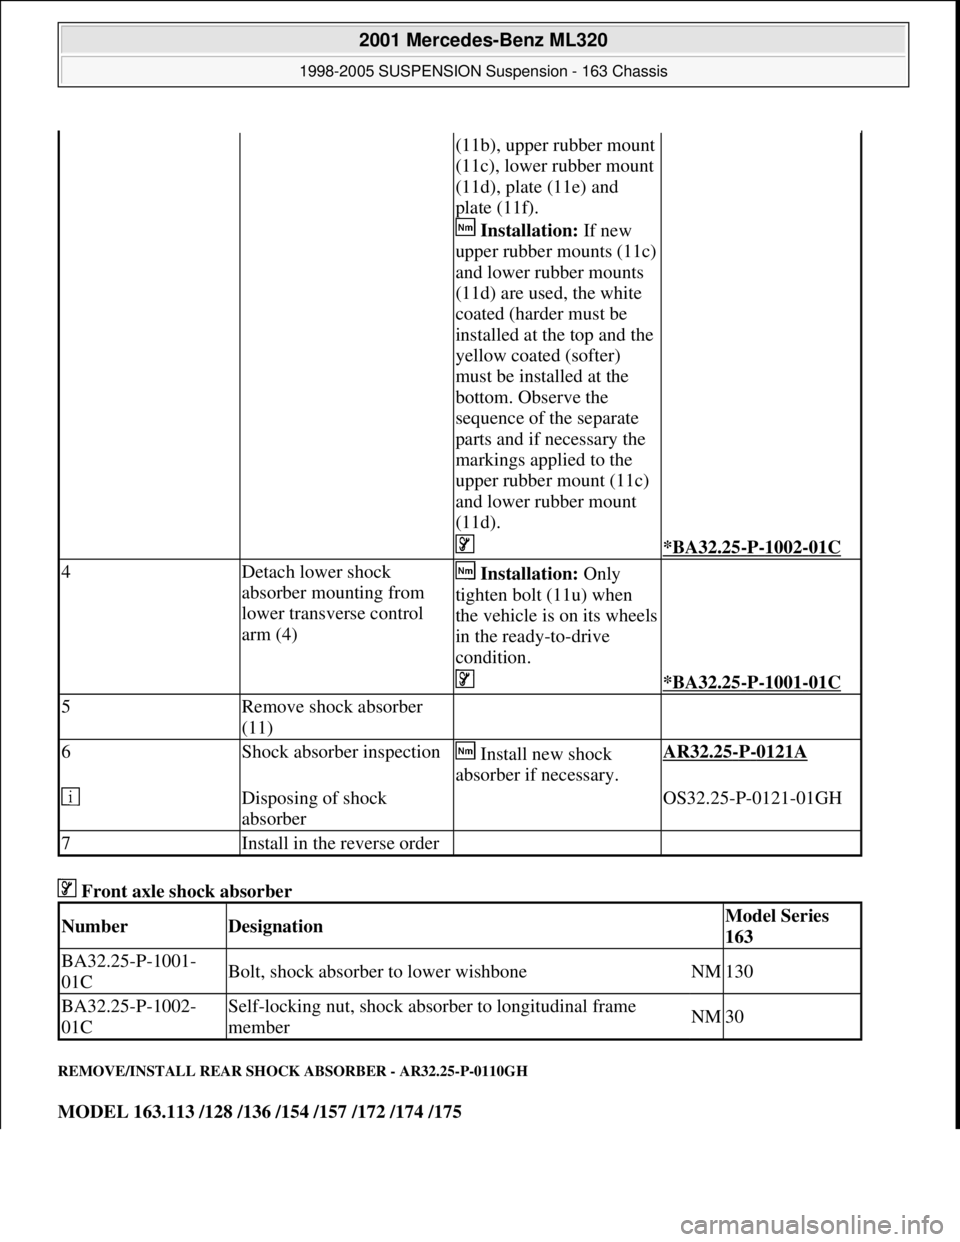
Front axle shock absorber
REMOVE/INSTALL REAR SHOCK ABSORBER - AR32.25-P-0110GH
MODEL 163.113 /128 /136 /154 /157 /172 /174 /175
(11b), upper rubber mount
(11c), lower rubber mount
(11d), plate (11e) and
plate (11f).
Installation: If new
upper rubber mounts (11c)
and lower rubber mounts
(11d) are used, the white
coated (harder must be
installed at the top and the
yellow coated (softer)
must be installed at the
bottom. Observe the
sequence of the separate
parts and if necessary the
markings applied to the
upper rubber mount (11c)
and lower rubber mount
(11d).
*BA32.25-P-1002-01C
4Detach lower shock
absorber mounting from
lower transverse control
arm (4) Installation: Only
tighten bolt (11u) when
the vehicle is on its wheels
in the ready-to-drive
condition.
*BA32.25-P-1001-01C
5Remove shock absorber
(11)
6Shock absorber inspection Install new shock
absorber if necessary.AR32.25-P-0121A
Disposing of shock
absorber OS32.25-P-0121-01GH
7Install in the reverse order
NumberDesignationModel Series
163
BA32.25-P-1001-
01CBolt, shock absorber to lower wishboneNM130
BA32.25-P-1002-
01CSelf-locking nut, shock absorber to longitudinal frame
memberNM30
2001 Mercedes-Benz ML320
1998-2005 SUSPENSION Suspension - 163 Chassis
me
Saturday, October 02, 2010 3:37:35 PMPage 15 © 2006 Mitchell Repair Information Company, LLC.