seat adjustment MERCEDES-BENZ ML500 1997 Complete Workshop Manual
[x] Cancel search | Manufacturer: MERCEDES-BENZ, Model Year: 1997, Model line: ML500, Model: MERCEDES-BENZ ML500 1997Pages: 4133, PDF Size: 88.89 MB
Page 3790 of 4133
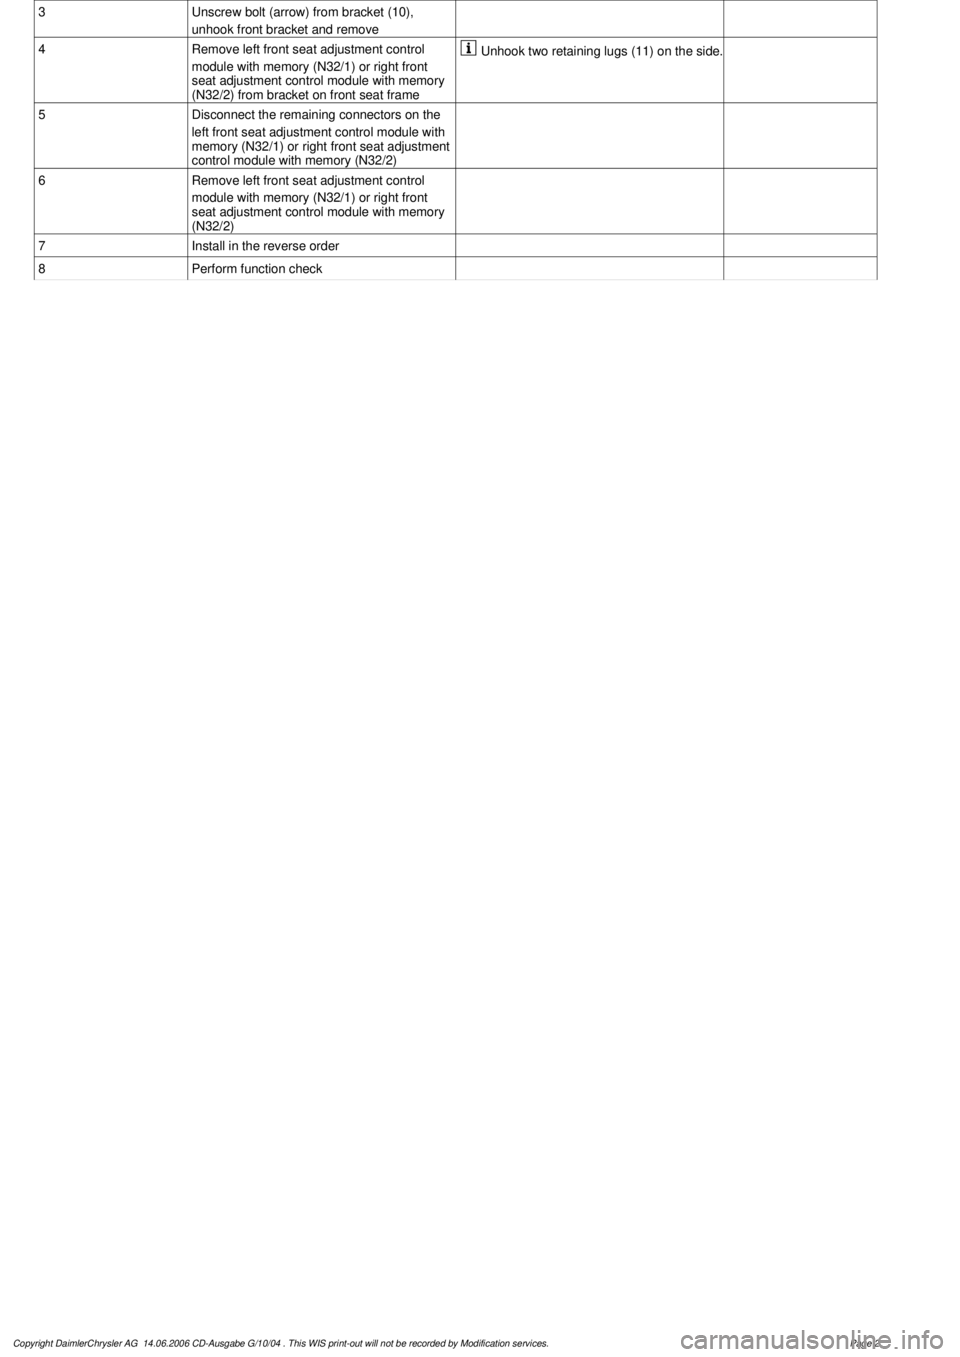
3
Unscrew bolt (arrow) from bracket (10),
unhook front bracket and remove
4
Remove left front seat adjustment control
module with memory (N32/1) or right front
seat adjustment control module with memory
(N32/2) from bracket on front seat frame
Unhook two retaining lugs (11) on the side.
5
Disconnect the remaining connectors on the
left front seat adjustment control module with
memory (N32/1) or right front seat adjustment
control module with memory (N32/2)
6
Remove left front seat adjustment control
module with memory (N32/1) or right front
seat adjustment control module with memory
(N32/2)
7
Install in the reverse order
8
Perform function check
Copyright DaimlerChrysler AG 14.06.2006 CD-Ausgabe G/10/04 . This WIS print-out will not be recorde
d by Modification services.
Page 2
Page 3791 of 4133
AR91.29-P-0003GI
Remove/install seat adjustment switch unit on front seat
1.10.02
MODEL
163.113,
163.136 #A as of 051500,
163.136 #X as of 708319,
163.154 #A as of 051500,
163.154 #X as of 708319,
163.157 /172 with CODE (221b) Electrically adjustable driver and passenger seat
MODEL
163.128 /174 /175
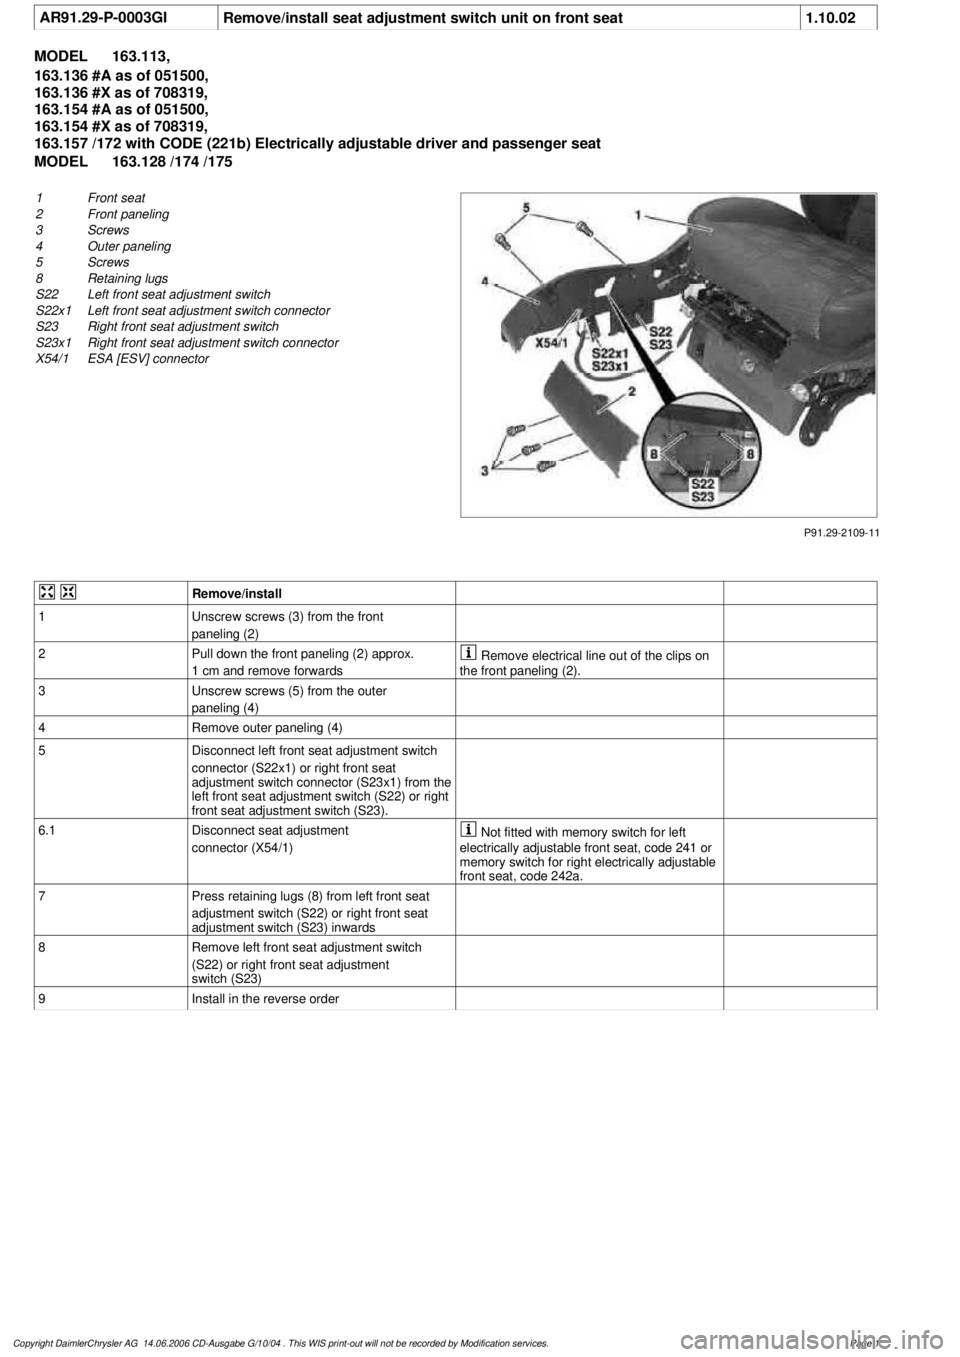
P91.29-2109-11
1
Front seat
2
Front paneling
3
Screws
4
Outer paneling
5
Screws
8
Retaining lugs
S22
Left front seat adjustment switch
S22x1
Left front seat adjustment switch connector
S23
Right front seat adjustment switch
S23x1
Right front seat adjustment switch connector
X54/1
ESA [ESV] connector
Remove/install
1
Unscrew screws (3) from the front
paneling (2)
2
Pull down the front paneling (2) approx.
1 cm and remove forwards
Remove electrical line out of the clips on
the front paneling (2).
3
Unscrew screws (5) from the outer
paneling (4)
4
Remove outer paneling (4)
5
Disconnect left front seat adjustment switch
connector (S22x1) or right front seat
adjustment switch connector (S23x1) from the
left front seat adjustment switch (S22) or right
front seat adjustment switch (S23).
6.1
Disconnect seat adjustment
connector (X54/1)
Not fitted with memory switch for left
electrically adjustable front seat, code 241 or
memory switch for right electrically adjustable
front seat, code 242a.
7
Press retaining lugs (8) from left front seat
adjustment switch (S22) or right front seat
adjustment switch (S23) inwards
8
Remove left front seat adjustment switch
(S22) or right front seat adjustment
switch (S23)
9
Install in the reverse order
Copyright DaimlerChrysler AG 14.06.2006 CD-Ausgabe G/10/04 . This WIS print-out will not be recorde
d by Modification services.
Page 1
Page 3792 of 4133
AR91.10-P-1060GH
Remove and install front seat backrest
5.3.97
MODEL
163.113 /136 /154 /157 /172
with CODE (221b) Electrically adjustable driver and passenger seat
with CODE (241) Memory for electrically adjustable left front seat
with CODE (242a) Memory for electrically adjustable right front seat
MODEL
163.128 /175
with CODE (241) Memory for electrically adjustable left front seat
with CODE (242a) Memory for electrically adjustable right front seat
MODEL
163.174
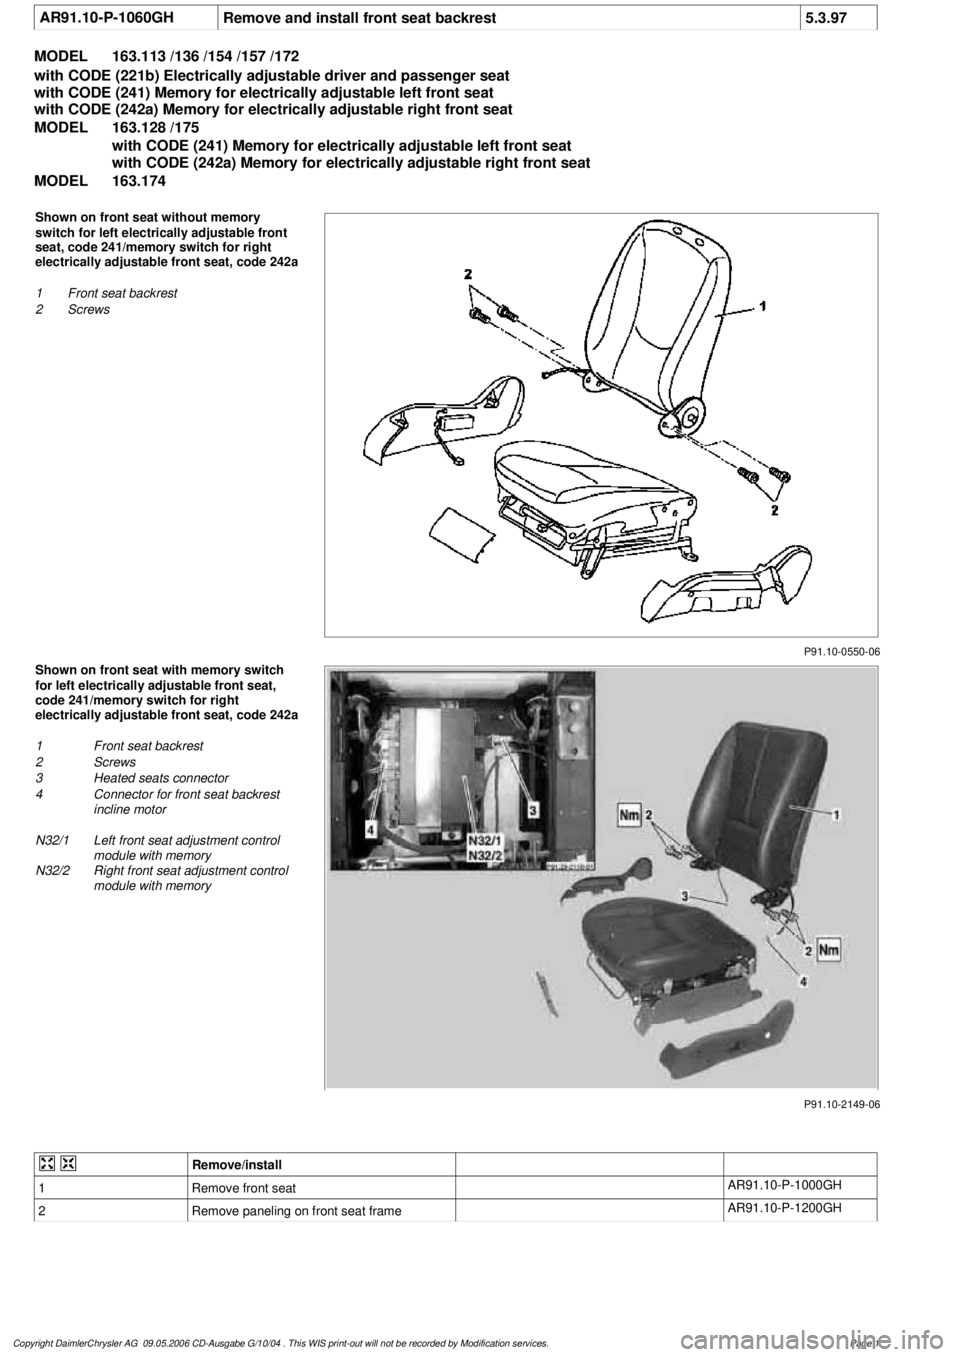
P91.10-0550-06
Shown on front seat without memory
switch for left electrically adjustable front
seat, code 241/memory switch for right
electrically adjustable front seat, code 242a
1
Front seat backrest
2
Screws
P91.10-2149-06
Shown on front seat with memory switch
for left electrically adjustable front seat,
code 241/memory switch for right
electrically adjustable front seat, code 242a
1
Front seat backrest
2
Screws
3
Heated seats connector
4
Connector for front seat backrest
incline motor
N32/1
Left front seat adjustment control
module with memory
N32/2
Right front seat adjustment control
module with memory
Remove/install
1
Remove front seat
AR91.10-P-1000GH
2
Remove paneling on front seat frame
AR91.10-P-1200GH
Copyright DaimlerChrysler AG 09.05.2006 CD-Ausgabe G/10/04 . This WIS print-out will not be recorde
d by Modification services.
Page 1
Page 3793 of 4133
3.1
Disconnect heated seats connector (3) and
connector for front seat backrest incline motor
(4) from left front seat adjustment control
module with memory (N32/1) or right front
seat adjustment control module with memory
(N32/2)
Only for memory switch for left electrically
adjustable front seat, code 241 or memory
switch for right electrically adjustable front
seat, code 242a.
Installation:
Ensure that the electrical
lines are routed properly!
4
Unscrew screws (2) from backrest fittings
*BA91.10-P-1003-01B
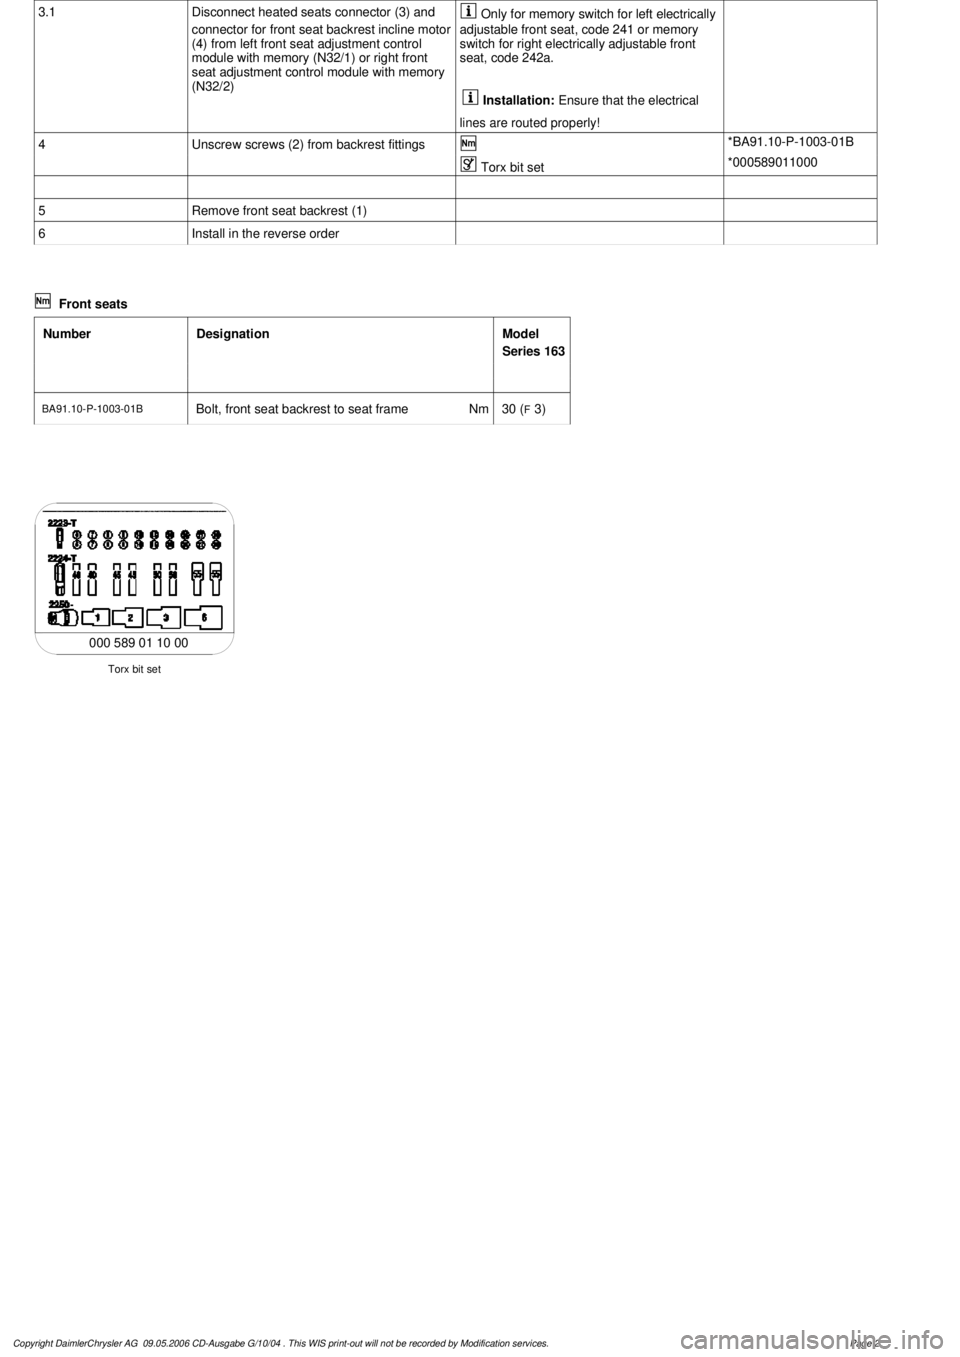
Torx bit set
*000589011000
5
Remove front seat backrest (1)
6
Install in the reverse order
Front seats
Number
Designation
Model
Series 163
BA91.10-P-1003-01B
Bolt, front seat backrest to seat frame
Nm
30 (
F
3)
Torx bit set
000 589 01 10 00
Copyright DaimlerChrysler AG 09.05.2006 CD-Ausgabe G/10/04 . This WIS print-out will not be recorde
d by Modification services.
Page 2
Page 3796 of 4133
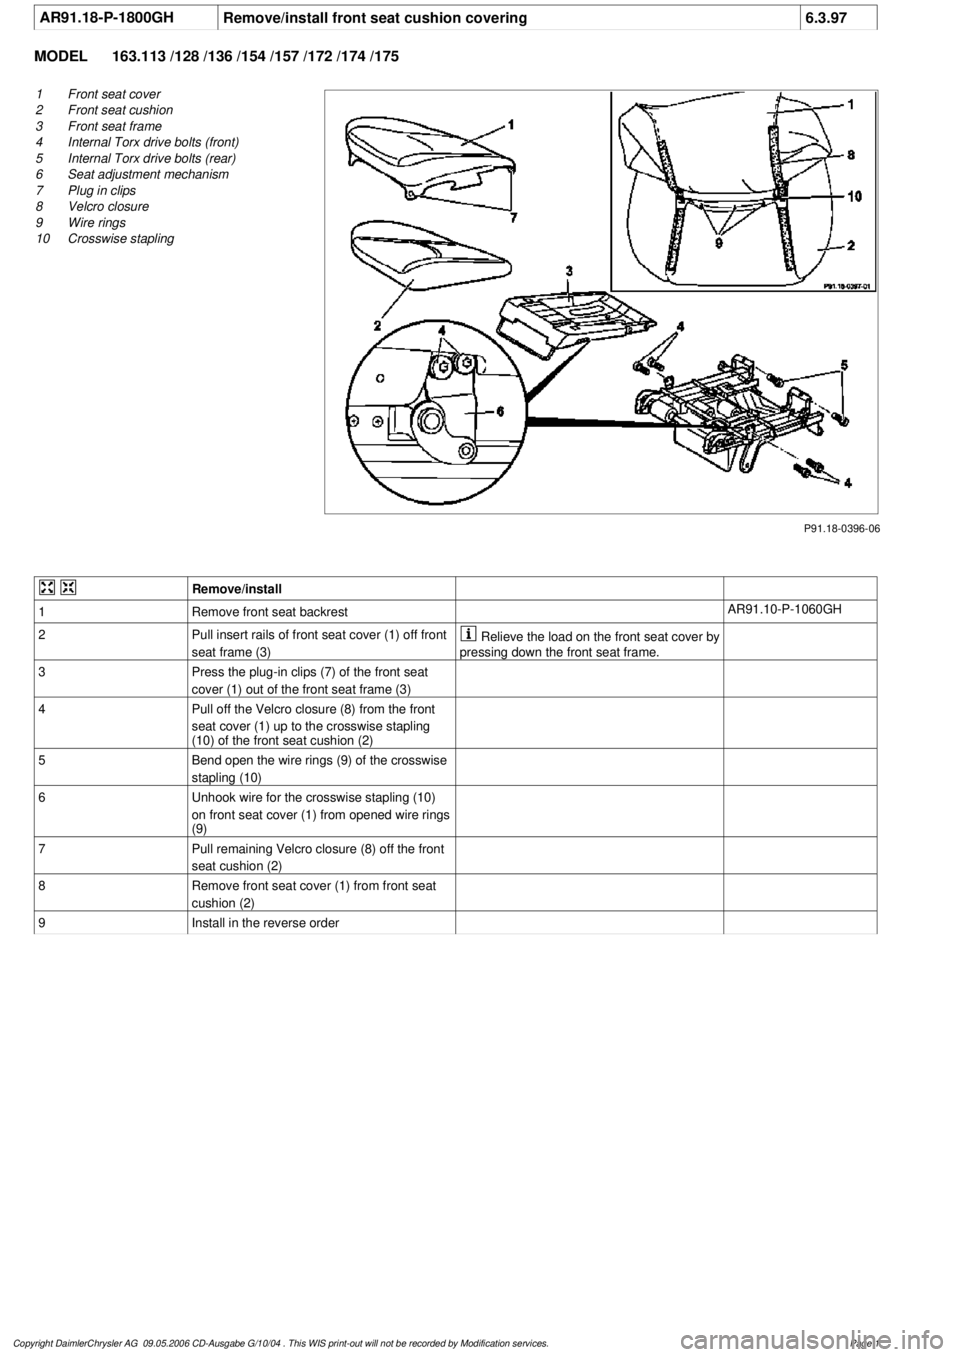
AR91.18-P-1800GH
Remove/install front seat cushion covering
6.3.97
MODEL
163.113 /128 /136 /154 /157 /172 /174 /175
P91.18-0396-06
1
Front seat cover
2
Front seat cushion
3
Front seat frame
4
Internal Torx drive bolts (front)
5
Internal Torx drive bolts (rear)
6
Seat adjustment mechanism
7
Plug in clips
8
Velcro closure
9
Wire rings
10
Crosswise stapling
Remove/install
1
Remove front seat backrest
AR91.10-P-1060GH
2
Pull insert rails of front seat cover (1) off front
seat frame (3)
Relieve the load on the front seat cover by
pressing down the front seat frame.
3
Press the plug-in clips (7) of the front seat
cover (1) out of the front seat frame (3)
4
Pull off the Velcro closure (8) from the front
seat cover (1) up to the crosswise stapling
(10) of the front seat cushion (2)
5
Bend open the wire rings (9) of the crosswise
stapling (10)
6
Unhook wire for the crosswise stapling (10)
on front seat cover (1) from opened wire rings
(9)
7
Pull remaining Velcro closure (8) off the front
seat cushion (2)
8
Remove front seat cover (1) from front seat
cushion (2)
9
Install in the reverse order
Copyright DaimlerChrysler AG 09.05.2006 CD-Ausgabe G/10/04 . This WIS print-out will not be recorde
d by Modification services.
Page 1
Page 3797 of 4133
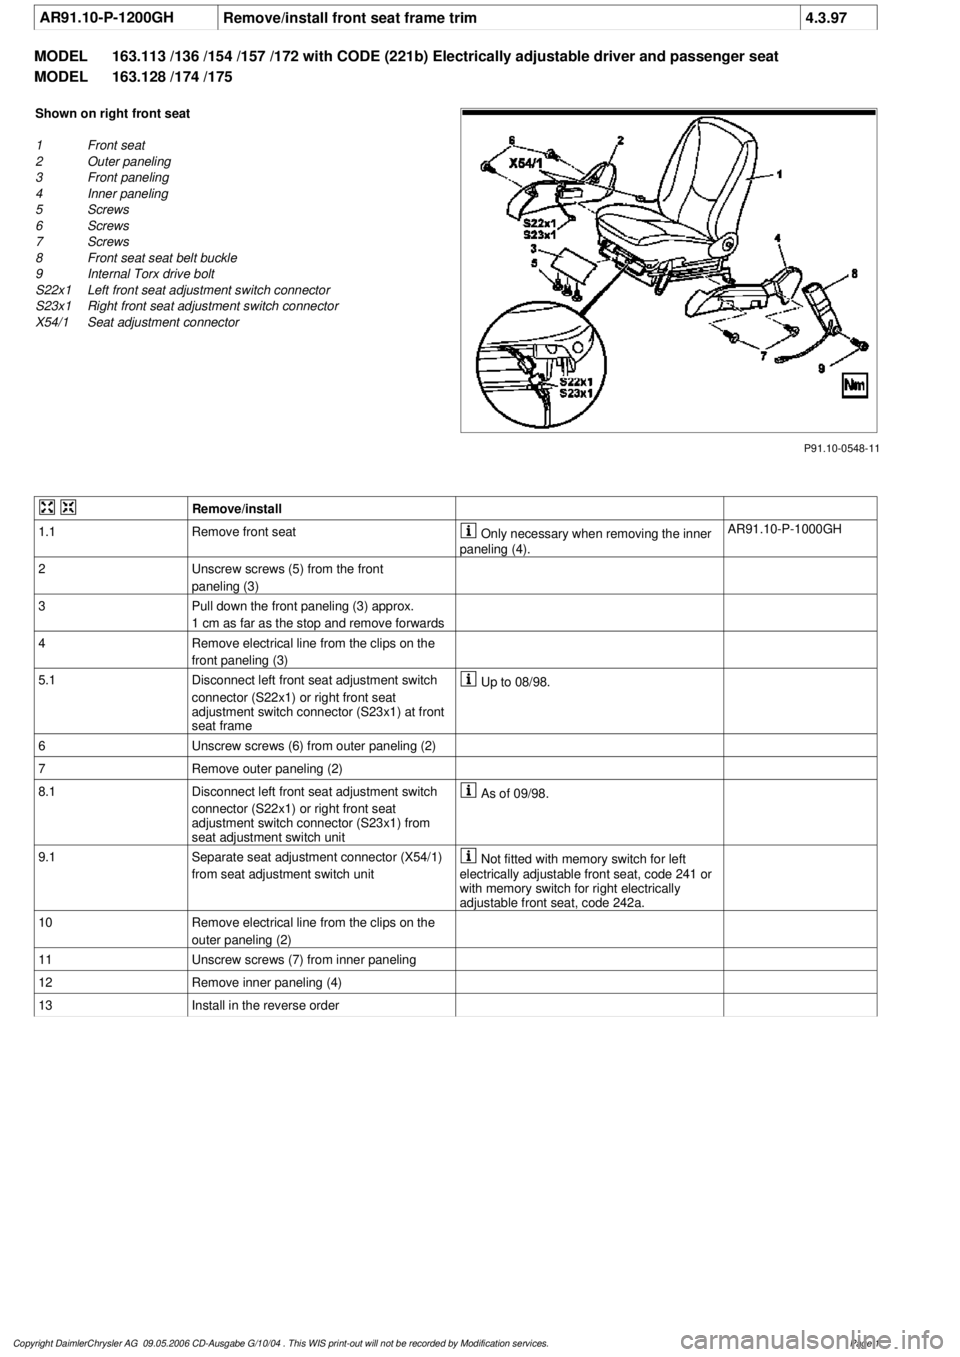
AR91.10-P-1200GH
Remove/install front seat frame trim
4.3.97
MODEL
163.113 /136 /154 /157 /172 with CODE (221b) Electrically adjustable driver and passenger seat
MODEL
163.128 /174 /175
P91.10-0548-11
Shown on right front seat
1
Front seat
2
Outer paneling
3
Front paneling
4
Inner paneling
5
Screws
6
Screws
7
Screws
8
Front seat seat belt buckle
9
Internal Torx drive bolt
S22x1
Left front seat adjustment switch connector
S23x1
Right front seat adjustment switch connector
X54/1
Seat adjustment connector
Remove/install
1.1
Remove front seat
Only necessary when removing the inner
paneling (4).
AR91.10-P-1000GH
2
Unscrew screws (5) from the front
paneling (3)
3
Pull down the front paneling (3) approx.
1 cm as far as the stop and remove forwards
4
Remove electrical line from the clips on the
front paneling (3)
5.1
Disconnect left front seat adjustment switch
connector (S22x1) or right front seat
adjustment switch connector (S23x1) at front
seat frame
Up to 08/98.
6
Unscrew screws (6) from outer paneling (2)
7
Remove outer paneling (2)
8.1
Disconnect left front seat adjustment switch
connector (S22x1) or right front seat
adjustment switch connector (S23x1) from
seat adjustment switch unit
As of 09/98.
9.1
Separate seat adjustment connector (X54/1)
from seat adjustment switch unit
Not fitted with memory switch for left
electrically adjustable front seat, code 241 or
with memory switch for right electrically
adjustable front seat, code 242a.
10
Remove electrical line from the clips on the
outer paneling (2)
11
Unscrew screws (7) from inner paneling
12
Remove inner paneling (4)
13
Install in the reverse order
Copyright DaimlerChrysler AG 09.05.2006 CD-Ausgabe G/10/04 . This WIS print-out will not be recorde
d by Modification services.
Page 1
Page 3798 of 4133
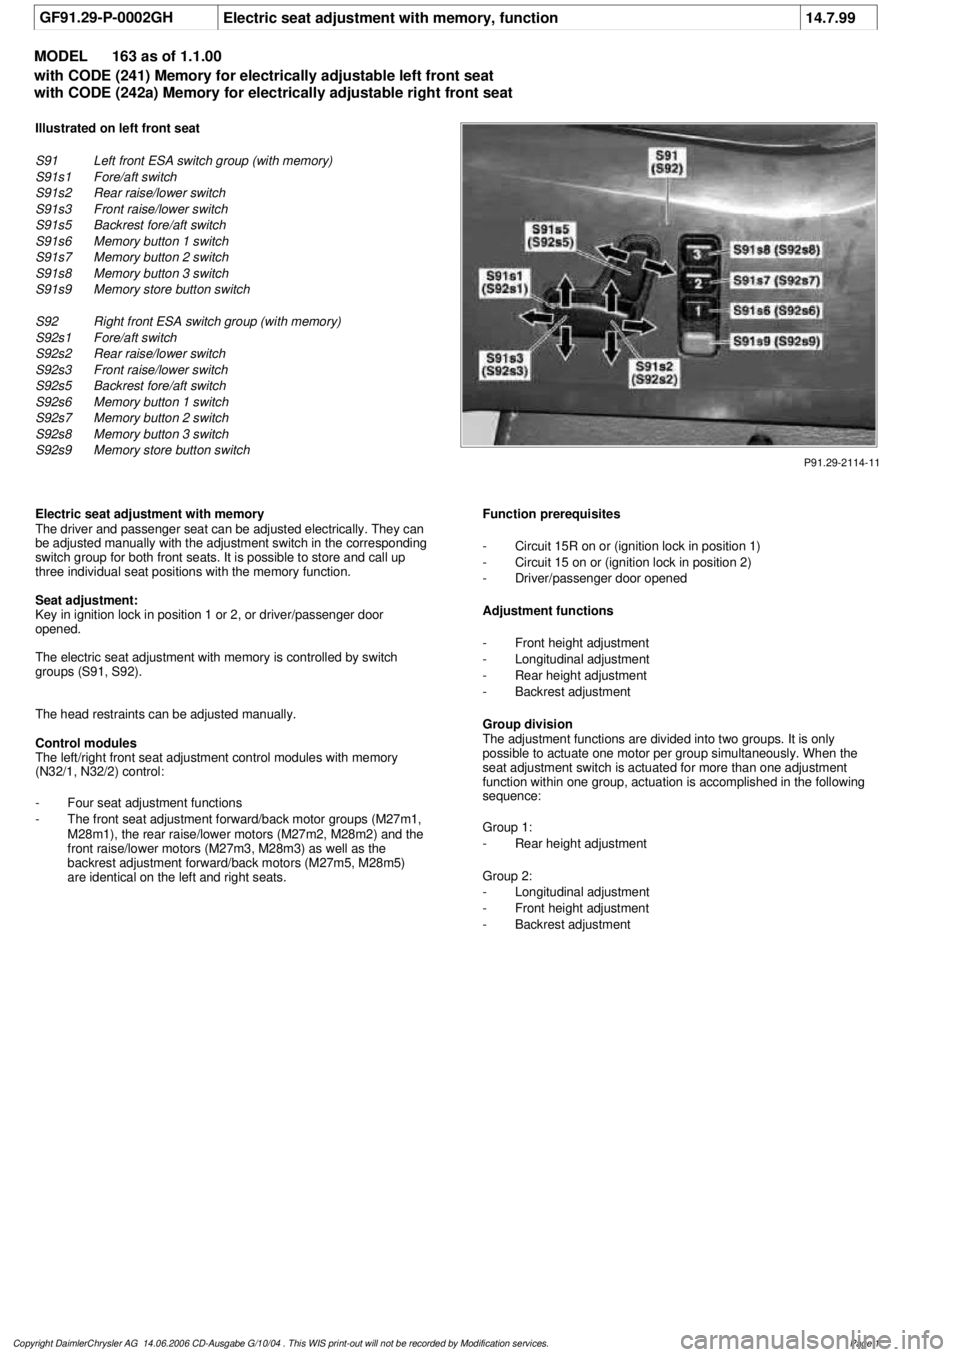
GF91.29-P-0002GH
Electric seat adjustment with memory, function
14.7.99
MODEL
163 as of 1.1.00
with CODE (241) Memory for electrically adjustable left front seat
with CODE (242a) Memory for electrically adjustable right front seat
P91.29-2114-11
Illustrated on left front seat
S91
Left front ESA switch group (with memory)
S91s1
Fore/aft switch
S91s2
Rear raise/lower switch
S91s3
Front raise/lower switch
S91s5
Backrest fore/aft switch
S91s6
Memory button 1 switch
S91s7
Memory button 2 switch
S91s8
Memory button 3 switch
S91s9
Memory store button switch
S92
Right front ESA switch group (with memory)
S92s1
Fore/aft switch
S92s2
Rear raise/lower switch
S92s3
Front raise/lower switch
S92s5
Backrest fore/aft switch
S92s6
Memory button 1 switch
S92s7
Memory button 2 switch
S92s8
Memory button 3 switch
S92s9
Memory store button switch
Electric seat adjustment with memory
The driver and passenger seat can be adjusted electrically. They can
be adjusted manually with the adjustment switch in the corresponding
switch group for both front seats. It is possible to store and call up
three individual seat positions with the memory function.
Seat adjustment:
Key in ignition lock in position 1 or 2, or driver/passenger door
opened.
The electric seat adjustment with memory is controlled by switch
groups (S91, S92).
The head restraints can be adjusted manually.
Control modules
The left/right front seat adjustment control modules with memory
(N32/1, N32/2) control:
-
Four seat adjustment functions
-
The front seat adjustment forward/back motor groups (M27m1,
M28m1), the rear raise/lower motors (M27m2, M28m2) and the
front raise/lower motors (M27m3, M28m3) as well as the
backrest adjustment forward/back motors (M27m5, M28m5)
are identical on the left and right seats.
Function prerequisites
-
Circuit 15R on or (ignition lock in position 1)
-
Circuit 15 on or (ignition lock in position 2)
-
Driver/passenger door opened
Adjustment functions
-
Front height adjustment
-
Longitudinal adjustment
-
Rear height adjustment
-
Backrest adjustment
Group division
The adjustment functions are divided into two groups. It is only
possible to actuate one motor per group simultaneously. When the
seat adjustment switch is actuated for more than one adjustment
function within one group, actuation is accomplished in the following
sequence:
Group 1:
-
Rear height adjustment
Group 2:
-
Longitudinal adjustment
-
Front height adjustment
-
Backrest adjustment
Copyright DaimlerChrysler AG 14.06.2006 CD-Ausgabe G/10/04 . This WIS print-out will not be recorde
d by Modification services.
Page 1
Page 3799 of 4133
The
seat position
is sensed by one potentiometer each on the
motors for the adjustment functions. Association of the direction of
rotation of the motor and the potentiometer is accomplished
automatically.
Button actuation
There are two possibilities for
storing
the
seat position
:
a)
First press and hold the memory button (S91s9 or S92s9) and
then press the corresponding memory location button
(S91s6/S91s7/S91s8 or S92s6/S92s7/S92s8) in addition.
b)
First press and then release the memory button (S91s9 or
S92s9). Then press the corresponding memory location button
(S91s6/S91s7/S91s8 or S92s6/S92s7/S92s8)
(within
T
3 s).
c)
Storage is accomplished in the left/right front seat adjustment
control modules with memory (N32/1, N32/2).
Calling up stored seat positions
Press desired memory location button (S91s6/S91s7/S91s8 or
S92s6/S92s7/S92s8) until the seat is adjusted to the stored position.
When adjusting the seat one adjustment function per group is
actuated. If the position button is released while moving to a stored
position the adjustment stops immediately.
Front seat adjustment switch group,
location/design/function
Model 163 with codes 241, 242a
GF91.29-P-2100GM
Front seat adjustment motor group,
location/function
Model 163 with codes 241, 242a
GF91.29-P-2103GM
Left front seat adjustment control module with
memory, location/purpose
Model 163 with codes 241, 242a
GF91.29-P-2106GH
Right front seat adjustment control module
with memory, location/purpose
Model 163 with codes 241, 242a
GF91.29-P-2107GH
Copyright DaimlerChrysler AG 14.06.2006 CD-Ausgabe G/10/04 . This WIS print-out will not be recorde
d by Modification services.
Page 2
Page 3801 of 4133
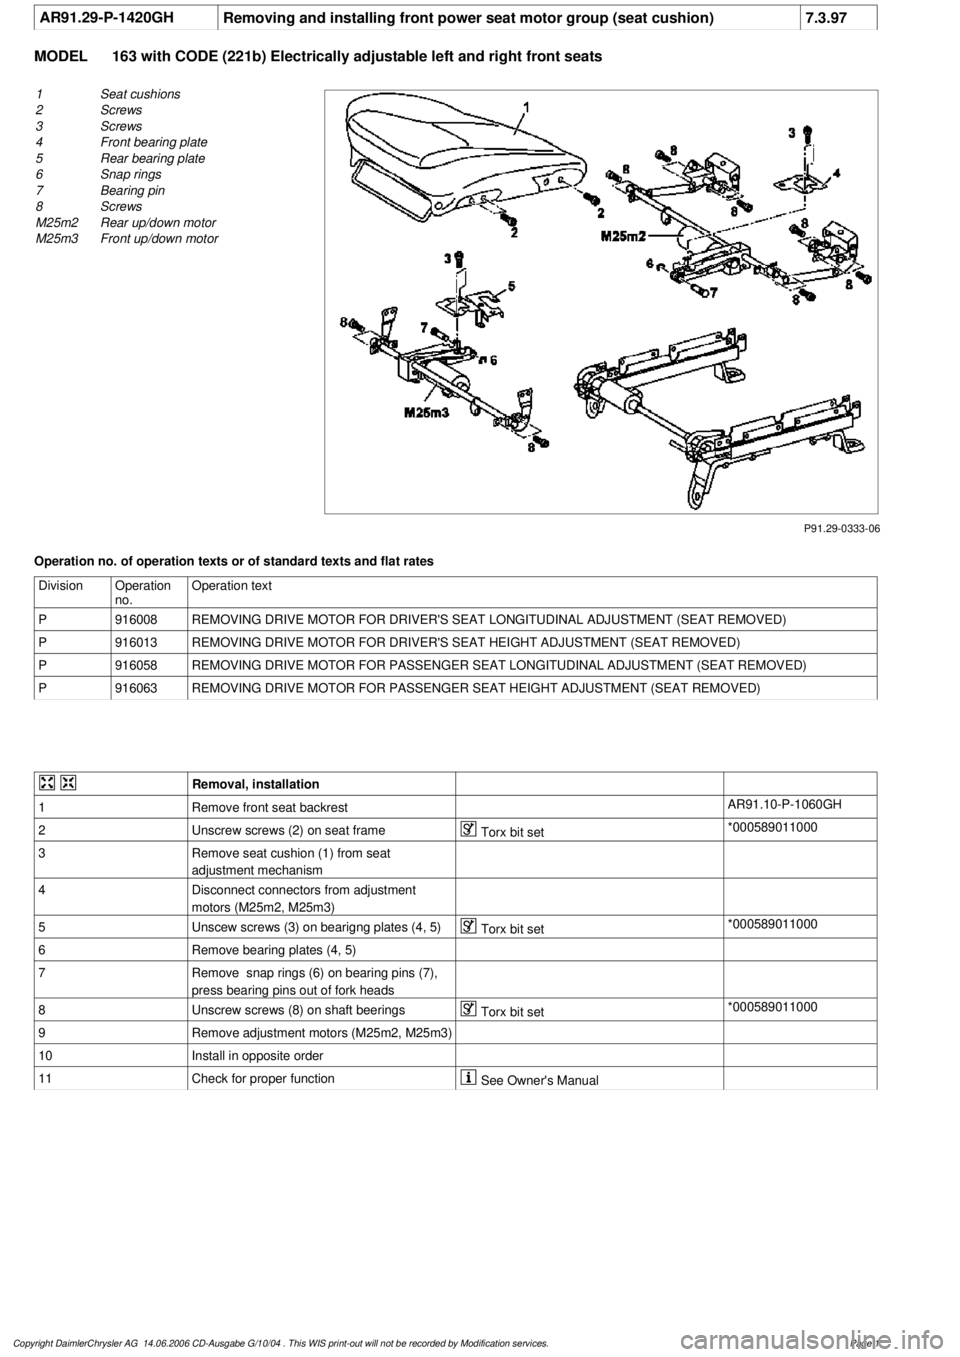
AR91.29-P-1420GH
Removing and installing front power seat motor group (seat cushion)
7.3.97
MODEL
163 with CODE (221b) Electrically adjustable left and right front seats
P91.29-0333-06
1
Seat cushions
2
Screws
3
Screws
4
Front bearing plate
5
Rear bearing plate
6
Snap rings
7
Bearing pin
8
Screws
M25m2
Rear up/down motor
M25m3
Front up/down motor
Operation no. of operation texts or of standard texts and flat rates
Division
Operation
no.
Operation text
P
916008
REMOVING DRIVE MOTOR FOR DRIVER'S SEAT LONGITUDINAL ADJUSTMENT (SEAT REMOVED)
P
916013
REMOVING DRIVE MOTOR FOR DRIVER'S SEAT HEIGHT ADJUSTMENT (SEAT REMOVED)
P
916058
REMOVING DRIVE MOTOR FOR PASSENGER SEAT LONGITUDINAL ADJUSTMENT (SEAT REMOVED)
P
916063
REMOVING DRIVE MOTOR FOR PASSENGER SEAT HEIGHT ADJUSTMENT (SEAT REMOVED)
Removal, installation
1
Remove front seat backrest
AR91.10-P-1060GH
2
Unscrew screws (2) on seat frame
Torx bit set
*000589011000
3
Remove seat cushion (1) from seat
adjustment mechanism
4
Disconnect connectors from adjustment
motors (M25m2, M25m3)
5
Unscew screws (3) on bearigng plates (4, 5)
Torx bit set
*000589011000
6
Remove bearing plates (4, 5)
7
Remove snap rings (6) on bearing pins (7),
press bearing pins out of fork heads
8
Unscrew screws (8) on shaft beerings
Torx bit set
*000589011000
9
Remove adjustment motors (M25m2, M25m3)
10
Install in opposite order
11
Check for proper function
See Owner's Manual
Copyright DaimlerChrysler AG 14.06.2006 CD-Ausgabe G/10/04 . This WIS print-out will not be recorde
d by Modification services.
Page 1
Page 3803 of 4133
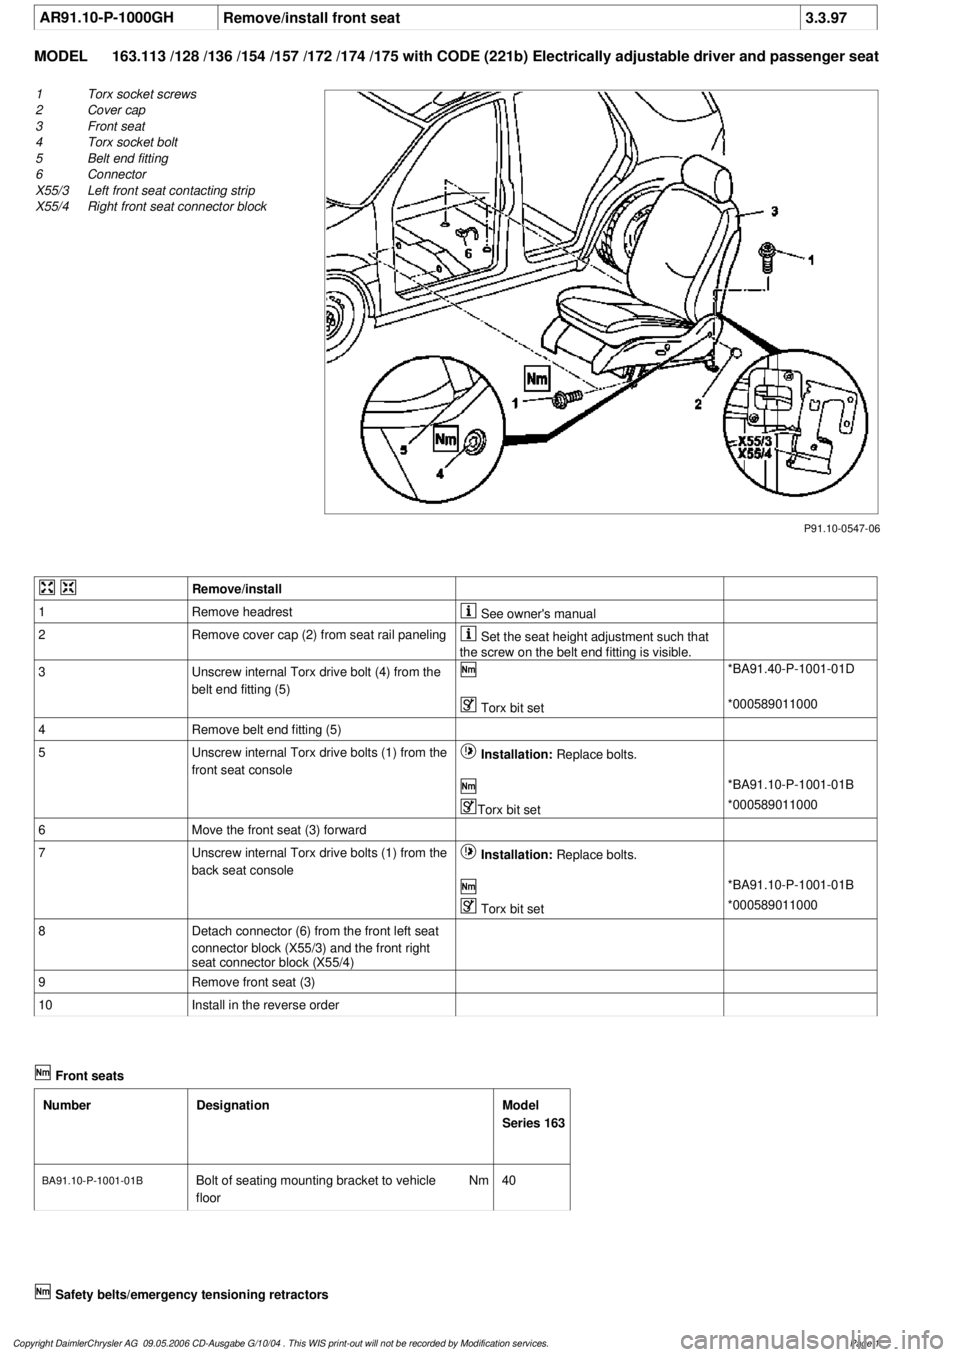
AR91.10-P-1000GH
Remove/install front seat
3.3.97
MODEL
163.113 /128 /136 /154 /157 /172 /174 /175 with CODE (221b) Electrically adjustable driver and passe
nger seat
P91.10-0547-06
1
Torx socket screws
2
Cover cap
3
Front seat
4
Torx socket bolt
5
Belt end fitting
6
Connector
X55/3
Left front seat contacting strip
X55/4
Right front seat connector block
Remove/install
1
Remove headrest
See owner's manual
2
Remove cover cap (2) from seat rail paneling
Set the seat height adjustment such that
the screw on the belt end fitting is visible.
3
Unscrew internal Torx drive bolt (4) from the
belt end fitting (5)
*BA91.40-P-1001-01D
Torx bit set
*000589011000
4
Remove belt end fitting (5)
5
Unscrew internal Torx drive bolts (1) from the
front seat console
Installation:
Replace bolts.
*BA91.10-P-1001-01B
Torx bit set
*000589011000
6
Move the front seat (3) forward
7
Unscrew internal Torx drive bolts (1) from the
back seat console
Installation:
Replace bolts.
*BA91.10-P-1001-01B
Torx bit set
*000589011000
8
Detach connector (6) from the front left seat
connector block (X55/3) and the front right
seat connector block (X55/4)
9
Remove front seat (3)
10
Install in the reverse order
Front seats
Number
Designation
Model
Series 163
BA91.10-P-1001-01BBolt of seating mounting bracket to vehicle
floor
Nm
40
Safety belts/emergency tensioning retractors
Copyright DaimlerChrysler AG 09.05.2006 CD-Ausgabe G/10/04 . This WIS print-out will not be recorde
d by Modification services.
Page 1