clock MERCEDES-BENZ ML550 2010 W164 Owner's Manual
[x] Cancel search | Manufacturer: MERCEDES-BENZ, Model Year: 2010, Model line: ML550, Model: MERCEDES-BENZ ML550 2010 W164Pages: 368, PDF Size: 9.09 MB
Page 8 of 368
Fuse box ........................................ 344
Hooks ............................................ 189
Tie-down rings ............................... 188
Cargo compartment cover blind ...... 190
Cargo net ........................................... 191
Cargo tie-down rings ......................... 188
Carpets, cleaning .............................. 265
Carriers .............................................. 187
Center console
Lower part ....................................... 32
Upper part ....................................... 31
Central locking
Automatic ................................ 74, 135
KEYLESS-GO .................................... 71
Locking/unlocking from inside ........75
SmartKey ......................................... 70
Central locking/unlocking switch ..... 75
Certification label .............................. 346
Children in the vehicle
Air bags ........................................... 37
BabySmart™ air bag deactivation
system ............................................. 46
Child safety locks (rear doors) .........60
Child seat anchors – LATCH-type ....59
Indicator lamp, front passenger
front air bag off (Canada only) .........46
Indicator lamp, front passenger
front air bag off (USA only) ..............42
Infant and child restraint systems .... 56
OCS (Occupant Classification
System) ........................................... 42
Override switch ................................ 60
Safety notes ..................................... 55
Tether anchorage points ..................58
Top tether ........................................ 58
Child safety
see Children in the vehicle
Child seat anchors – LATCH-type
see Children in the vehicle
Chrome-plated exhaust tip,
cleaning .............................................. 266
Cigarette lighter ................................ 196
Climate control system .................... 165
3-zone automatic climate control ..173
Air conditioning .....................169, 178
Air conditioning refrigerant ............359
Air distribution ....................... 171, 180Air recirculation mode ...........172, 182
Air volume ............................. 171, 181
Automatic mode ....................170, 179
Climate control .............................. 167
Deactivating system ..............169, 178
Front defroster ...................... 171, 181
Residual heat and
ventilation .............................. 172, 183
Temperature .......................... 170, 179
Clock ............................................ 28, 132
Cockpit ................................................. 27
Cold tire inflation pressure .............. 240
Collapsible tire (spare wheel) .......... 356
Collapsible wheel chock ................... 270
COMAND system see separate COMAND system
operating instructions
Combination switch ............................ 95
Comfort submenu
Easy-entry/exit feature .................. 136
Fold-in function for exterior rear
view mirrors ................................... 137
Seat belt adjustment feature .........136
Compass
Calling up ....................................... 207
Control system .................................. 119
Multifunction display .....................121
Multifunction steering wheel .........119
Resetting to factory settings ..........129
Control system menus ...................... 121
AIRMATIC/Compass ...................... 127
AMG ............................................... 123
Audio/DVD .................................... 126
Distronic ........................................ 128
Navigation ..................................... 127
Off-road Mode ............................... 125
Settings ......................................... 129
Standard display ............................ 122
Telephone ...................................... 139
Trip computer ................................ 138
Vehicle configuration .....................137
Vehicle status message memory ...128
Control system submenus
Comfort ......................................... 135
Instrument cluster .........................130
Lighting .......................................... 133
Time/Date ..................................... 132
Vehicle ........................................... 1356Index164_AKB; 7; 31, en-USd2ureepe,Version: 2.11.8.12009-09-11T12:07:36+02:00 - Seite 6
Page 9 of 368
Coolant
Anticorrosion/antifreeze ...............363
Capacities ...................................... 358
Checking level ............................... 216
Messages in the multifunction
display ........................................... 288
Corner-illuminating front fog
lamps .................................................... 96
Cruise control .................................... 141
Activating ....................................... 142
Canceling ....................................... 142
Changing the set speed .................143
Last stored speed ..........................143
Lever .............................................. 142
Messages in the mutlifunction
display ........................................... 278
Resume function ............................ 143
Setting current speed ....................142
Cup holders ........................................ 194
Curb weight ....................................... 240
Customer Assistance Center (CAC) ... 23
Customer Relations Department ....... 24
D
Dashboard see Instrument cluster
Data recording ..................................... 24
Date, Setting ...................................... 132
Daytime running lamp mode .............. 94
Switching on or off ......................... 133
Deep water
see Standing water
Defroster
Rear window .................................. 183
Windshield ............................. 171, 181
Delayed shut-off
Exterior lamps ................................ 134
Interior lighting .............................. 135
Department of Transportation
see DOT
Diesel engine
Preglow indicator lamp ....................29
Diesel fuel
see Fuel
Difficulties
While driving .................................. 106
With starting .................................. 105
Digital clock
see Clock
Digital speedometer ......................... 123
Dimensions (vehicle) see Vehicle specification
Direction of rotation (tires) .............. 231
Displays
Digital speedometer ......................123
Distronic ........................................ 146
Maintenance service indicator .......258
Messages in the multifunction
display ........................................... 272
Multifunction display .....................121
Outside temperature .............123, 131
Symbol messages ..........................283
Text messages ............................... 273
Trip computer ................................ 138
Vehicle status message memory ...128
Vehicle system settings .................129
Distronic ............................................ 144
Cleaning system sensor cover .......263
Control system .............................. 128
Distance warning function .............151
Distance warning
lamp ...................................... 146, 302
Driving with .................................... 150
Menu ............................................. 147
Messages in the multifunction
display ........................................... 278
Resume function ............................ 149
Sensor cover .................................. 263
Speed settings ............................... 148
Door control panel .............................. 33
Door handles ........................................ 33
Doors
Child safety locks ............................ 60
Locking/unlocking (KEYLESS-GO) ...71
Locking/unlocking (SmartKey) ........70
Messages in the multifunction
display ........................................... 286
Opening from inside ......................... 74
Remote door unlock (Tele Aid) .......203
Unlocking (Mechanical key) ...........306
DOT (Department of
Transportation) .................................. 240
Downhill Speed Regulation see DSR
Drinking and driving ......................... 244Index7164_AKB; 7; 31, en-USd2ureepe,Version: 2.11.8.12009-09-11T12:07:36+02:00 - Seite 7
Page 30 of 368
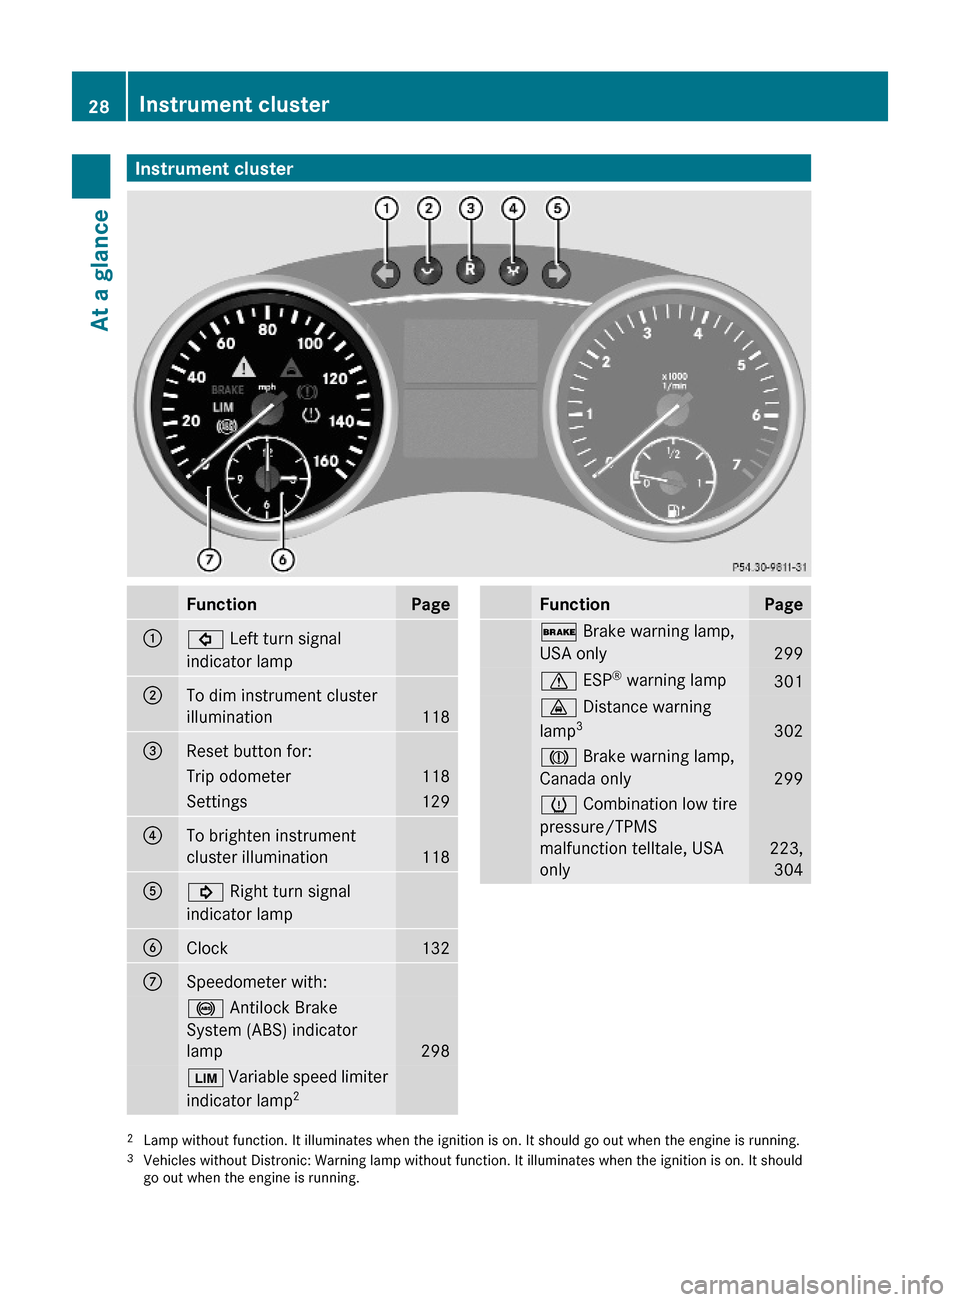
Instrument clusterFunctionPage:# Left turn signal
indicator lamp
;To dim instrument cluster
illumination118
=Reset button for: Trip odometer118Settings129?To brighten instrument
cluster illumination118
A! Right turn signal
indicator lamp
BClock 132CSpeedometer with: ! Antilock Brake
System (ABS) indicator
lamp 298
È Variable speed limiter
indicator lamp2FunctionPage$ Brake warning lamp,
USA only 299
d ESP® warning lamp 301· Distance warning
lamp3302
J Brake warning lamp,
Canada only299
h Combination low tire
pressure/TPMS
malfunction telltale, USA
only
223,
304
2Lamp without function. It illuminates when the ignition is on. It should go out when the engine is running.3Vehicles without Distronic: Warning lamp without function. It illuminates when the ignition is on. It shouldgo out when the engine is running.
28Instrument clusterAt a glance
164_AKB; 7; 31, en-USd2ureepe,Version: 2.11.8.12009-09-11T12:07:36+02:00 - Seite 28
Page 134 of 368
XMove the selection marker with button
W or X to the Instrument
Cluster submenu.
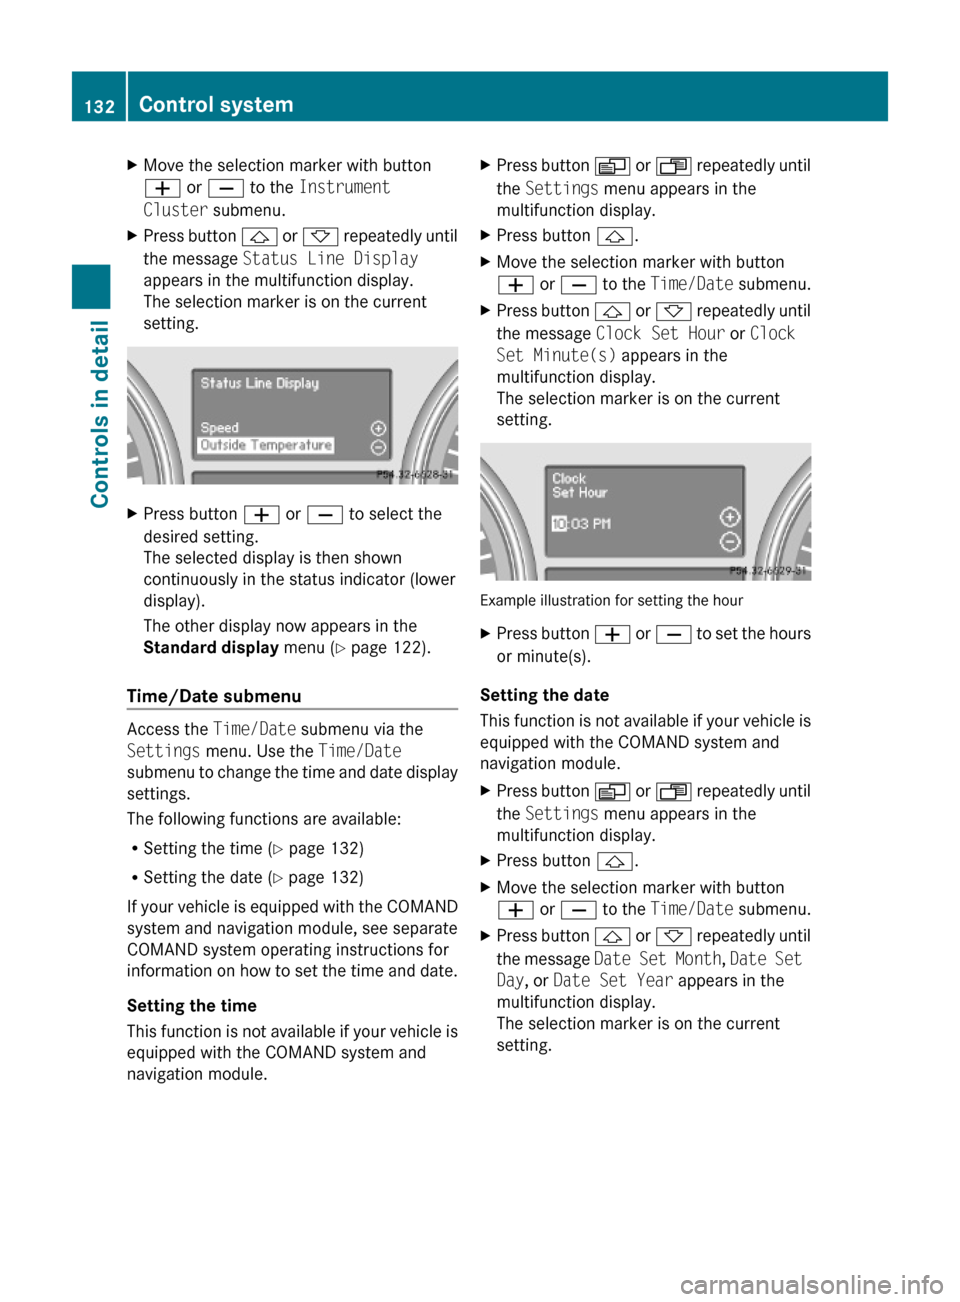
XPress button & or * repeatedly until
the message Status Line Display
appears in the multifunction display.
The selection marker is on the current
setting.
XPress button W or X to select the
desired setting.
The selected display is then shown
continuously in the status indicator (lower
display).
The other display now appears in the
Standard display menu (Y page 122).
Time/Date submenu
Access the Time/Date submenu via the
Settings menu. Use the Time/Date
submenu to change the time and date display
settings.
The following functions are available:
RSetting the time (Y page 132)
RSetting the date (Y page 132)
If your vehicle is equipped with the COMAND
system and navigation module, see separate
COMAND system operating instructions for
information on how to set the time and date.
Setting the time
This function is not available if your vehicle is
equipped with the COMAND system and
navigation module.
XPress button V or U repeatedly until
the Settings menu appears in the
multifunction display.
XPress button &.XMove the selection marker with button
W or X to the Time/Date submenu.
XPress button & or * repeatedly until
the message Clock Set Hour or Clock
Set Minute(s) appears in the
multifunction display.
The selection marker is on the current
setting.
Example illustration for setting the hour
XPress button W or X to set the hours
or minute(s).
Setting the date
This function is not available if your vehicle is
equipped with the COMAND system and
navigation module.
XPress button V or U repeatedly until
the Settings menu appears in the
multifunction display.
XPress button &.XMove the selection marker with button
W or X to the Time/Date submenu.
XPress button & or * repeatedly until
the message Date Set Month, Date Set
Day, or Date Set Year appears in the
multifunction display.
The selection marker is on the current
setting.
132Control systemControls in detail
164_AKB; 7; 31, en-USd2ureepe,Version: 2.11.8.12009-09-11T12:07:36+02:00 - Seite 132
Page 173 of 368
in small increments, preferably starting at
72‡ (22†).XIncreasing/decreasing: Turn
temperature control : and/or C
( Y page 167) slightly clockwise or
counterclockwise.
Adjusting air distribution
The air distribution can be adjusted manually.
The symbols on the buttons represent the
following functions:
SymbolFunction¯Directs air to the windshield and
side air ventsPDirects air through the center
and side air ventsODirects air to the footwells and
side air ventsXPress the desired air distribution button
¯ , P , or O .
The indicator lamp in button à goes out.
The automatic mode is switched off. Air
distribution is controlled according to the
desired button.
Adjusting air volume
XDecreasing/increasing: Press button
I or K .
The automatic mode is switched off. The
selected blower speed is shown in air
volume display G (Y page 167).
When using the Voice Control System, the
blower speed reduces automatically. When
the Voice Control System is not used
anymore, the blower speed increases to the
previously selected level.
Front defroster
You can use this setting to defrost the
windshield, for example if it is iced up.
You can also defog the windshield and the
side windows.
i Keep this setting selected only until the
windshield or the side windows are clear
again.
ActivatingXPress button ¦.
The indicator lamp in the button comes on.
The climate control switches to the
following functions automatically:
R most efficient blower speed and heating
power, depending on outside
temperature
R air flows onto the windshield and the
front door windows (side air vents must
be open)
R the air conditioning compressor
switches on at outside temperatures
above approximately 41‡ (5†) for air-
drying
Adjustments
You can adjust the air volume and the
temperature when the front defroster is
switched on. The air flow will remain on the
windshield and front door windows.
XPress button I to decrease or button
K to increase air volume to the desired
level.
The air volume decreases/increases to the
next lower/higher blower speed and
heating switches to the temperature that
was set before the front defroster was
switched on.Climate control171Controls in detail164_AKB; 7; 31, en-USd2ureepe,Version: 2.11.8.12009-09-11T12:07:36+02:00 - Seite 171Z
Page 182 of 368
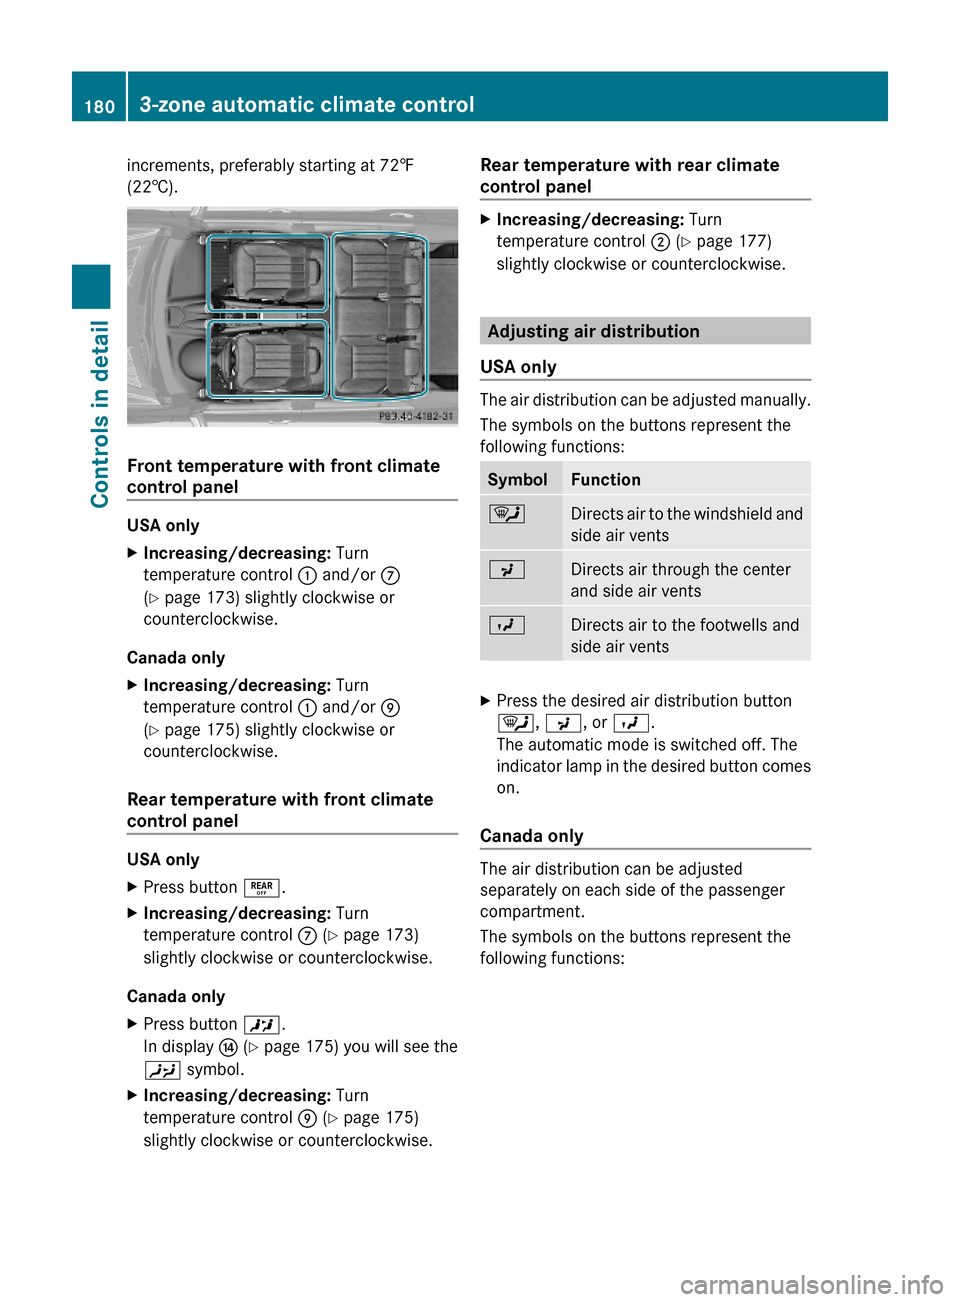
increments, preferably starting at 72‡
(22†).
Front temperature with front climate
control panel
USA only
XIncreasing/decreasing: Turn
temperature control : and/or C
(Y page 173) slightly clockwise or
counterclockwise.
Canada only
XIncreasing/decreasing: Turn
temperature control : and/or E
(Y page 175) slightly clockwise or
counterclockwise.
Rear temperature with front climate
control panel
USA only
XPress button ±.XIncreasing/decreasing: Turn
temperature control C (Y page 173)
slightly clockwise or counterclockwise.
Canada only
XPress button X.
In display J (Y page 175) you will see the
Y symbol.
XIncreasing/decreasing: Turn
temperature control E (Y page 175)
slightly clockwise or counterclockwise.
Rear temperature with rear climate
control panel
XIncreasing/decreasing: Turn
temperature control ; (Y page 177)
slightly clockwise or counterclockwise.
Adjusting air distribution
USA only
The air distribution can be adjusted manually.
The symbols on the buttons represent the
following functions:
SymbolFunction¯Directs air to the windshield and
side air vents
PDirects air through the center
and side air vents
ODirects air to the footwells and
side air vents
XPress the desired air distribution button
¯, P, or O.
The automatic mode is switched off. The
indicator lamp in the desired button comes
on.
Canada only
The air distribution can be adjusted
separately on each side of the passenger
compartment.
The symbols on the buttons represent the
following functions:
1803-zone automatic climate controlControls in detail
164_AKB; 7; 31, en-USd2ureepe,Version: 2.11.8.12009-09-11T12:07:36+02:00 - Seite 180
Page 214 of 368
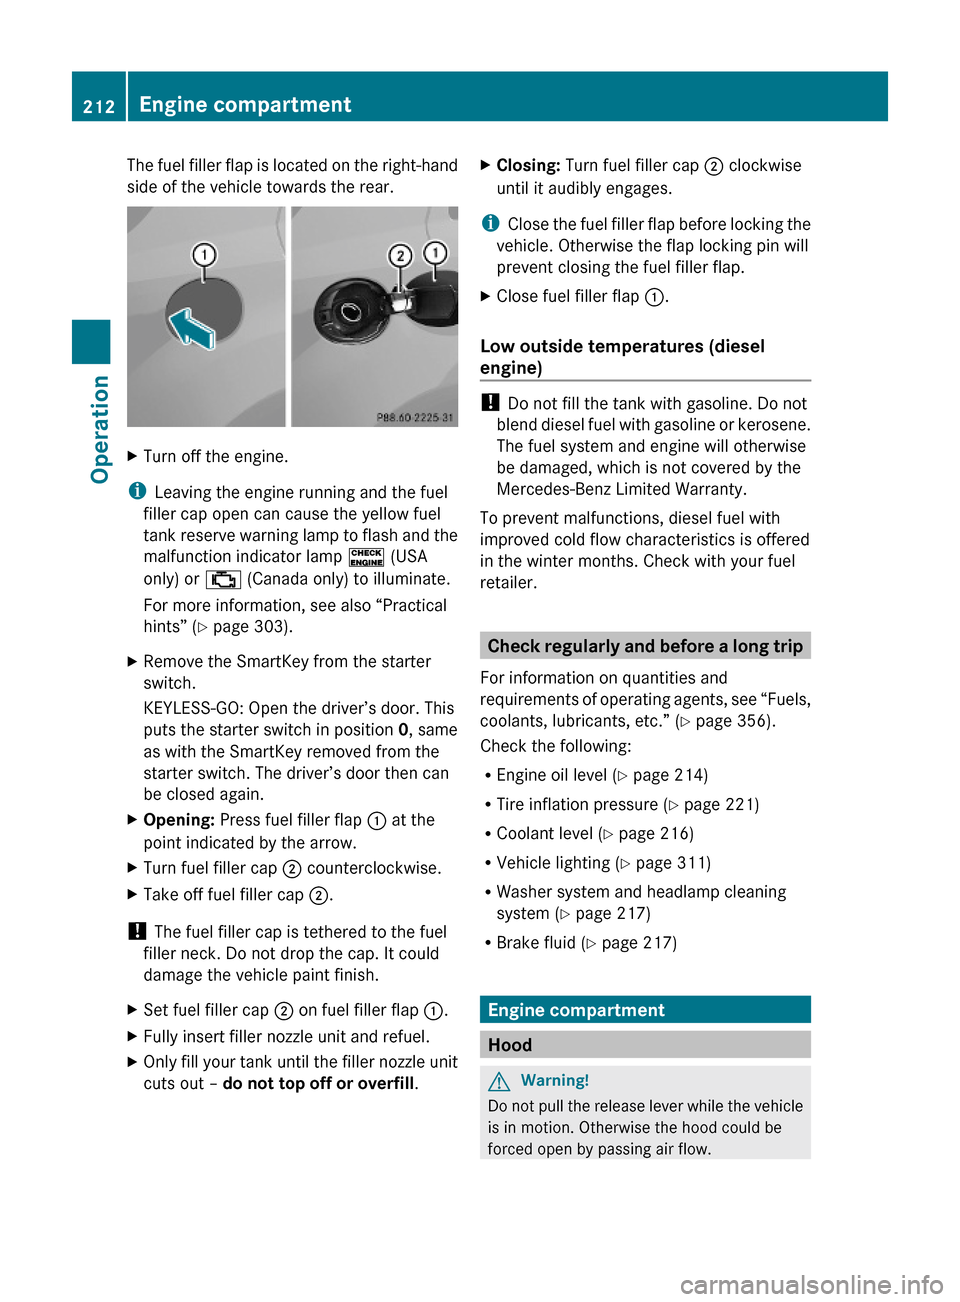
The fuel filler flap is located on the right-hand
side of the vehicle towards the rear.
XTurn off the engine.
iLeaving the engine running and the fuel
filler cap open can cause the yellow fuel
tank reserve warning lamp to flash and the
malfunction indicator lamp ! (USA
only) or ; (Canada only) to illuminate.
For more information, see also “Practical
hints” (Y page 303).
XRemove the SmartKey from the starter
switch.
KEYLESS-GO: Open the driver’s door. This
puts the starter switch in position 0, same
as with the SmartKey removed from the
starter switch. The driver’s door then can
be closed again.
XOpening: Press fuel filler flap : at the
point indicated by the arrow.
XTurn fuel filler cap ; counterclockwise.XTake off fuel filler cap ;.
! The fuel filler cap is tethered to the fuel
filler neck. Do not drop the cap. It could
damage the vehicle paint finish.
XSet fuel filler cap ; on fuel filler flap :.XFully insert filler nozzle unit and refuel.XOnly fill your tank until the filler nozzle unit
cuts out – do not top off or overfill.
XClosing: Turn fuel filler cap ; clockwise
until it audibly engages.
iClose the fuel filler flap before locking the
vehicle. Otherwise the flap locking pin will
prevent closing the fuel filler flap.
XClose fuel filler flap :.
Low outside temperatures (diesel
engine)
! Do not fill the tank with gasoline. Do not
blend diesel fuel with gasoline or kerosene.
The fuel system and engine will otherwise
be damaged, which is not covered by the
Mercedes-Benz Limited Warranty.
To prevent malfunctions, diesel fuel with
improved cold flow characteristics is offered
in the winter months. Check with your fuel
retailer.
Check regularly and before a long trip
For information on quantities and
requirements of operating agents, see “Fuels,
coolants, lubricants, etc.” (Y page 356).
Check the following:
REngine oil level (Y page 214)
RTire inflation pressure (Y page 221)
RCoolant level (Y page 216)
RVehicle lighting (Y page 311)
RWasher system and headlamp cleaning
system (Y page 217)
RBrake fluid (Y page 217)
Engine compartment
Hood
GWarning!
Do not pull the release lever while the vehicle
is in motion. Otherwise the hood could be
forced open by passing air flow.
212Engine compartmentOperation
164_AKB; 7; 31, en-USd2ureepe,Version: 2.11.8.12009-09-11T12:07:36+02:00 - Seite 212
Page 218 of 368
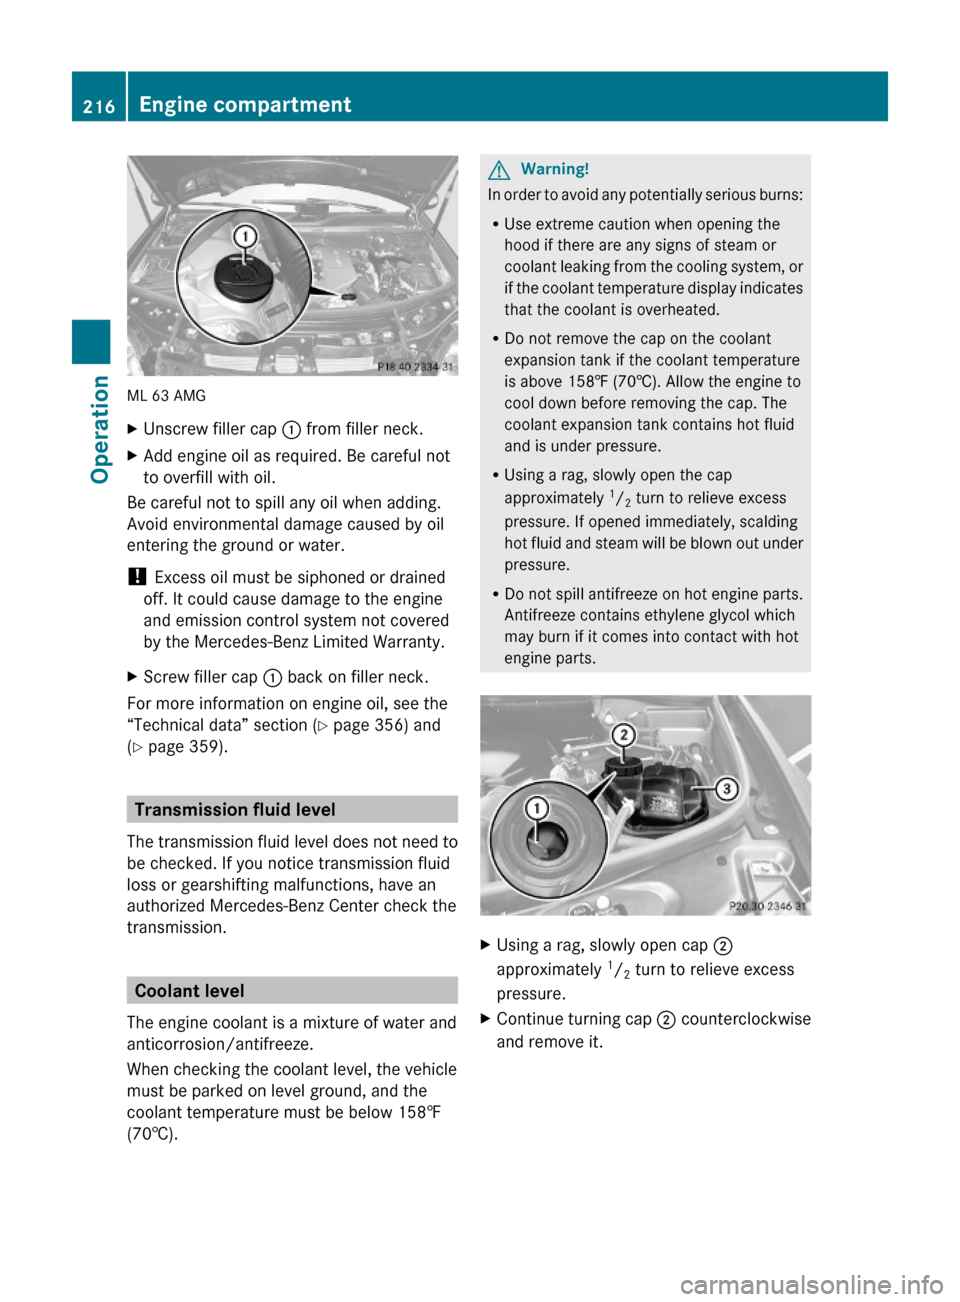
ML 63 AMG
XUnscrew filler cap : from filler neck.XAdd engine oil as required. Be careful not
to overfill with oil.
Be careful not to spill any oil when adding.
Avoid environmental damage caused by oil
entering the ground or water.
! Excess oil must be siphoned or drained
off. It could cause damage to the engine
and emission control system not covered
by the Mercedes-Benz Limited Warranty.
XScrew filler cap : back on filler neck.
For more information on engine oil, see the
“Technical data” section (Y page 356) and
(Y page 359).
Transmission fluid level
The transmission fluid level does not need to
be checked. If you notice transmission fluid
loss or gearshifting malfunctions, have an
authorized Mercedes-Benz Center check the
transmission.
Coolant level
The engine coolant is a mixture of water and
anticorrosion/antifreeze.
When checking the coolant level, the vehicle
must be parked on level ground, and the
coolant temperature must be below 158‡
(70†).
GWarning!
In order to avoid any potentially serious burns:
RUse extreme caution when opening the
hood if there are any signs of steam or
coolant leaking from the cooling system, or
if the coolant temperature display indicates
that the coolant is overheated.
RDo not remove the cap on the coolant
expansion tank if the coolant temperature
is above 158‡ (70†). Allow the engine to
cool down before removing the cap. The
coolant expansion tank contains hot fluid
and is under pressure.
RUsing a rag, slowly open the cap
approximately 1/2 turn to relieve excess
pressure. If opened immediately, scalding
hot fluid and steam will be blown out under
pressure.
RDo not spill antifreeze on hot engine parts.
Antifreeze contains ethylene glycol which
may burn if it comes into contact with hot
engine parts.
XUsing a rag, slowly open cap ;
approximately 1/2 turn to relieve excess
pressure.
XContinue turning cap ; counterclockwise
and remove it.
216Engine compartmentOperation
164_AKB; 7; 31, en-USd2ureepe,Version: 2.11.8.12009-09-11T12:07:36+02:00 - Seite 216
Page 273 of 368
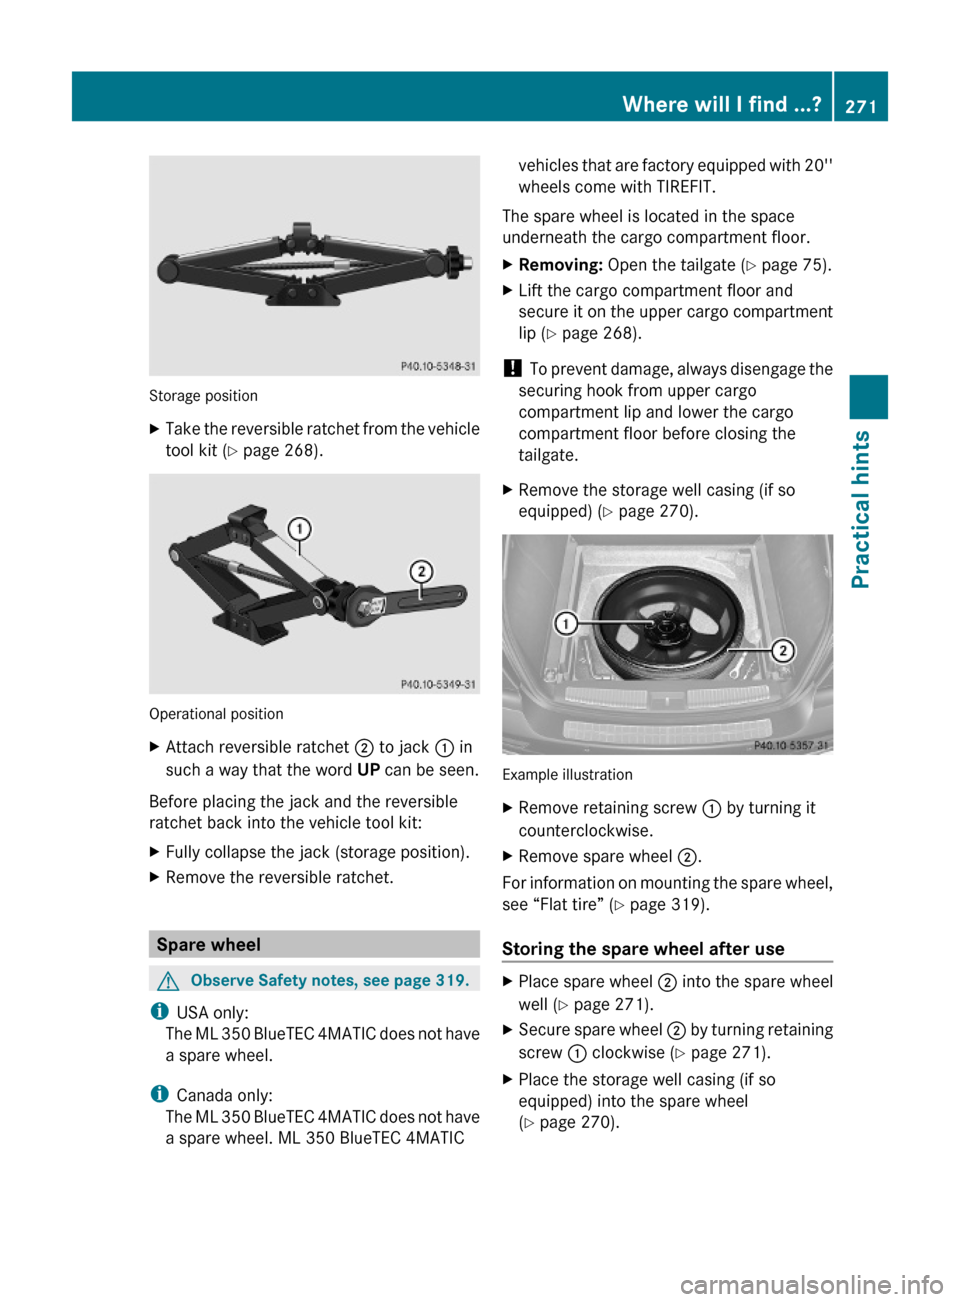
Storage position
XTake the reversible ratchet from the vehicle
tool kit (Y page 268).
Operational position
XAttach reversible ratchet ; to jack : in
such a way that the word UP can be seen.
Before placing the jack and the reversible
ratchet back into the vehicle tool kit:
XFully collapse the jack (storage position).XRemove the reversible ratchet.
Spare wheel
GObserve Safety notes, see page 319.
iUSA only:
The ML 350 BlueTEC 4MATIC does not have
a spare wheel.
iCanada only:
The ML 350 BlueTEC 4MATIC does not have
a spare wheel. ML 350 BlueTEC 4MATIC
vehicles that are factory equipped with 20''
wheels come with TIREFIT.
The spare wheel is located in the space
underneath the cargo compartment floor.
XRemoving: Open the tailgate (Y page 75).XLift the cargo compartment floor and
secure it on the upper cargo compartment
lip (Y page 268).
! To prevent damage, always disengage the
securing hook from upper cargo
compartment lip and lower the cargo
compartment floor before closing the
tailgate.
XRemove the storage well casing (if so
equipped) (Y page 270).
Example illustration
XRemove retaining screw : by turning it
counterclockwise.
XRemove spare wheel ;.
For information on mounting the spare wheel,
see “Flat tire” (Y page 319).
Storing the spare wheel after use
XPlace spare wheel ; into the spare wheel
well (Y page 271).
XSecure spare wheel ; by turning retaining
screw : clockwise (Y page 271).
XPlace the storage well casing (if so
equipped) into the spare wheel
(Y page 270).
Where will I find ...?271Practical hints164_AKB; 7; 31, en-USd2ureepe,Version: 2.11.8.12009-09-11T12:07:36+02:00 - Seite 271Z
Page 309 of 368
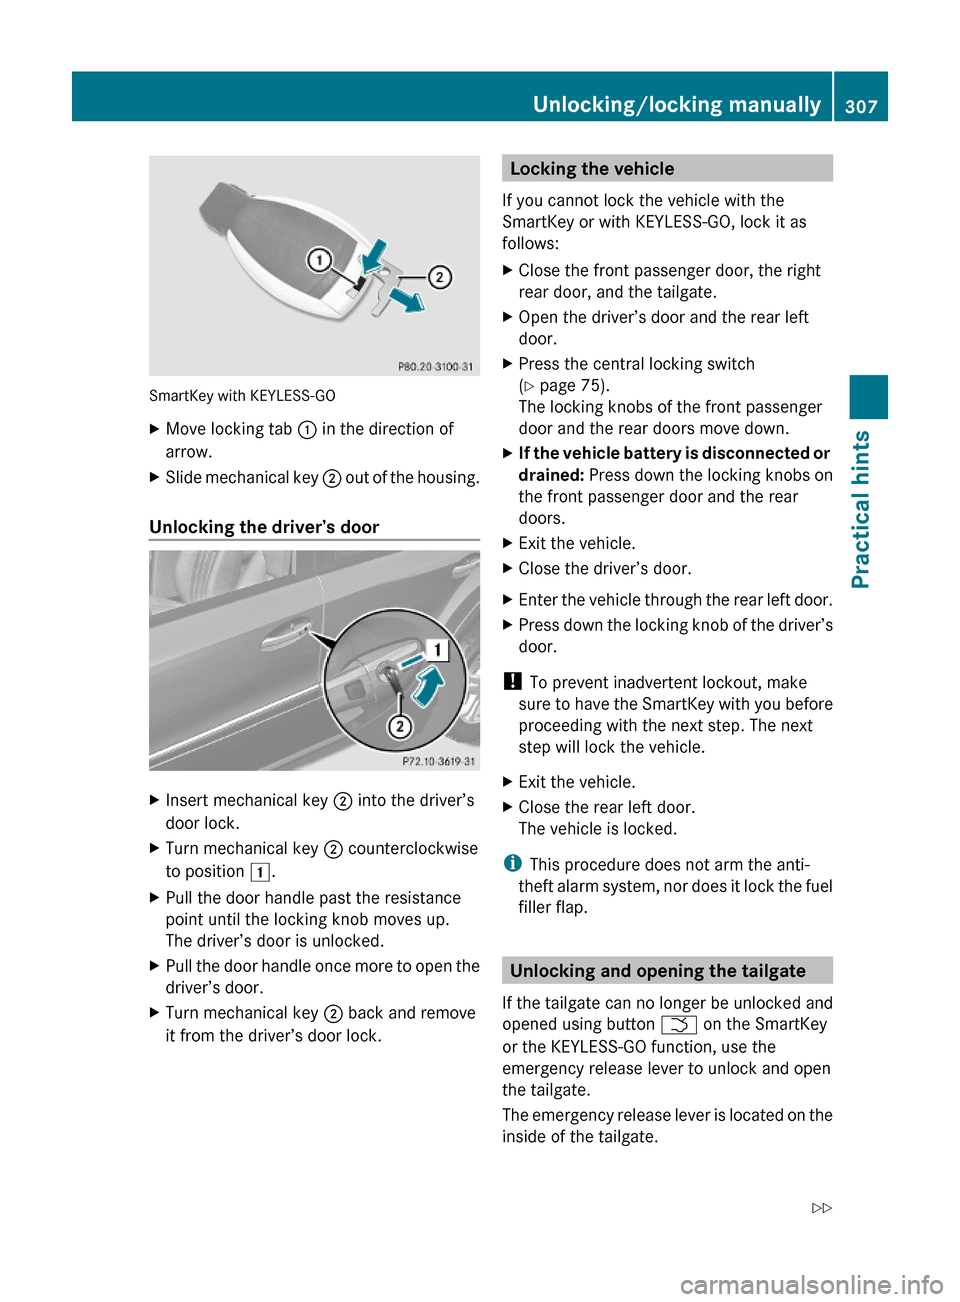
SmartKey with KEYLESS-GO
XMove locking tab : in the direction of
arrow.
XSlide mechanical key ; out of the housing.
Unlocking the driver’s door
XInsert mechanical key ; into the driver’s
door lock.
XTurn mechanical key ; counterclockwise
to position 1.
XPull the door handle past the resistance
point until the locking knob moves up.
The driver’s door is unlocked.
XPull the door handle once more to open the
driver’s door.
XTurn mechanical key ; back and remove
it from the driver’s door lock.Locking the vehicle
If you cannot lock the vehicle with the
SmartKey or with KEYLESS-GO, lock it as
follows:
XClose the front passenger door, the right
rear door, and the tailgate.
XOpen the driver’s door and the rear left
door.
XPress the central locking switch
(Y page 75).
The locking knobs of the front passenger
door and the rear doors move down.
XIf the vehicle battery is disconnected or
drained: Press down the locking knobs on
the front passenger door and the rear
doors.
XExit the vehicle.XClose the driver’s door.XEnter the vehicle through the rear left door.XPress down the locking knob of the driver’s
door.
! To prevent inadvertent lockout, make
sure to have the SmartKey with you before
proceeding with the next step. The next
step will lock the vehicle.
XExit the vehicle.XClose the rear left door.
The vehicle is locked.
iThis procedure does not arm the anti-
theft alarm system, nor does it lock the fuel
filler flap.
Unlocking and opening the tailgate
If the tailgate can no longer be unlocked and
opened using button F on the SmartKey
or the KEYLESS-GO function, use the
emergency release lever to unlock and open
the tailgate.
The emergency release lever is located on the
inside of the tailgate.
Unlocking/locking manually307Practical hints164_AKB; 7; 31, en-USd2ureepe,Version: 2.11.8.12009-09-11T12:07:36+02:00 - Seite 307Z