oil MERCEDES-BENZ ML55AMG 2001 W163 User Guide
[x] Cancel search | Manufacturer: MERCEDES-BENZ, Model Year: 2001, Model line: ML55AMG, Model: MERCEDES-BENZ ML55AMG 2001 W163Pages: 317, PDF Size: 10.4 MB
Page 160 of 317
157 Tele Aid
Te ch n ica l
data Instruments
and controlsOperationDrivingInstrument
cluster displayPractical hints Car care Index Important!
If the indicator lamp continues to flash or the system
does not reset, contact the Response Center at
1-800-756-9018 (in the USA) or 1-888-923-8367 (in
Canada), or Mercedes-Benz Client Assistance at
1-800-FOR-MERCedes (1-800-367-6372) in the USA or
Customer Service at 1-800-387-0100 in Canada.
Notes:
The indicator lamp for the respective button flashes
until the call is concluded and this can only be
completed by a Response Center or Client Assistance
Center representative, except Roadside assistance and
Information calls, which can also be terminated by
using the End button on the MCS unit.
When a Tele Aid call has been initiated, the MCS system
audio is muted and the selected mode (radio, tape or
CD) pauses. The optional cellular phone (if installed)
switches off. If you must use this phone, the vehicle
must be parked. Disconnect the coiled cord and place
the call. The navigation system (if engaged) will
continue to run. A pop-up window will appear in the
MCS display to indicate that a Tele Aid call is in
progress.Remote door unlock
In the case you have your vehicle locked unintentionally
(e.g. key inside vehicle), and the reserve key is not
handy, contact the Mercedes-Benz Response Center at
1-800-756-9018 (in the USA) or 1-888-923-8367 (in
Canada). You will be asked to provide your password
which you provided when you completed the subscriber
agreement.
Then return to your vehicle and pull outside handle of
liftgate for a minimum of 20 seconds until the “SOS”
button is flashing.
As an alternative, you may unlock the vehicle via
Internet using the ID and password sent to you shortly
after the completion of your Acquaintance Call.
The Response Center will then unlock your vehicle with
the remote door unlocking feature.
Note:
The remote door unlock feature is available if the
relevant cellular phone network is available.
The SOS button will f lash and the message
“EMERGENCY CALL – CALL CONNECTED” will appear
in t he MCS display to indica te receipt of t he d oor unlock
command.
Page 184 of 317
181 Driving instructions
Te ch n ica l
data Instruments
and controlsOperationDrivingInstrument
cluster displayPractical hints Car care Index Winter driving
Have your vehicle winterized at your authorized
Mercedes-Benz Light Truck Center before the onset of
winter.
•Change the engine oil if the engine contains an oil
which is not approved for winter operation. For
viscosity (SAE / CCMC class) and filling quantity,
see page 292.
•Check engine coolant anticorrosion / antifreeze
concentration.
•Additive for the windshield washer and headlamp
cleaning system: Add MB Concentrate “S” to a
premixed windshield washer solvent / antifreeze
which is formulated for below freezing temperatures
see page 237.
•Test battery: Battery capacity drops with decreasing
ambient temperature. A well charged battery helps
to ensure that the engine can be started, even at low
ambient temperatures.
•Tires: We recommend M+S rated radial-ply tires on
all four wheels for the winter season. Observe
permissible maximum speed for M+S rated
radial-ply tires and the legal speed limit.In winter operation, the maximum effectiveness of the
antilock brake system (ABS), the four wheel electronic
traction system (4-ETS+), the electronic stability
program (ESP), and electronic brake proportioning
(EBP) can only be achieved with M+S rated radial-ply
tires and / or snow chains recommended by
Mercedes-Benz. Snow chains maximize performance.
For driving instructions using snow chains see
page 179.
Deep water
Caution!
Do not drive through flooded areas or water of unknown
depth. Before driving through water, determine its
depth. It should not be deeper than approximately
20 inches (50 cm).
If you must drive through deep water, drive slowly to
prevent water from entering the engine compartment or
passenger compartment, being ingested by the air
intake, possibly causing damage to electrical
components or wiring, to engine or transmission that is
not covered by the Mercedes-Benz Limited Warranty.
Page 186 of 317
183 Driving instructions
Te ch n ica l
data Instruments
and controlsOperationDrivingInstrument
cluster displayPractical hints Car care Index Off-Road driving
Familiarize yourself with the vehicle characteristics and
gear changing before you attempt any difficult terrain
off-road driving. We recommend that you start out with
easy off-road travel.
Please read this chapter carefully before you begin
off-road travel.
Special driving features are available for specific kinds
of operation:
•LOW RANGE mode, see page 209
•LOW RANGE - ABS, see page 202
•LOW RANGE - 4-ETS+, see page 204
•LOW RANGE - ESP, see page 208
Engage the LOW RANGE mode before driving under
off-road conditions. For switching LOW RANGE mode on
and off see page 209.
Fasten items being carried as securely as possible, see
page 136.
We recommend to keep doors, liftgate, windows, and
roof closed whenever driving in off-road mode.Important!
Adjust vehicle speed to condition of terrain. The more
uneven, rutty and steeper the terrain, the lower the
speed should be.
Watch out for obstacles, such as rocks, holes,
tree-stumps, ruts.
Be especially careful when driving in unknown
territory. Eventually get out of the vehicle and scout the
path you intend to take.
Continuous and speedy driving in sandy soil overcomes
the vehicle rolling resistance, and helps to prevent the
vehicle from sinking into the ground.
Do not initiate jumps with the vehicle. It interrupts the
forward momentum of the vehicle.
Sand, dirt, mud and other material having friction
property, can cause exceptional wear and tear as well as
failure of the brakes.
In this case the brakes may be less effective or even fail
when you most need them. Always clean and check the
brakes following each off-road trip.
Page 187 of 317
184 Driving instructions
Te ch n ica l
data Instruments
and controlsOperationDrivingInstrument
cluster displayPractical hints Car care Index
Checklist before off-road driving
•Tires: Check the tread depth and maintain specified
tire pressure (see tire pressure label inside the fuel
filler flap). Check tires for possible damage and
remove foreign objects. The valve caps must be
mounted.
•Rims: Dented or bent rims can cause tire pressure
loss and damage the tire beads. For this reason
change rims before driving off-road.
• Vehicle tool kit: Check if the vehicle jack is
functional. In all cases take the vehicle tool kit, a
strong tow rope, a shovel and a small plank (to put
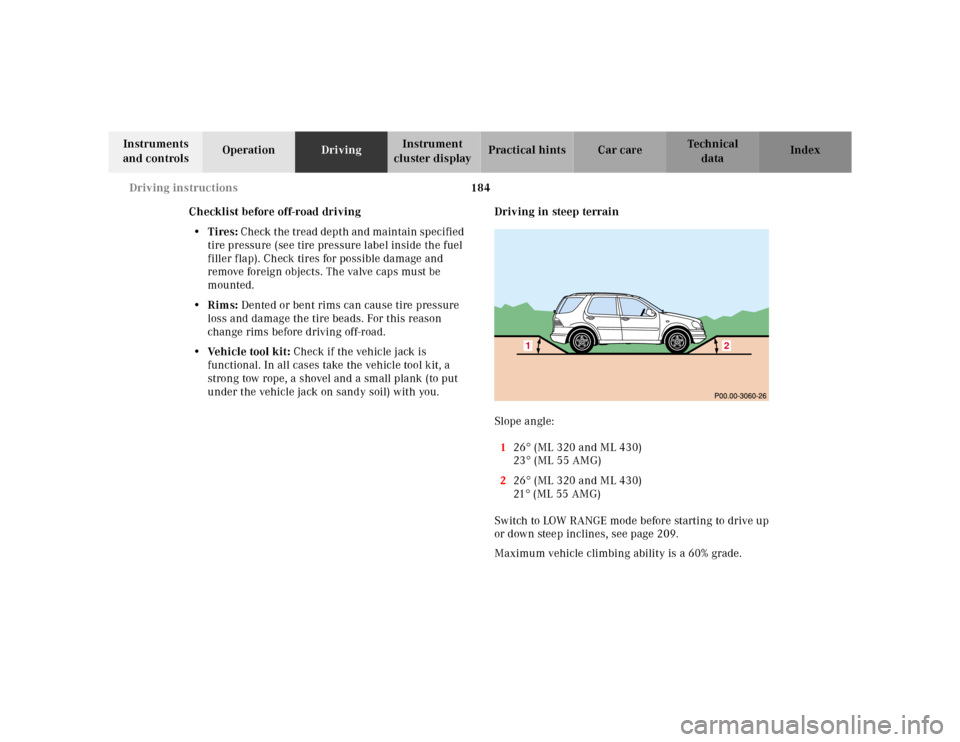
under the vehicle jack on sandy soil) with you.Driving in steep terrain
Slope angle:
126° (ML 320 and ML 430)
23° (ML 55 AMG)
226° (ML 320 and ML 430)
21° (ML 55 AMG)
Switch to LOW RANGE mode before starting to drive up
or down steep inclines, see page 209.
Maximum vehicle climbing ability is a 60% grade.
1
2
Page 192 of 317
189 Driving instructions
Te ch n ica l
data Instruments
and controlsOperationDrivingInstrument
cluster displayPractical hints Car care Index Returning from off-road driving
Off-road driving increases strain on the vehicle.
We recommend that you inspect the vehicle for possible
damage after each off-road trip. Recognizing any
damage and a subsequent timely repair reduces the
chance of a possible breakdown or accident later on.
Proceed as follows:
•Switch off the LOW RANGE mode, see page 209.
•Remove excessive dirt from tires, wheels, wheel
housings, and underbody. For instance, after driving
in mud, clean the radiator, chassis, engine, brakes,
and wheels from extreme dirt, using a strong jet of
water.
•Inspect frame, oil pan, brake hoses, etc., as well as
vehicle underbody for possible damage.
•Check tires for possible damage, clean all exterior
lamps, and conduct a brake test.•Check for brush or branches caught in the
undercarriage. They could increase the possibility of
a fire, as well as cut fuel and / or brake lines,
puncture rubber bellows of the axles or drive shafts.
Wa r n i n g !
If you feel a sudden significant vibration or ride
disturbance, or you suspect that possible damage to
your vehicle has occurred, you should turn on the
hazard warning flashers, carefully slow down, and
drive with caution to an area which is a safe
distance from the roadway.Inspect the tires and under the vehicle for possible
damage. If the vehicle or tires appear unsafe, have
it towed to the nearest Mercedes-Benz Light Truck
Center or tire dealer for repairs.
Page 216 of 317
213 What you should know at the gas station
Te ch n ica l
data Instruments
and controlsOperationDrivingInstrument
cluster displayPractical hints Car care Index Leaving the engine running and the fuel cap open can
cause the “CHECK ENGINE” lamp to illuminate.
Fuel tank capacity approximately 19.0 US gal (72.0 l).
This includes approximately 3.2 US gal (12.0 l) reserve.
Use premium unleaded gasoline: Posted Octane
Index 91 (Average of 96 RON / 86 MON).
•Engine oil
Engine oil level check, see page 89 and page 233.
Fill quantity between upper and lower dipstick
marking level: 2.1 US qt (2.0 l).
Recommended engine oils, see Approved Service
Products sheet.• Coolant
For normal replenishing, use water (potable water
quality).
For further information (e.g. anticorrosion/
antifreeze), see page 292.
• Spark plugs
Approved spark plugs, see page 290.
• Tire pressure
For tire pressure, refer to tire pressure label inside
the fuel filler flap. See page 250 for further details.
• Air conditioner
R-134a refrigerant and special PAG lubricant, see
page 294.
Wa r n i n g !
Overfilling of fuel tank may result in creating
pressure in the system which could cause a gas
discharge such as the gas spraying back out upon
removing the filler nozzle which could cause
personal injury.
Page 218 of 317
215 Check regulary and before a long trip
Te ch n ica l
data Instruments
and controlsOperationDrivingInstrument
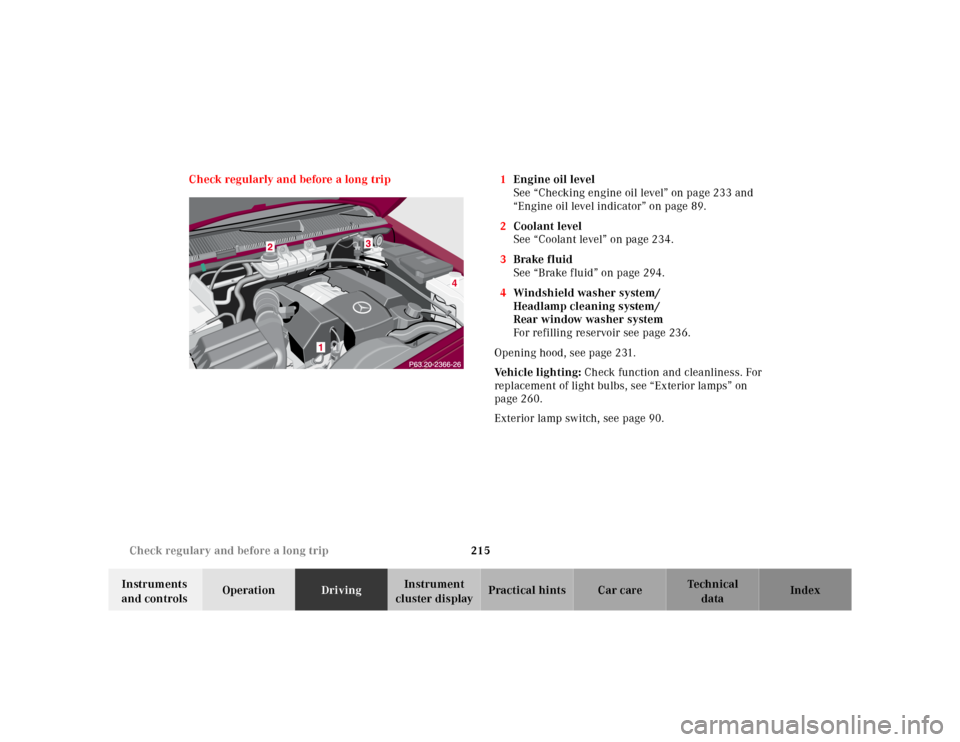
cluster displayPractical hints Car care Index Check regularly and before a long trip 1Engine oil level
See “Checking engine oil level” on page 233 and
“Engine oil level indicator” on page 89.
2Coolant level
See “Coolant level” on page 234.
3Brake fluid
See “Brake fluid” on page 294.
4Windshield washer system/
Headlamp cleaning system/
Rear window washer system
For refilling reservoir see page 236.
Opening hood, see page 231.
Ve h i c l e l i g h t i n g : Check function and cleanliness. For
replacement of light bulbs, see “Exterior lamps” on
page 260.
Exterior lamp switch, see page 90.
Page 220 of 317
217 Contents - Instrument cluster display
Te ch n ica l
data Instruments
and controlsOperation DrivingInstrument
cluster displayPractical hints Car care Index
Instrument cluster displayMalfunction and indicator
lamps in the
instrument cluster .................... 218
On-board diagnostic system –
Check engine malfunction
indicator lamp ............................. 218
Brake warning lamp .................. 219
Supplemental restraint system
(SRS) indicator lamp .................. 219
Fuel reserve warning .................220Electronic stability
program (ESP) / Electronic
traction system (ETS) –
warning lamp ............................. 221
BAS/ESP malfunction
indicator lamp ............................ 221
4-ETS malfunction
indicator lamp ............................ 221
LOW RANGE
indicator lamp ............................ 221
ABS malfunction
indicator lamp ............................ 222Adjustable steering wheel –
indicator lamp .............................222
AIRBAG OFF
indicator lamp .............................222
Seat belt warning lamp .............223
Charge indicator lamp ...............223
Low engine oil level
warning lamp ..............................224
Low engine coolant
level warning ..............................224
Brake pad wear
indicator lamp .............................225
FSS indicator ...............................225
Page 227 of 317
224 Malfunction and indicator lamps
Te ch n ica l
data Instruments
and controlsOperation DrivingInstrument
cluster displayPractical hints Car care Index
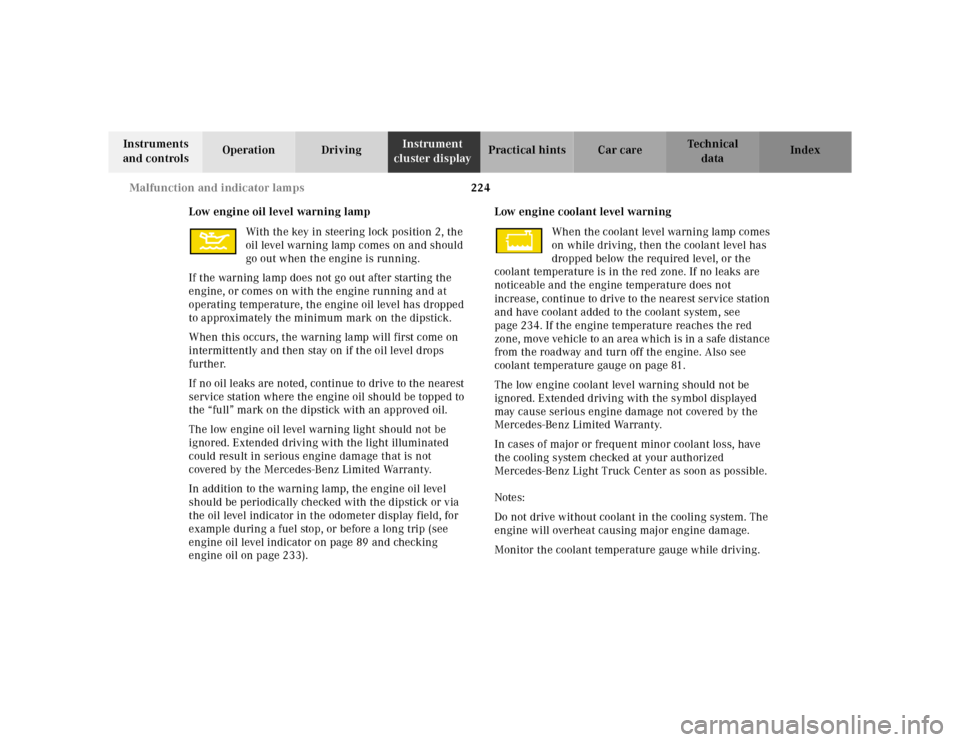
Low engine oil level warning lamp
With the key in steering lock position 2, the
oil level warning lamp comes on and should
go out when the engine is running.
If the warning lamp does not go out after starting the
engine, or comes on with the engine running and at
operating temperature, the engine oil level has dropped
to approximately the minimum mark on the dipstick.
When this occurs, the warning lamp will first come on
intermittently and then stay on if the oil level drops
further.
If no oil leaks are noted, continue to drive to the nearest
service station where the engine oil should be topped to
the “full” mark on the dipstick with an approved oil.
The low engine oil level warning light should not be
ignored. Extended driving with the light illuminated
could result in serious engine damage that is not
covered by the Mercedes-Benz Limited Warranty.
In addition to the warning lamp, the engine oil level
should be periodically checked with the dipstick or via
the oil level indicator in the odometer display field, for
example during a fuel stop, or before a long trip (see
engine oil level indicator on page 89 and checking
engine oil on page 233).Low engine coolant level warning
When the coolant level warning lamp comes
on while driving, then the coolant level has
dropped below the required level, or the
coolant temperature is in the red zone. If no leaks are
noticeable and the engine temperature does not
increase, continue to drive to the nearest service station
and have coolant added to the coolant system, see
page 234. If the engine temperature reaches the red
zone, move vehicle to an area which is in a safe distance
from the roadway and turn off the engine. Also see
coolant temperature gauge on page 81.
The low engine coolant level warning should not be
ignored. Extended driving with the symbol displayed
may cause serious engine damage not covered by the
Mercedes-Benz Limited Warranty.
In cases of major or frequent minor coolant loss, have
the cooling system checked at your authorized
Mercedes-Benz Light Truck Center as soon as possible.
Notes:
Do not drive without coolant in the cooling system. The
engine will overheat causing major engine damage.
Monitor the coolant temperature gauge while driving.
Page 230 of 317
227 Contents - Practical hints
Te ch n ica l
data Instruments
and controlsOperation DrivingInstrument
cluster displayPractical hintsCar care Index
Practical hintsFirst aid kit .....................................228
Fuses ................................................228
Electrical outlet ..............................230
Stowing things in the vehicle ......230
Hood ................................................. 231
Checking engine oil level .............233
Automatic transmission
fluid level ...................................234
Engine oil consumption ................234
Coolant level ...................................234
Adding coolant ...........................235
Windshield washer/headlamp
cleaning system .........................236
Windshield and
headlamp washer fluid
mixing ratio ................................237Vehicle jack, wheel bolt
wrench and screwdriver ......... 237
Air pump ......................................... 239
Wheels ............................................ 240
Tire replacement ....................... 240
Rotating wheels ......................... 241
Spare wheel .................................... 242
Changing wheels ........................... 245
Tire inflation pressure ................. 250
Battery ............................................. 251
Jump starting ................................. 253
Towing the vehicle ........................ 255
Transmission selector lever,
manually unlocking .................. 259
Stranded vehicle ............................ 259Exterior lamps ................................260
Headlamp assembly ................... 261
Taillamp assemblies ..................265
Adjusting headlamp aim ...............268
Remote control
battery replacement .................270
Synchronizing
remote control ............................ 271
Emergency operation of
sliding/pop-up roof ...................272
Emergency operation of
Skyview Top ...............................273
Manual release for
fuel filler flap ............................. 274
Replacing wiper blades .................275
Roof rack ......................................... 276