hood MERCEDES-BENZ ML55AMG 2002 W163 Owner's Manual
[x] Cancel search | Manufacturer: MERCEDES-BENZ, Model Year: 2002, Model line: ML55AMG, Model: MERCEDES-BENZ ML55AMG 2002 W163Pages: 342, PDF Size: 13.75 MB
Page 8 of 342

5 Contents
Practical hintsFirst aid kit .....................................250
Fuses ................................................250
Electrical outlet ..............................252
Stowing items in the vehicle ........252
Hood .................................................253
Checking engine oil level .............255
Automatic transmission
fluid level ...................................256
Engine oil consumption ................256
Coolant level ...................................256
Adding coolant ...........................257
Windshield washer/headlamp
cleaning system .........................258
Windshield and headlamp
washer fluid mixing ratio .........259Ve h i c l e j a c k ,
wheel bolt wrench and
screwdriver ............................... 259
Air pump ......................................... 261
Wheels ............................................ 262
Tire replacement ....................... 262
Rotating wheels ......................... 263
Spare wheel .................................... 264
Changing wheels ........................... 267
Tire inflation pressure ................. 272
Battery ............................................. 273
Jump starting ................................. 275
Towing the vehicle ........................ 277
Transmission selector lever,
manually unlocking .................. 281
Stranded vehicle ............................ 281Exterior lamps ................................282
Headlamp assembly ...................283
Taillamp assemblies ..................287
Adjusting headlamp aim ...............290
Remote control battery
replacement ...............................292
Synchronizing
remote control ............................293
Emergency operation of
sliding/pop-up roof ...................294
Manual release for
fuel filler flap .............................295
Replacing wiper blades .................295
Roof rack .........................................296
Page 30 of 342

27 Central locking system
Te ch n i c a l
data Instruments
and controlsOperationDrivingInstrument
cluster displayPractical hints Car care Index Locking and unlocking with remote control
Unlocking:
Press transmit button Πonce. All turn signal lamps
blink once to indicate that the driver’s door and fuel
filler flap are unlocked.
The antitheft alarm system is also deactivated.
Press transmit button Πa second time to unlock
remaining doors and liftgate.
Notes:
If the fuel filler flap cannot be opened, see page 295.
If within 40 seconds of unlocking with the remote
control, neither door nor liftgate is opened or the key is
not inserted in the steering lock, the vehicle will
automatically lock and reactivate the antitheft alarm
system.Locking:
Press transmit button ‹ once. All turn signal lamps
blink three times to indicate that the vehicle is locked
and the antitheft alarm is activated.
Notes:
If the turn signal lamps do not blink three times when
locking the vehicle, a door, the liftgate, or the hood is
not properly closed. Close the respective element and
lock the vehicle again with the remote control.
If the vehicle cannot be locked or unlocked by pressing
the transmit button, then it may be necessary to change
the batteries in the remote control or to synchronize the
remote control, see page 292 and page 293.
Unlocking the liftgate
Press transmit button Š to unlock only the liftgate.
This also deactivates the antitheft alarm.
Important!
A minimum height clearance of 7 ft. (2.15 m) is
required to open the liftgate.
Page 39 of 342

36 Antitheft alarm system
Te ch n i c a l
data Instruments
and controlsOperationDrivingInstrument
cluster displayPractical hints Car care Index
Antitheft alarm system
The indicator lamp is located in the center console.
The antitheft alarm is automatically armed or disarmed
with the remote control by locking or unlocking the
vehicle.
The antitheft alarm is armed within approximately
15 seconds after locking the vehicle with the remote
control.
A blinking lamp in the center console indicates that the
alarm is armed.
Notes:
Use of the mechanical key in the front door locks does
not arm or disarm the antitheft alarm system.
The alarm sounds when unlocking the driver’s door
with the mechanical key. Cancel alarm by turning key in
steering lock to position 1, or with the remote control by
pressing buttonŒ or‹.
If the vehicle battery voltage falls below 10 volts, the
alarm is automatically canceled and the antitheft alarm
system is disarmed. When the voltage is above this
value again, the antitheft alarm system is armed again.Operation:
Once the alarm system has been armed, the turn signal
lamps will flash rapidly (approximately 3 minutes) and
the horn will sound intermittently (approximately
30 seconds) when someone:
•opens a door,
•opens the liftgate,
•opens the hood,
•breaks a window,
•attempts to raise the vehicle.
The alarm will stay on even if the activating element
(a door, for example) is immediately closed.
If the alarm stays on for more than 20 seconds, an
emergency call is initiated automatically. See Tele Aid
on page 166.
Note:
The alarm system will cycle three times when triggered.
The interior lights are automatically switched on when
the alarm comes on and go out when the alarm is
cancelled.
Page 55 of 342

52 Restraint systems
Te ch n i c a l
data Instruments
and controlsOperationDrivingInstrument
cluster displayPractical hints Car care Index
Operation
The inertia reel stops the belt from unwinding during
sudden vehicle stops or when quickly pulling on the
belt. The locking function of the reel may be checked by
quickly pulling out the belt.
Unfastening of seat belts
Push the release button (3) in the belt buckle (2).
Allow the retractor to completely rewind the seat belt by
guiding the latch plate (1).
Wa r n i n g !
USE SEAT BELTS PROPERLY.• Seat belts can only work when used properly.
Never wear seat belts in any other way than as
described in this section, as that could result
in serious injuries in case of an accident.• Each occupant should wear their seat belt at all
times, because seat belts help reduce the
likelihood of and potential severity of injuries
in accidents, including rollovers. The
integrated restraint system includes “SRS”
(driver airbag, front passenger airbag, front
and rear door mounted side impact airbags),
“ETR” (seat belt emergency tensioning
retractors for the outboard passenger seats
[except in the optional 3rd row seats]), and
front seat knee bolsters. The system is
designed to enhance the protection offered to
properly belted occupants in certain frontal
(front airbags) and side (side impact airbags)
impacts which exceed preset deployment
thresholds.
Page 90 of 342
87 Instrument cluster
Te ch n i c a l
data Instruments
and controlsOperationDrivingInstrument
cluster displayPractical hints Car care Index Clock (13)
Adjusting clock (instrument cluster activated):
Minute: Pull out knob (2) and turn it to the right.
Hour: Pull out knob (2) and turn it to the left.
Coolant temperature gauge (1)
During severe operating conditions and stop-and-go city
traffic, the coolant temperature may rise close to the red
marking.
The engine should not be operated with the coolant
temperature in the red zone. Doing so may cause
serious engine damage which is not covered by the
Mercedes-Benz Limited Warranty.
Wa r n i n g !
• Driving when your engine is badly overheated
can cause some fluids which may have leaked
into the engine compartment to catch fire. You
could be seriously burned.• Steam from an overheated engine can cause
serious burns and can occur just by opening
the engine hood. Stay away from the engine if
you see or hear steam coming from it.Turn off the engine, get out of the vehicle and do
not stand near the vehicle until it cools down.
Page 222 of 342
219 Driving systems
Te ch n i c a l
data Instruments
and controlsOperationDrivingInstrument
cluster displayPractical hints Car care Index Antilock brake system (ABS)
Important!
The ABS improves steering control of the vehicle during
hard braking maneuvers.
The ABS prevents the wheels from locking up above a
vehicle speed of approximately 5 mph (8 km / h)
independent of road surface conditions.
At the instant one of the wheels is about to lock up, a
slight pulsation can be felt in the brake pedal,
indicating that the ABS is in the regulating mode. Keep
firm and steady pressure on the brake pedal while
experiencing the pulsation.
Continuous steady brake pedal pressure results in
applying the advantages of the ABS, namely braking
power and ability to steer the vehicle.In the case of an emergency brake maneuver keep
continuous full pressure on the brake pedal. In this
manner only can the ABS be most effective.
On slippery road surfaces, the ABS will respond even
with light brake pedal pressure because of the
increased likelihood of locking wheels. The pulsating
brake pedal can be an indication of hazardous road
conditions and functions as a reminder to take extra
care while driving.
ABS control
The ABS malfunction indicator lamp- in the
instrument cluster comes on with the key in steering
lock position 2 and should go out with the engine
running.
When the ABS malfunction indicator lamp- in the
instrument cluster comes on while the engine is
running, it indicates that the ABS has detected a
malfunction and has switched off. In this case, the brake
system functions in the usual manner, but without
antilock assistance.
With the ABS malfunctioning, the BAS, EBP, ESP and
4-ETS+ are also switched off. The malfunction indicator
lamps come on with the engine running.
Wa r n i n g !
Do not pump the brake pedal, rather use firm,
steady brake pedal pressure. Pumping the brake
pedal defeats the purpose for ABS and significantly
reduces braking effectiveness.
Page 241 of 342
238 Check regulary and before a long trip
Te ch n i c a l
data Instruments
and controlsOperationDrivingInstrument
cluster displayPractical hints Car care Index
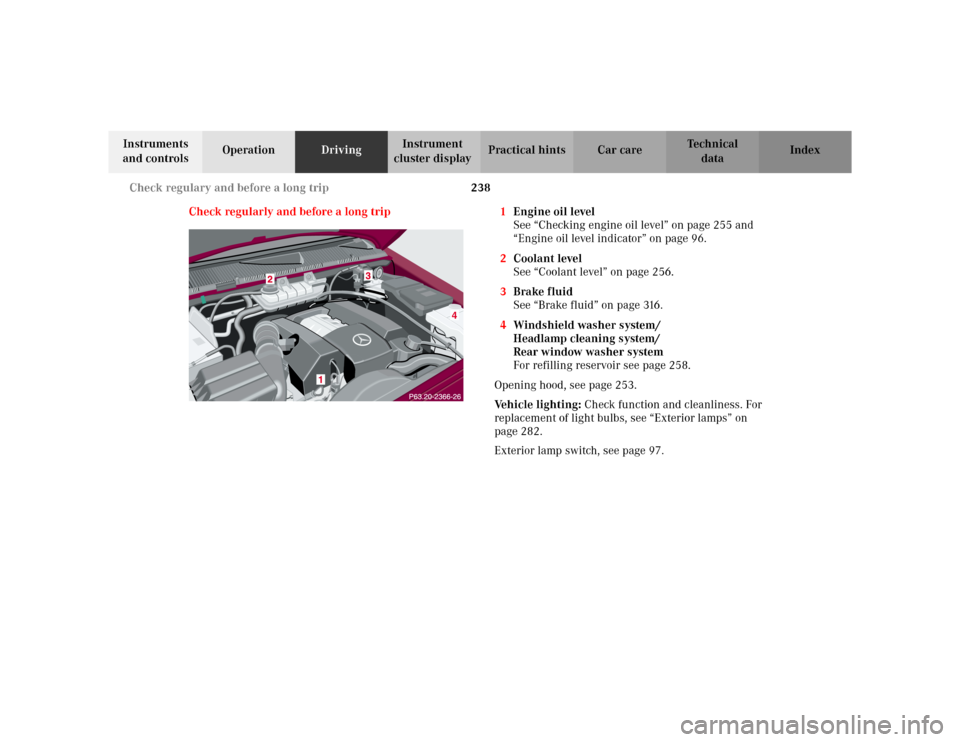
Check regularly and before a long trip 1Engine oil level
See “Checking engine oil level” on page 255 and
“Engine oil level indicator” on page 96.
2Coolant level
See “Coolant level” on page 256.
3Brake fluid
See “Brake fluid” on page 316.
4Windshield washer system/
Headlamp cleaning system/
Rear window washer system
For refilling reservoir see page 258.
Opening hood, see page 253.
Vehicle lighting: Check function and cleanliness. For
replacement of light bulbs, see “Exterior lamps” on
page 282.
Exterior lamp switch, see page 97.
Page 252 of 342

249 Contents - Practical hints
Te ch n i c a l
data Instruments
and controlsOperation DrivingInstrument
cluster displayPractical hintsCar care Index
Practical hintsFirst aid kit .....................................250
Fuses ................................................250
Electrical outlet ..............................252
Stowing items in the vehicle ........252
Hood .................................................253
Checking engine oil level .............255
Automatic transmission
fluid level ...................................256
Engine oil consumption ................256
Coolant level ...................................256
Adding coolant ...........................257
Windshield washer/headlamp
cleaning system .........................258
Windshield and headlamp
washer fluid mixing ratio .........259Ve h i c l e j a c k ,
wheel bolt wrench and
screwdriver ............................... 259
Air pump ......................................... 261
Wheels ............................................ 262
Tire replacement ....................... 262
Rotating wheels ......................... 263
Spare wheel .................................... 264
Changing wheels ........................... 267
Tire inflation pressure ................. 272
Battery ............................................. 273
Jump starting ................................. 275
Towing the vehicle ........................ 277
Transmission selector lever,
manually unlocking .................. 281
Stranded vehicle ............................ 281Exterior lamps ................................282
Headlamp assembly ...................283
Taillamp assemblies ..................287
Adjusting headlamp aim ...............290
Remote control battery
replacement ...............................292
Synchronizing
remote control ............................293
Emergency operation of
sliding/pop-up roof ...................294
Manual release for
fuel filler flap .............................295
Replacing wiper blades .................295
Roof rack .........................................296
Page 256 of 342

253 Engine compartment
Te ch n i c a l
data Instruments
and controlsOperation DrivingInstrument
cluster displayPractical hintsCar care Index Hood
To o pen :
To unlock the hood, pull release lever (1) under the
driver’s side of the instrument panel. At the same time a
handle (2) will extend out of the radiator grill (it may be
necessary to lift the hood up slightly).
Caution!
To avoid damage to the windshield wipers or hood, open
the hood only with wipers in the parked position.Pull handle (2) to its stop out of radiator grill and open
hood (do not pull up on handle).
To c l o s e :
Lower hood and let it drop into lock from a height of
approximately 1 ft. (30 cm).
To avoid hood damage, please make sure that hood is
fully closed. If not, repeat closing procedure. Do not
push down on hood to attempt to fully close it.
Page 257 of 342
254 Engine compartment
Te ch n i c a l
data Instruments
and controlsOperation DrivingInstrument
cluster displayPractical hintsCar care Index
Wa r n i n g !
To help prevent personal injury, stay clear of
moving parts when the hood is open and the engine
is running. Be sure the hood is properly closed
before driving. When closing hood, use extreme
caution not to catch hands or fingers.The radiator fan may continue to run for
approximately 30 seconds or even restart after the
engine has been turned off. Stay clear from fan
blades.
The engine is equipped with a transistorized
ignition system. Because of the high voltage it is
dangerous to touch any components (ignition coils,
spark plug sockets, diagnostic socket) of the
ignition system
• with the engine running,
• while starting the engine,
• if ignition is “on” and the engine is turned
manually.If you see flames, steam or smoke coming from the
engine compartment, or if the coolant temperature
gauge indicates that the engine is overheated, do
not open the hood. Move away from vehicle and do
not open the hood until the engine has cooled. If
necessary, call a fire department.