key battery MERCEDES-BENZ ML63AMG 2010 W164 User Guide
[x] Cancel search | Manufacturer: MERCEDES-BENZ, Model Year: 2010, Model line: ML63AMG, Model: MERCEDES-BENZ ML63AMG 2010 W164Pages: 368, PDF Size: 9.09 MB
Page 100 of 368
Runlock the vehicle
Rremove the SmartKey from the starter
switch (Interior Lighting Delayed
Shut-off must be switched on
(Y page 135))
Ropen a door
Ropen the tailgate
The interior lighting goes out after a short
time.
iIf a door remains open, the interior lamps
go out automatically after approximately
5 minutes when the SmartKey is removed
or in starter switch position 0.
XDeactivating: Press button ~.
Button ~ engages.
Manual control
! An interior lamp switched on manually
does not go out automatically.
Leaving an interior lamp switched on for an
extended period of time with the engine
turned off could result in a discharged
battery.
XSwitching front interior lighting on/
off: Press switch c.
XSwitching rear interior lighting on/off:
Press switch v.
XSwitching front reading lamps on/off:
Press respective switch p.
Emergency lighting
The interior lighting comes on automatically
if the vehicle is involved in an accident.
Switching off:
XPress button ~.
or
XPress hazard warning flasher switch
(Y page 96).
or
XUnlock the vehicle with the SmartKey.Interior lighting in the rear
! An interior lamp switched on manually
does not go out automatically.
Leaving an interior lamp switched on for an
extended period of time with the engine
turned off could result in a discharged
battery.
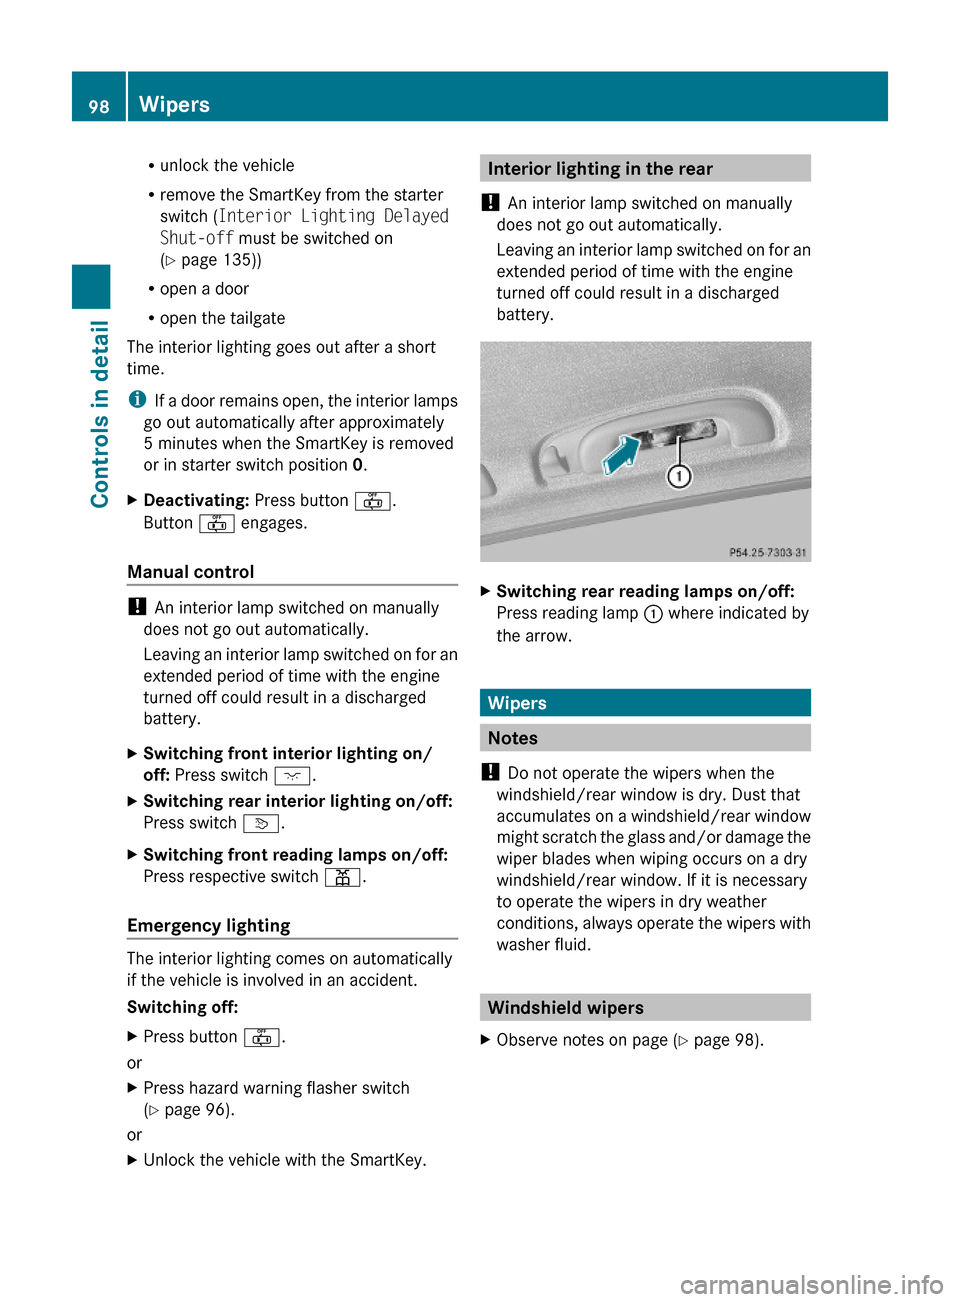
XSwitching rear reading lamps on/off:
Press reading lamp : where indicated by
the arrow.
Wipers
Notes
! Do not operate the wipers when the
windshield/rear window is dry. Dust that
accumulates on a windshield/rear window
might scratch the glass and/or damage the
wiper blades when wiping occurs on a dry
windshield/rear window. If it is necessary
to operate the wipers in dry weather
conditions, always operate the wipers with
washer fluid.
Windshield wipers
XObserve notes on page (Y page 98).98WipersControls in detail
164_AKB; 7; 31, en-USd2ureepe,Version: 2.11.8.12009-09-11T12:07:36+02:00 - Seite 98
Page 104 of 368
Closing when a door window is blockedGWarning!
Make sure that nobody can become trapped
and be seriously or even fatally injured when
closing a door window with greater force or
without automatic reversal function.
If the upward movement of a door window is
blocked during the closing procedure, the
door window will stop and open slightly.
XImmediately after the door window has
stopped because it was blocked, pull and
hold the respective switch upward until the
door window is fully closed.
The door window closes with greater force.
If the door window is blocked again and opens
slightly:
XImmediately after the door window was
blocked, pull and hold the respective
switch upward until the door window is fully
closed.
The door window closes without automatic
reversal function.GWarning!
Pulling and holding the switch to close the
door window immediately after it had been
blocked two times will cause the door window
to close without any reversal function for as
long as you hold the switch.
Synchronizing door windows
The door windows must be synchronized after
the battery has been disconnected or if the
door windows cannot be fully closed (express
operation).
Each door window must be synchronized
separately.
XClose all doors.XSwitch on the ignition.XPull and hold switch :, ; , = or ?
( Y page 101) until the respective door
window is closed.
The door window opens again slightly.XPull and hold the respective switch once
more immediately until the door window is
closed completely.XHold the respective switch for
approximately 1 second.
The door window is synchronized.
Summer opening feature
When the weather is warm, you can ventilate
the vehicle before driving off by
simultaneously
R opening the door windows
R opening the tilt/sliding sunroof
R switching on the seat ventilation for the
driver’s seat (Canada only)
The summer opening feature can only be
activated via the remote control of the
SmartKey. The SmartKey must be in close
proximity to the driver’s outside door handle.
XAim the transmitter eye of the SmartKey at
the driver’s outside door handle.XPress and hold button % on the
SmartKey until the door windows and the
tilt/sliding sunroof have reached the
desired position.
The vehicle unlocks.XRelease button % on the SmartKey to
interrupt the opening procedure.
Convenience closing feature
When locking the vehicle, you can
simultaneously close the door windows and
the tilt/sliding sunroof.
GWarning!
When closing the door windows and the tilt/
sliding sunroof, make sure there is no danger
102Power windowsControls in detail
164_AKB; 7; 31, en-USd2ureepe,Version: 2.11.8.12009-09-11T12:07:36+02:00 - Seite 102
Page 107 of 368
XMake sure the KEYLESS-GO start/stop
button is inserted in the starter switch
( Y page 80).
i
To start the engine with the SmartKey
instead of the KEYLESS-GO function,
remove the KEYLESS-GO start/stop button
from the starter switch. Proceed as
described in “With SmartKey”
( Y page 104).
XDepress the brake pedal during the starting
procedure.XDo not depress the accelerator pedal.XGasoline engine: Press the KEYLESS-GO
start/stop button once.
The engine starts automatically.XDiesel engine: Press the KEYLESS-GO
start/stop button once.
The engine preglows and starts
automatically.
i If the engine is at operating temperature,
the time the engine needs to preglow is
reduced.
Starting difficulties
! Remember that extended starting
attempts can drain the battery.
The engine does not start. You can hear
the starter.
There could be a malfunction in the engine
electronics or in the fuel supply system.
Carry out the following steps:
XIf you are starting the engine with the
SmartKey: Turn the SmartKey in the starter
switch to position 0 and repeat the starting
procedure.XIf you are starting the engine with KEYLESS-
GO: Close any doors that may be open to
allow for better detection of the SmartKey.
or
XRemove the KEYLESS-GO start/stop
button from the starter switch.XStart the engine with the SmartKey as radio
signals from another source may be
interfering with the KEYLESS-GO function.XRepeat the starting procedure.
If the engine does not start after several
starting attempts:
XContact an authorized Mercedes-Benz
Center or call Roadside Assistance.
The engine does not start. You cannot
hear the starter.
The battery may not be charged sufficiently.
XGet a jump start ( Y page 336).
If the engine will not start despite a jump
start:
XContact an authorized Mercedes-Benz
Center or call Roadside Assistance.
The starter has been exposed to excessive
temperatures.
XLet the starter cool for about 2 minutes.XRepeat the starting procedure.
If the engine does not start after several
starting attempts:
XContact an authorized Mercedes-Benz
Center or call Roadside Assistance.
Driving off
GWarning!
On slippery road surfaces, never downshift in
order to obtain braking action. This could
result in drive wheel slip and reduced vehicle
control. Your vehicle’s ABS will not prevent
this type of loss of control.
! Do not run a cold engine at high engine
speeds. Running a cold engine at high
engine speeds may shorten the service life
of the engine. This is not covered by the
Mercedes-Benz Limited Warranty.
ML 63 AMG: At engine temperatures below
68‡ (20†), the engine’s maximum speed
Driving and parking105Controls in detail164_AKB; 7; 31, en-USd2ureepe,Version: 2.11.8.12009-09-11T12:07:36+02:00 - Seite 105Z
Page 186 of 368
XSwitch on the ignition.XSwitching on: Press button ª on the
respective climate control panel.
The indicator lamp in the button comes on.XSwitching off: Press button ª again.
The rear window defroster switches off when
the battery voltage is too low. The indicator
lamp in button ª flashes. Too many
electrical consumers may be operating
simultaneously.
XSwitch off consumers that are currently not
needed if required.
Power tilt/sliding sunroof
Opening and closing
GObserve Safety notes, see page 55.GWarning!
When opening or closing the tilt/sliding
sunroof, make sure there is no danger of
anyone being harmed by the opening/closing
procedure.
The tilt/sliding sunroof is equipped with the
express operation and automatic reversal
function. If the movement of the tilt/sliding
sunroof is blocked during the closing
procedure, the tilt/sliding sunroof will stop
and open slightly.
The tilt/sliding sunroof operates differently
when the sunroof switch is pressed and held.
See the “Closing when the tilt/sliding sunroof
is blocked” section for details.
The opening/closing procedure of the tilt/
sliding sunroof can be immediately halted by
releasing the sunroof switch or, if the sunroof
switch was moved past the resistance point
and released, by moving the sunroof switch in
any direction.
GWarning!
The tilt/sliding sunroof is made out of glass.
In the event of an accident, the glass may
shatter. This may result in an opening in the
roof.
In a vehicle rollover, occupants not wearing
their seat belts or not wearing them properly
may be thrown out of the opening. Such an
opening also presents a potential for injury for
occupants wearing their seat belts properly as
entire body parts or portions of them may
protrude from the passenger compartment.
! To avoid damaging the seals, do not
transport any objects with sharp edges
which can stick out of the tilt/sliding
sunroof.
Do not open the tilt/sliding sunroof if there
is snow or ice on the roof, as this could
result in malfunctions.
If you cannot open or close the tilt/sliding
sunroof due to a malfunction contact
Roadside Assistance or an authorized
Mercedes-Benz Center.
! Please keep in mind that weather
conditions can sometimes change rapidly.
Make sure to close the tilt/sliding sunroof
when leaving the vehicle. If water enters
the vehicle interior, vehicle electronics
could be damaged which is not covered by
the Mercedes-Benz Limited Warranty.
i You can also open or close the tilt/sliding
sunroof using the SmartKey or the
KEYLESS-GO function, see “Summer
opening feature” ( Y page 102) and
“Convenience closing feature”
( Y page 102).
i After switching off the ignition or
removing the SmartKey from the starter
switch, you can operate the tilt/sliding
sunroof until you open the driver’s or front
passenger door. If no door was opened you
can operate the tilt/sliding sunroof for up
to 5 minutes.184Power tilt/sliding sunroofControls in detail
164_AKB; 7; 31, en-USd2ureepe,Version: 2.11.8.12009-09-11T12:07:36+02:00 - Seite 184
Page 188 of 368
closing the tilt/sliding sunroof with greater
force or without automatic reversal function.
If the movement of the tilt/sliding sunroof is
blocked during the closing procedure (e.g. by
ice or pollution), the tilt/sliding sunroof will
stop and open slightly.XImmediately after the tilt/sliding sunroof
has stopped and opened because it was
blocked, pull and hold the sunroof switch
in direction of arrow = until the tilt/sliding
sunroof is fully closed.
The tilt/sliding sunroof closes with greater
force.
If the tilt/sliding sunroof is blocked again and
opens slightly:
XImmediately after the tilt/sliding sunroof
was blocked and has opened, pull and hold
the sunroof switch in direction of arrow
= until the tilt/sliding sunroof is fully
closed.
The tilt/sliding sunroof closes without
automatic reversal function.GWarning!
Pulling and holding the sunroof switch to
close the tilt/sliding sunroof immediately
after it had been blocked two times will cause
the tilt/sliding sunroof to close without any
reversal function for as long as you hold the
sunroof switch.
Synchronizing
The tilt/sliding sunroof must be synchronized
R after the battery has been disconnected or
discharged
R after a malfunction
R if the tilt/sliding sunroof does not open
smoothly
! If the tilt/sliding sunroof cannot be closed
or synchronized, contact an authorized
Mercedes-Benz Center or call Roadside
Assistance.
XVehicles with SmartKey: Switch off the
ignition and remove the SmartKey from the
starter switch.XVehicles with KEYLESS-GO: Switch off the
ignition and open the driver’s door. This
puts the starter switch in position 0, same
as with the SmartKey removed from the
starter switch. The driver’s door then can
be closed again.XRemove the fuse for the tilt/sliding sunroof
from the fuse box ( Y page 342).XReinsert the fuse in the fuse box.XSwitch on the ignition.XPress and hold the sunroof switch in
direction of arrow : ( Y page 185) until the
tilt/sliding sunroof is fully raised at the
rear.XKeep holding the sunroof switch in
direction of arrow : for approximately
1 second.XCheck the express operation feature
( Y page 185).
If the tilt/sliding sunroof opens and closes
completely, the roof is synchronized.
Otherwise repeat the above steps.
Loading and storing
Loading instructions
GWarning!
Always fasten items being carried as securely
as possible. Use cargo tie-down rings and
fastening materials appropriate for the weight
and size of the load.
In an accident, during hard braking or sudden
maneuvers, loose items will be thrown around
inside the vehicle. This can cause injury to
vehicle occupants unless the items are
securely fastened in the vehicle.
To help avoid personal injury during a collision
or sudden maneuver, exercise care when
transporting cargo. Do not pile luggage or
cargo higher than the seat backrests.
186Loading and storingControls in detail
164_AKB; 7; 31, en-USd2ureepe,Version: 2.11.8.12009-09-11T12:07:36+02:00 - Seite 186
Page 269 of 368
Vehicle equipment ............................268
Where will I find ...? ..........................268
Vehicle status messages in the
multifunction display .......................272
What to do if … ..................................297
Unlocking/locking manually ...........306
Resetting activated NECK-PRO
active front head restraints .............309
Replacing SmartKey batteries .........309
Replacing bulbs .................................311
Replacing wiper blades ....................318
Flat tire ..............................................319
Bleeding the fuel system (diesel
engine only) .......................................331
AdBlue® (diesel engine only) ...........331
Battery ...............................................334
Jump starting ....................................336
Towing the vehicle ............................338
Fuses ..................................................342
267Practical hints164_AKB; 7; 31, en-USd2ureepe,Version: 2.11.8.12009-09-11T12:07:36+02:00 - Seite 267
Page 282 of 368
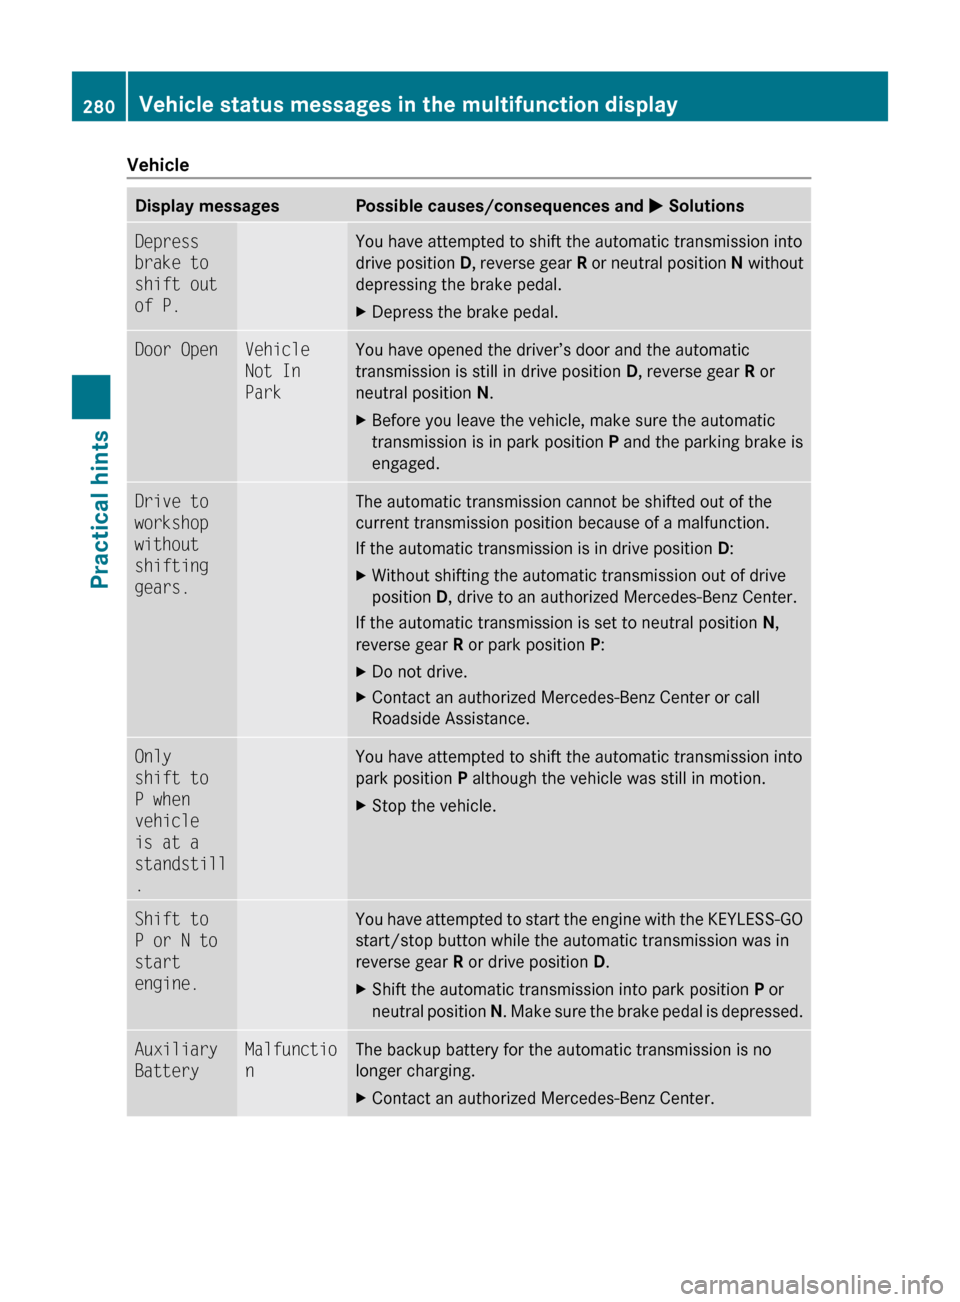
VehicleDisplay messagesPossible causes/consequences and M SolutionsDepress
brake to
shift out
of P.You have attempted to shift the automatic transmission into
drive position D, reverse gear R or neutral position N without
depressing the brake pedal.XDepress the brake pedal.Door OpenVehicle
Not In
ParkYou have opened the driver’s door and the automatic
transmission is still in drive position D, reverse gear R or
neutral position N.XBefore you leave the vehicle, make sure the automatic
transmission is in park position P and the parking brake is
engaged.Drive to
workshop
without
shifting
gears.The automatic transmission cannot be shifted out of the
current transmission position because of a malfunction.
If the automatic transmission is in drive position D:XWithout shifting the automatic transmission out of drive
position D, drive to an authorized Mercedes-Benz Center.
If the automatic transmission is set to neutral position N,
reverse gear R or park position P:
XDo not drive.XContact an authorized Mercedes-Benz Center or call
Roadside Assistance.Only
shift to
P when
vehicle
is at a
standstill
.You have attempted to shift the automatic transmission into
park position P although the vehicle was still in motion.XStop the vehicle.Shift to
P or N to
start
engine.You have attempted to start the engine with the KEYLESS-GO
start/stop button while the automatic transmission was in
reverse gear R or drive position D.XShift the automatic transmission into park position P or
neutral position N. Make sure the brake pedal is depressed.Auxiliary
BatteryMalfunctio
nThe backup battery for the automatic transmission is no
longer charging.XContact an authorized Mercedes-Benz Center.280Vehicle status messages in the multifunction displayPractical hints
164_AKB; 7; 31, en-USd2ureepe,Version: 2.11.8.12009-09-11T12:07:36+02:00 - Seite 280
Page 309 of 368
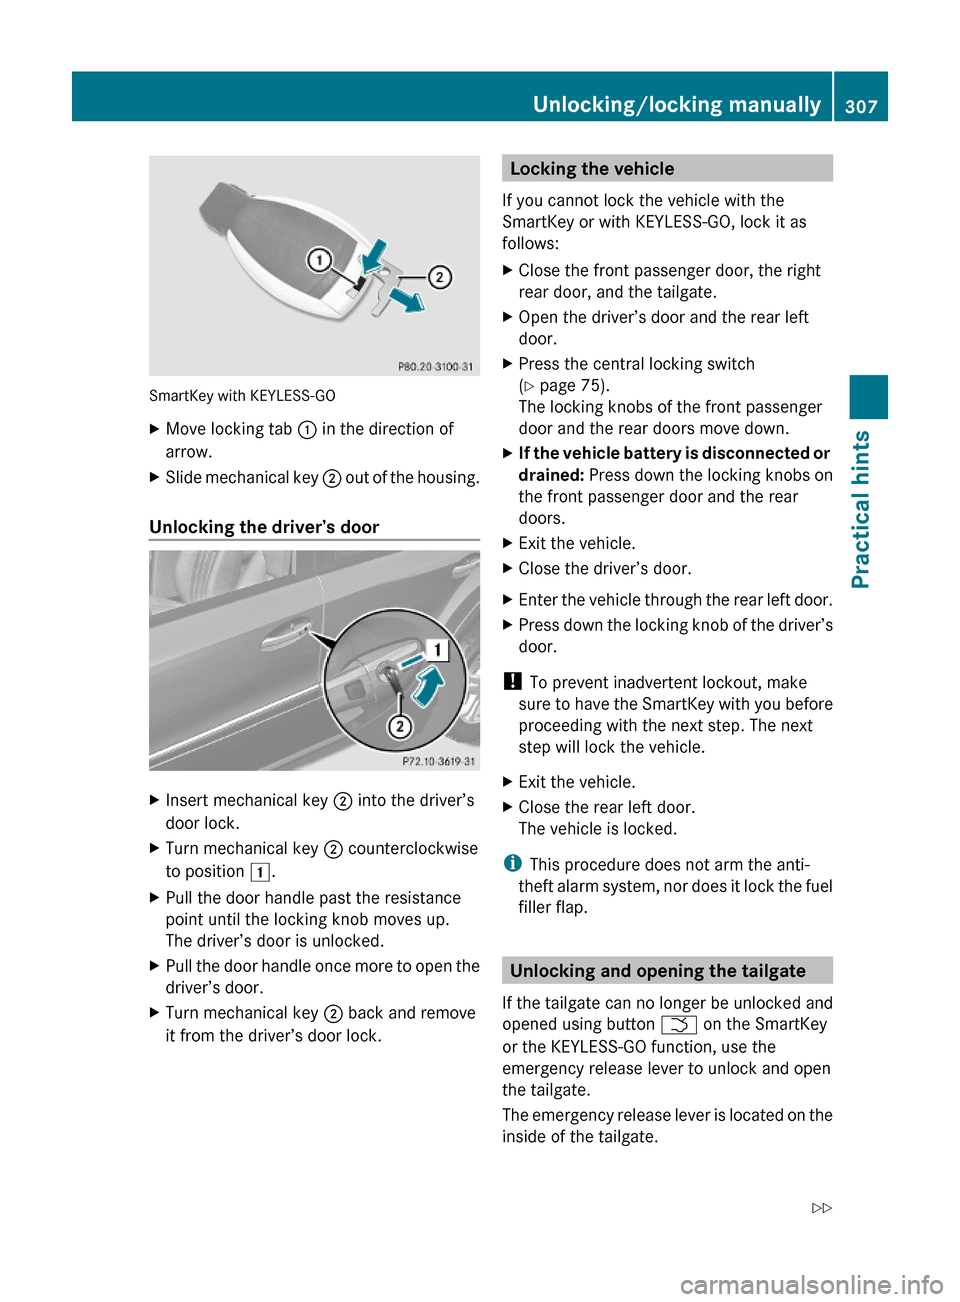
SmartKey with KEYLESS-GO
XMove locking tab : in the direction of
arrow.
XSlide mechanical key ; out of the housing.
Unlocking the driver’s door
XInsert mechanical key ; into the driver’s
door lock.
XTurn mechanical key ; counterclockwise
to position 1.
XPull the door handle past the resistance
point until the locking knob moves up.
The driver’s door is unlocked.
XPull the door handle once more to open the
driver’s door.
XTurn mechanical key ; back and remove
it from the driver’s door lock.Locking the vehicle
If you cannot lock the vehicle with the
SmartKey or with KEYLESS-GO, lock it as
follows:
XClose the front passenger door, the right
rear door, and the tailgate.
XOpen the driver’s door and the rear left
door.
XPress the central locking switch
(Y page 75).
The locking knobs of the front passenger
door and the rear doors move down.
XIf the vehicle battery is disconnected or
drained: Press down the locking knobs on
the front passenger door and the rear
doors.
XExit the vehicle.XClose the driver’s door.XEnter the vehicle through the rear left door.XPress down the locking knob of the driver’s
door.
! To prevent inadvertent lockout, make
sure to have the SmartKey with you before
proceeding with the next step. The next
step will lock the vehicle.
XExit the vehicle.XClose the rear left door.
The vehicle is locked.
iThis procedure does not arm the anti-
theft alarm system, nor does it lock the fuel
filler flap.
Unlocking and opening the tailgate
If the tailgate can no longer be unlocked and
opened using button F on the SmartKey
or the KEYLESS-GO function, use the
emergency release lever to unlock and open
the tailgate.
The emergency release lever is located on the
inside of the tailgate.
Unlocking/locking manually307Practical hints164_AKB; 7; 31, en-USd2ureepe,Version: 2.11.8.12009-09-11T12:07:36+02:00 - Seite 307Z
Page 311 of 368
Resetting activated NECK-PRO active
front head restraints
If the NECK-PRO active front head restraints
have been triggered in a rear-end collision,
they must be reset.
You can tell that the NECK-PRO active front
head restraints have been triggered when
they have been moved forward and cannot be
adjusted.
GWarning!
For safety reasons, have the NECK-PRO active
front head restraints checked at an
authorized Mercedes-Benz Center after a
rear-end collision.
GWarning!
When pushing back the head restraint
cushion, make sure your fingers do not
become caught between the head restraint
cushion and the cover. Failing to do so may
lead to injury.
iPressing the head restraint cushion back
requires high force. If you encounter
difficulties when pushing the head restraint
back, please have the procedure
performed at an authorized Mercedes-Benz
Center.
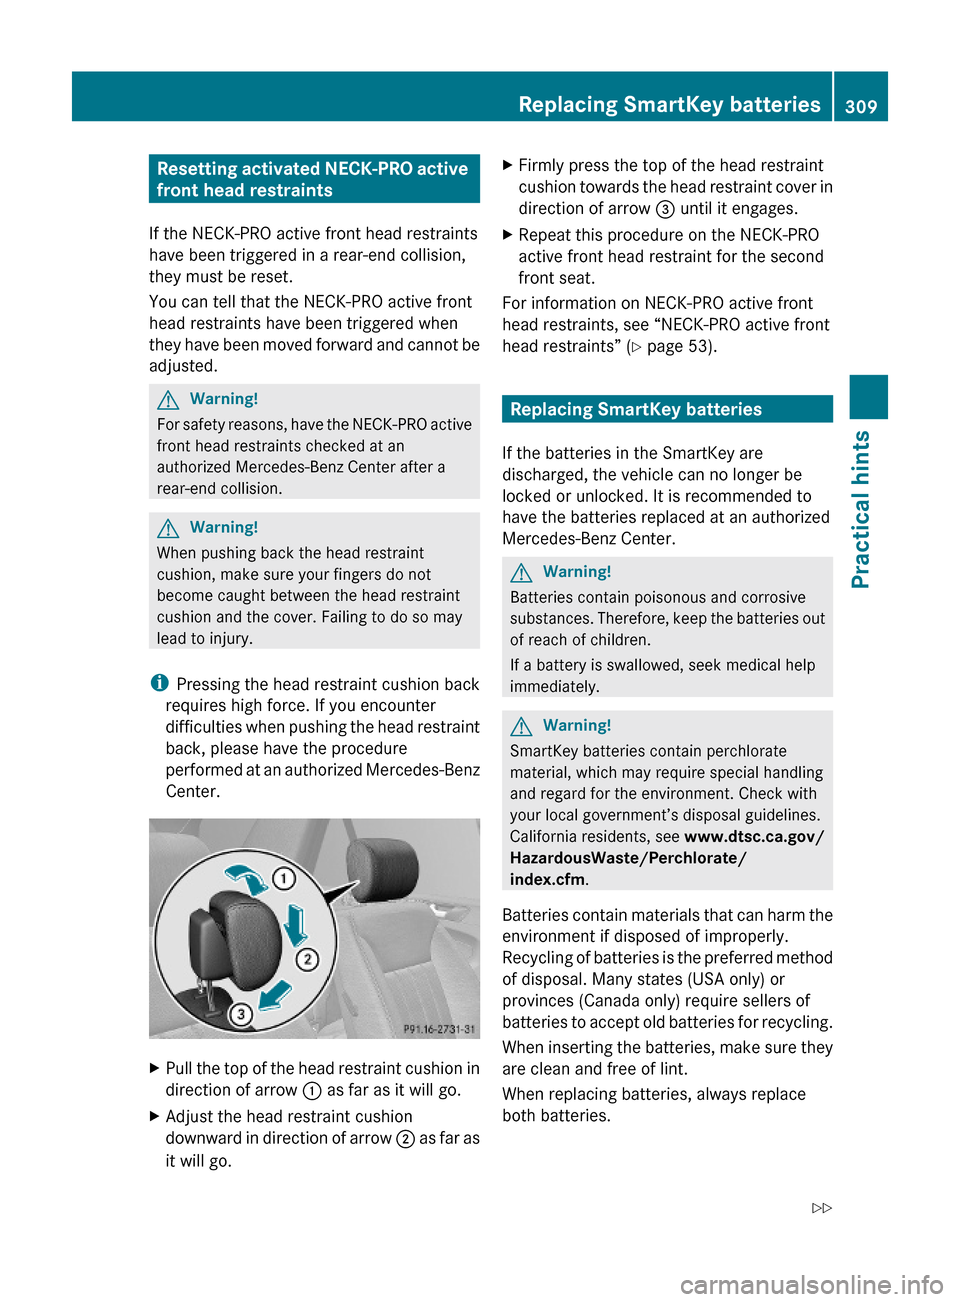
XPull the top of the head restraint cushion in
direction of arrow : as far as it will go.
XAdjust the head restraint cushion
downward in direction of arrow ; as far as
it will go.
XFirmly press the top of the head restraint
cushion towards the head restraint cover in
direction of arrow = until it engages.
XRepeat this procedure on the NECK-PRO
active front head restraint for the second
front seat.
For information on NECK-PRO active front
head restraints, see “NECK-PRO active front
head restraints” (Y page 53).
Replacing SmartKey batteries
If the batteries in the SmartKey are
discharged, the vehicle can no longer be
locked or unlocked. It is recommended to
have the batteries replaced at an authorized
Mercedes-Benz Center.
GWarning!
Batteries contain poisonous and corrosive
substances. Therefore, keep the batteries out
of reach of children.
If a battery is swallowed, seek medical help
immediately.
GWarning!
SmartKey batteries contain perchlorate
material, which may require special handling
and regard for the environment. Check with
your local government’s disposal guidelines.
California residents, see www.dtsc.ca.gov/
HazardousWaste/Perchlorate/
index.cfm.
Batteries contain materials that can harm the
environment if disposed of improperly.
Recycling of batteries is the preferred method
of disposal. Many states (USA only) or
provinces (Canada only) require sellers of
batteries to accept old batteries for recycling.
When inserting the batteries, make sure they
are clean and free of lint.
When replacing batteries, always replace
both batteries.
Replacing SmartKey batteries309Practical hints164_AKB; 7; 31, en-USd2ureepe,Version: 2.11.8.12009-09-11T12:07:36+02:00 - Seite 309Z
Page 312 of 368
iThe required replacement batteries are
available at any authorized Mercedes-Benz
Center.
Replacement batteries: Lithium, type
CR 2025 or equivalent.
XRemove the mechanical key from the
SmartKey (Y page 306).
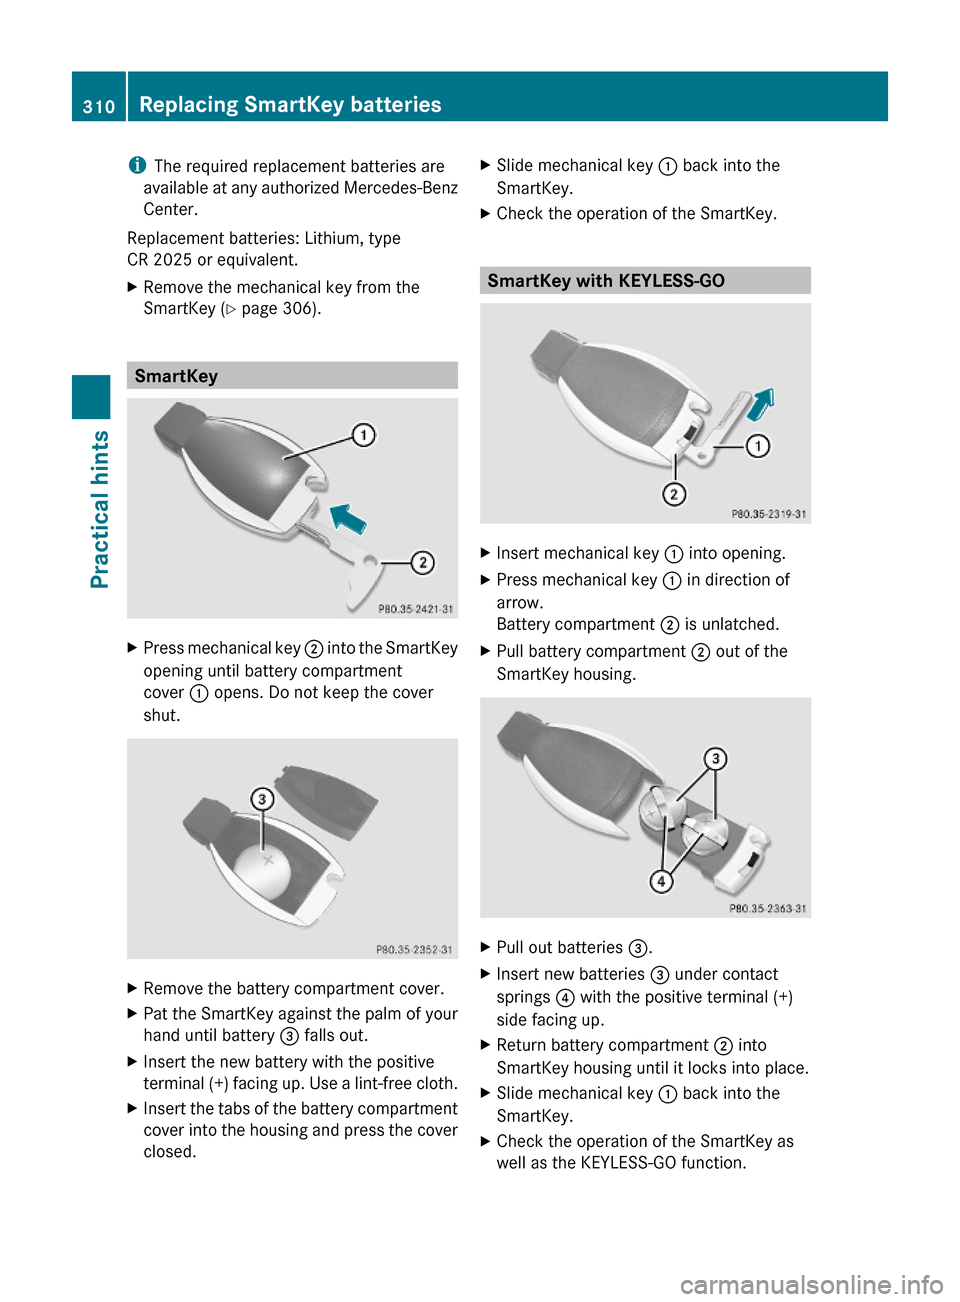
SmartKey
XPress mechanical key ; into the SmartKey
opening until battery compartment
cover : opens. Do not keep the cover
shut.
XRemove the battery compartment cover.XPat the SmartKey against the palm of your
hand until battery = falls out.
XInsert the new battery with the positive
terminal (+) facing up. Use a lint-free cloth.
XInsert the tabs of the battery compartment
cover into the housing and press the cover
closed.
XSlide mechanical key : back into the
SmartKey.
XCheck the operation of the SmartKey.
SmartKey with KEYLESS-GO
XInsert mechanical key : into opening.XPress mechanical key : in direction of
arrow.
Battery compartment ; is unlatched.
XPull battery compartment ; out of the
SmartKey housing.
XPull out batteries =.XInsert new batteries = under contact
springs ? with the positive terminal (+)
side facing up.
XReturn battery compartment ; into
SmartKey housing until it locks into place.
XSlide mechanical key : back into the
SmartKey.
XCheck the operation of the SmartKey as
well as the KEYLESS-GO function.
310Replacing SmartKey batteriesPractical hints
164_AKB; 7; 31, en-USd2ureepe,Version: 2.11.8.12009-09-11T12:07:36+02:00 - Seite 310