air condition MERCEDES-BENZ ML63AMG 2010 W164 Owner's Guide
[x] Cancel search | Manufacturer: MERCEDES-BENZ, Model Year: 2010, Model line: ML63AMG, Model: MERCEDES-BENZ ML63AMG 2010 W164Pages: 368, PDF Size: 9.09 MB
Page 178 of 368
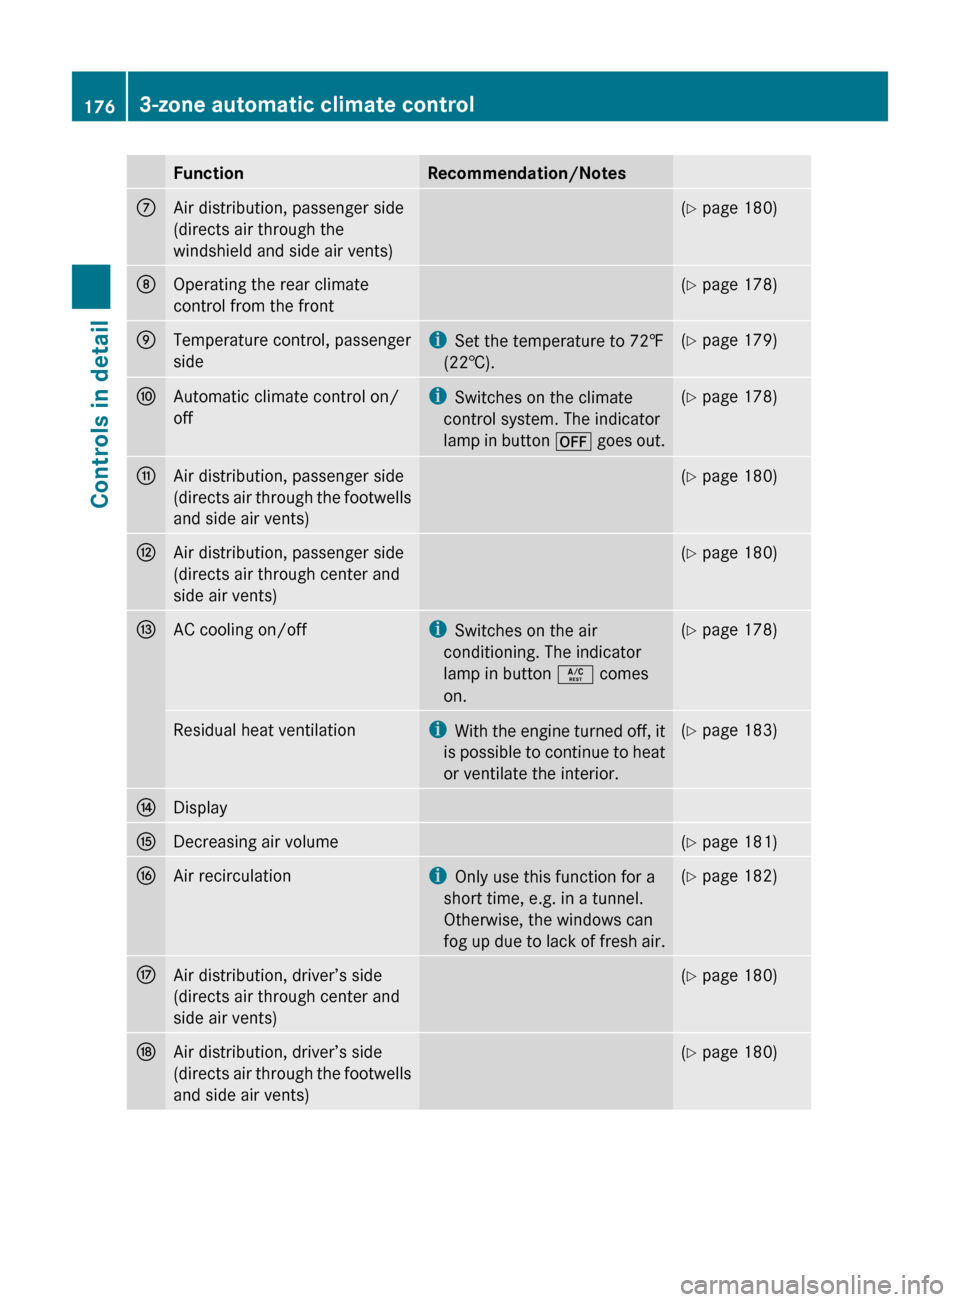
FunctionRecommendation/NotesCAir distribution, passenger side
(directs air through the
windshield and side air vents)( Y page 180)DOperating the rear climate
control from the front( Y page 178)ETemperature control, passenger
sidei Set the temperature to 72‡
(22†).( Y page 179)FAutomatic climate control on/
offi Switches on the climate
control system. The indicator
lamp in button ^ goes out.(Y page 178)GAir distribution, passenger side
(directs air through the footwells
and side air vents)( Y page 180)HAir distribution, passenger side
(directs air through center and
side air vents)( Y page 180)IAC cooling on/offi
Switches on the air
conditioning. The indicator
lamp in button Á comes
on.( Y page 178)Residual heat ventilationi
With the engine turned off, it
is possible to continue to heat
or ventilate the interior.( Y page 183)JDisplayKDecreasing air volume(Y page 181)LAir recirculationi
Only use this function for a
short time, e.g. in a tunnel.
Otherwise, the windows can
fog up due to lack of fresh air.( Y page 182)MAir distribution, driver’s side
(directs air through center and
side air vents)( Y page 180)NAir distribution, driver’s side
(directs air through the footwells
and side air vents)( Y page 180)1763-zone automatic climate controlControls in detail
164_AKB; 7; 31, en-USd2ureepe,Version: 2.11.8.12009-09-11T12:07:36+02:00 - Seite 176
Page 179 of 368
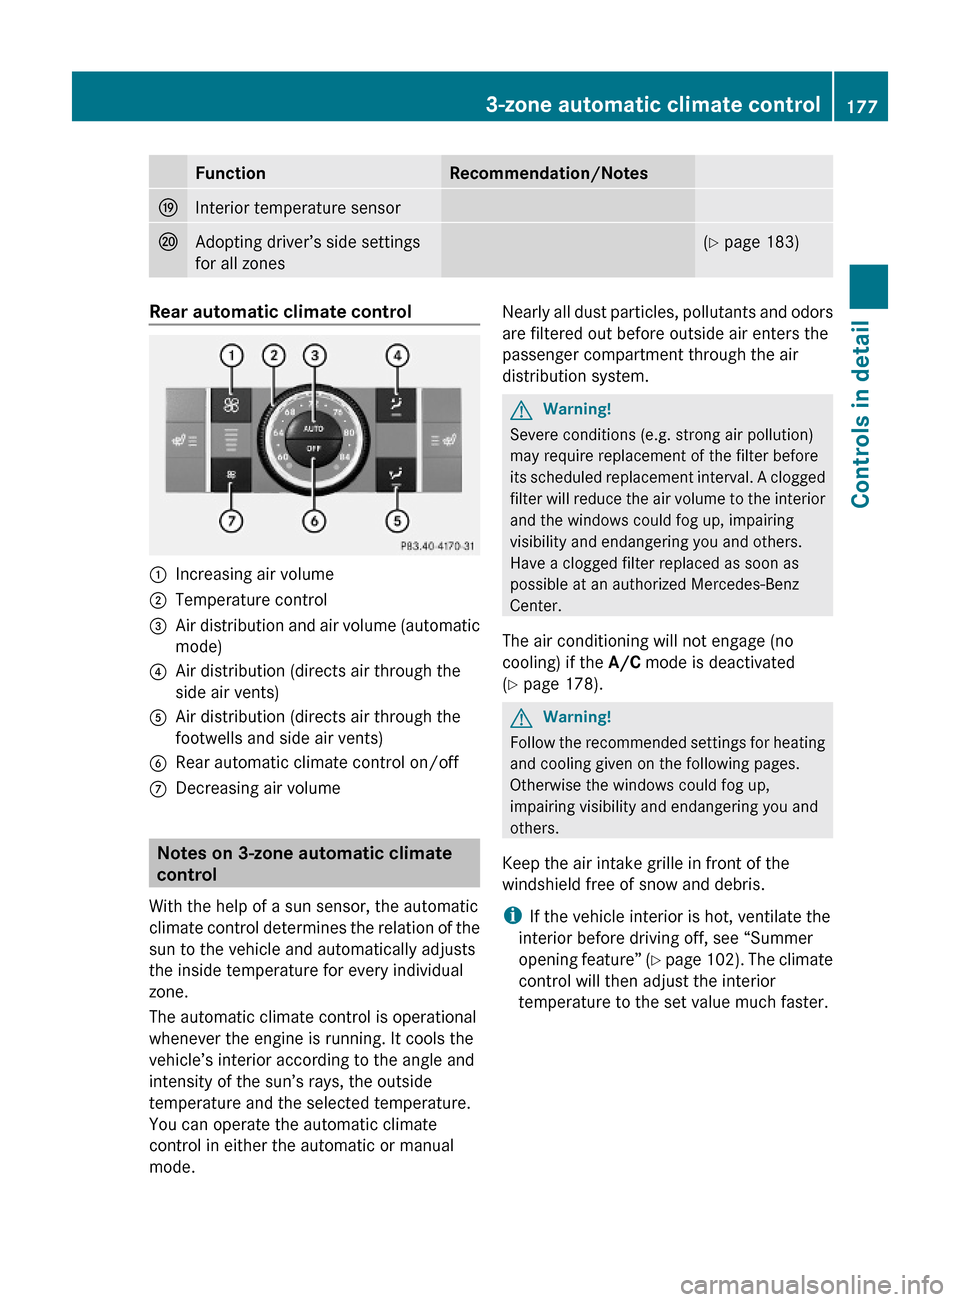
FunctionRecommendation/NotesOInterior temperature sensorPAdopting driver’s side settings
for all zones
(Y page 183)Rear automatic climate control:Increasing air volume;Temperature control=Air distribution and air volume (automatic
mode)
?Air distribution (directs air through the
side air vents)
AAir distribution (directs air through the
footwells and side air vents)
BRear automatic climate control on/offCDecreasing air volume
Notes on 3-zone automatic climate
control
With the help of a sun sensor, the automatic
climate control determines the relation of the
sun to the vehicle and automatically adjusts
the inside temperature for every individual
zone.
The automatic climate control is operational
whenever the engine is running. It cools the
vehicle’s interior according to the angle and
intensity of the sun’s rays, the outside
temperature and the selected temperature.
You can operate the automatic climate
control in either the automatic or manual
mode.
Nearly all dust particles, pollutants and odors
are filtered out before outside air enters the
passenger compartment through the air
distribution system.
GWarning!
Severe conditions (e.g. strong air pollution)
may require replacement of the filter before
its scheduled replacement interval. A clogged
filter will reduce the air volume to the interior
and the windows could fog up, impairing
visibility and endangering you and others.
Have a clogged filter replaced as soon as
possible at an authorized Mercedes-Benz
Center.
The air conditioning will not engage (no
cooling) if the A/C mode is deactivated
(Y page 178).
GWarning!
Follow the recommended settings for heating
and cooling given on the following pages.
Otherwise the windows could fog up,
impairing visibility and endangering you and
others.
Keep the air intake grille in front of the
windshield free of snow and debris.
iIf the vehicle interior is hot, ventilate the
interior before driving off, see “Summer
opening feature” (Y page 102). The climate
control will then adjust the interior
temperature to the set value much faster.
3-zone automatic climate control177Controls in detail164_AKB; 7; 31, en-USd2ureepe,Version: 2.11.8.12009-09-11T12:07:36+02:00 - Seite 177Z
Page 180 of 368
Deactivating the climate control
systemGWarning!
When the climate control system is switched
off, the outside air supply and circulation are
also switched off. Only choose this setting for
a short time. Otherwise the windows could fog
up, impairing visibility and endangering you
and others.
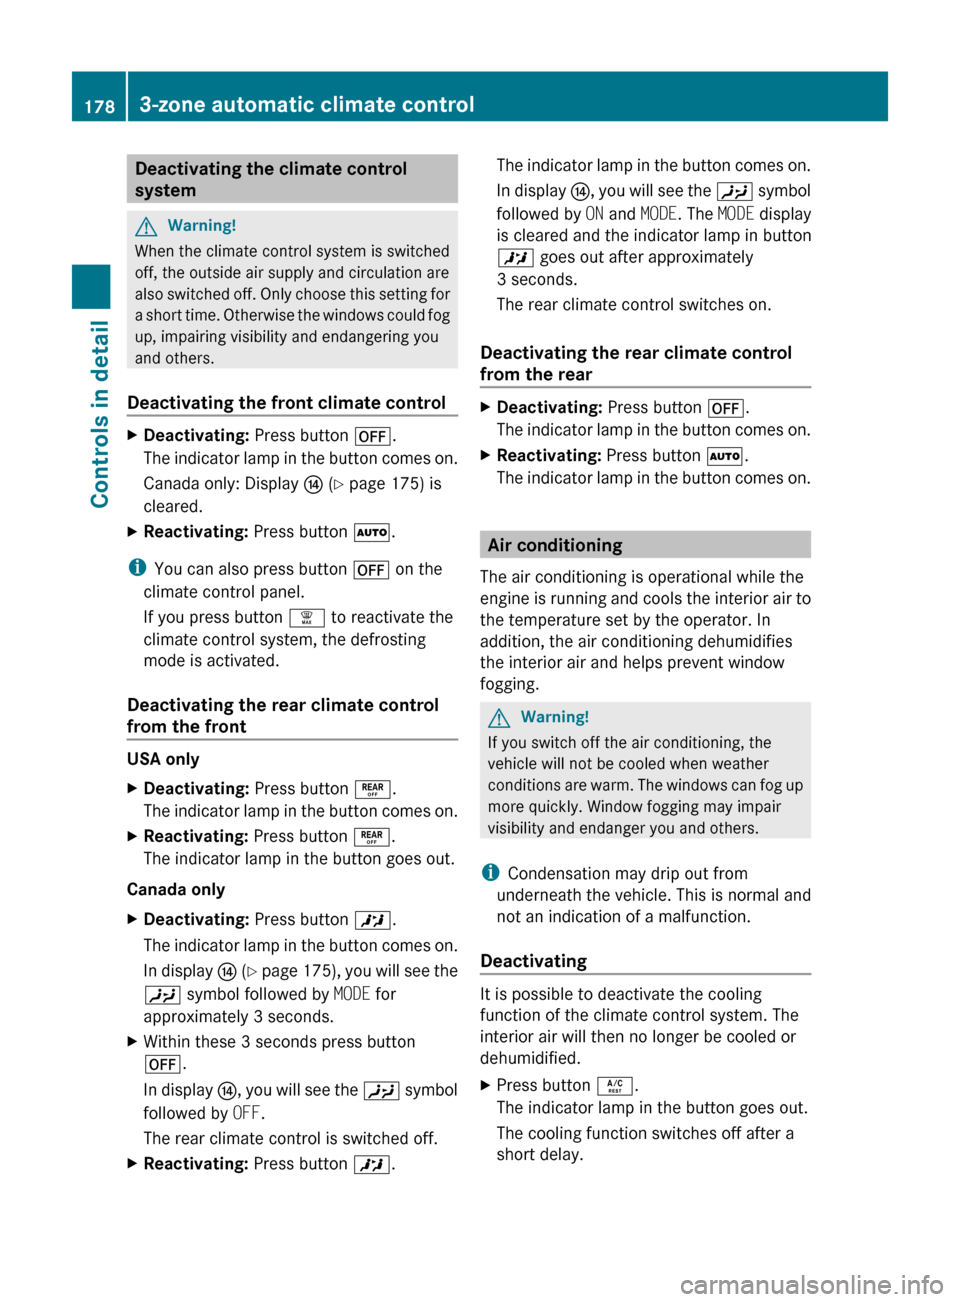
Deactivating the front climate control
XDeactivating: Press button ^.
The indicator lamp in the button comes on.
Canada only: Display J (Y page 175) is
cleared.XReactivating: Press button Ã.
i
You can also press button ^ on the
climate control panel.
If you press button ¦ to reactivate the
climate control system, the defrosting
mode is activated.
Deactivating the rear climate control
from the front
USA only
XDeactivating: Press button ±.
The indicator lamp in the button comes on.XReactivating: Press button ±.
The indicator lamp in the button goes out.
Canada only
XDeactivating: Press button X.
The indicator lamp in the button comes on.
In display J ( Y page 175), you will see the
Y symbol followed by MODE for
approximately 3 seconds.XWithin these 3 seconds press button
^ .
In display J, you will see the Y symbol
followed by OFF.
The rear climate control is switched off.XReactivating: Press button X.The indicator lamp in the button comes on.
In display J, you will see the Y symbol
followed by ON and MODE . The MODE display
is cleared and the indicator lamp in button
X goes out after approximately
3 seconds.
The rear climate control switches on.
Deactivating the rear climate control
from the rear
XDeactivating: Press button ^.
The indicator lamp in the button comes on.XReactivating: Press button Ã.
The indicator lamp in the button comes on.
Air conditioning
The air conditioning is operational while the
engine is running and cools the interior air to
the temperature set by the operator. In
addition, the air conditioning dehumidifies
the interior air and helps prevent window
fogging.
GWarning!
If you switch off the air conditioning, the
vehicle will not be cooled when weather
conditions are warm. The windows can fog up
more quickly. Window fogging may impair
visibility and endanger you and others.
i Condensation may drip out from
underneath the vehicle. This is normal and
not an indication of a malfunction.
Deactivating
It is possible to deactivate the cooling
function of the climate control system. The
interior air will then no longer be cooled or
dehumidified.
XPress button Á.
The indicator lamp in the button goes out.
The cooling function switches off after a
short delay.1783-zone automatic climate controlControls in detail
164_AKB; 7; 31, en-USd2ureepe,Version: 2.11.8.12009-09-11T12:07:36+02:00 - Seite 178
Page 181 of 368
Activating
Moist air can fog up the windows. You can
dehumidify the interior air with the air
conditioning.
XPress button Á again.
The indicator lamp in the button comes on.
The air conditioning uses the refrigerant
R134a. This refrigerant is free of CFCs which
are harmful to the ozone layer.
! If the air conditioning cannot be activated
again, this indicates that the air
conditioning is losing refrigerant. The
compressor has turned off.
Have the air conditioning checked at the
nearest authorized Mercedes-Benz Center.
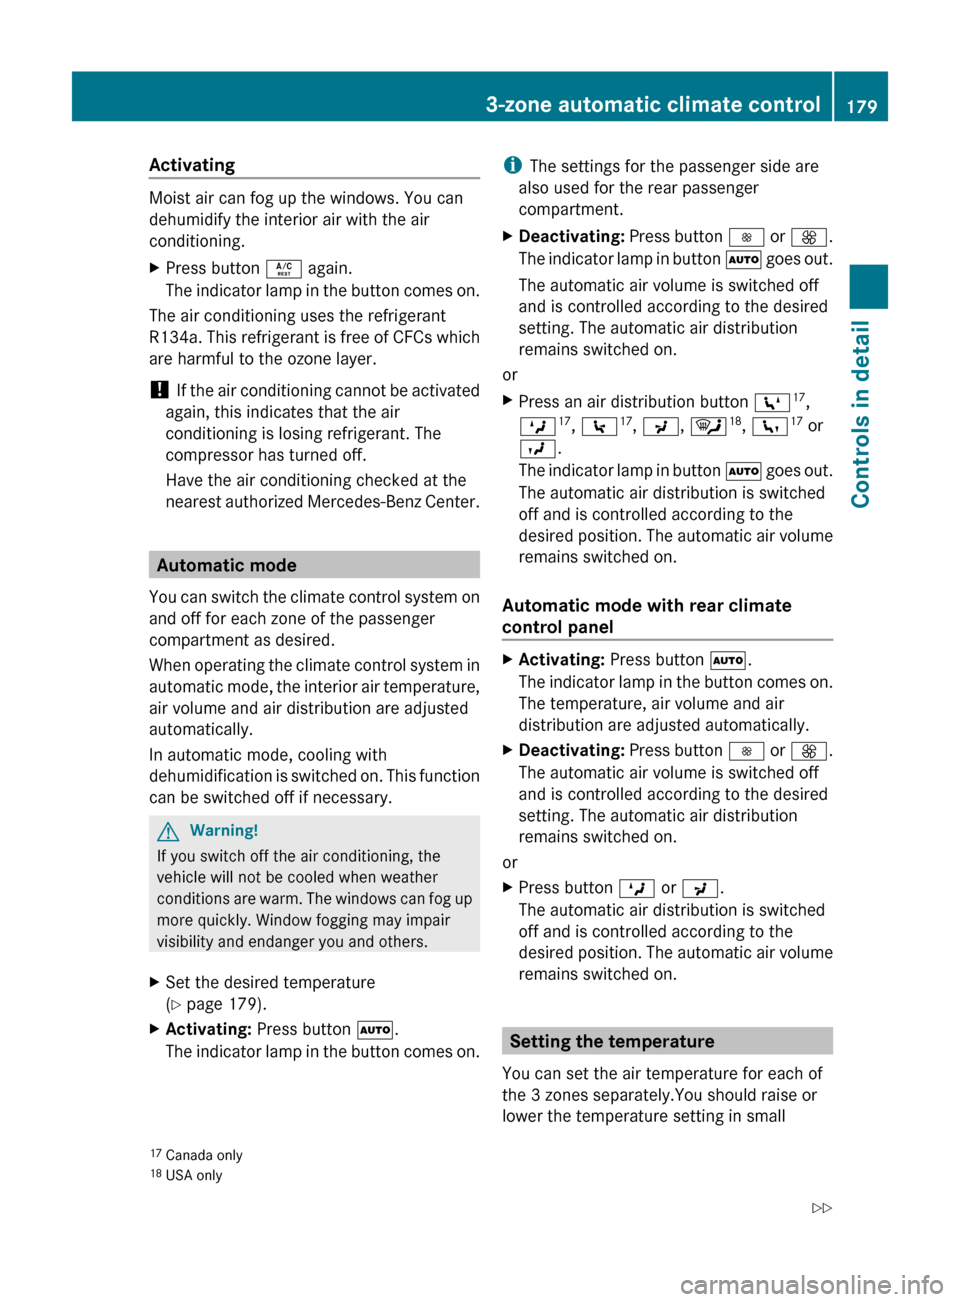
Automatic mode
You can switch the climate control system on
and off for each zone of the passenger
compartment as desired.
When operating the climate control system in
automatic mode, the interior air temperature,
air volume and air distribution are adjusted
automatically.
In automatic mode, cooling with
dehumidification is switched on. This function
can be switched off if necessary.
GWarning!
If you switch off the air conditioning, the
vehicle will not be cooled when weather
conditions are warm. The windows can fog up
more quickly. Window fogging may impair
visibility and endanger you and others.
XSet the desired temperature
( Y page 179).XActivating: Press button Ã.
The indicator lamp in the button comes on.i The settings for the passenger side are
also used for the rear passenger
compartment.XDeactivating: Press button I or K .
The indicator lamp in button à goes out.
The automatic air volume is switched off
and is controlled according to the desired
setting. The automatic air distribution
remains switched on.
or
XPress an air distribution button Z17
,
M 17
, \ 17
, P , ¯ 18
, c 17
or
O .
The indicator lamp in button à goes out.
The automatic air distribution is switched
off and is controlled according to the
desired position. The automatic air volume
remains switched on.
Automatic mode with rear climate
control panel
XActivating: Press button Ã.
The indicator lamp in the button comes on.
The temperature, air volume and air
distribution are adjusted automatically.XDeactivating: Press button I or K .
The automatic air volume is switched off
and is controlled according to the desired
setting. The automatic air distribution
remains switched on.
or
XPress button M or P .
The automatic air distribution is switched
off and is controlled according to the
desired position. The automatic air volume
remains switched on.
Setting the temperature
You can set the air temperature for each of
the 3 zones separately.You should raise or
lower the temperature setting in small
17 Canada only
18 USA only3-zone automatic climate control179Controls in detail164_AKB; 7; 31, en-USd2ureepe,Version: 2.11.8.12009-09-11T12:07:36+02:00 - Seite 179Z
Page 183 of 368
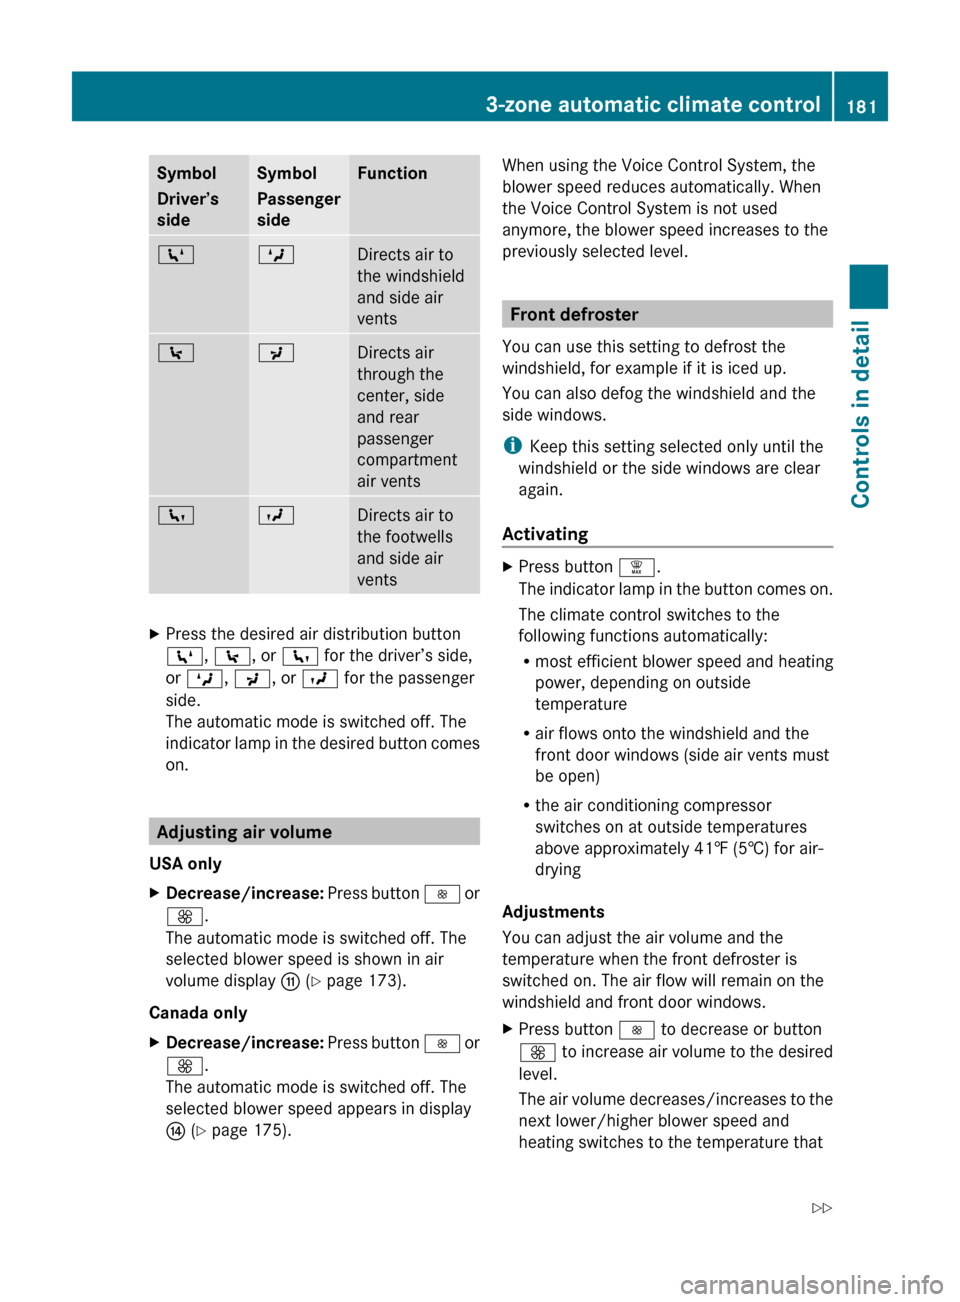
Symbol
Driver’s
sideSymbol
Passenger
sideFunctionZMDirects air to
the windshield
and side air
vents\PDirects air
through the
center, side
and rear
passenger
compartment
air ventscODirects air to
the footwells
and side air
ventsXPress the desired air distribution button
Z , \ , or c for the driver’s side,
or M , P , or O for the passenger
side.
The automatic mode is switched off. The
indicator lamp in the desired button comes
on.
Adjusting air volume
USA only
XDecrease/increase: Press button I or
K .
The automatic mode is switched off. The
selected blower speed is shown in air
volume display G (Y page 173).
Canada only
XDecrease/increase: Press button I or
K .
The automatic mode is switched off. The
selected blower speed appears in display
J (Y page 175).When using the Voice Control System, the
blower speed reduces automatically. When
the Voice Control System is not used
anymore, the blower speed increases to the
previously selected level.
Front defroster
You can use this setting to defrost the
windshield, for example if it is iced up.
You can also defog the windshield and the
side windows.
i Keep this setting selected only until the
windshield or the side windows are clear
again.
Activating
XPress button ¦.
The indicator lamp in the button comes on.
The climate control switches to the
following functions automatically:
R most efficient blower speed and heating
power, depending on outside
temperature
R air flows onto the windshield and the
front door windows (side air vents must
be open)
R the air conditioning compressor
switches on at outside temperatures
above approximately 41‡ (5†) for air-
drying
Adjustments
You can adjust the air volume and the
temperature when the front defroster is
switched on. The air flow will remain on the
windshield and front door windows.
XPress button I to decrease or button
K to increase air volume to the desired
level.
The air volume decreases/increases to the
next lower/higher blower speed and
heating switches to the temperature that3-zone automatic climate control181Controls in detail164_AKB; 7; 31, en-USd2ureepe,Version: 2.11.8.12009-09-11T12:07:36+02:00 - Seite 181Z
Page 184 of 368
was set before the front defroster was
switched on.
The indicator lamp in button ¦ goes out.
The indicator lamp in button Á comes
on.
or
XTurn temperature control : and/or C
(USA only) ( Y page 173) or : and/or E
(Canada only) ( Y page 175) slightly in any
direction.
Heating switches to the temperature that
was set before the front defroster was
switched on.
The indicator lamp in button ¦ goes out.
The indicator lamp in button Á comes
on.
i The air conditioning compressor remains
on even if the indicator lamp in button
¦ goes out. This helps to prevent the
windshield from fogging.
Deactivating
XPress button ¦ once more.
The indicator lamp in the button goes out.
Defrosting is turned off.
The previous settings are once again in
effect. The air conditioning compressor
remains switched on.
i To deactivate, you can also press button
^ or à .
Windshield fogged on the outside
XSwitch the windshield wipers on
( Y page 98).XPress button Ã.
The indicator lamp in the button goes out.
Air volume and air distribution are
controlled separately for each zone.
If the automatic air volume and air
distribution are switched off:
XPress buttons O/c 19
and P /
\ 19
.
Air recirculation mode
Switch to air recirculation mode to prevent
unpleasant odors from entering the vehicle
from the outside (e. g. before driving through
a tunnel). This setting cuts off the intake of
outside air and recirculates the air in the
passenger compartment.
GWarning!
Fogged windows impair visibility,
endangering you and others. If the windows
begin to fog on the inside, switching off the
air recirculation mode immediately should
clear interior window fogging. If interior
window fogging persists, make sure the air
conditioning is activated, or press button
¦ .
XActivating: Press button d.
The indicator lamp in the button comes on.
i The air recirculation mode is activated
automatically at high outside
temperatures.
The indicator lamp in button d is not lit
when the air recirculation mode is switched
on automatically.
A quantity of outside air is added after
approximately 30 minutes.
If you have turned off the air conditioning
or the outside temperature is below 41‡
(5†), the air recirculation mode will not
switch on automatically.
XDeactivating: Press button d.
The indicator lamp in the button goes out.19 Canada only1823-zone automatic climate controlControls in detail
164_AKB; 7; 31, en-USd2ureepe,Version: 2.11.8.12009-09-11T12:07:36+02:00 - Seite 182
Page 185 of 368
iThe manually selected air recirculation
mode is deactivated automatically:
R after 5 minutes if the outside
temperature is below approximately
41‡ (5†)
R after 5 minutes if the air conditioning and
air-drying are turned off
R after 30 minutes if the outside
temperature is above approximately
41‡ (5†)
At outside temperatures above 79‡ (26†)
the system will not automatically switch back
to outside air. A quantity of outside air is
added after approximately 30 minutes.
Residual heat and ventilation
With the engine switched off, it is possible to
continue to heat or ventilate the interior for
up to 30 minutes. This feature makes use of
the residual heat produced by the engine.
i How long the system will provide heating
depends on the coolant temperature and
the battery voltage.
Regardless of the temperature and air
volume set on the climate control panel, an
interior temperature is aimed at by 72‡
(22† ) and the blower runs on low speed to
protect the vehicle battery.
XActivating: Switch off the ignition.XPress button Á.
The indicator lamp in the button comes on.XDeactivating: Press button Á again.
The indicator lamp in the button goes out.
The residual heat is deactivated
automatically:
R when the ignition is switched on
R after approximately 30 minutes
R if the battery voltage drops
R if the coolant temperature is too low
Using driver-side settings for all
temperature zones
This feature is only available in Canada
vehicles.
You can use the settings of the driver’s side,
such as temperature, air volume and air
distribution, for all temperature zones. These
settings only need to be made once and the
climate control system will automatically
regulate the settings for all temperature
zones quickly and comfortably.XActivating: Adjust the air temperature, air
volume and air distribution.XPress button ¸.
The indicator lamp in the button comes on.
The driver-side settings are used for all
temperature zones.XDeactivating: Press button ¸ again.
The indicator lamp in the button goes out.
i If you manually set the temperature, air
volume or air distribution for the passenger
side or the rear passenger compartment
when the MONO setting is active, the
MONO setting will be switched off.
Rear window defroster
GWarning!
Any accumulation of snow and ice should be
removed from the rear window before driving.
Visibility could otherwise be impaired,
endangering you and others.
The rear window defroster uses a large
amount of power. To keep the battery drain
to a minimum, switch off the defroster as
soon as the rear window is clear. The
defroster is switched off automatically after
some time of operation depending on the
outside temperature.
Rear window defroster183Controls in detail164_AKB; 7; 31, en-USd2ureepe,Version: 2.11.8.12009-09-11T12:07:36+02:00 - Seite 183Z
Page 201 of 368
XStart the engine.
RThe temperature of the DC/AC inverter is
temporarily too high.
XPull the plug of the small device out of
115V AC socket : and plug it in again
after waiting a few minutes.
R Some small devices have a continuous
power rating of less than 150 W but a very
high switch-on current. Such devices will
not operate. When connecting such a
device, 115V AC socket : will not provide
power.
If LED ; still does not come on, contact an
authorized Mercedes-Benz Center.
Tele Aid
! In order to activate the Tele Aid system, a
subscriber agreement must be completed.
To ensure your system is activated and
operational, please press Information
button E to perform the acquaintance
call. Failure to complete either of these
steps may result in a system that is not
activated.
If you have any questions regarding
activation, please call the Customer
Assistance Center at
1-800-FOR-MERCedes (1-800-367-6372)
(USA only) or 1-888-923-8367 (Canada
only).
Shortly after the completion of your Tele Aid
acquaintance call, you will receive a user ID
and password in the mail. You may use this
password to access the Tele Aid section in
“Owner’s Online” at www.mbusa.com (USA
only). The “My Tele Aid” section will give you
access to account information, remote door
unlock and more.
The Tele Aid system is available if
R it has been activated and is operational.
Activation requires a subscription for
monitoring services, connection and
cellular air time
R vehicle battery power is available
R the relevant cellular phone network and
GPS signals are available and pass the
information on to the Customer Assistance
Center
i Location of the vehicle on a map is only
possible if the vehicle is able to receive
signals from the GPS satellite network and
pass the information on to the Customer
Assistance Center.
The Tele Aid system
(Telematic Alarm Identification on Demand)
The Tele Aid system consists of three types
of response:
R Automatic and manual emergency
R Roadside Assistance
R Information
To adjust the speaker volume during a Tele
Aid call do the following:
XPress button W or X on the
multifunction steering wheel.
or
XUse the adjustment button on your
COMAND system.
Be sure to check “Owner’s Online” at
www.mbusa.com (USA only) for more
information and a description of all available
features.
System self-test
The system performs a self-test after you
have switched on the ignition.
GWarning!
A malfunction in the system has been
detected if any or all of the following
conditions occur:
Useful features199Controls in detail164_AKB; 7; 31, en-USd2ureepe,Version: 2.11.8.12009-09-11T12:07:36+02:00 - Seite 199Z
Page 221 of 368
sharply reduced at tread depths of less
than 1/8 in (3 mm).
RWhen replacing individual tires, you should
mount new tires on the front wheels first
(on vehicles with same-sized wheels all
around).
Recommended tire inflation pressure
GWarning!
Follow recommended tire inflation pressures.
Do not underinflate tires. Underinflated tires
wear excessively and/or unevenly, adversely
affect handling and fuel economy, and are
more likely to fail from being overheated.
Do not overinflate tires. Overinflated tires can
adversely affect handling and ride comfort,
wear unevenly, increase stopping distance,
and result in sudden deflation (blowout)
because they are more likely to become
punctured or damaged by road debris,
potholes etc.
Do not overload the tires by exceeding the
specified load limit as indicated on the Tire
and Loading Information placard on the
driver’s door B-pillar. Overloading the tires
can overheat them, possibly causing a
blowout. Overloading the tires can also result
in handling or steering problems, or brake
failure.
Your vehicle is equipped with the Tire and
Loading Information placard located on the
driver’s door B-pillar (Y page 227).
The tire inflation pressure should be checked
regularly. Only adjust the tire inflation
pressure on cold tires. The tires can be
considered cold if the vehicle has been
parked for at least 3 hours or driven less than
1 mile (1.6 km). Depending on the ambient
temperature, the driving speed and the tire
load, the tire temperature changes. When the
tire temperature changes by 18‡ (10†), the
tire inflation pressure will change by
approximately 1.5 psi (0.1 bar). Keep this in
mind when checking tire inflation pressure on
warm tires and adjust the tire pressure only
if the tire inflation pressure is too low for the
current operating conditions. If you check the
tire inflation pressure when the tires are
warm, the reading will be higher than the cold
reading. This is normal. Do not let air out to
match the specified cold tire inflation
pressure. Otherwise, the tire will be
underinflated.
Follow recommended cold tire inflation
pressures listed on Tire and Loading
Information placard on the driver’s door
B-pillar.
Keeping the tires properly inflated provides
the best handling, tread life and riding
comfort.
In addition to the Tire and Loading
Information placard on the driver’s door
B-pillar, also consult the tire inflation
pressure label on the inside of the filler flap
for any additional information pertaining to
special driving situations. For more
information, see “Important notes on tire
inflation pressure” (Y page 220).
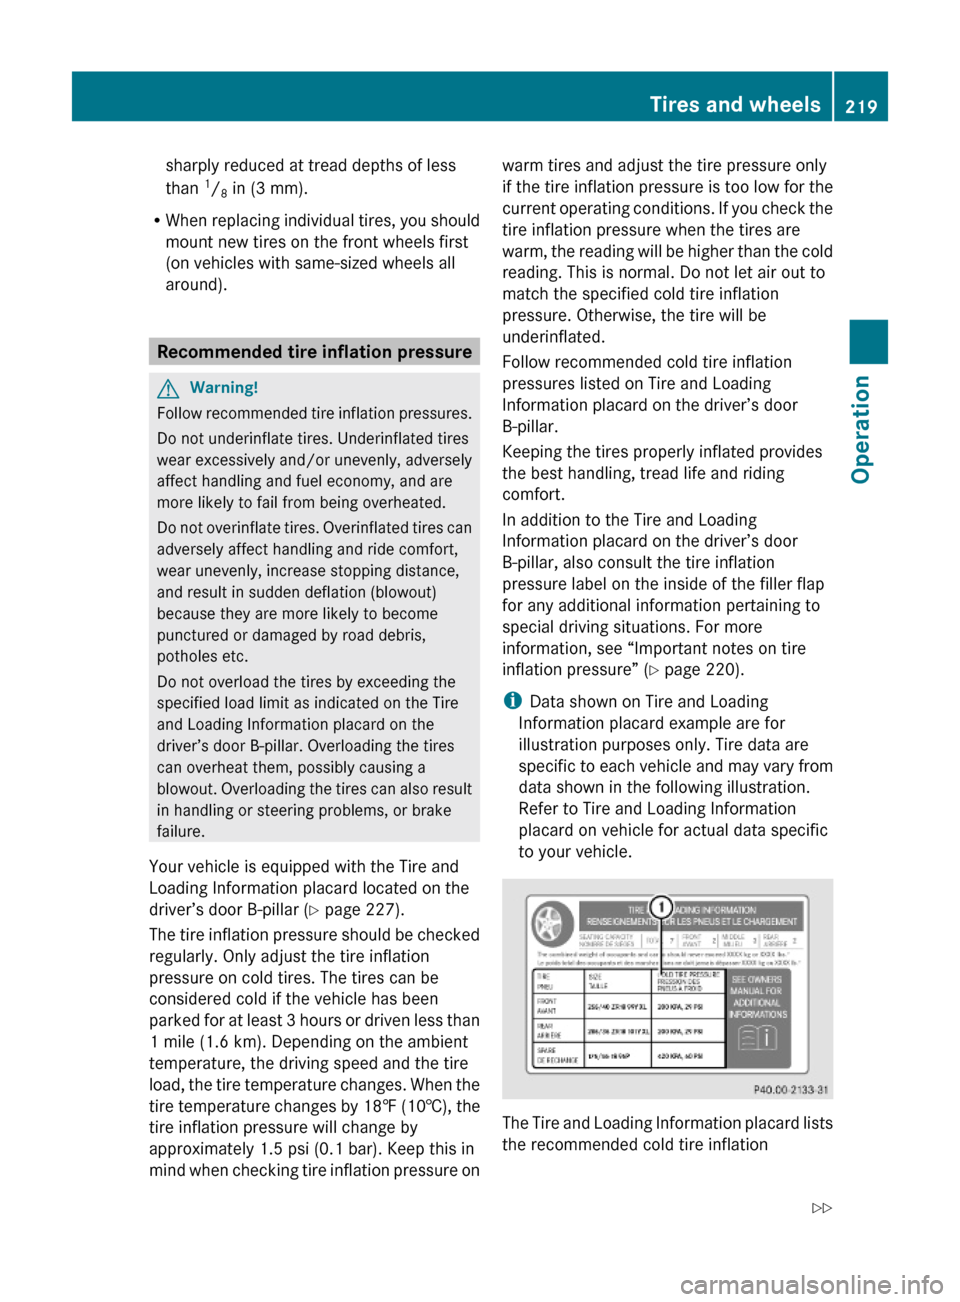
iData shown on Tire and Loading
Information placard example are for
illustration purposes only. Tire data are
specific to each vehicle and may vary from
data shown in the following illustration.
Refer to Tire and Loading Information
placard on vehicle for actual data specific
to your vehicle.
The Tire and Loading Information placard lists
the recommended cold tire inflation
Tires and wheels219Operation164_AKB; 7; 31, en-USd2ureepe,Version: 2.11.8.12009-09-11T12:07:36+02:00 - Seite 219Z
Page 222 of 368
pressures : for maximum loaded vehicle
weight. The tire inflation pressures listed
apply to the tires installed as original
equipment.
Important notes on tire inflation
pressure
GWarning!
If the tire inflation pressure drops repeatedly,
check the tires for punctures from foreign
objects and/or whether air is leaking from the
valves or from around the rim.
Tire temperature and tire inflation pressure
are also increased while driving, depending
on the driving speed and the tire load.
If you will be driving your vehicle at high
speeds of 100 mph (160 km/h) or higher,
where it is legal and conditions allow, consult
the tire inflation pressure label on the inside
of the fuel filler flap on how to adjust the cold
tire inflation pressure. If you do not adjust the
tire inflation pressure, excessive heat can
build up and result in sudden tire failure.
If you are not sure about the proper tire
inflation pressure, contact an authorized
Mercedes-Benz Center.
iDriving comfort may be reduced when the
tire inflation pressure is adjusted to the
value for speeds above 100 mph
(160 km/h) as specified on the tire inflation
pressure label located on the inside of the
fuel filler flap.
Make sure to readjust the tire inflation
pressure for normal driving speeds.
Supplemental tire inflation pressure
information for different loading conditions of
the vehicle can be found on the tire inflation
pressure label. The tire inflation pressure
label is located on the inside of the fuel filler
flap.
For the tire inflation pressure for spare
wheels such as Minispare wheels or spare
wheels with collapsible tire refer to
Rthe yellow label on the spare wheel rim
Rthe “Technical data” section of this
Operator’s Manual (Y page 356)
Rthe Tire and Loading Information placard on
the driver’s door B-pillar
Unless specified otherwise, the tire inflation
pressures on the tire inflation pressure label
are valid for all approved, factory-equipped
tires.
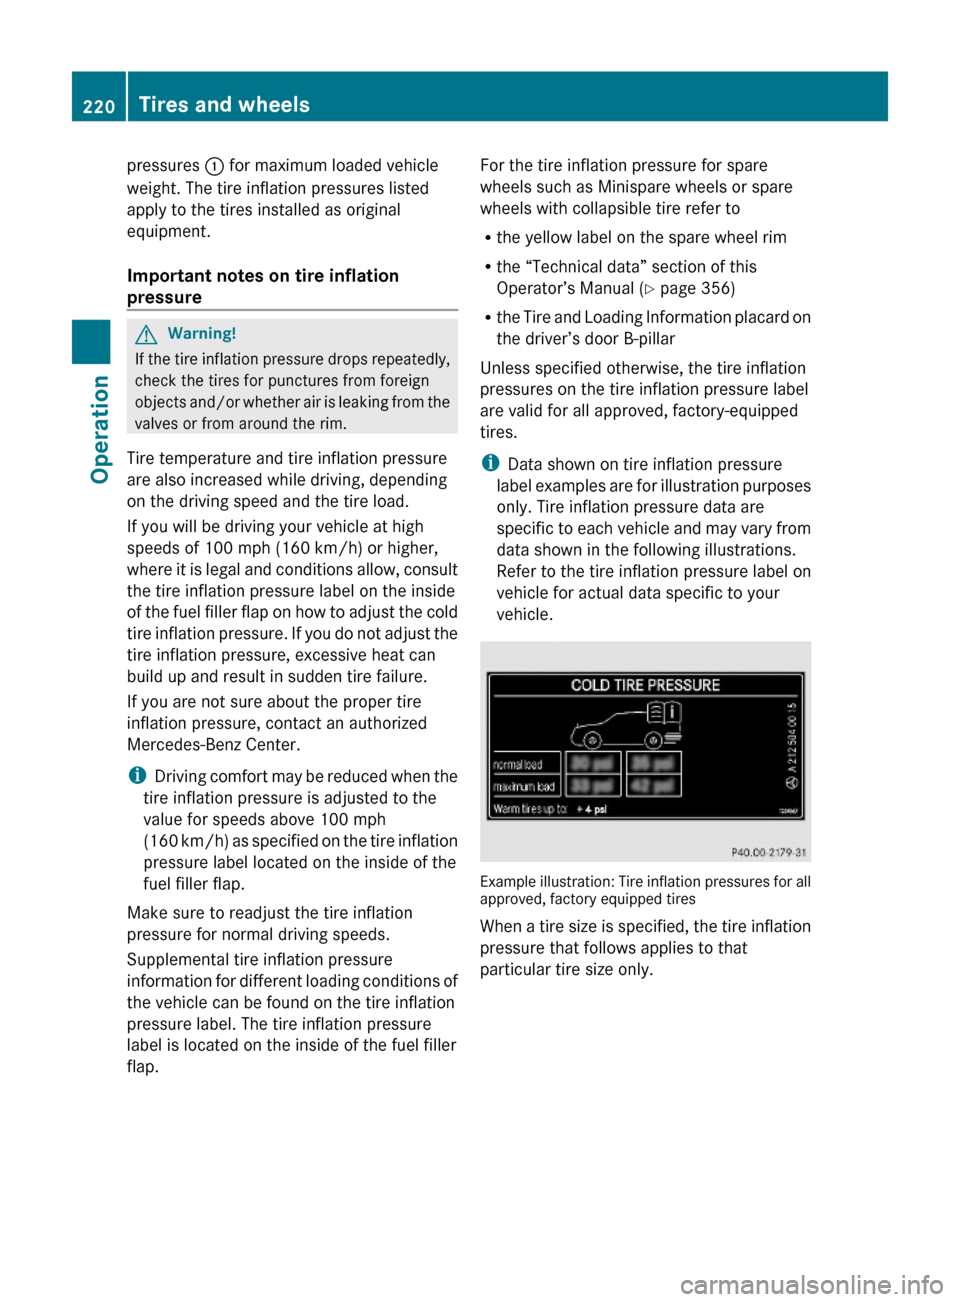
iData shown on tire inflation pressure
label examples are for illustration purposes
only. Tire inflation pressure data are
specific to each vehicle and may vary from
data shown in the following illustrations.
Refer to the tire inflation pressure label on
vehicle for actual data specific to your
vehicle.
Example illustration: Tire inflation pressures for allapproved, factory equipped tires
When a tire size is specified, the tire inflation
pressure that follows applies to that
particular tire size only.
220Tires and wheelsOperation
164_AKB; 7; 31, en-USd2ureepe,Version: 2.11.8.12009-09-11T12:07:36+02:00 - Seite 220