service MERCEDES-BENZ R-Class 2010 R171 Comand Manual
[x] Cancel search | Manufacturer: MERCEDES-BENZ, Model Year: 2010, Model line: R-Class, Model: MERCEDES-BENZ R-Class 2010 R171Pages: 224, PDF Size: 7 MB
Page 102 of 224
XTo set the volume: Press 9 or : .
The red bar moves up or down.XTo confirm selection: Press 9.
“911” Emergency Call
GWarning
The 911 emergency call system is a public
service. Using it without due cause is a
criminal offense.
The following conditions must be met for a
“911” emergency call:
R Phone switched on
R Mobile phone network available
RValid SIM card in the phone (not required
on all mobile phone networks)
R Mobile phone connected with COMAND via
Bluetooth ®
If you are unable to make an emergency call,
you will have to initiate rescue measures
yourself.
The “911” emergency number is a public
service. Any abuse is punishable by law.XEnter the digits on the COMAND control
unit ( Y page 107).XPress the 6 button.
The phone establishes the connection.XWait until the emergency call center
answers, then describe the emergency.
Submenu Overview
NamePhoneCall lists or Mic On/OffDisplays the COMAND phone
bookPhone listDisplays or deletes call listsDownload ContactsSwitches hands-free
microphone on/off (during a
call)Delete ContactsAdjusts the VolumePhone Main Menu
Switching to Phone ModeXPress the function button % on the
COMAND control unit.
i If you press the 6 button with the
phone main menu already open, the call list
“Calls Dialed” appears .
or
From another Main Function
XSelect Phone£Phone £Phone .
i
If phone mode was active last, you only
need to select “Phone”.
Within the Phone FunctionXSelect Phone£Phone .
or
XIn the phone mode press the k button
repeatedly until the phone main menu
appears.100Submenu OverviewTelephone
Page 103 of 224
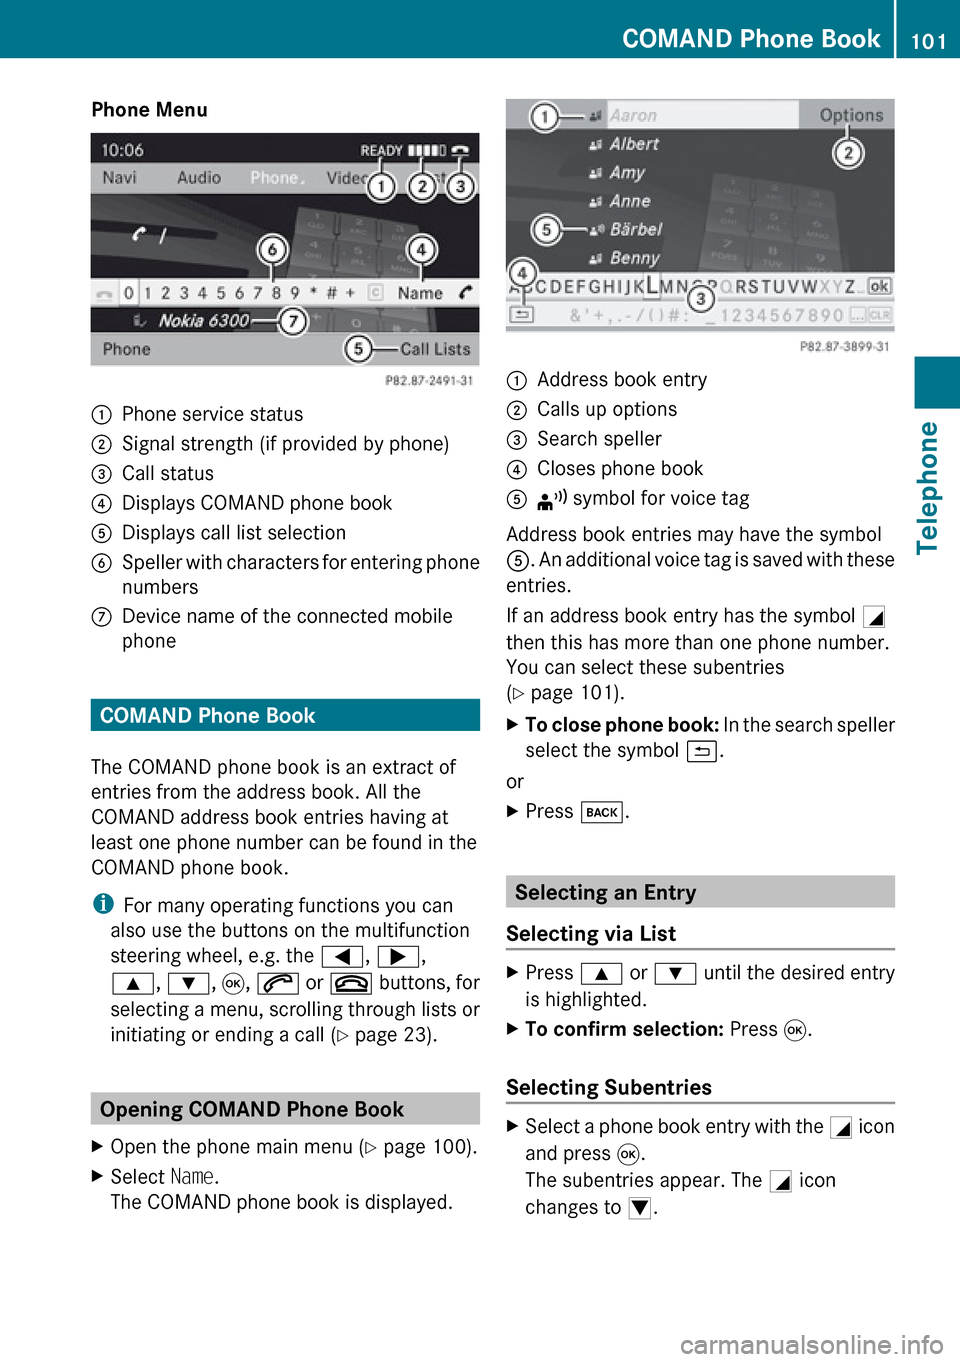
Phone Menu1Phone service status2Signal strength (if provided by phone)3Call status4Displays COMAND phone book5Displays call list selection6Speller with characters for entering phone
numbers7Device name of the connected mobile
phone
COMAND Phone Book
The COMAND phone book is an extract of
entries from the address book. All the
COMAND address book entries having at
least one phone number can be found in the
COMAND phone book.
i For many operating functions you can
also use the buttons on the multifunction
steering wheel, e.g. the =, ; ,
9 , : , 9 , 6 or ~ buttons, for
selecting a menu, scrolling through lists or
initiating or ending a call ( Y page 23).
Opening COMAND Phone Book
XOpen the phone main menu ( Y page 100).XSelect Name.
The COMAND phone book is displayed.1Address book entry2Calls up options3Search speller4Closes phone book5¦ symbol for voice tag
Address book entries may have the symbol
5 . An additional voice tag is saved with these
entries.
If an address book entry has the symbol +
then this has more than one phone number.
You can select these subentries
( Y page 101).
XTo close phone book: In the search speller
select the symbol á.
or
XPress k.
Selecting an Entry
Selecting via List
XPress 9 or : until the desired entry
is highlighted.XTo confirm selection: Press 9.
Selecting Subentries
XSelect a phone book entry with the + icon
and press 9.
The subentries appear. The + icon
changes to /.COMAND Phone Book101TelephoneZ
Page 125 of 224
HD Radio™
Important Notes
In chapter “HD Radio™, you will find detailed
information about
R the special features of HD Radio that
distinguish it from analog AM and FM radio
R selecting an HD Radio station
R displaying program information.
i Optional HD Radio ®
equipment is
required for the HD Radio operation
described here. A special subscription,
however, is not necessary.
i HD Radio features include
R digital broadcasts in the same waveband
as analog AM/FM; the analog AM/FM
stations remain at their current place on
the dial
R the ability to broadcast multiple program
streams over a single FM/AM frequency
(e. g. HD1, HD2, etc.)
R static-free, clear reception
R FM stations offer CD quality sound, AM
stations sound like analog FM stations
R a variety of data services, including
textbased information – artist name,
song title, etc. – shown on the display.
More information on HD Radio you will find
at http://www.hdradio.com.
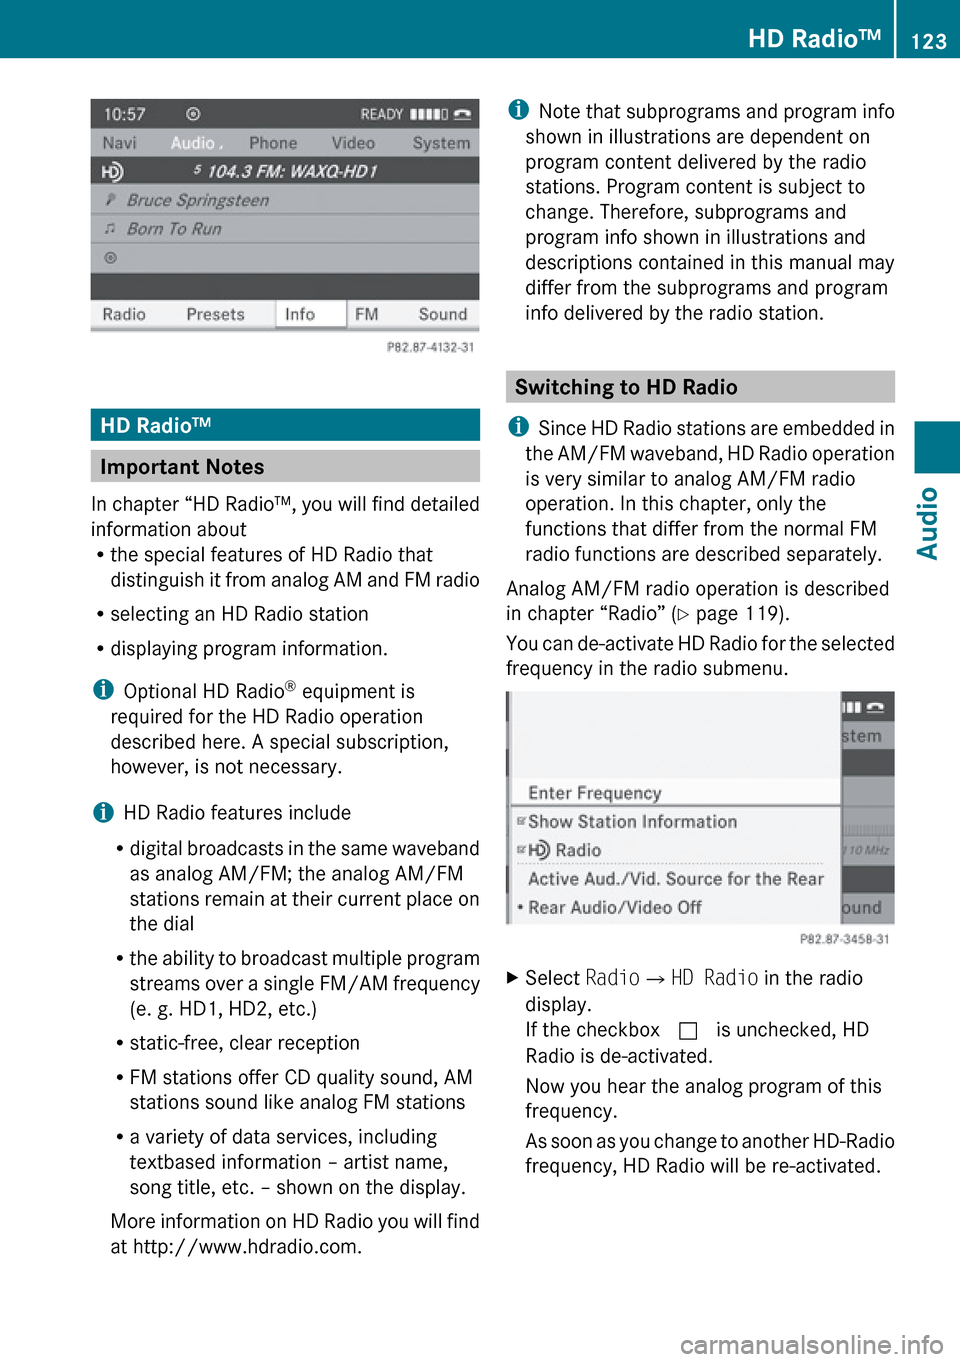
i Note that subprograms and program info
shown in illustrations are dependent on
program content delivered by the radio
stations. Program content is subject to
change. Therefore, subprograms and
program info shown in illustrations and
descriptions contained in this manual may
differ from the subprograms and program
info delivered by the radio station.
Switching to HD Radio
i Since HD Radio stations are embedded in
the AM/FM waveband, HD Radio operation
is very similar to analog AM/FM radio
operation. In this chapter, only the
functions that differ from the normal FM
radio functions are described separately.
Analog AM/FM radio operation is described
in chapter “Radio” ( Y page 119).
You can de-activate HD Radio for the selected
frequency in the radio submenu.
XSelect Radio£HD Radio in the radio
display.
If the checkbox c is unchecked, HD
Radio is de-activated.
Now you hear the analog program of this
frequency.
As soon as you change to another HD-Radio
frequency, HD Radio will be re-activated.HD Radio™123AudioZ
Page 127 of 224
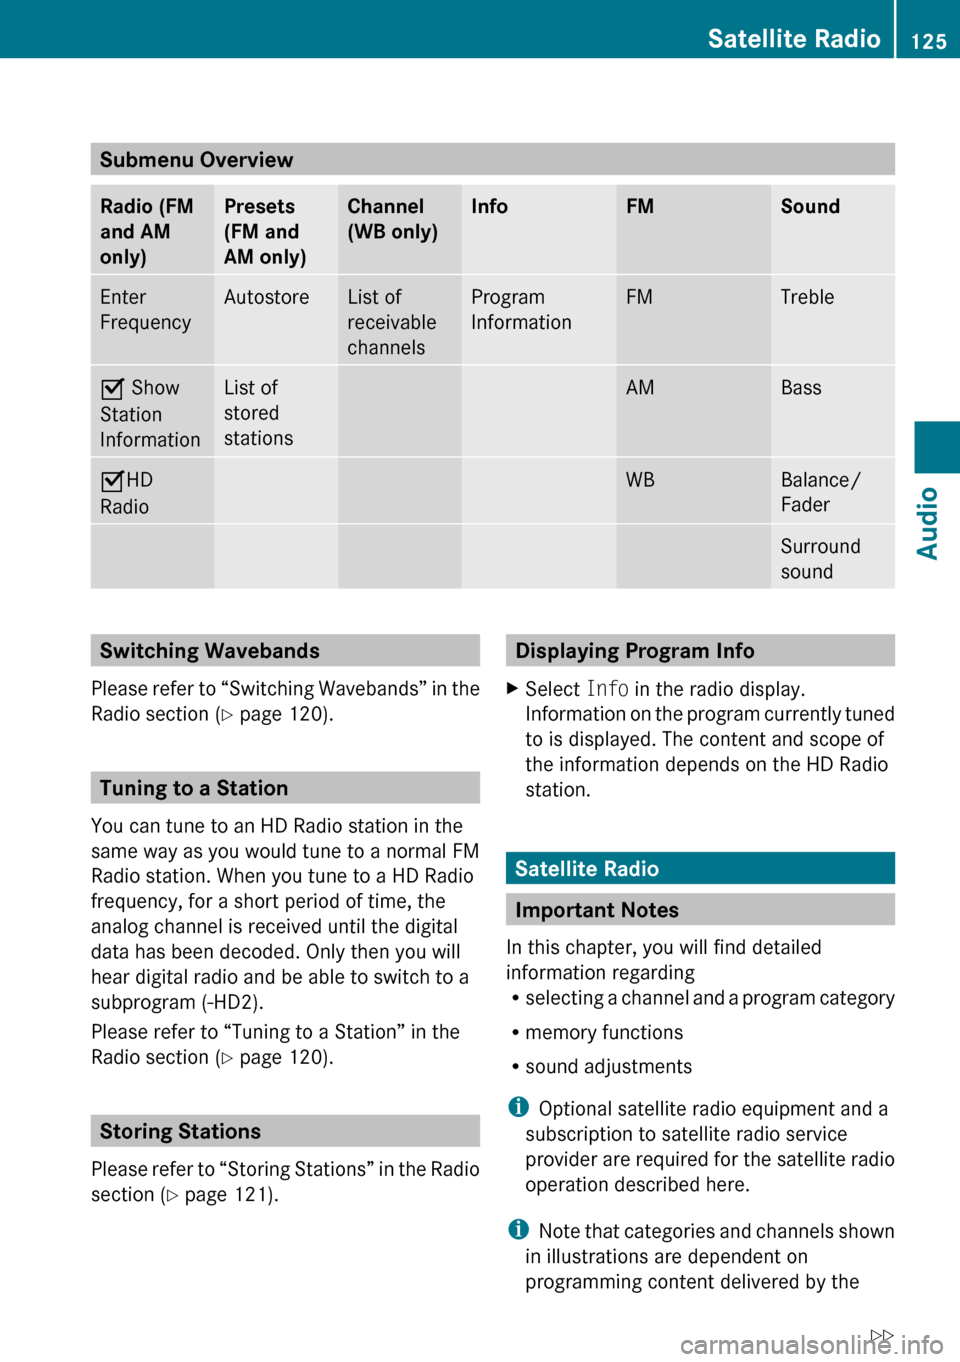
Submenu Overview
Radio (FM
and AM
only)Presets
(FM and
AM only)Channel
(WB only)InfoFMSoundEnter
FrequencyAutostoreList of
receivable
channelsProgram
InformationFMTrebleÇ Show
Station
InformationList of
stored
stationsAMBassÇ HD
RadioWBBalance/
FaderSurround
soundSwitching Wavebands
Please refer to “Switching Wavebands” in the
Radio section ( Y page 120).
Tuning to a Station
You can tune to an HD Radio station in the
same way as you would tune to a normal FM
Radio station. When you tune to a HD Radio
frequency, for a short period of time, the
analog channel is received until the digital
data has been decoded. Only then you will
hear digital radio and be able to switch to a
subprogram (-HD2).
Please refer to “Tuning to a Station” in the
Radio section ( Y page 120).
Storing Stations
Please refer to “Storing Stations” in the Radio
section ( Y page 121).
Displaying Program InfoXSelect Info in the radio display.
Information on the program currently tuned
to is displayed. The content and scope of
the information depends on the HD Radio
station.
Satellite Radio
Important Notes
In this chapter, you will find detailed
information regarding
R selecting a channel and a program category
R memory functions
R sound adjustments
i Optional satellite radio equipment and a
subscription to satellite radio service
provider are required for the satellite radio
operation described here.
i Note that categories and channels shown
in illustrations are dependent on
programming content delivered by the
Satellite Radio125AudioZ
Page 128 of 224
service provider. Programming content is
subject to change. Therefore, channel and
categories shown in illustrations and
descriptions contained in this manual may
differ from the channels and categories
delivered by the service provider.
Satellite radio service may be unavailable
or interrupted from time to time for a
variety of reasons, such as environmental
or topographic conditions and other things
we cannot control. Service might also not
be available in certain places (e.g., in
tunnels, parking garages, or within or next
to buildings) or near other technologies.
i SIRIUS XM Radio provides over 130
channels of digital-quality radio, including
100% commercial-free music, sports, news
and entertainment.
SIRIUS XM Radio uses a fleet of high-power
satellites to broadcast 24 hours per day,
coast-to-coast, in the contiguous U.S.
This diverse, satellite-delivered
programming is available for a monthly
subscription fee. For more information, call
the SIRIUS XM Service Center
( Y page 129) or contact www.sirius.com
(USA) or www.siriuscanada.com (Canada).
Subscribing
Subscribing to Satellite Radio
To switch to satellite radio operation:
XFrom another main function: Select
Audio £Audio £SatRadio .
i
If radio mode was active last, you only
need to select Audio.
XWithin the audio function: Select Audio
£ SatRadio .
The Satellite radio main menu will appear
and displays the Weather channel. You
cannot select any other station.XSelect SatRadio (from the submenu)
£ Service .
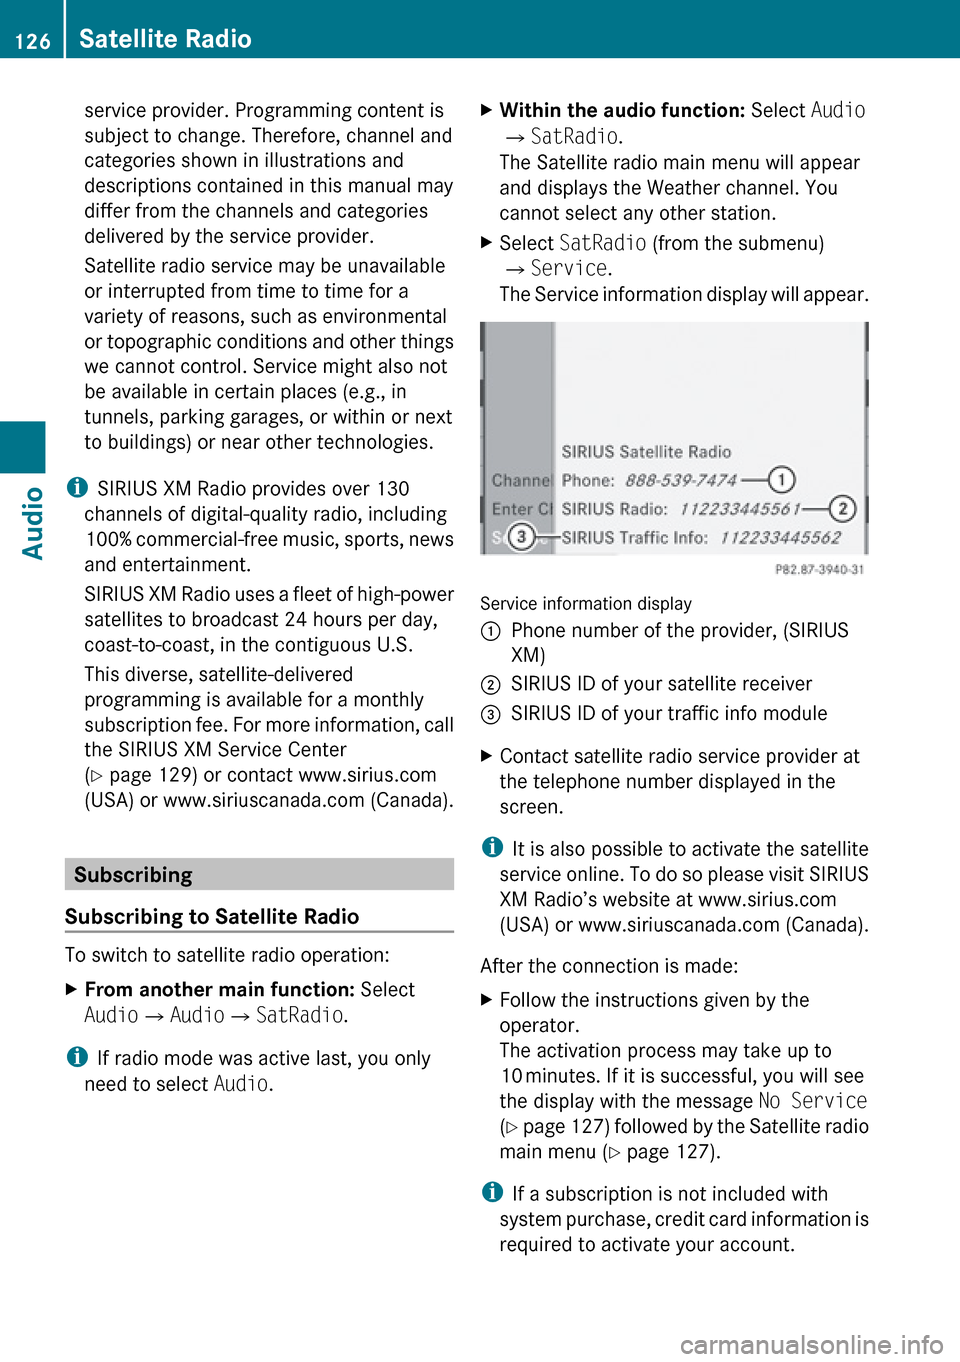
The Service information display will appear.
Service information display
1Phone number of the provider, (SIRIUS
XM)2SIRIUS ID of your satellite receiver=SIRIUS ID of your traffic info moduleXContact satellite radio service provider at
the telephone number displayed in the
screen.
i It is also possible to activate the satellite
service online. To do so please visit SIRIUS
XM Radio’s website at www.sirius.com
(USA) or www.siriuscanada.com (Canada).
After the connection is made:
XFollow the instructions given by the
operator.
The activation process may take up to
10 minutes. If it is successful, you will see
the display with the message No Service
( Y page 127) followed by the Satellite radio
main menu ( Y page 127).
i
If a subscription is not included with
system purchase, credit card information is
required to activate your account.
126Satellite RadioAudio
Page 129 of 224
Satellite Radio Operation
i For many operating functions you can
also use the buttons on the multifunction
steering wheel, e.g. the ;, = , 9
or : buttons, for selecting a channel or
a menu or scrolling through lists
( Y page 23).
Switching on
See “Subscribing to Satellite Radio” for
important subscription information
( Y page 126).
To switch to satellite radio operation:
XFrom another main function: Select
Audio £Audio £SatRadio .
i
If radio mode was active last, you only
need to select Audio.
XWithin the audio function: Select Audio
£ SatRadio .
The message No Service will appear at start
up or when the signal is not available.
After the COMAND acquires the signal, the
Satellite radio display will appear. The station
last tuned to will begin to play.
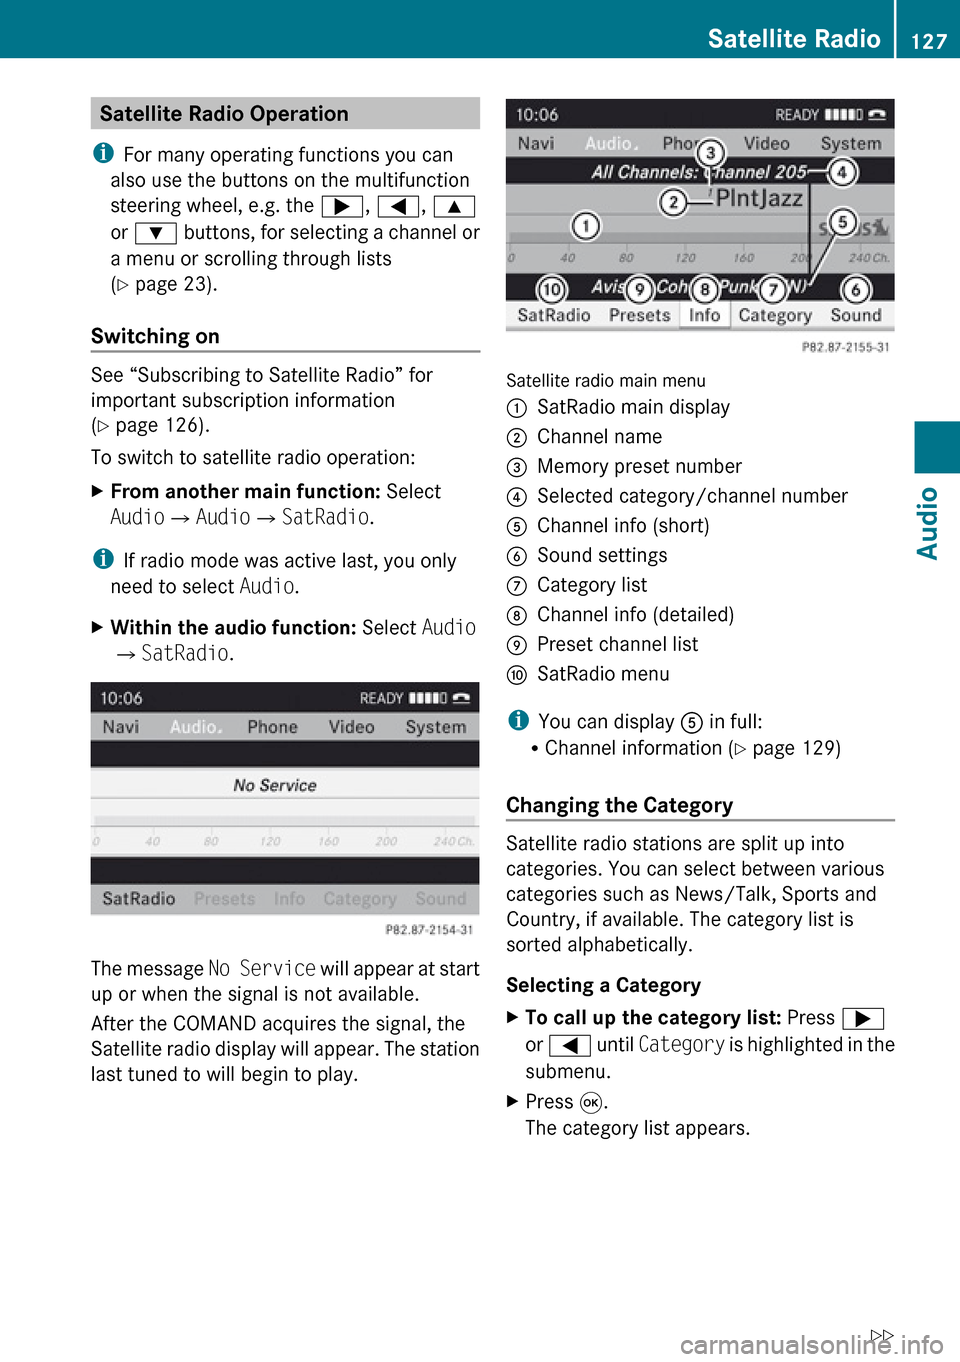
Satellite radio main menu
1SatRadio main display2Channel name3Memory preset number4Selected category/channel number5Channel info (short)6Sound settings7Category list8Channel info (detailed)9Preset channel listaSatRadio menu
i You can display 5 in full:
R Channel information ( Y page 129)
Changing the Category
Satellite radio stations are split up into
categories. You can select between various
categories such as News/Talk, Sports and
Country, if available. The category list is
sorted alphabetically.
Selecting a Category
XTo call up the category list: Press ;
or = until Category is highlighted in the
submenu.XPress 9.
The category list appears.Satellite Radio127AudioZ
Page 131 of 224
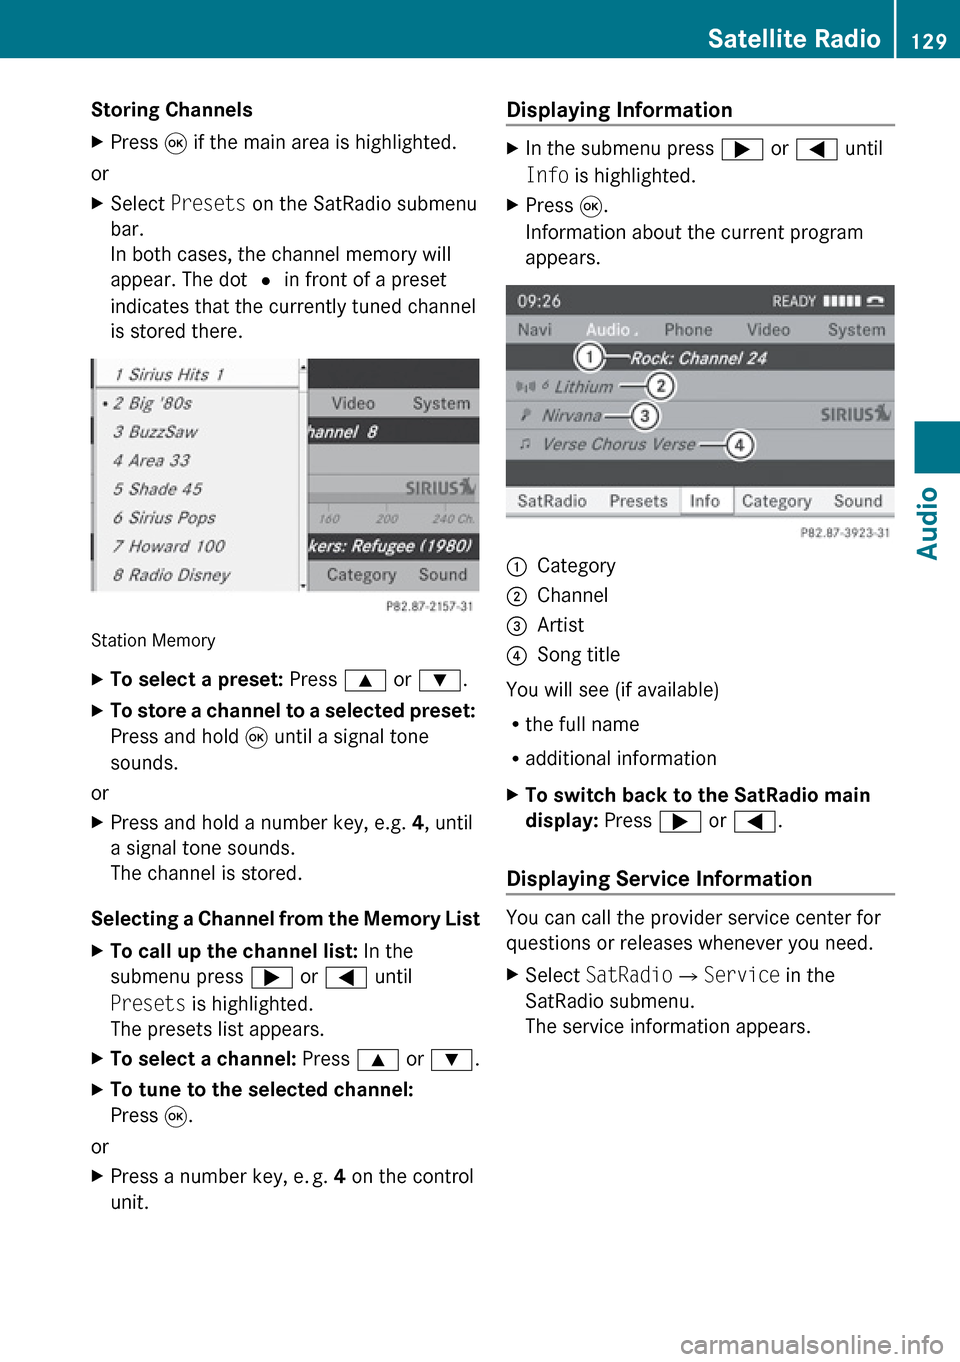
Storing ChannelsXPress 9 if the main area is highlighted.
or
XSelect Presets on the SatRadio submenu
bar.
In both cases, the channel memory will
appear. The dot R in front of a preset
indicates that the currently tuned channel
is stored there.
Station Memory
XTo select a preset: Press 9 or : .XTo store a channel to a selected preset:
Press and hold 9 until a signal tone
sounds.
or
XPress and hold a number key, e.g. 4, until
a signal tone sounds.
The channel is stored.
Selecting a Channel from the Memory List
XTo call up the channel list: In the
submenu press ; or = until
Presets is highlighted.
The presets list appears.XTo select a channel: Press 9 or : .XTo tune to the selected channel:
Press 9.
or
XPress a number key, e. g. 4 on the control
unit.Displaying Information XIn the submenu press ; or = until
Info is highlighted.XPress 9.
Information about the current program
appears.1Category2Channel3Artist4Song title
You will see (if available)
R the full name
R additional information
XTo switch back to the SatRadio main
display: Press ; or = .
Displaying Service Information
You can call the provider service center for
questions or releases whenever you need.
XSelect SatRadio £Service in the
SatRadio submenu.
The service information appears.Satellite Radio129AudioZ
Page 148 of 224
Supported Data Formats (USB devices)
The following data types are supported:
R MP3: CBR, VBR (up to 320 kbit/s)
R WMA: CBR, VBR (up to 320 kbit/s)
In order to display the metadata during
playback, ID3 tags (version 1.x, 2.3, 2.4) and
WMA tags in ASCII and UTF16 coding are
supported.
Notes on USB Devices
R In order to keep the initialisation time short,
do not store data other than music files on
the USB device.
R Up to eight directory levels with up to 1,000
tracks are supported.
R Do not use a USB extension cable or
adapter. These may impair functionality.
R Playlists are searched for in the
background on the USB device and, if
available, are offered beside folders in a
separate category. The initialisation of
large USB mass storage devices can take
several minutes.
i Files protected with DRM (Digital Rights
Management) are not supported by the
Media Interface.
Connecting External Devices
For the connection of external devices to the
Media Interface device-specific adaption
cables are needed, which are included in the
delivery of the Media Interface. You will find
the connection sockets in the glove
compartment or in the storage compartment
of the center console (SL-Class).
Never connect more than one device at a
time. Please consult a Mercedes-Benz
Service Center for further information.
i Do not leave external devices in the
vehicle, as functionality cannot be
guaranteed above certain temperatures
(such as inside a vehicle in direct sunlight).
Mercedes-Benz does not take
responsibility for any damage to external
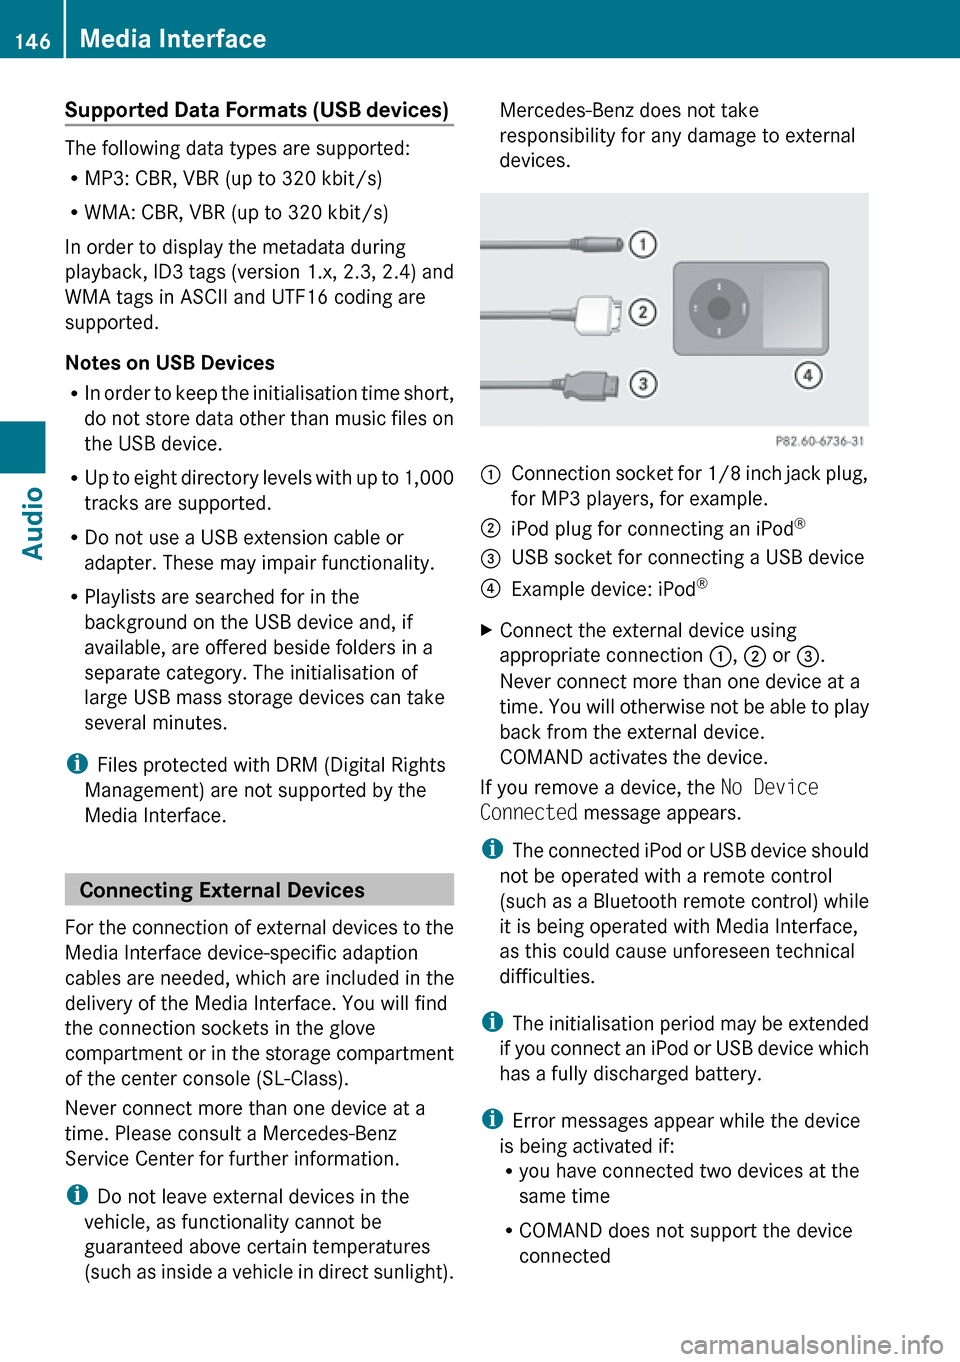
devices.1Connection socket for 1/8 inch jack plug,
for MP3 players, for example.2iPod plug for connecting an iPod ®3USB socket for connecting a USB device4Example device: iPod®XConnect the external device using
appropriate connection 1, 2 or 3.
Never connect more than one device at a
time. You will otherwise not be able to play
back from the external device.
COMAND activates the device.
If you remove a device, the No Device
Connected message appears.
i The connected iPod or USB device should
not be operated with a remote control
(such as a Bluetooth remote control) while
it is being operated with Media Interface,
as this could cause unforeseen technical
difficulties.
i The initialisation period may be extended
if you connect an iPod or USB device which
has a fully discharged battery.
i Error messages appear while the device
is being activated if:
R you have connected two devices at the
same time
R COMAND does not support the device
connected
146Media InterfaceAudio
Page 149 of 224
Rthe device connected consumes too
much power
R the Media Interface connection is
defective
If necessary, consult a Mercedes-Benz
Service Center.
Switching to Media Interface
From Another Main Function
XSelect Audio£Audio £Media
Interface in the audio menu display.
i
If you previously selected operation with
Media Interface, you need only select
Audio .
or
XPress the h function button.
Switch on the previous disc operating
mode.
i If you previously selected operation with
Media Interface, it will now be switched on.
XPress number key i.
This will automatically select the audio
device connected.
or
XSelect Media.
The media list appears. The R dot
indicates the current medium being played.XPress 9 or : until position 0 is
highlighted in the media list.
i If no device is connected, you will see the
entry Media Interface instead of a
device name.
If COMAND does not support the device
connected or if two devices have been
connected, the Not available entry
appears.
XPress 9.
COMAND activates the connected device.
You will see a corresponding message. The
basic display then appears.
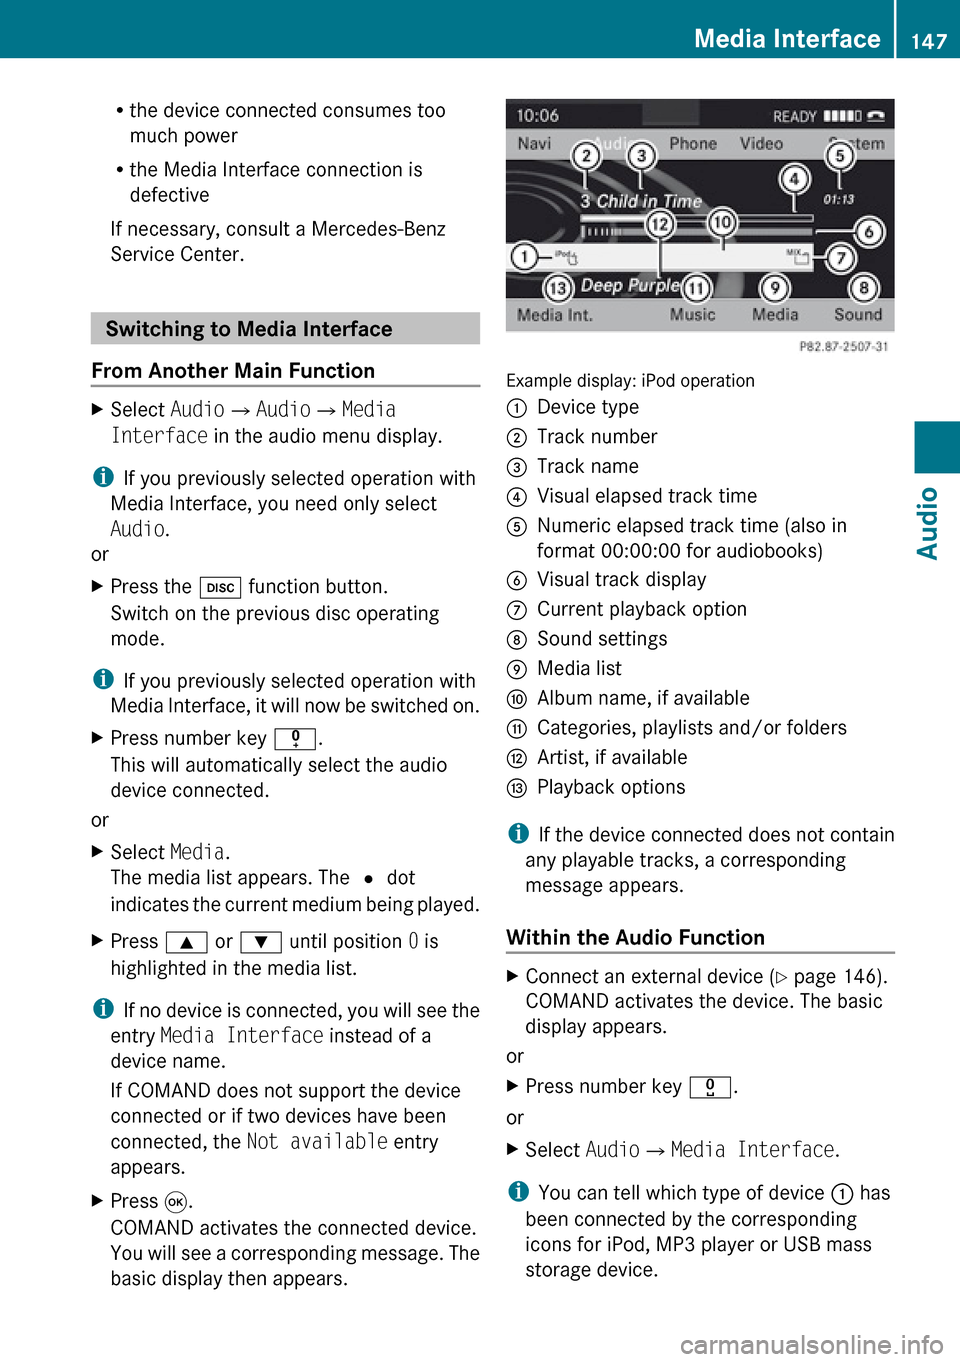
Example display: iPod operation
1Device type2Track number3Track name4Visual elapsed track time5Numeric elapsed track time (also in
format 00:00:00 for audiobooks)6Visual track display7Current playback option8Sound settings9Media listaAlbum name, if availablebCategories, playlists and/or folderscArtist, if availabledPlayback options
i If the device connected does not contain
any playable tracks, a corresponding
message appears.
Within the Audio Function
XConnect an external device ( Y page 146).
COMAND activates the device. The basic
display appears.
or
XPress number key x.
or
XSelect Audio£Media Interface .
i
You can tell which type of device 1 has
been connected by the corresponding
icons for iPod, MP3 player or USB mass
storage device.
Media Interface147AudioZ
Page 166 of 224
General Information
Vehicle Equipment
i This Operator’s Manual describes all
features, standard or optional, potentially
available for your vehicle at the time of
purchase. Please be aware that your
vehicle might not be equipped with all
features described in this manual.
Overview
This chapter describes the RSE (Rear Seat
Entertainment) system:
R Basic functions ( Y page 168)
R System settings ( Y page 169)
R CD/DVD audio and MP3 operation
R DVD Video operation ( Y page 174)
R AUX operation ( Y page 179)
Safety Instructions
GWarning
The RSE CD/DVD player is a Class 1 laser
product. There is a danger of invisible laser
radiation when you open or damage the cover.
Do not remove the cover. The RSE CD/DVD
player does not contain any parts which can
be serviced by the user. For safety reasons,
have any necessary service work performed
by qualified personnel.
GWarning
The driver should not wear a Rear Seat
Entertainment headset while operating the
vehicle under any circumstances. The use of
a headset while driving the vehicle could
drastically impair the ability to react to audible
traffic conditions (e.g. emergency sirens from
police/fire/ambulance, another car’s horn,
etc.).GWarning
When not in use, headsets or external video
sources should be stored in a safe location
(e.g. one of the vehicle’s storage
compartments) so that they are not loose
within the passenger compartment during
braking, vehicle maneuvers or a traffic
accident. Objects moving within the
passenger compartment could cause serious
personal injury to vehicle occupants.
GWarning
Due to a potential choking hazard, wired
headset usage by children should only occur
with adult supervision.
Rear Seat Entertainment
Components
The rear-seat entertainment system consists
of:
R two display screens behind the head rests
of front-seats
R a remote control
R a CD/DVD drive
R Aux connectors on the drive and display
screens for connecting external devices
R two wireless headsets
164General InformationRear Seat Entertainment