navigation MERCEDES-BENZ R-Class 2010 R171 Comand Manual
[x] Cancel search | Manufacturer: MERCEDES-BENZ, Model Year: 2010, Model line: R-Class, Model: MERCEDES-BENZ R-Class 2010 R171Pages: 224, PDF Size: 7 MB
Page 77 of 224
A numerically sorted list is available.
Selecting a Category
Depending on the number of available
categories, the main category list is displayed
either with or without predictive speller
( Y page 76).
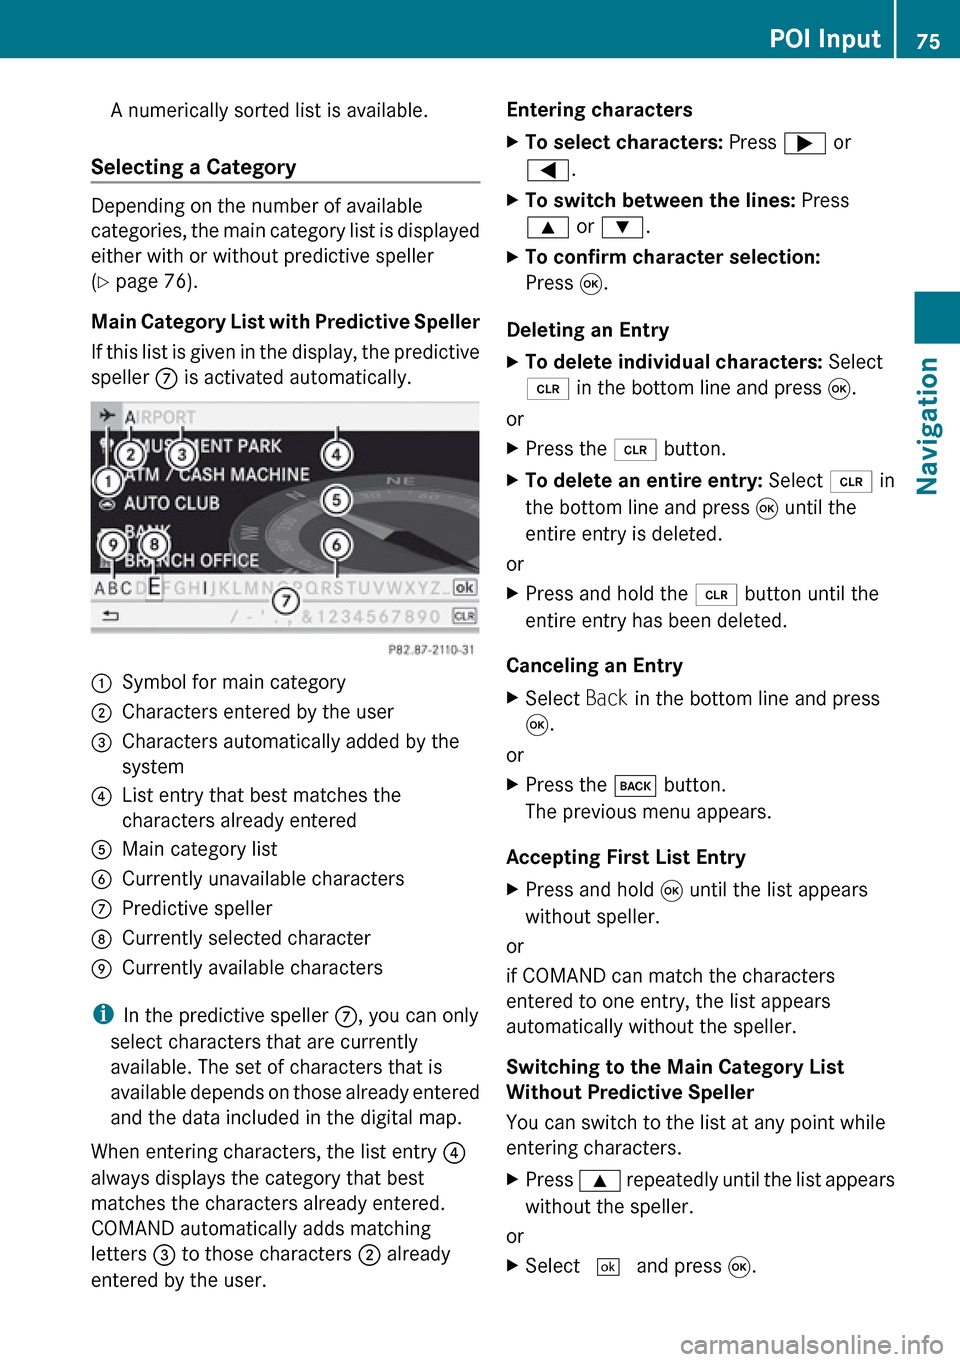
Main Category List with Predictive Speller
If this list is given in the display, the predictive
speller 7 is activated automatically.
1Symbol for main category2Characters entered by the user3Characters automatically added by the
system4List entry that best matches the
characters already entered5Main category list6Currently unavailable characters7Predictive speller8Currently selected character9Currently available characters
i In the predictive speller 7, you can only
select characters that are currently
available. The set of characters that is
available depends on those already entered
and the data included in the digital map.
When entering characters, the list entry 4
always displays the category that best
matches the characters already entered.
COMAND automatically adds matching
letters 3 to those characters 2 already
entered by the user.
Entering charactersXTo select characters: Press ; or
= .XTo switch between the lines: Press
9 or : .XTo confirm character selection:
Press 9.
Deleting an Entry
XTo delete individual characters: Select
õ in the bottom line and press 9.
or
XPress the 2 button.XTo delete an entire entry: Select õ in
the bottom line and press 9 until the
entire entry is deleted.
or
XPress and hold the 2 button until the
entire entry has been deleted.
Canceling an Entry
XSelect Back in the bottom line and press
9 .
or
XPress the k button.
The previous menu appears.
Accepting First List Entry
XPress and hold 9 until the list appears
without speller.
or
if COMAND can match the characters
entered to one entry, the list appears
automatically without the speller.
Switching to the Main Category List
Without Predictive Speller
You can switch to the list at any point while
entering characters.
XPress 9 repeatedly until the list appears
without the speller.
or
XSelect d and press 9.POI Input75NavigationZ
Page 78 of 224
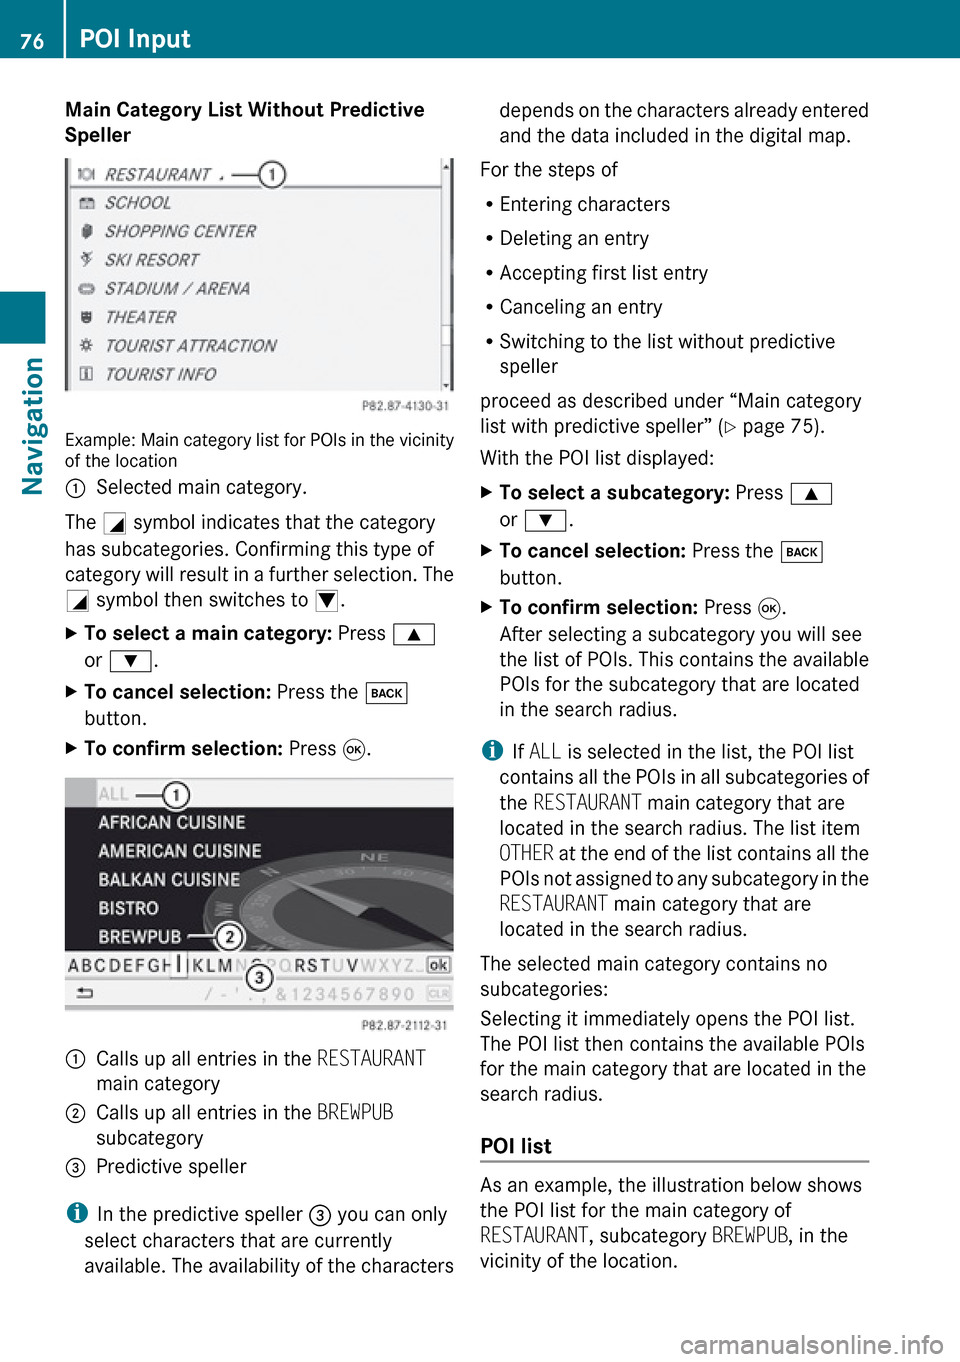
Main Category List Without Predictive
Speller
Example: Main category list for POIs in the vicinity
of the location
1Selected main category.
The G symbol indicates that the category
has subcategories. Confirming this type of
category will result in a further selection. The
G symbol then switches to I.
XTo select a main category: Press 9
or : .XTo cancel selection: Press the k
button.XTo confirm selection: Press 9.1Calls up all entries in the RESTAURANT
main category2Calls up all entries in the BREWPUB
subcategory3Predictive speller
i In the predictive speller 3 you can only
select characters that are currently
available. The availability of the characters
depends on the characters already entered
and the data included in the digital map.
For the steps of
R Entering characters
R Deleting an entry
R Accepting first list entry
R Canceling an entry
R Switching to the list without predictive
speller
proceed as described under “Main category
list with predictive speller” ( Y page 75).
With the POI list displayed:XTo select a subcategory: Press 9
or : .XTo cancel selection: Press the k
button.XTo confirm selection: Press 9.
After selecting a subcategory you will see
the list of POIs. This contains the available
POIs for the subcategory that are located
in the search radius.
i If ALL is selected in the list, the POI list
contains all the POIs in all subcategories of
the RESTAURANT main category that are
located in the search radius. The list item
OTHER at the end of the list contains all the
POIs not assigned to any subcategory in the
RESTAURANT main category that are
located in the search radius.
The selected main category contains no
subcategories:
Selecting it immediately opens the POI list.
The POI list then contains the available POIs
for the main category that are located in the
search radius.
POI list
As an example, the illustration below shows
the POI list for the main category of
RESTAURANT , subcategory BREWPUB, in the
vicinity of the location.
76POI InputNavigation
Page 79 of 224
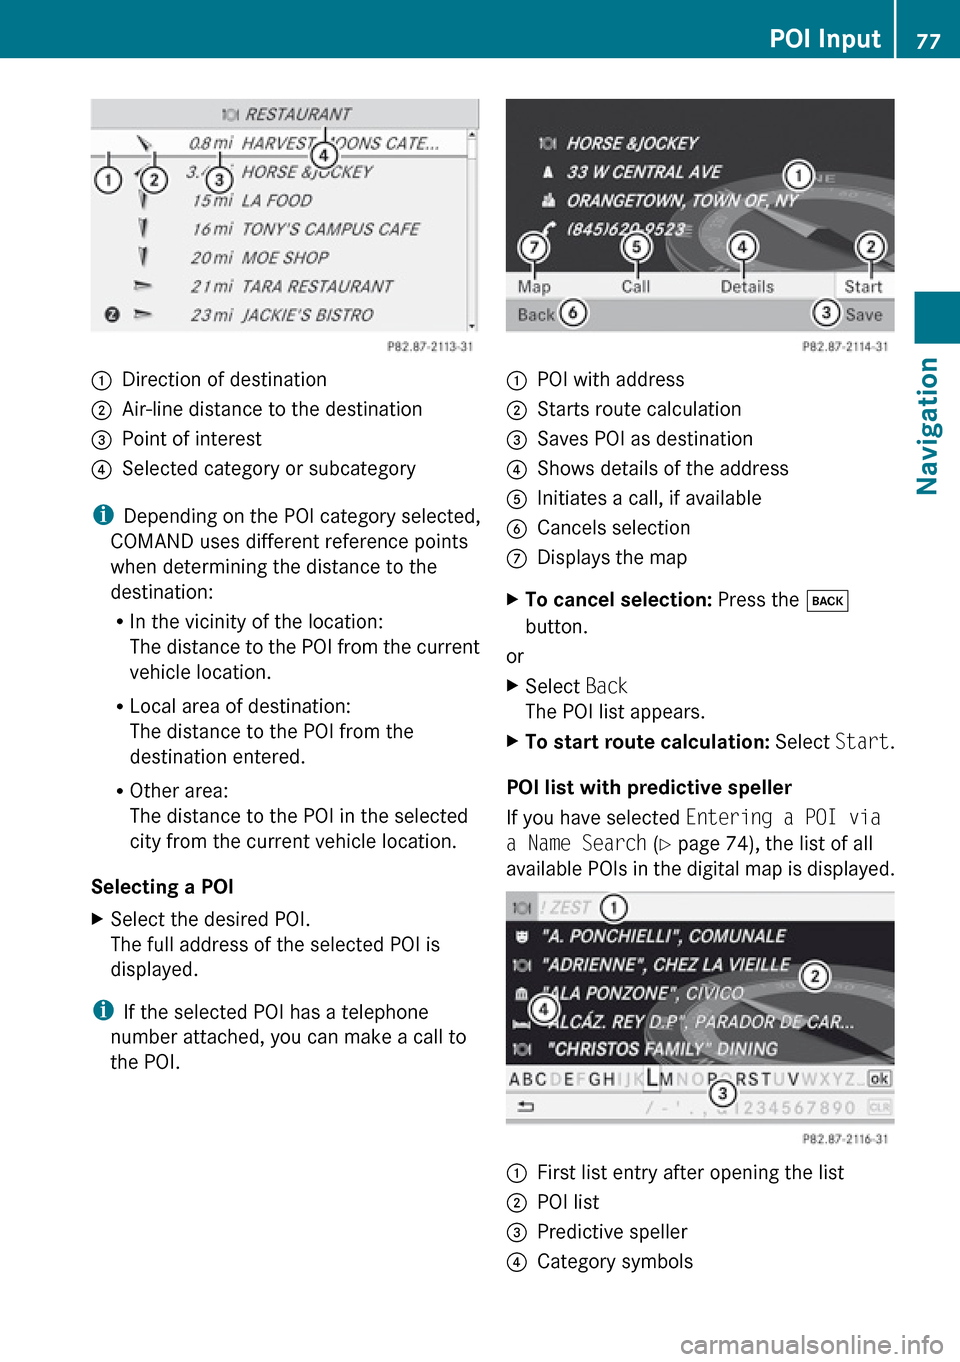
1Direction of destination2Air-line distance to the destination3Point of interest4Selected category or subcategory
iDepending on the POI category selected,
COMAND uses different reference points
when determining the distance to the
destination:
R In the vicinity of the location:
The distance to the POI from the current
vehicle location.
R Local area of destination:
The distance to the POI from the
destination entered.
R Other area:
The distance to the POI in the selected
city from the current vehicle location.
Selecting a POI
XSelect the desired POI.
The full address of the selected POI is
displayed.
i If the selected POI has a telephone
number attached, you can make a call to
the POI.
1POI with address2Starts route calculation3Saves POI as destination4Shows details of the address5Initiates a call, if available6Cancels selection7Displays the mapXTo cancel selection: Press the k
button.
or
XSelect Back
The POI list appears.XTo start route calculation: Select Start.
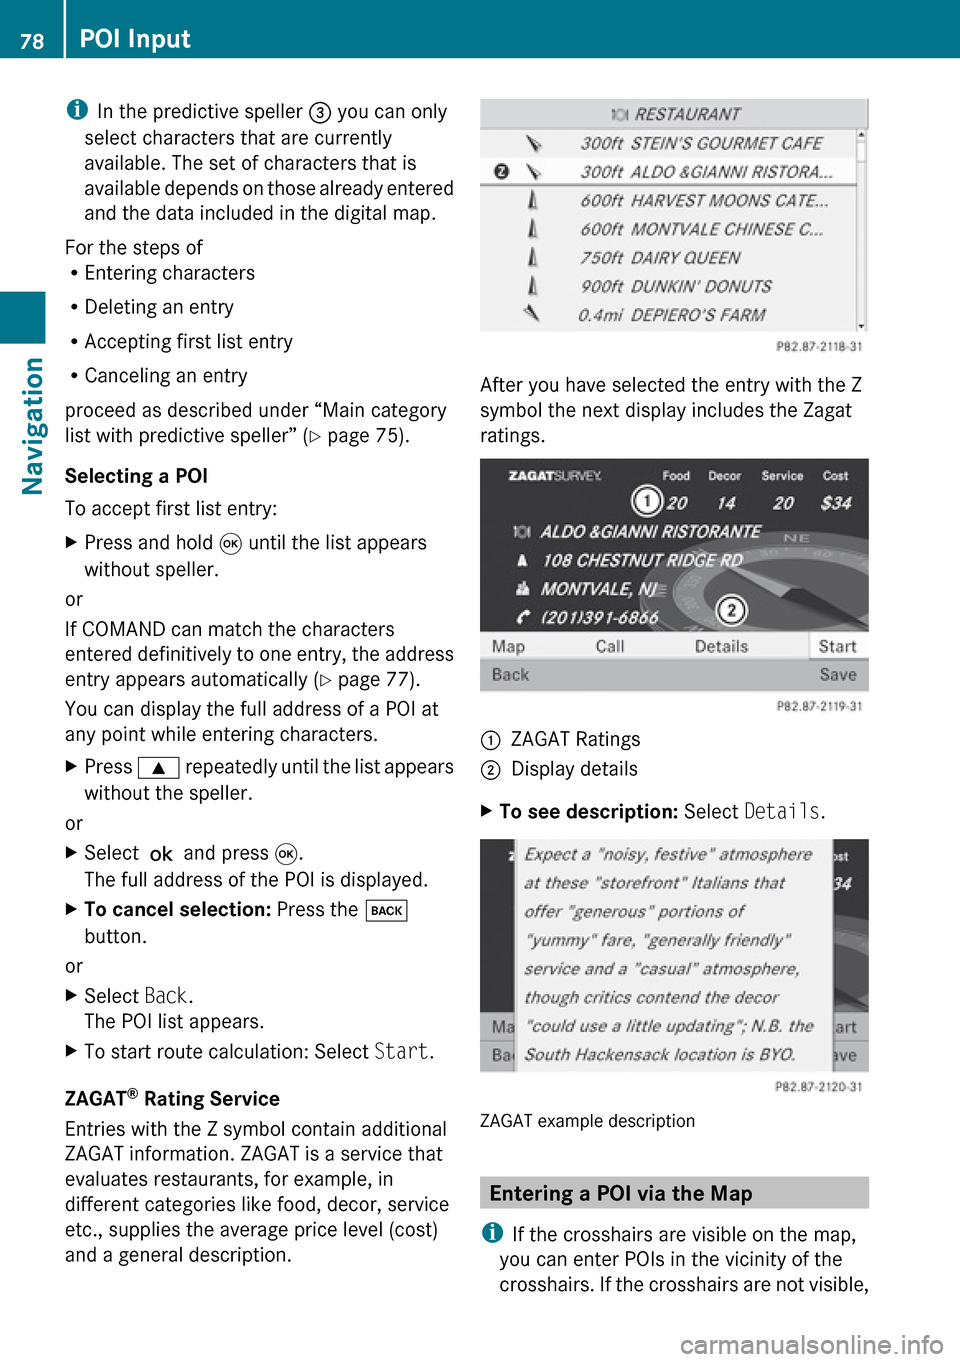
POI list with predictive speller
If you have selected Entering a POI via
a Name Search (Y page 74), the list of all
available POIs in the digital map is displayed.
1First list entry after opening the list2POI list3Predictive speller4Category symbolsPOI Input77NavigationZ
Page 80 of 224
iIn the predictive speller 3 you can only
select characters that are currently
available. The set of characters that is
available depends on those already entered
and the data included in the digital map.
For the steps of
R Entering characters
R Deleting an entry
R Accepting first list entry
R Canceling an entry
proceed as described under “Main category
list with predictive speller” ( Y page 75).
Selecting a POI
To accept first list entry:XPress and hold 9 until the list appears
without speller.
or
If COMAND can match the characters
entered definitively to one entry, the address
entry appears automatically ( Y page 77).
You can display the full address of a POI at
any point while entering characters.
XPress 9 repeatedly until the list appears
without the speller.
or
XSelect ? and press 9.
The full address of the POI is displayed.XTo cancel selection: Press the k
button.
or
XSelect Back.
The POI list appears.XTo start route calculation: Select Start.
ZAGAT ®
Rating Service
Entries with the Z symbol contain additional
ZAGAT information. ZAGAT is a service that
evaluates restaurants, for example, in
different categories like food, decor, service
etc., supplies the average price level (cost)
and a general description.
After you have selected the entry with the Z
symbol the next display includes the Zagat
ratings.
1ZAGAT Ratings2Display detailsXTo see description: Select Details .
ZAGAT example description
Entering a POI via the Map
i If the crosshairs are visible on the map,
you can enter POIs in the vicinity of the
crosshairs. If the crosshairs are not visible,
78POI InputNavigation
Page 81 of 224
you can enter POIs in the vicinity of the
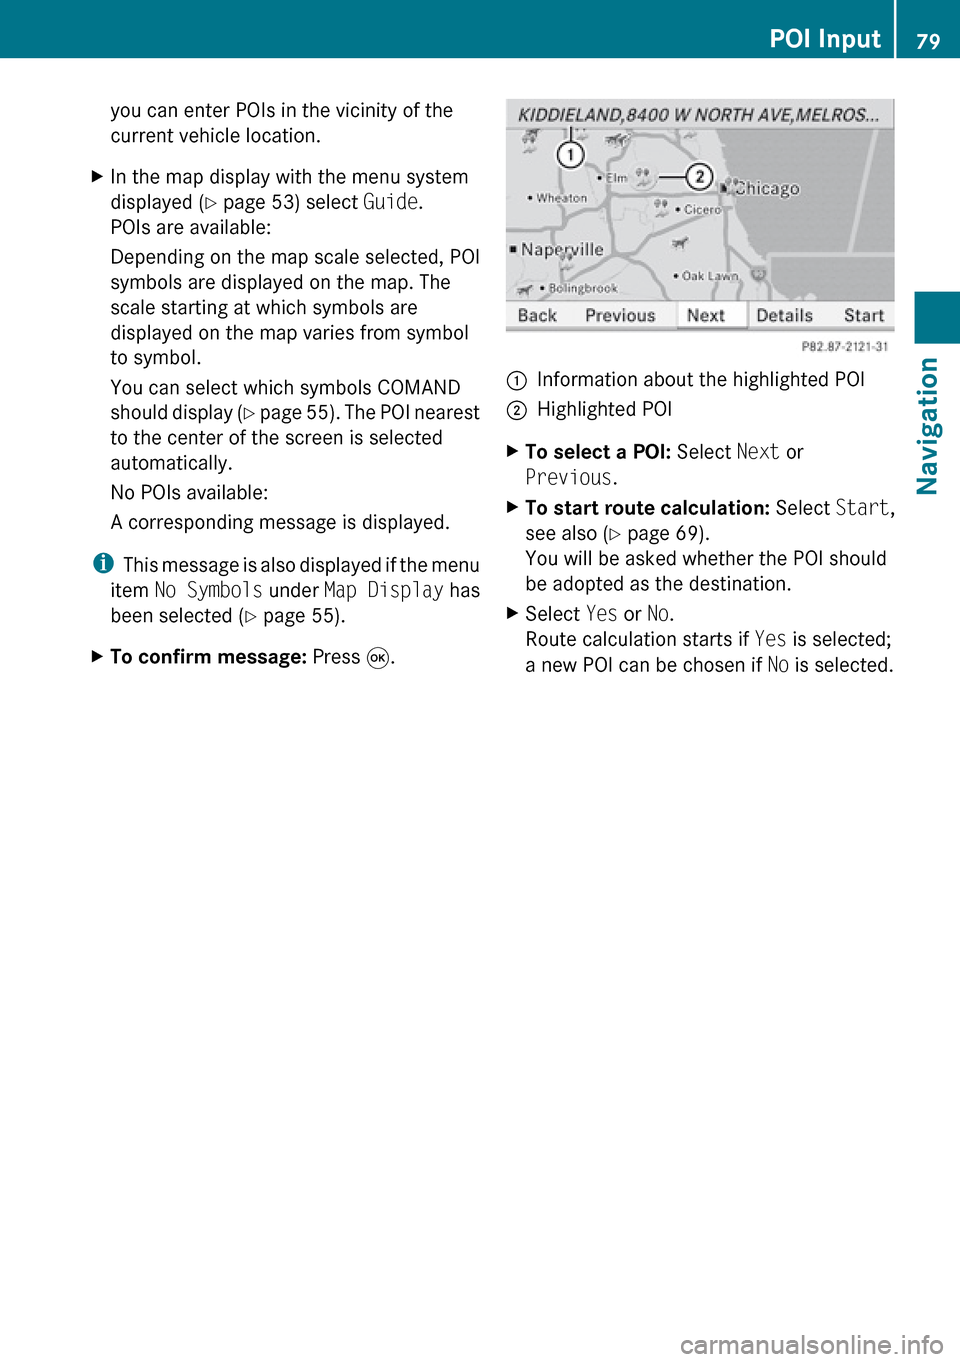
current vehicle location.XIn the map display with the menu system
displayed ( Y page 53) select Guide.
POIs are available:
Depending on the map scale selected, POI
symbols are displayed on the map. The
scale starting at which symbols are
displayed on the map varies from symbol
to symbol.
You can select which symbols COMAND
should display (Y page 55). The POI nearest
to the center of the screen is selected
automatically.
No POIs available:
A corresponding message is displayed.
i This message is also displayed if the menu
item No Symbols under Map Display has
been selected ( Y page 55).
XTo confirm message: Press 9.1Information about the highlighted POI2Highlighted POIXTo select a POI: Select Next or
Previous .XTo start route calculation: Select Start,
see also ( Y page 69).
You will be asked whether the POI should
be adopted as the destination.XSelect Yes or No.
Route calculation starts if Yes is selected;
a new POI can be chosen if No is selected.POI Input79NavigationZ
Page 82 of 224
Route Guidance
General Notes
GWarning
COMAND calculates the route to the
destination without taking into account the
following, for example:
R Traffic lights
R Stop and right-of-way signs
R Lane merging
R Parking or stopping prohibited areas
R Other road and traffic rules and regulations
R Narrow bridges
COMAND may give incorrect navigation
commands if the data in the digital map does
not correspond with the actual road/ traffic
situation. For example, if the traffic routing
has been changed or the direction of a one-
way road has been reversed.
For this reason, you must always observe
applicable road and traffic rules and
regulations during your journey. Road and
traffic rules and regulations always have
priority over the navigation commands
generated by the system.
COMAND guides you to the destination by
means of driving recommendations in the
form of navigation announcements or route
guidance displays.
i The route guidance displays only appear
if the display has been switched to
navigation mode.
If, for some reason, you do not follow the
navigation announcements or if you leave the
calculated route, COMAND automatically
calculates a new route to the destination.
If the map data contains corresponding
information during route guidance, COMAND
tries to avoid roads with limited passability,
e.g. roads that are blocked for through-traffic
and are for residents only.
Driving Maneuver
Driving maneuvers are given in three phases:
R Preparation phase
R Announcement phase
R Maneuver phase
Preparation Phase
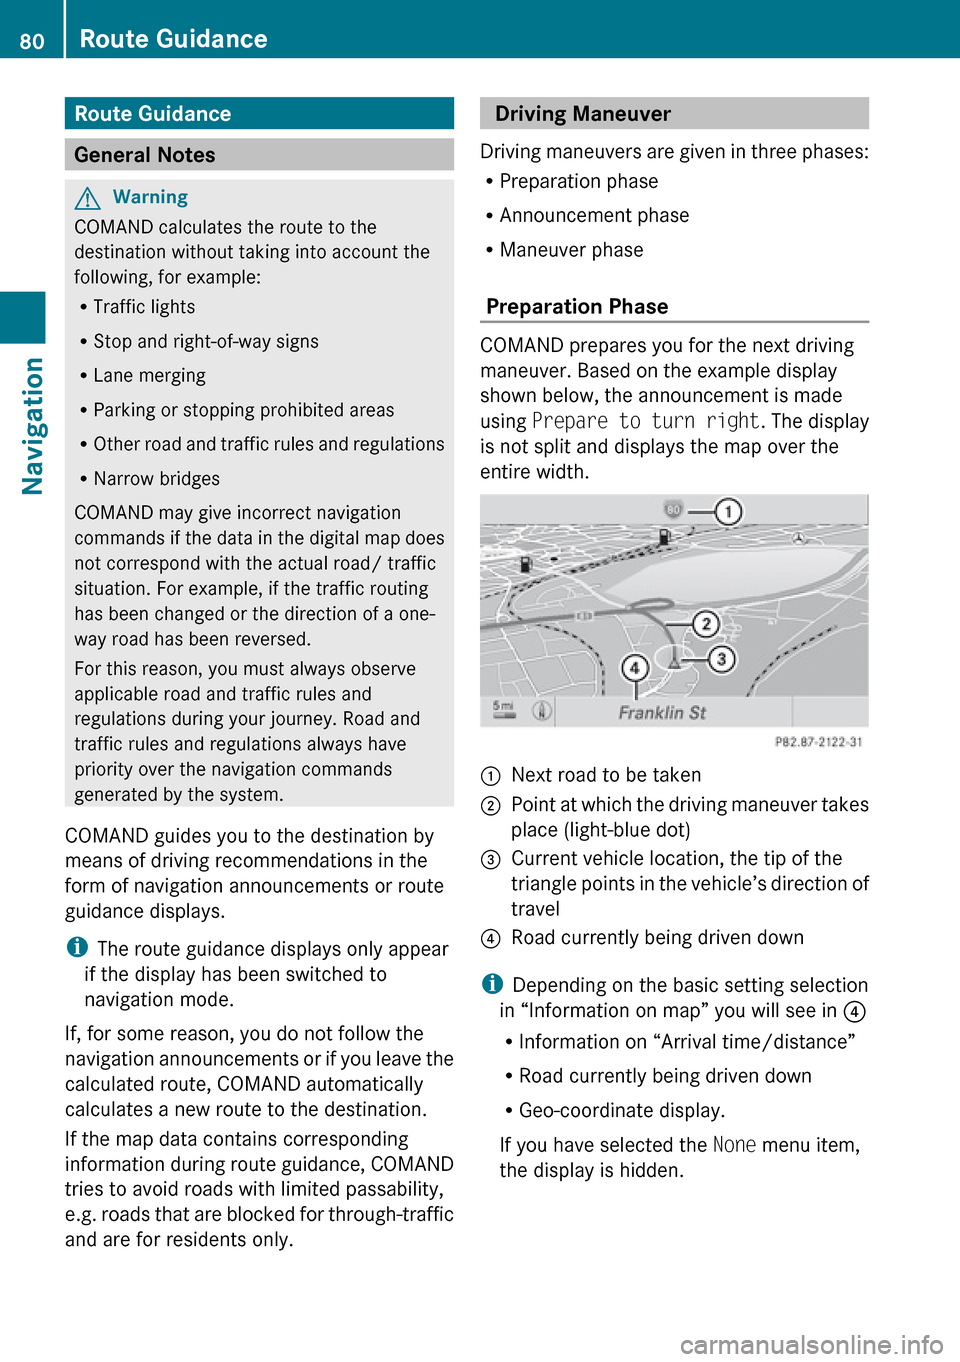
COMAND prepares you for the next driving
maneuver. Based on the example display
shown below, the announcement is made
using Prepare to turn right . The display
is not split and displays the map over the
entire width.
1Next road to be taken2Point at which the driving maneuver takes
place (light-blue dot)3Current vehicle location, the tip of the
triangle points in the vehicle’s direction of
travel4Road currently being driven down
i Depending on the basic setting selection
in “Information on map” you will see in 4
R Information on “Arrival time/distance”
R Road currently being driven down
R Geo-coordinate display.
If you have selected the None menu item,
the display is hidden.
80Route GuidanceNavigation
Page 83 of 224
Announcement Phase
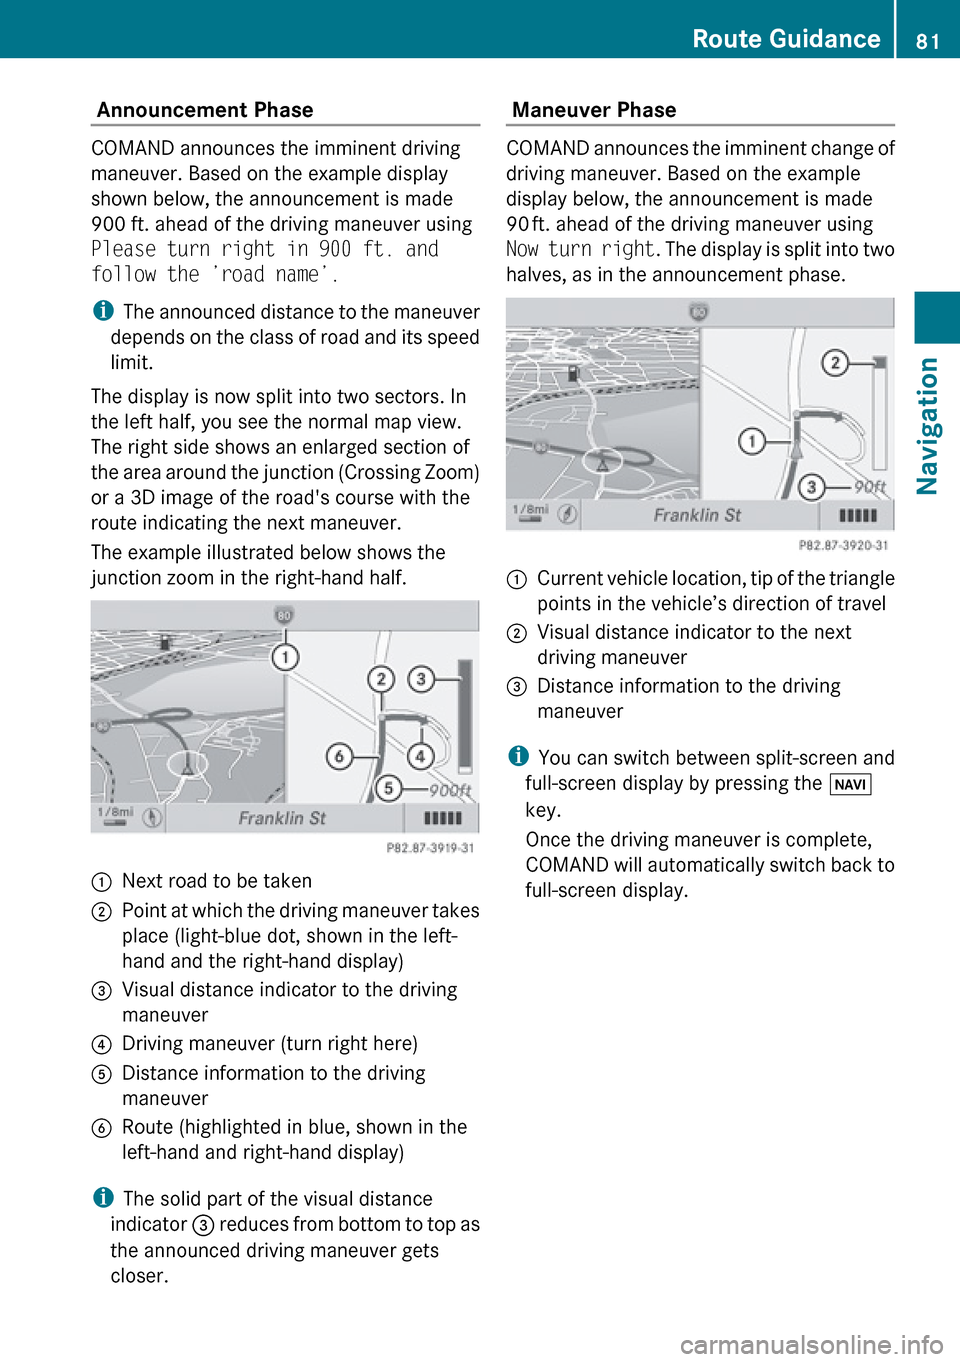
COMAND announces the imminent driving
maneuver. Based on the example display
shown below, the announcement is made
900 ft. ahead of the driving maneuver using
Please turn right in 900 ft. and
follow the ’road name’.
i The announced distance to the maneuver
depends on the class of road and its speed
limit.
The display is now split into two sectors. In
the left half, you see the normal map view.
The right side shows an enlarged section of
the area around the junction (Crossing Zoom)
or a 3D image of the road's course with the
route indicating the next maneuver.
The example illustrated below shows the
junction zoom in the right-hand half.
1Next road to be taken2Point at which the driving maneuver takes
place (light-blue dot, shown in the left-
hand and the right-hand display)3Visual distance indicator to the driving
maneuver4Driving maneuver (turn right here)5Distance information to the driving
maneuver6Route (highlighted in blue, shown in the
left-hand and right-hand display)
i The solid part of the visual distance
indicator 3 reduces from bottom to top as
the announced driving maneuver gets
closer.
Maneuver Phase
COMAND announces the imminent change of
driving maneuver. Based on the example
display below, the announcement is made
90 ft. ahead of the driving maneuver using
Now turn right . The display is split into two
halves, as in the announcement phase.
1Current vehicle location, tip of the triangle
points in the vehicle’s direction of travel2Visual distance indicator to the next
driving maneuver3Distance information to the driving
maneuver
i You can switch between split-screen and
full-screen display by pressing the Ø
key.
Once the driving maneuver is complete,
COMAND will automatically switch back to
full-screen display.
Route Guidance81NavigationZ
Page 84 of 224
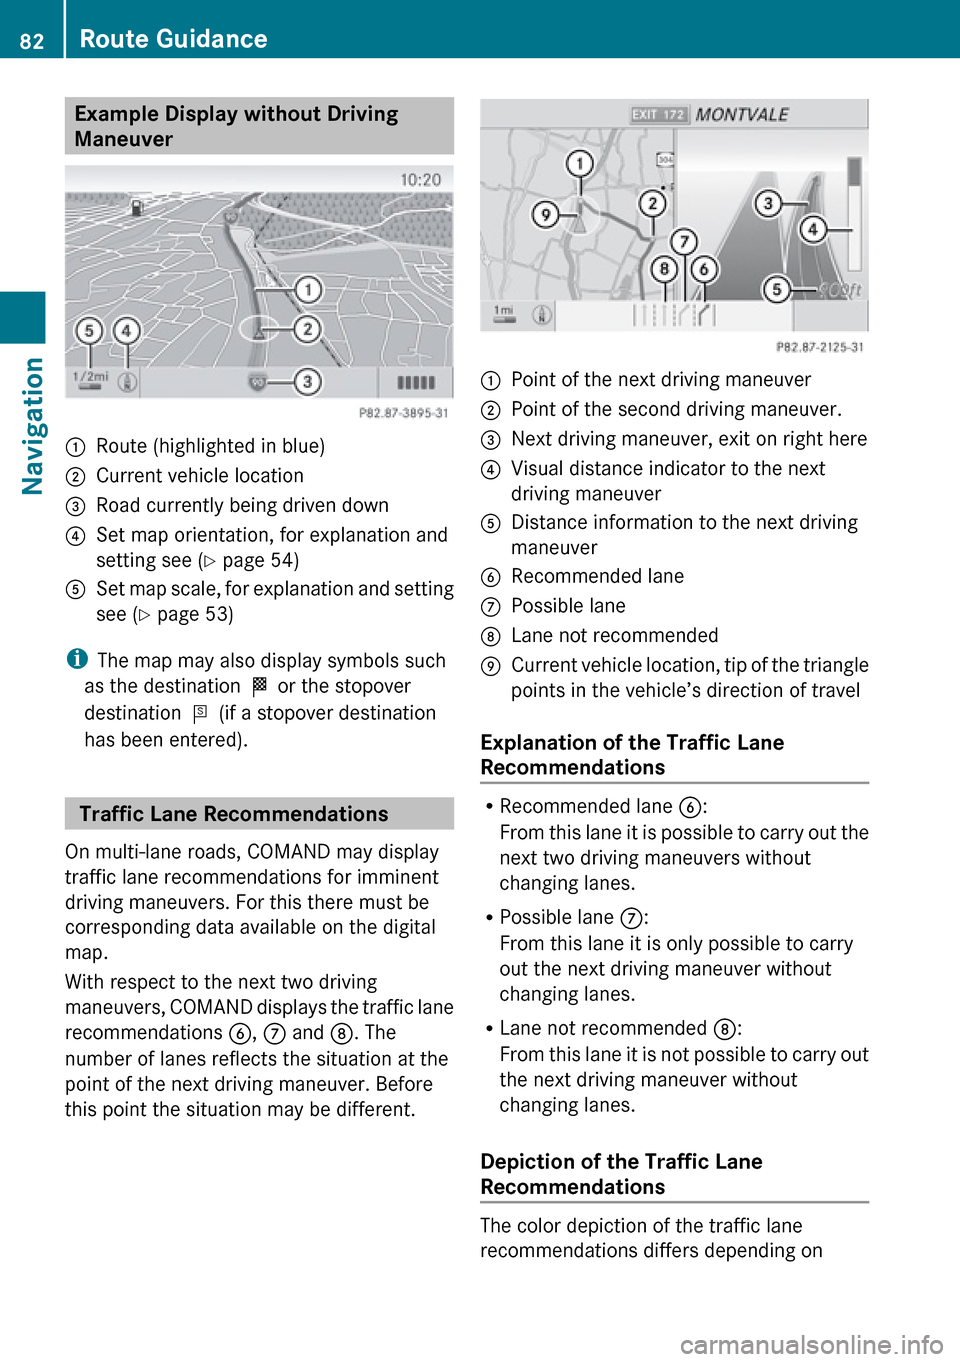
Example Display without Driving
Maneuver1Route (highlighted in blue)2Current vehicle location3Road currently being driven down4Set map orientation, for explanation and
setting see ( Y page 54)5Set map scale, for explanation and setting
see ( Y page 53)
i
The map may also display symbols such
as the destination < or the stopover
destination = (if a stopover destination
has been entered).
Traffic Lane Recommendations
On multi-lane roads, COMAND may display
traffic lane recommendations for imminent
driving maneuvers. For this there must be
corresponding data available on the digital
map.
With respect to the next two driving
maneuvers, COMAND displays the traffic lane
recommendations 6, 7 and 8. The
number of lanes reflects the situation at the
point of the next driving maneuver. Before
this point the situation may be different.
1Point of the next driving maneuver2Point of the second driving maneuver.3Next driving maneuver, exit on right here4Visual distance indicator to the next
driving maneuver5Distance information to the next driving
maneuver6Recommended lane7Possible lane8Lane not recommended9Current vehicle location, tip of the triangle
points in the vehicle’s direction of travel
Explanation of the Traffic Lane
Recommendations
R Recommended lane 6:
From this lane it is possible to carry out the
next two driving maneuvers without
changing lanes.
R Possible lane 7:
From this lane it is only possible to carry
out the next driving maneuver without
changing lanes.
R Lane not recommended 8:
From this lane it is not possible to carry out
the next driving maneuver without
changing lanes.
Depiction of the Traffic Lane
Recommendations
The color depiction of the traffic lane
recommendations differs depending on
82Route GuidanceNavigation
Page 85 of 224
whether the display is set to day or night
design.LaneDay
designNight
designRecommended lane
6Dark
blueLight
bluePossible lane
7Light
blueDark
blueLane not
recommended
8GreyGrey
Destination or Destination Region
Reached
Once you have reached your destination, a
checkered flag is displayed and route
guidance is ended automatically.
For certain special destinations (airports or
highway intersections), you will hear the
Area of dest. reached message in
addition to the checkered flag.
Off-road and Off-map
GWarning
The COMAND navigation system may direct
you to off-road routes that your vehicle may
not be capable of traversing through without
damaging your tires, wheels or vehicle. It is
the driver’s sole responsibility to determine
the suitability of the route. Off-road routes
may be of varying conditions and their
appropriateness for use may be affected by
various factors such as time of day, time of
year and immediate weather conditions that
cannot be judged or taken into consideration
by the COMAND system.
Route Guidance to an Off-road
Destination
COMAND can also guide you to destinations
that are within the area covered by the digital
map, but are not themselves included on the
map. Such destinations are off-road
destinations, which you can enter, for
example, by entering the destination via the
map.
In this case, COMAND guides you on roads
known to the system for as long as possible
using navigation announcements and route
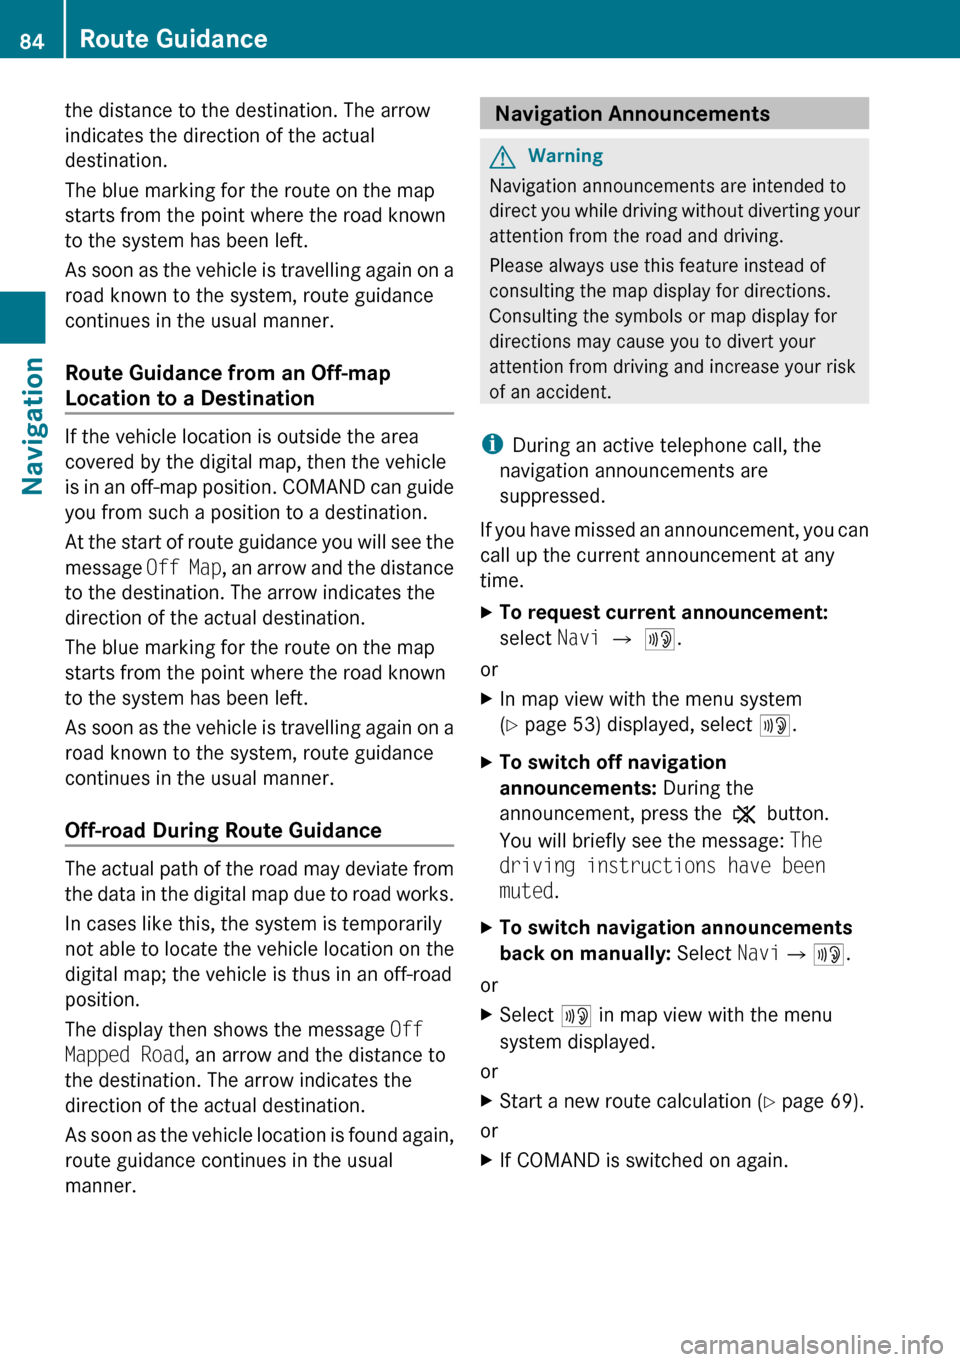
guidance displays.1Off-road destination2Off-road route segment (dashed line)3Current vehicle location, tip of the triangle
points in the vehicle’s direction of travel4Off-road, no road name available
When the vehicle is entering the area that is
not covered by the digital map, the screen is
split. On the right half of the screen an arrow
appears that points to the off-road
destination 1 and the system announces:
Please follow the arrow on the
display . When the vehicle comes close to
the destination the message You reached
the destination area is given.
Route Guidance from an Off-road
Location to a Destination
If the vehicle location is within the area
covered by the digital map, but the map itself
does not contain any information on the
location, the vehicle is in an off-road position.
COMAND can guide you from such a position
to a destination.
At the start of route guidance you will see the
message Off Mapped Road , an arrow and
Route Guidance83NavigationZ
Page 86 of 224
the distance to the destination. The arrow
indicates the direction of the actual
destination.
The blue marking for the route on the map
starts from the point where the road known
to the system has been left.
As soon as the vehicle is travelling again on a
road known to the system, route guidance
continues in the usual manner.
Route Guidance from an Off-map
Location to a Destination
If the vehicle location is outside the area
covered by the digital map, then the vehicle
is in an off-map position. COMAND can guide
you from such a position to a destination.
At the start of route guidance you will see the
message Off Map, an arrow and the distance
to the destination. The arrow indicates the
direction of the actual destination.
The blue marking for the route on the map
starts from the point where the road known
to the system has been left.
As soon as the vehicle is travelling again on a
road known to the system, route guidance
continues in the usual manner.
Off-road During Route Guidance
The actual path of the road may deviate from
the data in the digital map due to road works.
In cases like this, the system is temporarily
not able to locate the vehicle location on the
digital map; the vehicle is thus in an off-road
position.
The display then shows the message Off
Mapped Road , an arrow and the distance to
the destination. The arrow indicates the
direction of the actual destination.
As soon as the vehicle location is found again,
route guidance continues in the usual
manner.
Navigation Announcements GWarning
Navigation announcements are intended to
direct you while driving without diverting your
attention from the road and driving.
Please always use this feature instead of
consulting the map display for directions.
Consulting the symbols or map display for
directions may cause you to divert your
attention from driving and increase your risk
of an accident.
i During an active telephone call, the
navigation announcements are
suppressed.
If you have missed an announcement, you can
call up the current announcement at any
time.
XTo request current announcement:
select Navi £ 6 .
or
XIn map view with the menu system
( Y page 53) displayed, select 6.XTo switch off navigation
announcements: During the
announcement, press the , button.
You will briefly see the message: The
driving instructions have been
muted .XTo switch navigation announcements
back on manually: Select Navi£6 .
or
XSelect 6 in map view with the menu
system displayed.
or
XStart a new route calculation ( Y page 69).
or
XIf COMAND is switched on again.84Route GuidanceNavigation