change time MERCEDES-BENZ R-Class 2010 R171 Comand Manual
[x] Cancel search | Manufacturer: MERCEDES-BENZ, Model Year: 2010, Model line: R-Class, Model: MERCEDES-BENZ R-Class 2010 R171Pages: 224, PDF Size: 7 MB
Page 15 of 224
Telephone calls
emergency ............................. 100, 216
lists of ............................................ 104
making ........................................... 107
see Calling
Tel menu ............................................... 26
Terminating phone calls ................... 109
Time of arrival, displaying .................. 58
Time settings ....................................... 39
Time zone, setting ............................... 39
Town, selecting as destination ........ 192
Track names ...................................... 131
Track selection (audio)
CD, DVD, or MP3 ........................... 139
copying into Music Register ........... 143
iPods and MP3 players ..........148, 150
normal and random options ...........141
rear seat entertainment system .....172
steering wheel operation .................26
voice commands for ......................205
Track selection (video) ..... 158, 159, 176
voice commands for ......................205
Traffic lane recommendations ........... 82
Traffic messages ................................. 87
automatic reading on/off ................61
Training for voice control ................... 41
Transmit volume (phone) ................... 99
Treble setting
main system .................................... 32
rear seat entertainment system .....169
Troubleshooting
voice control .................................. 212
U
UCI connection .................................. 145
Units of measurement, navigation .... 51
Updating Gracenote ®
Media
Database ............................................ 141
Updating map software ...................... 48
USB devices
connecting to ................................. 146
playback options ............................ 150
playlists and folders .......................148
selecting active partition ...............150
selecting tracks .....................148, 150
V
Vehicle location (current)
compass display .............................. 61
displaying ......................................... 58
GPS reception .................................. 51
moving map to ................................. 54
saving in Last Destinations ........53, 94
Video .................................................. 154
control menu, displaying/hiding ....156
handling and care of discs .............154
interactive content ........................160
operating DVD menu .............158, 177
picture settings .............................. 158
rear seat entertainment system .....174
voice control with .......................... 211
Video Aux (auxiliary)
boost function ............................... 161
main system .................................. 161
rear seat entertainment system .....166
Voice control ..................................... 184
canceling the dialog .......................186
command list ................................. 205
creating voice tags ........................198
general operation .......................... 184
help function .................................. 214
interrupting the dialog ...................186
language settings ............................. 40
operating safety ............................. 184
settings ............................................ 41
starting the dialog ..........................186
switching help screen on or off ........41
training for voice recognition ...........41
troubleshooting ............................. 212
with address book .........114, 197, 212
with DVD changer ..........................204
with external equipment (Aux) .......205
with navigation .............................. 189
with phone ..................................... 187
with radio and satellite
radio ...................................... 201, 214
Voice mail, voice control for ............ 189
Voice tags, creating .......................... 198
Volume (loudness)
COMAND ......................................... 32
external audio sources ..........151, 161
mobile phones ................................. 99
muting COMAND ............................. 32Index13
Page 28 of 224
Operating DVD Changer, Music Register,
Memory Card, Media Interface
Selecting a track or sceneXFrom COMAND select a source from the
Audio menu.XPress button V or U repeatedly until
the audio source currently being played
appears in the multifunction display.XSelecting previous or next track: Press
button * or & briefly.X Selecting a track from the track list
(quick search): Press and hold * or
& .
i
Track selection may depend on selected
settings in COMAND or the connected
device.
NAVI Menu
The NAV menu contains the functions needed
to operate your navigation system.
XPress button V or U repeatedly until
you see the message NAV in the
multifunction display.
The message shown in the multifunction
display depends on the status of the
navigation system:
R with COMAND switched off, the message
NAV OFF appears in the multifunction
display.
R with COMAND switched on but route
guidance not activated, the direction of
travel and, if applicable, the name of the
street currently traveled on appear in the
multifunction display.
R with COMAND switched on and route
guidance activated, maneuver instructions
appear in the multifunction display.
Tel Menu
GWarning
A driver's attention to the road must always
be his/her primary focus when driving. For
your safety and the safety of others, we
recommend that you pull over to a safe
location and stop before placing or taking a
telephone call. If you choose to use the mobile
phone while driving, please use the handsfree
device and only use the mobile phone when
weather, road, and traffic conditions permit.
Some jurisdictions prohibit the driver from
using a cellular mobile phone while driving a
vehicle.
Bear in mind that at a speed of just 30 mph
(approximately 50 km/h), your vehicle is
covering a distance of 44 feet (approximately
14 m) every second.
You can use the functions in the Tel menu to
operate your mobile phone, provided it is
connected to a handsfree system and
switched on.XSwitch on the mobile phone and COMAND
( Y page 31).XPress button V or U on the steering
wheel repeatedly until the TEL menu
appears in the multifunction display.
Which message appears in the multifunction
display depends on your mobile phone's
authorization and on/off status:
R If the mobile phone has not yet been
authorized, the message in the
multifunction display is: BLUETOOTH
READY .
R If the mobile phone is switched on and
authorized, the message in the
multifunction display is: READY.
Answering a Call
When your mobile phone is ready to receive
calls, you can answer a call at any time. In the
multifunction display you will see a
corresponding message or, if available, the
caller ID (name and number):
XPress button 6.
You have answered the call.26Multifunction Steering WheelAt a Glance
Page 41 of 224
Switching the Display On/OffXTo switch the display off: Select System
£ Display Off .
The display is switched off.XTo switch on the display: Press the 9
button, the k button or one of the
= , ; , : or 9 buttons.
or
XPress the q button.
The system menu appears.
i You can also press one of the function
buttons, e.g. the h button. This turns on
the display and switches to the
corresponding function.
Time
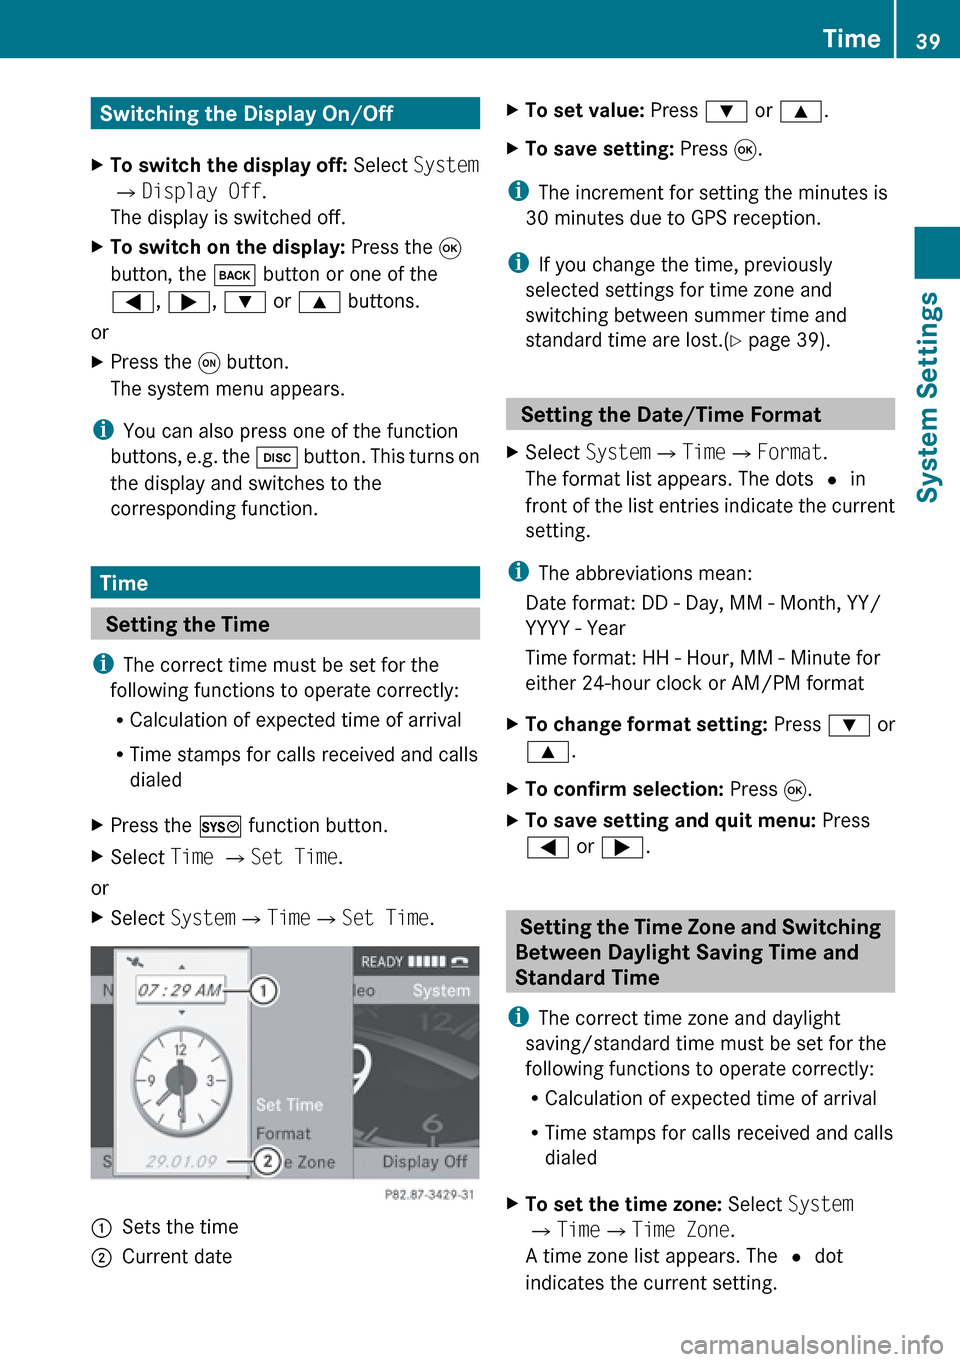
Setting the Time
i The correct time must be set for the
following functions to operate correctly:
R Calculation of expected time of arrival
R Time stamps for calls received and calls
dialed
XPress the W function button.XSelect Time £ Set Time .
or
XSelect System £Time £Set Time .1Sets the time2Current dateXTo set value: Press : or 9 .XTo save setting: Press 9.
i
The increment for setting the minutes is
30 minutes due to GPS reception.
i If you change the time, previously
selected settings for time zone and
switching between summer time and
standard time are lost.( Y page 39).
Setting the Date/Time Format
XSelect System £Time £Format .
The format list appears. The dots R in
front of the list entries indicate the current
setting.
i The abbreviations mean:
Date format: DD - Day, MM - Month, YY/
YYYY - Year
Time format: HH - Hour, MM - Minute for
either 24-hour clock or AM/PM format
XTo change format setting: Press : or
9 .XTo confirm selection: Press 9.XTo save setting and quit menu: Press
= or ; .
Setting the Time Zone and Switching
Between Daylight Saving Time and
Standard Time
i The correct time zone and daylight
saving/standard time must be set for the
following functions to operate correctly:
R Calculation of expected time of arrival
R Time stamps for calls received and calls
dialed
XTo set the time zone: Select System
£ Time £Time Zone .
A time zone list appears. The R dot
indicates the current setting.Time39System SettingsZ
Page 42 of 224
XPress : or 9 to select the
appropriate time zone.XTo switch between Daylight Saving and
Standard Time: Select Daylight
Saving Time (Summer) or Standard
Time (Winter).
The R dot indicates the current setting.XTo save setting and exit menu:
Press = or ; .
Language Setting
This function allows you to determine the
language for the menu displays and the
navigation messages. The language selection
affects the input options in the editing and
smart speller.
XSelect System £Settings £Language .
The language list appears. The R dot
indicates the current setting.XTo change setting: Press : or 9 to
select the desired language.XTo confirm the language selection:
Press 9.
COMAND loads the selected language and
sets it.
Display Settings
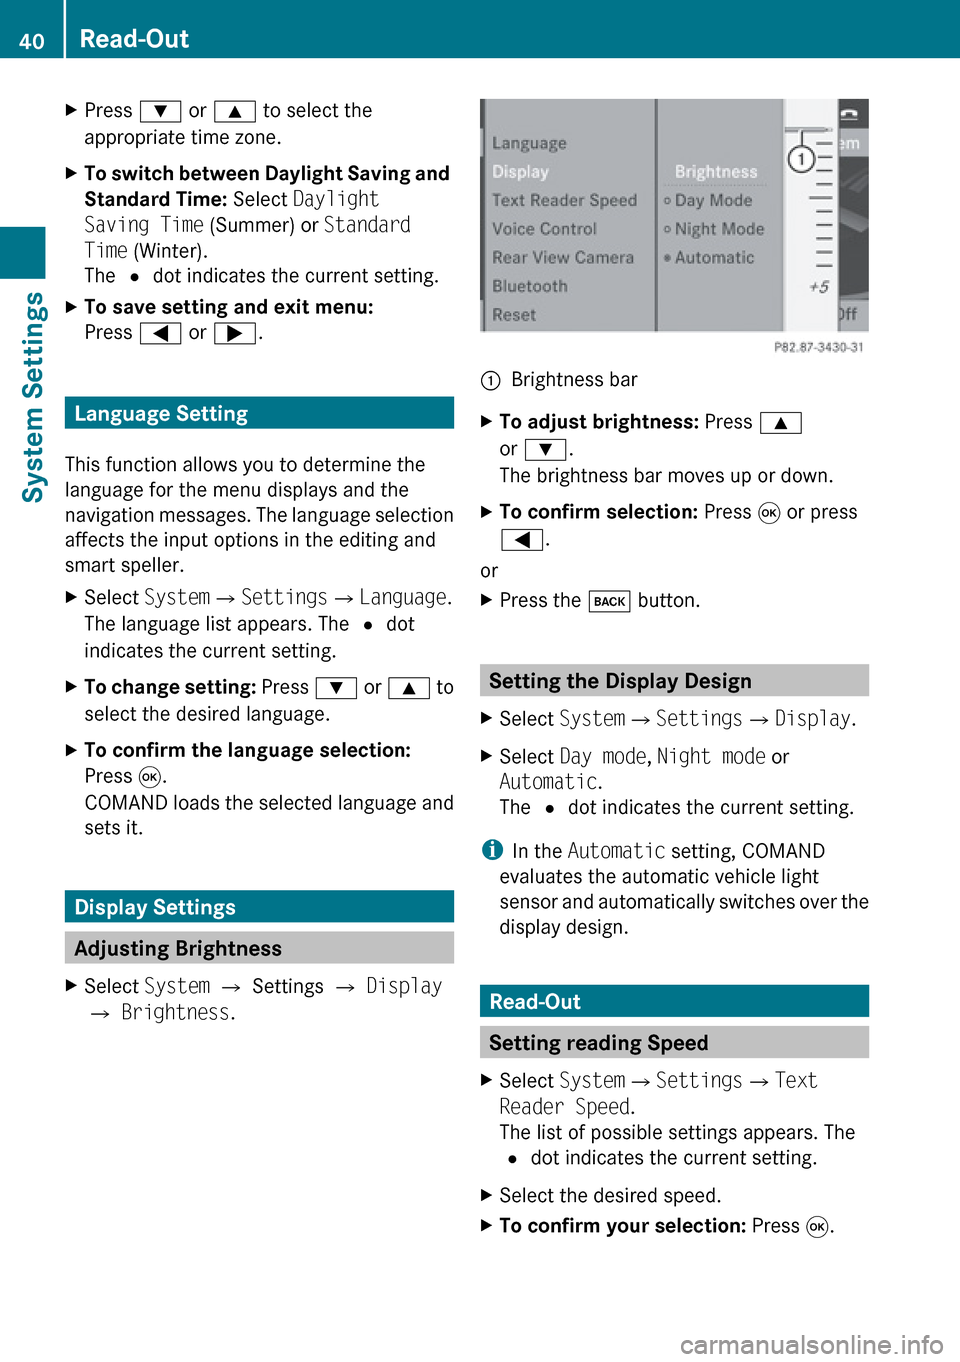
Adjusting Brightness
XSelect System £ Settings £ Display
£ Brightness .1Brightness barXTo adjust brightness: Press 9
or : .
The brightness bar moves up or down.XTo confirm selection: Press 9 or press
= .
or
XPress the k button.
Setting the Display Design
XSelect System £Settings £Display .XSelect Day mode , Night mode or
Automatic .
The R dot indicates the current setting.
i
In the Automatic setting, COMAND
evaluates the automatic vehicle light
sensor and automatically switches over the
display design.
Read-Out
Setting reading Speed
XSelect System £Settings £Text
Reader Speed .
The list of possible settings appears. The
R dot indicates the current setting.XSelect the desired speed.XTo confirm your selection: Press 9.40Read-OutSystem Settings
Page 45 of 224
Switching Bluetooth®
On or Off XSelect System £Settings
£ Bluetooth £Activate Bluetooth .
Bluetooth is switched on Ç or off c.
Connecting Bluetooth Devices
i To connect a Bluetooth device, the
Bluetooth function must be switched on in
COMAND and on the particular device. The
Bluetooth device must also be “visible” to
COMAND in order for COMAND to find and
display it. For the setting procedures,
please see the operating instructions for
the Bluetooth device.
It is possible to establish a Bluetooth
connection between COMAND and the
following types of device:
R Mobile phone
i Bluetooth-enabled mobile phones must
correspond to particular profiles to be
connected to COMAND.
Further information on suitable mobile
phones and connecting Bluetooth-enabled
mobile phones to COMAND is available via
the Internet at www.mbusa-mobile.com . Or
call the Mercedes-Benz Customer
Assistance Center at 1-800-FOR-
MERCedes (1-800-367-6372) (US), or
Customer Relations at 1-800-387-0100
(Canada).
The volume of telephone conversations can
change after the phone has been
connected.
R Portable personal computer
You can connect up to ten devices to
COMAND.
The connection process includes searching
for the device and its subsequent
authorization.
Opening the Bluetooth Device List
and Searching for a Device
i You must first switch on Bluetooth to be
able to call up the list of Bluetooth devices
( Y page 43).XTo open the list: Select System
£ Settings £Bluetooth £
Bluetooth Device List .XTo start the search: Select Update .
COMAND starts the search for devices
within reception range. The device list
appears after a short time.
i If you open the device list again, it may
not display all devices as you may have
removed one from the car for a while, for
example. In this case, start a new search to
update the device list.
XTo cancel search: Select Cancel.
The device list can contain the following
devices:
R All (available) devices found, regardless of
whether they have been authorized or not.
R All authorized devices, regardless of
whether they have been found (are
available) or not.
The device list may show the following icons
immediately after manual updating:
Bluetooth43System SettingsZ
Page 50 of 224
Introduction
Vehicle Equipment
i This Operator’s Manual describes all
features, standard or optional, potentially
available for your vehicle at the time of
purchase. Please be aware that your
vehicle might not be equipped with all
features described in this manual.
Safety Instructions
GWarning
For safety reasons, only enter a destination
when the vehicle is stationary. When the
vehicle is in motion, a passenger should enter
the destination. Study manual and select
route before driving.
Bear in mind that at a speed of just 30 mph
(approximately 50 km/h), your vehicle is
covering a distance of 44 feet (approximately
14 m) every second.
COMAND calculates the route to the
destination without taking account of the
following:
R Traffic lights
R Stop and right-of-way-signs
R Lane merging
R Parking or stopping prohibited areas
R Other road and traffic rules and regulations
R Narrow bridges
GWarning
COMAND may give incorrect navigation
commands if the data in the digital map does
not correspond with the actual road/traffic
situation. Digital maps do not cover all areas
nor all routes within an area. For example, if
the traffic routing has been changed or the
direction of a one-way road has been
reversed.
For this reason, you must always observe
applicable road and traffic rules and
regulations during your journey. Road and
traffic rules and regulations always have
priority over the navigation commands
generated by the system.GWarning
Navigation announcements are intended to
direct you while driving without diverting your
attention from the road and driving.
Please always use this feature instead of
consulting the map display for directions.
Consulting the symbols or map display for
directions may cause you to divert your
attention from driving and increase your risk
of an accident.
Updating the Map Software
The digital data for the map software will
become obsolete, just like conventional road
maps. Optimum route guidance by the
navigation system is only achieved with up-
to-date map software. Information on new
map software versions is available from an
authorized Mercedes-Benz Center.
You can have the map software updated there
by means of a DVD or perform the update
process yourself.
Notes on DVD Discs
R Only touch the discs at the edges.
R Handle the discs with care in order to
prevent reading errors.
R Avoid scratching, leaving fingerprints and
dust on the discs.
R Use a commercially available cleaning cloth
to clean discs. Always wipe in a straight line
from the inside outwards, never in a circular
motion.
R After use, put the discs back into the box.
R Protect the discs from heat and direct
sunlight.
48IntroductionNavigation
Page 51 of 224
Update Sequence
The sequence includes the following stages:
R Loading DVD into the DVD changer
R Update process
i The update process may take between 60
and 150 minutes, depending on the size of
the map software.
If possible, perform the update when the
vehicle is stationary. The DVD read speed
is faster when the vehicle is stationary than
when the vehicle is moving and the update
therefore takes less time. If you perform
the update with the engine off and the
vehicle battery is no longer powerful
enough, COMAND may shut off
automatically during the process to protect
the battery. In this case, restart the update
with the engine running.
You can interrupt the update process and
continue it at later time. If you cancel the
update process, the navigation system is
not ready for operation.
GWarning
Never leave the engine running in an enclosed
space. The exhaust gases contain carbon
monoxide. Inhaling exhaust gases constitutes
a health hazard and could lead to loss of
consciousness or even death.
Loading DVDs into DVD Changer
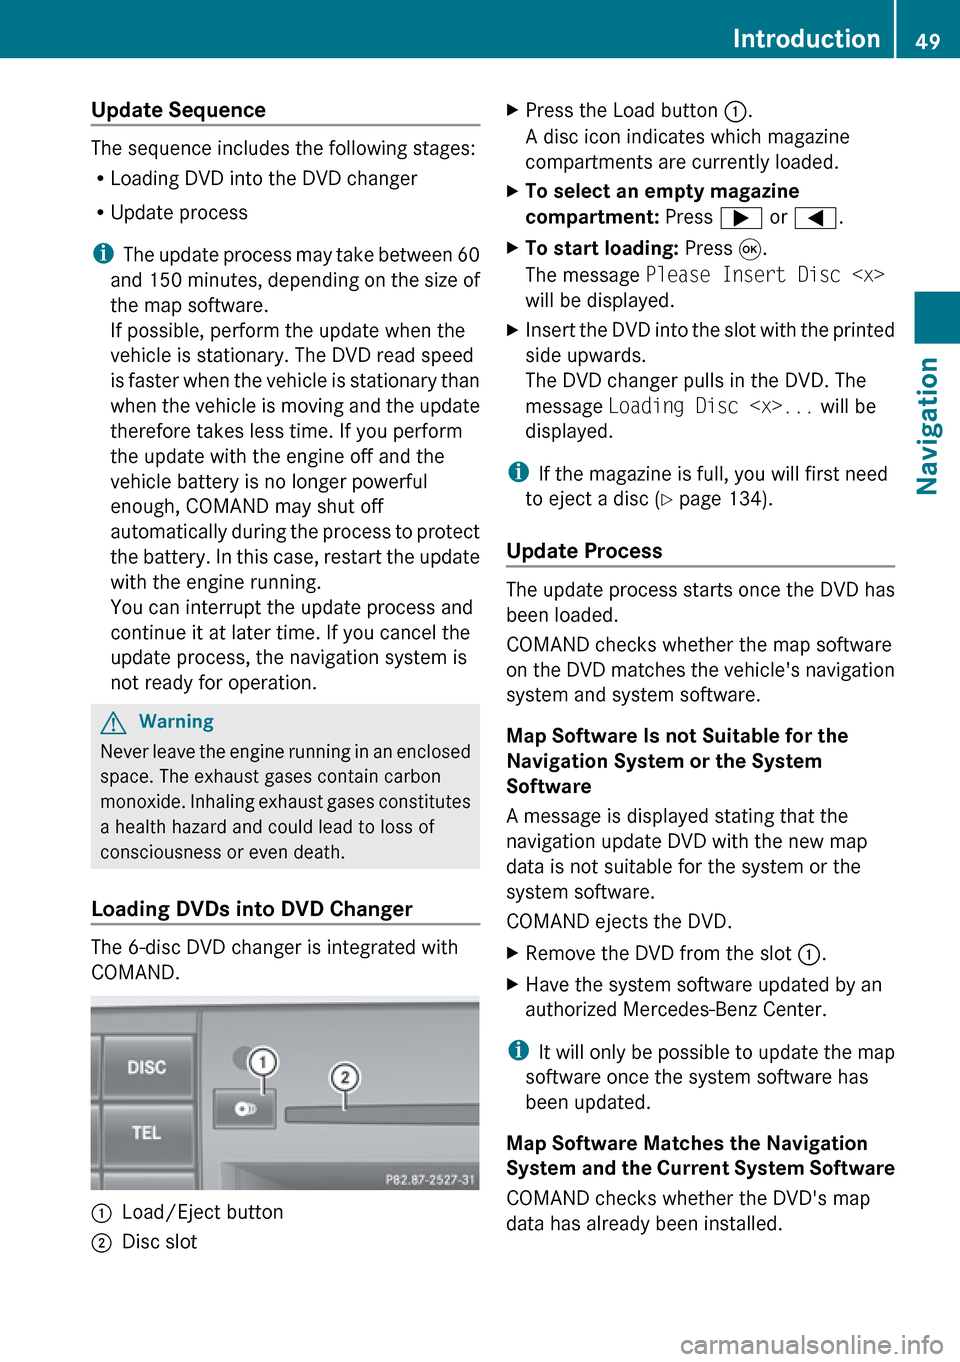
The 6-disc DVD changer is integrated with
COMAND.
1Load/Eject button2Disc slotXPress the Load button 1.
A disc icon indicates which magazine
compartments are currently loaded.XTo select an empty magazine
compartment: Press ; or = .XTo start loading: Press 9.
The message Please Insert Disc
will be displayed.XInsert the DVD into the slot with the printed
side upwards.
The DVD changer pulls in the DVD. The
message Loading Disc
displayed.
i If the magazine is full, you will first need
to eject a disc ( Y page 134).
Update Process
The update process starts once the DVD has
been loaded.
COMAND checks whether the map software
on the DVD matches the vehicle's navigation
system and system software.
Map Software Is not Suitable for the
Navigation System or the System
Software
A message is displayed stating that the
navigation update DVD with the new map
data is not suitable for the system or the
system software.
COMAND ejects the DVD.
XRemove the DVD from the slot 1.XHave the system software updated by an
authorized Mercedes-Benz Center.
i It will only be possible to update the map
software once the system software has
been updated.
Map Software Matches the Navigation
System and the Current System Software
COMAND checks whether the DVD's map
data has already been installed.
Introduction49NavigationZ
Page 52 of 224
Map Data Is Already Installed
The version release and a corresponding
message will be given on the display.XTo confirm message: Press 9.
COMAND ejects the DVD.
Map Data Is not yet Installed
The version release and a query as to whether
the update should be carried out will be given
on the display.
XSelect Yes or No.
If No is selected, COMAND ejects the DVD
automatically and the map data is not
updated.XRemove the DVD from the slot.
If Yes is selected, the map data is updated.
Updating the Map Data
While the update is in progress, a
corresponding message and a progress bar
are displayed. The progress bar fills from left
to right over the course of the update. The
navigation system is not functional until the
update is complete.
You cannot eject the DVD during the update.
If you switch COMAND off during the update,
this will interrupt the update and the update
will resume at the point of interruption when
the system is restarted.
While updating, COMAND may prompt you to
change the DVD. A corresponding message
is then displayed.
XPress the Eject button V.
The magazine menu appears. The magazine
compartment containing the current disc is
highlighted.XPress 9.
COMAND ejects the DVD.XRemove the DVD from the slot.XInsert the DVD requested by COMAND.
If the update has been completed
successfully, a corresponding message is
displayed.XTo confirm message: Press 9.
COMAND ejects the DVD.XRemove the DVD from the slot.
The update is complete.
If the update has not been completed
successfully, a message is displayed
indicating that the map update is not
possible.
XTo confirm message: Press 9.
COMAND ejects the DVD.XRemove the DVD from the slot.
An unseccussful update may be caused by
one of the following:
R DVD dirty or scratched.
XClean the DVD.
Please refer to the “Notes on DVD
discs” section ( Y page 48).XRestart the update.
R
Overheating as a result of excessively high
temperatures in the passenger
compartment.
XWait until the passenger compartment
has cooled down.XRestart the update.
General Information
Operational Readiness of the
Navigation System after the System
Software Update
Sometimes the installed map software is no
longer compatible following a system
software update by an authorized Mercedes-
Benz Center. In this case, the navigation
system is not operational.
XTo update map software: Proceed as
described in the “Update Process” section
( Y page 49). Use map software compatible
with the system software.
i Please note that in this case the update
must run through right to the end. If you
50IntroductionNavigation
Page 82 of 224
Route Guidance
General Notes
GWarning
COMAND calculates the route to the
destination without taking into account the
following, for example:
R Traffic lights
R Stop and right-of-way signs
R Lane merging
R Parking or stopping prohibited areas
R Other road and traffic rules and regulations
R Narrow bridges
COMAND may give incorrect navigation
commands if the data in the digital map does
not correspond with the actual road/ traffic
situation. For example, if the traffic routing
has been changed or the direction of a one-
way road has been reversed.
For this reason, you must always observe
applicable road and traffic rules and
regulations during your journey. Road and
traffic rules and regulations always have
priority over the navigation commands
generated by the system.
COMAND guides you to the destination by
means of driving recommendations in the
form of navigation announcements or route
guidance displays.
i The route guidance displays only appear
if the display has been switched to
navigation mode.
If, for some reason, you do not follow the
navigation announcements or if you leave the
calculated route, COMAND automatically
calculates a new route to the destination.
If the map data contains corresponding
information during route guidance, COMAND
tries to avoid roads with limited passability,
e.g. roads that are blocked for through-traffic
and are for residents only.
Driving Maneuver
Driving maneuvers are given in three phases:
R Preparation phase
R Announcement phase
R Maneuver phase
Preparation Phase
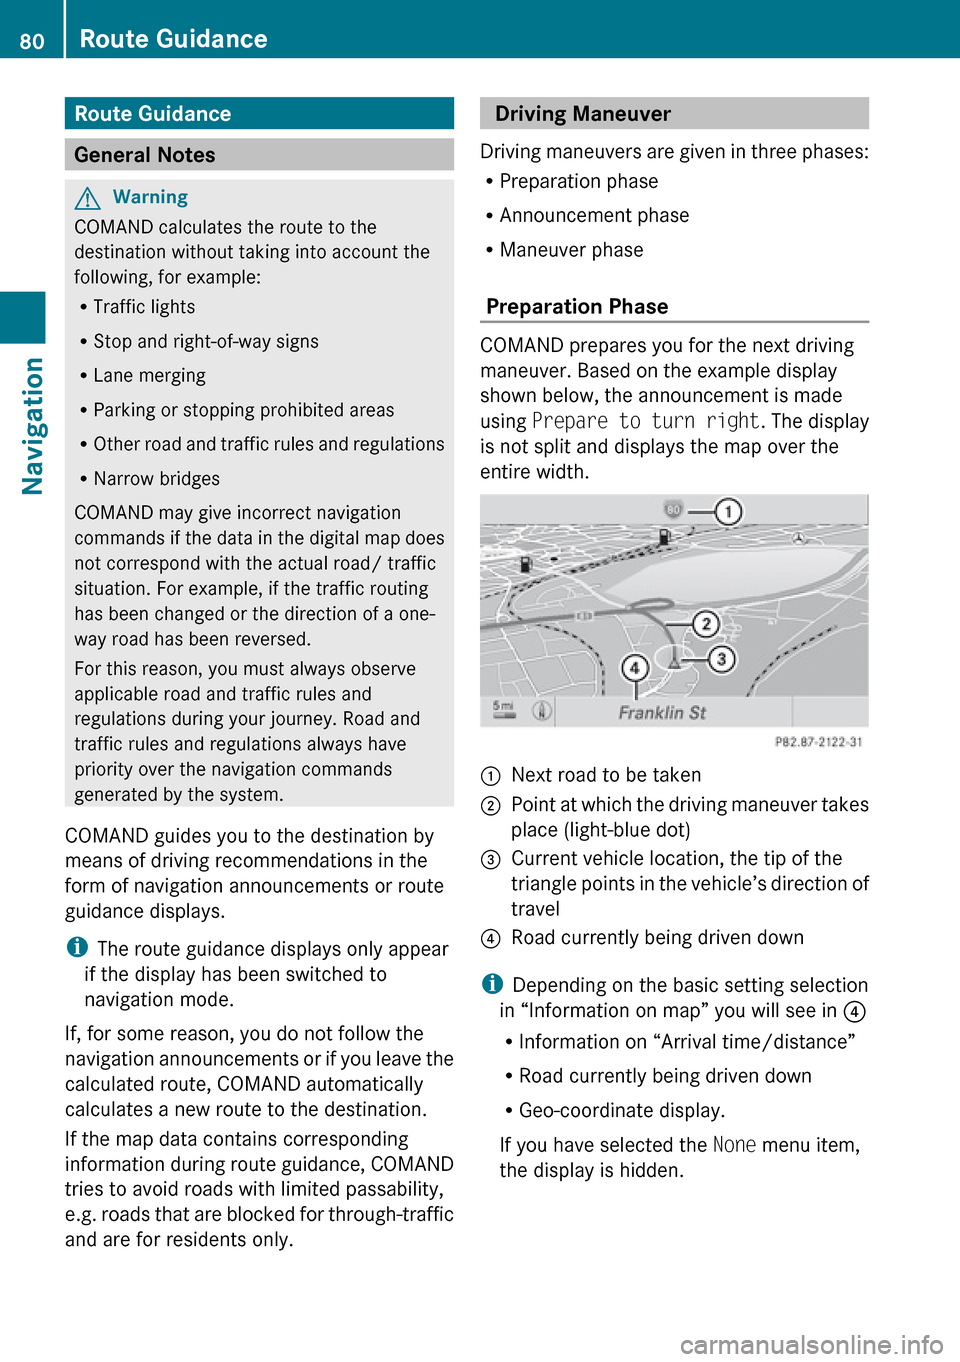
COMAND prepares you for the next driving
maneuver. Based on the example display
shown below, the announcement is made
using Prepare to turn right . The display
is not split and displays the map over the
entire width.
1Next road to be taken2Point at which the driving maneuver takes
place (light-blue dot)3Current vehicle location, the tip of the
triangle points in the vehicle’s direction of
travel4Road currently being driven down
i Depending on the basic setting selection
in “Information on map” you will see in 4
R Information on “Arrival time/distance”
R Road currently being driven down
R Geo-coordinate display.
If you have selected the None menu item,
the display is hidden.
80Route GuidanceNavigation
Page 87 of 224
XTo set the volume of the
announcements: Set the volume during
the automatic announcement ( Y page 32).
or
XCall up an announcement manually using
Navi £6 and adjust the volume.
Audio Fadeout
The Audio Fadeout function, if activated,
lowers the volume of the current audio source
when a navigation announcement is issued.
As soon as the navigation announcement has
ended, the audio source will be played with
the previous volume ( Y page 61).
Canceling Route Guidance
XIn the map display with the menu system
displayed ( Y page 53) select Destination
£ Cancel Route Guidance .
Resuming Route Guidance
XSelect Destination £Continue Route
Guidance in map view with the menu
system displayed.
COMAND calculates the route.
Detour Function
i The Detour function blocks a route
segment ahead. You can set the length of
the block. COMAND calculates a detour
route if possible.
XSelect Route£Detour in map view with
the menu system displayed ( Y page 53).XTo set the length of block: Select
Longer or Shorter repeatedly until the
required length is set.
The blocked segment is highlighted in red/
white on the map. Shown at the top of the
display is the length of the blockedsegment and the route segment to which
the block goes.XTo cancel the function: Select Back.XTo start route calculation: Select Start,
see also ( Y page 69).XTo change a block: Select Navi£Route
£ Detour £Change .XThen set length of block.XTo delete block: Select Navi£Route
£ Detour £Delete .
i
If a block already exists, the message
Detour Already Set is displayed. You
can then change or delete this.
Alternative Route
i You can have other routes calculated for
the original route guidance using the
Alternative Route function.
XIn the map display with the menu system
displayed ( Y page 53) select Route
£ Alternative Route .
The display is split into two halves. On the
left is the map, which displays one or more
alternative routes between the start and
the destination. The current route is
highlighted in dark blue, other alternative
routes are light blue (day mode). If the
display is in night mode, the representation
is inverse.
The right side of the display shows
information on the active alternative route,
e.g. length of the segment and the
estimated time of arrival.XTo select next or previous alternative
route: Select Next or Previous .
The selected route is now highlighted in
dark blue.XTo return to the original route guidance:
Select Back.XTo start route guidance with the
selected alternative route guidance:
Select Start.Route Guidance85NavigationZ