ESP MERCEDES-BENZ R-Class 2011 W251 Comand Manual
[x] Cancel search | Manufacturer: MERCEDES-BENZ, Model Year: 2011, Model line: R-Class, Model: MERCEDES-BENZ R-Class 2011 W251Pages: 214, PDF Size: 4.69 MB
Page 161 of 214

Aud
io/vid eosocke t
: Videopor t(V)
; Audio port(L)
= Audio port(R)
i Tofacilitate correctplayback, itmay be
necessary toset asuitab levideo standard
in the external videosource.
X Connect theexternal deviceto
corresponding port:,;or=.
COMAND activatesthedevice. Switchi
ngon video AUXmode
X Select Video in
the main function barusing
the 9=; buttonsandpress the
9 button toconfirm.
If video AUXmode wasthelast mode
selected, itwill now beactive.
If another videosource isswitched on,you
can now switch tovideo AUXmode inthe
video menu.
X Select Video and
press the9button to
confirm.
X Select Aux and
press the9button to
confirm.
The video AUXmenu appears.You willhear
and seetheconten tof the external video
source ifthis isconnect edand switched to
play back. Video
AUXmode
For detail son how tooperate theexternal
video source, seetherespective device's
operating instructions.
Ext ernal video sources mayhave different
aud iooutput volume. Youcanselect two
different inputvolume levelsforthe AUX
connect ion:
R Standard Ext
ernal sources withamediu mtohigh
audio output volume.
R Boost Ex
tern alsources withalow audio output
volume. X
Setting thedesired inputvolume:
Select Volume using
the
9:=; buttonsand press
the 9button toconf irm.
X Select Standard or
Boost and
press the
9 button toconf irm. Video
AUXoperat ion
159Video Z
Page 164 of 214
Vehi
cle equi pmen t
i TheseOpe rating Instru ctionsdescri beall
sta nda rdand optio nal equipme ntava ilab le
for your veh icleat the time ofpurcha se.
Pl ea se note thatyour vehicle maynotbe
equipped withallfeatures described. General
information Changing
thebatt eries
Notes Both
theremote controland thetwo sets of
wireless headphones requirebatteries. G
War
ning!
Keep thebatteries outofthe reach of
children. Consultadoctor immediately ifa
child should swallow abattery.
Do not dismantle, short-circuit orburn a
battery. H
Environmental
note
Dispose ofdischarged batteriesinan
environ mentallyresponsible manner. In
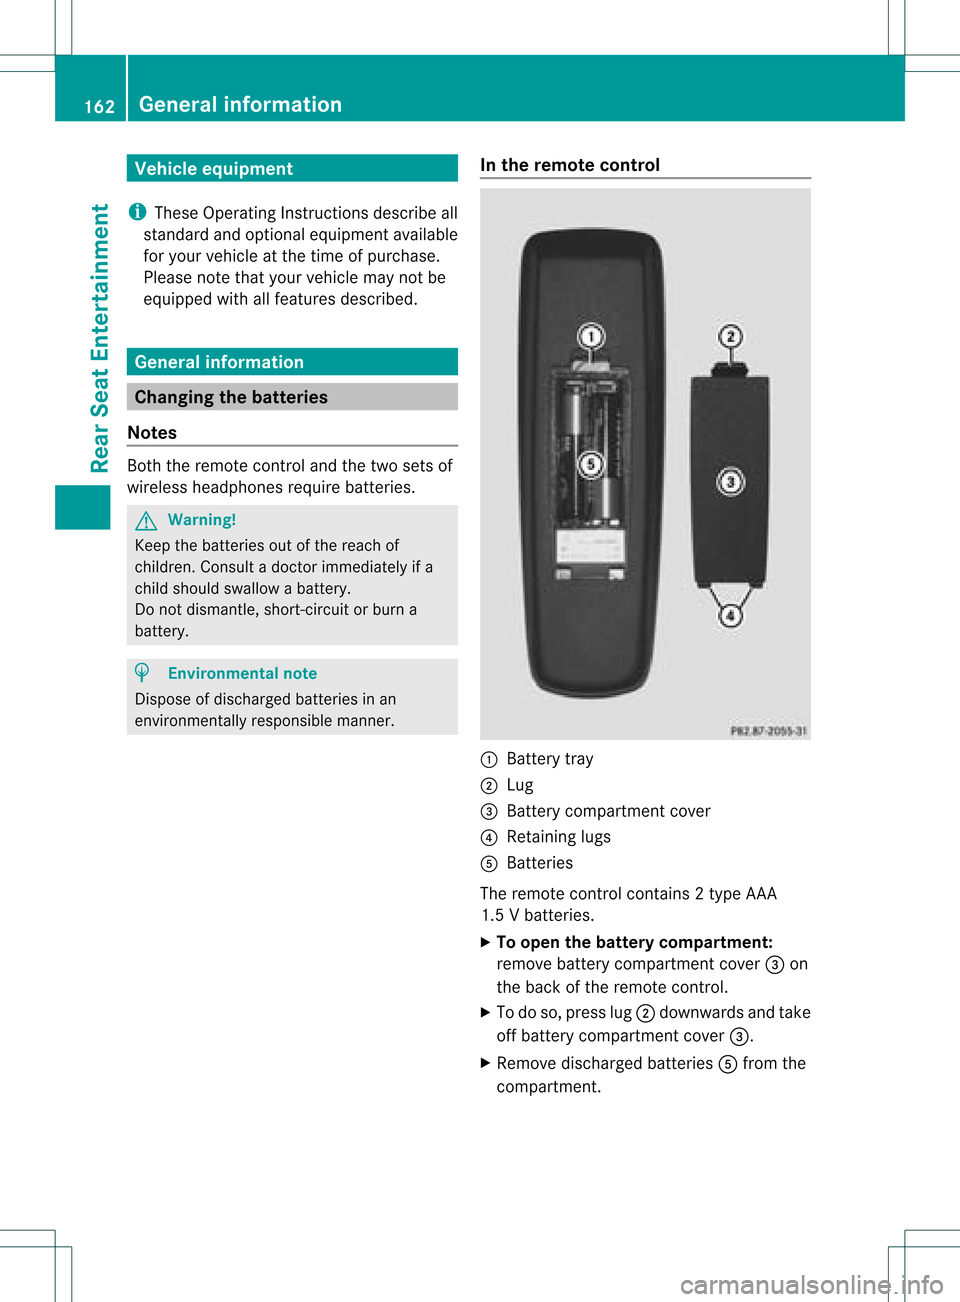
the remot econtrol :
Batt erytray
; Lug
= Batt erycompartm entcover
? Retaining lugs
A Batt eries
The remote controlcont ains 2type AAA
1.5 Vbatteries.
X To open thebatt erycompar tment:
remove batterycompartm entcover =on
the back ofthe remote control.
X To do so, press lug;downwards andtake
off battery compartm entcover =.
X Remove discharged batteriesAfrom the
compartm ent. 162
General
informationRearSeatEntert ainment
Page 165 of 214

X
Insert newbatteries. Observethepola rity
marking onthe batteries andinthe battery
compartment whendoing so.
Left-hand battery:thepositive pole(+)
must faceupwards.
Rig ht-hand battery: thepositive pole(+)
must facedownwa rds.
X To clo sethe battery compartment: first
pla cebattery compartment cover=into
the battery compartment withretaining
lug s? and allow lug ;toclip into place.
In the wirel essheadphones The
battery compartment coverislocated on
the left head phone. :
Battery compartment cover
The wirel esshead phones contain 2type AAA
1. 5V bat terie s.
X To ope nth ebat tery com partme nt:fo ld
th ebat tery compar tmentco ver :
upwar ds.Whe ndoing so,hold theleft
headphone asshown toprevent the
insert edbatteries fromfalling out.
X Remove thedischarged batteriesfromthe
compart ment.
X Insert newbatteries. Observethepolarity
marking onthe batteries andinthe battery
compart mentwhen doing so.
Left- hand battery: thepositive pole(+)
must faceupwards. Right-hand
battery:thepositive pole(+)
must facedownwards.
X To close thebatt erycompar tment:
press thebattery compartm entlid
downwards untilitclips intoplace.
If the batteries havebeen insert ed
correc tly,the indicator lampwilllight up
green whentheheadphones areswitched
on. Basic
functions Using
headphones
You canusethewireless headphones
supplied and/oruptotwo sets ofwired
headphones connected tothe correspon ding
jack ofthe rear-com partmentscreen s
(Y page 30).
Infor mation on:
R switching thewireless headphones on/off
R adjusting thevolume ofthe headphones
R selecting ascreen forthe headphones
can befound inthe "Wireless headphones"
section (Ypage 33). Using
themain loudspeaker s
You canusethevehicle loudspeakers to
listen toadisc insert edinthe rear-
compart mentdrive. Todo so, atleast oneof
the rear-com partmentscree nsmus tbeset to
disc mode.
X Sett ingusing COMAND: press,for
example, the$ function button to
switch onanaudio mode.
X Select Audio using
the9 button and
press the9button tocon firm.
The audio menu (Ypage 21)appears.
X Select Rear using
the9: buttons
and press the9button tocon firm.
i The headphones' volumesettingdoes not
affect themain loudspeakers. Ba
sic functions
163RearSeatEntert ainment Z
Page 169 of 214
Gene
ralnotes
You willfind information onthe follo wing
topics inthe "Aud io"chapter:
R Notes onCDs/DVDs (Ypage 139)
R Notes onMP3 mode (Ypage 137)
R Notes oncopyri ght(Ypage 139) Ins
erting aCD/DVD
M- Class :th eCD /DVD drive isin thece nter
beh ind th efron tseats.
R-Class: theCD/D VDdrive isin the center
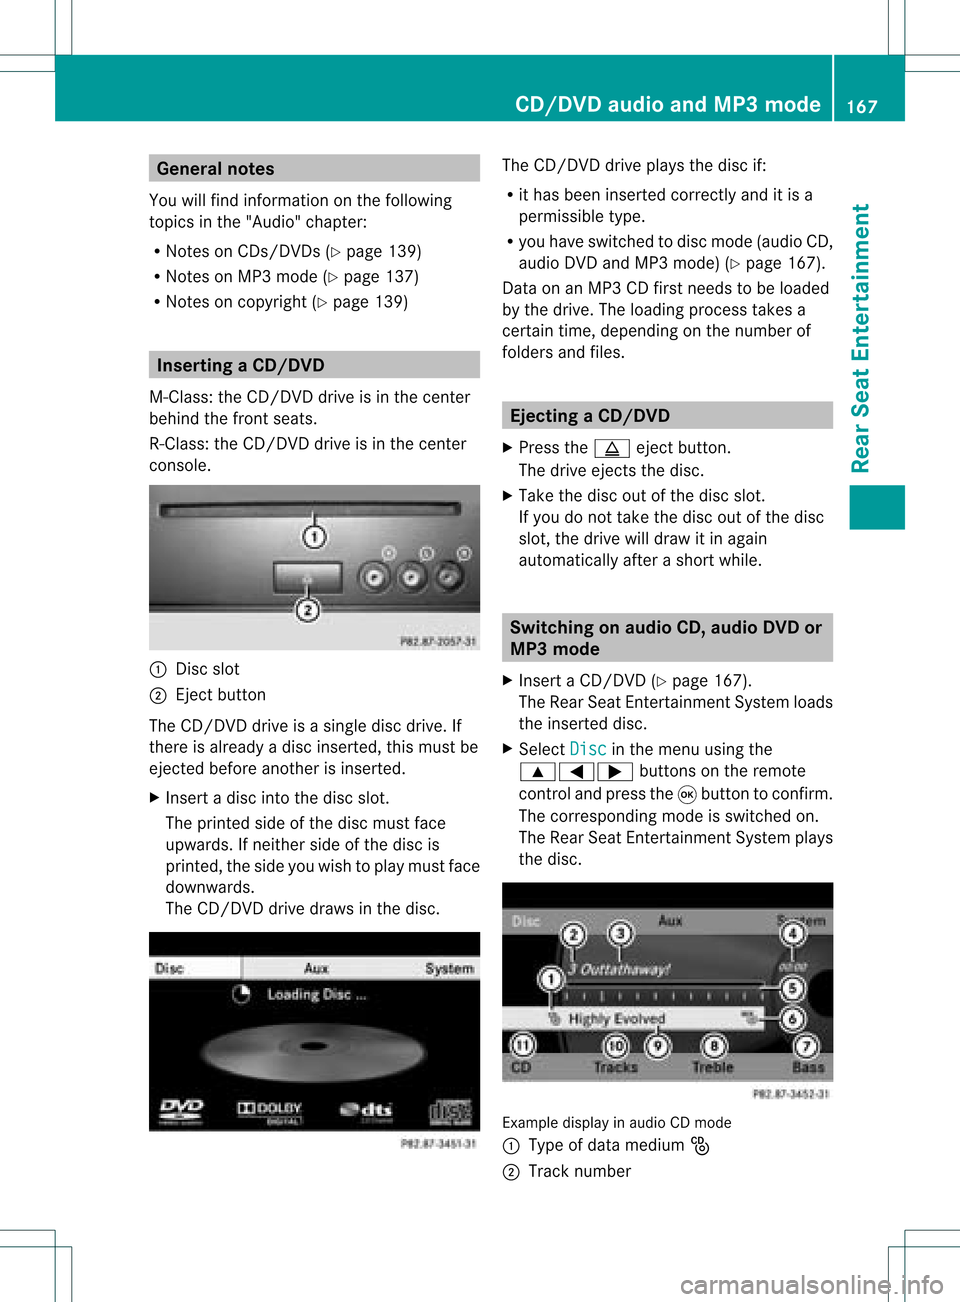
con sole. :
Disc slot
; Eject button
The CD/D VDdrive isasingle discdrive. If
ther eis already adisc insert ed,this must be
ejec tedbefore anotherisinsert ed.
X Inser tadisc intothe disc slot.
The print edside ofthe disc must face
upwards. Ifneit her side ofthe disc is
print ed,the side youwish toplay must face
downwards.
The CD/D VDdrive draws inthe disc. The
CD/D VDdrive plays thedisc if:
R ithas been insert edcorr ectlyand itis a
permissible type.
R you have switchedtodisc mode (audio CD,
audio DVDandMP3 mode) (Ypage 167).
Dat aon anMP3 CDfirst needs tobe loaded
by the drive. Theloading processtak esa
cert aintime, dependin gon the number of
folders andfiles. Ejecting
aCD/DVD
X Press theþ ejec tbut ton.
The drive ejec ts thedis c.
X Tak eth edis co utofthed isc slot .
If you donot takethe disc outofthe disc
slot ,the drive willdraw itin again
autom atically afterashor twhile. Switching
onaudio CD,audio DVDor
MP3 mode
X Insert aCD/DV D(Y page 167).
The Rear SeatEntertainment Systemloads
the inserted disc.
X Select Disc in
the menu usingthe
9=; buttonsonthe remote
cont roland press the9button toconfirm .
The corresponding modeisswitched on.
The Rear SeatEntertainment Systemplays
the disc. Example
displayinaudio CDmode
: Type ofdata medium _
; Track number CD/
DVD audioand MP3 mode
167RearSeatEnterta inment Z
Page 171 of 214
Selec
tingbytrack list In
audi oCD mode, thetrack listcont ains all
the track son the disc current lyplay ing.
In audi oDVD mode, thetrack listcont ains all
track sin the current lyactive group; see
"Settin gthe audi oformat" (Ypage 170).
In MP3 mode, thetrack listshows alltrack s
on the current lyactive folder, aswell asthe
folder structureforselection ofall the track s
on the MP3 CD.
X Select Tracks (audi
oCD/D VDmode) or
Folder (MP3
mode) using
the :=; buttonsonthe remote
cont roland press the9button toconf irm.
or
X Press the9button whenthedisplay /
selection windowisactive.
The track listappears. The#dot indicates
the current track.
X Select atrack using the9: buttons
and press the9button toconf irm.
Selec tingatrac kbydirect lyenter ingits
num ber X
Press honthe remo tecon trol.
The track entrydisplay appears.
Ex ample: track 2
X Press thel numbe rkey.
Ex ample: track 12
X Press thecorrespo ndingnumbe rkeys in
rapid success ion.
i Itis not possible toent ernumbers that
exc eed thenumber oftrac kson the CDor
in the curren tlyactiv efolder.
X Wait forapproximat elythree secon dsafter
makin gan ent ry.
You willhear theentered track.The
corr espondin gbasic menu thenreappears. Fast
forwar d/rewind
X With the<0004000900130010000C0001001C002400130005000C0005000300140009000F
000E> windowactive,
press the= or; button onthe
remot econ trol repeatedly untilyoureach
the desired position.
or
X Press andhold theE orF button
until thedesired position hasbeen
reached. Selecting
afolder
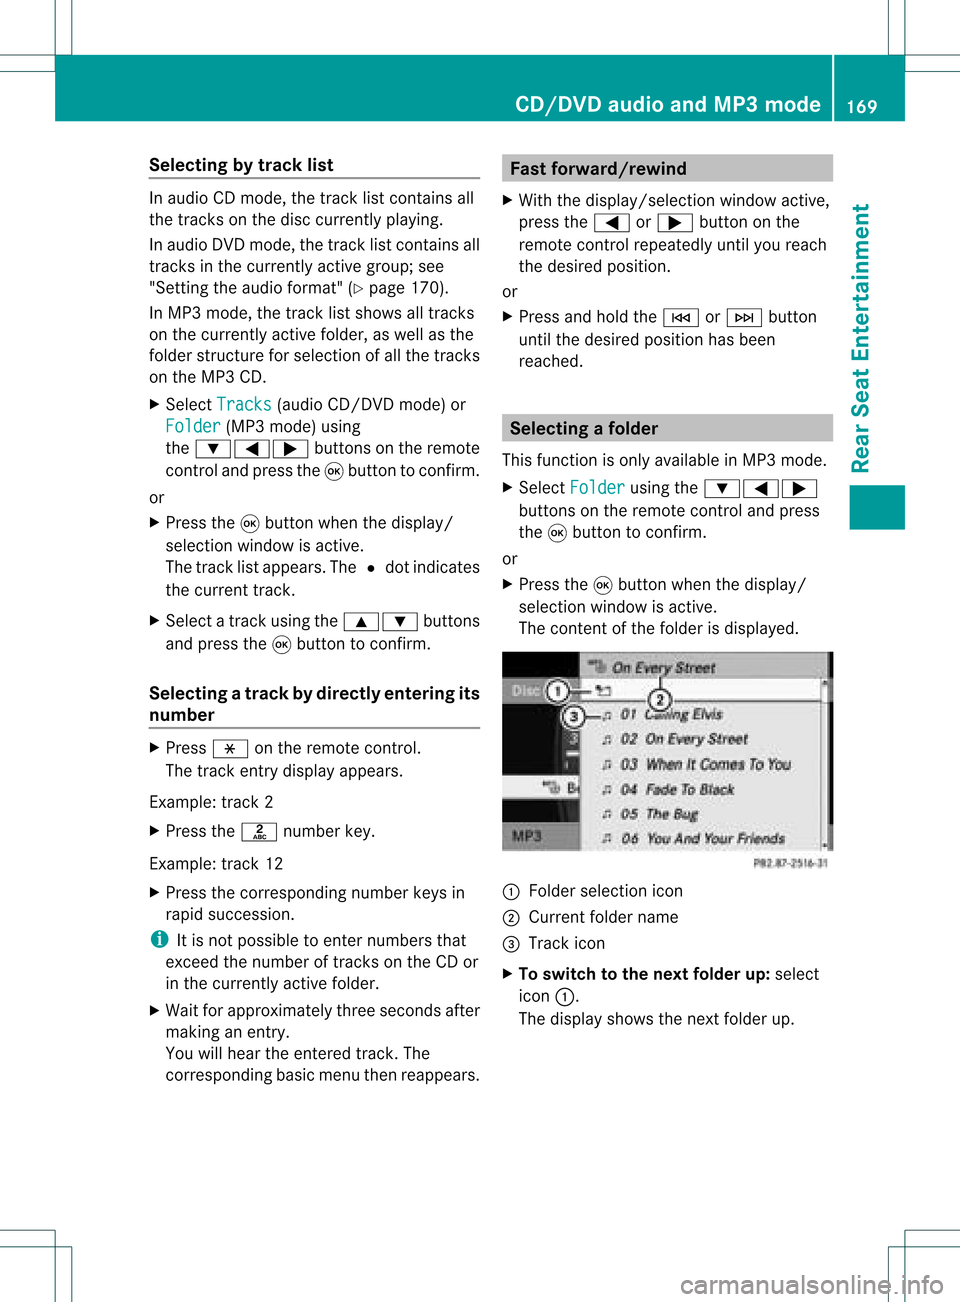
This function ison lyavailable inMP3 mode .
X Sele ctFol der usin
gth e:=;
butt onson therem otecon trol and pres s
th e9 butt ontocon firm.
or
X Pres sth e9 butt onwhen thedisplay/
selec tionw indow isact ive.
The contentofthe folder isdispla yed. :
Folder selection icon
; Current foldername
= Track icon
X To switch tothe next folder up:select
icon :.
The displa yshows thenext folder up. CD/
DVD audioand MP3 mode
169RearSeatEnterta inment Z
Page 173 of 214
control
andpressthe 9buttons to
confi rm.
The options list ap pea rs.A# dot indicates
the optioncurr ently selected .
X Sel ect Norm al Trac
k Sequ
ence ,
Rand om Trac
ks or
Rand omFold er us
ing the
9: buttons andpressthe 9button
to confi rm.
The optionisswi tched on.Allopti ons
excep tNorm alTrac kSequ ence wi
llbe
ind icated inthe displ ay/sel ectio nwindow.
i Ifyou chan gethe disc, theNorm al Trac
kSequ ence opt
ion isact ivat ed
autom atically. Ifan opt ion isselec ted,it
remain sselec tedafterthe Rear Seat
En ter tain men tSyst emisswitc hedonor
off . Switch
ingtrack infor mation on/off
(MP3 modeonly)
If the func tionisswitc hedon,folder andtrack
name sare displayed.
If the func tion isswitc hedoff,disc andfile
name sare displayed.
X Selec tDisp layTrackInfo rmation using
the9: buttonsonthe remo te
con trol and press the9butt ontocon firm .
The func tion isswitc hedonO oroff ª,
depen dingonthe prev ious status. Vid
eoDVD mode Gener
alnotes
Her eyou willfindfurt her inform ation onthe
followin gtop ics:
R Safe tynot es(Ypage 128)
R Not eson CDs/ DVDs (Ypage 139) DVD
playback conditions
There maybeplayback problemswhen
playing copieddiscs .There arealarge variety of
discs, DVDauthoring software,discwriting
software andwriters available.This variety
means thatthere isno guarantee thatthe
Rear SeatEntertainment Systemwillbeable
to play video DVDsthat youhave copied
yourself.
You willfind further information inthe "Video"
chapter (Ypage 153). Inform ationregarding
COMAND alsoappli estothe Rear Seat
Ent ertainment System. Function
restrictions
Depending onthe DVD ,it is possible that
certain functionsoractions described inthis
section willbetemporarily blockedormay not
funct ionatall. Assoon asyou trytoactivate
these functionsoractions, youwillsee the
K icon inthe displa y. Inserting
andejecting aCD/DVD
X Proc eed asdes cribed inthe"Au dio CD/
DV Da ndMP3 mode"sec tion
(Y page 129) . Sw
itchin gon video DVD mode
X Inse rtavid eo DVD.
The RearSea tEnterta inmentSys tem load s
the disc.
If disc mod ewa sthe last mod esel ecte d,it
wi llnow beacti ve.
If it wa snot, switch onvideo DVD modeas
de scri bedin the followi ng instructio n.
X Sel ect Disc us
ing the 9=;
bu ttons onthe rem otecontro land press
the 9button toconfi rm.
If the video DVD fulfills the play ba ck
cri teri a,the filme ithe rstar tsautoma tically
or the menu saved onthe DVD appe ars. If
the DVD menu appe ars, yo uwi llnee dto
sta rtthe film ma nua lly.
X Sel ect the corr espo ndi ngmenu itemi nthe
DVD menu (Ypage 174). Video
DVDmode
171RearSeatEnterta inment Z
Page 175 of 214
X
To conti nue play back:sel ect Mand press
the 9button toconfi rm.
Pl ay ba ck conti nuesfrom thepoint where it
wa sinte rrupte d.The menu ishidd en.
X To sto pplay back:wh ile play ba ck is
inte rrupte d,sel ect ±againa nd pre ssthe
9 button toconfi rm.
Pl ay ba ck stop sand jumpstothe beginning
of the DVD. Mishighl ighted .
X To res tart playback:sel ect Mand press
the 9button toconfi rm.
Pl ay ba ck sta rts from thestartof the DVD. Se
lecti ng ascene/ch apter
Not es Fur
ther inform ation onthis fun ction is
availab lein the"Vide o"chapt er
(Y page 155).
Ski pping forwar ds/back wards X
Pre ssthe= or; buttonon the
rem oteco ntrol .
or
X Pre sstheE orF button.
The navigat ionmen u(Y page 172)appear s
for appr oximat elyeigh tsecon ds.
Selecting ascene/ch apter directl y The
example sillust ratehow tosele ctscen e/
ch apt er5.
X Op tion1: while thefilm isplayin g,pre ss
th eh button.
X Pre sstheco rrespo nding num berkey,in
th is cas eo.
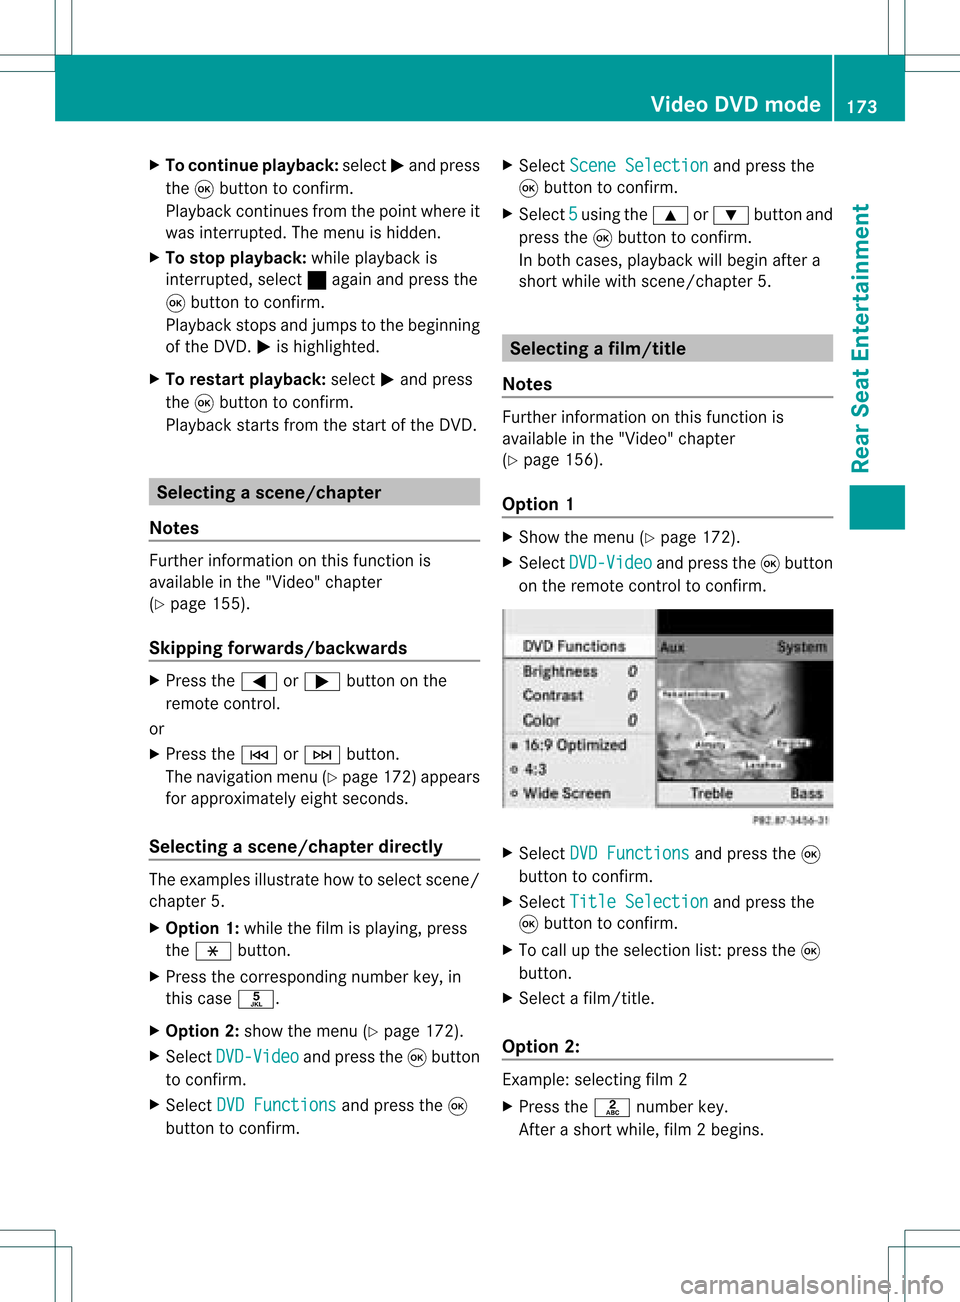
X Op tion2: sho wthemen u(Y page 172).
X Se lec tDVD -Video and
pressthe9 but ton
to confirm .
X Se lec tDVD Functions and
pressthe9
but tonto confirm . X
Se lec tSce neSelection and
pressthe
9 buttonto confirm .
X Se lec t5 usin
gth e9 or: buttona nd
pre ssthe 9button toconfi rm.
In bo th cas es, play ba ck willbe gina fter a
short whilewith scene/chap ter5. Sel
ecting afilm/t itle
Not es Furt
herinformat iononthis func tion is
available inthe "Video" chapter
(Y page 156).
Opt ion 1 X
Show themen u(Y page 172).
X Selec tDVD- Video and
press the9butt on
on the remo tecon trol to con firm . X
Selec tDVD Functions and
press the9
butt ontocon firm .
X Selec tTitl eSele ction and
press the
9 butt ontocon firm .
X To call upthe selec tionlist:press the9
butt on.
X Selec ta film/ title.
Opt ion 2: Ex
ample: selectingfilm 2
X Press thel numbe rkey.
Af ter ashor twhile, film2begins. Vid
eoDVD mode
173Rear SeatEntert ainment Z
Page 176 of 214

DVD
menu
No tes You
willfindfur ther info rm ation ontheDV D
men uin the"Vid eo"chapt er(Y page 156).
Cal ling uptheDVD menu X
Sh ow themen u(Y page 172).
X Se lec tDVD -Video and
pressthe9 but ton
on therem oteco ntro lto confirm .
X Se lec tDVD Functions and
pressthe9
but tonto confirm .
X Se lec tMen u and
pressthe9 buttonto
co nfirm .
The DVDm enu appears.
Selecting menuitems inthe DVD menu X
Select amenu itemusing the
9:=; buttonson the
remot econ trol and press the9button to
con firm.
Am enu appears.
i Menu itemswhich cannotbe select edare
shown ingray. X
Confirm Select by
pressing the9button .
The Rear SeatEntert ainmen tSystem
carries outtheaction ordisplays a
submenu forthe action selectedinthe DVD
menu.
X Ifrequired, selectfromthefurth eroption s.
The Rear SeatEntert ainmen tSystem then
switch esback tothe DVD menu. i
Depen dingonthe DVD ,the menu items
Back (tomovie) ,
Play ,
Stop ,
., /orGo Up only
work at
cert ainpoint sin the DVD menu ordo not
work atall. You willsee theKicon inthe
display asan indicat or.
Stopp ingafilm orskipp ingtothe
beginning orend ofas cene X
Se lec tany men uitem fromthe DVD menu .
Th emenu appe ars.
X To sto pthe film: select the Stop menu
ite ma ndpre ssthe 9button toconfi rm.
X To skipto the endof asc en e:sel ect
the / menu itema ndpre ssthe 9
bu tton toconfi rm.
X To skiptoth ebeginnin gof as cene:
selec tthe . menu itemandpress the
9 button toconfirm .
Moving upone level inthe DVD menu X
Option 1:press the% backbutton or
select thecorresponding menuiteminthe
DVD menu.
X Option 2:select anymenu iteminthe DVD
menu.
X Select theGoUp menu
iteminthe menu
and press the9button toconfirm .
Going backtothe movie X
Option 1:press the% backbutton
repeatedly untilyouseethefilm orselect
the corresponding menuiteminthe DVD
menu.
X Option 2:select anymenu iteminthe DVD
menu.
X Select theBack (to movie) menu
itemin
the menu andpress the9button to
confirm . 174
Video
DVDmodeRear SeatEnterta inment
Page 177 of 214
Setting
theaudio format
This funct ionisnot availa bleonallDVD s.Ifit
is availa ble,youcan setthe audi olanguage
or the audi oformat. Thenumber ofsettin gs
is determined bythe DVD content. Itis
possible thatthesettin gsmay alsobe
accessed inthe DVD menu.
X Show themenu (Ypage 172).
X Select DVD-Video and
press the9button
on the remote controltoconf irm.
X Select DVDFunctions and
press the9
button toconf irm.
X Select Audio Language and
press the9
button toconf irm.
Am enu appears afterashort while. The
# dot infron tof an ent ryindicat esthe
curren tlyselect edlanguage.
X Select alanguage usingthe9:
button sand press the9button tocon firm.
X To exit themenu: pressthe=
or ; button . Subtit
lesand camer aangle
These functionsare not available onallDVD s.
The number ofsubtitle languages andcamera
angles available dependsonthe contentof
the DVD. Itis po ssi ble tha tthe settin gsmay
also beaccessed inthe DVD menu.
X Show themenu (Ypage 172).
X Select DVD-Video and
press the9button
on the remote controltoconfirm .
X Select DVDFunctions and
press the9
button toconfirm .
X Select Subtitles or
Camera Angle and
press the9button toconfirm .
In both cases, amenu appearsafter afew
seconds. The#dot infront ofan entr y
indicates thecurrent setting.
X Select asettin gusing the9:
buttons andpress the9button toconfirm .X
To exit themenu: pressthe=
or ; button. Interactive
content
DVD scan also containinteract ivecont ent
(e.g. avideo game). Inavideo game, youmay
be able toinfluence eventsbyselecting and
triggering actions.Thetype andnumber of
actions depend onthe DVD .
X Select anaction usingthe
9:=; buttonsandpress
the 9button toexecute it.
A menu appearsand thefirst entry,
Select ,
is highlighted.
X Press the9button. AUX
mode Introduction
You canconn ectone extern alvideo source to
each ofthe displa ysofthe Rear Seat
Ent ertainment System(AUXdispla y)and also
one extern alvideo source tothe rear-
compartmen tCD/DV Ddrive (AUX drive) with
a sound andpicture signal.
Please seethecorresponding operating
instruct ionsforinformation onhow to
operate theextern alvideo source.
For further detailsconcerning externalvideo
sources, pleaseconsult anauthorized
Mercedes-Ben zCent er. Connecting
auxiliaryequipme nt
AU Xdrive The
AUX drive jacks arelocate don the CD/
DVD drive next tothe CD/DVD ejectbutton
(Y page 32). AU
Xmode
175Rear Seat Entertain ment Z
Page 178 of 214
AUX
displa y The
AUXdisp layjacksare locate don theside
of thesc ree n(Y page 30).
Aud ioand videoconnect ion X
Inser tthe audi oplug forthe left and right
signals intothecorresponding Land R
jacks.
X Insert thevideo plugintotheVsocket . Switching
onAUX mode
AUX drive X
Select Aux in
the menu usingthe
9=; buttonsonthe remote
cont roland press the9button toconfirm .
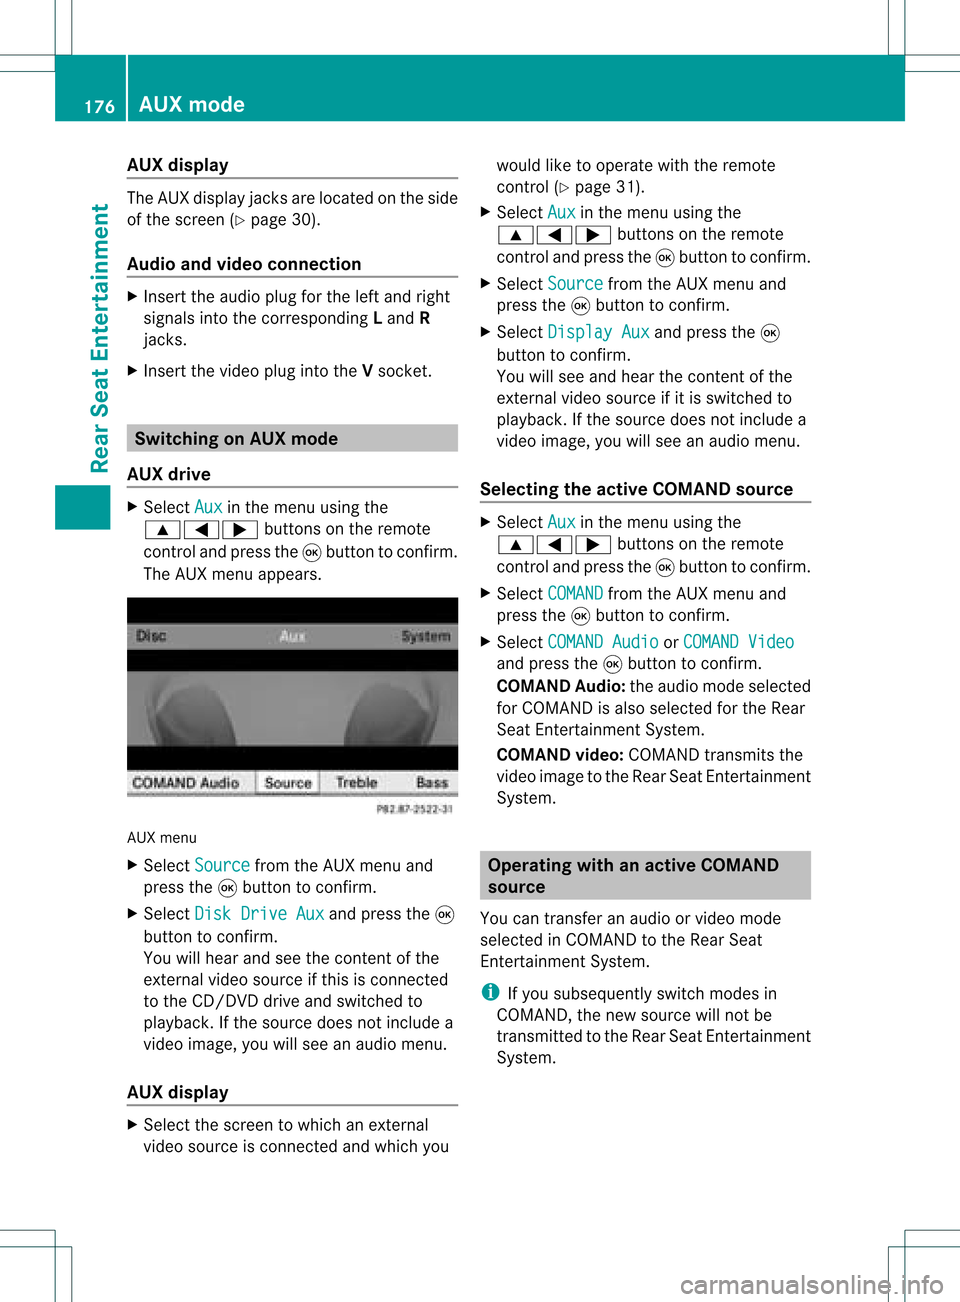
The AUX menu appears. AUX
menu
X Select Source from
theAUX menu and
press the9button toconfirm .
X Select DiskDrive Aux and
press the9
button toconfirm .
You willhear andseethecont entofthe
extern alvideo source ifthis isconn ected
to the CD/DV Ddrive andswitched to
play back. Ifthe source doesnotinclude a
video image, youwillsee anaudi omenu.
AUX display X
Select thescreen towhich anextern al
video source isconn ected andwhich you would
liketooperate withtheremote
cont rol(Ypage 31).
X Select Aux in
the menu usingthe
9=; buttonsonthe remote
cont roland press the9button toconfirm .
X Select Source from
theAUX menu and
press the9button toconfirm .
X Select Display Aux and
press the9
button toconfirm .
You willsee and hear thecont entofthe
extern alvideo source ifit is switched to
play back. Ifthe source doesnotinclude a
video image, youwillsee anaudi omenu.
Selec tingtheactive COMAND source X
Select Aux in
the menu usingthe
9=; buttonsonthe remote
cont roland press the9button toconfirm .
X Select COMAND from
theAUX menu and
press the9button toconfirm .
X Select COMAND Audio or
COMAND Video and
press the9button toconfirm .
COMAND Audio:theaudi omode selected
for COMAND isalso selected forthe Rear
Seat Entertainment System.
COMAND video:COMAND transmitsthe
video image tothe Rear SeatEntertainment
System. Operat
ingwith anactive COMAND
source
You cantransf eran audi oorvideo mode
selec tedinCOMA NDtothe Rear Seat
En ter tain men tSyst em.
i Ifyou subsequen tlyswitc hmodes in
COMA ND,the new sourc ewill notbe
tr ansm itted tothe Rear SeatEnter tain men t
Syst em. 176
AUX
modeRearSeat Enter tainment