engine MERCEDES-BENZ R-Class 2011 W251 Owner's Guide
[x] Cancel search | Manufacturer: MERCEDES-BENZ, Model Year: 2011, Model line: R-Class, Model: MERCEDES-BENZ R-Class 2011 W251Pages: 364, PDF Size: 16.5 MB
Page 78 of 364
This may impair the functioning of KEYLESS-
GO.
R To open or close the vehicle, the KEYLESS-
GO key should be no more than 3 ft (1 m)
from the door or tailgate.
R When the vehicle is parked for more than
72 hours, the KEYLESS-GO function is
deactivated. Pull one of the outer door
handles and turn on the ignition to
reactivate the KEYLESS-GO function.
R If the KEYLESS-GO key is not near the
vehicle, it is possible that the system may
not recognize it. In this case, the vehicle
cannot be locked or started with KEYLESS-
GO.
R If the KEYLESS-GO key has been removed
from the vehicle (e.g. if a passenger leaves
the vehicle with the KEYLESS-GO key):
- while someone is holding the Start/Stop
button or attempting to lock the vehicle
with the outer door handle, the message
Key not detected appears in the
multifunction display
- while someone is holding the Start/Stop
button or attempting to lock the vehicle
with the outer door handle, the message
Key not detected appears in the
multifunction display
- while the engine is running, the red
message Key not detected appears in
the multifunction display as you pull
away. Find the KEYLESS-GO key or
change its current position immediately
(e.g. place it on the front-passenger seat
or carry it in your shirt pocket.)
R If you have started the engine using the
Start/Stop button, you can turn if off again
by:
- pressing the Start/Stop button again
- inserting the KEYLESS-GO key in the
ignition lock when the vehicle isstationary and the automatic
transmission is in parking position P.
R You may accidentally unlock the vehicle if
the KEYLESS-GO key is within 3 ft (1 m) of
the vehicle and:
- an outer door handle comes into contact
with water
or
- you are cleaning an outer door handle.
R Note that the engine can be started by any
vehicle occupant if a KEYLESS-GO key is in
the vehicle.
Option 1: there is a KEYLESS-GO key in the
vehicle and a KEYLESS-GO key outside the
vehicle. If you leave the KEYLESS-GO key
behind when you get out and lock the
vehicle, a message does not appear in the
multifunction display.
Option 2: there is a KEYLESS-GO key in the
vehicle but no KEYLESS-GO key outside the
vehicle. When you get out and try to lock
the vehicle, the message Key still in
vehicle appears in the multifunction
display. The vehicle is not locked in this
case.
When starting the engine and while driving,
KEYLESS-GO also checks whether a valid key
is in the vehicle by periodically establishing
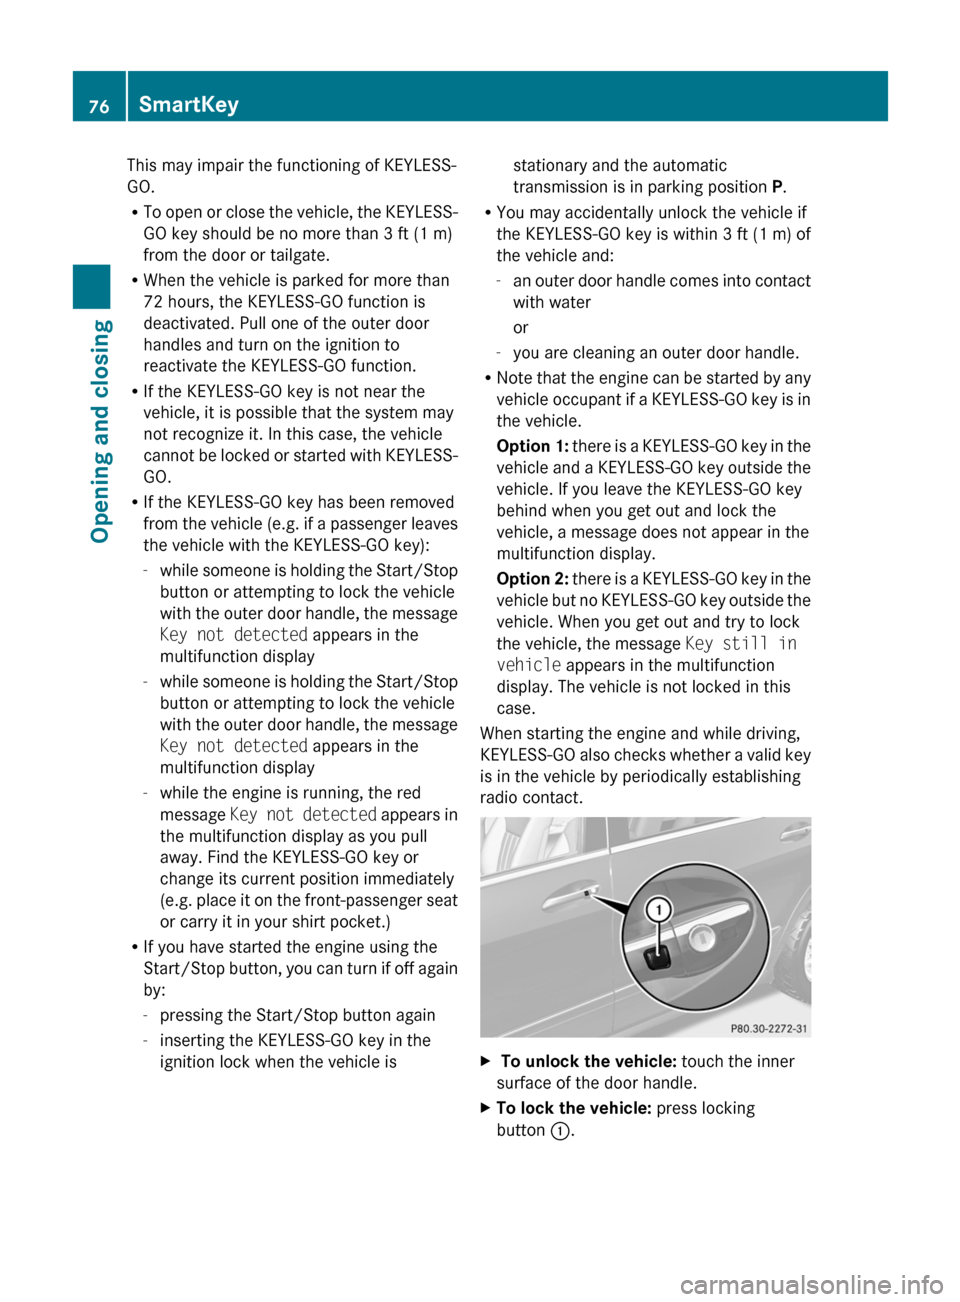
radio contact.X To unlock the vehicle: touch the inner
surface of the door handle.XTo lock the vehicle: press locking
button :.76SmartKeyOpening and closing
BA 251 USA, CA Edition A 2011; 1; 3, en-USd2sboikeVersion: 3.0.3.52010-04-16T14:31:55+02:00 - Seite 76
Page 82 of 364
ProblemPossible causes/consequences and M SolutionsThe engine cannot be
started using the
SmartKey.The on-board voltage is too low.XSwitch off non-essential consumers, e.g. seat heating or interior
lighting, and try to start the engine again.
If this does not work:
XCheck the starter battery and charge it if necessary
( Y page 308).
or
XJump-start the vehicle ( Y page 311).
or
XConsult a qualified specialist workshop.The engine cannot be
started using KEYLESS-
GO. The SmartKey is in
the vehicle.A door is open. Therefore, the SmartKey cannot be detected as
easily.XClose the door and try to start the vehicle again.There is interference from a powerful source of radio waves.XStart your vehicle with the SmartKey in the ignition lock.Doors
Important safety guidelines
GWarning!
When leaving the vehicle, always remove the
SmartKey from the starter switch. Always
take the SmartKey with you and lock the
vehicle. Do not leave children unattended in
the vehicle, even if they are secured in a child
restraint system, or with access to an
unlocked vehicle. A child's unsupervised
access to a vehicle could result in an accident
and/or serious personal injury. The children
could
R injure themselves on parts of the vehicle
R be seriously or fatally injured through
excessive exposure to extreme heat or cold
R injure themselves or cause an accident with
vehicle equipment that can be operated
even if the SmartKey is removed from the
starter switch or removed from the vehicle,
such as seat adjustment, steering wheel
adjustment, or the memory function
If children open a door, they could injure other
persons or get out of the vehicle and injure
themselves or be injured by following traffic.
Do not expose the child restraint system to
direct sunlight. The child restraint system's
metal parts, for example, could become very
hot, and the child could be burned by these
parts.GWarning!
Do not carry heavy or hard objects in the
passenger compartment or cargo
compartment unless they are firmly secured
in place.
Unsecured or improperly positioned cargo
increases a child’s risk of injury in the event
of
R strong braking maneuvers
R sudden changes of direction
R an accident
80DoorsOpening and closing
BA 251 USA, CA Edition A 2011; 1; 3, en-USd2sboikeVersion: 3.0.3.52010-04-16T14:31:55+02:00 - Seite 80
Page 85 of 364
even if the SmartKey is removed from the
starter switch or removed from the vehicle,
such as seat adjustment, steering wheel
adjustment, or the memory function
If children open a door, they could injure other
persons or get out of the vehicle and injure
themselves or be injured by following traffic.
Do not expose the child restraint system to
direct sunlight. The child restraint system's
metal parts, for example, could become very
hot, and the child could be burned by these
parts.GWarning!
Do not carry heavy or hard objects in the
passenger compartment or cargo
compartment unless they are firmly secured
in place.
Unsecured or improperly positioned cargo
increases a child’s risk of injury in the event
of
R strong braking maneuvers
R sudden changes of direction
R an accident
GWarning!
Make sure the tailgate is closed when the
engine is running and while driving. Among
other dangers, deadly carbon monoxide (CO)
gases may enter vehicle interior resulting in
unconsciousness and death.
! The tailgate swings upwards and to the
rear when opened. Therefore, make sure
that there is sufficient clearance above and
behind the tailgate.
To open the tailgate completely, a minimum
clearance of 7.20 ft (2.20 m) above the
ground is necessary.
You can:
R open and close the tailgate manually from
outside
R open and close the tailgate automatically
from outside
R open the tailgate manually from inside
Ropen and close the tailgate automatically
from inside
R limit the opening angle of the tailgate
Opening and closing from the outside
Opening
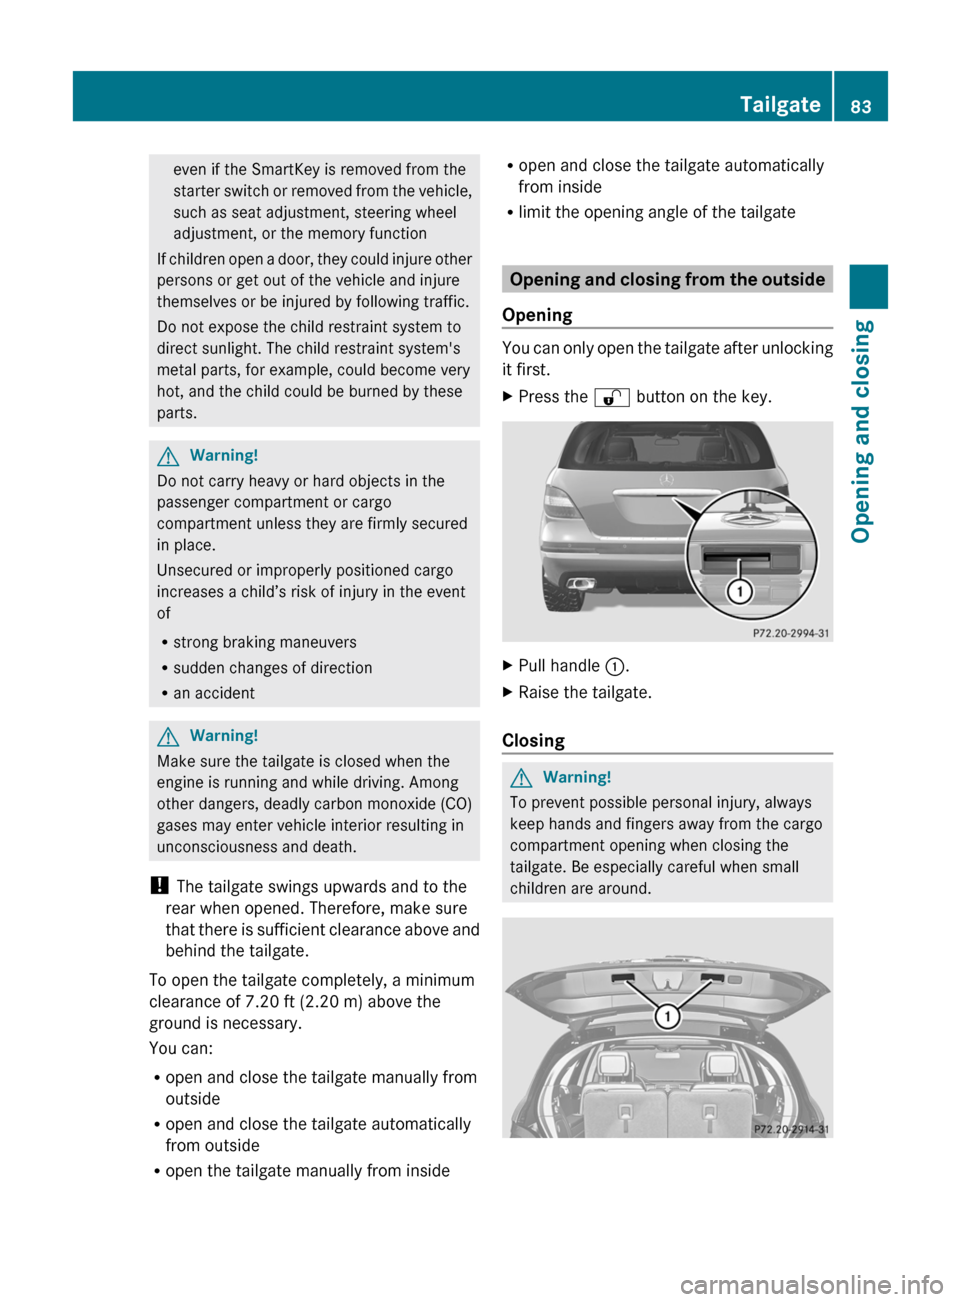
You can only open the tailgate after unlocking
it first.
XPress the % button on the key.XPull handle :.XRaise the tailgate.
Closing
GWarning!
To prevent possible personal injury, always
keep hands and fingers away from the cargo
compartment opening when closing the
tailgate. Be especially careful when small
children are around.
Tailgate83Opening and closingBA 251 USA, CA Edition A 2011; 1; 3, en-USd2sboikeVersion: 3.0.3.52010-04-16T14:31:55+02:00 - Seite 83Z
Page 86 of 364
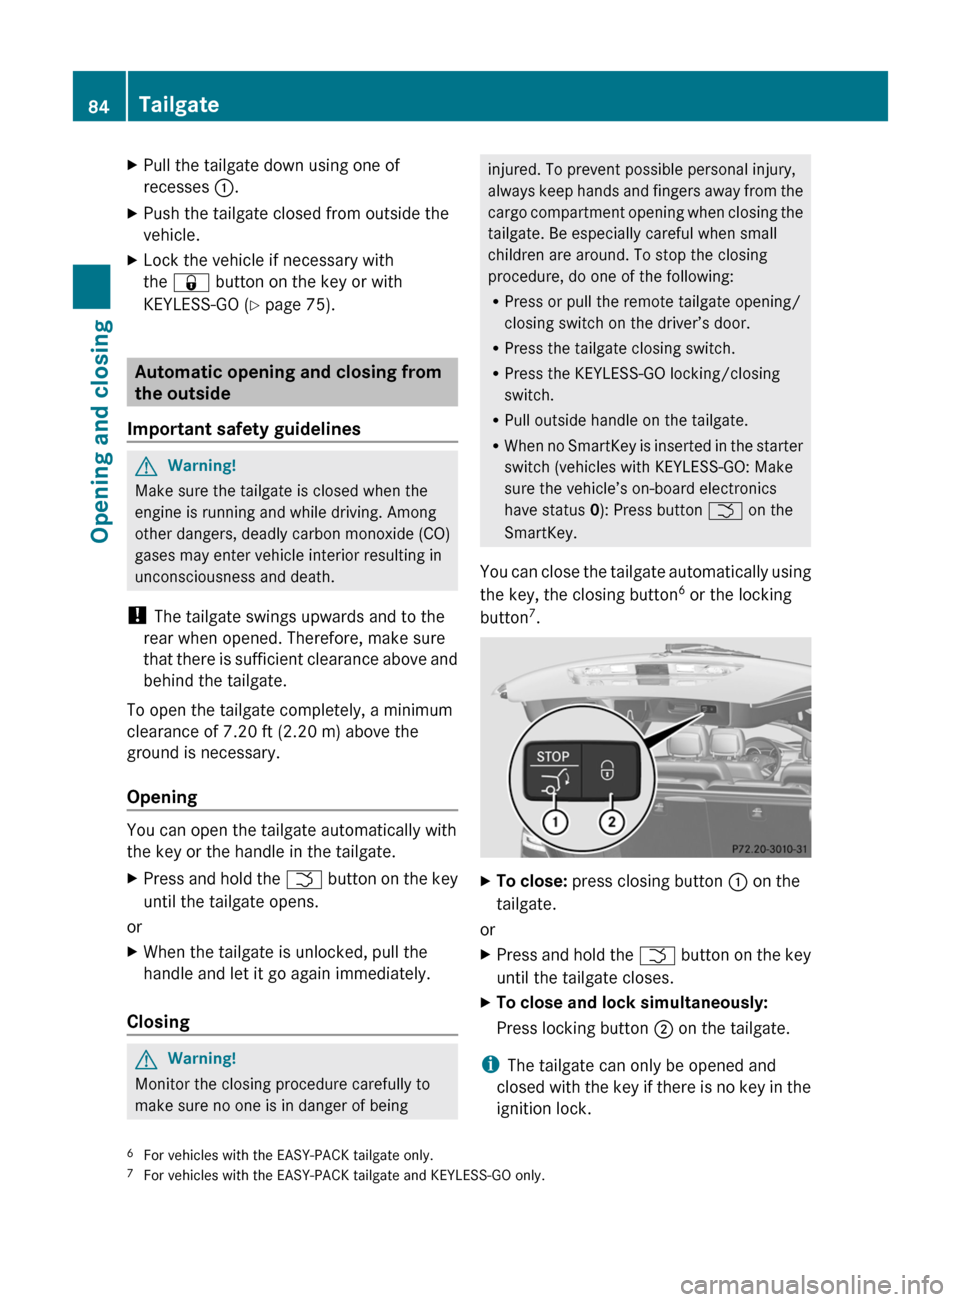
XPull the tailgate down using one of
recesses :.XPush the tailgate closed from outside the
vehicle.XLock the vehicle if necessary with
the & button on the key or with
KEYLESS-GO ( Y page 75).
Automatic opening and closing from
the outside
Important safety guidelines
GWarning!
Make sure the tailgate is closed when the
engine is running and while driving. Among
other dangers, deadly carbon monoxide (CO)
gases may enter vehicle interior resulting in
unconsciousness and death.
! The tailgate swings upwards and to the
rear when opened. Therefore, make sure
that there is sufficient clearance above and
behind the tailgate.
To open the tailgate completely, a minimum
clearance of 7.20 ft (2.20 m) above the
ground is necessary.
Opening
You can open the tailgate automatically with
the key or the handle in the tailgate.
XPress and hold the F button on the key
until the tailgate opens.
or
XWhen the tailgate is unlocked, pull the
handle and let it go again immediately.
Closing
GWarning!
Monitor the closing procedure carefully to
make sure no one is in danger of being
injured. To prevent possible personal injury,
always keep hands and fingers away from the
cargo compartment opening when closing the
tailgate. Be especially careful when small
children are around. To stop the closing
procedure, do one of the following:
R Press or pull the remote tailgate opening/
closing switch on the driver’s door.
R Press the tailgate closing switch.
R Press the KEYLESS-GO locking/closing
switch.
R Pull outside handle on the tailgate.
R When no SmartKey is inserted in the starter
switch (vehicles with KEYLESS-GO: Make
sure the vehicle’s on-board electronics
have status 0): Press button F on the
SmartKey.
You can close the tailgate automatically using
the key, the closing button 6
or the locking
button 7
.XTo close: press closing button : on the
tailgate.
or
XPress and hold the F button on the key
until the tailgate closes.XTo close and lock simultaneously:
Press locking button ; on the tailgate.
i
The tailgate can only be opened and
closed with the key if there is no key in the
ignition lock.
6 For vehicles with the EASY-PACK tailgate only.
7 For vehicles with the EASY-PACK tailgate and KEYLESS-GO only.84TailgateOpening and closing
BA 251 USA, CA Edition A 2011; 1; 3, en-USd2sboikeVersion: 3.0.3.52010-04-16T14:31:55+02:00 - Seite 84
Page 87 of 364
If the tailgate touches an object while
closing, the closing procedure is
interrupted and the tailgate reopens.
i Only with KEYLESS-GO: if you leave a
KEYLESS-GO key in the cargo
compartment, the tailgate will not lock.
The tailgate is not closed unless a
KEYLESS-GO key is detected.
Opening the tailgate from the inside
GWarning!
Do not leave children unattended in the
vehicle. Children could open the tailgate from
the inside, which could result in an accident
and/or serious personal injury.
! Always make sure there is sufficient
space when opening.
You can unlock and open the tailgate from
inside the vehicle.
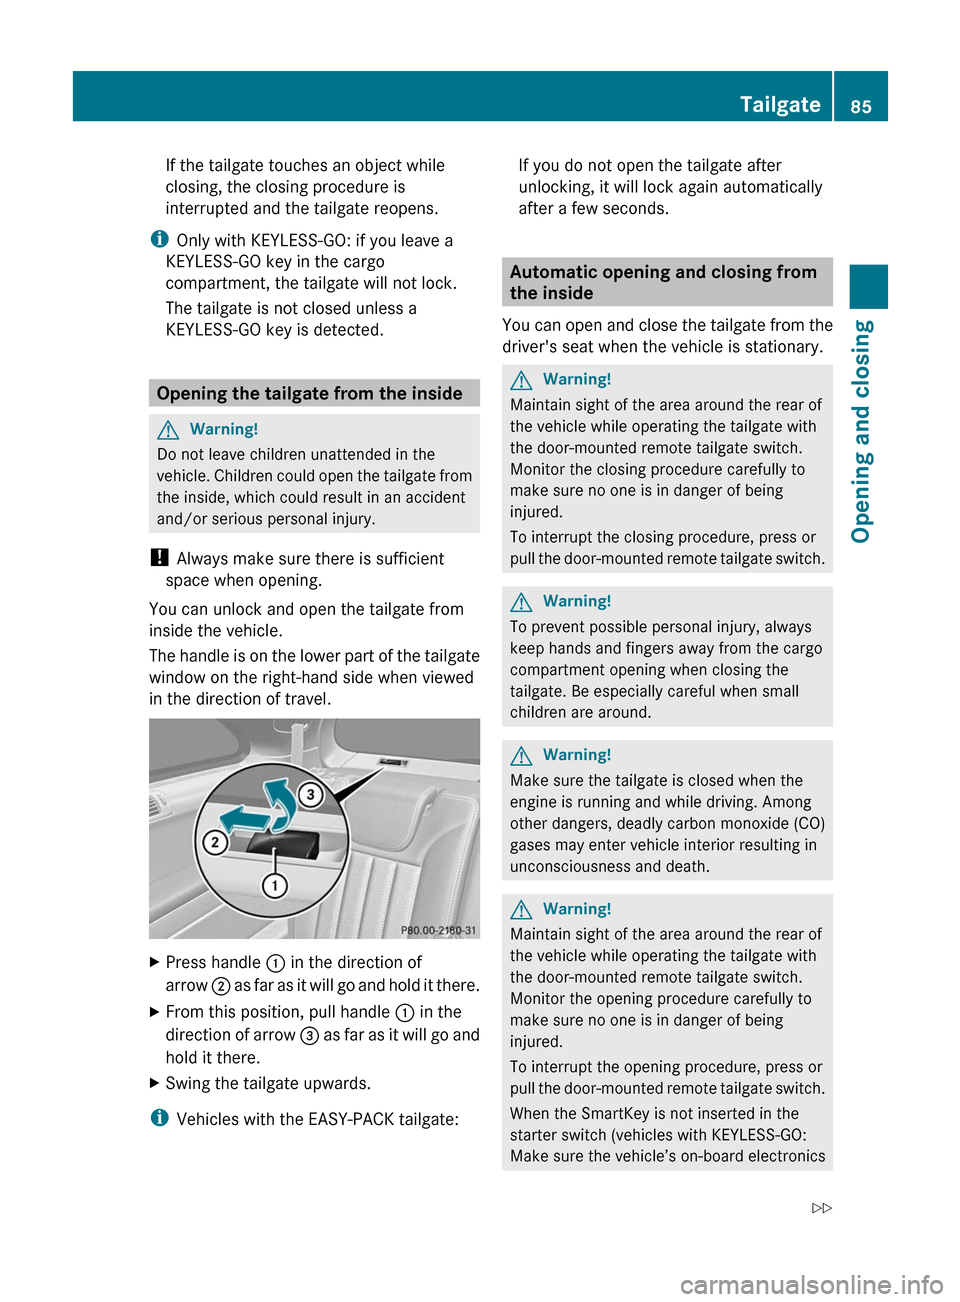
The handle is on the lower part of the tailgate
window on the right-hand side when viewed
in the direction of travel.
XPress handle : in the direction of
arrow ; as far as it will go and hold it there.XFrom this position, pull handle : in the
direction of arrow = as far as it will go and
hold it there.XSwing the tailgate upwards.
i Vehicles with the EASY-PACK tailgate:
If you do not open the tailgate after
unlocking, it will lock again automatically
after a few seconds.
Automatic opening and closing from
the inside
You can open and close the tailgate from the
driver's seat when the vehicle is stationary.
GWarning!
Maintain sight of the area around the rear of
the vehicle while operating the tailgate with
the door-mounted remote tailgate switch.
Monitor the closing procedure carefully to
make sure no one is in danger of being
injured.
To interrupt the closing procedure, press or
pull the door-mounted remote tailgate switch.
GWarning!
To prevent possible personal injury, always
keep hands and fingers away from the cargo
compartment opening when closing the
tailgate. Be especially careful when small
children are around.
GWarning!
Make sure the tailgate is closed when the
engine is running and while driving. Among
other dangers, deadly carbon monoxide (CO)
gases may enter vehicle interior resulting in
unconsciousness and death.
GWarning!
Maintain sight of the area around the rear of
the vehicle while operating the tailgate with
the door-mounted remote tailgate switch.
Monitor the opening procedure carefully to
make sure no one is in danger of being
injured.
To interrupt the opening procedure, press or
pull the door-mounted remote tailgate switch.
When the SmartKey is not inserted in the
starter switch (vehicles with KEYLESS-GO:
Make sure the vehicle’s on-board electronics
Tailgate85Opening and closingBA 251 USA, CA Edition A 2011; 1; 3, en-USd2sboikeVersion: 3.0.3.52010-04-16T14:31:55+02:00 - Seite 85Z
Page 90 of 364
override switch for the side windows is
activated.XTurn the key to position 2 in the ignition
lock.
i You can continue to operate the side
windows after you switch off the engine.
This function remains active for five
minutes or until one of the front doors is
opened.
XTo open: press the corresponding switch.XTo close: pull the corresponding switch.
i
If you press the switch beyond the point
of resistance, an automatic opening/
closing process is started in the
corresponding direction. You can stop
automatic operation by pressing again.
Opening and closing the hinged side
windows
You can operate the hinged side windows
electrically.
The hinged side windows can only be
operated from the driver's seat.
GWarning!
Make sure that nobody can become trapped
as you close the hinged side windows. If there
is a risk of somebody becoming trapped,
release the switch or push the switch again to
reopen the side window.
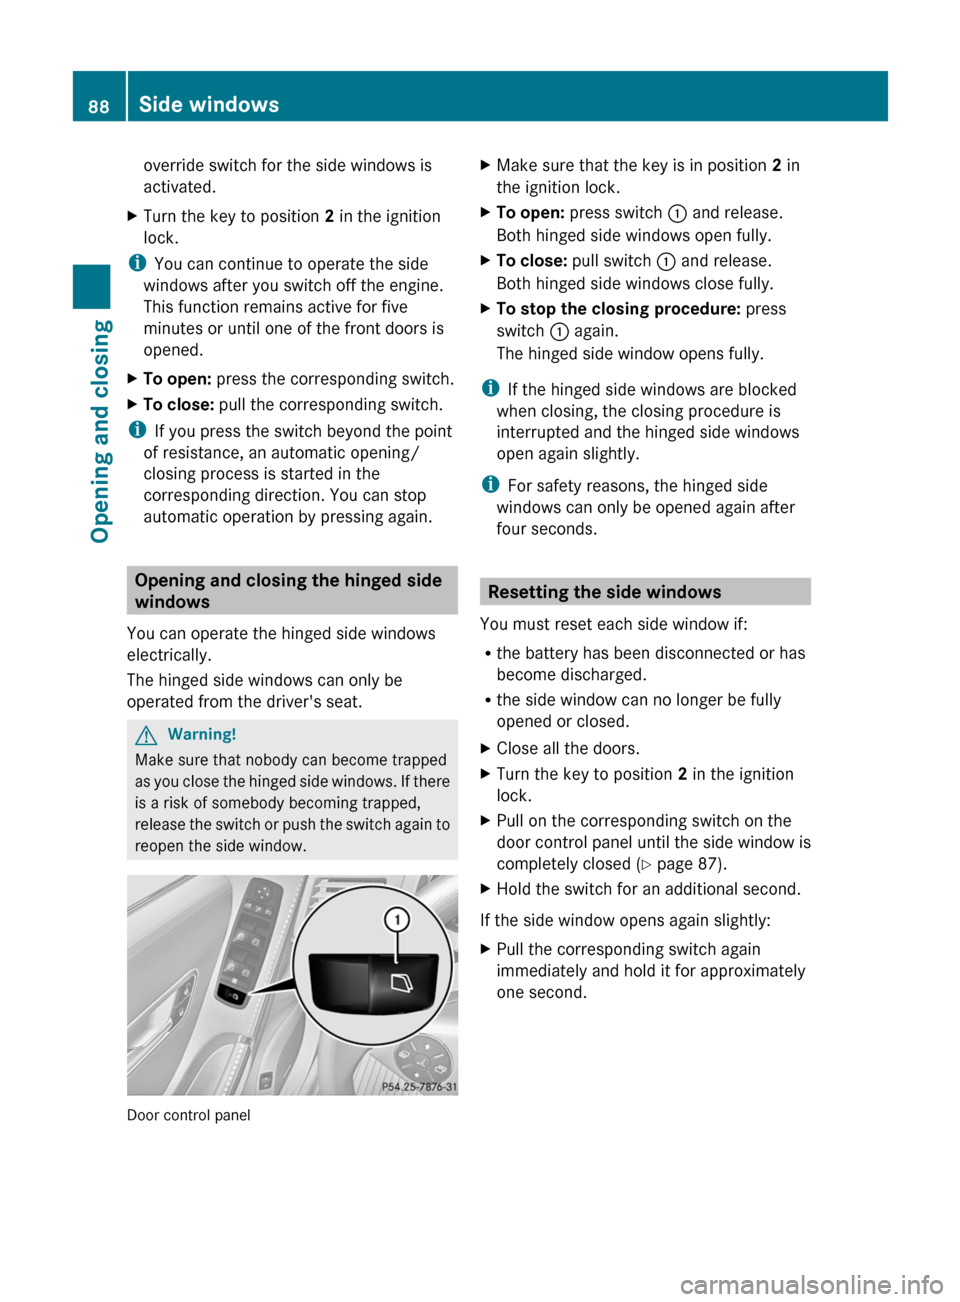
Door control panel
XMake sure that the key is in position 2 in
the ignition lock.XTo open: press switch : and release.
Both hinged side windows open fully.XTo close: pull switch : and release.
Both hinged side windows close fully.XTo stop the closing procedure: press
switch : again.
The hinged side window opens fully.
i If the hinged side windows are blocked
when closing, the closing procedure is
interrupted and the hinged side windows
open again slightly.
i For safety reasons, the hinged side
windows can only be opened again after
four seconds.
Resetting the side windows
You must reset each side window if:
R the battery has been disconnected or has
become discharged.
R the side window can no longer be fully
opened or closed.
XClose all the doors.XTurn the key to position 2 in the ignition
lock.XPull on the corresponding switch on the
door control panel until the side window is
completely closed ( Y page 87).XHold the switch for an additional second.
If the side window opens again slightly:
XPull the corresponding switch again
immediately and hold it for approximately
one second.88Side windowsOpening and closing
BA 251 USA, CA Edition A 2011; 1; 3, en-USd2sboikeVersion: 3.0.3.52010-04-16T14:31:55+02:00 - Seite 88
Page 94 of 364
The tilt/sliding panel operates differently
when the roof panel switch is pressed and
held. See the relevant section in this chapter
for details.
The opening/closing procedure of the tilt/
sliding panel can be immediately halted by
releasing the roof panel switch or, if the roof
panel switch was moved past the resistance
point and released, by moving the roof panel
switch in any direction.GWarning!
The panorama roof with tilt/sliding panel is
made out of glass. In the event of an accident,
the glass may shatter. This may result in an
opening in the roof.
In a vehicle rollover, occupants not wearing
their seat belts or not wearing them properly
may be thrown out of the opening. Such an
opening also presents a potential for injury for
occupants wearing their seat belts properly as
entire body parts or portions of them may
protrude from the passenger compartment.
! Only open the sliding sunroof if it is free
of snow and ice. Otherwise, malfunctions
may occur.
Do not allow anything to protrude from the
sliding sunroof. Otherwise, the seals could
be damaged.
! If the sliding sunroof cannot be opened or
closed due to a malfunction, contact a
qualified specialist workshop, e.g. an
authorized Mercedes-Benz Center.
! Do not forget that the weather can
change abruptly. Make certain that the
sliding sunroof is closed when you leave the
vehicle. The vehicle electronics can be
damaged if water enters the vehicle
interior.
i Resonance noises can occur in addition
to the usual airflow noises when the sliding
sunroof is open. They are caused by minor
pressure fluctuations in the vehicle interior.
Change the position of the sliding sunroof
or open a side window slightly to reduce or
eliminate these noises.
Operating the sliding sunroof
Opening and closing
i You can still operate the tilt/sliding
sunroof even if you switch off the engine or
remove the SmartKey. This function
remains active for five minutes or until one
of the front doors is opened.
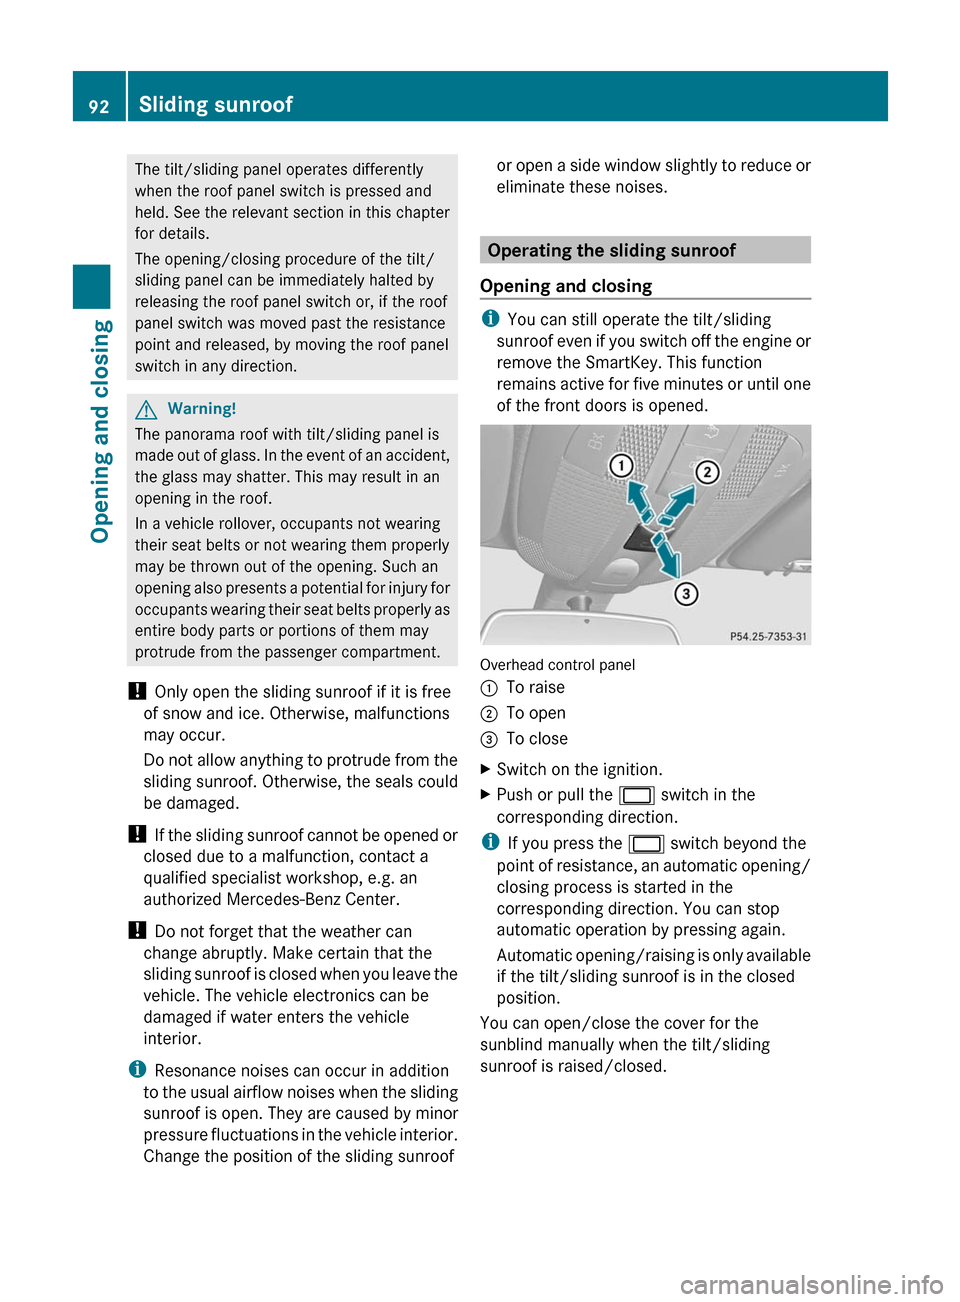
Overhead control panel
:To raise;To open=To closeXSwitch on the ignition.XPush or pull the 2 switch in the
corresponding direction.
i If you press the 2 switch beyond the
point of resistance, an automatic opening/
closing process is started in the
corresponding direction. You can stop
automatic operation by pressing again.
Automatic opening/raising is only available
if the tilt/sliding sunroof is in the closed
position.
You can open/close the cover for the
sunblind manually when the tilt/sliding
sunroof is raised/closed.
92Sliding sunroofOpening and closing
BA 251 USA, CA Edition A 2011; 1; 3, en-USd2sboikeVersion: 3.0.3.52010-04-16T14:31:55+02:00 - Seite 92
Page 118 of 364
Vehicle equipment
i This manual describes all the standard
and optional equipment of your vehicle
which was available at the time of
purchase. Country-specific differences are
possible. Bear in mind that your vehicle
may not feature all functions described
here. This also refers to safety-related
systems and functions.
Exterior lighting
Important safety guidelines
For reasons of safety, Mercedes-Benz
recommends that you drive with the lights
switched on even during the daytime. In some
countries, operation of the headlamps varies
due to legal requirements and self-imposed
obligations. In these countries, the daytime
running lamps are automatically switched on
when the engine is started.
Notes on driving abroad
Converting to symmetrical low beam
when driving abroad: switch the headlamps
to symmetrical low beam in countries in
which traffic drives on the opposite side of the
road to the country where the vehicle is
registered. This prevents oncoming traffic
from being dazzled. Symmetrical lights do not
illuminate as large an area of the edge of the
carriageway.
Have the headlamps converted at a qualified
specialist workshop, e.g. an authorized
Mercedes-Benz Center, as close to the border
as possible before driving in these countries.
Converting to asymmetrical low beam
after returning: have the headlamps
converted back to asymmetrical low beam at
a qualified specialist workshop, e.g. an
authorized Mercedes-Benz Center, as soon as
possible after crossing the border when
returning.
Light switch
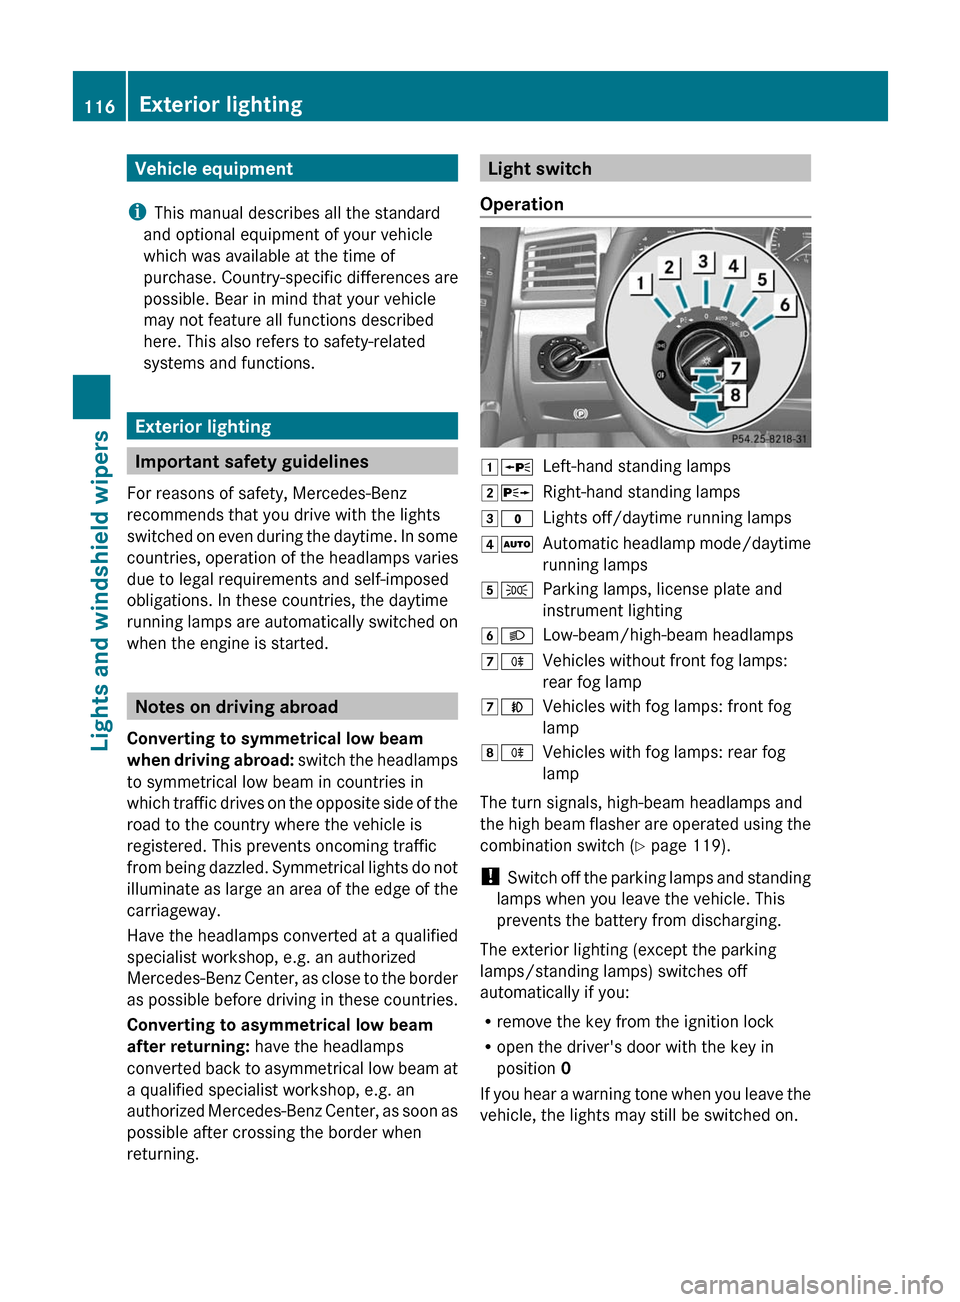
Operation1 WLeft-hand standing lamps2XRight-hand standing lamps3$Lights off/daytime running lamps4ÃAutomatic headlamp mode/daytime
running lamps5 TParking lamps, license plate and
instrument lighting6 LLow-beam/high-beam headlamps7RVehicles without front fog lamps:
rear fog lamp7 NVehicles with fog lamps: front fog
lamp8 RVehicles with fog lamps: rear fog
lamp
The turn signals, high-beam headlamps and
the high beam flasher are operated using the
combination switch ( Y page 119).
! Switch off the parking lamps and standing
lamps when you leave the vehicle. This
prevents the battery from discharging.
The exterior lighting (except the parking
lamps/standing lamps) switches off
automatically if you:
R remove the key from the ignition lock
R open the driver's door with the key in
position 0
If you hear a warning tone when you leave the
vehicle, the lights may still be switched on.
116Exterior lightingLights and windshield wipers
BA 251 USA, CA Edition A 2011; 1; 3, en-USd2sboikeVersion: 3.0.3.52010-04-16T14:31:55+02:00 - Seite 116
Page 119 of 364
XTurn the light switch to $ or à .
or
XIf the rear fog lamp is switched on: press
the light switch in to the stop.
Low-beam headlamps
XTo switch on the low-beam headlamps:
turn the key in the ignition lock to position
2 or start the engine.XTurn the light switch to L.
The L indicator lamp in the instrument
cluster lights up.XTo switch off the low-beam
headlamps: turn the light switch to $.
Daytime running lamps
Daytime running lamps in Canada
In Canada, the "daytime running lamps"
function is required by law. It can therefore
not be deactivated.
XTurn the light switch to $ or à .
With the engine running: depending on the
ambient light, either the daytime running
lamps or the low-beam headlamps are
switched on.
If the low-beam headlamps are switched
on, the T indicator lamp on the light
switch and the L indicator lamp in the
instrument cluster light up.
If the light switch is set to $ or à , you
cannot switch on the high-beam headlamps.
Turn the light switch to L when driving at
night. You can switch on the high-beam
headlamps in this position.
With the engine running while the vehicle is
stationary (vehicles with automatic
transmission): the low-beam headlamps
switch off after 3 minutes if you shift the
selector lever to N or P from a driving
position.
With the engine running while the vehicle is
stationary: if you set the light switch to
T , the parking lamps and the low-beam
headlamps switch on.
Daytime running lamps in the USA
The daytime running lamps are deactivated
ex works on vehicles for the USA.XTo switch on the daytime running
lamps: switch on the "daytime running
lamps" function via the on-board computer
( Y page 206).XTurn the light switch to $ or à .
When the engine is running: the low-beam
headlamps are switched on. The T
indicator lamp on the light switch and the
L indicator lamp in the instrument
cluster light up.
You can only switch on the high-beam
headlamps if there is little ambient light.
However, the headlamp flashers can always
be applied.
If you set the light switch to T or L
while the engine is running, the manual
setting overrides the daytime running lamps.
Automatic headlamps
GWarning!
If the light switch is set to Ã, the low-beam
headlamps will not come on automatically if
it is foggy. This could endanger you and
others. Therefore, turn the light switch to
L in fog.
The automatic headlamp feature is only an
aid. The driver is responsible for the vehicle's
lighting at all times.
GWarning
In low ambient lighting or foggy conditions,
only switch from position à to L with
the vehicle at a standstill in a safe location.
Switching from à to L will briefly
switch off the headlamps. Doing so while
driving in low ambient lighting conditions may
result in an accident.
Exterior lighting117Lights and windshield wipersBA 251 USA, CA Edition A 2011; 1; 3, en-USd2sboikeVersion: 3.0.3.52010-04-16T14:31:55+02:00 - Seite 117Z
Page 120 of 364
XTo switch on automatic headlamp
mode: turn the light switch to Ã.
SmartKey in position 1 in the ignition lock:
the parking lamps are switched on or off
automatically depending on the brightness
of the ambient light.
With the engine running: depending on the
brightness of the ambient light, the daytime
running lamps 11
or the low-beam
headlamps are switched on or off
automatically.
When the low-beam headlamps are
switched on, the L indicator lamp in the
instrument cluster lights up.
Fog lamps and rear fog lamps
Front fog lamps
Only vehicles with front fog lamps have the
"fog lamps" function.
GWarning!
If you suspect that driving conditions will be
foggy, turn the light switch to L before you
start your journey. Otherwise, your vehicle
may not be visible and you could endanger
yourself and others.
GWarning
In low ambient lighting or foggy conditions,
only switch from position à to L with
the vehicle at a standstill in a safe location.
Switching from à to L will briefly
switch off the headlamps. Doing so while
driving in low ambient lighting conditions may
result in an accident.
XTo switch on the front fog lamps: turn
the key in the ignition lock to position 2 or
start the engine.XTurn the light switch to L or T . If the
light switch is set to Ã, you cannot
switch on the fog lamps.XPull the light switch out to the first detent.
The green N indicator lamp on the light
switch lights up.XTo switch off the front fog lamps: press
the light switch in as far as it will go.
The green N indicator lamp on the light
switch goes out.
Rear fog lamp
XTo switch on (vehicles with front fog
lamps): turn the key in the ignition lock to
position 2 or start the engine.XTurn the light switch to L or T . When
the light switch is set to Ã, you cannot
switch on the rear fog lamp.XTurn the light switch to L. When the
light switch is set to T, you cannot
switch on the rear fog lamp.XPull the light switch out to the second stop.
The yellow R indicator lamp on the light
switch lights up.XTo switch off the rear fog lamp: press the
light switch in as far as it will go.
The yellow R indicator lamp on the light
switch goes out.XTo switch on (vehicles without front fog
lamps): turn the key in the ignition lock to
position 2 or start the engine.XTurn the light switch to L. When the
light switch is set to Ã, you cannot
switch on the rear fog lamp.XPull the light switch out to the stop.
The yellow R indicator lamp on the light
switch lights up.XTo switch off the rear fog lamp: press the
light switch in as far as it will go.
The yellow R indicator lamp on the light
switch goes out.11 Only if daytime running lamps have been activated via the on-board computer.118Exterior lightingLights and windshield wipers
BA 251 USA, CA Edition A 2011; 1; 3, en-USd2sboikeVersion: 3.0.3.52010-04-16T14:31:55+02:00 - Seite 118