remove seats MERCEDES-BENZ R-Class 2011 W251 Owner's Manual
[x] Cancel search | Manufacturer: MERCEDES-BENZ, Model Year: 2011, Model line: R-Class, Model: MERCEDES-BENZ R-Class 2011 W251Pages: 364, PDF Size: 16.5 MB
Page 47 of 364
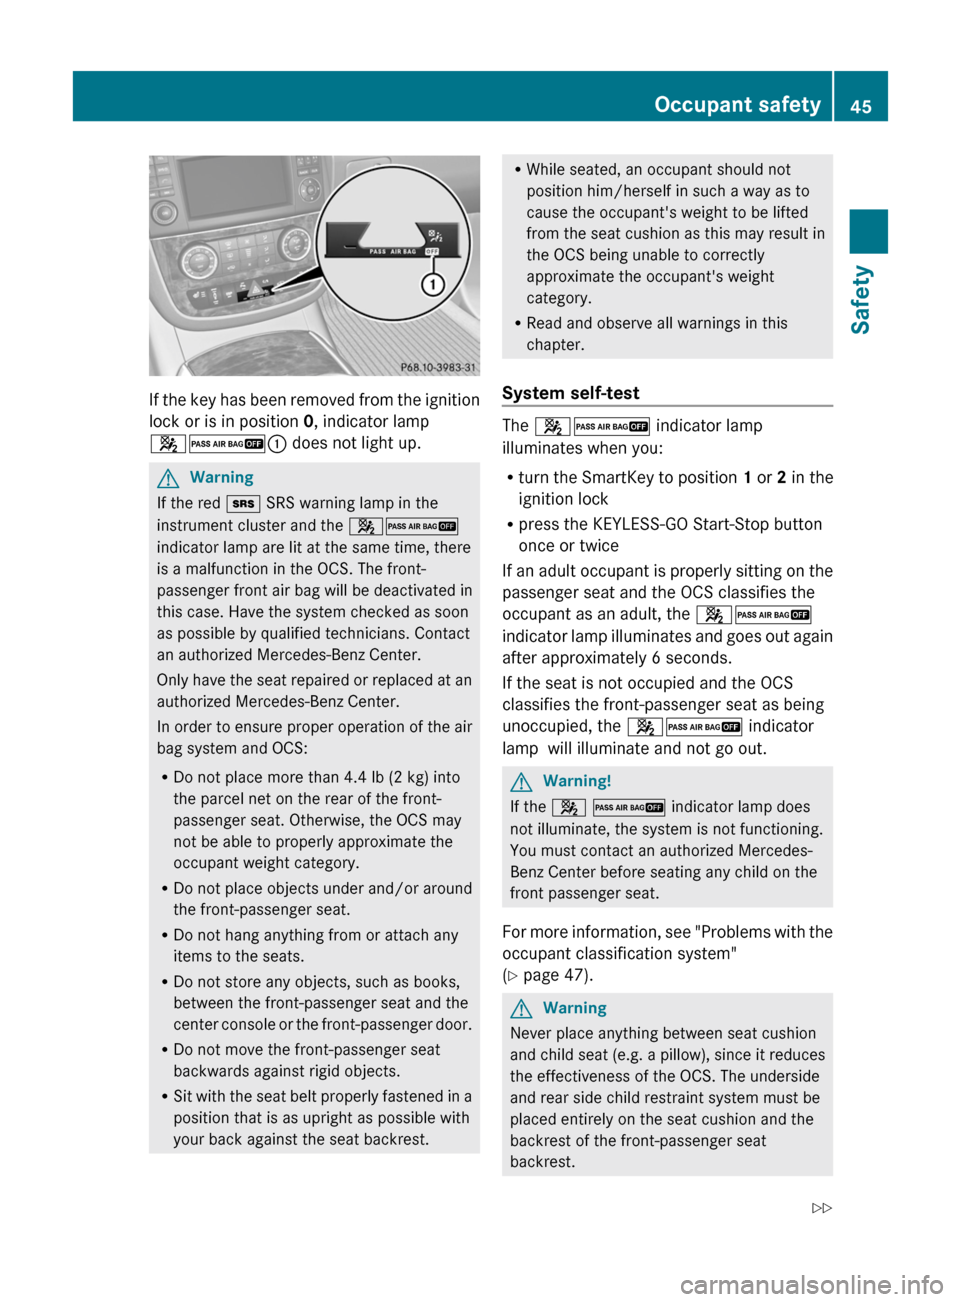
If the key has been removed from the ignition
lock or is in position 0, indicator lamp
42 : does not light up.
GWarning
If the red + SRS warning lamp in the
instrument cluster and the 42
indicator lamp are lit at the same time, there
is a malfunction in the OCS. The front-
passenger front air bag will be deactivated in
this case. Have the system checked as soon
as possible by qualified technicians. Contact
an authorized Mercedes-Benz Center.
Only have the seat repaired or replaced at an
authorized Mercedes-Benz Center.
In order to ensure proper operation of the air
bag system and OCS:
R Do not place more than 4.4 lb (2 kg) into
the parcel net on the rear of the front-
passenger seat. Otherwise, the OCS may
not be able to properly approximate the
occupant weight category.
R Do not place objects under and/or around
the front-passenger seat.
R Do not hang anything from or attach any
items to the seats.
R Do not store any objects, such as books,
between the front-passenger seat and the
center console or the front-passenger door.
R Do not move the front-passenger seat
backwards against rigid objects.
R Sit with the seat belt properly fastened in a
position that is as upright as possible with
your back against the seat backrest.
R While seated, an occupant should not
position him/herself in such a way as to
cause the occupant's weight to be lifted
from the seat cushion as this may result in
the OCS being unable to correctly
approximate the occupant's weight
category.
R Read and observe all warnings in this
chapter.
System self-test
The 42 indicator lamp
illuminates when you:
R turn the SmartKey to position 1 or 2 in the
ignition lock
R press the KEYLESS-GO Start-Stop button
once or twice
If an adult occupant is properly sitting on the
passenger seat and the OCS classifies the
occupant as an adult, the 42
indicator lamp illuminates and goes out again
after approximately 6 seconds.
If the seat is not occupied and the OCS
classifies the front-passenger seat as being
unoccupied, the 42 indicator
lamp will illuminate and not go out.
GWarning!
If the 4 2 indicator lamp does
not illuminate, the system is not functioning.
You must contact an authorized Mercedes-
Benz Center before seating any child on the
front passenger seat.
For more information, see "Problems with the
occupant classification system"
( Y page 47).
GWarning
Never place anything between seat cushion
and child seat (e.g. a pillow), since it reduces
the effectiveness of the OCS. The underside
and rear side child restraint system must be
placed entirely on the seat cushion and the
backrest of the front-passenger seat
backrest.
Occupant safety45SafetyBA 251 USA, CA Edition A 2011; 1; 3, en-USd2sboikeVersion: 3.0.3.52010-04-16T14:31:55+02:00 - Seite 45Z
Page 63 of 364
may only carry a child on the front-
passenger seat once the system has been
repaired.
A child in a rear-facing child restraint on the
front-passenger seat will be seriously
injured or even killed if the front-passenger
front air bag inflates.
R when securing a child in a child restraint
system on the front-passenger seat, you
must:
- move the front-passenger seat as far
back as possible
- use a child restraint system that is
suitable for the age, size and weight of
the child
- observe the manufacturer's installation
instructions in order to install and secure
the child restraint system correctly.
R For children larger than the typical 12-
month-old child, the front-passenger front
air bag can be activated or deactivated.GWarning
Infants and small children should never share
a seat belt with another occupant. During an
accident, they could be crushed between the
occupant and seat belt.
A child's risk of serious or fatal injuries is
significantly increased if the child restraints
are not properly secured in the vehicle and/
or the child is not properly secured in the child
restraint.
Children too big for a toddler restraint must
ride in seats using regular seat belts. Position
the shoulder belt across the chest and
shoulder, not face or neck. A booster seat
may be necessary to achieve proper seat belt
positioning for children over 41 lb (18 kg) until
they reach a height where a lap/shoulder belt
fits properly without a booster.
When the child restraint is not in use, remove
it from the vehicle or secure it with the seat
belt to prevent the child restraint from
becoming a projectile in the event of an
accident.
Special seat belt retractorGWarning
Observe "Important safety instructions"
( Y page 59).
All seat belts in the vehicle, except the
driver's seat belt, are equipped with a special
seat belt retractor. The activated special seat
belt retractor ensures that the seat belt
cannot slacken after being fastened.
Installing a child restraint system:
XAlways comply with the manufacturer's
installation instructions.XPull the seat belt smoothly from the inertia
reel.XEngage the seat belt tongue in the belt
buckle.
Activating the special seat belt retractor:
XPull the seat belt out fully and let the inertia
reel retract it again.
While the seat belt is retracting, you should
hear a ratcheting sound. The special seat
belt retractor is activated.XPush down on the child restraint system to
take up any slack.
Removing a child restraint system/
deactivating the special seat belt retractor:
XAlways comply with the manufacturer's
installation instructions.XPress the seat belt release button and
guide the belt tongue to the belt outlet.
The special seat belt retractor is
deactivated.GWarning
Never release the seat belt buckle while the
vehicle is in motion, since the special seat belt
retractor will be deactivated.
Children in the vehicle61SafetyBA 251 USA, CA Edition A 2011; 1; 3, en-USd2sboikeVersion: 3.0.3.52010-04-16T14:31:55+02:00 - Seite 61Z
Page 64 of 364
LATCH-type child restraint (ISOFIX) in
the rearGWarning
Observe "Important safety instructions"
( Y page 59).
GWarning
Children that are too large for a child restraint
must travel in seats using normal seat belts.
Position shoulder belt across the chest and
shoulder, not face or neck.
In order to attain the correct seating position
for children weighing over 41 lb (18 kg), it may
be necessary to use a booster seat until they
reach a height where a normal lap/shoulder
seat belt lies properly across their bodies
without the need for a booster seat.
Install the child restraint system according to
the manufacturer's instructions.
The child restraint system must be installed
firmly on both brackets.
An incorrectly installed child restraint system
can come loose in the event of an accident,
causing the child to be severely or fatally
injured.
Child restraint systems/child restraint
retaining brackets that are damaged or have
suffered damage due to an impact must be
replaced.
ISOFIX is a standardized securing system for
specially designed child restraint systems on
the rear seats.
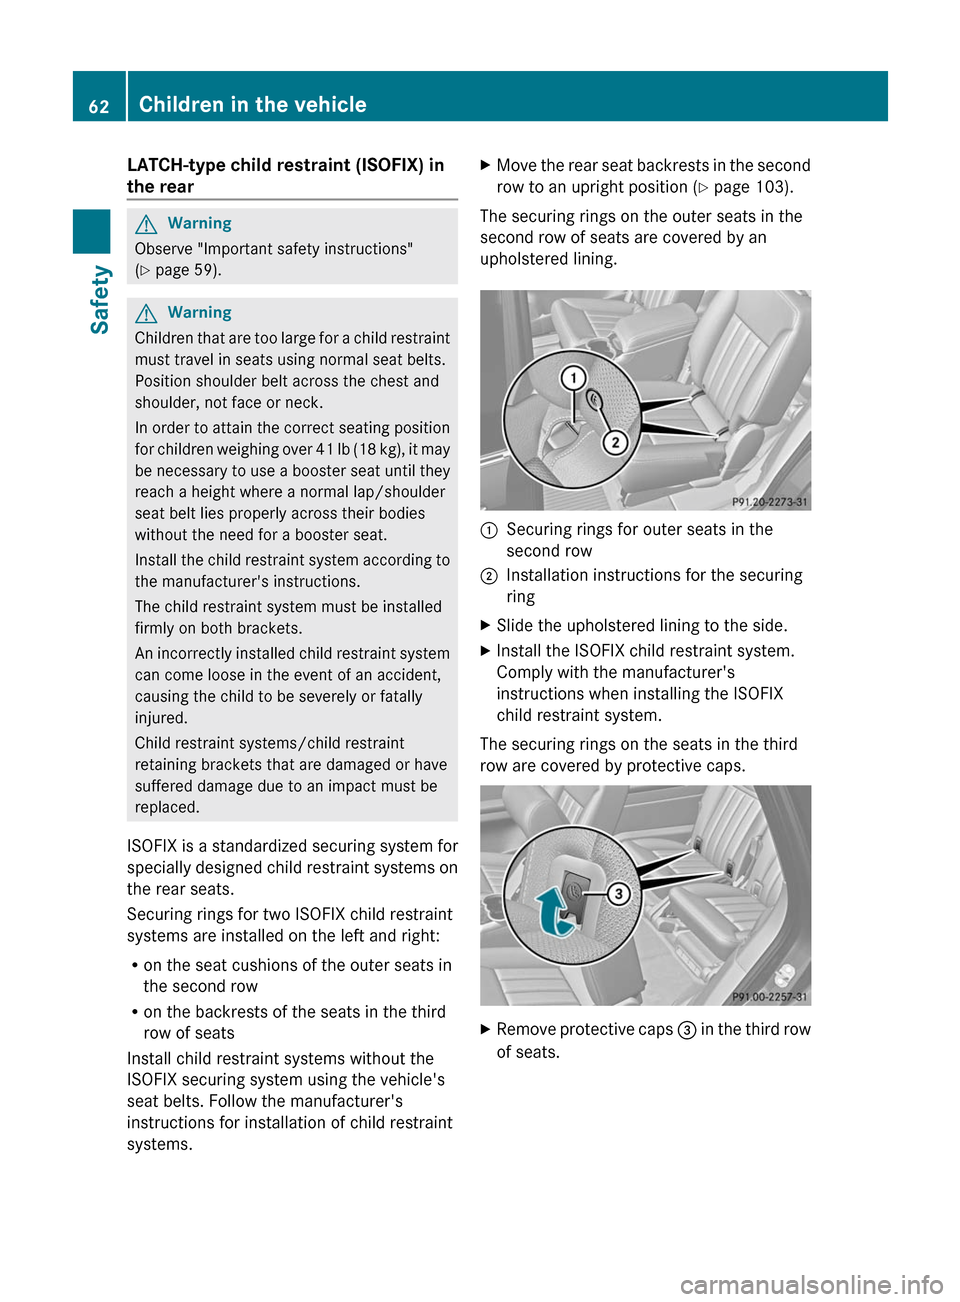
Securing rings for two ISOFIX child restraint
systems are installed on the left and right:
R on the seat cushions of the outer seats in
the second row
R on the backrests of the seats in the third
row of seats
Install child restraint systems without the
ISOFIX securing system using the vehicle's
seat belts. Follow the manufacturer's
instructions for installation of child restraint
systems.
XMove the rear seat backrests in the second
row to an upright position ( Y page 103).
The securing rings on the outer seats in the
second row of seats are covered by an
upholstered lining.
:Securing rings for outer seats in the
second row;Installation instructions for the securing
ringXSlide the upholstered lining to the side.XInstall the ISOFIX child restraint system.
Comply with the manufacturer's
instructions when installing the ISOFIX
child restraint system.
The securing rings on the seats in the third
row are covered by protective caps.
XRemove protective caps = in the third row
of seats.62Children in the vehicleSafety
BA 251 USA, CA Edition A 2011; 1; 3, en-USd2sboikeVersion: 3.0.3.52010-04-16T14:31:55+02:00 - Seite 62
Page 65 of 364
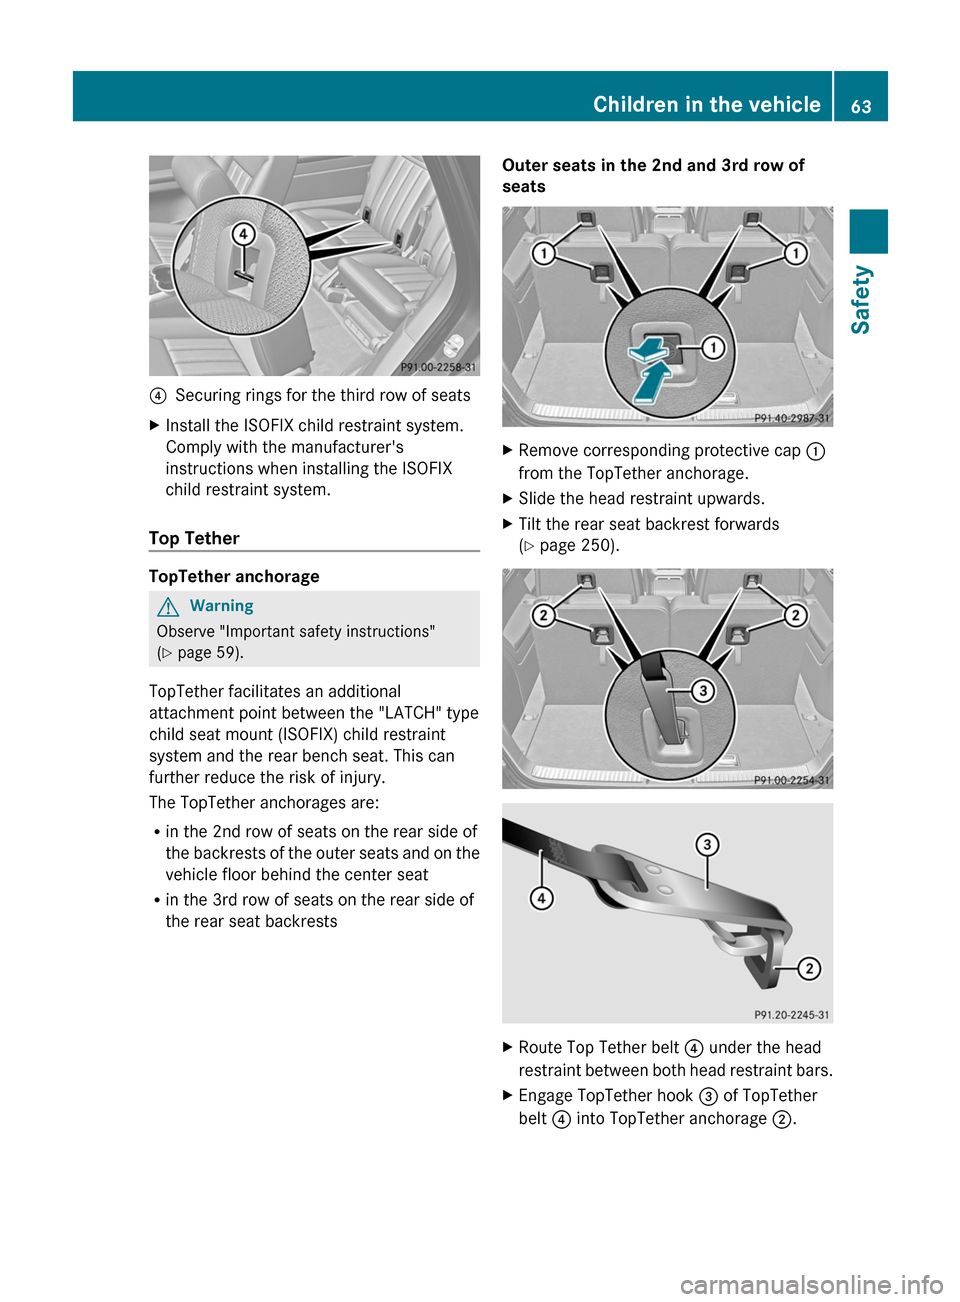
?Securing rings for the third row of seatsXInstall the ISOFIX child restraint system.
Comply with the manufacturer's
instructions when installing the ISOFIX
child restraint system.
Top Tether
TopTether anchorage
GWarning
Observe "Important safety instructions"
( Y page 59).
TopTether facilitates an additional
attachment point between the "LATCH" type
child seat mount (ISOFIX) child restraint
system and the rear bench seat. This can
further reduce the risk of injury.
The TopTether anchorages are:
R in the 2nd row of seats on the rear side of
the backrests of the outer seats and on the
vehicle floor behind the center seat
R in the 3rd row of seats on the rear side of
the rear seat backrests
Outer seats in the 2nd and 3rd row of
seatsXRemove corresponding protective cap :
from the TopTether anchorage.XSlide the head restraint upwards.XTilt the rear seat backrest forwards
( Y page 250).XRoute Top Tether belt ? under the head
restraint between both head restraint bars.XEngage TopTether hook = of TopTether
belt ? into TopTether anchorage ;.Children in the vehicle63SafetyBA 251 USA, CA Edition A 2011; 1; 3, en-USd2sboikeVersion: 3.0.3.52010-04-16T14:31:55+02:00 - Seite 63Z
Page 102 of 364
Do not drive the vehicle without the seat head
restraints. Head restraints are intended to
help reduce injuries during an accident.
! To avoid damage to the seats and the seat
heating, observe the following information:
R do not spill any liquids on the seats. If
liquid is spilled on the seats, dry them as
soon as possible.
R if the seat covers are damp or wet, do not
switch on the seat heating. The seat
heating should also not to be used to dry
the seats.
R clean the seat covers as recommended;
see the " Interior care" section.
R do not transport heavy loads on the
seats. Do not place sharp objects on the
seat cushions, e.g. knives, nails or tools.
The seats should only be occupied by
passengers, if possible.
R when the seat heating is in operation, do
not cover the seats with insulating
materials, e.g. covers, bags, seat covers,
child seats or booster seats.
! When you move the seats, make sure that
there are no objects in the footwell or
behind the seats. Otherwise, you could
damage the seats and the objects.
! When the outer seats in the second row
are folded down, the front seats must not
be in their rearmost position. The front
seats and the outer seats in the second row
could otherwise be damaged.
! Make sure that the sun visor is folded up
before adjusting the backrest and head
restraint height. The head restraint and sun
visor could otherwise collide when the head
restraint is fully extended.
i The rear-compartment head restraints
can be removed ( Y page 102).
Please contact an authorized Mercedes-
Benz Center for more information.i Related topics:
R Cargo compartment enlargement
(folding the second and third rows of
seats forwards) ( Y page 250)
Adjusting the seats
i Vehicles without the memory function:
the seats can be adjusted within five
minutes of opening a front door.
The time span starts over if, within these
five minutes, you:
R open or close a front door
R insert the key into or remove the key
from the ignition lock
R switch the ignition on or off.
If the key is in position 2 in the ignition, you
can adjust the seats at any time.
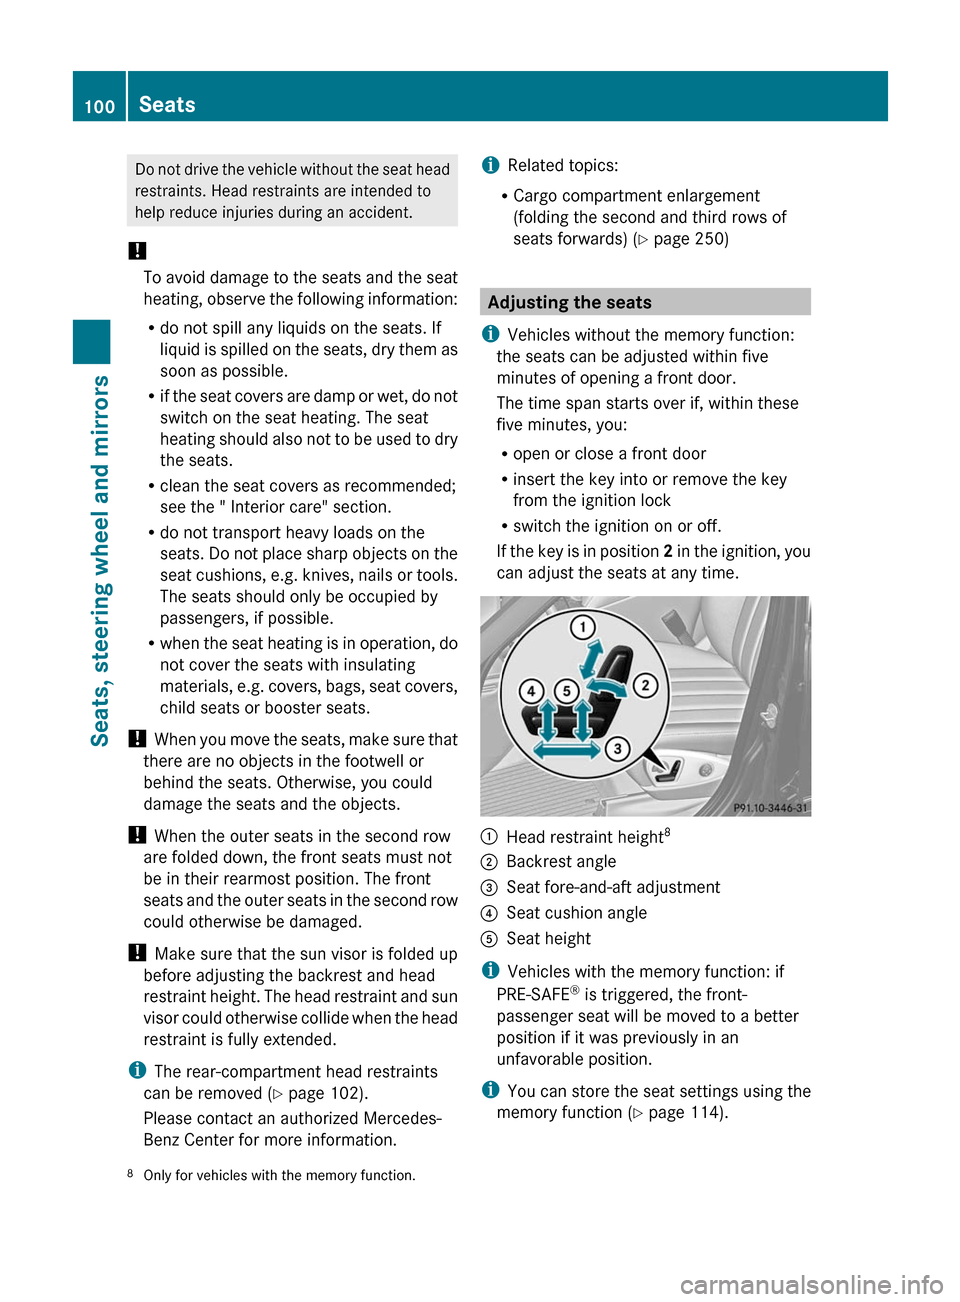
:Head restraint height 8;Backrest angle=Seat fore-and-aft adjustment?Seat cushion angleASeat height
i
Vehicles with the memory function: if
PRE-SAFE ®
is triggered, the front-
passenger seat will be moved to a better
position if it was previously in an
unfavorable position.
i You can store the seat settings using the
memory function ( Y page 114).
8
Only for vehicles with the memory function.100SeatsSeats, steering wheel and mirrors
BA 251 USA, CA Edition A 2011; 1; 3, en-USd2sboikeVersion: 3.0.3.52010-04-16T14:31:55+02:00 - Seite 100
Page 103 of 364
Adjusting the head restraints
Adjusting the head restraints manually
Adjusting the head restraint height 9
! The head restraints may only be removed
in a qualified specialist workshop.
Mercedes-Benz recommends that you go
to an authorized Mercedes-Benz Center.
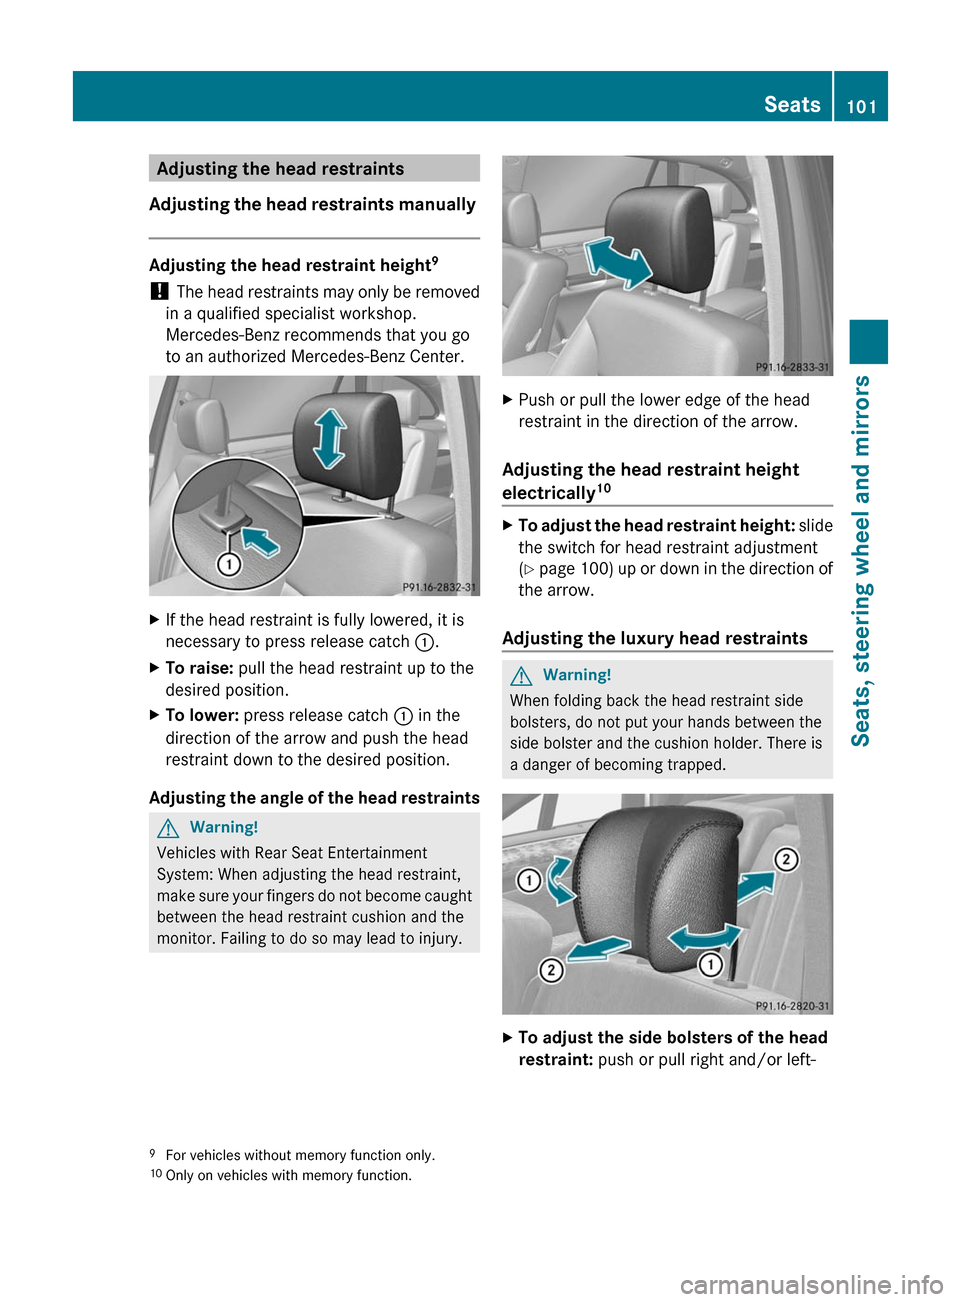
XIf the head restraint is fully lowered, it is
necessary to press release catch :.XTo raise: pull the head restraint up to the
desired position.XTo lower: press release catch : in the
direction of the arrow and push the head
restraint down to the desired position.
Adjusting the angle of the head restraints
GWarning!
Vehicles with Rear Seat Entertainment
System: When adjusting the head restraint,
make sure your fingers do not become caught
between the head restraint cushion and the
monitor. Failing to do so may lead to injury.
XPush or pull the lower edge of the head
restraint in the direction of the arrow.
Adjusting the head restraint height
electrically 10
XTo adjust the head restraint height:
slide
the switch for head restraint adjustment
( Y page 100) up or down in the direction of
the arrow.
Adjusting the luxury head restraints
GWarning!
When folding back the head restraint side
bolsters, do not put your hands between the
side bolster and the cushion holder. There is
a danger of becoming trapped.
XTo adjust the side bolsters of the head
restraint: push or pull right and/or left-9
For vehicles without memory function only.
10 Only on vehicles with memory function.Seats101Seats, steering wheel and mirrorsBA 251 USA, CA Edition A 2011; 1; 3, en-USd2sboikeVersion: 3.0.3.52010-04-16T14:31:55+02:00 - Seite 101Z
Page 104 of 364
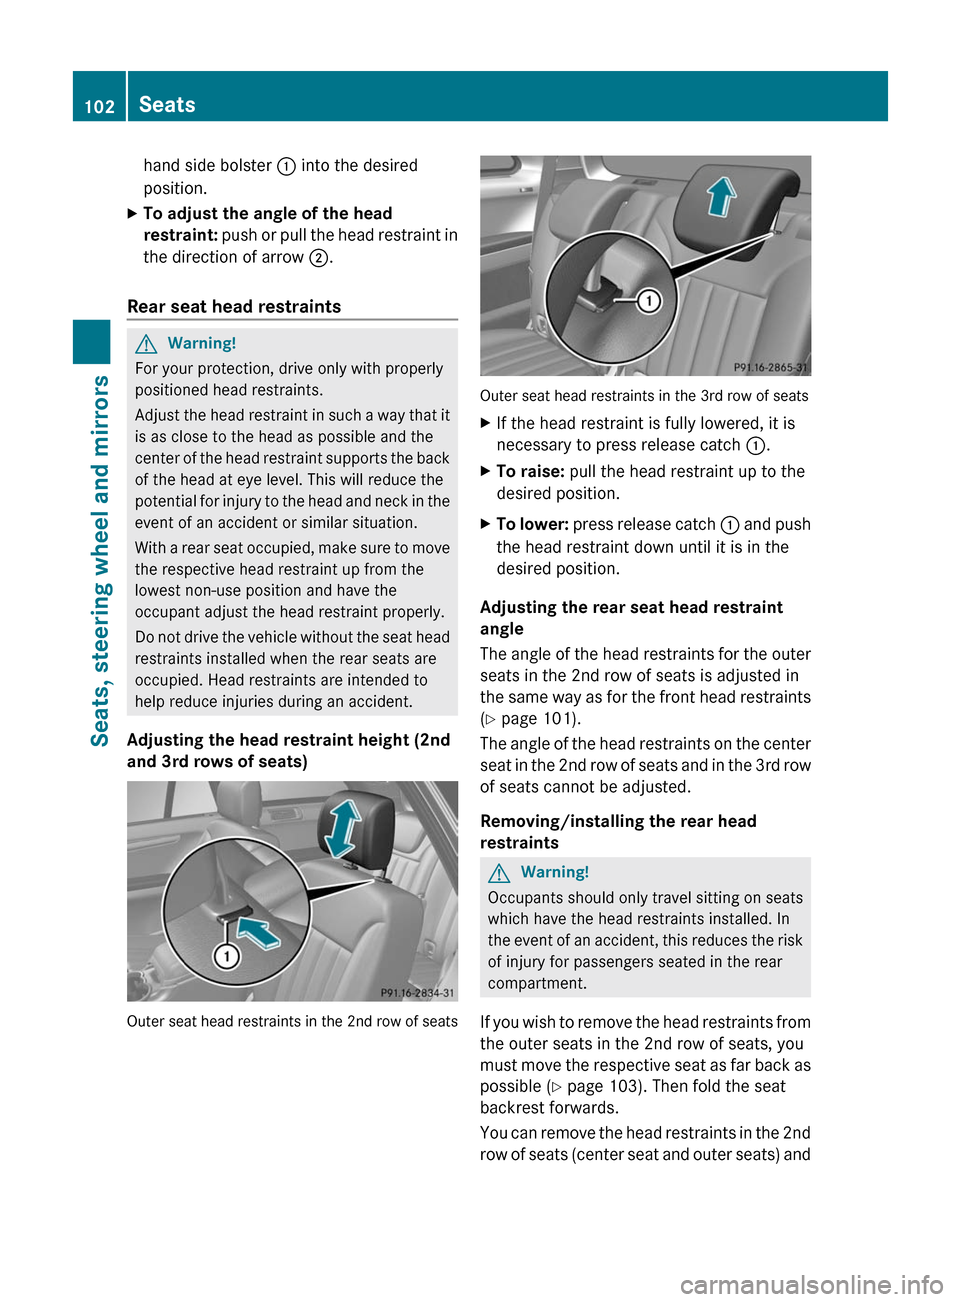
hand side bolster : into the desired
position.XTo adjust the angle of the head
restraint: push or pull the head restraint in
the direction of arrow ;.
Rear seat head restraints
GWarning!
For your protection, drive only with properly
positioned head restraints.
Adjust the head restraint in such a way that it
is as close to the head as possible and the
center of the head restraint supports the back
of the head at eye level. This will reduce the
potential for injury to the head and neck in the
event of an accident or similar situation.
With a rear seat occupied, make sure to move
the respective head restraint up from the
lowest non-use position and have the
occupant adjust the head restraint properly.
Do not drive the vehicle without the seat head
restraints installed when the rear seats are
occupied. Head restraints are intended to
help reduce injuries during an accident.
Adjusting the head restraint height (2nd
and 3rd rows of seats)
Outer seat head restraints in the 2nd row of seats
Outer seat head restraints in the 3rd row of seats
XIf the head restraint is fully lowered, it is
necessary to press release catch :.XTo raise: pull the head restraint up to the
desired position.XTo lower: press release catch : and push
the head restraint down until it is in the
desired position.
Adjusting the rear seat head restraint
angle
The angle of the head restraints for the outer
seats in the 2nd row of seats is adjusted in
the same way as for the front head restraints
( Y page 101).
The angle of the head restraints on the center
seat in the 2nd row of seats and in the 3rd row
of seats cannot be adjusted.
Removing/installing the rear head
restraints
GWarning!
Occupants should only travel sitting on seats
which have the head restraints installed. In
the event of an accident, this reduces the risk
of injury for passengers seated in the rear
compartment.
If you wish to remove the head restraints from
the outer seats in the 2nd row of seats, you
must move the respective seat as far back as
possible ( Y page 103). Then fold the seat
backrest forwards.
You can remove the head restraints in the 2nd
row of seats (center seat and outer seats) and
102SeatsSeats, steering wheel and mirrors
BA 251 USA, CA Edition A 2011; 1; 3, en-USd2sboikeVersion: 3.0.3.52010-04-16T14:31:55+02:00 - Seite 102
Page 105 of 364
the head restraints in the 3rd row of seats in
the same way.
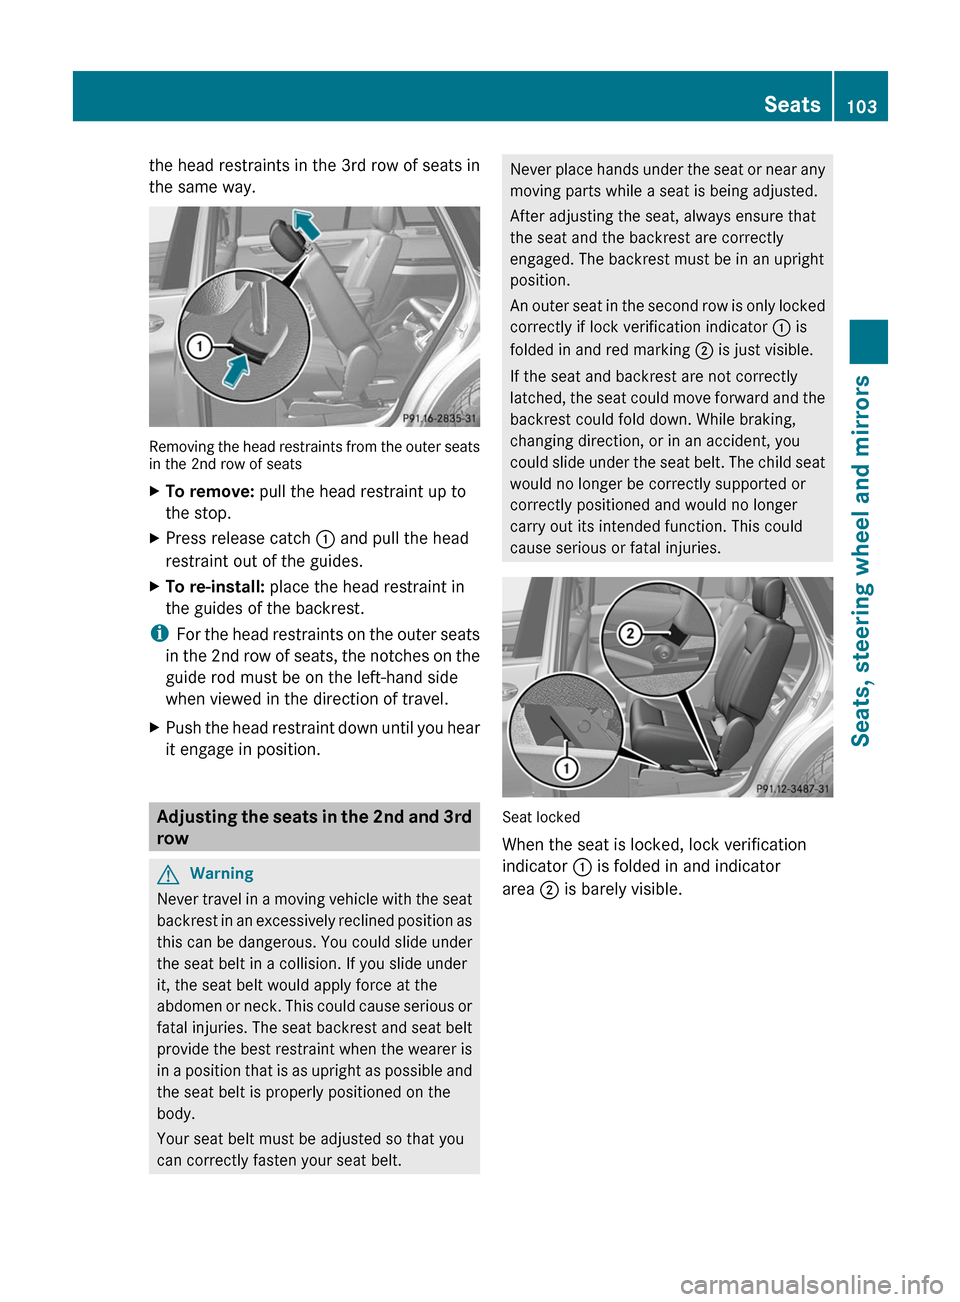
Removing the head restraints from the outer seats
in the 2nd row of seats
XTo remove: pull the head restraint up to
the stop.XPress release catch : and pull the head
restraint out of the guides.XTo re-install: place the head restraint in
the guides of the backrest.
i For the head restraints on the outer seats
in the 2nd row of seats, the notches on the
guide rod must be on the left-hand side
when viewed in the direction of travel.
XPush the head restraint down until you hear
it engage in position.
Adjusting the seats in the 2nd and 3rd
row
GWarning
Never travel in a moving vehicle with the seat
backrest in an excessively reclined position as
this can be dangerous. You could slide under
the seat belt in a collision. If you slide under
it, the seat belt would apply force at the
abdomen or neck. This could cause serious or
fatal injuries. The seat backrest and seat belt
provide the best restraint when the wearer is
in a position that is as upright as possible and
the seat belt is properly positioned on the
body.
Your seat belt must be adjusted so that you
can correctly fasten your seat belt.
Never place hands under the seat or near any
moving parts while a seat is being adjusted.
After adjusting the seat, always ensure that
the seat and the backrest are correctly
engaged. The backrest must be in an upright
position.
An outer seat in the second row is only locked
correctly if lock verification indicator : is
folded in and red marking ; is just visible.
If the seat and backrest are not correctly
latched, the seat could move forward and the
backrest could fold down. While braking,
changing direction, or in an accident, you
could slide under the seat belt. The child seat
would no longer be correctly supported or
correctly positioned and would no longer
carry out its intended function. This could
cause serious or fatal injuries.
Seat locked
When the seat is locked, lock verification
indicator : is folded in and indicator
area ; is barely visible.
Seats103Seats, steering wheel and mirrorsBA 251 USA, CA Edition A 2011; 1; 3, en-USd2sboikeVersion: 3.0.3.52010-04-16T14:31:55+02:00 - Seite 103Z
Page 112 of 364
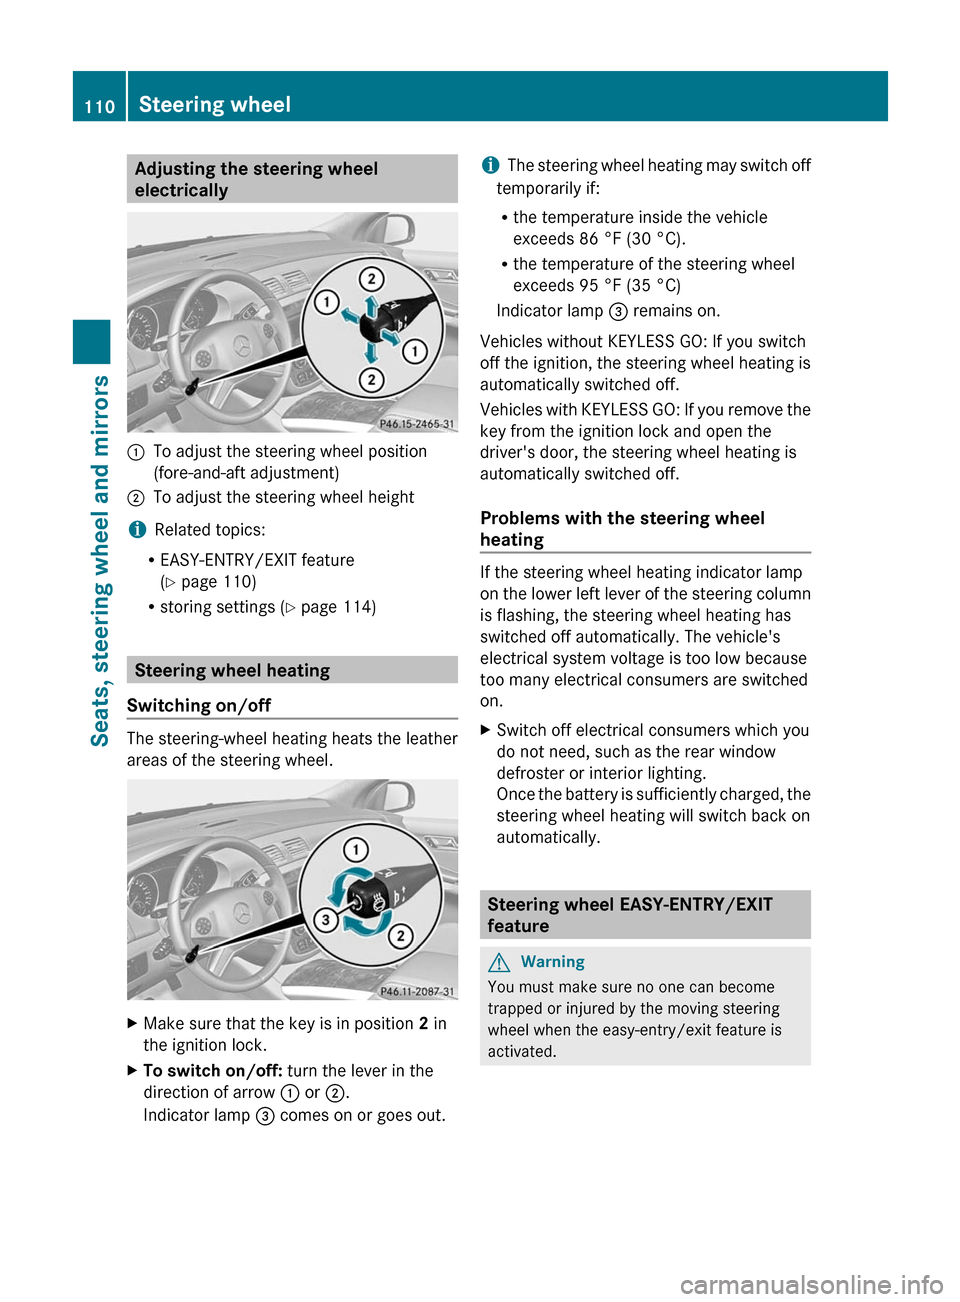
Adjusting the steering wheel
electrically:To adjust the steering wheel position
(fore-and-aft adjustment);To adjust the steering wheel height
i Related topics:
R EASY-ENTRY/EXIT feature
( Y page 110)
R storing settings ( Y page 114)
Steering wheel heating
Switching on/off
The steering-wheel heating heats the leather
areas of the steering wheel.
XMake sure that the key is in position 2 in
the ignition lock.XTo switch on/off: turn the lever in the
direction of arrow : or ;.
Indicator lamp = comes on or goes out.i The steering wheel heating may switch off
temporarily if:
R the temperature inside the vehicle
exceeds 86 °F (30 °C).
R the temperature of the steering wheel
exceeds 95 °F (35 °C)
Indicator lamp = remains on.
Vehicles without KEYLESS GO: If you switch
off the ignition, the steering wheel heating is
automatically switched off.
Vehicles with KEYLESS GO: If you remove the
key from the ignition lock and open the
driver's door, the steering wheel heating is
automatically switched off.
Problems with the steering wheel
heating
If the steering wheel heating indicator lamp
on the lower left lever of the steering column
is flashing, the steering wheel heating has
switched off automatically. The vehicle's
electrical system voltage is too low because
too many electrical consumers are switched
on.
XSwitch off electrical consumers which you
do not need, such as the rear window
defroster or interior lighting.
Once the battery is sufficiently charged, the
steering wheel heating will switch back on
automatically.
Steering wheel EASY-ENTRY/EXIT
feature
GWarning
You must make sure no one can become
trapped or injured by the moving steering
wheel when the easy-entry/exit feature is
activated.
110Steering wheelSeats, steering wheel and mirrors
BA 251 USA, CA Edition A 2011; 1; 3, en-USd2sboikeVersion: 3.0.3.52010-04-16T14:31:55+02:00 - Seite 110
Page 113 of 364

To stop steering wheel movement do one of
the following:
R Move steering wheel adjustment stalk.
R Press one of the memory position buttons.
R Press memory button M.
Do not leave children unattended in the
vehicle, or with access to an unlocked vehicle.
Children could open the driver's door and
unintentionally activate the easy-entry/exit
feature, which could result in an accident
and/or serious personal injury.
The EASY-ENTRY/EXIT feature makes getting
in and out of your vehicle easier.
The steering wheel swings upwards when
you:
R remove the key from the ignition lock.
R open the driver's door and KEYLESS-GO is
in position 1
R open the driver's door and the key is in
position 0 or 1 in the ignition lock.
i The steering wheel only moves upwards if
it has not already reached the upper end
stop.
The steering wheel is moved to the last
selected position when:
R the driver's door is closed, and
R you insert the key into the ignition lock.
or
R in vehicles with KEYLESS-GO, you press the
Start/Stop button once.
When you close the driver's door with the
ignition switched on, the steering wheel is
also automatically moved to the previously
set position.
The last position of the steering wheel is
stored when you switch off the ignition or
when you store the setting with the memory
function ( Y page 114).
You can activate and deactivate the EASY-
ENTRY/EXIT feature in the on-board
computer ( Y page 209).GWarning
Let the system complete the adjustment
procedure before setting the vehicle in
motion. All steering wheel adjustment must
be completed before setting the vehicle in
motion. Driving off with the steering wheel
still adjusting could cause the driver to lose
control of the vehicle.
i If the crash-responsive EASY-EXIT feature
is triggered in an accident, the steering
column will move upwards when the
driver's door is opened. This occurs
irrespective of the position of the key in the
ignition lock. This makes it easier to exit the
vehicle and rescue the occupants.
The crash-responsive EASY-EXIT feature is
only operational after an accident if the
EASY-EXIT/ENTRY feature is activated in
the on-board computer.
Mirrors
Rear-view mirror
Rear-view mirror (manual anti-glare)
XAnti-glare mode: flick anti-glare
switch : forwards or back.Mirrors111Seats, steering wheel and mirrorsBA 251 USA, CA Edition A 2011; 1; 3, en-USd2sboikeVersion: 3.0.3.52010-04-16T14:31:55+02:00 - Seite 111Z