buttons MERCEDES-BENZ R-Class 2012 W251 Comand Manual
[x] Cancel search | Manufacturer: MERCEDES-BENZ, Model Year: 2012, Model line: R-Class, Model: MERCEDES-BENZ R-Class 2012 W251Pages: 210, PDF Size: 5.11 MB
Page 88 of 210

X
To scrol lthe map: pressthe =;
9: buttons.
X To setthe map scale :pre ssthe U or
T button.
The scaleba ra ppears.
X Press theU orT buttonagain.
The map view iszoom edinor out.
X To add anarea tobe avoided :press the
9 butt on.
Ar ed square onthe map delimits thearea
to be avoided. X
To set the size ofthe squa re:press the
U orT button .
The square isenlarged orreduced.
X To confirm thesetting: pressthe9
button .
The listappears. Thepreviously selected
area tobe avoided hasbeen added and
activat ed.
X Ifyou want touse listfunc tions,proceed
accor dingtothe instruct ions described
under "Option 2:the listappears". Opt
ion 2:the listappears Ex
ample display: "Avoidarea"list
X Select Avoid newarea using
the
9: buttonsand press the9button
to con firm.
The map withthecross hairappears.
X Proceed accordingtothe instruct ions
under "Option 1:the map appears" ifyou
wish toset anew area tobe avoided.
The following illustration showsanexample
with twoareas thataretobe avoided. :
Area curren tlybeing avoided
; New areatobe avoided, thesize ofwhich
can stillbeadjusted
Switching anavoided areaon/off X
Select anent ryinthe listusing the
9: buttonsand press the9button
to con firm.
The avoided areaisswitch edon O oroff
ª depending onthe previous status. 86
Addit
ional settingsNavigation
Page 89 of 210

Disp
laying andc hangi nganavoi ded
area X
Select anentry inthe listusi ng the
9: buttons.
X Select Option s usi
ng the ; button and
press the9button toconfirm.
X Select Displa y/Change and
press the
9 button toconfirm.
The area tobe avoi ded isindi cated inthe
map.
X To chang ethe posi tion ofthe area: press
the =;9 or; button.
The area ismoved onthe map.
X To chang ethe size ofthe area: press the
U orT button.
The area isenla rged orredu ced.
X To confirm thechang e:press the9
button.
The lista ppears andthechang eis ent ered.
Deleting asetarea X
Sele ctan ent ryinthelist usin gth e
9: buttons.
X Sele ctOpt ions usin
gth e; buttonand
pres sth e9 butt ontocon firm.
X Sele ctDel ete and
pres s9 tocon firm.
Aq uery appear sask ing whet hertheen try
sho uld bedelet ed.
X Se lec tYes or
No .
If you selectYes ,
th een try is delet ed.
If you sele ctNo ,
th epro ces swill beabor ted. "R
ecor drou te" funct ion
Swit chingth efu nct ion on/of f X
To swit chtonav igationmod e:pre ssthe
Ø function button.
X To show themen u:pre ssthe9 button. X
Se lec tNav i in
themain function bar usin g
th e9=; buttons and pressthe
9 buttonto confirm .
X Se lec tSav eoff -roadroute and
press
th e9 buttonto confirm . Off
-road routemen u
X Se lec tSav eoff -roadroute again
and
pre ssthe9 buttonto confirm .
De pen dingon thepre vious status ,you
swit chtheopt ion onO oroff ª.
X To exit themen u:pre ssthe=
or ; button.
Disp laying mem oryusage When
themem oryis90 %full, youseea
mes sage tothis eff ect.You willalso seea
mes sage when themem oryisco mple tely full.
X To confi rmthemes sage:pre ssthe9
but ton.
i Inord erto be able tocontinue usingth e
"Reco rdrout e"fun ction ,you should delete
the route memory afterwards.
X To switch tonavigation mode:pressthe
Ø functionbutton .
X To show themenu: pressthe9button .
X Select Navi in
the main functionbar using
the 9=; buttonsand press the
9 button toconf irm.
X Select Saveoff-road route and
press
the 9button toconf irm. Additional
settings
87Navigation Z
Page 90 of 210
X
Sel ect Off -road rou
te mem
ory and
press
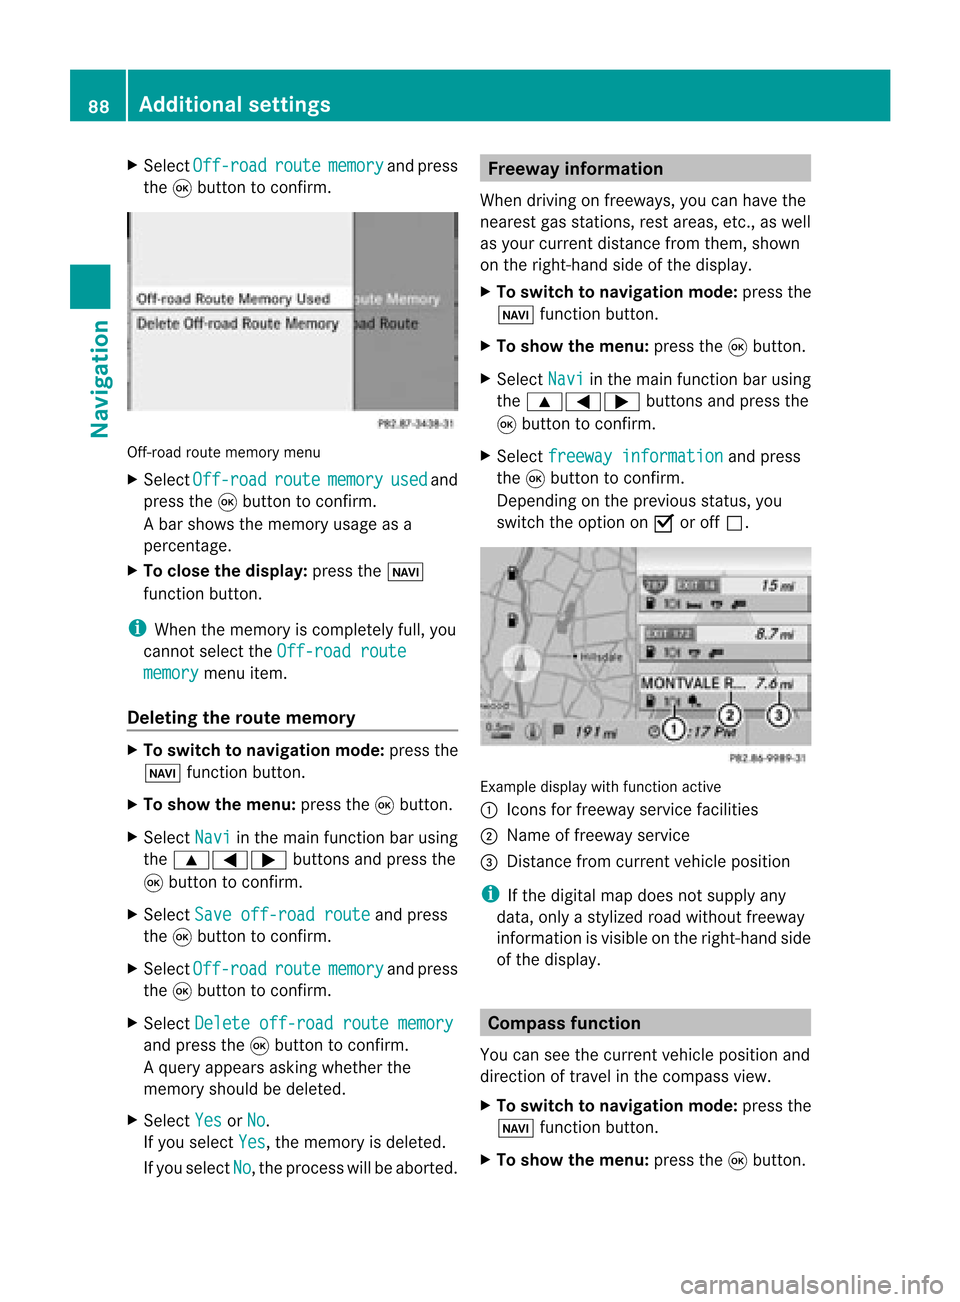
the 9button toconfi rm. Off-ro
adrou tememo rymenu
X Sel ect Off -road rou
te mem
ory use
d and
pre ssthe 9button toconfi rm.
Ab arsho wsthemem oryusage asa
perc entag e.
X To close thedis pla y:pres sth eß
fun ction button.
i When themem oryisco mple tely full, you
can notselec tth eOff -roadroute mem
ory men
uite m.
Deleti ngtherou temem ory X
To swit chtonav igat ionmod e:pres sth e
Ø function button.
X To show themen u:pres sth e9 button.
X Sel ect Navi in
themain function bar usin g
th e9=; buttons and pres sth e
9 buttonto confirm .
X Sel ect Saveoff -roadroute and
pres s
th e9 buttonto confirm .
X Sel ect Off -road rou
te mem
ory and
pres s
th e9 buttonto confirm .
X Sel ect Delete off-roadroutememory and
pres sth e9 buttonto confirm .
Aq uery appear sask ing whet herthe
mem oryshould bedelet ed.
X Se lec tYes or
No .
If you selectYes ,
th emem oryisdelet ed.
If you sele ctNo ,
th epro ces swill beabor ted. Free
way information
When drivingonfreeways, youcan have the
ne ares tgas statio ns,res tareas, etc.,aswel l
as you rcurr entd istanc efrom them, shown
on the right-hand sideofthe disp lay.
X To swi tch tonavig ation mode: pressthe
Ø function button.
X To show themenu: pressthe9button.
X Select Navi in
the main function barusing
the 9=; buttonsandpress the
9 button toconfirm.
X Select freeway information and
press
the 9button toconfirm.
Dependi ngon the previ ousstatus, you
swi tch the option onO oroff ª. Example
displaywith function active
: Icons forfreew ayservice facilities
; Name offreew ayservice
= Distance fromcurrent vehicleposi tion
i Ifthe digitalmap does notsupplyany
data ,only astyli zed road witho utfreew ay
informati onisvisib leon the right-hand side
of the disp lay. Co
mpass function
You canseethecurrent vehicleposi tion and
dire ction oftravel inthe compas sview .
X To swi tch tonavig ation mode: pressthe
Ø function button.
X To show themenu: pressthe9button. 88
Additio
nalsetting sNavigatio n
Page 91 of 210
X
Sel ect Positi on in
the navi gation menu
ba ru sing the:=; buttonsand
press the9button toconfirm.
X Select Compass and
press the9button to
confirm.
Depending onthe previous status,you
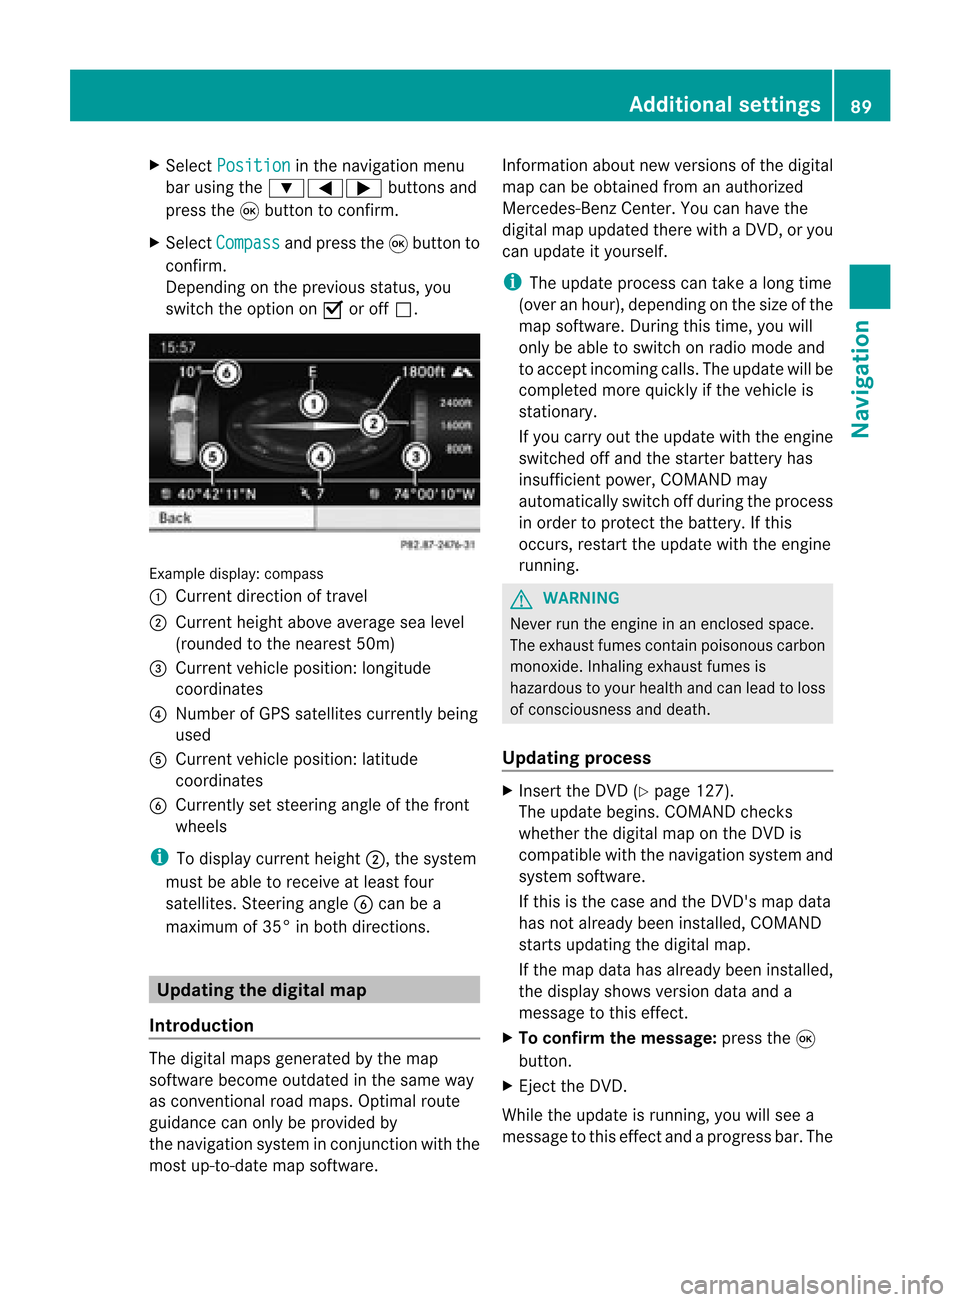
switch theoption onO oroff ª. Example
display:compass
: Current direction oftravel
; Current heightaboveaverage sealevel
(rounded tothe nearest 50m)
= Current vehicleposition: longitude
coordinates
? Number ofGPS satellites currentlybeing
used
A Current vehicleposition: latitude
coordinates
B Currently setsteering angleofthe front
wheels
i Todispla ycurrent height;,thesystem
must beable toreceive atleast four
satellites. SteeringangleBcan bea
maximum of35° inboth directions. Updat
ingthe digital map
Introduction The
digital mapsgenerated bythe map
software becomeoutdated inthe same way
as conven tionalroadmaps. Optimal route
guida ncecanonly beprovided by
the navigation systeminconj unction withthe
most up-to-date mapsoftware. Information
aboutnew version sof the digital
map canbeobtained fromanauthoriz ed
Mercedes- BenzCenter .You canhave the
digital mapupdated therewith aDVD ,or you
can update ityourself.
i The update process cantake along time
(over anhour), depending onthe size ofthe
map software. Duringthis time, youwill
only beable toswitch onradio mode and
to accept incomingcalls. Theupdate willbe
complet edmore quickly ifthe vehicle is
stat ionary.
If you carry outtheupdate withtheengin e
switch edoff and thestart erbatter yhas
insuffic ientpower, COMAND may
automatic allyswitch offduring theprocess
in order toprotec tthe batter y.Ifthis
occ urs, restartthe update withtheengin e
runn ing. G
WARN
ING
Never runtheengin ein an enclos edspace.
The exhaust fumescontain poisonous carbon
monox ide.Inhaling exhaustfumesis
hazardous toyour health andcanlead toloss
of con sciousnes sand death.
Upda tingprocess X
Inser tthe DVD (Ypage 127).
The update begins. COMAND checks
whether thedigital maponthe DVD is
compat iblewith thenavigation systemand
system software.
If this isthe case andtheDVD 'smap data
has notalready beeninstalled, COMAND
start supdating thedigital map.
If the map data hasalready beeninstalled,
the display showsversion dataanda
message tothis effec t.
X To confirm themessage: pressthe9
button .
X Eject the DVD .
While theupdate isrunn ing,youwillsee a
message tothis effec tand apro gressbar.The Addi
tional settin gs
89Navigation Z
Page 98 of 210
is
the refore recomm endedthat youchan ge
this name sothat youcan easily recogn ize
your mobile phone(see themobile phone
operat inginst ruct ions ).
X Swit chon the mobile phone(see themobile
phone operating instructions).
X Act ivate Bluetooth ®
function sand, where
necessary, Bluetooth®
visibil ityon the
mobile phone(seethemobile phone
operating instructions).
COMAND X
Act ivate theBluetooth ®
function in
COMAND (Ypage 40). Conne
ctingamobile phone
Gener alinfor mation Bef
ore usin gyour mobilephon ewith
COMA NDforthefir st tim e,you willneedto
con nectit.
When youauth orizeanew mobi lephon e,itis
con nectedautom atically.
Conn ecting com prises:
R sear ching for aBluet ooth®
-c apable mobile
phon e
R auth orizing theBluet ooth®
-c apable mobile
phon e
You canconnectupto ten mobile phones.
Search ingforam obile phone X
Pres sth e% function butt onon
COMA ND.
X Sele ctPho ne in
thete lepho nebasic menu
usin gth e:=; buttonsand
pres sth e9 butt ontocon firm.
X Sele ctBlu etooth Phones and
pres sth e
9 butt ontocon firm. X
Sele ctUpd ate and
pres sth e9 butt onto
con firm.
COMA NDsear chesfor Bluet ooth®
te lepho neswith inran geand adds them to
th eBluet ooth®
telepho nelist.
The durat ionofthesear chdepen dson the
num berofBluet ooth®
telepho neswith in
ran geand their char acteris tics. Ex
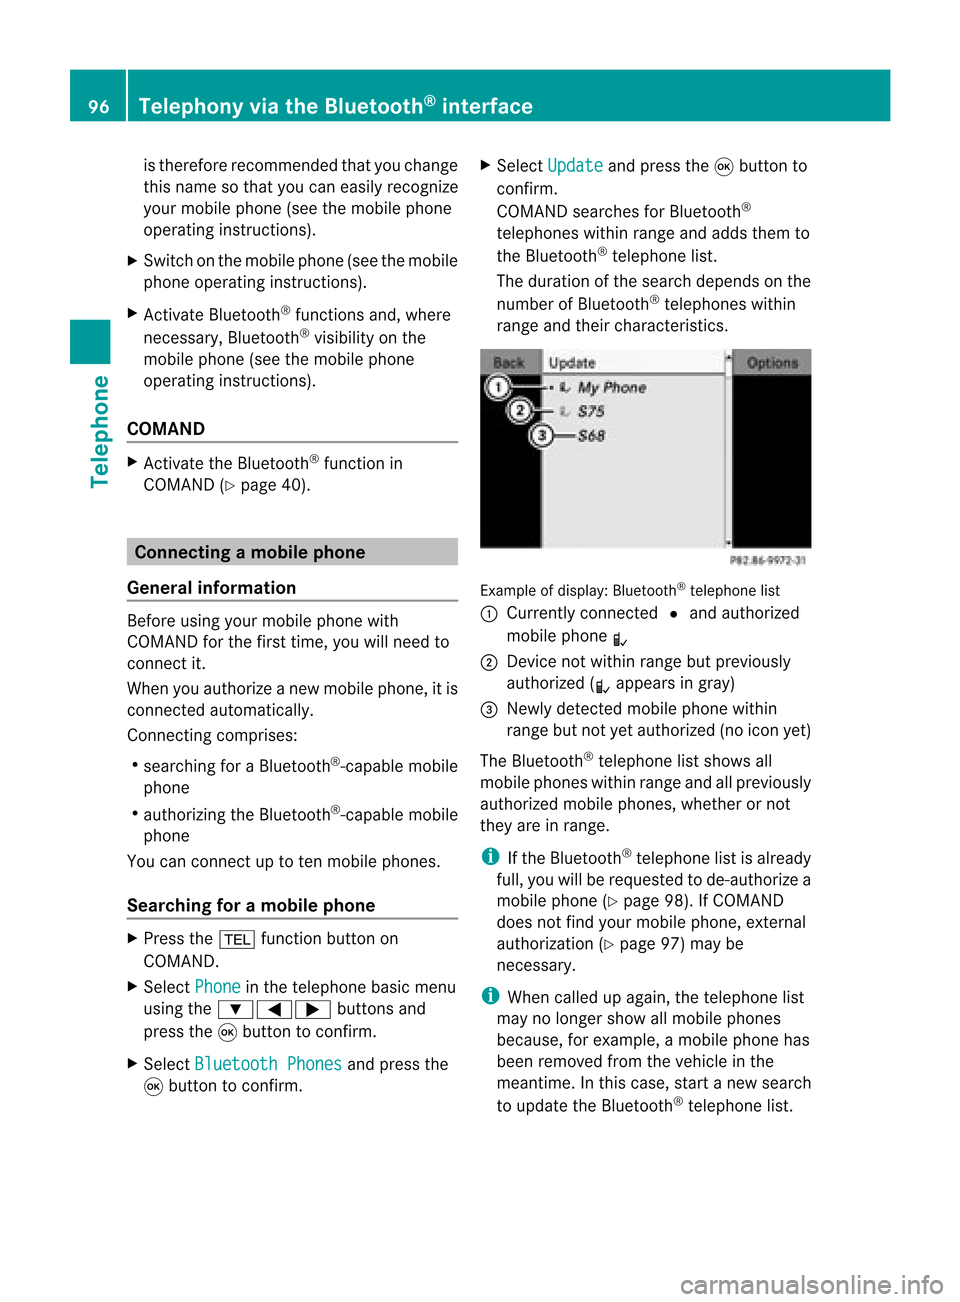
ample ofdisplay: Bluetooth®
tel epho nelist
: Curre ntly con nected# and auth orized
mobi lephon eL
; Dev icenotw ithin rangebut prev iously
author ized(Lappears ingray)
= Newly detected mobile phonewithin
rang ebut not yetauthor ized(noicon yet)
The Bluet ooth®
telep honelist shows all
mobile phoneswithin rangeand allprev iously
author izedmobile phones,whet herornot
the yare inrang e.
i Ifthe Bluet ooth®
telep honelist isalready
full, youwillberequest edtode-aut horizea
mobile phone(Y page 98).If COMA ND
does notfindyour mobile phone,ext ern al
author ization (Ypage 97)may be
nec essary.
i When called upagain, thetelep honelist
may nolong ershow allmobile phones
because, forexam ple,amobile phonehas
been removedfromthe vehic lein the
mean time.In this case, start anew searc h
to update theBluet ooth®
telep honelist . 96
Telep hony viatheBlu etoot h®
inter faceTelep hone
Page 99 of 210
Aut
horizing (regist ering) amobile
ph one X
Sele ctas yet unaut horizedmobi lephon e
= intheBluet ooth®
telepho nelist usin g
th e9: buttons.
X Sele ctOpt ions usin
gth e; buttonand
pres sth e9 butt ontocon firm.
X Sele ctAut horize and
pres sth e9 butt on
to con firm.
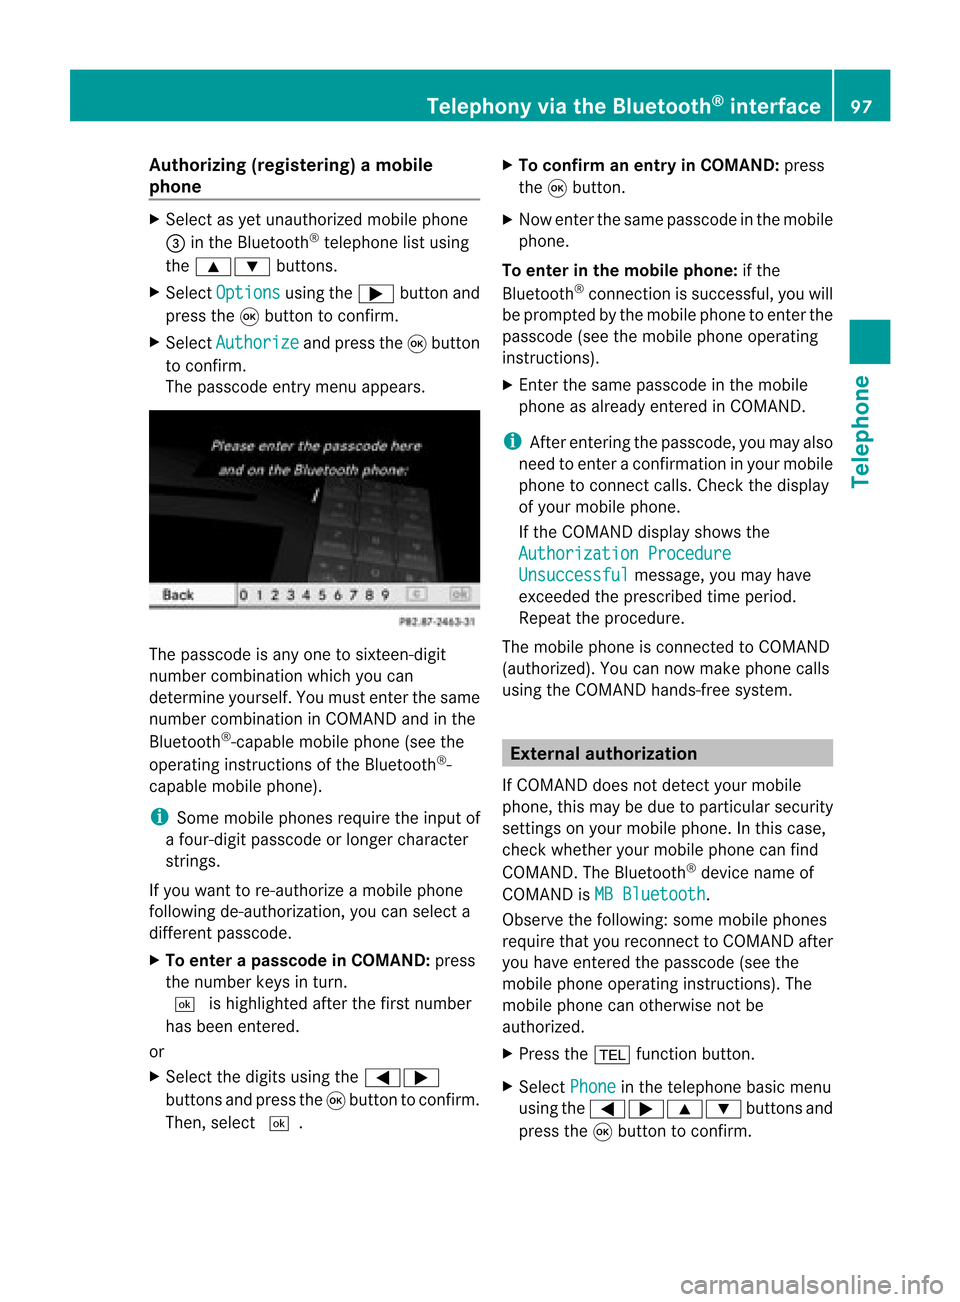
The passc odeentrymen uappears . The
passc odeisany oneto six teen- digit
num bercom binatio nwhich youcan
determine yourself.Youmust enter thesame
number combination inCOMAND andinthe
Bluetooth ®
-capable mobilephone(seethe
operating instructionsofthe Bluetooth ®
-
capable mobilephone).
i Some mobile phones requiretheinput of
a four-digit passcode orlonger character
strings.
If you want tore-authorize amobile phone
following <0004000500270001001500140008000F00120009001E000100140009000F000E
0035> youcan select a
different passcode.
X To enter apassc odeinCOMA ND:press
the numbe rkeys inturn.
¬ ishigh lighted after thefirst numbe r
has beenentere d.
or
X Sel ect the digits using the =;
bu ttons andpressthe 9button toconfi rm.
The n,sel ect ¬. X
To confi rm anentry inCO MA ND: press
the 9button.
X Now enterthe same passcode inthe mobile
phone.
To enter inthe mobile phone:ifthe
Bluetooth ®
conn ection issuccessful, youwill
be prompted bythe mobile phonetoenter the
passcode (seethemobile phoneoperating
instruct ions).
X Ent erthe same passcode inthe mobile
phone asalready entered inCOMAND.
i Afterenterin gthe passcode, youmay also
need toenter aconfirm ationinyour mobile
phone toconn ectcalls. Check thedispla y
of your mobile phone.
If the COMAND displayshows the
Authorization Procedure Unsuccessful message,
youmay have
exceeded theprescribed timeperiod.
Repea tthe procedure.
The mobile phoneisconn ected toCOMAND
(authorized). Youcannow make phone calls
using theCOMAND hands-free system. External
authorizat ion
If COMAND doesnotdetect yourmobile
phone, thismay bedue toparticular security
settin gson your mobile phone. Inthis case,
check whether yourmobile phonecanfind
COMAND. TheBluetooth ®
device nameof
COMAND isMB Bluetooth .
Observe thefollowing: somemobile phones
require thatyoureconn ecttoCOMAND after
you have entered thepasscode (seethe
mobile phoneoperating instructions).The
mobile phonecanotherwise notbe
authorized.
X Press the% functionbutton.
X Select Phone in
the telephone basicmenu
using the=;9: buttonsand
press the9button toconfirm . Telephony
viathe Bluetooth ®
interface 97Telephone Z
Page 100 of 210
X
Sel ect Bluetooth Phones and
pressthe
9 button toconfi rm.
X Sel ect Update and
pressthe 9button to
confi rm.
X Sel ect Opt ions us
ing the ; button and
pre ssthe 9button toconfi rm.
X Sel ect ExternalAuthorization and
pre ssthe 9button toconfi rm.
X Start theBluetoo th®
sea rch onthe mob ile
pho ne(seethe mob ile pho neope rating
instr uctions) .
X Sel ect COMAND (MB Bluetooth )
on the
mob ile pho ne.
X Enter thepassco deon the mob ile pho ne
wh en req uested toand then inputitin
CO MAND. Auto
matic reconnecti on
CO MAND alwa yssea rche sfor the last
connecte dmob ile pho ne.
If no connecti oncan bemad eto the mos t
rece ntlyconnecte dmob ilep hone, thesystem
searches forthe mobile phonewhichwas
conn ected before thatone. Conne
ctinganother mobilephone
If you have authorized severalmobilephones,
you can switch between theindividua l
phones.
i You canonly switch toanother authorized
mobile phoneifno phone callisactive.
X Select themobile phoneinthe Bluetooth ®
telephone listusing the9: buttons
and press the9button toconfirm .
The selected mobilephoneissearched for
and conn ected ifit is within Bluetooth ®
range andifBluetooth ®
is activated.
Only onemobile phonecanbeconn ected
at any one time. Thecurrent lyconn ected mobile
phoneisindicated bythe #dot in
the Bluetooth ®
telephone list(Ypage 96). To
display details
X Press the% functionbutton on
COMAND.
X Select thedesired mobilephoneinthe
Bluetooth ®
telephone listusing the
9: buttons.
X Select Options using
the; button and
press the9button toconfirm .
X Select Details and
press the9button to
confirm .
The following information concerning the
selected mobilephoneisshown:
R Bluetooth ®
name
R Bluetooth ®
address
R availa bility
R authorization status
X To close thedetailed display:pressthe
= or; button. Deregis
tering(de-aut horizing) a
mobile phone
Mercedes-Ben zrecomm endsde-
authoriz ationinCOMAND andonthe mobile
phone. Subsequent authorizationmay
other wisefail.
X Select thedesired mobilephoneinthe
Bluetoot h®
telephon elist using the
9: buttons. 98
Telephony viatheBluet ooth®
interf aceTelephone
Page 101 of 210
X
Sel ect Opt ions us
ing the ; button and
pre ssthe 9button toconfi rm.
X Sel ect De-Aut horize and
pressthe 9
bu tton toconfi rm.
Ap rompt appears asking whethe ryou
really wishtorevoke authorization forthis
mobile phone.
X Select Yes or
No .
If you select Yes ,
the mobile phonewillbe
deleted fromtheBluetooth ®
telephone list.
If you select No ,
the process willbe
canceled.
i Before re-authoriz ingthe mobile phone,
you should alsodelete thedevice nameMB Bluetooth from
yourmobile phone's
Bluetooth ®
list. Telephone
basicmenu (Bluetooth ®
interfa ce)
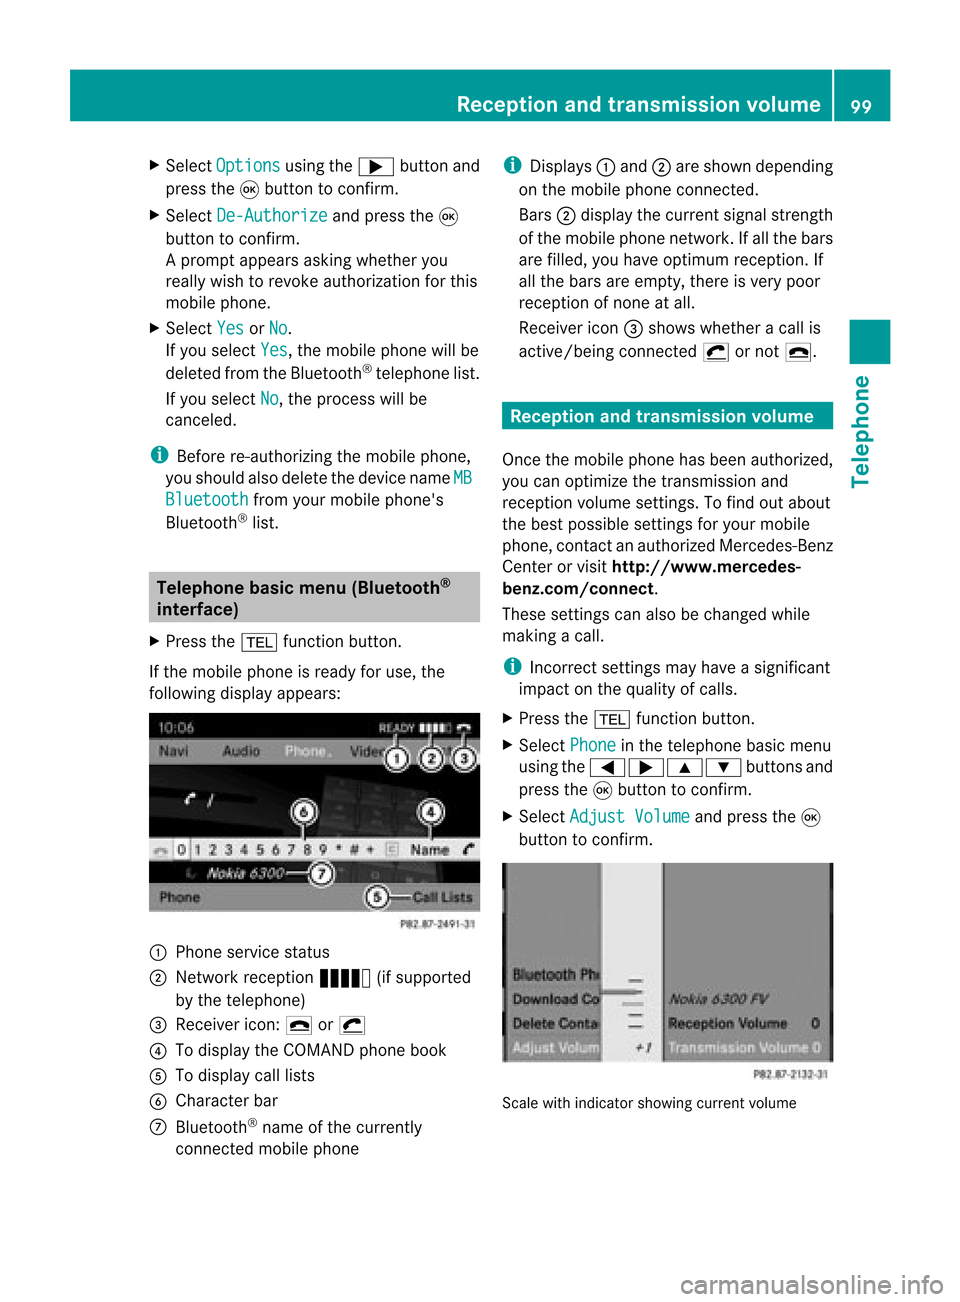
X Press the% functionbutton .
If the mobile phoneisready foruse, the
following displayappears: 1
Phone service status
2 Network reception Ä(ifsupported
by the telephone)
3 Receiver icon:¢or¡
4 Todisplay theCOMAND phonebook
5 Todisplay calllists
6 Character bar
7 Bluetooth ®
name ofthe current ly
conn ected mobile phone i
Displays :and ;are shown depending
on the mobile phoneconnected.
Bars ;display thecurrent signalstrength
of the mobile phonenetwork .Ifa llthe bars
are filled, youhave optimum receptio n.If
all the bars areempt y,the reisvery poor
rec eptio nofnone atall.
Receiver icon=shows whether acall is
active/ beingconnected ¡ornot ¢. Reception
andtransmission volume
Once themobile phonehasbeen authorized,
you can optimize thetrans mission and
reception volumesettings. Tofind outabout
the best possible settings foryour mobile
phone, contactanauthorized Mercedes-B enz
Center orvisit htt<0010002D002200220017001700170021000D0005001200030005000400050013
0025B
benz.com/connect .
These settings canalso bechanged while
making acall.
i Incorrect settings may have asignificant
impact onthe quali tyof calls.
X Press the% functionbutton .
X Select Phone in
the telephone basicmenu
using the=;9: buttonsand
press the9button toconf irm.
X Select Adjust Volume and
press the9
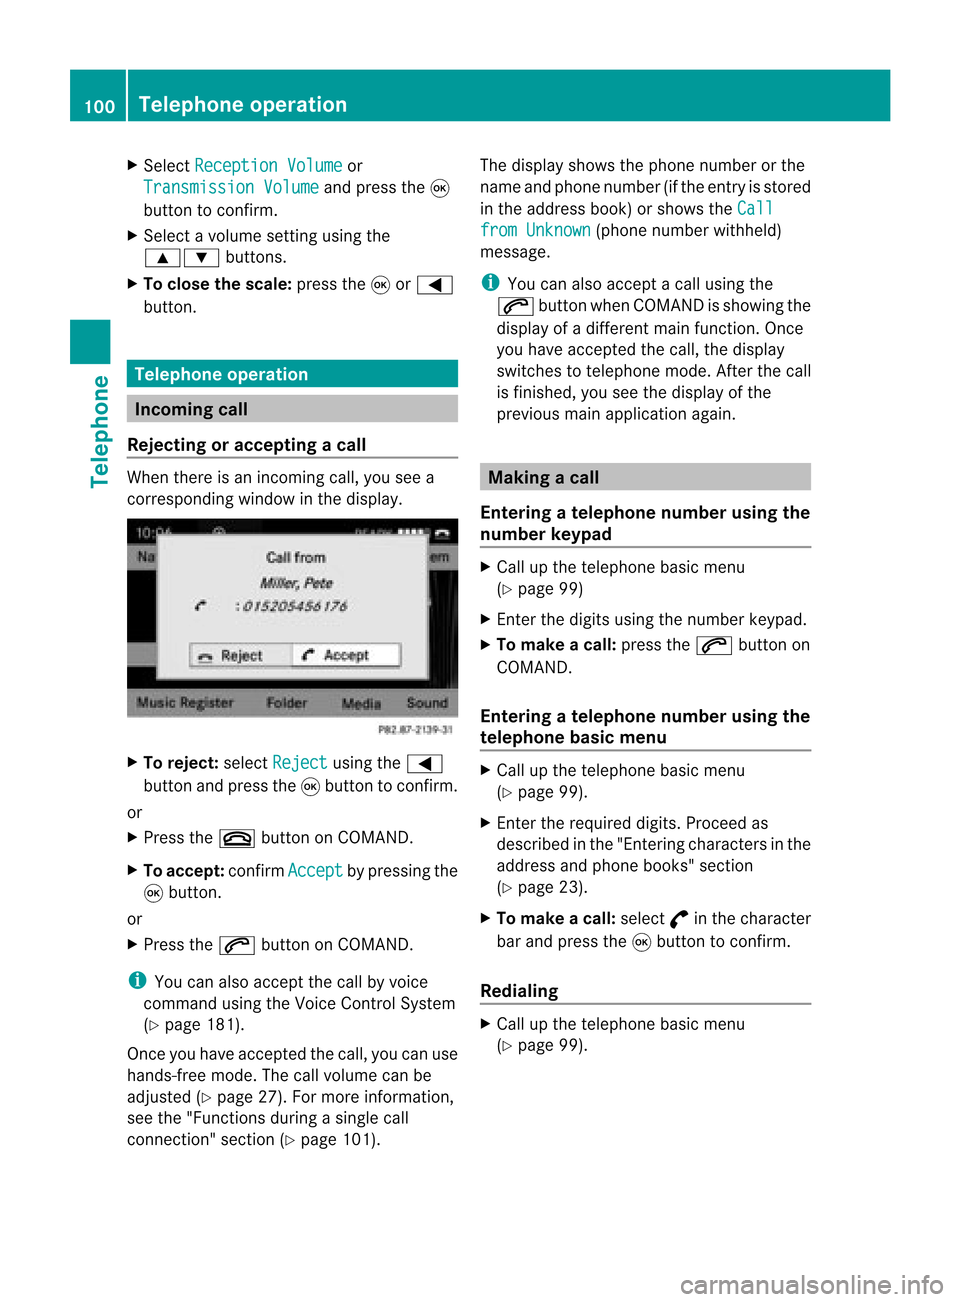
button toconf irm. Scale
withindicator showingcurrentvolume Reception
andtransmission volume
99Telephone Z
Page 102 of 210
X
Sel ect Reception Volume or
Tra nsmission Volume and
pressthe 9
bu tton toconfi rm.
X Sel ect avol ume settingusing the
9: buttons.
X To clos ethe scale :pre ssthe 9or=
bu tton. Tel
epho neope ratio n In
co ming call
Reje cting oracc epti ngacall When
thereisan incomi ngcall ,you seea
corresp ondingwindow inthe displa y. X
To rejec t:sel ect Rejec t usi
ng the =
bu tton andpres sthe 9button toconfirm.
or
X Press the~ button onCOM AND.
X To acc ept: confirm Accept by
pres sing the
9 button.
or
X Press the6 button onCOM AND.
i You canalso accep tthe call byvoice
command usingtheVoice Control System
(Y page 181).
Once youhave accepted thecall, youcan use
hands-free mode.Thecallvolume canbe
adjusted (Ypage 27).Formore information ,
see the"Function sduring asingle call
conn ection" section (Ypage 101). The
displa yshows thephone number orthe
name andphone number (ifthe entr yis stored
in the address book)orshows theCall from
Unknown (phone
number withheld)
message.
i You canalso accept acall using the
6 button whenCOMAND isshowing the
displa yof adifferent mainfunction.Once
you have accepted thecall, thedispla y
switches totelephone mode.Afterthe call
is finished, youseethedispla yof the
previous mainapplication again. Making
acall
Entering ateleph onenum berusin gth e
num berkeyp ad X
Call upthete lepho nebasic menu
(Y page 99)
X En tert he digits usingthenumber keypad.
X To make acall: press the6 button on
COMAND.
Entering ateleph onenum berusin gth e
telep hone basicmen u X
Call upthete lepho nebasic menu
(Y page 99).
X En tert he required digits.Proceed as
described inthe "Ent ering characters inthe
address andphone books" section
(Y page 23).
X To make acall: select °inthe character
bar and press the9button toconfirm .
Redialing X
Call upthe telephone basicmenu
(Y page 99). 100
Telephone
operationTelephone
Page 103 of 210
X
Sel ect °inthe characte rbarand pres sth e
9 buttonto confirm .
or
X While the° iconishighlig hted,press the
6 button onCOMAND.
In both cases, thecalls dialedlist appea rs.
The most recent lydial ednumber isat the
top.
X To selec tacall:press the9 or:
button.
X To make acal l:press the9or6
button.
Co nne ctin gac all toan entry inac all list
or inthe COM AND phone book X
Ca llup acall lista nd select anentry using
the 9: buttons.
or
X Ca llup the COMAND phone book and
sel ect anentry using the 9:
bu ttons.
X To make acal l:pre ssthe 9or6
bu tton. Fu
nctio ns avai labledurin gac all
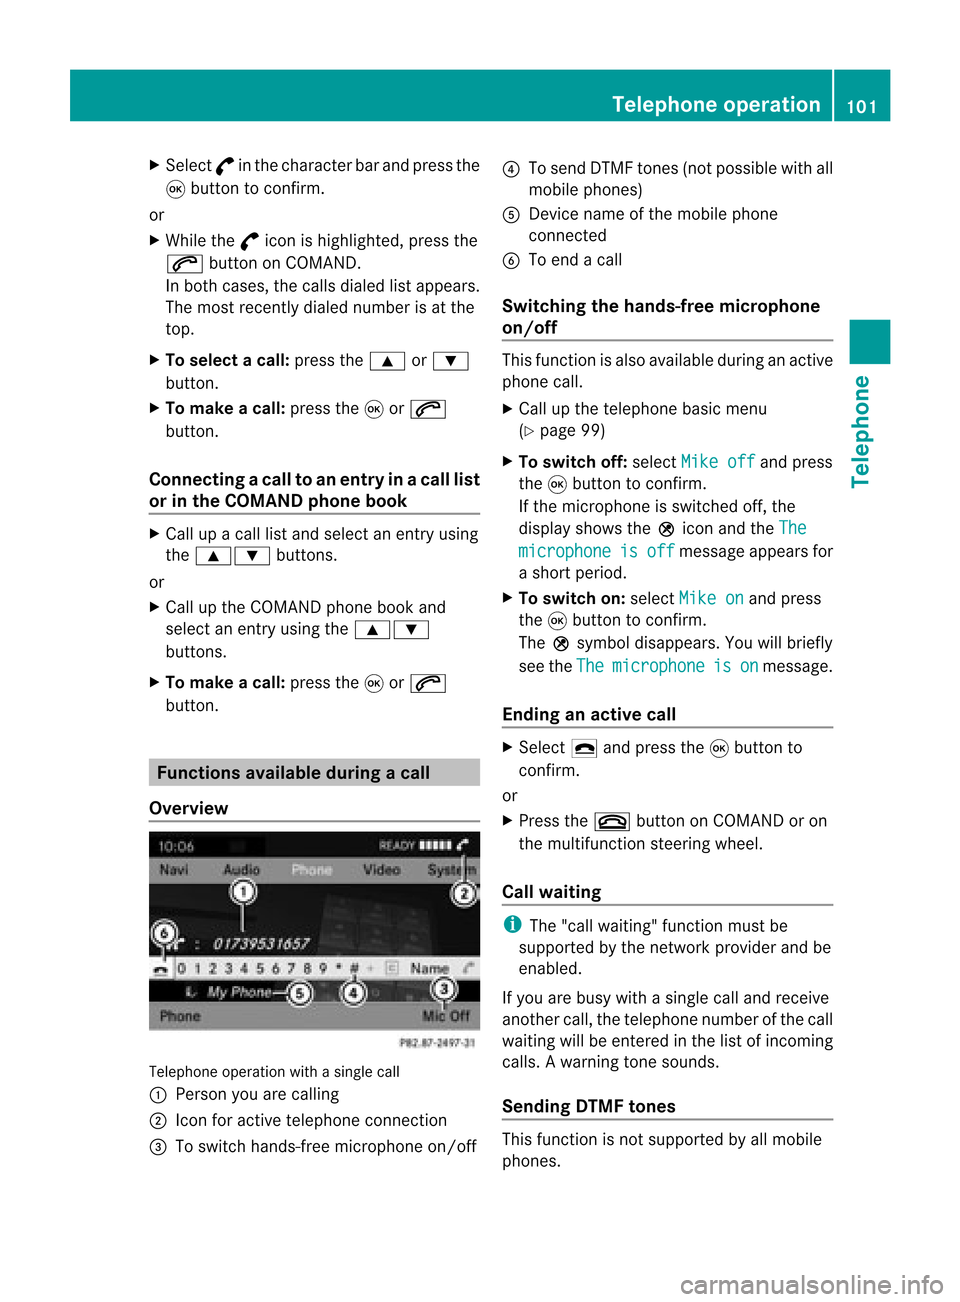
Ove rview Tel
epho neoper ationwithasing lecall
: Perso nyou are calling
; Icon foractive telephone connection
= Toswitch hands-fr eemicrophon eon/of f?
Tosend DTMF tones(not possible withall
mobile phones)
A Device nameofthe mobile phone
conn ected
B Toend acall
Switching thehands- freemicroph one
on/off This
funct ionisalso availa bleduring anactive
phone call.
X Call upthe telephone basicmenu
(Y page 99)
X To switch off:select Mikeoff and
press
the 9button toconf irm.
If the microphon eis switched off,the
display showstheQicon andtheThe microphone is off message
appearsfor
a short period.
X To switch on:select Mikeon and
press
the 9button toconf irm.
The Qsymbol disappea rs.You willbriefly
see theThe microphone is on message.
Ending anactive call X
Select ¢andpress the9button to
conf irm.
or
X Press the~ button onCOMAND oron
the multifunct ionsteerin gwheel.
Call waiting i
The "call waiting" functionmust be
supported bythe network provider andbe
enabled.
If you arebusy withasingle calland receive
another call,thetelephone numberofthe call
waiting willbeenter edinthe listofincomin g
calls. Awarning tone soun ds.
Send ingDTM Fton es This
function isno tsuppor tedby allmob ile
phon es. Tel
eph one oper ation
101Teleph one Z