drive program MERCEDES-BENZ R-Class 2012 W251 User Guide
[x] Cancel search | Manufacturer: MERCEDES-BENZ, Model Year: 2012, Model line: R-Class, Model: MERCEDES-BENZ R-Class 2012 W251Pages: 368, PDF Size: 15.19 MB
Page 154 of 368
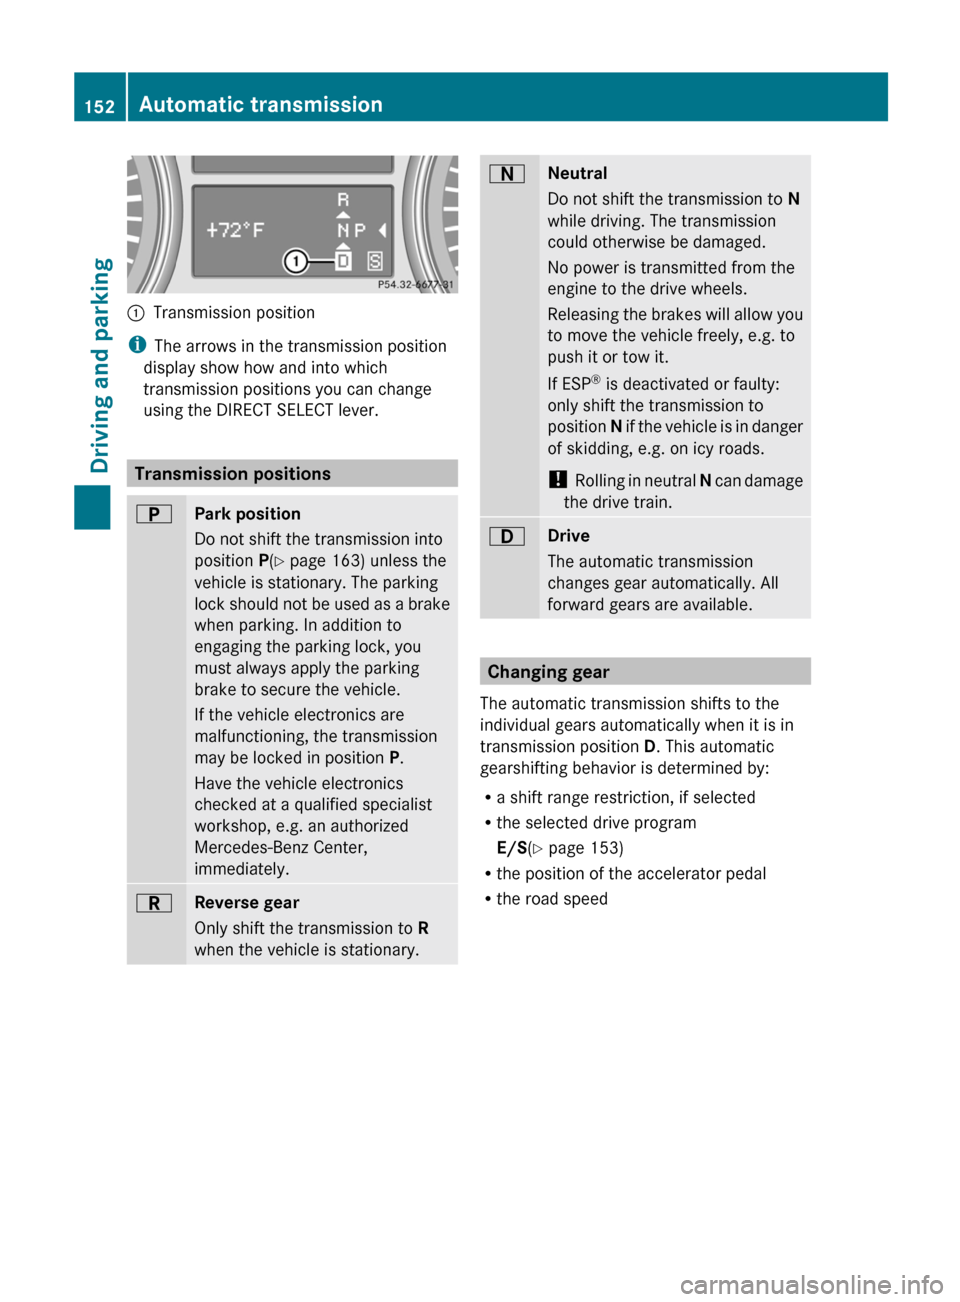
:Transmission position
iThe arrows in the transmission position
display show how and into which
transmission positions you can change
using the DIRECT SELECT lever.
Transmission positions
BPark position
Do not shift the transmission into
position P(Y page 163) unless the
vehicle is stationary. The parking
lock should not be used as a brake
when parking. In addition to
engaging the parking lock, you
must always apply the parking
brake to secure the vehicle.
If the vehicle electronics are
malfunctioning, the transmission
may be locked in position P.
Have the vehicle electronics
checked at a qualified specialist
workshop, e.g. an authorized
Mercedes-Benz Center,
immediately.CReverse gear
Only shift the transmission to R
when the vehicle is stationary.ANeutral
Do not shift the transmission to N
while driving. The transmission
could otherwise be damaged.
No power is transmitted from the
engine to the drive wheels.
Releasing the brakes will allow you
to move the vehicle freely, e.g. to
push it or tow it.
If ESP ®
is deactivated or faulty:
only shift the transmission to
position N if the vehicle is in danger
of skidding, e.g. on icy roads.
! Rolling in neutral N can damage
the drive train.7Drive
The automatic transmission
changes gear automatically. All
forward gears are available.
Changing gear
The automatic transmission shifts to the
individual gears automatically when it is in
transmission position D. This automatic
gearshifting behavior is determined by:
R a shift range restriction, if selected
R the selected drive program
E/S (Y page 153)
R the position of the accelerator pedal
R the road speed
152Automatic transmissionDriving and parking
Page 155 of 368
Driving tips
Kickdown
Use kickdown for maximum acceleration.
XVehicles for USA: fully depress the
accelerator pedal.
The transmission shifts to a lower gear
depending on the engine speed.XVehicles for Canada: depress the
accelerator pedal beyond the pressure
point.
The transmission shifts to a lower gear
depending on the engine speed.
Rocking the vehicle free
Rocking the vehicle free by shifting back and
forth between transmission positions D and
R can help to free a vehicle that has become
stuck in mud or snow. The engine
management system of the vehicle limits
shifting back and forth between transmission
positions D and R to a maximum speed of
5 mph (9 km/h). To shift back and forth
between transmission positions D and R,
move the selector lever up and down beyond
the pressure point.
Working on the vehicle
GWARNING
When working on the vehicle, engage the
parking brake and shift the automatic
transmission into park position P. Otherwise
the vehicle could roll away which could result
in an accident and/or serious personal injury.
Trailer towing
XWhen towing a trailer and driving downhill,
shift to the lower gear if the automatic
transmission constantly shifts between
two gears.XEngaging a lower gear and reducing the
speed reduces the risk of the engine
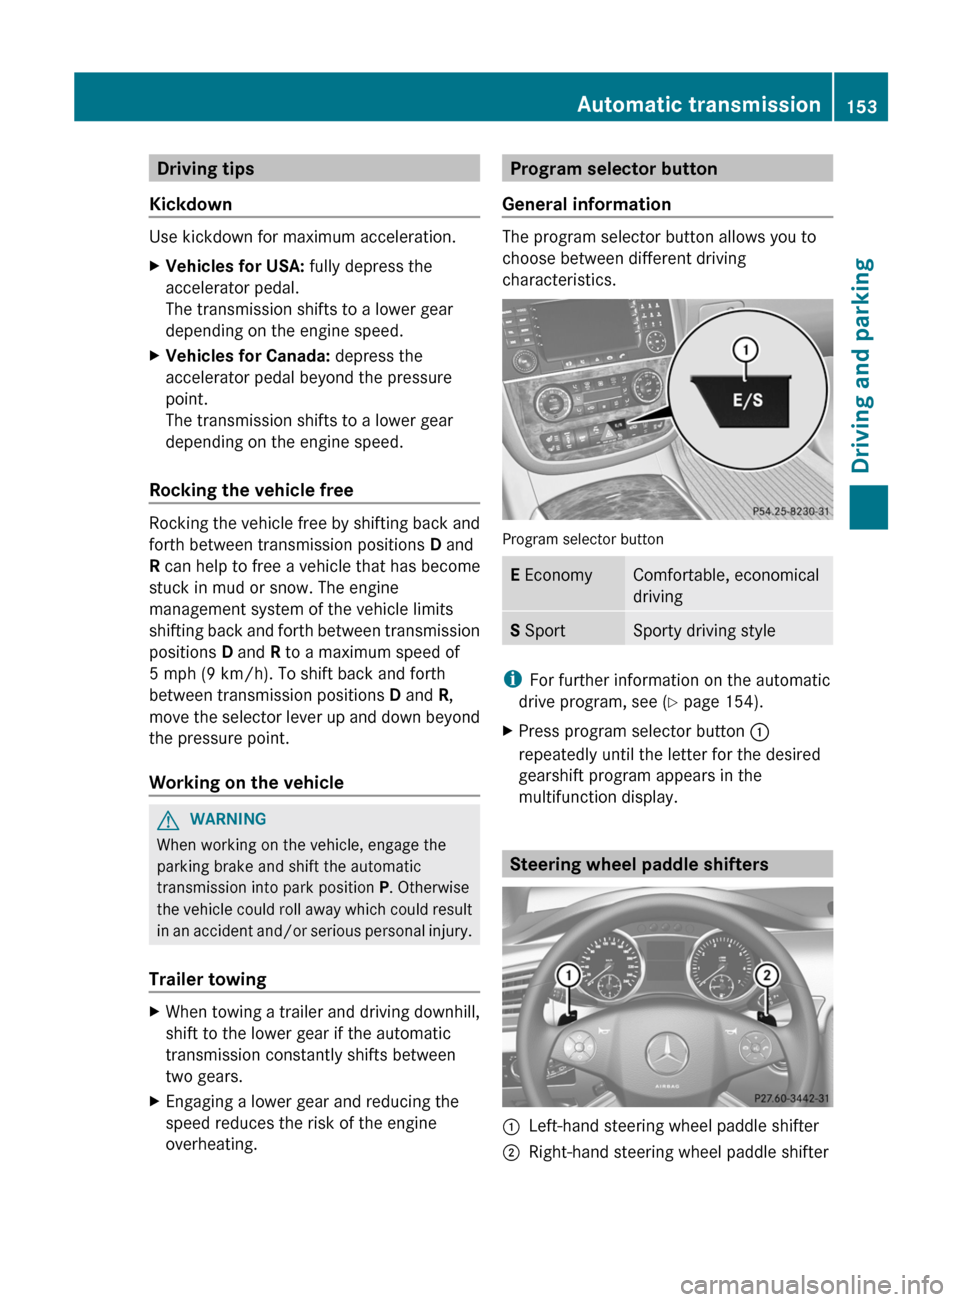
overheating.Program selector button
General information
The program selector button allows you to
choose between different driving
characteristics.
Program selector button
E EconomyComfortable, economical
drivingS SportSporty driving style
i
For further information on the automatic
drive program, see ( Y page 154).
XPress program selector button :
repeatedly until the letter for the desired
gearshift program appears in the
multifunction display.
Steering wheel paddle shifters
:Left-hand steering wheel paddle shifter;Right-hand steering wheel paddle shifterAutomatic transmission153Driving and parkingZ
Page 156 of 368
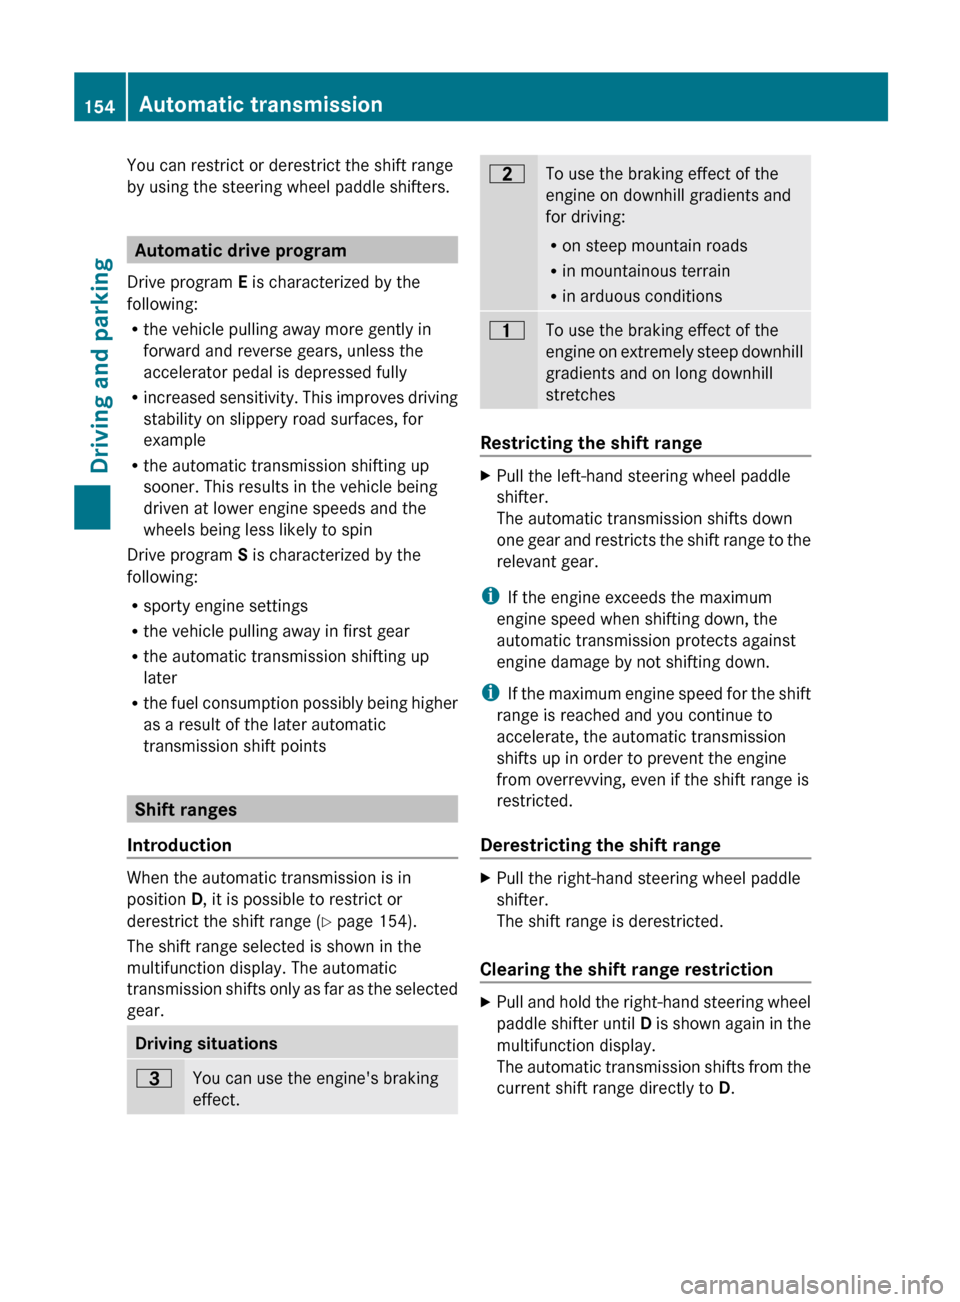
You can restrict or derestrict the shift range
by using the steering wheel paddle shifters.
Automatic drive program
Drive program E is characterized by the
following:
R the vehicle pulling away more gently in
forward and reverse gears, unless the
accelerator pedal is depressed fully
R increased sensitivity. This improves driving
stability on slippery road surfaces, for
example
R the automatic transmission shifting up
sooner. This results in the vehicle being
driven at lower engine speeds and the
wheels being less likely to spin
Drive program S is characterized by the
following:
R sporty engine settings
R the vehicle pulling away in first gear
R the automatic transmission shifting up
later
R the fuel consumption possibly being higher
as a result of the later automatic
transmission shift points
Shift ranges
Introduction
When the automatic transmission is in
position D, it is possible to restrict or
derestrict the shift range ( Y page 154).
The shift range selected is shown in the
multifunction display. The automatic
transmission shifts only as far as the selected
gear.
Driving situations=You can use the engine's braking
effect.5To use the braking effect of the
engine on downhill gradients and
for driving:
R on steep mountain roads
R in mountainous terrain
R in arduous conditions4To use the braking effect of the
engine on extremely steep downhill
gradients and on long downhill
stretches
Restricting the shift range
XPull the left-hand steering wheel paddle
shifter.
The automatic transmission shifts down
one gear and restricts the shift range to the
relevant gear.
i If the engine exceeds the maximum
engine speed when shifting down, the
automatic transmission protects against
engine damage by not shifting down.
i If the maximum engine speed for the shift
range is reached and you continue to
accelerate, the automatic transmission
shifts up in order to prevent the engine
from overrevving, even if the shift range is
restricted.
Derestricting the shift range
XPull the right-hand steering wheel paddle
shifter.
The shift range is derestricted.
Clearing the shift range restriction
XPull and hold the right-hand steering wheel
paddle shifter until D is shown again in the
multifunction display.
The automatic transmission shifts from the
current shift range directly to D.154Automatic transmissionDriving and parking
Page 202 of 368
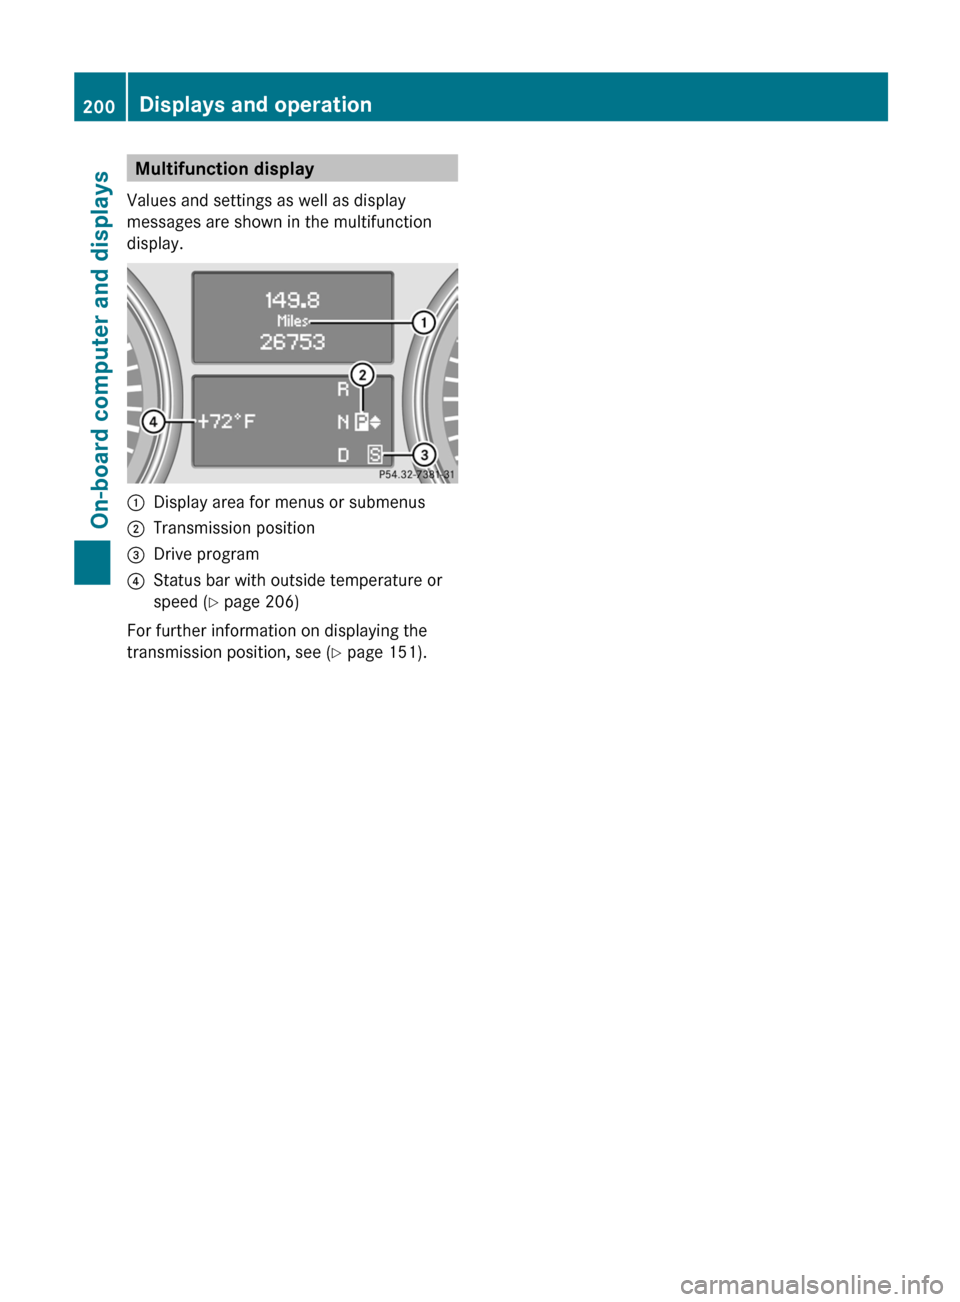
Multifunction display
Values and settings as well as display
messages are shown in the multifunction
display.:Display area for menus or submenus;Transmission position=Drive program?Status bar with outside temperature or
speed ( Y page 206)
For further information on displaying the
transmission position, see ( Y page 151).
200Displays and operationOn-board computer and displays
Page 216 of 368
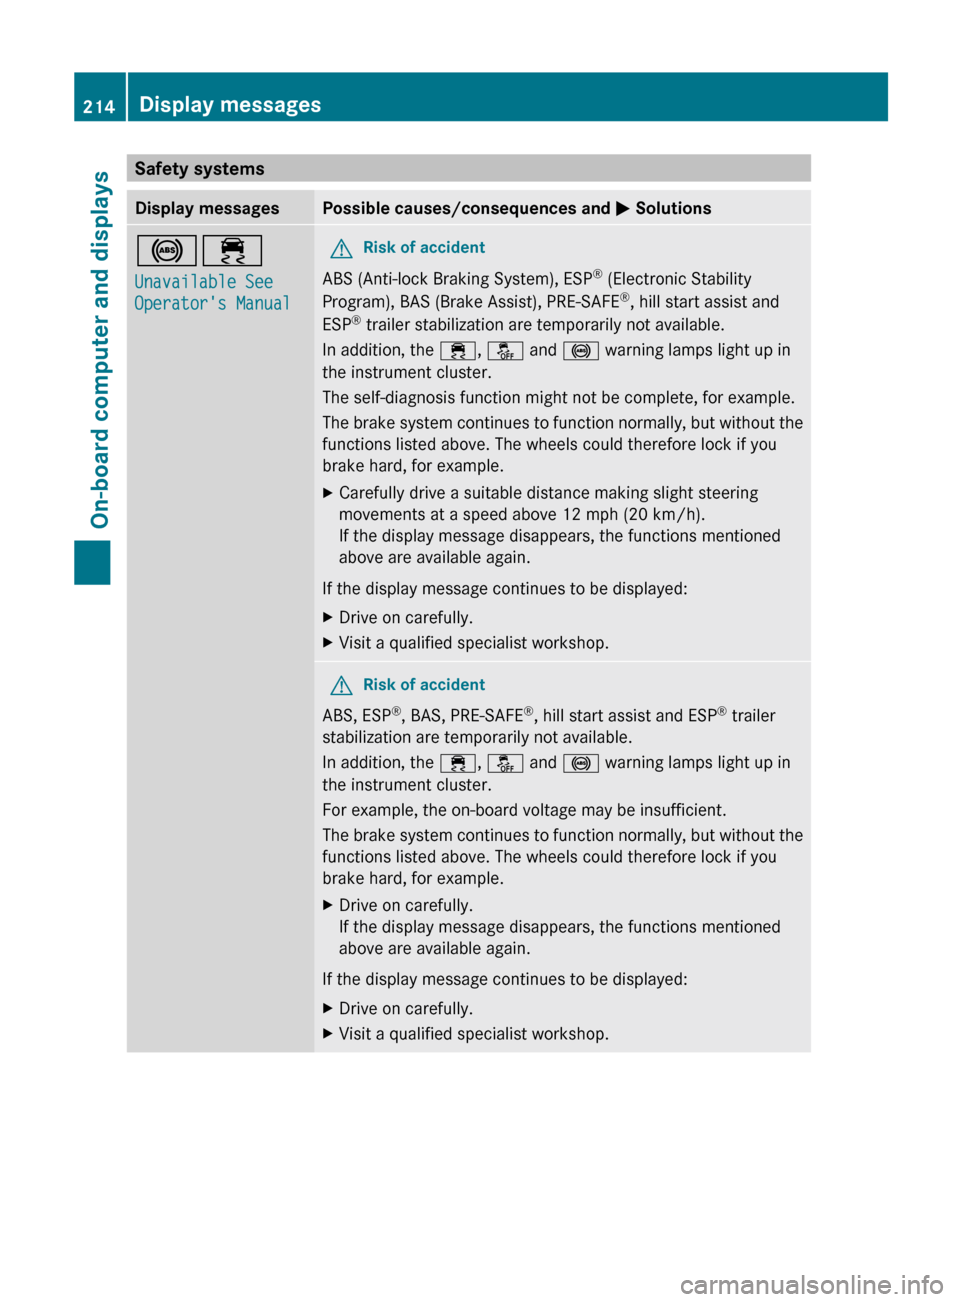
Safety systemsDisplay messagesPossible causes/consequences and M Solutions!÷
Unavailable See
Operator's ManualGRisk of accident
ABS (Anti-lock Braking System), ESP ®
(Electronic Stability
Program), BAS (Brake Assist), PRE-SAFE ®
, hill start assist and
ESP ®
trailer stabilization are temporarily not available.
In addition, the ÷, å and ! warning lamps light up in
the instrument cluster.
The self-diagnosis function might not be complete, for example.
The brake system continues to function normally, but without the
functions listed above. The wheels could therefore lock if you
brake hard, for example.
XCarefully drive a suitable distance making slight steering
movements at a speed above 12 mph (20 km/h).
If the display message disappears, the functions mentioned
above are available again.
If the display message continues to be displayed:
XDrive on carefully.XVisit a qualified specialist workshop.GRisk of accident
ABS, ESP ®
, BAS, PRE-SAFE ®
, hill start assist and ESP ®
trailer
stabilization are temporarily not available.
In addition, the ÷, å and ! warning lamps light up in
the instrument cluster.
For example, the on-board voltage may be insufficient.
The brake system continues to function normally, but without the
functions listed above. The wheels could therefore lock if you
brake hard, for example.
XDrive on carefully.
If the display message disappears, the functions mentioned
above are available again.
If the display message continues to be displayed:
XDrive on carefully.XVisit a qualified specialist workshop.214Display messagesOn-board computer and displays
Page 242 of 368
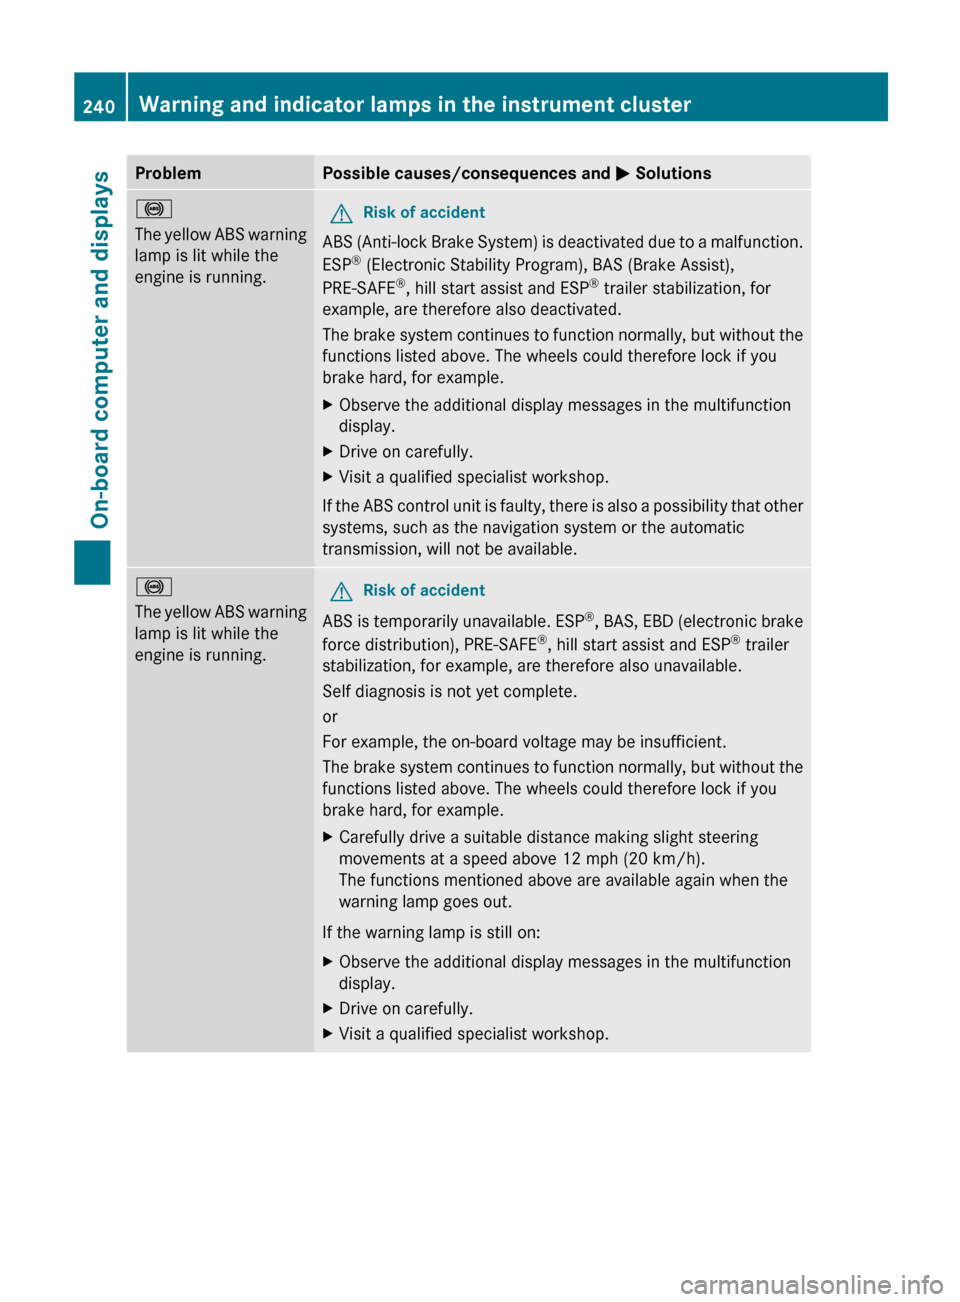
ProblemPossible causes/consequences and M Solutions!
The yellow ABS warning
lamp is lit while the
engine is running.GRisk of accident
ABS (Anti-lock Brake System) is deactivated due to a malfunction.
ESP ®
(Electronic Stability Program), BAS (Brake Assist),
PRE-SAFE ®
, hill start assist and ESP ®
trailer stabilization, for
example, are therefore also deactivated.
The brake system continues to function normally, but without the
functions listed above. The wheels could therefore lock if you
brake hard, for example.
XObserve the additional display messages in the multifunction
display.XDrive on carefully.XVisit a qualified specialist workshop.
If the ABS control unit is faulty, there is also a possibility that other
systems, such as the navigation system or the automatic
transmission, will not be available.
!
The yellow ABS warning
lamp is lit while the
engine is running.GRisk of accident
ABS is temporarily unavailable. ESP ®
, BAS, EBD (electronic brake
force distribution), PRE-SAFE ®
, hill start assist and ESP ®
trailer
stabilization, for example, are therefore also unavailable.
Self diagnosis is not yet complete.
or
For example, the on-board voltage may be insufficient.
The brake system continues to function normally, but without the
functions listed above. The wheels could therefore lock if you
brake hard, for example.
XCarefully drive a suitable distance making slight steering
movements at a speed above 12 mph (20 km/h).
The functions mentioned above are available again when the
warning lamp goes out.
If the warning lamp is still on:
XObserve the additional display messages in the multifunction
display.XDrive on carefully.XVisit a qualified specialist workshop.240Warning and indicator lamps in the instrument clusterOn-board computer and displays
Page 277 of 368
command for vehicle remote unlocking has
been received.
If you pull the tailgate handle for more than
20 seconds before receiving authorization
for remote unlocking from the Mercedes-
Benz Customer Assistance Center, you
must wait 15 minutes before you can pull
the tailgate handle again.
Service for recovering a stolen vehicle
If your vehicle has been stolen:
XNotify the police.
The police will issue a numbered incident
report.XThis number will be forwarded to the
Mercedes-Benz Customer Assistance
Center together with your PIN.
The Mercedes-Benz Customer Assistance
Center then attempts to locate the mbrace
system. The Mercedes-Benz Customer
Assistance Center contacts you and the
local law enforcement agency if the vehicle
is located. However, only the law
enforcement agency is informed of the
location of the vehicle.
i If the anti-theft alarm system is active for
longer than 30 seconds, mbrace
automatically informs the Mercedes-Benz
Customer Assistance Center.
Garage door opener
Important safety notes
The HomeLink ®
garage door opener
integrated in the rear-view mirror allows you
to operate up to three different door and gate
systems.
i Certain garage door drives are
incompatible with the integrated garage
door opener. If you have difficulty
programming the integrated garage door
opener, contact an authorized Mercedes-
Benz Center or call one of the following
telephone hotlines:
R USA: Mercedes-Benz Customer
Assistance Center at
1-800-FOR-MERCedes
R Canada: Customer Service at
1-800-387-0100GWARNING
Before programming the integrated remote
control to a garage door opener or gate
operator, make sure people and objects are
out of the way of the device to prevent
potential harm or damage. When
programming a garage door opener, the door
moves up or down. When programming a gate
operator, the gate opens or closes.
Do not use the integrated remote control with
any garage door opener that lacks safety stop
and reverse features as required by U.S.
federal safety standards (this includes any
garage door opener model manufactured
before April 1, 1982). A garage door that
cannot detect an object - signaling the door
to stop and reverse - does not meet current
U.S. federal safety standards.
When programming a garage door opener,
park vehicle outside the garage.
Do not run the engine while programming the
integrated remote control. Inhalation of
exhaust gas is hazardous to your health. All
exhaust gas contains carbon monoxide (CO),
and inhaling it can cause unconsciousness
and possible death. All exhaust gas contains
carbon monoxide (CO), and inhaling it can
cause unconsciousness and possible death.
i USA only:
This device complies with Part 15 of the
FCC requirements. Operation is subject to
the following two conditions:
Features275Stowing and featuresZ
Page 278 of 368
1. This device must not cause harmful
interference, and
2. this device must withstand any
interference received, including
interference that may cause undesired
operation.
Any unauthorized modification to this
device could void the user's authority to
operate the equipment.
i Canada only:
This device complies with RSS-210 of
Industry Canada. Operation is subject to
the following two conditions:
1. This device must not cause harmful
interference, and
2. this device must withstand any
interference received, including
interference that may cause undesired
operation.
Any unauthorized modification to this
device could void the user's authority to
operate the equipment.
Programming the integrated garage
door opener on the rear-view mirror
Programming
GWARNING
Only press the transmitter button on the
integrated garage door opener if there are no
persons or objects present within the sweep
of the garage door. People could otherwise be
injured by the movement of the door.
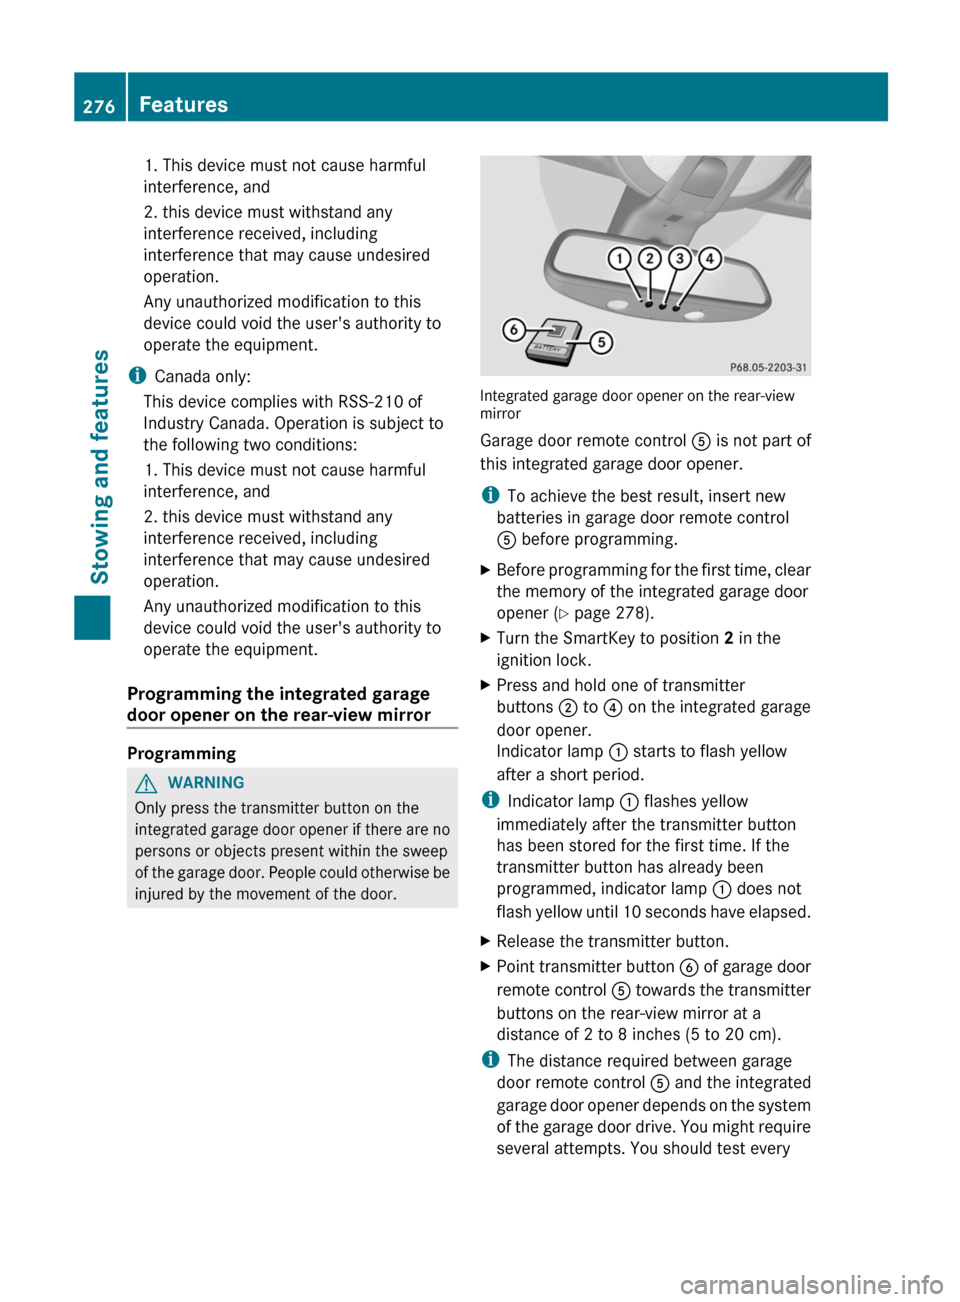
Integrated garage door opener on the rear-view
mirror
Garage door remote control A is not part of
this integrated garage door opener.
i To achieve the best result, insert new
batteries in garage door remote control
A before programming.
XBefore programming for the first time, clear
the memory of the integrated garage door
opener ( Y page 278).XTurn the SmartKey to position 2 in the
ignition lock.XPress and hold one of transmitter
buttons ; to ? on the integrated garage
door opener.
Indicator lamp : starts to flash yellow
after a short period.
i Indicator lamp : flashes yellow
immediately after the transmitter button
has been stored for the first time. If the
transmitter button has already been
programmed, indicator lamp : does not
flash yellow until 10 seconds have elapsed.
XRelease the transmitter button.XPoint transmitter button B of garage door
remote control A towards the transmitter
buttons on the rear-view mirror at a
distance of 2 to 8 inches (5 to 20 cm).
i The distance required between garage
door remote control A and the integrated
garage door opener depends on the system
of the garage door drive. You might require
several attempts. You should test every
276FeaturesStowing and features
Page 279 of 368
position for at least 25 seconds before
trying another position.XPress and hold transmitter button B on
garage door remote control A until
indicator lamp : lights up green.
Programming is complete if indicator
lamp : lights up or flashes green.XRelease transmitter button ;, = or ? on
the integrated garage door opener and the
transmitter button on garage door remote
control B.
If indicator lamp : lights up red:
XRepeat the programming procedure for the
transmitter button. When doing so, vary the
distance between the garage door remote
control and the rear-view mirror.
i If the indicator lamp flashes green after
successful programming, the garage door
system is operating on a rolling code. After
programming, you must synchronize the
garage door opener integrated in the rear-
view mirror with the receiver of the garage
door system.
Synchronizing the rolling code
Your vehicle must be within range of the
garage or gate opener drive. Make sure that
neither your vehicle nor any persons/objects
are present within the sweep of the door or
gate.
Observe the safety notes when performing
the rolling code synchronization.
XTurn the SmartKey to position 2 in the
ignition lock.XPress the programming button of the door
or gate drive (see the door or gate drive
operating instructions, e.g. under
"Programming of additional remote
controls").
i You now normally have 30 seconds to
initiate the next step.
XPress the previously programmed
transmitter button of the HomeLink ®integrated garage door opener repeatedly
in succession until the door opens.
The rolling code synchronization is then
complete.
Notes on programming the remote
control
Canadian radio frequency laws require a
"break" (or interruption) of the transmission
signals after broadcasting for a few seconds.
These signals may not therefore last long
enough for the integrated garage door opener
to recognize the signal during programming.
Comparable with Canadian law, some U.S.
garage door openers also have a built-in
"interruption".
If you live in Canada or have difficulties
programming the garage door opener
(regardless of where you live) when using the
programming steps (see above), proceed as
follows:
XPress and hold one of transmitter
buttons ; to ? of the integrated garage
door opener.
Indicator lamp : starts to flash yellow
after a short period.XRelease the transmitter button.XPress transmitter button B of the garage
door remote control and hold for two
seconds, then release for two seconds,
then press again and hold for two seconds.XRepeat this sequence on transmitter
button B of the garage door remote
control until indicator lamp : is green.
Repeat the process if indicator lamp :
turns red.XContinue with the other programming
steps (see above).
Problems when programming
If you are experiencing problems
programming the integrated garage door
opener on the rear-view mirror, take note of
the following instructions:
R check the transmission frequency of
garage door remote control A (usually
Features277Stowing and featuresZ
Page 280 of 368
found on the reverse side of the remote
control).
The integrated garage door opener is
compatible with devices that can be
operated with units in a frequency range of
280 to 390 MHz.
R change the batteries in garage door remote
control A. This increases the probability
that garage door remote control A will
send a strong and precise signal to the
integrated garage door opener on the rear-
view mirror.
R when programming, hold garage door
remote control A at different distances
and angles from the transmitter button that
you are programming. Try different angles
at a distance between 2 and 12 inches (5
to 30 cm) or the same angle at varying
distances.
R if another remote control for the same
garage door drive is available, repeat the
same programming steps with this remote
control. Before you perform the steps of the
operation, make sure that there are new
batteries in the garage door remote
control.
R note that some remote controls only
transmit for a limited amount of time (the
indicator lamp on the remote control goes
out). Press the remote control button again
before it stops transmitting.
R align the antenna cable of the garage door
opener unit. This can improve signal
reception/transmission.
Opening/closing the garage door
Once programmed, the integrated garage
door opener will assume the function of the
garage door system's remote control. Please
also read the operating instructions for the
garage door system.
XTurn the SmartKey to position 2 in the
ignition lock.XPress transmitter button ;, = or ? in the
overhead control panel that you have
programmed to operate the garage door.
Garage door system with a fixed code:
indicator lamp : lights up green.
Garage door system with a rolling code:
indicator lamp : flashes green.
i
The transmitter will transmit a signal for
as long as the transmitter button is being
pressed. After a maximum of ten seconds,
transmission is terminated and indicator
lamp : flashes yellow. Press the
transmitter button again, if necessary.
Clearing the memory of the integrated
garage door opener on the rear-view
mirror
XTurn the SmartKey to position 2 in the
ignition lock.XPress transmitter buttons ; and ?.
The indicator lamp lights up yellow.XPress and hold transmitter buttons ;
and ? until the indicator lamp turns green.
i
Make sure that you clear the memory of
the integrated garage door opener before
selling the vehicle.
Compass
Calling up the compass
XPress the V or U button on the
multifunction steering wheel repeatedly
until the AIRMATIC/Compass menu
appears in the multifunction display.
The compass shows which direction the
vehicle is currently traveling in: N, NE , E , SE ,
S , SW , W or NW.278FeaturesStowing and features