fuel cap release MERCEDES-BENZ R-Class 2012 W251 Owner's Manual
[x] Cancel search | Manufacturer: MERCEDES-BENZ, Model Year: 2012, Model line: R-Class, Model: MERCEDES-BENZ R-Class 2012 W251Pages: 368, PDF Size: 15.19 MB
Page 12 of 368

Fuel filler flapEmergency release ........................158
Opening/closing ............................ 158
Fuel filter (display message) ............ 228
Fuel level Calling up the range (on-board
computer) ...................................... 211
Fuel tank
Capacity ........................................ 355
Problem (malfunction) ...................160
Fuse allocation chart (vehicle tool
kit) ...................................................... 296
Fuses Allocation chart ............................. 317
Before changing ............................. 317
Dashboard fuse box .......................318
Engine emergency stop .................319
Fuse box in the cargo
compartment ................................. 318
Fuse box in the engine
compartment ................................. 318
Important safety notes ..................317
G
Garage door opener Clearing the memory .....................278
Notes ............................................. 275
Opening/closing the garage door ..278
Programming (button in the rear-
view mirror) ................................... 276
Gasoline ............................................. 157
Gear or selector lever (cleaning
guidelines) ......................................... 293
Genuine Mercedes-Benz parts ......... 352
Glove box ........................................... 249
GTW (Gross Trailer Weight)
(definition) ......................................... 344
H
Handbrake see Parking brake
Hazard warning lamps ...................... 117
Headlamp cleaning system Notes ............................................. 360
Headlamp delayed switch-off
see Exterior lighting delayed switch-off
Headlamps
Adding fluid to cleaning system .....285
Cleaning system (function) ............117
Misting up ...................................... 118
see Automatic headlamp mode
Head restraints
Adjusting ......................................... 99
Adjusting (electrically) .....................99
Adjusting (manually) ........................99
Adjusting (rear) .............................. 100
Installing/removing (rear) ..............100
Luxury .............................................. 99
see NECK-PRO head restraints/
NECK-PRO luxury head restraints
Heating
see Climate control
High-beam headlamps
Changing bulbs .............................. 122
Display message ............................ 223
Switching on/off ........................... 117
Hill start assist .................................. 147
Hood Closing ........................................... 283
Display message ............................ 235
Opening ......................................... 282
Hydroplaning ..................................... 168
I
Ignition lock see SmartKey positions
Immobilizer .......................................... 68
Indicator and warning lamps DISTRONIC .................................... 245
Indicator lamps
see Warning and indicator lamps
Insect protection on the radiator .... 283
Instrument cluster Overview .......................................... 29
Selecting the language (on-board
computer) ...................................... 206
Settings ......................................... 205
Warning and indicator lamps ...........30
Instrument cluster lighting ................ 29
Instrument lighting see Instrument cluster lighting
Interior lighting
Automatic control ..........................119
10Index
Page 160 of 368

obtained from oil companies, e.g. at gas
stations.
Refueling
Fuel filler flap
The fuel filler flap is unlocked or locked
automatically when you open or close the
vehicle with the SmartKey or using KEYLESS-
GO.
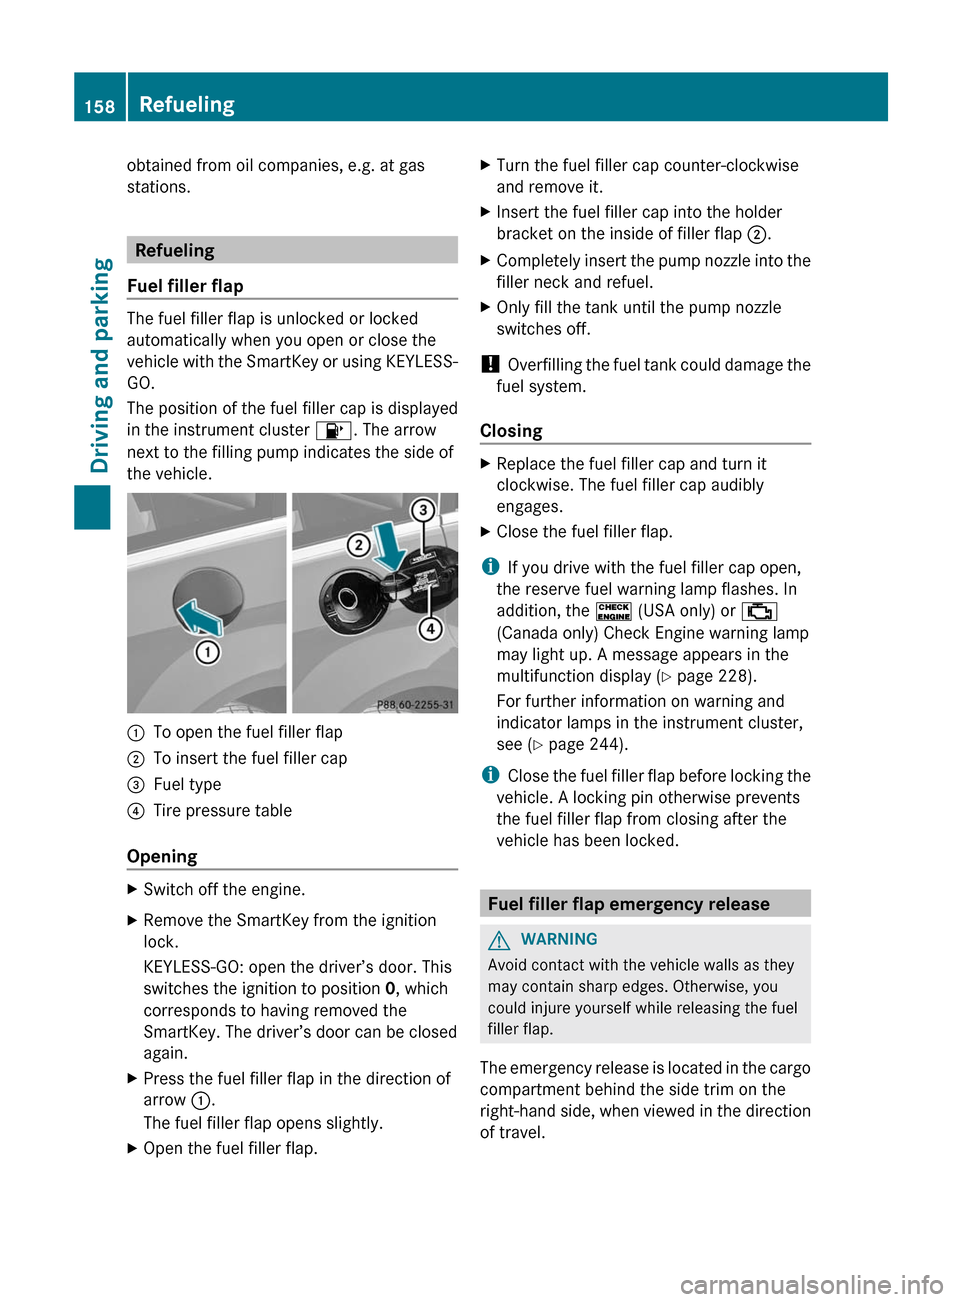
The position of the fuel filler cap is displayed
in the instrument cluster 8. The arrow
next to the filling pump indicates the side of
the vehicle.
:To open the fuel filler flap;To insert the fuel filler cap=Fuel type?Tire pressure table
Opening
XSwitch off the engine.XRemove the SmartKey from the ignition
lock.
KEYLESS-GO: open the driver’s door. This
switches the ignition to position 0, which
corresponds to having removed the
SmartKey. The driver’s door can be closed
again.XPress the fuel filler flap in the direction of
arrow :.
The fuel filler flap opens slightly.XOpen the fuel filler flap.XTurn the fuel filler cap counter-clockwise
and remove it.XInsert the fuel filler cap into the holder
bracket on the inside of filler flap ;.XCompletely insert the pump nozzle into the
filler neck and refuel.XOnly fill the tank until the pump nozzle
switches off.
! Overfilling the fuel tank could damage the
fuel system.
Closing
XReplace the fuel filler cap and turn it
clockwise. The fuel filler cap audibly
engages.XClose the fuel filler flap.
i If you drive with the fuel filler cap open,
the reserve fuel warning lamp flashes. In
addition, the ! (USA only) or ;
(Canada only) Check Engine warning lamp
may light up. A message appears in the
multifunction display ( Y page 228).
For further information on warning and
indicator lamps in the instrument cluster,
see ( Y page 244).
i Close the fuel filler flap before locking the
vehicle. A locking pin otherwise prevents
the fuel filler flap from closing after the
vehicle has been locked.
Fuel filler flap emergency release
GWARNING
Avoid contact with the vehicle walls as they
may contain sharp edges. Otherwise, you
could injure yourself while releasing the fuel
filler flap.
The emergency release is located in the cargo
compartment behind the side trim on the
right-hand side, when viewed in the direction
of travel.
158RefuelingDriving and parking
Page 163 of 368

DEF
Important notes on use
To function properly, BlueTEC exhaust gas
aftertreatment must be operated with the
reducing agent DEF. Adding DEF is one of the
tasks performed during maintenance. Under
normal operating conditions, a tank of DEF
lasts until the next service due date.
When the DEF supply has almost run out, the
Check Additive See Operator's
Manual message is shown in the
multifunction display.
When the DEF supply sinks to a minimum
level, the Remaining Starts: 16 message
is shown in the multifunction display.
When the Remaining Starts: 16 message
is shown in the multifunction display, you can
start the engine 16 more times. If DEF is not
added, it is then not possible to start the
engine again. Fill the DEF tank with about
1 gal (3.8 l) DEF or have the DEF tank refilled
at a qualified specialist workshop.
Use the special DEF refill bottle when filling
between maintenance intervals. Contact an
authorized Mercedes-Benz Center with any
questions or, if necessary, contact Roadside
Assistance ( Y page 22).
Further information about BlueTEC exhaust
gas aftertreatment and DEF is available at any
authorized Mercedes-Benz Center.
Adding DEF
GWARNING
Make sure
R DEF does not come into contact with skin,
eyes, or clothing
R to keep DEF out of the reach of children
If you and/or others have come into contact
with DEF:
R If DEF has gotten into contact with eyes,
flush with plenty of water immediately and
seek medical help.
R Clean affected skin immediately with plenty
of water.
R If DEF was swallowed, rinse mouth
immediately with plenty of water and drink
plenty of water. Consult a physician.GWARNING
If you open the DEF tank cap at high
temperatures, ammonia vapors can be
released.
Ammonia vapors have a pungent odor and are
particularly irritating to:
R skin
R mucous membranes
R eyes
You may experience a burning sensation in
your eyes, nose and throat, as well as
coughing and watering of the eyes.
Do not inhale any ammonia vapors that may
be released. Only refill the DEF tank in well
ventilated areas.
! Only use DEF that complies with
ISO 22241. Do not add any special
additives to DEF and do not thin DEF with
water. This could destroy the BlueTEC
exhaust gas aftertreatment.
If the outside temperature is lower than
Ò 11 †, damage may occur when topping up.
If DEF is frozen and there is an active warning
indicator, topping up may not be possible.
Park the vehicle in a warmer place, e.g. in a
garage, until DEF has become fluid again.
Filling is then possible again. Alternatively,
have the DEF tank refilled at a qualified
specialist workshop.
! Rinse surfaces that have come into
contact with DEF immediately with water or
remove DEF using a damp cloth and cold
water. If the DEF has already crystallized,
Refueling161Driving and parkingZ
Page 164 of 368

use a sponge and cold water to clean it. DEF
residues crystallize after time and
contaminate the affected surfaces.
! DEF is not a fuel additive and must not be
added to the fuel tank. If DEF is added to
the fuel tank, this can lead to engine
damage.
i If you are adding between maintenance
intervals, add approximately 1 gallon (3.8 l)
of DEF to the DEF tank. One gallon (3.8 l)
of DEF is approximately 2 DEF refill bottles.
For further information on DEF, see:
( Y page 357).
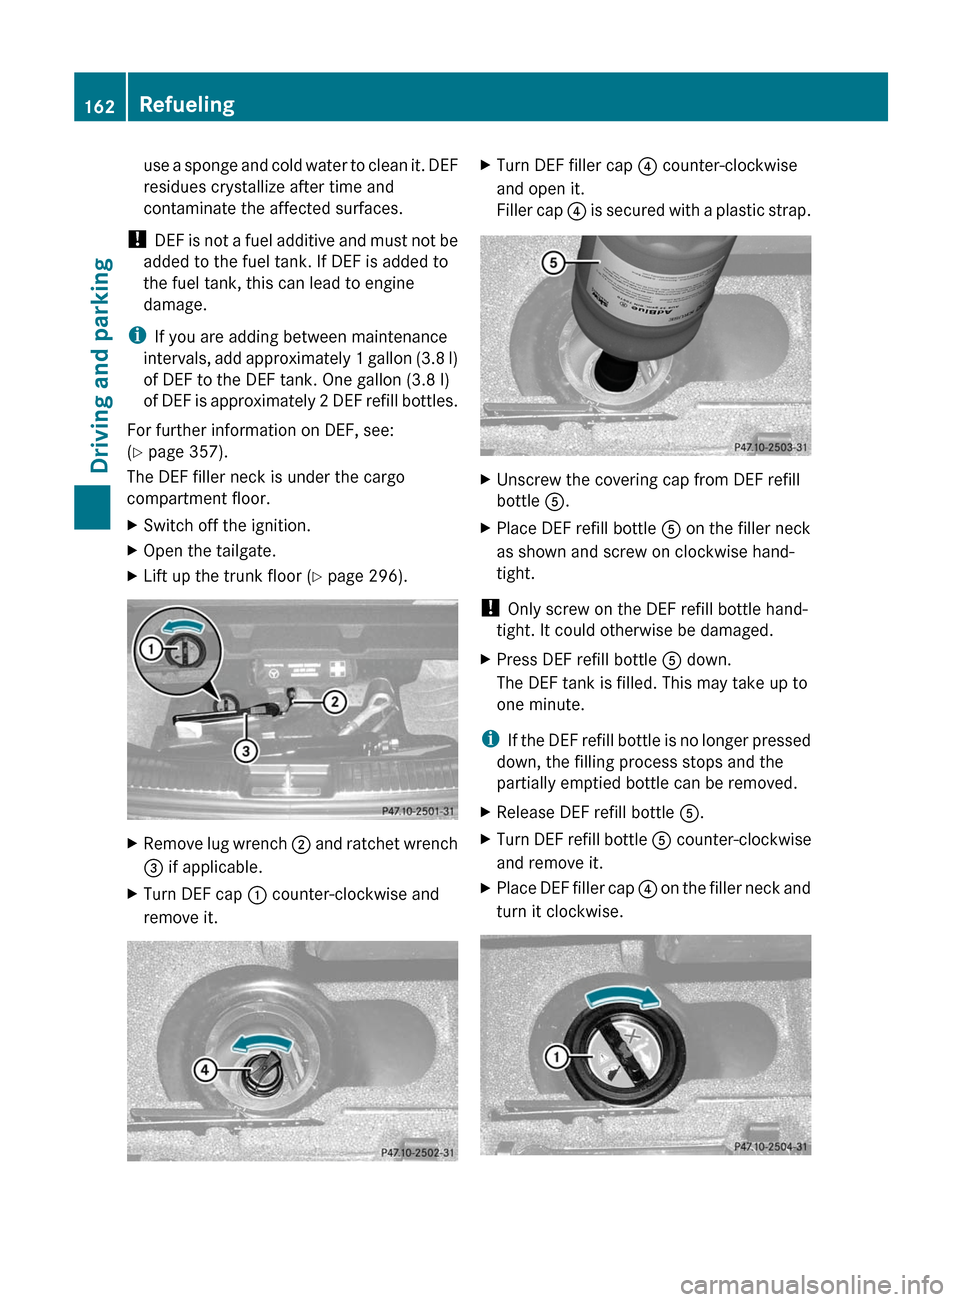
The DEF filler neck is under the cargo
compartment floor.XSwitch off the ignition.XOpen the tailgate.XLift up the trunk floor ( Y page 296).XRemove lug wrench ; and ratchet wrench
= if applicable.XTurn DEF cap : counter-clockwise and
remove it.XTurn DEF filler cap ? counter-clockwise
and open it.
Filler cap ? is secured with a plastic strap.XUnscrew the covering cap from DEF refill
bottle A.XPlace DEF refill bottle A on the filler neck
as shown and screw on clockwise hand-
tight.
! Only screw on the DEF refill bottle hand-
tight. It could otherwise be damaged.
XPress DEF refill bottle A down.
The DEF tank is filled. This may take up to
one minute.
i If the DEF refill bottle is no longer pressed
down, the filling process stops and the
partially emptied bottle can be removed.
XRelease DEF refill bottle A.XTurn DEF refill bottle A counter-clockwise
and remove it.XPlace DEF filler cap ? on the filler neck and
turn it clockwise.162RefuelingDriving and parking
Page 331 of 368

Checking the tire pressures
Important safety notesGWARNING
Follow recommended tire inflation pressures.
Do not underinflate tires. Underinflated tires
wear excessively and/or unevenly, adversely
affect handling and fuel economy, and are
more likely to fail from being overheated.
Do not overinflate tires. Overinflated tires can
adversely affect handling and ride comfort,
wear unevenly, increase stopping distance,
and result in sudden deflation (blowout)
because they are more likely to become
punctured or damaged by road debris,
potholes etc.
Do not overload the tires by exceeding the
specified load limit as indicated on the Tire
and Loading Information placard on the
driver's door B-pillar. Overloading the tires
can overheat them, possibly causing a
blowout. Overloading the tires can also result
in handling or steering problems, or brake
failure.
Check the tire pressure at least once a month.
Only check and correct tire pressures when
the tires are cold ( Y page 325).
Checking tire pressure manually
To determine and set the correct tire
pressure, proceed as follows:
XRemove the valve cap of the tire that is to
be checked.XPress the tire pressure gauge securely onto
the valve.XRead the tire pressure and compare it with
the recommended value on the Tire and
Loading Information placard on the
B-pillar on the driver's side of your vehicle.XIf necessary, increase the tire pressure to
the recommended value ( Y page 325).XIf the tire pressure is too high, release air
by pressing down the metal pin in the valve
using the tip of a pen, for example. Thencheck the tire pressure again using the tire
pressure gauge.XScrew the valve cap onto the valve.XRepeat these steps for the other tires.
Tire pressure loss warning system
(Canada only)
Important safety notes
While the vehicle is in motion, the tire
pressure loss warning system monitors the
set tire pressure using the rotational speed of
the wheels. This enables the system to detect
significant pressure loss in a tire. If the speed
of rotation of a wheel changes as a result of
a loss of pressure, a corresponding warning
message will appear in the multifunction
display.
GWARNING
When the multifunction display shows the
message Tire Pressure Check Tires , one
or more of your tires are significantly
underinflated. You should stop and check
your tires as soon as possible, and inflate
them to the proper tire inflation pressure as
indicated on the vehicle's Tire and Loading
Information placard or on the tire inflation
pressure label.
Driving on a significantly underinflated tire
causes the tire to overheat and can lead to
tire failure. Underinflation also reduces fuel
efficiency and tire tread life, and may affect
the vehicle's handling and stopping ability.
Each tire, including the spare, should be
checked at least once a month when cold.
Inflate the tires to the recommended tire
inflation pressure as specified on
R the Tire and Loading Information placard on
the driver's door B-pillar
or
R the tire inflation pressure label located on
the inside of the fuel filler flap
Tire pressure329Wheels and tiresZ