fold seats MERCEDES-BENZ R-CLASS FAMILY TOURER 2012 Owners Manual
[x] Cancel search | Manufacturer: MERCEDES-BENZ, Model Year: 2012, Model line: R-CLASS FAMILY TOURER, Model: MERCEDES-BENZ R-CLASS FAMILY TOURER 2012Pages: 368, PDF Size: 29.05 MB
Page 17 of 368
SeatFolding down the 2nd row of
seats .............................................. 254
Important safety notes ....................97
Resetting the 2nd row of seats ......256
Resetting the 3rd row of seats ....... 256
Seat belts
Adjusting the driver's and front-
passenger seat belt .........................54
Adjusting the height ......................... 54
Belt force limiters ............................ 55
Cleaning ......................................... 293
Correct usage .................................. 52
Emergency Tensioning Devices ........ 55
Fastening ......................................... 53
Important safety guidelines .............51
Releasing ......................................... 54
Safety guidelines ............................. 39
Special seat belt retractor ...............58
Switching belt adjustment on/off
(on-board computer) ......................209
Warning lamp ................................. 238
Warning lamp (function) ................... 54
Seats
Adjusting (electrically) .....................98
Adjusting (second and third rows) . 101
Adjusting the 4-way lumbar
support .......................................... 105
Adjusting the head restraint ............99
Cleaning the cover .........................293
Correct driver's seat position ........... 96
Folding down the 3rd row of seats . 255
Folding the rear bench seat
forwards/back ............................... 253
Multicontour seat .......................... 105
Seat heating problem ....................106
Seat ventilation problem ................107
Storing settings (memory
function) ........................................ 112
Switching seat heating on/off .......106
Switching the seat ventilation on/
off .................................................. 106
Securing hooks .................................. 258
Sensors (cleaning instructions) ....... 291
Service see ASSYST PLUS service interval
display Service interval display
Displaying service messages .........287
Hiding service messages ...............287
Notes ............................................. 287
Service messages ..........................287
Service products
Brake fluid ..................................... 359
Capacities ...................................... 355
Coolant (engine) ............................ 359
DEF special additives .....................357
Engine oil ....................................... 358
Fuel ................................................ 356
Important safety notes ..................354
Refrigerant (air-conditioning
system) .......................................... 359
Washer fluid ................................... 360
Settings
Factory (on-board computer) .........205
On-board computer .......................205
Setting the air distribution ............... 138
Setting the airflow ............................ 138
Side impact air bag ............................. 42
Side marker lamp (display
message) ............................................ 224
Side marker lamps (changing
bulbs) ................................................. 123
Side windows Convenience closing feature ............88
Convenience opening feature ..........87
Hinged side windows .......................87
Important safety information ...........86
Opening/closing .............................. 86
Problem (malfunction) .....................89
Resetting ......................................... 89
Sliding sunroof
Important safety notes ....................89
Opening/closing .............................. 90
Problem (malfunction) .....................92
Resetting ......................................... 90
see Panorama roof with power
tilt/sliding panel
SmartKey
Changing the battery .......................76
Changing the programming .............75
Checking the battery .......................76
Convenience closing feature ............88
Convenience opening feature ..........87
Display message ............................ 236Index15
Page 63 of 368
Ensure that:
R Top Tether hook = is hooked into Top
Tether anchorage ; as shown
R Top Tether belt ? is not twisted
R Top Tether belt ? is routed between the
seat backrest and the cargo
compartment cover if the cargo
compartment cover is installed.
R Top Tether belt ? is routed between the
seat backrest and the cargo net if the
cargo net is installed.GWARNING
Do not secure the Top Tether hook to the loop
underneath the Top Tether anchorage if you
are securing a child restraint system in the
third row of seats. The child restraint system
is not secured if you do so. An incorrectly
fitted child restraint system cannot perform
its intended protective function in the event
of an accident, and could lead to injuries.
XSwing back the seat backrest until it
engages ( Y page 253).
The outer seats in the second row are only
locked if the lock verification indicator is
folded in and the indicator area is barely
visible ( Y page 253).GWARNING
Make sure that the seats are locked and that
the backrests are locked in a vertical position
after fitting the Top Tether belt.
The outer seats in the second row are only
locked if the lock verification indicator is
folded in and the indicator area is barely
visible.
If the backrests are not locked, they could fold
forwards in the event of an accident, sudden
braking or a sudden change of direction.
Instead of restraining an occupant, they could
cause additional serious or even fatal injury.
XMove the head restraint back down again
slightly if necessary ( Y page 100). Makesure that you do not interfere with the
correct routing of Top Tether belt ?.XInstall the LATCH-type (ISOFIX) child
restraint system with Top TetherComply
with the manufacturer's installation
instructions when doing so. Make sure that
Top Tether belt ? is tight.
Center seat in the 2nd row
GWARNING
Only secure a child restraint system on the
center seat in the second row when the belt
buckles of the outer seats are not obstructed
or overlapped by the child restraint system.
Not all child restraint systems, including some
Mercedes-Benz approved child restraint
systems, can be used in this seat position. For
further information contact an authorized
Mercedes-Benz Center.
Do not use the LATCH-type anchors (ISOFIX)
or seat belt buckles for the outer seats in
conjunction with a child seat in the second-
row center seat. Child seats in the center
seating position must only be secured by the
center seat position seat belt inserted into the
seat belt buckle for the second-row center
seat.
GWARNING
Please be aware that installation of a child
seat in the second-row center seat position
can prevent the folding forward of the outer
second-row seats which can obstruct access
to and exit from the third-row seats. This
could affect the occupants' on the third-row
seats ability to exit the vehicle. In case of an
accident it will be difficult for occupants of the
third-row seats to leave the vehicle. Serious
injuries could be the result.
Install a child seat in one of the outer seating
positions according to the installation
instructions if access to the third-row seats is
required.
XMove the head restraint upwards.Children in the vehicle61SafetyZ
Page 64 of 368
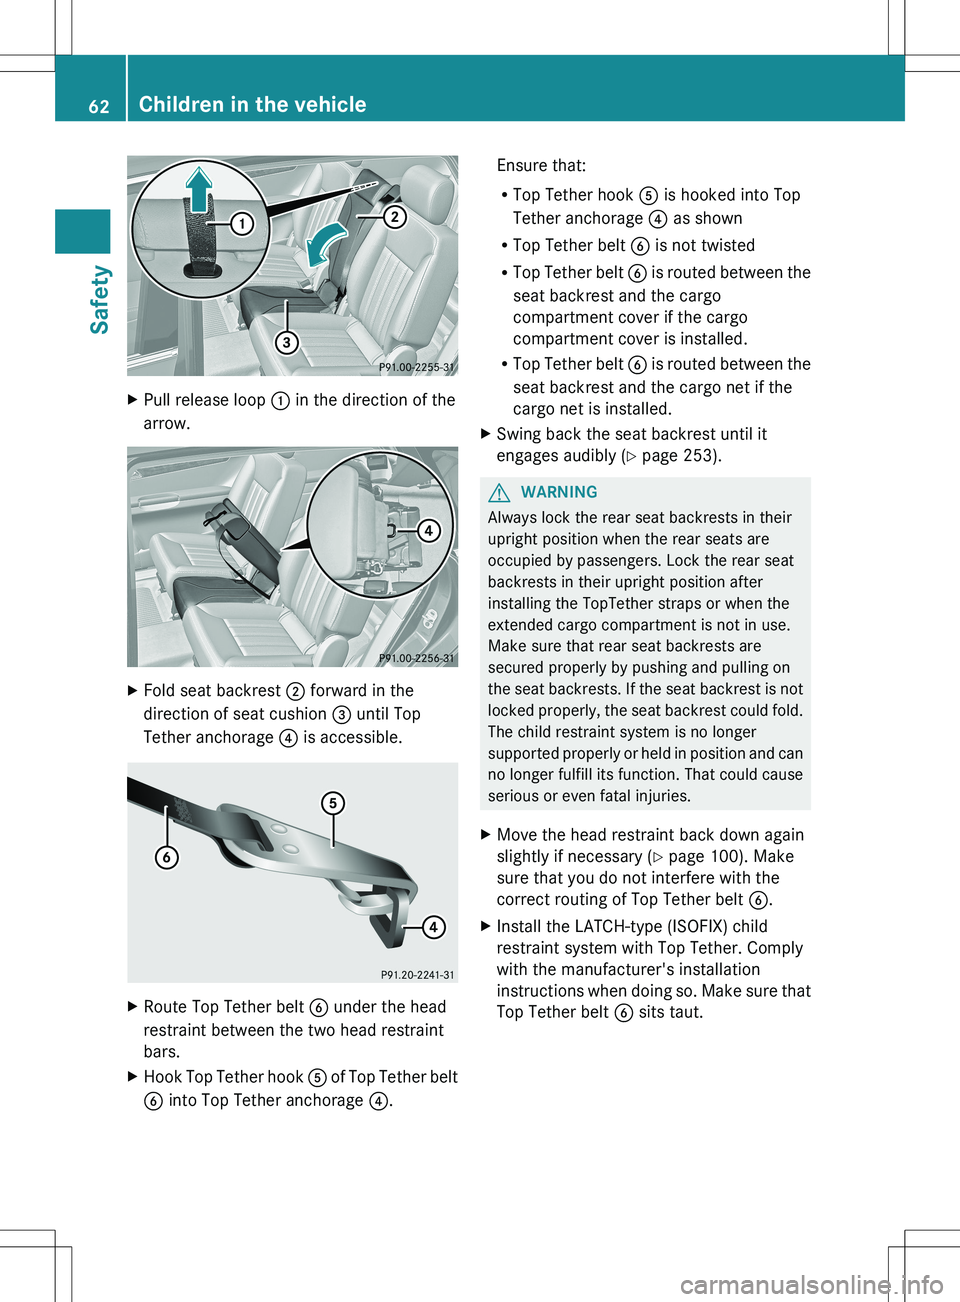
XPull release loop : in the direction of the
arrow.XFold seat backrest ; forward in the
direction of seat cushion = until Top
Tether anchorage ? is accessible.XRoute Top Tether belt B under the head
restraint between the two head restraint
bars.XHook Top Tether hook A of Top Tether belt
B into Top Tether anchorage ?.Ensure that:
R Top Tether hook A is hooked into Top
Tether anchorage ? as shown
R Top Tether belt B is not twisted
R Top Tether belt B is routed between the
seat backrest and the cargo
compartment cover if the cargo
compartment cover is installed.
R Top Tether belt B is routed between the
seat backrest and the cargo net if the
cargo net is installed.XSwing back the seat backrest until it
engages audibly ( Y page 253).GWARNING
Always lock the rear seat backrests in their
upright position when the rear seats are
occupied by passengers. Lock the rear seat
backrests in their upright position after
installing the TopTether straps or when the
extended cargo compartment is not in use.
Make sure that rear seat backrests are
secured properly by pushing and pulling on
the seat backrests. If the seat backrest is not
locked properly, the seat backrest could fold.
The child restraint system is no longer
supported properly or held in position and can
no longer fulfill its function. That could cause
serious or even fatal injuries.
XMove the head restraint back down again
slightly if necessary ( Y page 100). Make
sure that you do not interfere with the
correct routing of Top Tether belt B.XInstall the LATCH-type (ISOFIX) child
restraint system with Top Tether. Comply
with the manufacturer's installation
instructions when doing so. Make sure that
Top Tether belt B sits taut.62Children in the vehicleSafety
Page 100 of 368
injury to the head and neck in the event of an
accident or similar situation.
Do not drive the vehicle without the seat head
restraints. Head restraints are intended to
help reduce injuries during an accident.
! To avoid damage to the seats and the seat
heating, observe the following information:
R keep liquids from spilling on the seats. If
liquid is spilled on the seats, dry them as
soon as possible.
R if the seat covers are damp or wet, do not
switch on the seat heating. The seat
heating should also not be used to dry
the seats.
R clean the seat covers as recommended;
see the "Interior care" section.
R do not transport heavy loads on the
seats. Do not place sharp objects on the
seat cushions, e.g. knives, nails or tools.
The seats should only be occupied by
passengers, if possible.
R when the seat heating is in operation, do
not cover the seats with insulating
materials, e.g. blankets, coats, bags,
seat covers, child seats or booster seats.
! When you move the seats, make sure that
there are no objects in the footwell or
behind the seats. Otherwise, you could
damage the seats and the objects.
! When the outer seats in the second row
are folded down, the front seats must not
be in their rearmost position. The front
seats and the outer seats in the second row
could otherwise be damaged.
! Make sure that the sun visor is folded up
before adjusting the backrest and head
restraint height. The head restraint and sun
visor could otherwise collide when the head
restraint is fully extended.
i The rear-compartment head restraints
can be removed ( Y page 100).Please contact an authorized Mercedes-
Benz Center for more information.
i Other topics:
R Cargo compartment enlargement
(folding the second and third row of seats
forward) ( Y page 253)
Adjusting the seats
i Vehicles without Memory function: the
seats can be adjusted within three minutes
of a front door being opened.
The time period starts over again if, within
these three minutes, you:
R open or close a front door
R insert the SmartKey into the ignition lock
or remove it from the ignition lock
R switch the ignition on or off
If the SmartKey is in position 2 in the
ignition lock, the seats can be adjusted at
any time.
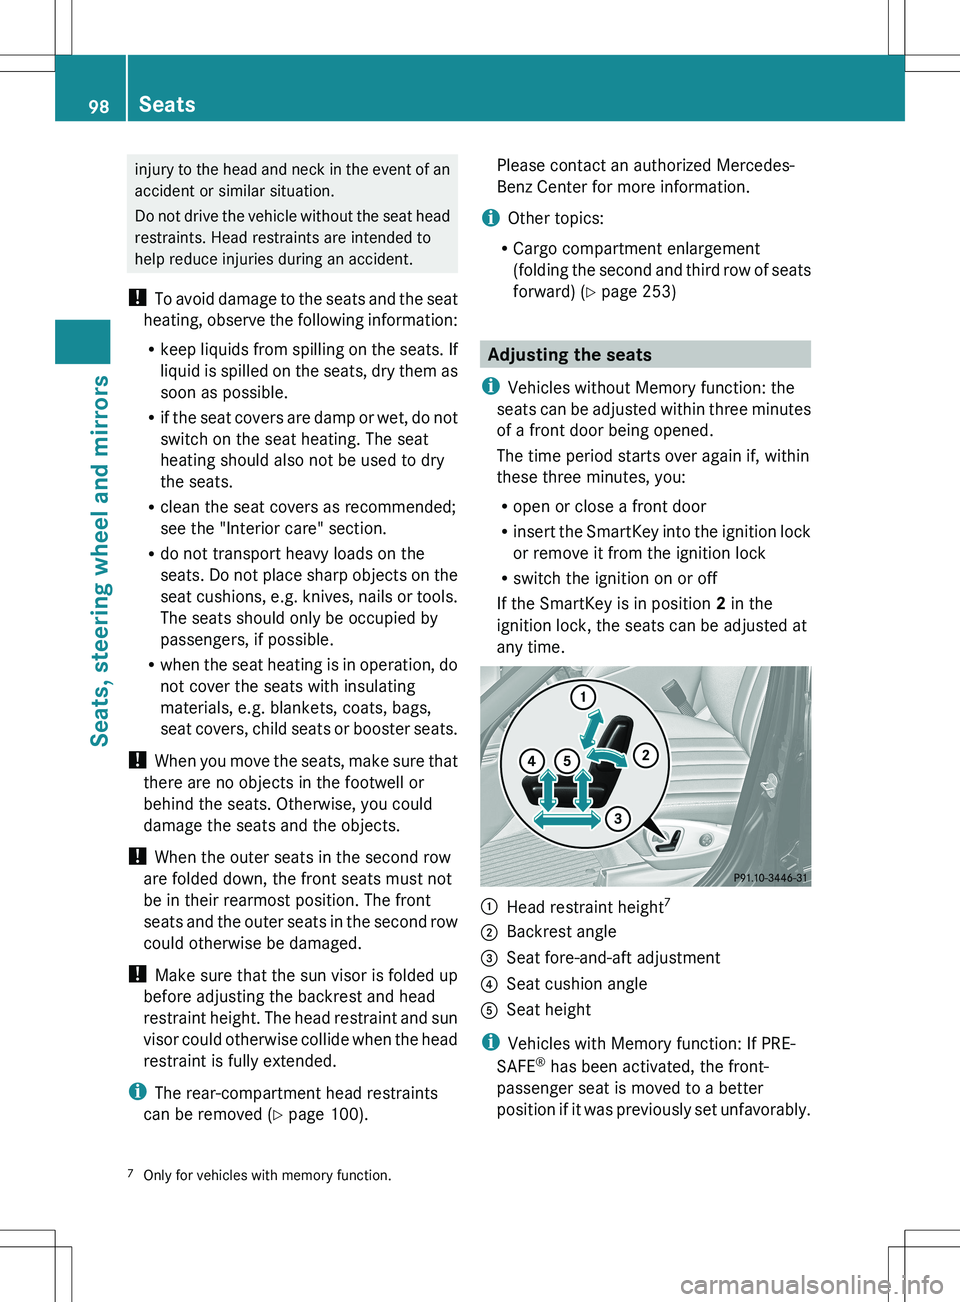
:Head restraint height 7;Backrest angle=Seat fore-and-aft adjustment?Seat cushion angleASeat height
i
Vehicles with Memory function: If PRE-
SAFE ®
has been activated, the front-
passenger seat is moved to a better
position if it was previously set unfavorably.
7 Only for vehicles with memory function.98SeatsSeats, steering wheel and mirrors
Page 101 of 368
iYou can store the seat settings using the
memory function ( Y page 112).
Adjusting the head restraints
Adjusting the head restraints manually
Adjusting the head restraint height 8
! The head restraints must only be removed
at a qualified specialist workshop.
Mercedes-Benz recommends that you use
a Mercedes-Benz Center for this purpose.
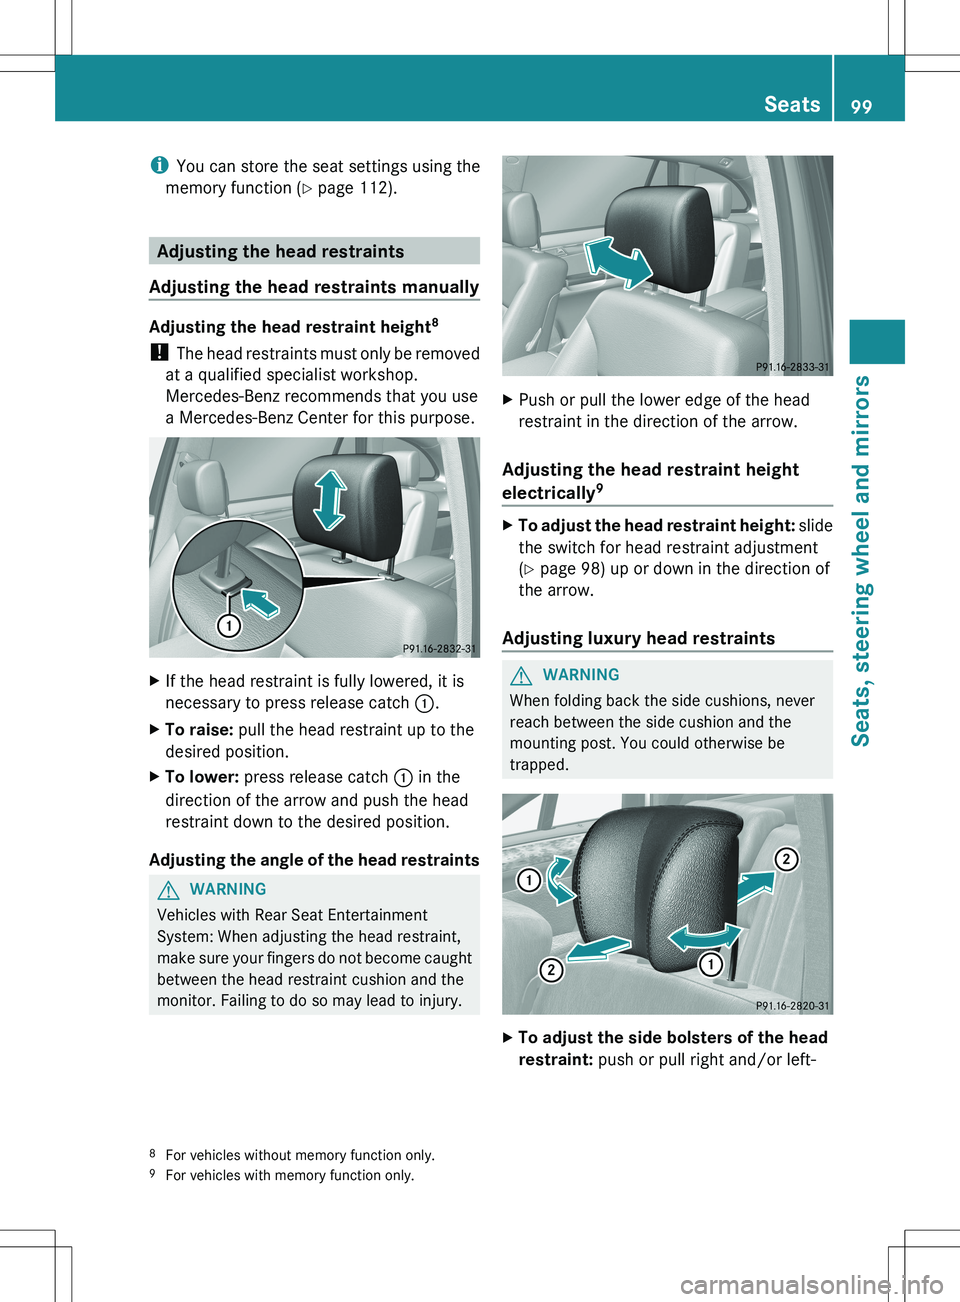
XIf the head restraint is fully lowered, it is
necessary to press release catch :.XTo raise: pull the head restraint up to the
desired position.XTo lower: press release catch : in the
direction of the arrow and push the head
restraint down to the desired position.
Adjusting the angle of the head restraints
GWARNING
Vehicles with Rear Seat Entertainment
System: When adjusting the head restraint,
make sure your fingers do not become caught
between the head restraint cushion and the
monitor. Failing to do so may lead to injury.
XPush or pull the lower edge of the head
restraint in the direction of the arrow.
Adjusting the head restraint height
electrically 9
XTo adjust the head restraint height:
slide
the switch for head restraint adjustment
( Y page 98) up or down in the direction of
the arrow.
Adjusting luxury head restraints
GWARNING
When folding back the side cushions, never
reach between the side cushion and the
mounting post. You could otherwise be
trapped.
XTo adjust the side bolsters of the head
restraint: push or pull right and/or left-8
For vehicles without memory function only.
9 For vehicles with memory function only.Seats99Seats, steering wheel and mirrorsZ
Page 102 of 368

hand side bolster : into the desired
position.XTo adjust the angle of the head
restraint: push or pull the head restraint in
the direction of arrow ;.
Rear seat head restraints
GWARNING
For safety reasons, always drive with the rear
head restraints in the upright position when
the rear seats are occupied.
Keep the area around head restraints clear of
articles (e.g. clothing) to not obstruct the
folding operation of the head restraints.
GWARNING
For your protection, drive only with properly
positioned head restraints.
Adjust the head restraint in such a way that it
is as close to the head as possible and the
center of the head restraint supports the back
of the head at eye level. This will reduce the
potential for injury to the head and neck in the
event of an accident or similar situation.
With a rear seat occupied, make sure to move
the respective head restraint up from the
lowest non-use position and have the
occupant adjust the head restraint properly.
Do not drive the vehicle without the seat head
restraints installed when the rear seats are
occupied. Head restraints are intended to
help reduce injuries during an accident.
Adjusting the head restraint height
(second and third row of seats)
Outer seat head restraints in the second row of
seats
Outer seat head restraints in the third row of seats
XIf the head restraint is fully lowered, it is
necessary to press release catch :.XTo raise: pull the head restraint up to the
desired position.XTo lower: press release catch : and push
the head restraint down until it is in the
desired position.
Removing and installing rear head
restraints
GWARNING
Occupants should only travel sitting on seats
which have the head restraints installed. In
the event of an accident, this reduces the risk
of injury for passengers seated in the rear
compartment.
If you wish to remove the head restraints from
the outer seats in the second row of seats,
100SeatsSeats, steering wheel and mirrors
Page 103 of 368
you must move the respective seat as far
back as possible (Y page 101). Then, fold the
seat backrest forwards.
You can remove the head restraints in the
second row of seats (center seat and outer
seats) and the head restraints in the third row
of seats in the same way.
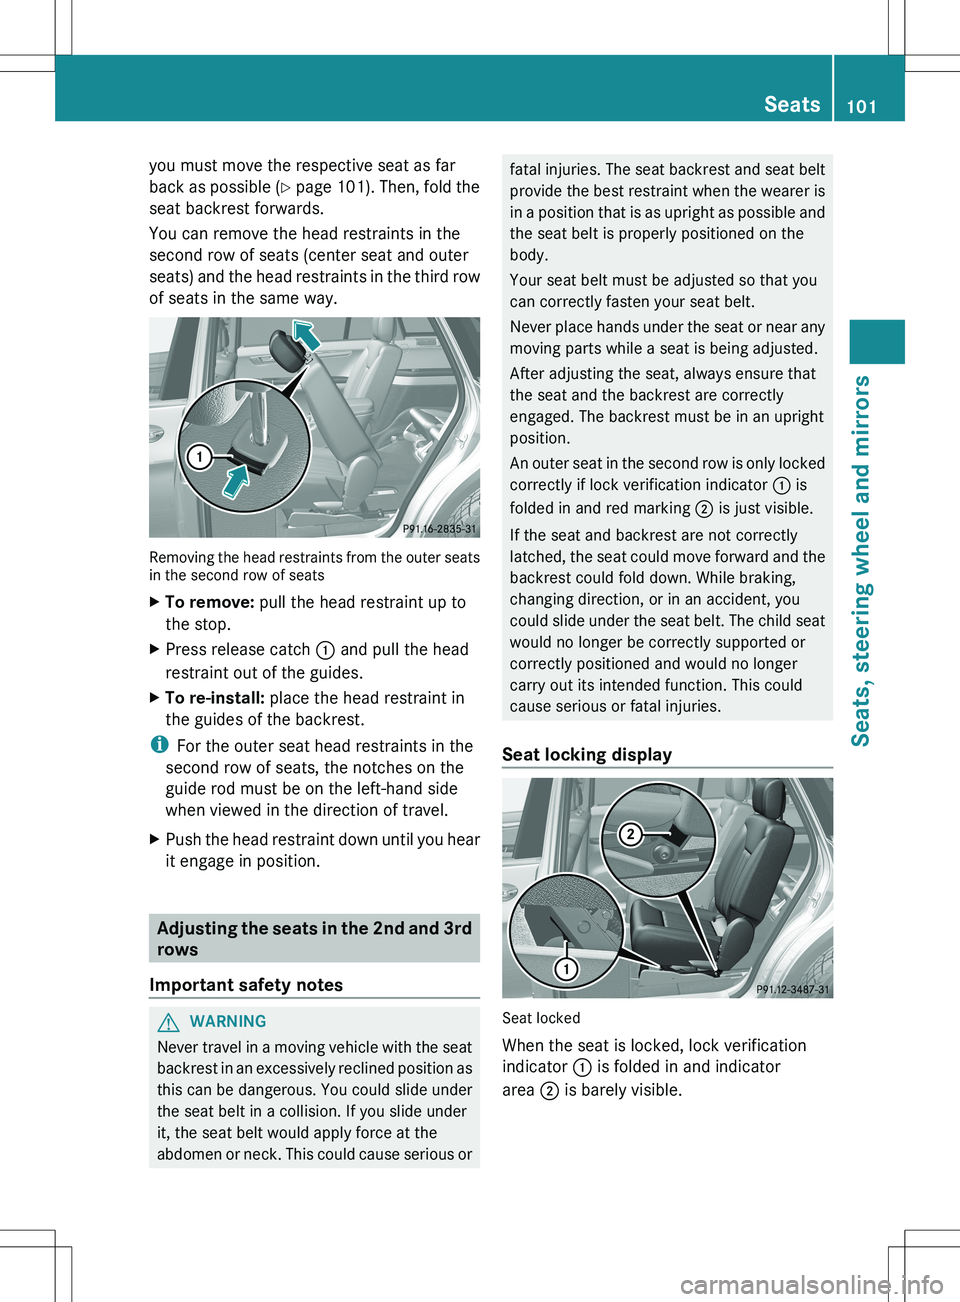
Removing the head restraints from the outer seats
in the second row of seats
XTo remove: pull the head restraint up to
the stop.XPress release catch : and pull the head
restraint out of the guides.XTo re-install: place the head restraint in
the guides of the backrest.
i For the outer seat head restraints in the
second row of seats, the notches on the
guide rod must be on the left-hand side
when viewed in the direction of travel.
XPush the head restraint down until you hear
it engage in position.
Adjusting the seats in the 2nd and 3rd
rows
Important safety notes
GWARNING
Never travel in a moving vehicle with the seat
backrest in an excessively reclined position as
this can be dangerous. You could slide under
the seat belt in a collision. If you slide under
it, the seat belt would apply force at the
abdomen or neck. This could cause serious or
fatal injuries. The seat backrest and seat belt
provide the best restraint when the wearer is
in a position that is as upright as possible and
the seat belt is properly positioned on the
body.
Your seat belt must be adjusted so that you
can correctly fasten your seat belt.
Never place hands under the seat or near any
moving parts while a seat is being adjusted.
After adjusting the seat, always ensure that
the seat and the backrest are correctly
engaged. The backrest must be in an upright
position.
An outer seat in the second row is only locked
correctly if lock verification indicator : is
folded in and red marking ; is just visible.
If the seat and backrest are not correctly
latched, the seat could move forward and the
backrest could fold down. While braking,
changing direction, or in an accident, you
could slide under the seat belt. The child seat
would no longer be correctly supported or
correctly positioned and would no longer
carry out its intended function. This could
cause serious or fatal injuries.
Seat locking display
Seat locked
When the seat is locked, lock verification
indicator : is folded in and indicator
area ; is barely visible.
Seats101Seats, steering wheel and mirrorsZ
Page 104 of 368
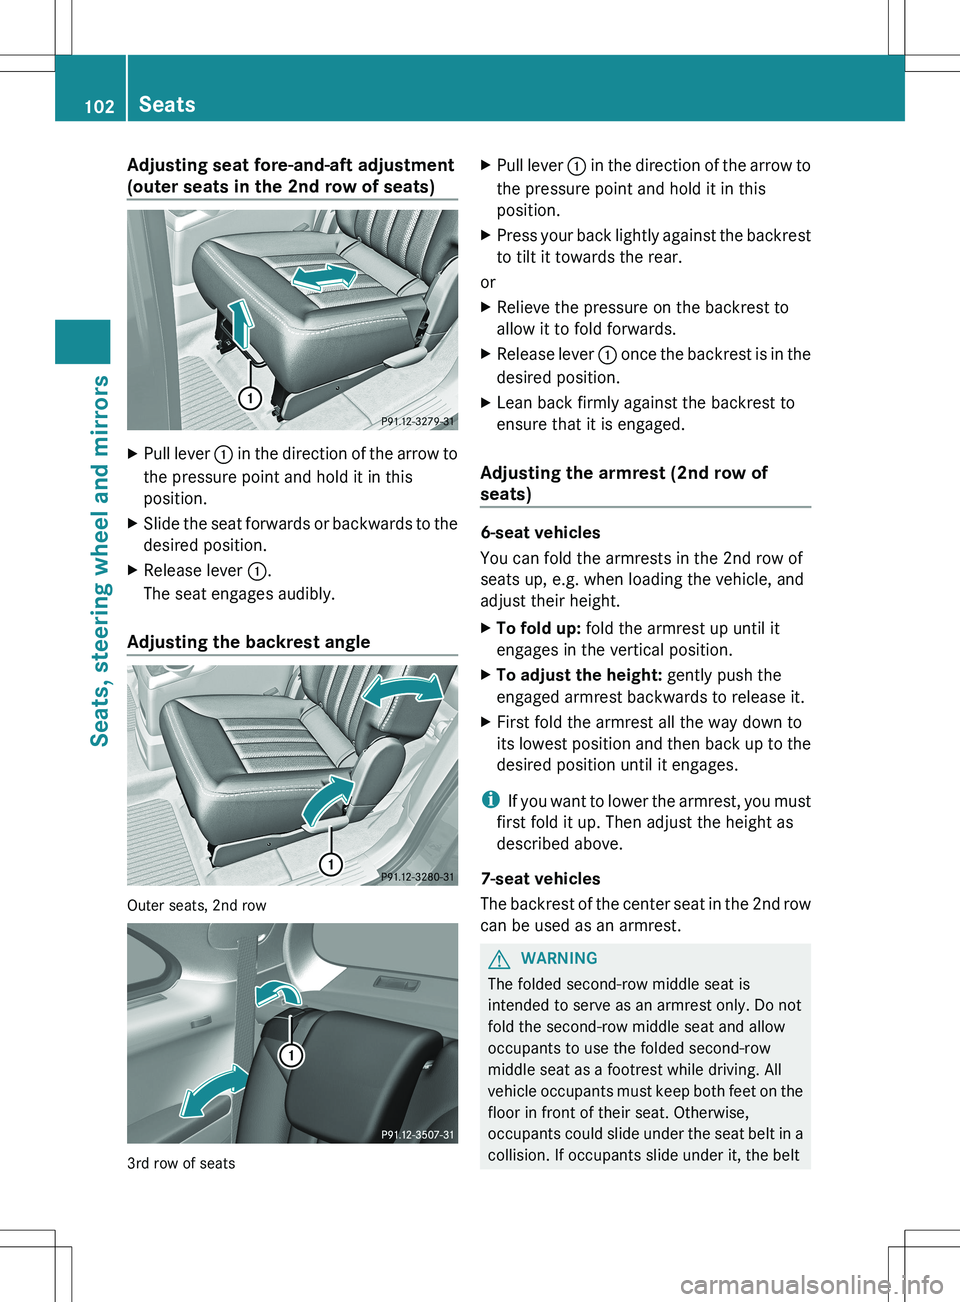
Adjusting seat fore-and-aft adjustment
(outer seats in the 2nd row of seats)XPull lever : in the direction of the arrow to
the pressure point and hold it in this
position.XSlide the seat forwards or backwards to the
desired position.XRelease lever :.
The seat engages audibly.
Adjusting the backrest angle
Outer seats, 2nd row
3rd row of seats
XPull lever : in the direction of the arrow to
the pressure point and hold it in this
position.XPress your back lightly against the backrest
to tilt it towards the rear.
or
XRelieve the pressure on the backrest to
allow it to fold forwards.XRelease lever : once the backrest is in the
desired position.XLean back firmly against the backrest to
ensure that it is engaged.
Adjusting the armrest (2nd row of
seats)
6-seat vehicles
You can fold the armrests in the 2nd row of
seats up, e.g. when loading the vehicle, and
adjust their height.
XTo fold up: fold the armrest up until it
engages in the vertical position.XTo adjust the height: gently push the
engaged armrest backwards to release it.XFirst fold the armrest all the way down to
its lowest position and then back up to the
desired position until it engages.
i If you want to lower the armrest, you must
first fold it up. Then adjust the height as
described above.
7-seat vehicles
The backrest of the center seat in the 2nd row
can be used as an armrest.
GWARNING
The folded second-row middle seat is
intended to serve as an armrest only. Do not
fold the second-row middle seat and allow
occupants to use the folded second-row
middle seat as a footrest while driving. All
vehicle occupants must keep both feet on the
floor in front of their seat. Otherwise,
occupants could slide under the seat belt in a
collision. If occupants slide under it, the belt
102SeatsSeats, steering wheel and mirrors
Page 105 of 368
would apply force at the abdomen or neck.
That could cause serious or even fatal injuries.
Do not fold the second-row middle seat and
allow occupants to use the folded second-row
middle seat as a table while driving. Objects
placed on the folded second-row middle seat
may move freely during braking, vehicle
maneuvers, or an accident and be thrown
around in the vehicle interior. Objects thrown
around in the vehicle interior may cause an
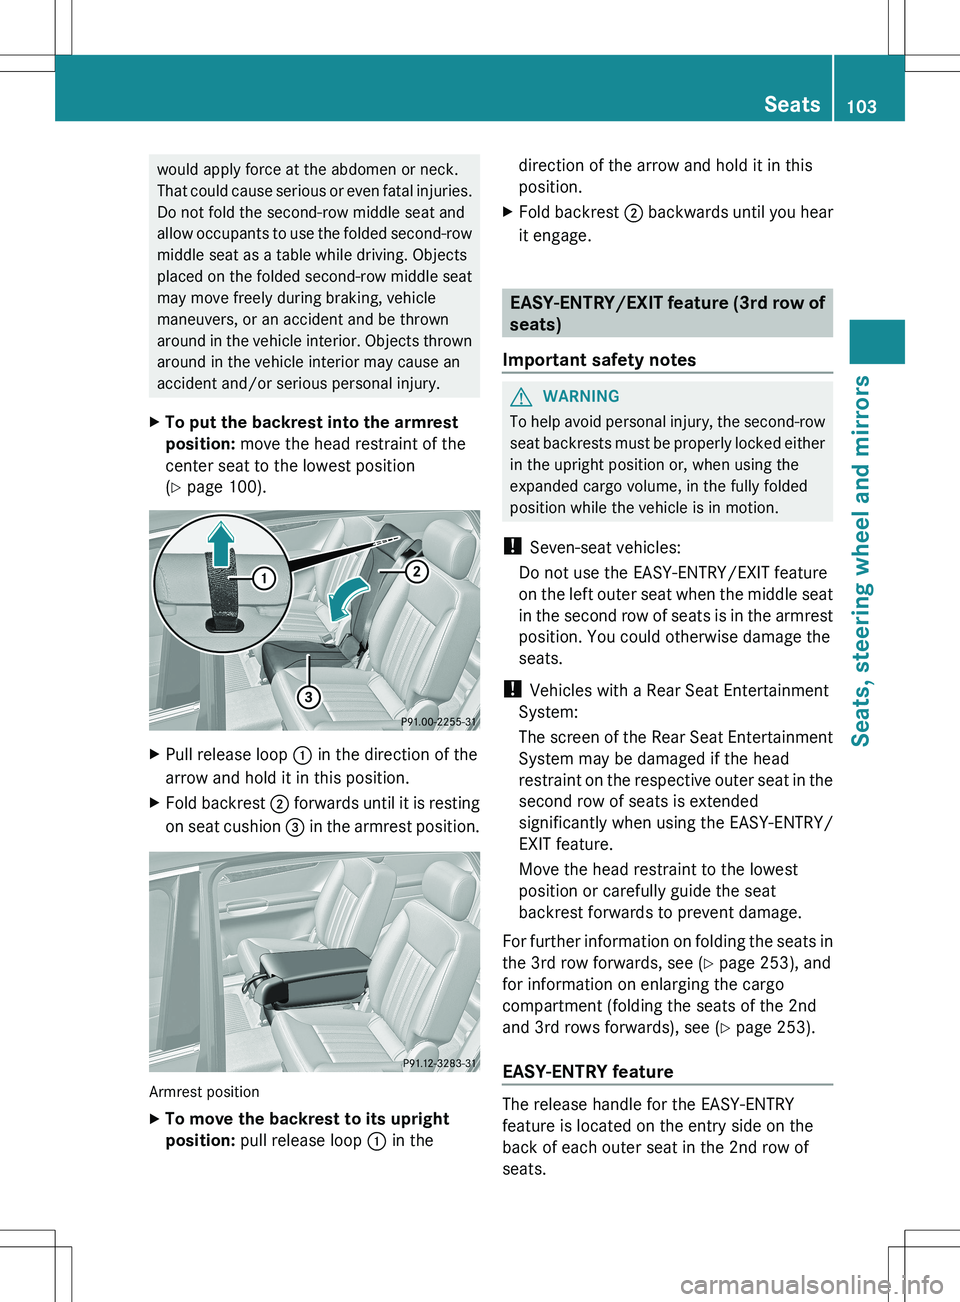
accident and/or serious personal injury.XTo put the backrest into the armrest
position: move the head restraint of the
center seat to the lowest position
( Y page 100).XPull release loop : in the direction of the
arrow and hold it in this position.XFold backrest ; forwards until it is resting
on seat cushion = in the armrest position.
Armrest position
XTo move the backrest to its upright
position: pull release loop : in thedirection of the arrow and hold it in this
position.XFold backrest ; backwards until you hear
it engage.
EASY-ENTRY/EXIT feature (3rd row of
seats)
Important safety notes
GWARNING
To help avoid personal injury, the second-row
seat backrests must be properly locked either
in the upright position or, when using the
expanded cargo volume, in the fully folded
position while the vehicle is in motion.
! Seven-seat vehicles:
Do not use the EASY-ENTRY/EXIT feature
on the left outer seat when the middle seat
in the second row of seats is in the armrest
position. You could otherwise damage the
seats.
! Vehicles with a Rear Seat Entertainment
System:
The screen of the Rear Seat Entertainment
System may be damaged if the head
restraint on the respective outer seat in the
second row of seats is extended
significantly when using the EASY-ENTRY/
EXIT feature.
Move the head restraint to the lowest
position or carefully guide the seat
backrest forwards to prevent damage.
For further information on folding the seats in
the 3rd row forwards, see ( Y page 253), and
for information on enlarging the cargo
compartment (folding the seats of the 2nd
and 3rd rows forwards), see ( Y page 253).
EASY-ENTRY feature
The release handle for the EASY-ENTRY
feature is located on the entry side on the
back of each outer seat in the 2nd row of
seats.
Seats103Seats, steering wheel and mirrorsZ
Page 106 of 368
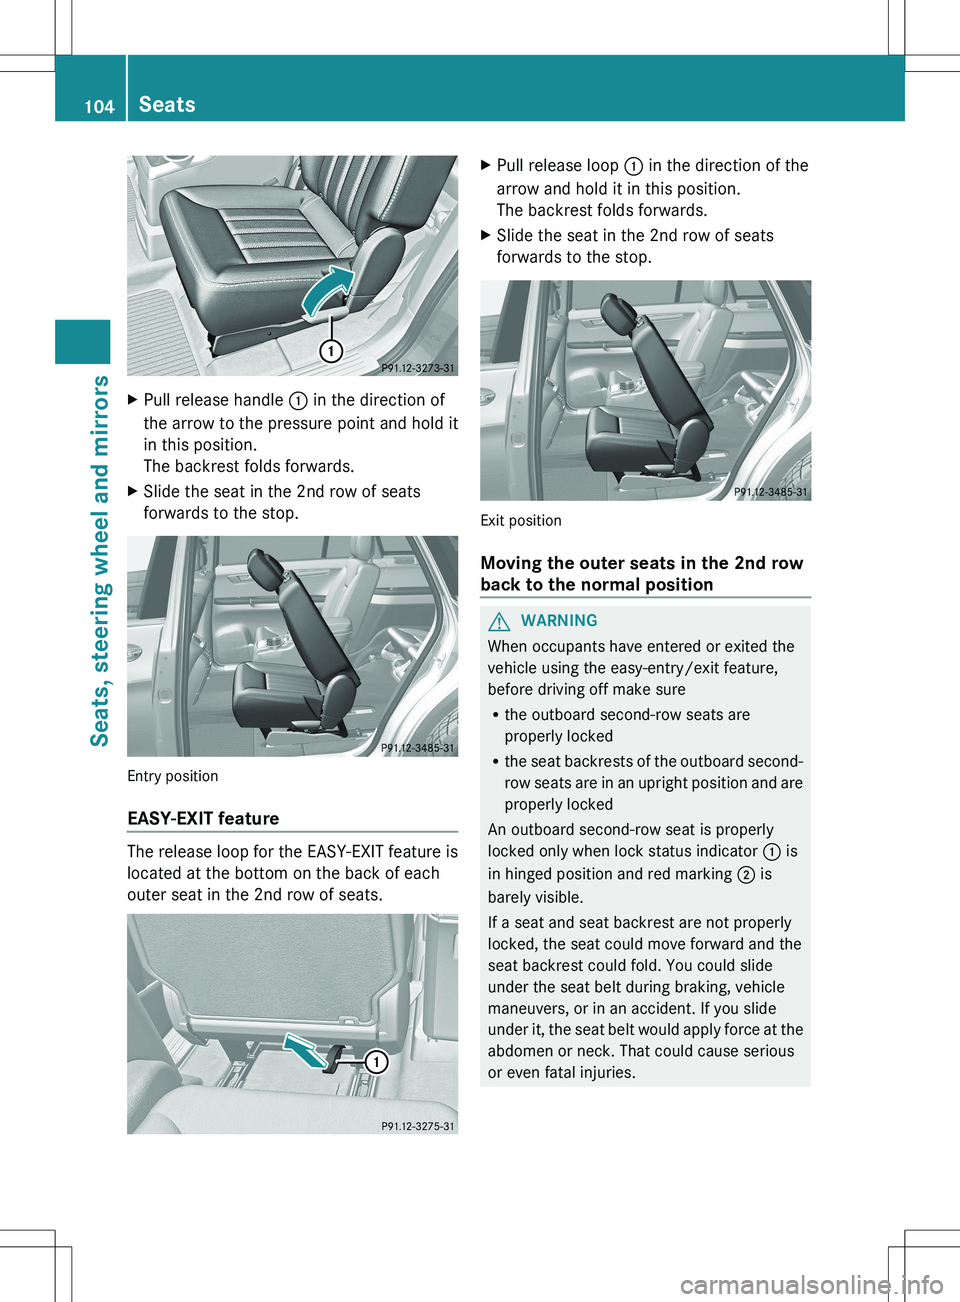
XPull release handle : in the direction of
the arrow to the pressure point and hold it
in this position.
The backrest folds forwards.XSlide the seat in the 2nd row of seats
forwards to the stop.
Entry position
EASY-EXIT feature
The release loop for the EASY-EXIT feature is
located at the bottom on the back of each
outer seat in the 2nd row of seats.
XPull release loop : in the direction of the
arrow and hold it in this position.
The backrest folds forwards.XSlide the seat in the 2nd row of seats
forwards to the stop.
Exit position
Moving the outer seats in the 2nd row
back to the normal position
GWARNING
When occupants have entered or exited the
vehicle using the easy-entry/exit feature,
before driving off make sure
R the outboard second-row seats are
properly locked
R the seat backrests of the outboard second-
row seats are in an upright position and are
properly locked
An outboard second-row seat is properly
locked only when lock status indicator : is
in hinged position and red marking ; is
barely visible.
If a seat and seat backrest are not properly
locked, the seat could move forward and the
seat backrest could fold. You could slide
under the seat belt during braking, vehicle
maneuvers, or in an accident. If you slide
under it, the seat belt would apply force at the
abdomen or neck. That could cause serious
or even fatal injuries.
104SeatsSeats, steering wheel and mirrors