MERCEDES-BENZ R-CLASS FAMILY TOURER 2013 Owners Manual
Manufacturer: MERCEDES-BENZ, Model Year: 2013, Model line: R-CLASS FAMILY TOURER, Model: MERCEDES-BENZ R-CLASS FAMILY TOURER 2013Pages: 364, PDF Size: 28.68 MB
Page 251 of 364
248
Page 252 of 364
Useful information
............................250
Stowage areas .................................. 250
Features ............................................. 264 249Stowage and features
Page 253 of 364
Useful information
i This Operator's Manual describes all
models and all standard and optional
equipment of your vehicle available at the
time of publication of the Operator's
Manual. Country-specific differences are
possible. Please note that your vehicle may
not be equipped with all features
described. This also applies to safety-
related systems and functions.
i Read the information on qualified
specialist workshops: (Y page 24).Stowage areas
Loading guidelines
G
WARNING
Always faste nitems being carried as securely
as possible. Use cargo tie-down rings and
fastening materials appropriate for the weight
and size of the load.
In an accident, durin ghard braking or sudden
maneuvers, loose items will be thrown around
inside the vehicle .This can cause injury to
vehicle occupants unless the items are
securely fastened in the vehicle.
To help avoid personal injury during a collision
or sudden maneuver, exercise care when
transporting cargo. Do not pile luggage or
cargo higher than the seat backrests.
The cargo compartmentist he preferred place
to carry objects. Always use cargo tie-down
rings, and if so equipped, always use the cargo
net when transporting cargo.
Never drive a vehicle with the tailgate open.
Deadly carbon monoxide (CO) gases may
enter vehicle interior resulting in
unconsciousness and death.
The gross vehicle weight (GVW) is the vehicle
weight including fuel, vehicle tool kit, spare
wheel, installed accessories, vehicle
occupants and luggage/cargo. The gross load limit and the gross vehicle
weight rating (GVWR) for your vehicle must
never be exceeded. The load limit and GVWR
are given on the vehicle identification plate
found on the B-pillar of the driver's door
(Y
page 323).
The load must also be distributed so that the
weight on each axle never exceeds the gross
axle weight rating (GAWR) for the front and
rear axles. The relevant GVWR and GAWR
information can be found on the vehicle
identification plate on the B-pillar of the
driver's side (Y page 323).
You will find further information in the
"Loading the vehicle" section (Y page 323).
The handling characteristics of a laden
vehicle are dependent on the distribution of
the load within the vehicle. For this reason,
you should observe the following notes when
transporting a load:
R when transporting a load, never exceed the
maximum permissible gross vehicle weight
or the gross axle weight rating of the
vehicle (including occupants).
R position heavy loads as far forwards as
possible and as low down in the cargo
compartmenta s possible.
R the load must not protrude above the upper
edge of the seat backrests.
R always place the load against the rear or
front seat backrests. Make sure that the
seat backrests are securely locked into
place.
R hook in the cargo net when loading.
R always place the load behind unoccupied
seats if possible.
R secure the load with sufficiently strong and
wear-resistant tie-downs. Pad sharp edges
for protection. 250
Stowage areasStowage and features
Page 254 of 364
Stowage space
Important safety notes G
WARNING
To help avoid personal injury during a collision
or sudden maneuver, exercise care when
storing objects in the vehicle. Put luggage or
cargo in the cargo compartmen tifpossible.
Do not pile luggage or cargo higher than the
seat backrests.
If so equipped, always use the cargo net when
transporting cargo. The cargo net cannot
secure hard or heavy objects.
Parcel nets cannot secure hard or heavy
objects.
Keep compartment lids closed. This will help
to prevent stored objects from being thrown
about and injuring vehicle occupants during
R braking
R vehicle maneuvers
R an accident
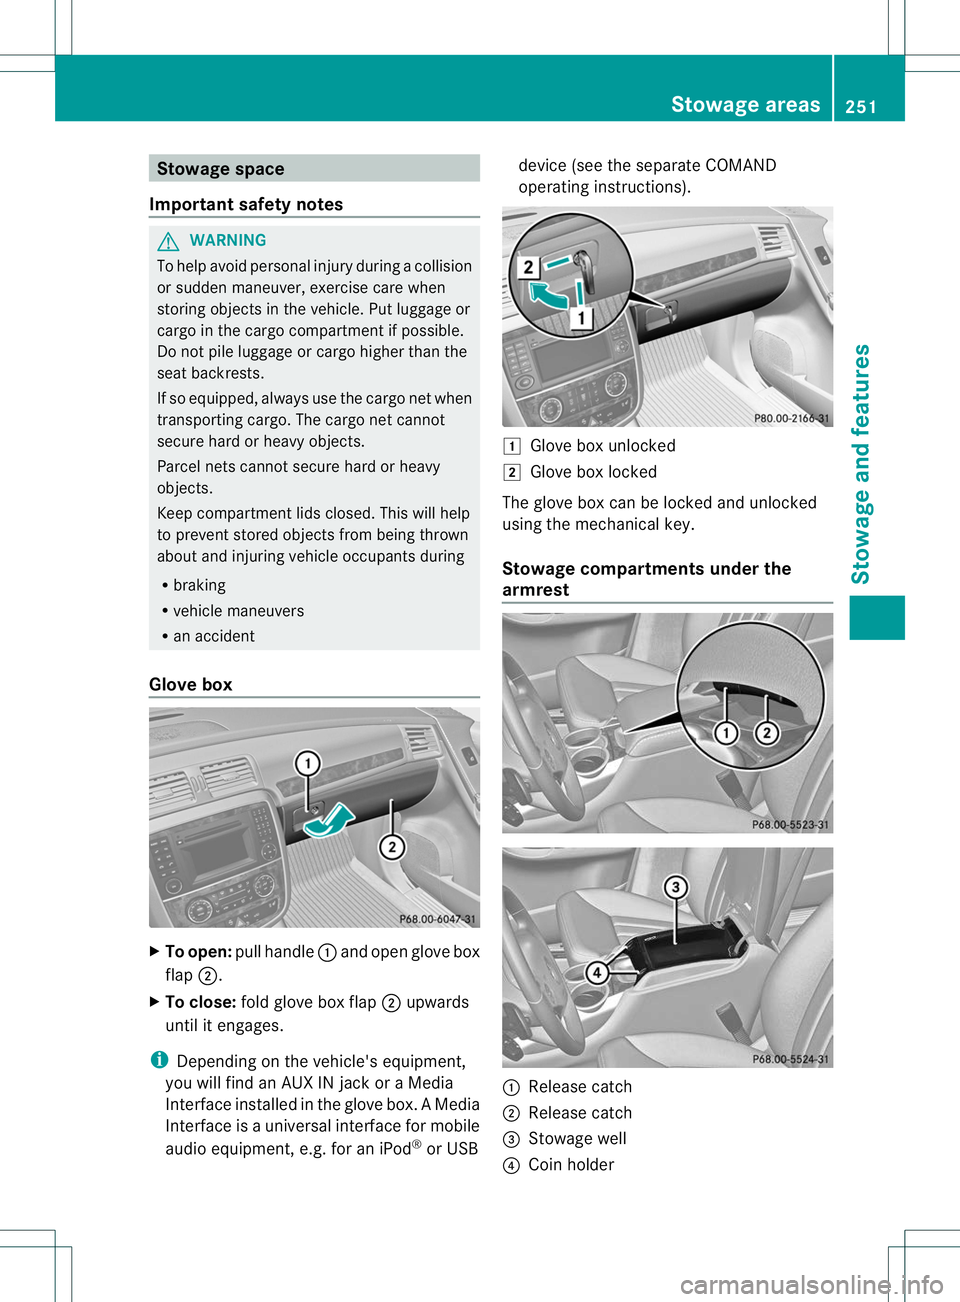
Glove box X
To open: pull handle :and open glove box
flap ;.
X To close: fold glove box flap ;upwards
until it engages.
i Depending on the vehicle's equipment,
you will find an AUX IN jack or a Media
Interface installed in the glove box. AMedia
Interface is a universal interface for mobile
audio equipment, e.g. for an iPod ®
or USB device (see the separate COMAND
operating instructions).
1
Glove box unlocked
2 Glove box locked
The glove box can be locked and unlocked
using the mechanical key.
Stowage compartments under the
armrest :
Release catch
; Release catch
= Stowage well
? Coin holder Stowage areas
251Stowage and features Z
Page 255 of 364
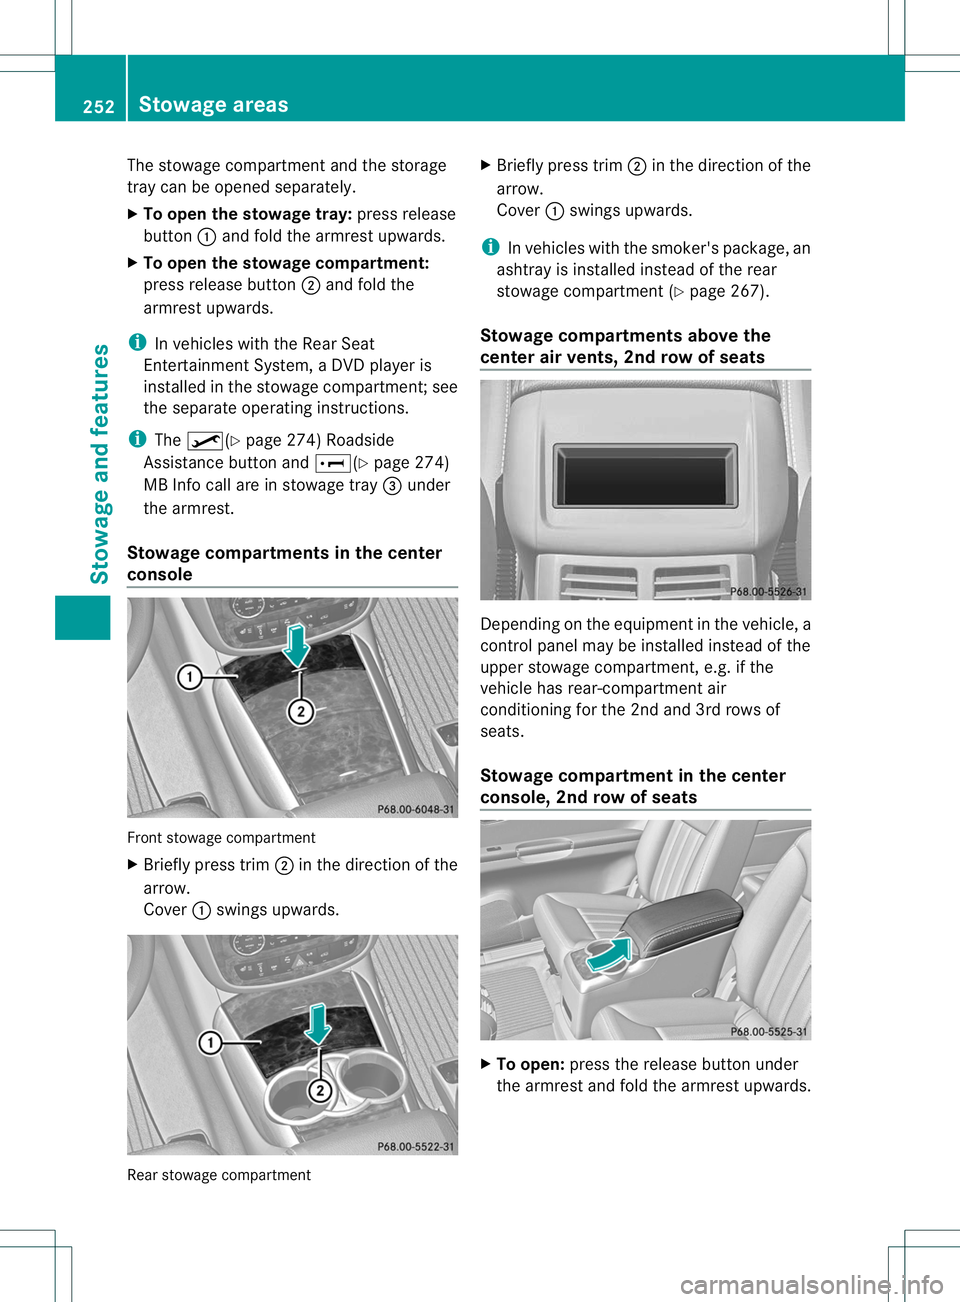
The stowage compartment and the storage
tray can be opened separately.
X
To open the stowage tray: press release
button :and fold the armrest upwards.
X To open the stowage compartment:
press release button ;and fold the
armrest upwards.
i In vehicles with the Rear Seat
Entertainment System, a DVD player is
installed in the stowage compartment; see
the separate operating instructions.
i The º(Y page 274) Roadside
Assistance button and E(Ypage 274)
MB Info call are in stowage tray =under
the armrest.
Stowage compartments in the center
console Front stowage compartment
X
Briefly press trim ;in the direction of the
arrow.
Cover :swings upwards. Rear stowage compartment X
Briefly press trim ;in the direction of the
arrow.
Cover :swings upwards.
i In vehicles with the smoker's package, an
ashtray is installed instead of the rear
stowage compartment (Y page 267).
Stowage compartments above the
center air vents, 2nd row of seats Depending on the equipment in the vehicle, a
control panel may be installed instead of the
upper stowage compartment, e.g. if the
vehicle has rear-compartmen
tair
conditioning for the 2nd and 3rd rows of
seats.
Stowage compartment in the center
console, 2nd row of seats X
To open: press the release button under
the armrest and fold the armrest upwards. 252
Stowage areasStowage and features
Page 256 of 364
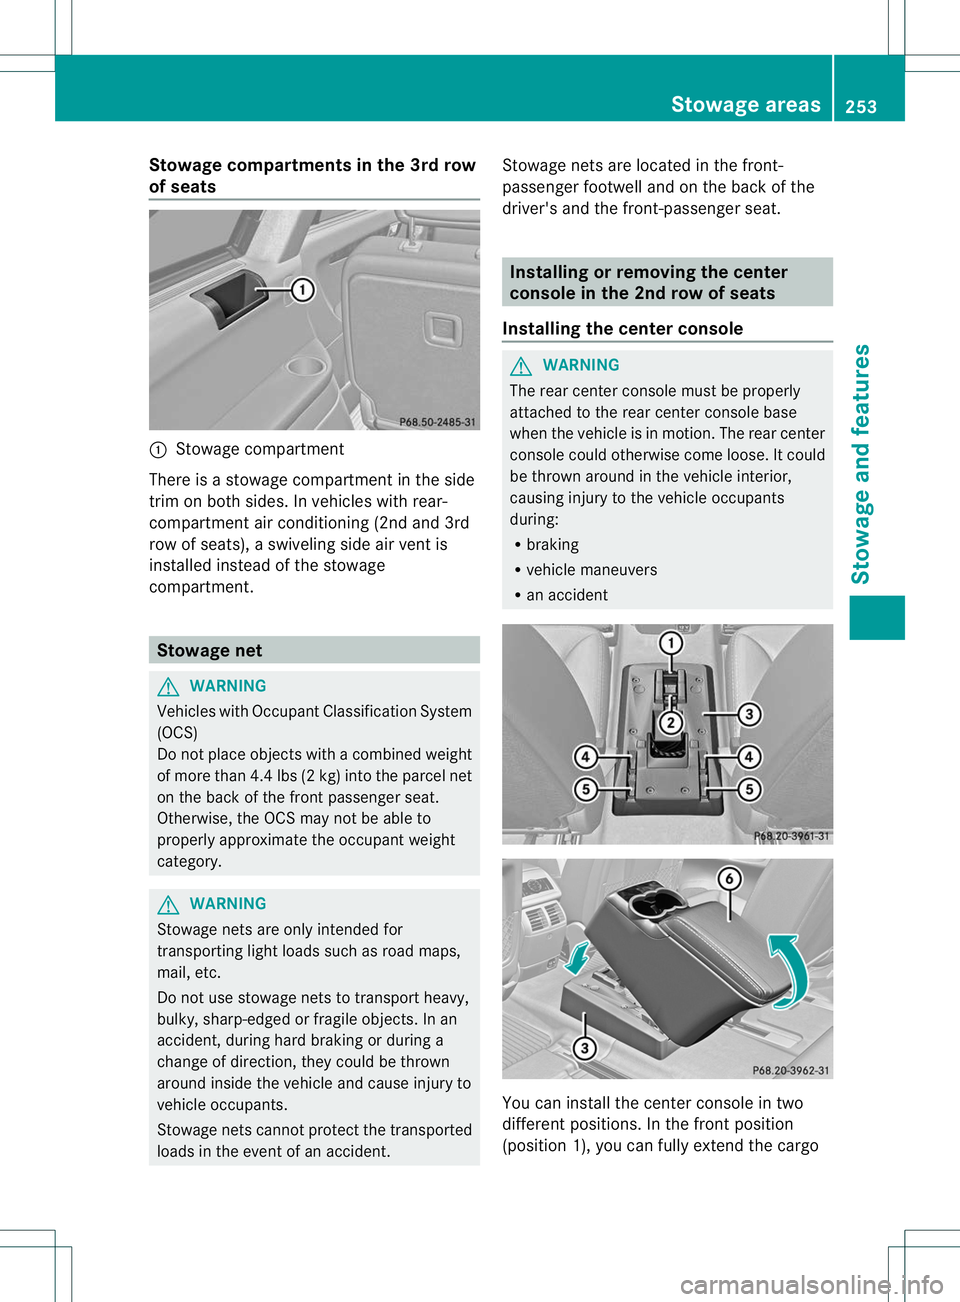
Stowage compartments in the 3rd row
of seats
:
Stowage compartment
There is a stowage compartmen tinthe side
trim on both sides. In vehicles with rear-
compartment air conditioning (2nd and 3rd
row of seats), a swiveling side air vent is
installed instead of the stowage
compartment. Stowage net
G
WARNING
Vehicles with Occupant Classification System
(OCS)
Do not place objects with a combined weight
of more than 4.4 lbs (2 kg) into the parcel net
on the back of the front passenger seat.
Otherwise, the OCS may not be able to
properly approximate the occupant weight
category. G
WARNING
Stowage nets are only intended for
transporting light loads such as road maps,
mail, etc.
Do not use stowage nets to transport heavy,
bulky, sharp-edged or fragile objects. In an
accident, during hard braking or during a
change of direction, they could be thrown
around inside the vehicle and cause injury to
vehicle occupants.
Stowage nets cannot protect the transported
loads in the event of an accident. Stowage nets are located in the front-
passenger footwell and on the back of the
driver's and the front-passenger seat. Installing or removing the center
console in the 2nd row of seats
Installing the center console G
WARNING
The rear center console must be properly
attached to the rear center console base
when the vehicle is in motion. The rear center
console could otherwise come loose. It could
be thrown around in the vehicle interior,
causing injury to the vehicle occupants
during:
R braking
R vehicle maneuvers
R an accident You can install the center console in two
different positions. In the front position
(position 1), you can fully extend the cargo Stowage areas
253Stowage and features Z
Page 257 of 364
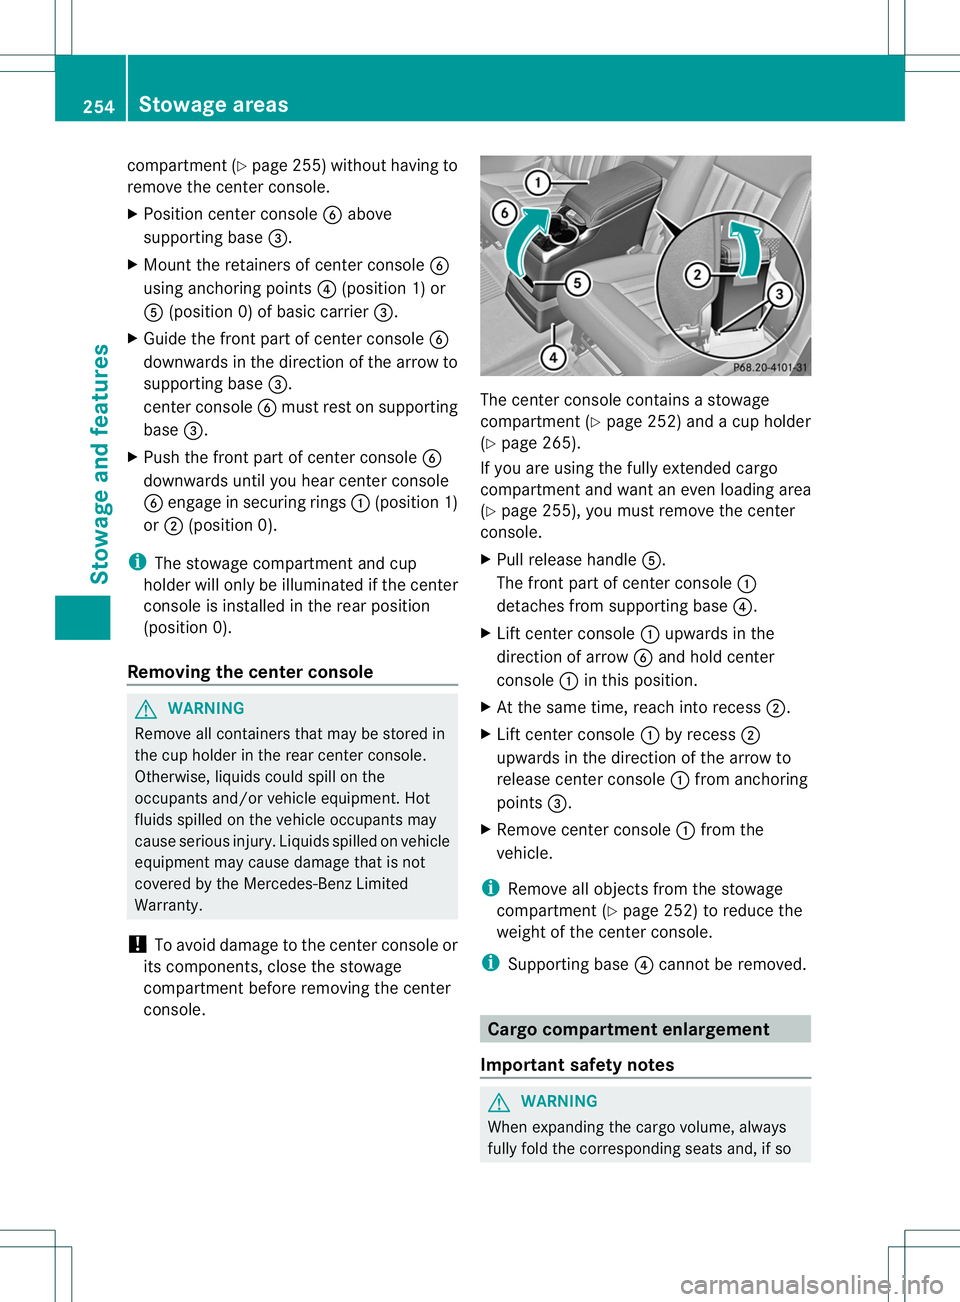
compartment (Y
page 255) withouth aving to
remove the center console.
X Positio ncenter console Babove
supporting base =.
X Mount the retainers of center console B
using anchoring points ?(position 1) or
A (position 0) of basic carrier =.
X Guide the front part of center console B
downwards in the direction of the arrow to
supporting base =.
center console Bmust rest on supporting
base =.
X Push the front part of center console B
downwards until you hear center console
B engage in securing rings :(position 1)
or ; (position 0).
i The stowage compartment and cup
holder will only be illuminated if the center
console is installed in the rear position
(position 0).
Removing the center console G
WARNING
Remove all containers that may be stored in
the cup holder in the rear center console.
Otherwise, liquids could spill on the
occupants and/or vehicle equipment .Hot
fluids spilled on the vehicle occupants may
cause serious injury. Liquids spilled on vehicle
equipment may cause damage that is not
covered by the Mercedes-Benz Limited
Warranty.
! To avoid damage to the center console or
its components, close the stowage
compartment before removing the center
console. The center console contains a stowage
compartment (Y
page 252) and a cup holder
(Y page 265).
If you are using the fully extended cargo
compartment and want an even loading area
(Y page 255), you must remove the center
console.
X Pull release handle A.
The front part of center console :
detaches from supporting base ?.
X Lift center console :upwards in the
direction of arrow Band hold center
console :in this position.
X At the same time, reach into recess ;.
X Lift center console :by recess ;
upwards in the direction of the arrow to
release center console :from anchoring
points =.
X Remove center console :from the
vehicle.
i Remove all objects from the stowage
compartment (Y page 252) to reduce the
weight of the center console.
i Supporting base ?cannot be removed. Cargo compartment enlargement
Important safety notes G
WARNING
When expanding the cargo volume, always
fully fold the corresponding seats and, if so 254
Stowage areasStowage and features
Page 258 of 364
equipped, always use the cargo net when
transporting cargo.
Unless you are transporting cargo, the seat
backrests must remain properly locked in the
upright position.
In an accident, during hard braking or sudden
maneuvers, loose items will be thrown around
inside the vehicle. This can cause injury to
vehicle occupants unless the items are
securely fastened in the vehicle.
Always use the cargo tie-down rings.
G
WARNING
Never drive a vehicle with the tailgate open.
Deadly carbon monoxide (CO) gases may
enter vehicle interior resulting in
unconsciousness and death.
To enlarge the cargo compartment, the rear
bench seats of the second and third rows of
seats can be folded forwards separately. You
can enlarge the cargo compartment partially
(Y page 255) or fully (Y page 255).
Partially enlarging the cargo
compartment (folding the seats in the
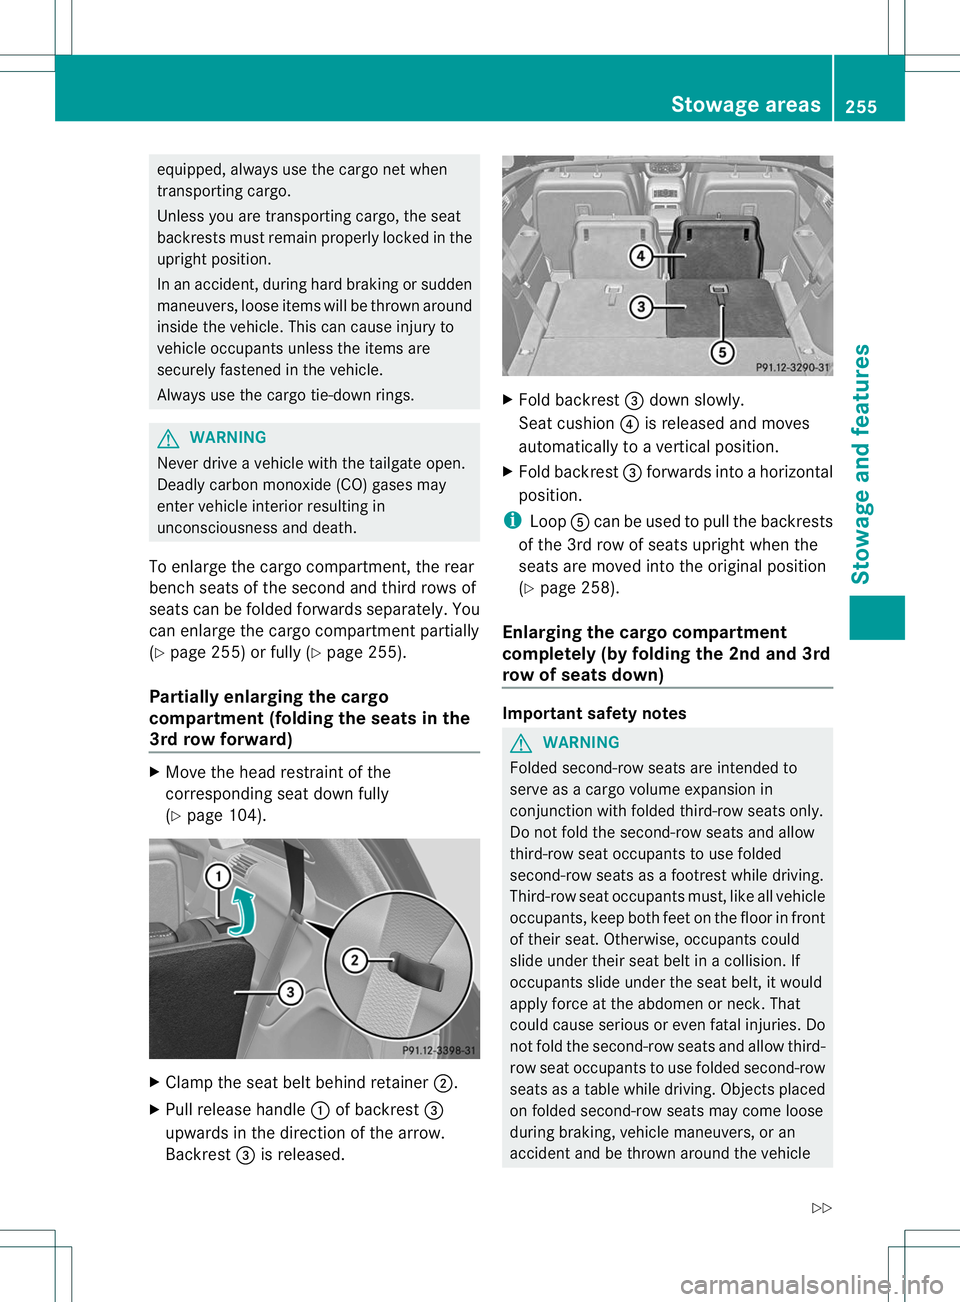
3rd row forward) X
Move the head restraint of the
corresponding seat down fully
(Y page 104). X
Clamp the seat belt behind retainer ;.
X Pull release handle :of backrest =
upwards in the direction of the arrow.
Backrest =is released. X
Fold backrest =down slowly.
Seat cushion ?is released and moves
automatically to a vertical position.
X Fold backrest =forwards into a horizontal
position.
i Loop Acan be used to pull the backrests
of the 3rd row of seats upright when the
seats are moved into the original position
(Y page 258).
Enlarging the cargo compartment
completely (by folding the 2nd and 3rd
row of seats down) Important safety notes
G
WARNING
Folded second-row seats are intended to
serve as a cargo volume expansion in
conjunction with folded third-row seats only.
Do not fold the second-row seats and allow
third-row seat occupants to use folded
second-row seats as a footrest while driving.
Third-row seat occupants must, like all vehicle
occupants, keep both feet on the floor in front
of their seat. Otherwise, occupants could
slide under their seat belt in a collision. If
occupants slide under the seat belt, it would
apply force at the abdomen or neck .That
could cause serious or even fatal injuries. Do
not fold the second-row seats and allow third-
row seat occupants to use folded second-row
seats as a table while driving. Objects placed
on folded second-row seats may come loose
during braking, vehicle maneuvers, or an
accident and be thrown around the vehicle Stowage areas
255Stowage and features
Z
Page 259 of 364
interior. Objects thrown around the vehicle
interior may cause an accident and/or
serious personal injury.
! Make absolutely sure that you adhere to
the specified folding order when fully
enlarging the cargo compartment:
R fold down the center seat in the 2nd row
of seats (7-seat vehicles)
R fold down the outer seats in the 2nd row
of seats
R fold down the seats in the 3rd row of
seats
You could otherwise damage the seats.
Folding down the center seat in the 2nd
row of seats
! Close the cup holder in the 2nd row of
seats before folding down the 2nd row of
seats .You could otherwise damage the
seats or cup holder.
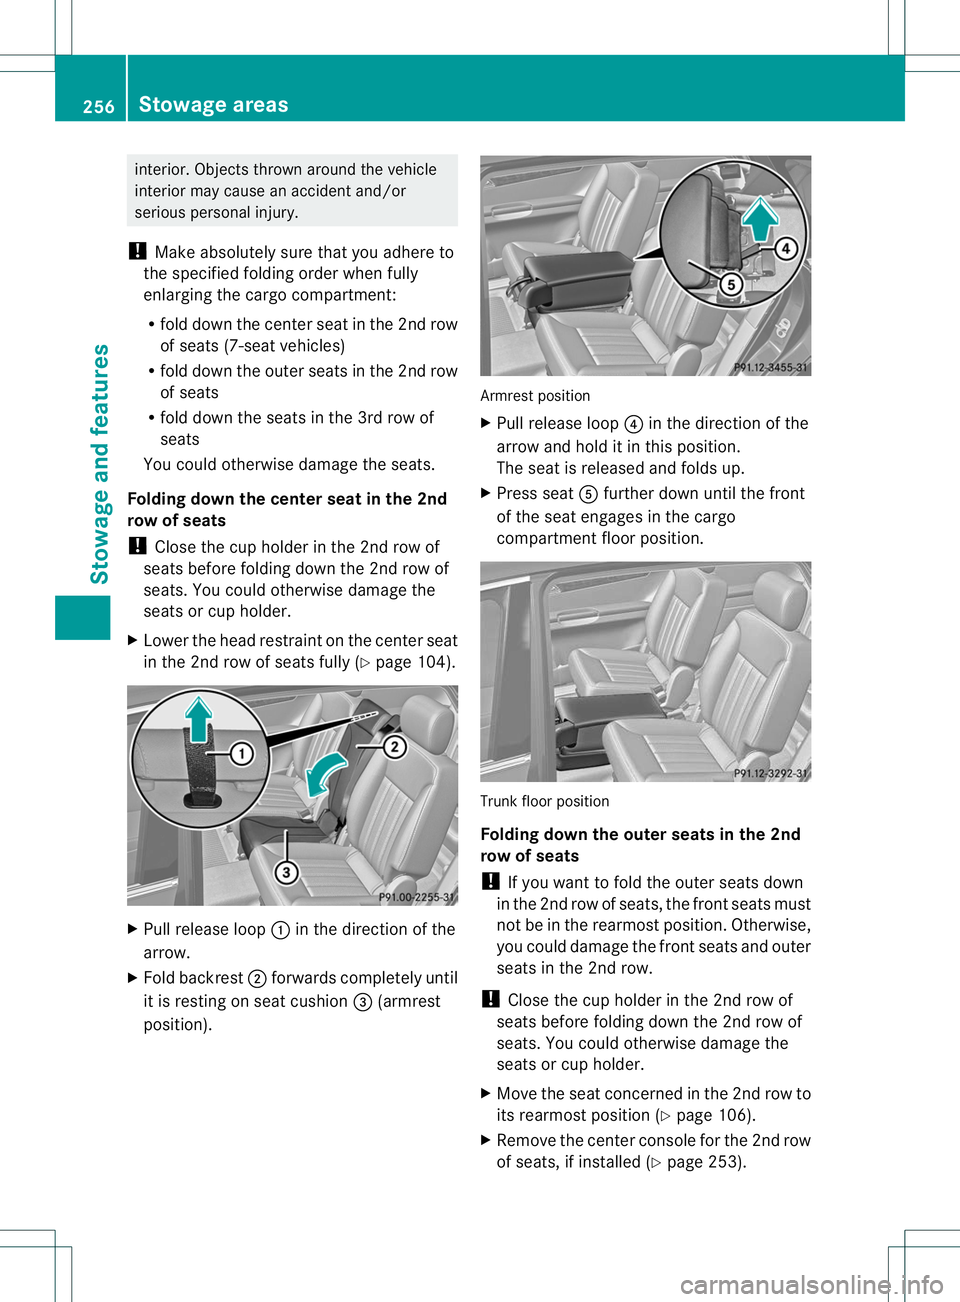
X Lower the head restraint on the center seat
in the 2nd row of seats fully (Y page 104).X
Pull release loop :in the direction of the
arrow.
X Fold backrest ;forwards completely until
it is resting on seat cushion =(armrest
position). Armrest position
X
Pull release loop ?in the direction of the
arrow and hold it in this position.
The seat is released and folds up.
X Press seat Afurther down until the front
of the seat engages in the cargo
compartment floor position. Trunk floor position
Folding down the outer seats in the 2nd
row of seats
!
If you want to fold the outer seats down
in the 2nd row of seats, the front seats must
not be in the rearmost position. Otherwise,
you could damage the front seats and outer
seats in the 2nd row.
! Close the cup holder in the 2nd row of
seats before folding down the 2nd row of
seats. You could otherwise damage the
seats or cup holder.
X Move the seat concerned in the 2nd row to
its rearmost position (Y page 106).
X Remove the center console for the 2nd row
of seats, if installed (Y page 253).256
Stowage areasStowage and features
Page 260 of 364
i
On vehicles with a long wheelbase, the
center console for the 2nd row of seats can
remain in place if it has been installed in the
forward position (position 1) (Y page 253).
However, the loading area will not be level.
The stowage compartment and cup holder
will only be illuminated if the center console
is installed in the rear position (position 0)
(Y page 253).
i The center console in the 2nd row of seats
can remain installed if it is installed in the
front position (position 1) (Y page 253).
However, the loading area will not be level.
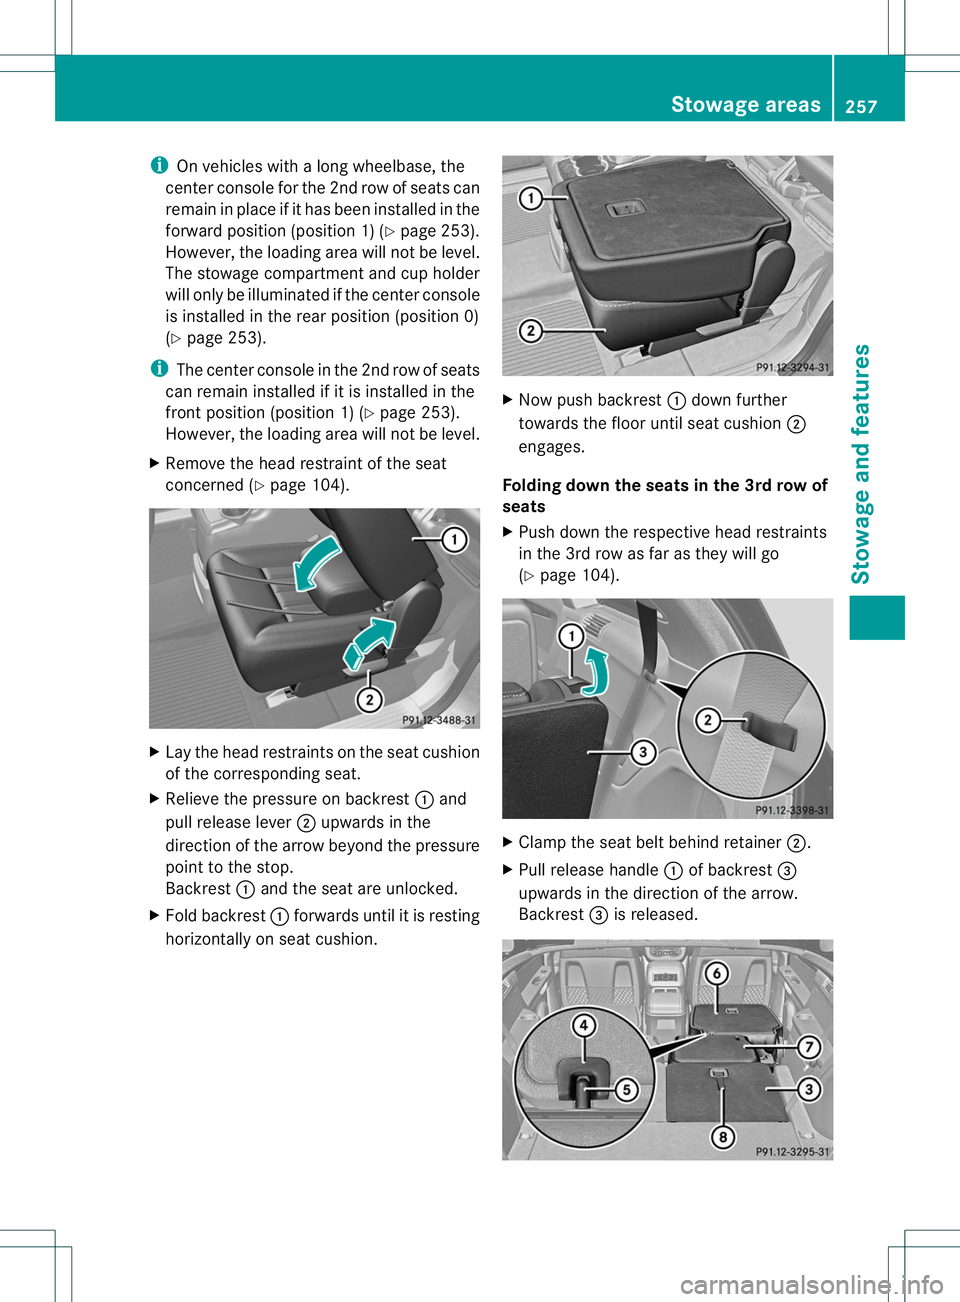
X Remove the head restraint of the seat
concerned (Y page 104). X
Lay the head restraints on the seat cushion
of the corresponding seat.
X Relieve the pressure on backrest :and
pull release lever ;upwards in the
direction of the arrow beyond the pressure
point to the stop.
Backrest :and the seat are unlocked.
X Fold backrest :forwards until it is resting
horizontally on seat cushion. X
Now push backrest :down further
towards the floor until seat cushion ;
engages.
Folding down the seats in the 3rd row of
seats
X Push down the respective head restraints
in the 3rd row as far as they will go
(Y page 104). X
Clamp the seat belt behind retainer ;.
X Pull release handle :of backrest =
upwards in the direction of the arrow.
Backrest =is released. Stowage areas
257Stowage and features Z