battery MERCEDES-BENZ R-CLASS FAMILY TOURER 2013 Owners Manual
[x] Cancel search | Manufacturer: MERCEDES-BENZ, Model Year: 2013, Model line: R-CLASS FAMILY TOURER, Model: MERCEDES-BENZ R-CLASS FAMILY TOURER 2013Pages: 364, PDF Size: 28.68 MB
Page 8 of 364
Program selector button
................157
Pulling away ................................... 151
Shift range s................................... 158
Starting the engine ........................151
Steering wheel paddle shifters ......157
Trailer towing ................................. 157
Transmissio nposition display ........155
Transmission positions ..................156
Automatic transmission
emergency mode ............................... 160 B
Backup lamp Changing bulbs .............................. 129
Display message ............................ 223
BAS (Brake Assist System) .................68
Battery (SmartKey) Checking .......................................... 79
Important safety notes ....................79
Replacing ......................................... 80
Battery (vehicle)
Charging ........................................ 303
Display message ............................ 226
Important safety notes ..................301
Jump starting ................................. 304
Overview ........................................ 301
Blin dSpot Assist
Activating/deactivating .................211
Display message ............................ 229
Notes/function .............................. 191
Trailer towing ................................. 193
BlueTEC
Adding DEF .................................... 164
BlueTEC (DEF) .................................... 353
Brake Assist see BAS (Brake Assist System)
Brake fluid
Display message ............................ 218
Notes ............................................. 355
Brake lamps
Display message ............................ 222
Brakes
ABS .................................................. 68
BAS .................................................. 68
Brake fluid (notes) .........................355
Display message ............................ 215
Driving tips .................................... 169Important safety notes
..................169
Maintenance .................................. 170
Parking brake ........................ 167, 171
Warning lamp ................................. 239
Breakdown
see Flat tire
see Towing away
Bulbs
see Changing bulbs C
California Important notice for retail
customers and lessees ....................22
Calling up a malfunction
see Display messages
Car
see Vehicle
Care
Carpets .......................................... 296
Car wash ........................................ 290
Display ........................................... 294
Exterior lights ................................ 293
Gea rors electo rlever .................... 295
Interior ........................................... 294
Matte finish ................................... 291
Notes ............................................. 289
Paint .............................................. 291
Plastic trim .................................... 294
Power washer ................................ 291
Roof lining ...................................... 296
Seat bel t........................................ 295
Seat cover ..................................... 295
Sensors ......................................... 293
Steering wheel ............................... 295
Tai lpipes ....................................... 293
Trim pieces .................................... 295
Washing by hand ........................... 290
Wheels ........................................... 292
Windows ........................................ 292
Wiper blades .................................. 292
Wooden trim .................................. 295
Cargo compartment cover
Extending ...................................... .262
Notes/ho wtouse......................... 260 Index
5
Page 18 of 364
Warning lamp ................................. 238
Warning lamp (function) ...................58
Seats
Adjusting (electrically) ...................102
Adjusting the head restraint ..........103
Cleaning the cover .........................295
Correct driver's sea tposition ........100
Entry position (3rd row of seats) ....108
Exit position (3rd row of seats) ......108
Folding downt he 2nd row of
seats .............................................. 256
Folding downt he 3rd row of seats .257
Folding the 2nd row of seats
forward manually ........................... 107
Folding the rear bench seat
forwards/back ............................... 254
Important safety notes ..................101
Overview ........................................ 101
Resetting the 2nd row of seats ......258
Resetting the 3rd row of seats ....... 258
Seat heating problem ....................111
Seat ventilation problem ................111
Storing settings (memory
function) ........................................ 116
Switching sea theating on/off .......110
Switching seat ventilation on/off ..111
Securing hooks .................................. 260
Selector lever Cleaning ......................................... 295
Sensors (cleaning instructions) .......293
Service see ASSYST PLUS
Service products
Brake fluid ..................................... 355
Coolant (engine) ............................ 355
DEF special additive s..................... 353
Engine oil ....................................... 354
Fuel ................................................ 351
Important safety notes ..................350
Washer fluid .................................. .356
Service work
see ASSYST PLUS
Settings
Factory (on-board computer) .........206
On-board computer .......................206
Setting the air distribution ...............141
Setting the airflow ............................141Short journeys (diesel particle
filter)
................................................... 169
Side impact air bag .............................45
Side marker lamp (display
message) ............................................ 223
Side marker lamps (changing
bulbs) ................................................. 128
Side windows Cleaning ......................................... 292
Convenience closing feature ............91
Convenience opening feature ..........90
Hinged sid ewindows ....................... 90
Important safety information ...........89
Opening/closing .............................. 89
Overview .......................................... 89
Problem (malfunction) .....................93
Resetting ......................................... 92
Sliding sunroof
Important safety notes ....................93
Opening/closing .............................. 94
Problem (malfunction) .....................97
Resetting ......................................... 95
see Panorama roof with power
tilt/sliding panel
SmartKey
Changing the battery .......................80
Changing the programming .............78
Checking the battery .......................79
Convenience closing feature ............91
Convenience opening feature ..........90
Display message ............................ 236
Door central locking/unlocking .......77
Important safety notes ....................76
Loss ................................................. 81
Mechanical key ................................ 78
Overview .......................................... 76
Positions (ignition lock) .................149
Problem (malfunction) .....................81
Starting the engine ........................151
Snow chains
Information .................................... 315
Sockets
2nd row of seats ............................ 270
Center console .............................. 269
Front-passenger footwell ...............269
General notes ................................ 269
Luggage compartment ...................270 Index
15
Page 22 of 364
Lowering
........................................ 338
Maintenance .................................... 22
Parking for a long period ................ 168
Pulling away ................................... 151
Raising ........................................... 336
Reporting problems .........................25
Securing from rolling away ............335
Towing away .................................. 306
Transporting .................................. 308
Unlocking (in an emergency) ...........84
Unlocking (SmartKey) ......................77
Vehicle data ................................... 357
Vehicle battery
see Battery (vehicle)
Vehicle data ....................................... 357
Vehicle dimensions ...........................357
Vehicle emergency locking ................84
Vehicle identification number see VIN
Vehicle identification plate ..............349
Vehicle level (display message) .......228
Vehicle tool kit .................................. 298
Video Operating the DVD ......................... 205
VIN ...................................................... 349W
Warning and indicator lamps ABS ................................................ 239
Brakes ........................................... 239
Check Engine ................................. 245
Distance warning ........................... 246
ESP ®
.............................................. 241
ESP ®
OFF ....................................... 242
Fuel tank ........................................ 245
Overview .......................................... 32
PASSENGER AIR BAG OFF
indicator lamp .................................. 46
Reserve fuel ................................... 245
Seat belt. ....................................... 238
SRS ................................................ 244
Tire pressure monitor ....................247
Warranty ............................................ 348
Washer fluid Display message ............................ 236
Wheel bol ttightening torque ...........338
Wheel chock ...................................... 335Wheels
Changing awheel .......................... 334
Checking ........................................ 313
Cleaning ......................................... 292
Cleaning (warning) .........................335
Emergency spare wheel .................342
Important safety notes ..................312
Interchanging/changing ................334
Mounting anew wheel ................... 338
Mounting awheel .......................... 335
Overview ........................................ 312
Removing awheel .......................... 337
Storing ........................................... 335
Tightening torque ........................... 338
Whee lsize/tir esize ....................... 339
Window curtain air bag ....................... 46
Windows see Side windows
Windshield
Defrosting ...................................... 142
Infrared reflective .......................... 281
Windshiel dwasher fluid
see Windshield washer system
Windshield washer system
Adding washer fluid .......................288
Filling capacity ............................... 356
Notes ............................................. 356
Windshiel dwipers
Problem (malfunction) ...................132
Rea rwindow wiper ........................ 131
Replacing the wiper blades ............131
Switching on/off ........................... 130
Winte rdriving
Slippery roa dsurface s................... 172
Snow chains .................................. 315
Winter operation
General notes ................................ 314
Overview ........................................ 314
Radiator cover ............................... 285
Winter tires
M+S tires ....................................... 314
Wiper blades
Cleaning ......................................... 292
Important safety notes ..................131
Replacing ....................................... 131
Replacing (rea rwindow) ................ 132
Replacing (windshield). ..................131 Index
19
Page 27 of 364
including interference that may cause
undesired operation. Changes or
modifications not expressly approved by the
party responsible for compliance could void
the user’s authority to operate the
equipment."
Canada:
"The wireless devices of this vehicle
comply with Industry Canada license-exempt
RSS standard(s). Operation is subject to the
following two conditions: (1) These devices
may not cause interference, and (2) These
devices must accept any interference,
including interference that may cause
undesired operation of the device." Diagnostics connection
G
WARNING
If you connect equipment to the on-board
diagnostics connection, it can affect the
operation of the vehicle systems. This can
impair the operating safet yofyour vehicle
while driving. There is a risk of an accident.
Do not connect any equipment to the on-
board diagnostics connection. G
WARNING
Loose equipment or equipment cables which
are connected to the on-board diagnostics
connection can obstruct the area around the
pedals. The equipment or the cables could
come between the pedals in the event of
sudden braking or acceleration. This may
affect the function of the pedals. There is a
risk of an accident.
Do not attach any equipment or cables in the
driver's footwell.
! If the engine is switched off and
equipment on the diagnostics connection
is used, the starter battery may discharge.
The diagnostics connection is only intended
for the connection of diagnostic equipment at
a qualified specialist workshop.
Connecting equipment to the diagnostics
connection can, for example, lead to emissions monitoring information being
reset. This may lead to the vehicle failing to
meet the requirements of the next emissions
test during the main inspection.
Qualified specialist workshop
An authorized Mercedes-Benz Center is a
qualified specialist workshop. It has the
necessary specialist knowledge, tools and
qualifications to correctly carry out the work
required on your vehicle. This is especially the
case for work relevant to safety.
Observe the notes in the Maintenance
Booklet.
Always have the following work carried out at
an authorized Mercedes-Benz Center:
R work relevant to safety
R service and maintenance work
R repair work
R alterations, installation work and
modifications
R work on electronic components Correct use
G
WARNING
There are various warning stickers affixed to
your vehicle. Their purpose is to alert you and
others to various dangers. Therefore, do not
remove any warning stickers unless the
sticker clearly states that you may do so.
If you remove any warning stickers, you or
others could fail to recognize certain dangers
and be injured.
When driving your vehicle observe the
following information:
R the safety notes in this manual
R the Technical Data section in this manual
R traffic rules and regulations
R laws and safety standards pertaining to
motor vehicles 24
Introduction
Page 43 of 364
Useful information
i This Operator's Manual describes all
models and all standard and optional
equipment of your vehicle available at the
time of publication of the Operator's
Manual. Country-specific differences are
possible. Please note that your vehicle may
not be equipped with all features
described. This also applies to safety-
related systems and functions.
i Read the information on qualified
specialist workshops: (Y page 24).Panic alarm
X
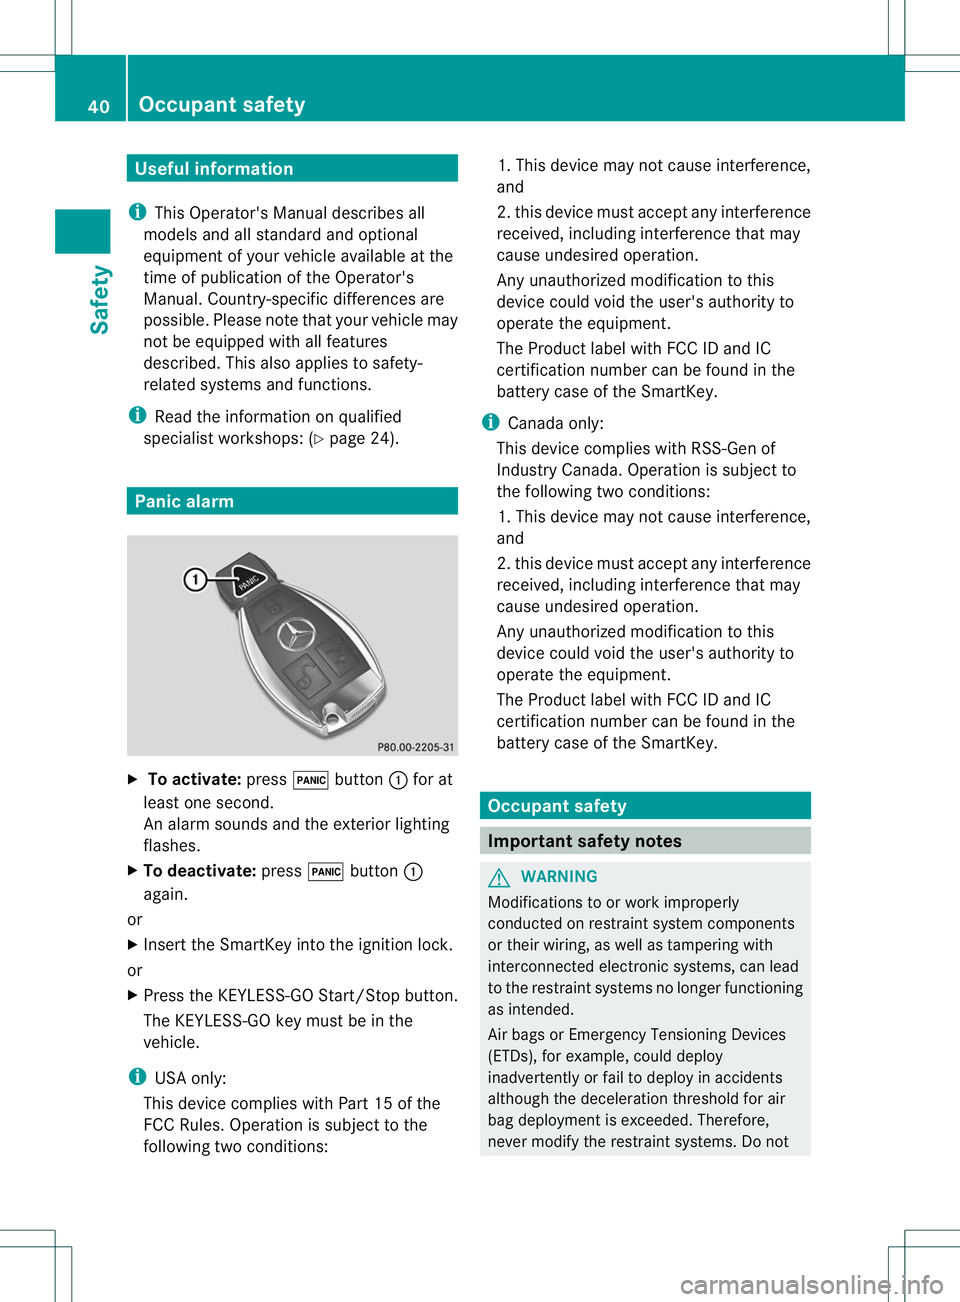
To activate: press!button :for at
least one second.
An alarm sounds and the exterior lighting
flashes.
X To deactivate: press!button :
again.
or
X Insert the SmartKey into the ignition lock.
or
X Press the KEYLESS-GO Start/Stop button.
The KEYLESS-GO key must be in the
vehicle.
i USA only:
This device complies with Part 15 of the
FCC Rules. Operation is subjec tto the
following two conditions: 1. This device may not cause interference,
and
2. this device must accept any interference
received, including interference that may
cause undesired operation.
Any unauthorized modification to this
device could void the user's authority to
operate the equipment.
The Product label with FCC ID and IC
certification number can be found in the
battery case of the SmartKey.
i Canada only:
This device complies with RSS-Gen of
Industry Canada. Operation is subject to
the following two conditions:
1. This device may not cause interference,
and
2. this device must accept any interference
received, including interference that may
cause undesired operation.
Any unauthorized modification to this
device could void the user's authority to
operate the equipment.
The Product label with FCC ID and IC
certification number can be found in the
battery case of the SmartKey. Occupant safety
Important safety notes
G
WARNING
Modifications to or work improperly
conducted on restraint system components
or their wiring, as well as tampering with
interconnected electronic systems, can lead
to the restraint systems no longer functioning
as intended.
Air bags or Emergency Tensioning Devices
(ETDs), for example, could deploy
inadvertently or fail to deploy in accidents
although the deceleration threshold for air
bag deployment is exceeded. Therefore,
never modify the restraint systems. Do not 40
Occupant safetySafety
Page 75 of 364
R
a narrow vehicle traveling in front, e.g. a
motorbike
R a vehicle traveling in frontonadifferent line
relative to the center of your vehicle
Following damage to the fronte nd of the
vehicle, have the configuratio nand operation
of the rada rsensor checked at a qualified
specialist workshop. This also applies to
collisions at low speeds where there is no
visible damage to the fron tofthe vehicle.
i USA only: This device has been approved
by the FCC as a "VehicularR adar System".
The radar sensor is intended for use in an
automotive radar system only. Removing,
altering or tampering with the device will
void any warranties, and is notp ermitted
by the FCC. Do not tamper with, alter, or
use the device in any non-approved way.
Any unauthorized modification to this
device could void the user's authority to
operate the equipment.
i Canada only: This device complies with
RSS-210 of Industry Canada. Operation is
subject to the following two conditions:
1. This device may not cause interference,
and
2. this device must accept any interference
received, including interference that may
cause undesired operation of the device.
Removal, tampering, or altering of the
device will void any warranties, and is not
permitted. Do not tamper with, alter, or use
the device in any non-approved way.
Any unauthorized modification to this
device could void the user's authority to
operate the equipment. Theft deterrent locking system
Immobilizer
X To activate with the SmartKey: remove
the SmartKey from the ignition lock.
X To activate with KEYLESS-GO: switch the
ignition off and open the driver's door.
X To deactivate: switch on the ignition.
The immobilizer prevents your vehicle from
being started without the correct SmartKey.
When leaving the vehicle, always take the
SmartKey with you and lock the vehicle.
Anyone can start the engine if a valid
SmartKey has been left inside the vehicle.
i The immobilizer is always deactivated
when you start the engine.
In the event that the engine cannot be
started when the starter battery is fully
charged, the immobilizer may be faulty.
Contac tanauthorized Mercedes-Benz
Cente rorcall 1-800-FOR-MERCedes (in the
USA) or 1-800-387-0100 (in Canada). ATA (anti-theft alarm system)
X
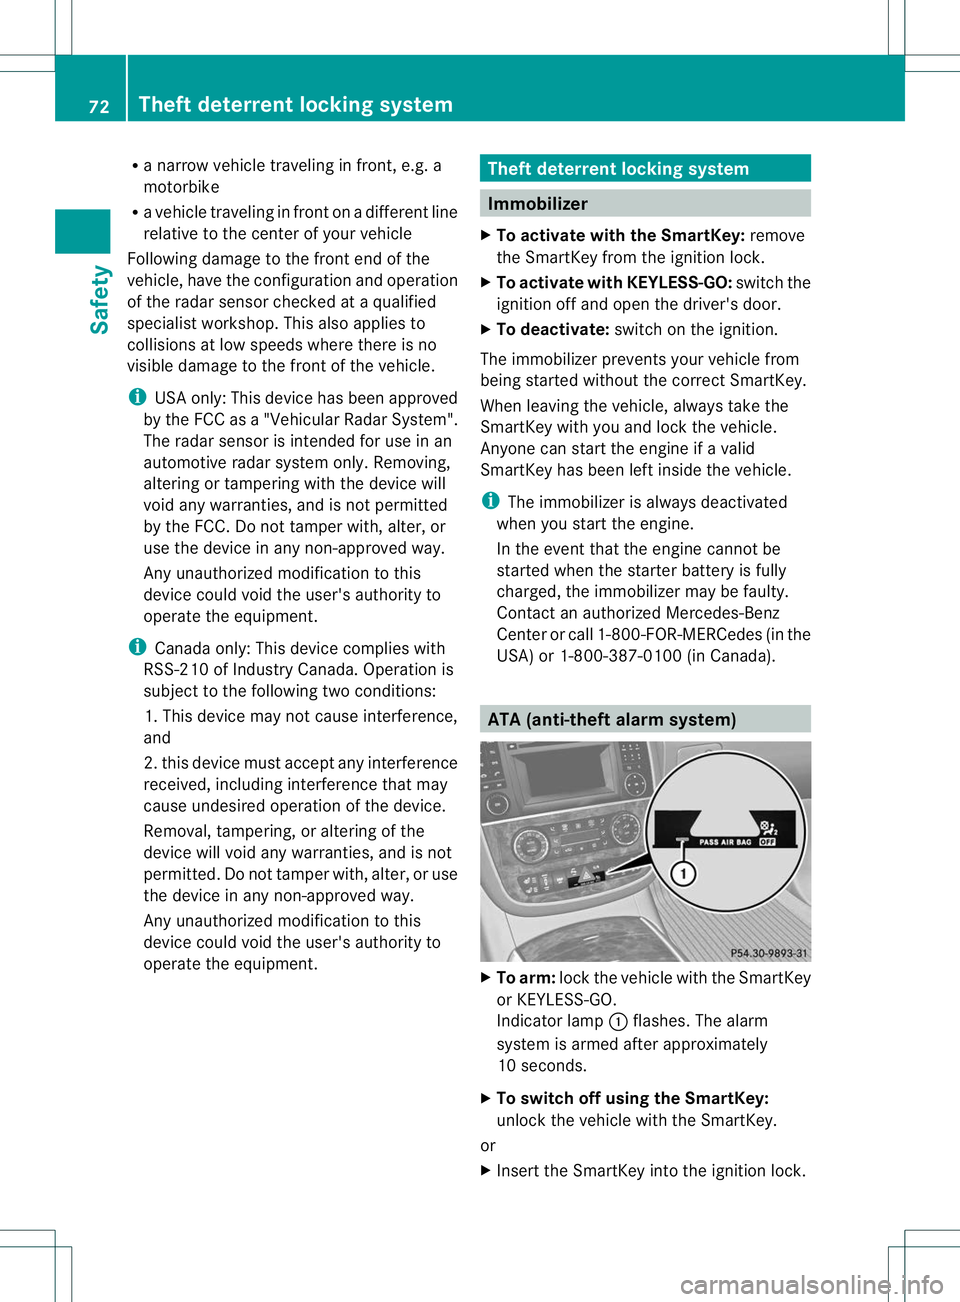
To arm: lockthe vehicle with the SmartKey
or KEYLESS-GO.
Indicator lamp :flashes. The alarm
system is armed after approximately
10 seconds.
X To switch off using the SmartKey:
unlock the vehicle with the SmartKey.
or
X Insert the SmartKey into the ignition lock. 72
Theft deterrent locking systemSafety
Page 79 of 364
Useful information
i This Operator's Manual describes all
models and all standard and optional
equipment of your vehicle available at the
time of publication of the Operator's
Manual. Country-specific differences are
possible. Please note that your vehicle may
not be equipped with all features
described. This also applies to safety-
related systems and functions.
i Read the information on qualified
specialist workshops: (Y page 24).SmartKey
Important safety notes
G
WARNING
When leaving the vehicle, always remove the
SmartKey from the ignition lock. Always take
the SmartKey with you and lock the vehicle.
Do not leave children unsupervised in the
vehicle, even if they are secured in a child
restraint system, and do not give them access
to an unlocked vehicle. Achild's unsupervised
access to a vehicle could result in an accident
and/or serious personal injury. They could:
R injure themselves on vehicle parts
R be seriously or fatally injured by extreme
heat or cold
R injure themselves or have an accident with
vehicle equipment that may still be in
operation even after the SmartKey has
been removed from the ignition, such as the
seat adjustment, steering wheel
adjustment or memory function.
If children open a door, they could cause
severe or even fatal injury to other persons; if
they get out of the vehicle, they could injure
themselves when doing so or be seriously or
even fatally injured by any passing traffic.
Do not expose the child restraint system to
direct sunlight. The child restraint system's
metal parts, for example, could become very hot, and a child could be burned on these
parts.
G
WARNUNG
If a key ring is too heavy or too large, the
weight acting on the SmartKey could cause it
to turn in the ignition lock or catch on the
steering wheel. This could cause the engine
to be switched off suddenly. You could lose
control of the vehicle and cause an accident.
Do not attach any heavy or large key rings to
the SmartKey that is inserted in the ignition.
i USA only:
This device complies with Part 15 of the
FCC Rules. Operation is subject to the
following two conditions:
1. This device may not cause interference,
and
2. this device must accept any interference
received, including interference that may
cause undesired operation.
Any unauthorized modification to this
device could void the user's authority to
operate the equipment.
The Product label with FCC ID and IC
certification number can be found in the
battery case of the SmartKey.
i Canada only:
This device complies with RSS-210 of
Industry Canada.O peration is subjectto
the following two conditions:
1. This device may not cause interference,
and
2. this device must accep tany interference
received, including interference tha tmay
cause undesired operation.
Any unauthorized modificatio nto this
device could void the user's authority to
operate the equipment. 76
SmartKeyOpening/closing
Page 80 of 364
The Product label with FCC ID and IC
certification number can be found in the
battery case of the SmartKey.
R Do not keep the SmartKey:
-with electronic devices, e.g. a mobile
phone or another SmartKey
- with metallic objects, e.g. coins or metal
foil
- inside metallic objects, e.g. a metal case
This can affect the SmartKey's
functionality.
Do not keep the KEYLESS-GO key in the
temperature-controlled cup holder.
Otherwise, the KEYLESS-GO key will not be
recognized.
Keep the SmartKey away from strong
magnetic fields. Otherwise, the remote
control function could be affected. SmartKey functions
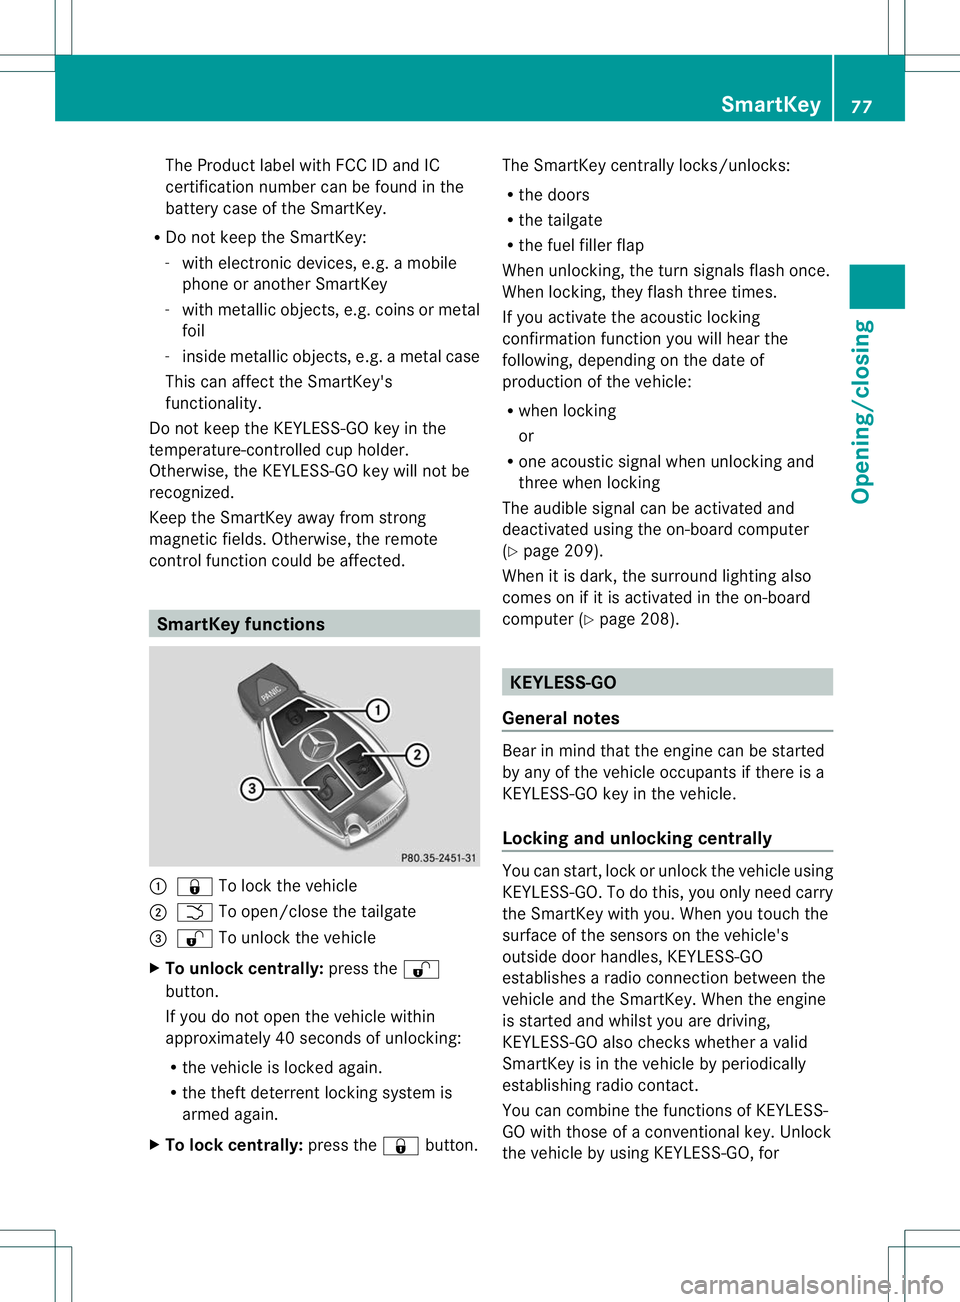
:
& To lock the vehicle
; F To open/close the tailgate
= % To unlock the vehicle
X To unlock centrally: press the%
button.
If you do not open the vehicle within
approximately 40 seconds of unlocking:
R the vehicle is locked again.
R the theft deterrent locking system is
armed again.
X To lock centrally: press the&button. The SmartKey centrally locks/unlocks:
R
the doors
R the tailgate
R the fuel filler flap
When unlocking, the turn signals flash once.
When locking, they flash three times.
If you activate the acoustic locking
confirmation function you will hear the
following, depending on the date of
production of the vehicle:
R when locking
or
R one acoustic signal when unlocking and
three when locking
The audible signal can be activated and
deactivated using the on-board computer
(Y page 209).
When it is dark, the surround lighting also
comes on if it is activated in the on-board
computer (Y page 208). KEYLESS-GO
General notes Bear in mind that the engine can be started
by any of the vehicle occupants if there is a
KEYLESS-GO key in the vehicle.
Locking and unlocking centrally
You can start, lock or unlock the vehicle using
KEYLESS-GO. To do this, you only need carry
the SmartKey with you. When you touch the
surface of the sensors on the vehicle's
outside door handles, KEYLESS-GO
establishes a radio connection between the
vehicle and the SmartKey. When the engine
is started and whilst you are driving,
KEYLESS-GO also check
swhether a valid
SmartKey is in the vehicle by periodically
establishing radio contact.
You can combine the functions of KEYLESS-
GO with those of a conventional key. Unlock
the vehicle by using KEYLESS-GO, for SmartKey
77Opening/closing Z
Page 81 of 364
instance, and lock it using the
&button on
the SmartKey.
When locking or unlockin gwith KEYLESS-GO,
the distance between the SmartKey and the
corresponding door handle must not be
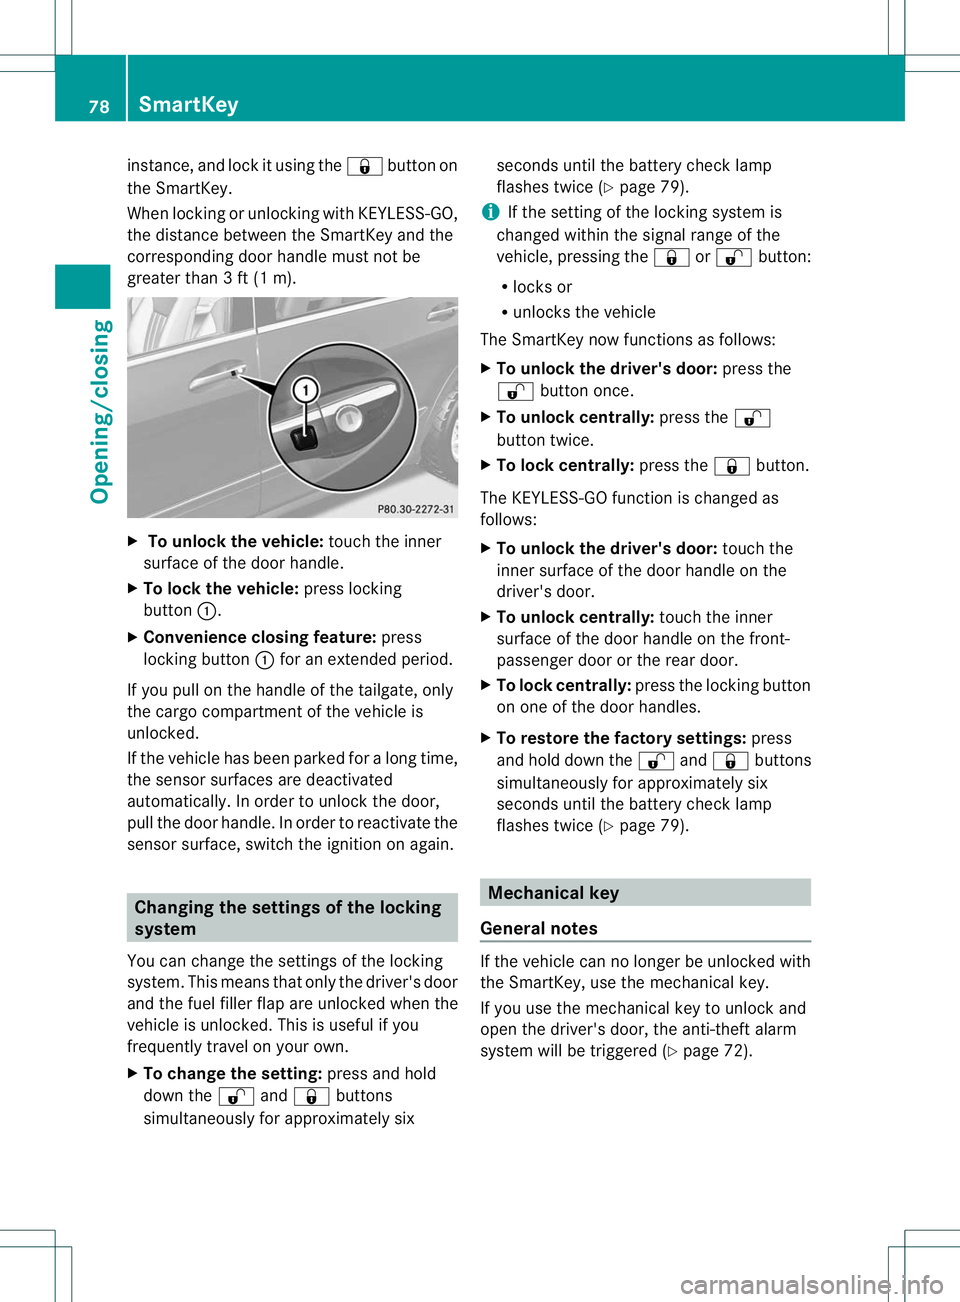
greater than 3 ft (1 m). X
To unlock the vehicle: touch the inner
surface of the door handle.
X To lock the vehicle: press locking
button :.
X Convenience closing feature: press
locking button :for an extended period.
If you pull on the handle of the tailgate, only
the cargo compartment of the vehicle is
unlocked.
If the vehicle has been parked for a long time,
the sensor surfaces are deactivated
automatically. In order to unloc kthe door,
pull the door handle. In order to reactivate the
sensor surface, switch the ignition on again. Changing the settings of the locking
system
You can change the settings of the locking
system. This means that only the driver's door
and the fuel filler flap are unlocked when the
vehicle is unlocked. This is useful if you
frequently travel on your own.
X To change the setting: press and hold
down the %and& buttons
simultaneously for approximately six seconds until the battery check lamp
flashes twice (Y
page 79).
i If the setting of the locking system is
changed within the signal range of the
vehicle, pressing the &or% button:
R locks or
R unlocks the vehicle
The SmartKey now functions as follows:
X To unlock the driver's door: press the
% button once.
X To unlock centrally: press the%
button twice.
X To lock centrally: press the&button.
The KEYLESS-GO function is changed as
follows:
X To unlock the driver's door: touch the
inner surface of the door handle on the
driver's door.
X To unlock centrally: touch the inner
surface of the door handle on the front-
passenger door or the rear door.
X To lock centrally: press the locking button
on one of the door handles.
X To restore the factory settings: press
and hold down the %and& buttons
simultaneously for approximately six
seconds until the battery check lamp
flashes twice (Y page 79). Mechanical key
General notes If the vehicle can no longer be unlocked with
the SmartKey, use the mechanical key.
If you use the mechanical key to unlock and
open the driver's door, the anti-theft alarm
system will be triggered (Y
page 72).78
SmartKeyOpening/closing
Page 82 of 364
There are several ways to turn off the alarm:
X
To turn the alarm off with the
SmartKey: press the%or& button
on the SmartKey.
or
X Insert the SmartKey into the ignition lock.
or
X To deactivate the alarm with KEYLESS-
GO: press the Start/Stop button in the
ignition lock. The SmartKey must be in the
vehicle.
or
X Lock or unlock the vehicle using KEYLESS-
GO. The SmartKey must be outside the
vehicle.
If you unlock the vehicle using the mechanical
key, the fuel filler flap will not be unlocked
automatically.
X To unlock the fuel filler flap: insert the
SmartKey into the ignition lock.
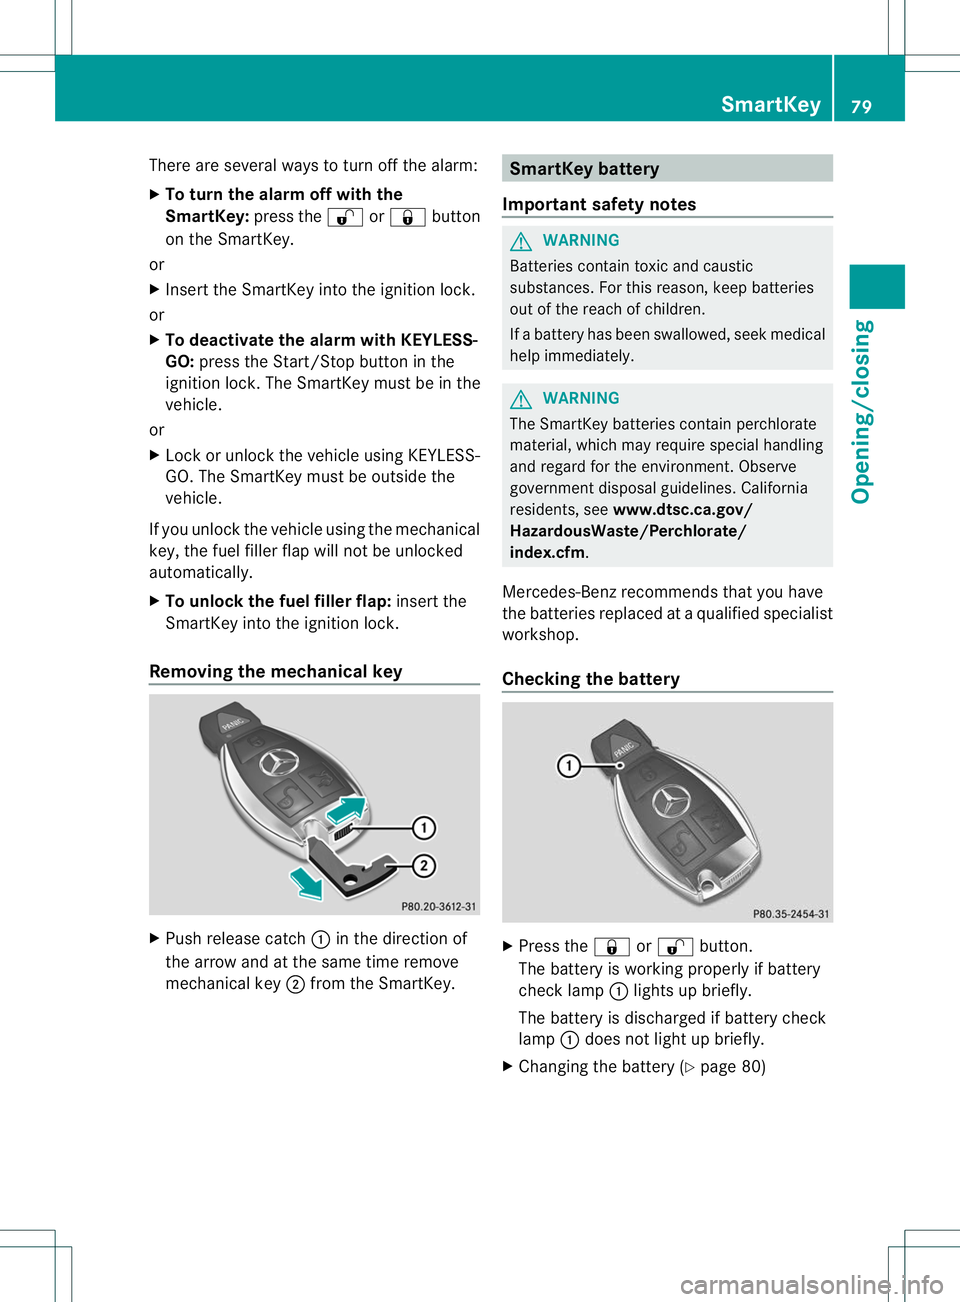
Removing the mechanical key X
Push release catch :in the direction of
the arrow and at the same time remove
mechanical key ;from the SmartKey. SmartKey battery
Important safety notes G
WARNING
Batteries contain toxic and caustic
substances .For this reason, keep batteries
out of the reach of children.
If a battery has been swallowed, seek medical
help immediately. G
WARNING
The SmartKey batteries contain perchlorate
material, which may require special handling
and regard for the environment. Observe
government disposal guidelines. California
residents, see www.dtsc.ca.gov/
HazardousWaste/Perchlorate/
index.cfm.
Mercedes-Benz recommends that you have
the batteries replaced at a qualified specialist
workshop.
Checking the battery X
Press the &or% button.
The battery is working properly if battery
check lamp :lights up briefly.
The battery is discharged if battery check
lamp :does not light up briefly.
X Changing the battery (Y page 80) SmartKey
79Opening/closing Z