hood open MERCEDES-BENZ R-CLASS FAMILY TOURER 2013 Owners Manual
[x] Cancel search | Manufacturer: MERCEDES-BENZ, Model Year: 2013, Model line: R-CLASS FAMILY TOURER, Model: MERCEDES-BENZ R-CLASS FAMILY TOURER 2013Pages: 364, PDF Size: 28.68 MB
Page 13 of 364
Fue
lgauge ....................................... 31
Grade (gasoline) ............................ 351
Important safety notes ..................351
Premium-grade unleaded gasoline .351
Problem (malfunction) ...................163
Quality (diesel). .............................. 352
Refueling ........................................ 160
Tank content/reserve fuel .............351
Fuel filler flap
Emergency release ........................162
Opening/closing ............................ 161
Fuel filte r(display message) ............227
Fuel level Calling up the range (on-board
computer) ...................................... 212
Fuel tank
Capacity ........................................ 351
Problem (malfunction) ...................163
Fuse allocation chart (vehicle tool
kit) ...................................................... 299
Fuses Allocation chart ............................. 309
Before changing ............................. 309
Dashboard fuse box .......................309
Engine emergency stop .................310
Fuse box in the cargo
compartment ................................. 310
Fuse box in the engine
compartment ................................. 309
Important safety notes ..................308 G
Garage door opener Clearing the memory .....................280
Important safety notes ..................277
Opening/closing the garage door ..280
Programming (button in the rear-
view mirror) ................................... 278
Genuine Mercedes-Benz parts .........348
Glove box ........................................... 251
GTW (Gross Trailer Weight)
(definition) ......................................... 332 H
Handbrake see Parking brake
Hazard warning lamps ......................124
Headlamp delayed switch-off see Exterior lighting delayed switch-off
Headlamps
Adding fluid to cleaning system .....288
Cleaning system (capacity )............ 356
Cleaning system (function) ............123
Cleaning system (notes) ................356
Fogging up ..................................... 124
see Automatic headlamp mode
Head restraints
Adjusting ....................................... 103
Adjusting (electrically). ..................103
Adjusting (manually). .....................103
Adjusting (rear) .............................. 104
Installing/removing (rear) ..............104
Luxury ............................................ 103
see NECK-PRO head restraints/
NECK-PRO luxury head restraints
Heating
see Climate control
High-beam headlamps
Changing bulbs .............................. 128
Display message ............................ 222
Switching on/off ........................... 123
Hill start assist .................................. 152
Hood Closing .......................................... .285
Display message ............................ 235
Opening ......................................... 284
Hydroplaning ..................................... 171 I
Ignition lock see Key positions
Immobilizer .......................................... 72
Indicator and warning lamps DISTRONI C.................................... 246
Indicator lamps
see Warning and indicator lamps
Insectp rotection on the radiator ....285 10
Index
Page 33 of 364
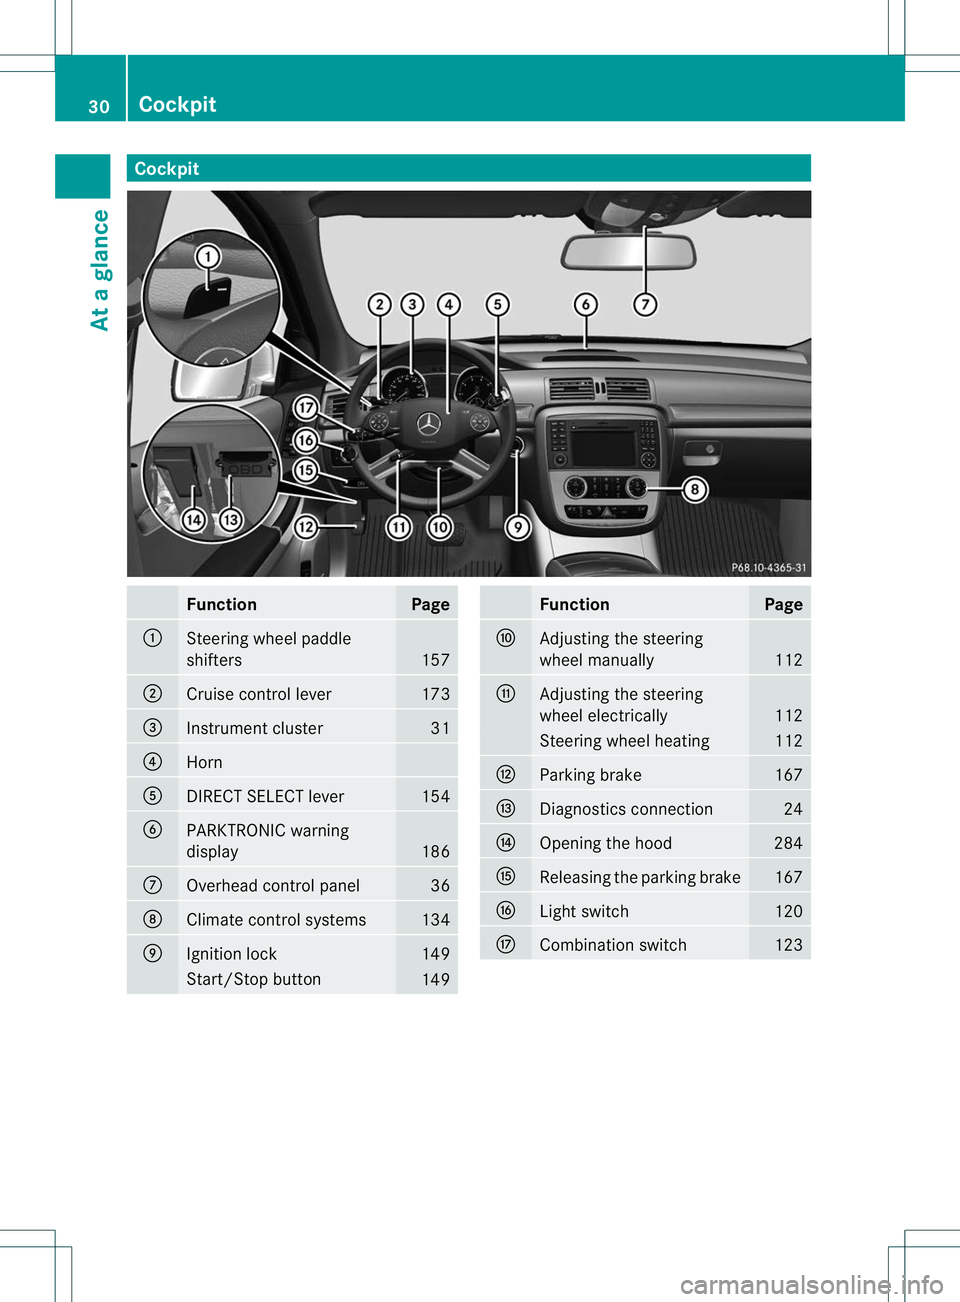
Cockpit
Function Page
:
Steering wheel paddle
shifters
157
;
Cruise control lever 173
=
Instrument cluster 31
?
Horn
A
DIRECT SELECT lever 154
B
PARKTRONIC warning
display
186
C
Overhead control panel 36
D
Climate control systems 134
E
Ignition lock 149
Start/Stop button
149 Function Page
F
Adjusting the steering
wheel manually
112
G
Adjusting the steering
wheel electrically
112
Steering wheel heating 112
H
Parking brake 167
I
Diagnostics connection 24
J
Opening the hood 284
K
Releasing the parking brake 167
L
Ligh
tswitch 120
M
Combinatio
nswitch 12330
CockpitAt a glance
Page 76 of 364
X
To switc hoff using KEYLESS-GO: unlock
the vehicle with KEYLESS-GO.
or
X Press the Start/Stop button on the
dashboard. The SmartKey must be inside
the vehicle.
Av isual and audible alarm is triggered if the
alarm system is armed and you open:
R a door
R the vehicle with the mechanical key
R the tailgate
R the hood
X To turn the alarm off with the
SmartKey: press the%or& button
on the SmartKey.
The alarm is switched off.
or
X Insert the SmartKey into the ignition lock.
The alarm is switched off.
X To stop the alar musing KEYLESS-GO:
grasp the outside door handle. The
SmartKey must be outside the vehicle.
The alarm is switched off.
or
X Press the Start/Stop button on the
dashboard. The SmartKey must be inside
the vehicle.
The alarm is switched off.
The alarm is not switched off, even if you
close the open door that has triggered it, for
example.
i If the alarm stays on for more than
30 seconds, the mbrace (USA only) or TELE
AID (Canada only) emergency call system
initiates a call to the Customer Assistance
Center automatically. The emergency call
system initiates the call provided that:
R you have subscribed to the mbrace/
TELEAID Service.
R the mbrace/TELEAID Service has been
activated properly.
R the required mobile phone, power supply
and GPS are available. Theft deterrent locking system
73Safety Z
Page 134 of 364
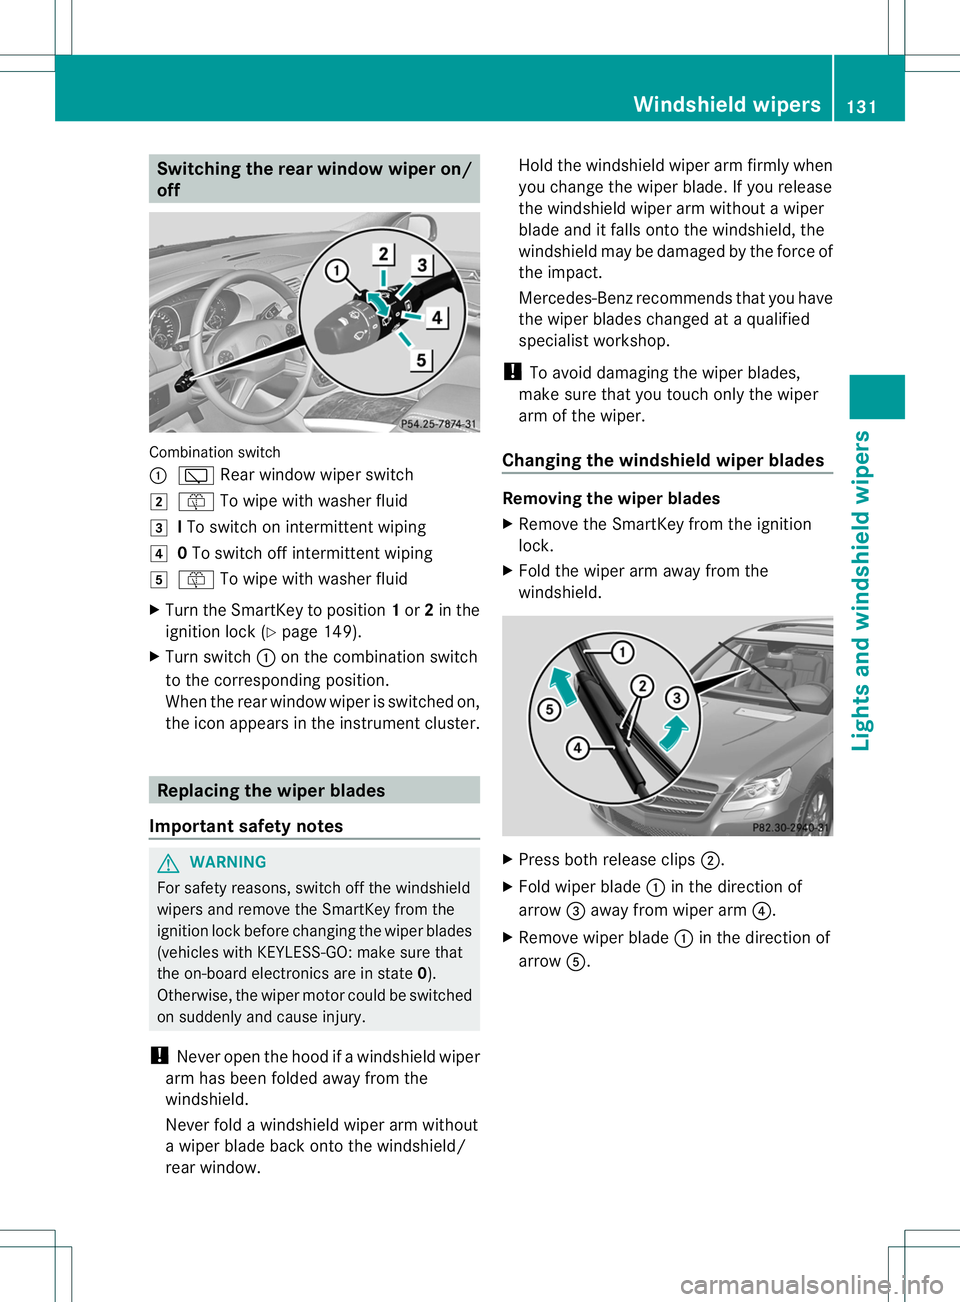
Switching the rear window wiper on/
off
Combination switch
:
è Rear window wiper switch
2 ô To wipe with washer fluid
3 ITo switch on intermittent wiping
4 0To switch off intermittent wiping
5 ô To wipe with washer fluid
X Turn the SmartKey to position 1or 2in the
ignition lock (Y page 149).
X Turn switch :on the combination switch
to the corresponding position.
When the rear window wiper is switched on,
the icon appears in the instrumen tcluster. Replacing the wiper blades
Important safety notes G
WARNING
For safety reasons, switch off the windshield
wipers and remove the SmartKey from the
ignition lock before changing the wiper blades
(vehicles with KEYLESS-GO: make sure that
the on-board electronics are in state 0).
Otherwise, the wiper motor could be switched
on suddenly and cause injury.
! Neve ropen the hood if a windshield wiper
arm has been folded away from the
windshield.
Never fold a windshield wiper arm without
a wiper blade back onto the windshield/
rear window. Hold the windshield wiper arm firmly when
you change the wiper blade. If you release
the windshield wiper arm without a wiper
blade and it falls onto the windshield, the
windshield may be damaged by the force of
the impact.
Mercedes-Benz recommends that you have
the wiper blades changed at
aqualified
specialist workshop.
! To avoid damaging the wiper blades,
make sure that you touch only the wiper
arm of the wiper.
Changing the windshield wiper blades Removing the wiper blades
X
Remove the SmartKey from the ignition
lock.
X Fold the wiper arm away from the
windshield. X
Press both release clips ;.
X Fold wiper blade :in the direction of
arrow =away from wiper arm ?.
X Remove wiper blade :in the direction of
arrow A. Windshiel
dwipers
131Lights and windshield wipers Z
Page 147 of 364
Setting the air vents
Important safety notes
G
WARNING
Very hot or very cold air can flow from the air
vents. This could cause burns or frostbite to
bare skin in the immediate vicinity of the
vents. Keep bare skin away from these air
vents. If necessary, direct the airflow away to
a different area of the vehicle interior.
In order to ensure the direct flow of fresh air
through the air vents into the vehicle interior,
please observe the following notes:
R keep the air intake grill on the hood free of
blockages, such as ice, snow or leaves.
R never cover the air vents or air intake grilles
in the vehicle interior.
i For virtually draft-free ventilation, adjust
the sliders of the air vents to the center
position. Setting the center air vents
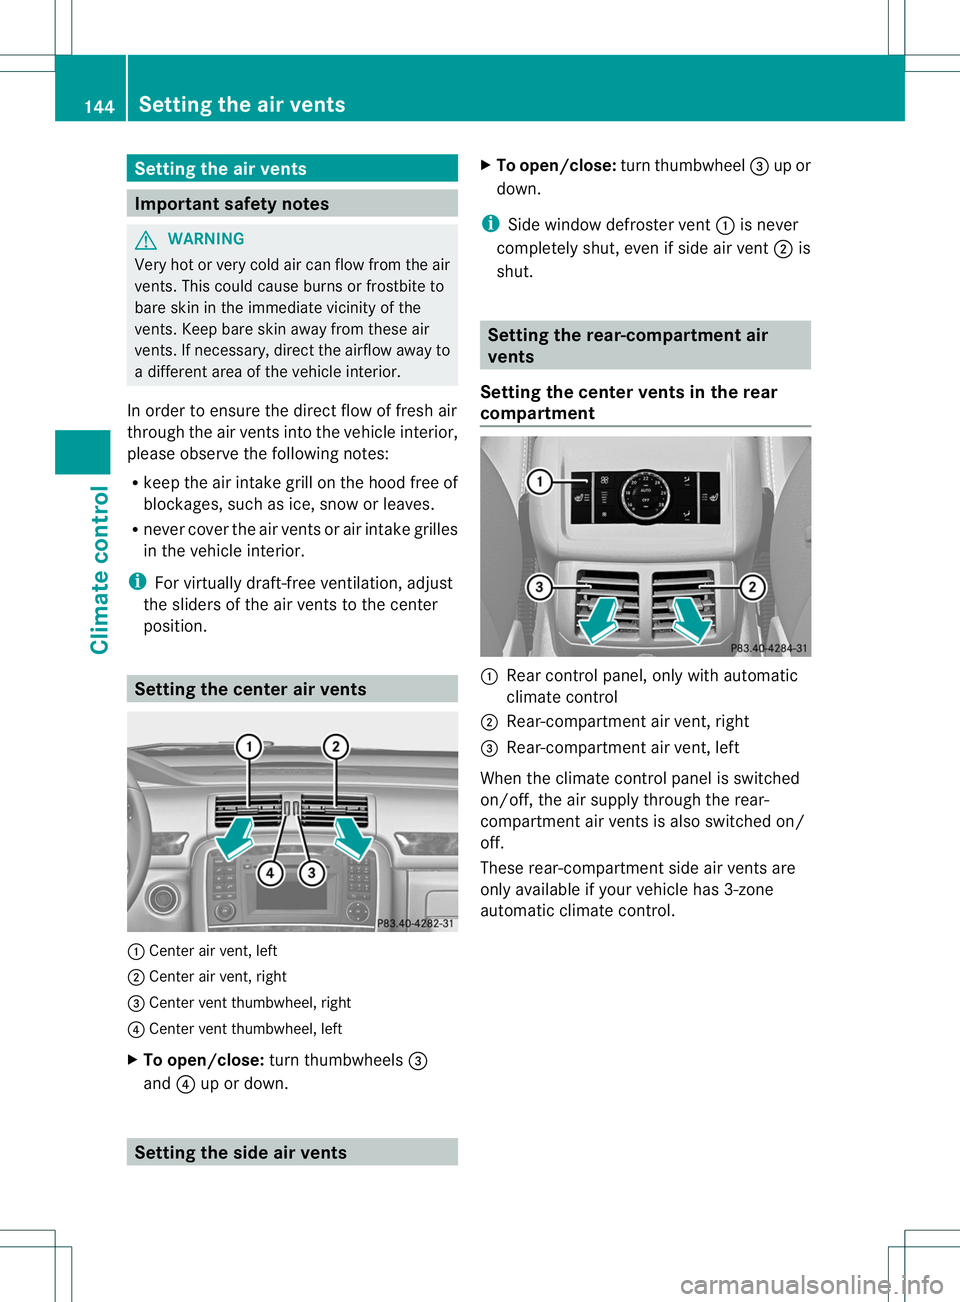
:
Center air vent, left
; Center air vent, right
= Center vent thumbwheel, right
? Center vent thumbwheel, left
X To open/close: turn thumbwheels =
and ?up or down. Setting the side air vents X
To open/close: turn thumbwheel =up or
down.
i Side window defroster vent :is never
completely shut, even if side air vent ;is
shut. Setting the rear-compartment air
vents
Setting the center vents in the rear
compartment :
Rear control panel, only with automatic
climate control
; Rear-compartment air vent, right
= Rear-compartment air vent, left
When the climate control panel is switched
on/off, the air supply through the rear-
compartmen tair vents is also switched on/
off.
These rear-compartmen tside air vents are
only available if your vehicle has 3-zone
automatic climate control. 144
Setting the air ventsClimate control
Page 206 of 364
Standard display menu
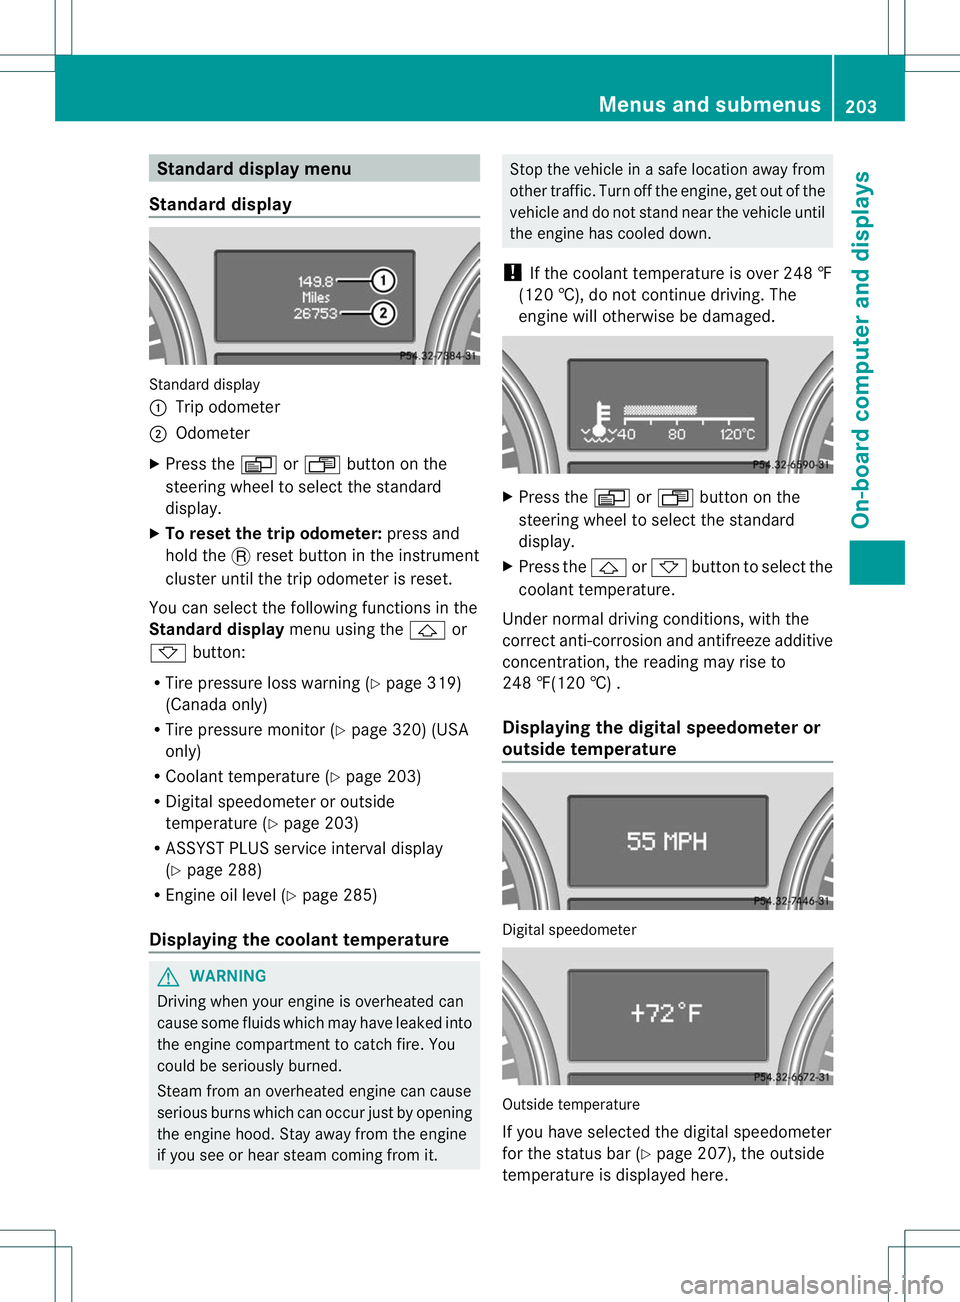
Standard display Standard display
:
Trip odometer
; Odometer
X Press the VorU button on the
steering wheel to select the standard
display.
X To reset the trip odometer: press and
hold the .reset button in the instrument
cluster until the trip odometer is reset.
You can select the following functions in the
Standard display menu using the&or
* button:
R Tire pressure loss warning (Y page 319)
(Canada only)
R Tire pressure monitor (Y page 320) (USA
only)
R Coolant temperature (Y page 203)
R Digital speedometer or outside
temperature (Y page 203)
R ASSYST PLUS service interval display
(Y page 288)
R Engine oil level (Y page 285)
Displaying the coolant temperature G
WARNING
Driving when your engine is overheated can
cause some fluids which may have leaked into
the engine compartment to catch fire. You
could be seriously burned.
Steam from an overheated engine can cause
serious burns which can occur just by opening
the engine hood. Stay away from the engine
if you see or hear steam coming from it. Stop the vehicle in a safe location away from
other traffic. Turn off the engine, get out of the
vehicle and do not stand near the vehicle until
the engine has cooled down.
! If the coolant temperature is over 248 ‡
(120 †), do not continue driving. The
engine will otherwise be damaged. X
Press the VorU button on the
steering wheel to select the standard
display.
X Press the &or* button to select the
coolant temperature.
Under normal driving conditions, with the
correcta nti-corrosiona nd antifreeze additive
concentration, the reading may rise to
248 ‡(120 †) .
Displaying the digital speedomete ror
outside temperature Digital speedometer
Outside temperature
If you have selected the digital speedometer
for the status bar (Y
page 207), the outside
temperature is displayed here. Menus and submenus
203On-board computer and displays Z
Page 228 of 364
Display messages Possible causes/consequences and
M Solutions
?
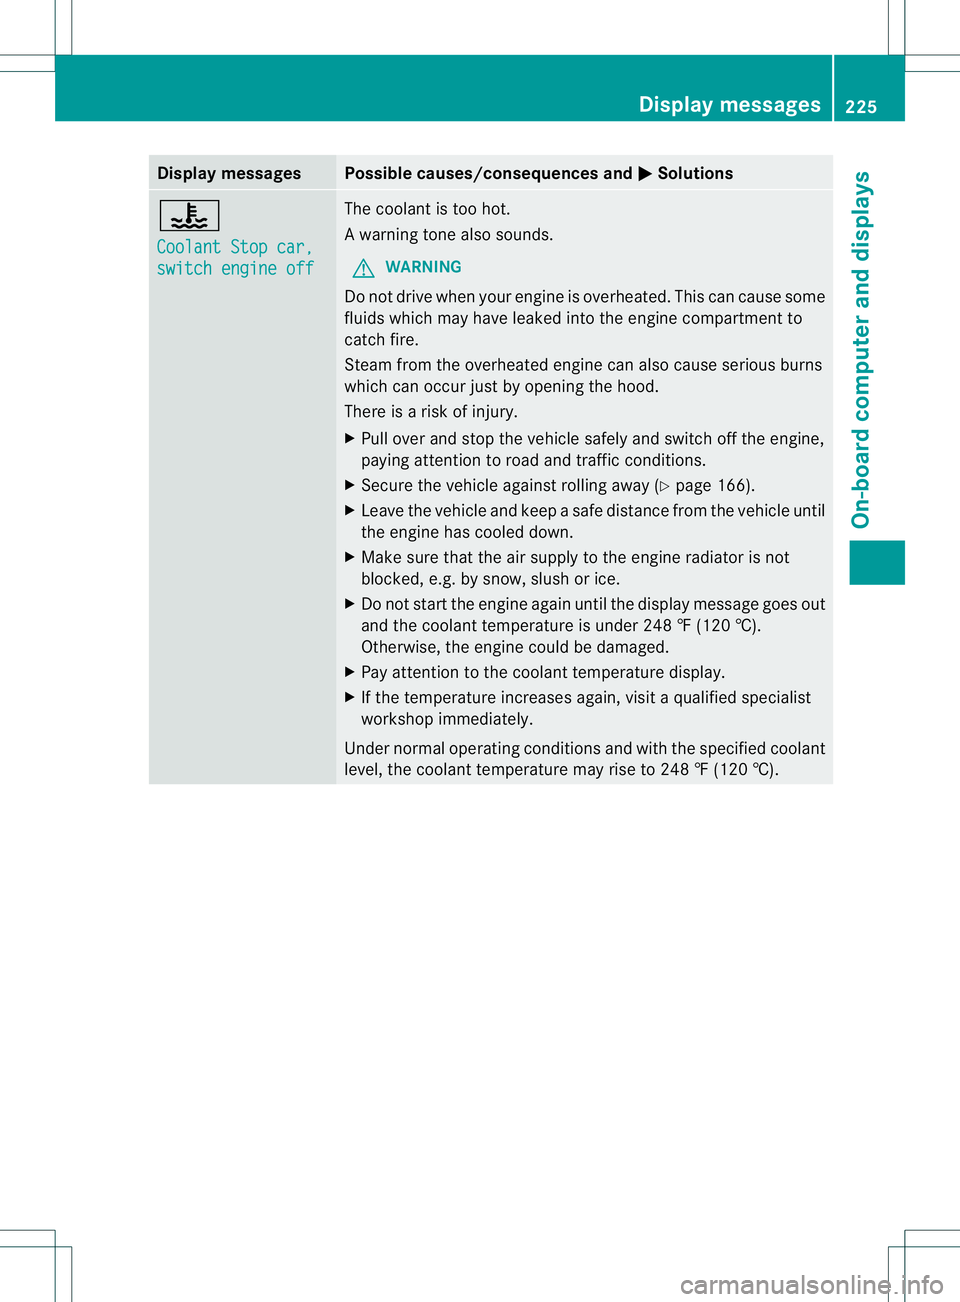
Coolant Stop car,
switch engine off The coolan
tis too hot.
Aw arning tone also sounds.
G WARNING
Do no tdrive when youre ngine is overheated. Thi scan cause some
fluids which may have leaked into the engine compartmen tto
catch fire.
Stea mfrom the overheated engine can also cause serious burns
which can occur just by opening the hood.
There is a risk of injury.
X Pull over and stop the vehicle safely and switch off the engine,
paying attention to road and traffic conditions.
X Secure the vehicle against rolling away (Y page 166).
X Leave the vehicle and keep a safe distance from the vehicle until
the engine has cooled down.
X Make sure that the air supply to the engine radiator is not
blocked, e.g. by snow, slush or ice.
X Do not start the engine again until the display message goes out
and the coolant temperature is under 248 ‡ (120 †).
Otherwise, the engine could be damaged.
X Pay attention to the coolant temperature display.
X If the temperature increases again, visit a qualified specialist
workshop immediately.
Under normal operating conditions and with the specified coolant
level, the coolant temperature may rise to 248 ‡ (120 †). Display messages
225On-board computer and displays Z
Page 238 of 364
Display messages Possible causes/consequences and
M Solutions
Depress brake to
shift out of P. You have attempted to mov
ethe transmission selector lever to
position D,Ror Nwithout depressing the brake pedal.
X Depress the brake pedal. Door Open Vehicle
Not In Park The driver's door is open and the transmission is in position
R,N
or D.
X Shift the transmission to position P.
X Secure the vehicle against rolling away (Y page 166).Drive to workshop
without shifting
gears. You cannot change the transmission position due to a malfunction.
If transmission position
Dis selected:
X Drive to a qualified specialist workshop without shifting the
transmission from position D.
If transmission position R,Nor Pis selected:
X Notify a qualified specialist workshop or breakdown service. Only shift to P
when vehicle is at
a standstill. The vehicle is moving.
X
Pull over and stop the vehicle safely as soon as possible, paying
attention to road and traffic conditions.
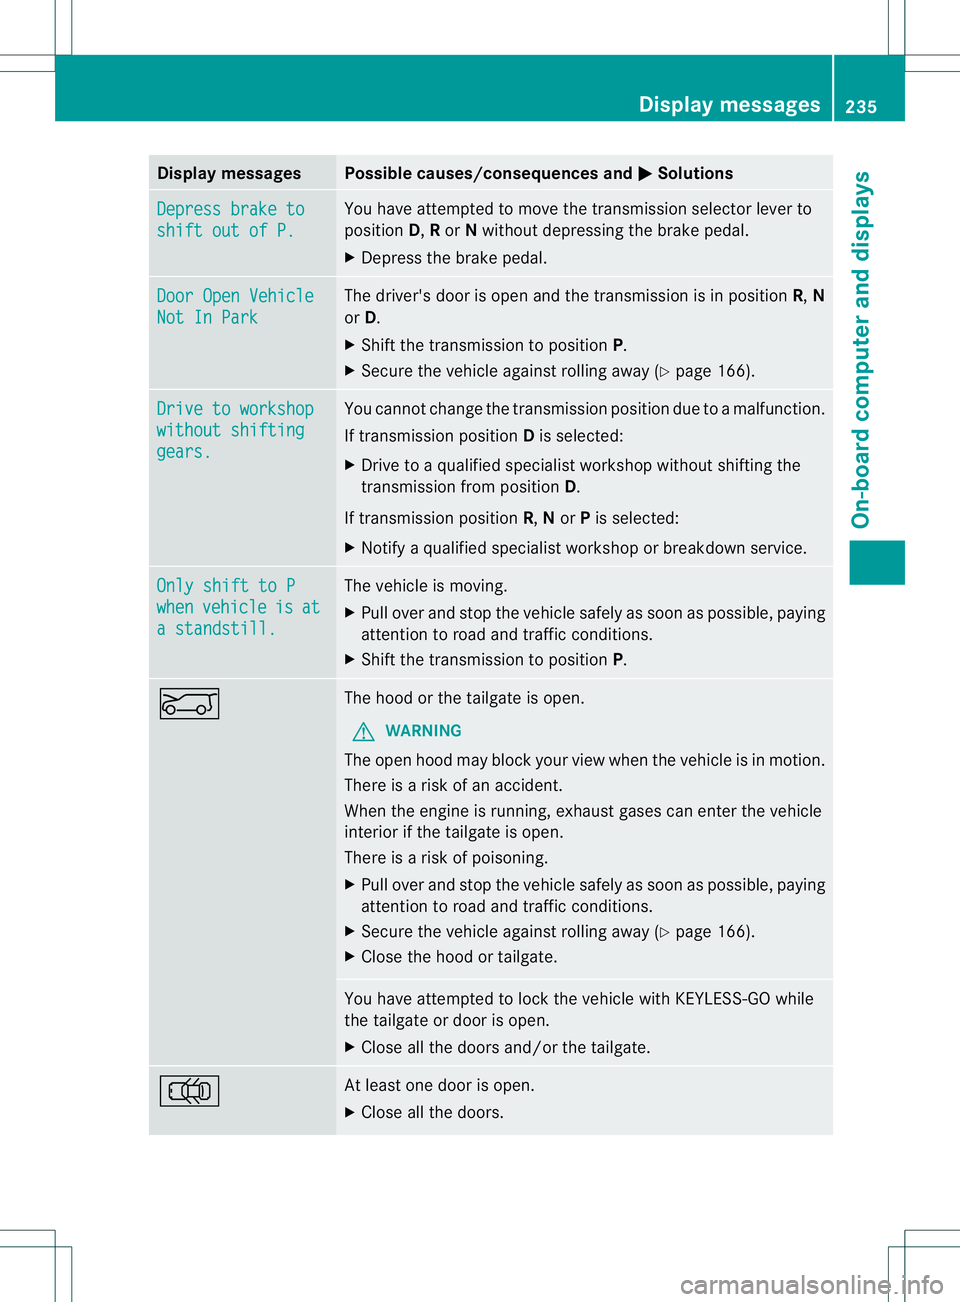
X Shift the transmission to position P.E The hood or the tailgate is open.
G WARNING
The open hood may block your view when the vehicle is in motion.
There is a risk of an accident.
When the engine is running, exhaust gases can enter the vehicle
interior if the tailgate is open.
There is a risk of poisoning.
X Pull over and stop the vehicle safely as soon as possible, paying
attention to road and traffic conditions.
X Secure the vehicle against rolling away (Y page 166).
X Close the hood or tailgate. You have attempted to lock the vehicle with KEYLESS-GO while
the tailgate or door is open.
X
Close all the doors and/or the tailgate. ; At least one door is open.
X
Close all the doors. Display messages
235On-board computer and displays Z
Page 282 of 364
Synchronizing the rolling code
Your vehicle must be within reach of the
garage door or exterior gate drive. Make sure
that neither your vehicle nor any persons/
objects are present within the sweep of the
door or gate.
Observe the safety notes when performing
the rolling code synchronization.
X
Turn the SmartKey to position 2in the
ignition lock.
X Press the programming button of the door
or gate drive (see the door or gate drive
operating instructions, e.g. under
"Programming of additional remote
controls").
i Usually, you now have 30seconds to
initiate the next step.
X Press previously programmed button ;,
= or? of the integrated garage door
opener until the door closes.
The rolling code synchronization is then
complete.
Notes on programming the remote
control
Canadianr adio frequency laws require a
"break" (or interruption) of the transmission
signals after broadcasting for a few seconds.
Therefore, these signals may no tlast long
enough for the integrated garage door
opener. The signal is notr ecognized during
programming. Comparable with Canadian
law, some U.S.g arage door openers are
designed to "time-out" in the same manner.
Proceed as follows:
R if you live in Canada
R if you have difficulties programming the
garage door opener (regardless of where
you live) when using the programming
steps X
Press and hold one of buttons ;to? on
the integrated garage door opener.
Afte rashort time, indicator lamp :lights
up yellow.
X Release the button.
Indicator lamp :flashes yellow.
X Press button Bof garage door remote
control Afor two seconds, then release it
for two seconds.
X Press button Bagainf or two seconds.
X Repeat this sequence on button Bof
remote control Auntil indicator lamp :
lights up green.
If indicator lamp :turns red, repeat the
process.
X Continue with the other programming
steps (see above).
Problems when programming
If you are experiencing problems
programming the integrated garage door
opener on the rear-view mirror, take note of
the following instructions:
R Check the transmitter frequency of garage
door drive remote control A.This can
usually be found on the back of the remote
control.
The integrated garage door opener is
compatible with devices that have units
which operate in the frequency range of
280to 433MHz.
R Replace the batteries in garage door
remote control A.This increases the
likelihood that garage door remote control
A will transmit a stronga nd precise signal
to the integrated garage door opene rinthe
rear-view mirror.
R When programming, hold remote control
A at varying distances and angles from the
button that you are programming. Try
various angles at a distance between 2and
12 inches (5to 30 cm) or at the same angle
but at varying distances.
R If another remote control for the same
garage door drive is available, repeat the Features
279Stowage and features Z
Page 287 of 364
Useful information
i This Operator's Manual describes all
models and all standard and optional
equipment of your vehicle available at the
time of publication of the Operator's
Manual. Country-specific differences are
possible. Please note that your vehicle may
not be equipped with all features
described. This also applies to safety-
related systems and functions.
i Read the information on qualified
specialist workshops: (Y page 24).Engine compartment
Hood
Opening the hood G
WARNING
Do not pull the release lever while the vehicle
is in motion. Otherwise, the hood could be
forced open by passing air flow.
This could cause the hood to come loose and
injure you and/oro thers.G
WARNING
Do not open the hood when the engine is
overheated. You could be seriously injured.
Observe the coolant temperature display to
determine whether the engine may be
overheated. If you see flames or smoke
coming from the engine compartment, move
away fro mthe vehicle. Wait until the engine
has cooled. If necessary, call the fire
department. G
WARNING
There is a risk of injury if the hood is open,
even if the engine is not running.
Some engine components can become very
hot.
To avoid the risk of burns, only touch those
components described in the Operator's
Manual and observe the relevant safety notes. G
WARNING
To avoid injury, stay clear of moving parts
when the hood is open and the engine is
running.
The radiator fan may continue to run for
approximately 30seconds or may even restart
after the engine has been switched off. For
this reason, you must not reach into the fan
rotation area. G
WARNING
Vehicles with gasoline engine:
The engine is equipped with a transistorized
ignition system. Because of the high voltage
it is dangerous to touch any components
(ignition coils, spark plug sockets, diagnostic
socket) of the ignition system
R with the engine running
R while starting the engine
R when the ignition is switched on and the
engine is turned manually G
WARNING
Vehicles with diesel engine:
The engine is equipped with a high-voltage
electronic control unit for the injection
system. Because of the high voltage it is
dangerous to touch any components of the
injection system (injectors, electrical wires)
R with the engine running
R while starting the engine
R when the ignition is switched on G
WARNING
The windshield wipers and wiper linkage
could be set in motion.
When the hood is open, you or others could
be injured by the wiper linkage.
Make sure that the windshield wipers are
switched off. Remove the SmartKey or make
sure that no ignition position has been
selected with KEYLESS-GO. All indicator
lamps must be off in the instrument panel. 284
Engine compartmentMaintenance and care