tire pressure MERCEDES-BENZ R-CLASS FAMILY TOURER 2013 Owners Manual
[x] Cancel search | Manufacturer: MERCEDES-BENZ, Model Year: 2013, Model line: R-CLASS FAMILY TOURER, Model: MERCEDES-BENZ R-CLASS FAMILY TOURER 2013Pages: 364, PDF Size: 28.68 MB
Page 20 of 364
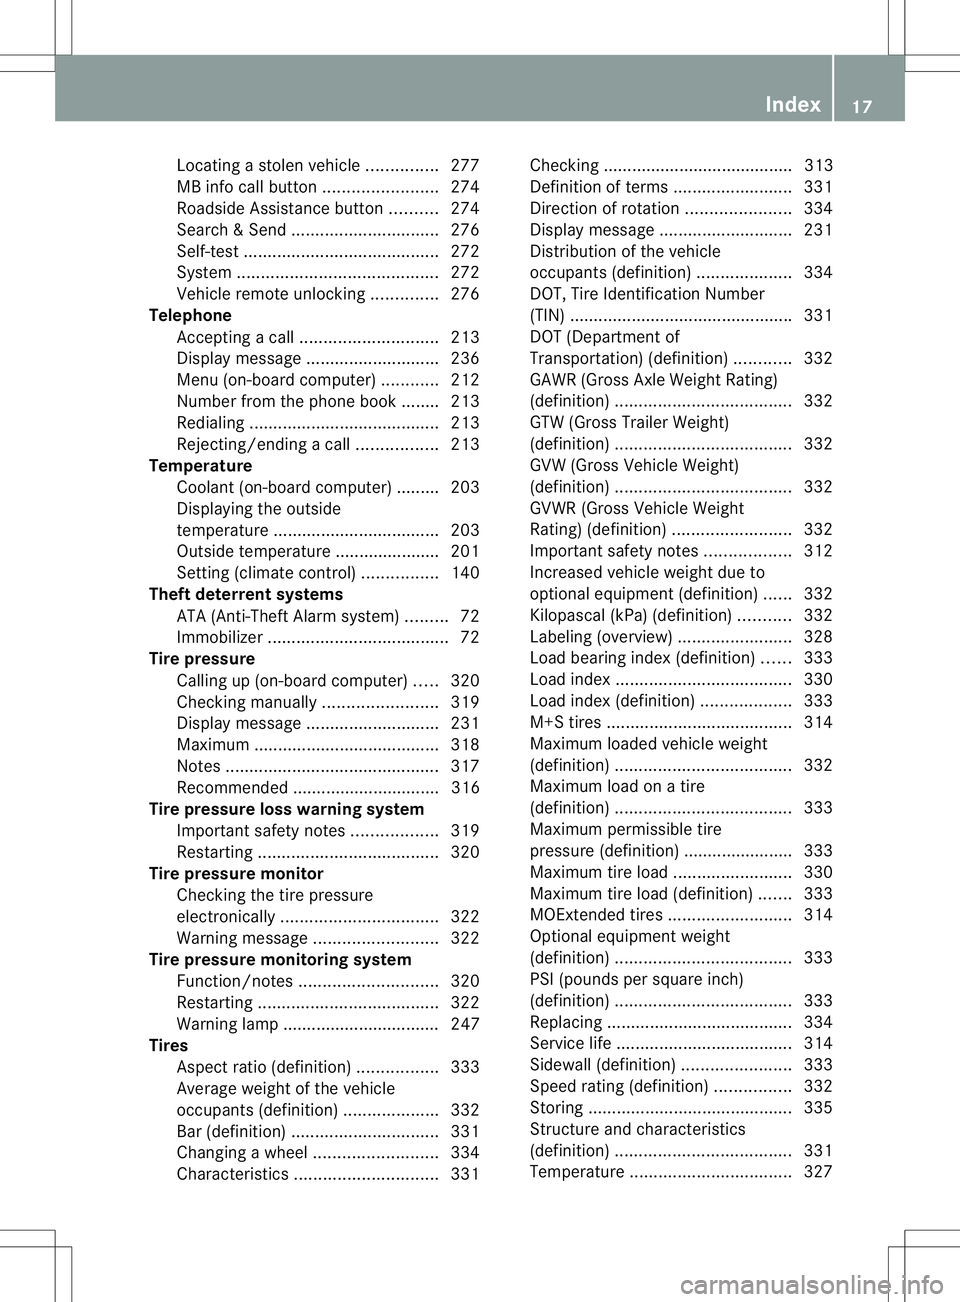
Locating
astolen vehicl e............... 277
MB info call button ........................274
Roadside Assistance button ..........274
Search &Send ............................... 276
Self-test ......................................... 272
System .......................................... 272
Vehicle remote unlocking ..............276
Telephone
Accepting acall............................. 213
Display message ............................ 236
Menu (on-board computer) ............212
Number from the phone book ....... .213
Redialing ........................................ 213
Rejecting/ending acall................. 213
Temperature
Coolant (on-board computer) ......... 203
Displaying the outside
temperature ................................... 203
Outside temperature ..................... .201
Setting (climate control) ................140
Theft deterrent systems
ATA (Anti-Theft Alarm system) .........72
Immobilize r...................................... 72
Tire pressure
Calling up (on-board computer) .....320
Checking manually ........................319
Display message ............................ 231
Maximum ....................................... 318
Notes ............................................. 317
Recommended ............................... 316
Tire pressure loss warning system
Important safety notes ..................319
Restarting ...................................... 320
Tire pressure monitor
Checking the tire pressure
electronically ................................. 322
Warning message .......................... 322
Tire pressure monitoring system
Function/notes ............................. 320
Restarting ...................................... 322
Warning lamp ................................. 247
Tires
Aspect ratio (definition) .................333
Average weight of the vehicle
occupants (definition) ....................332
Bar (definition) ............................... 331
Changing awheel .......................... 334
Characteristics .............................. 331Checking ........................................ 313
Definition of terms
.........................331
Directio nofrotation ...................... 334
Display message ............................ 231
Distributio nofthe vehicle
occupants (definition) ....................334
DOT, Tire Identification Number
(TIN) .............................................. .331
DOT (Department of
Transportation) (definition) ............332
GAWR (Gross Axle Weight Rating)
(definition) ..................................... 332
GTW (Gross Trailer Weight)
(definition) ..................................... 332
GVW (Gross Vehicle Weight)
(definition) ..................................... 332
GVWR (Gross Vehicle Weight
Rating) (definition) .........................332
Important safety notes ..................312
Increased vehicle weight due to
optional equipment (definition) ......332
Kilopascal (kPa) (definition) ...........332
Labeling (overview )........................ 328
Load bearing index (definition) ......333
Load index ..................................... 330
Load index (definition) ...................333
M+S tires ....................................... 314
Maximum loaded vehicle weight
(definition) ..................................... 332
Maximum load on a tire
(definition) ..................................... 333
Maximum permissible tire
pressure (definition) ....................... 333
Maximum tire load. ........................330
Maximum tire load (definition) .......333
MOExtended tires ..........................314
Optional equipment weight
(definition) ..................................... 333
PSI (pounds per square inch)
(definition) ..................................... 333
Replacing ....................................... 334
Service life ..................................... 314
Sidewall (definition) .......................333
Speed rating (definition) ................332
Storing ........................................... 335
Structure and characteristics
(definition) ..................................... 331
Temperature .................................. 327 Index
17
Page 21 of 364
TIN (Tire Identification Number)
(definition
)..................................... 333
Tire bead( definition) ...................... 333
Tire pressure (definition) ................333
Tire pressures (recommended )...... 332
Tire size (data) ............................... 339
Tire size designation, load-bearing
capacity, speed rating .................... 328
Tire tread ....................................... 313
Tire tread (definition) .....................333
Total load limit (definition) .............334
Traction ......................................... 327
Traction (definition) .......................334
Trea dwear ..................................... 327
TWR (permissible trailer drawbar
noseweight) (definition) .................334
Uniform Tire Quality Grading
Standard s...................................... 326
Uniform Tire Quality Grading
Standard s(definition) .................... 332
Unladen weight (definition) ............333
Wea rindicato r(definition) .............334
Whee lrim (definition ).................... 332
see Flat tire
Top Tether ............................................ 64
Towing Important safety guidelines ...........306
Installing the towing eye ................307
Removing the towing eye. ..............307
Towing atrailer
Cleaning the trailer tow hitch ......... 294
Coupling up atrailer ...................... 194
Decoupling atrailer ....................... 196
Driving tips .................................... 193
ESP ®
(Electronic Stability
Program) .......................................... 70
Important safety notes ..................193
Lights displaym essage.................. 221
Power supply ................................. 197
Shift range ..................................... 157
Towing away
With both axles on the ground .......307
Tow-starting
Emergency engine starting ............308
Important safety notes ..................306
Trailer coupling
see Towing atrailer Trailer loads and drawbar
noseweights
...................................... 196
Trailer towing Blind Spot Assist ............................ 193
PARKTRONI C................................. 188
Permissible trailer loads and
drawbarn oseweights ..................... 196
Transfer case ..................................... 160
Transmission see Automatic transmission
Transporting the vehicle ..................308
Trim pieces (cleaning instructions) .295
Trip computer (on-board
computer) .......................................... 211
Trip odometer Calling up ....................................... 203
Resetting (on-board computer) ......212
Trunk
see Tailgate
Turn signals
Changing bulbs (front) ...................128
Display message ............................ 222
Switching on/off ........................... 123
TWR (Tongue Weight Rating)
(definition) ......................................... 334
Type identification plate see Vehicle identification plate U
Unlocking Emergency unlocking .......................84
From inside the vehicle (central
unlocking button) ............................. 83 V
Vanity mirror (in the sun visor) ........267
Vehicle Correct use ...................................... 24
Data acquisition ............................... 25
Display message ............................ 234
Equipment ....................................... 21
Individua lsettings .......................... 206
Limited Warranty ............................. 25
Loading .......................................... 323
Locking (in an emergency) ...............84
Locking (SmartKey) .......................... 77 18
Index
Page 22 of 364
Lowering
........................................ 338
Maintenance .................................... 22
Parking for a long period ................ 168
Pulling away ................................... 151
Raising ........................................... 336
Reporting problems .........................25
Securing from rolling away ............335
Towing away .................................. 306
Transporting .................................. 308
Unlocking (in an emergency) ...........84
Unlocking (SmartKey) ......................77
Vehicle data ................................... 357
Vehicle battery
see Battery (vehicle)
Vehicle data ....................................... 357
Vehicle dimensions ...........................357
Vehicle emergency locking ................84
Vehicle identification number see VIN
Vehicle identification plate ..............349
Vehicle level (display message) .......228
Vehicle tool kit .................................. 298
Video Operating the DVD ......................... 205
VIN ...................................................... 349W
Warning and indicator lamps ABS ................................................ 239
Brakes ........................................... 239
Check Engine ................................. 245
Distance warning ........................... 246
ESP ®
.............................................. 241
ESP ®
OFF ....................................... 242
Fuel tank ........................................ 245
Overview .......................................... 32
PASSENGER AIR BAG OFF
indicator lamp .................................. 46
Reserve fuel ................................... 245
Seat belt. ....................................... 238
SRS ................................................ 244
Tire pressure monitor ....................247
Warranty ............................................ 348
Washer fluid Display message ............................ 236
Wheel bol ttightening torque ...........338
Wheel chock ...................................... 335Wheels
Changing awheel .......................... 334
Checking ........................................ 313
Cleaning ......................................... 292
Cleaning (warning) .........................335
Emergency spare wheel .................342
Important safety notes ..................312
Interchanging/changing ................334
Mounting anew wheel ................... 338
Mounting awheel .......................... 335
Overview ........................................ 312
Removing awheel .......................... 337
Storing ........................................... 335
Tightening torque ........................... 338
Whee lsize/tir esize ....................... 339
Window curtain air bag ....................... 46
Windows see Side windows
Windshield
Defrosting ...................................... 142
Infrared reflective .......................... 281
Windshiel dwasher fluid
see Windshield washer system
Windshield washer system
Adding washer fluid .......................288
Filling capacity ............................... 356
Notes ............................................. 356
Windshiel dwipers
Problem (malfunction) ...................132
Rea rwindow wiper ........................ 131
Replacing the wiper blades ............131
Switching on/off ........................... 130
Winte rdriving
Slippery roa dsurface s................... 172
Snow chains .................................. 315
Winter operation
General notes ................................ 314
Overview ........................................ 314
Radiator cover ............................... 285
Winter tires
M+S tires ....................................... 314
Wiper blades
Cleaning ......................................... 292
Important safety notes ..................131
Replacing ....................................... 131
Replacing (rea rwindow) ................ 132
Replacing (windshield). ..................131 Index
19
Page 35 of 364
Warning and indicator lamps
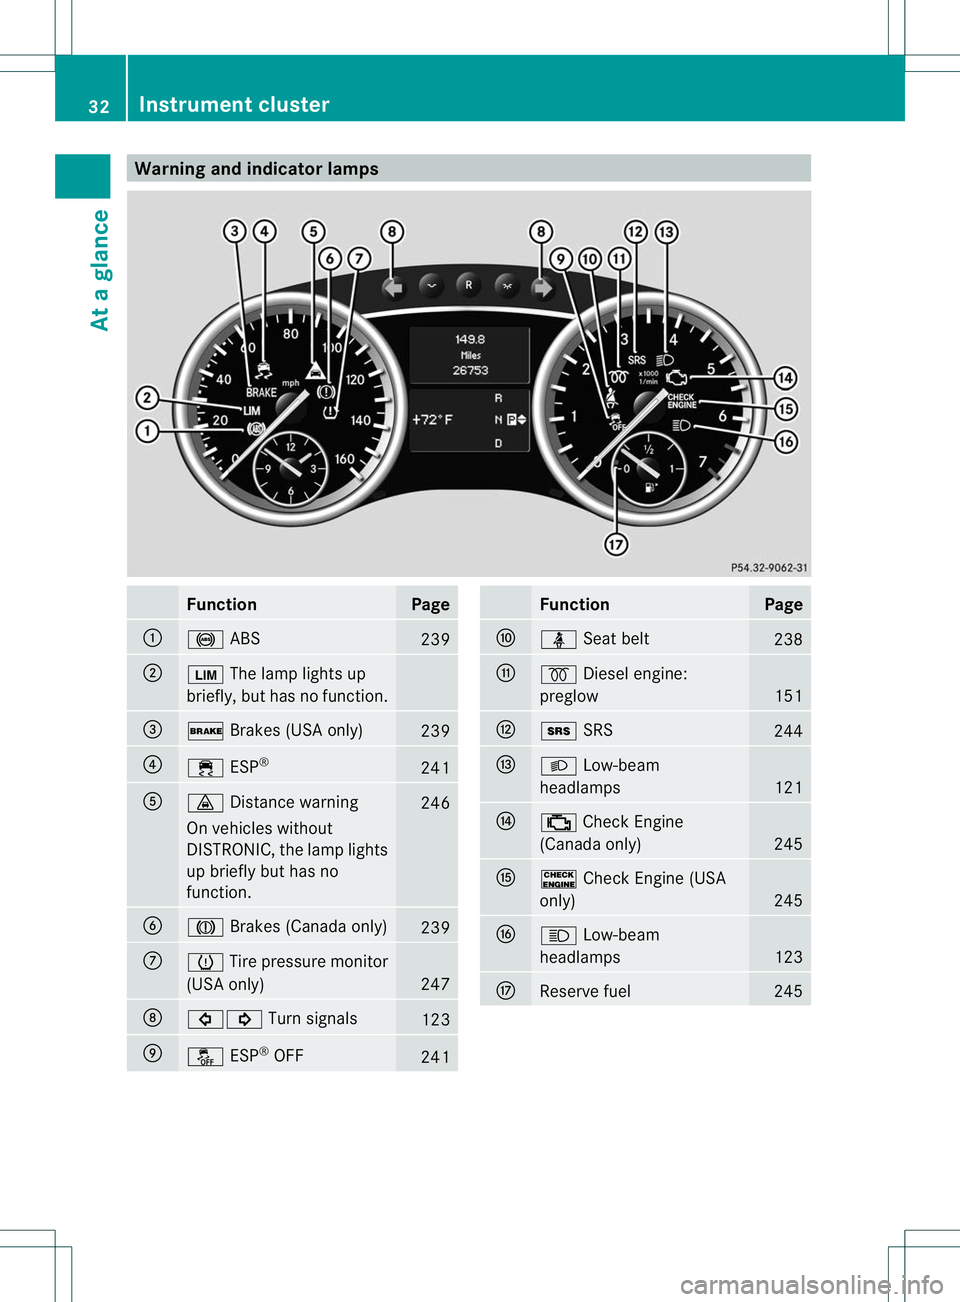
Function Page
:
!
ABS 239
;
È
The lamp lights up
briefly, but has no function. =
$
Brakes (USA only) 239
?
÷
ESP® 241
A
·
Distance warning 246
On vehicles without
DISTRONIC, the lamp lights
up briefly but has no
function.
B
J
Brakes (Canada only) 239
C
h
Tire pressure monitor
(USA only) 247
D
#!
Turn signals 123
E
å
ESP®
OFF 241 Function Page
F
ü
Seat belt 238
G
%
Diesel engine:
preglow 151
H
+
SRS 244
I
L
Low-beam
headlamps 121
J
;
Check Engine
(Canada only) 245
K
!
Check Engine (USA
only) 245
L
K
Low-beam
headlamps 123
M
Reserve fuel 24532
Instrument clusterAt a glance
Page 71 of 364
systems can neither reduce the risk of
accident nor override the laws of physics.
Driving safety systems are merely aids
designed to assist driving. You are
responsible for the distance to the vehicle in
front, for vehicle speed and for braking in
good time. Always adapty
our driving style to
suit the prevailing road and weather
conditions and maintain asafe distance from
the vehicle in front. Drive carefully.
i The driving safety systems described only
work as effectively as possible when there
is adequate contact between the tires and
the road surface. Please pay special
attention to the note son tires,
recommended minimu mtire tread depths,
etc. (Y page 312).
In wintry driving conditions, always use
winter tires (M+S tires) and if necessary,
snow chains. Only in this way will the
driving safety systems described in this
section work as effectively as possible. ABS (Anti-lock Braking System)
Important safety notes i
Observe the "Importan tsafety notes"
sectio n(Ypage 67). G
WARNING
If ABSi s faulty, the wheels could lock when
braking. The steerability and braking
characteristics may be severely impaired.
Additionally, further driving safety systems
are deactivated. There is an increased danger
of skidding and accidents.
Drive on carefully. Have ABS checked
immediately at a qualified specialist
workshop.
When ABS is malfunctioning, other systems,
including driving safety systems, will also
become inoperative. Observe the information
on the ABS warning lamp (Y page 239) and
display messages which may be shown in the
instrument cluster (Y page 215). ABS regulates brake pressure in such a way
that the wheels do not lock when you brake.
This allows you to continue steering the
vehicle when braking.
ABS works from a speed of about 5 mph
(8 km/h) upwards, regardless of road-surface
conditions. ABS works on slippery surfaces,
even if you only brake gently.
The yellow
!ABS warning lamp in the
instrument cluster lights up when the ignition
is switched on. It goes out when the engine is
running.
Braking X
If ABS intervenes: continue to depress the
brake pedal vigorously until the braking
situation is over.
X To make a full brake application:
depress the brake pedal with full force.
If ABS intervenes when braking, you will feel
a pulsing in the brake pedal.
The pulsating brake pedal can be an
indication of hazardous road conditions, and
functions as a reminder to take extra care
while driving. BAS (Brake AssistS
ystem)
i Observe the "Important safety notes"
section (Y page 67). G
WARNING
If BAS is malfunctioning, the braking distance
in an emergency braking situation is
increased. There is a risk of an accident.
In an emergency braking situation, depress
the brake pedal with full force. ABS prevents
the wheels from locking.
BAS operates in emergency braking
situations. If you depress the brake pedal
quickly, BAS automatically boosts the braking
force, thus shortening the stopping distance.
The brakes will function as usual once you
release the brake pedal. BAS is deactivated. 68
Driving safety systemsSafety
Page 97 of 364
G
WARNING
The sliding sunroof is made out of glass. In the
event of an accident, the glass may shatter.
This may result in an opening in the roof.
In a vehicle rollover, occupants not wearing
their seat belts or not wearing them properly
may be thrown out of the opening. Such an
opening also presents a potential for injury for
occupants wearing their seat belts properly,
as entire body parts or portions of them may
protrude from the passenger compartment.
! Only open the sliding sunroof if it is free
of snow and ice. Otherwise, malfunctions
may occur.
Do not allow anything to protrude from the
sliding sunroof. Otherwise, the seals could
be damaged.
i Resonance noises can occur in addition
to the usual airflow noises when the sliding
sunroof is open. They are caused by minor
pressure fluctuations in the vehicle interior.
To reduce or eliminate these noises:
R change the position of the sliding sunroof
R open a side window
R open the panorama roof with power tilt/
sliding panel to the comfort setting
Yourv ehicle may be equipped with a sliding
sunroof or a panorama roof with power tilt/
sliding panel. In this section, the term "sliding
sunroof" refers to both types of sliding
sunroof. Operating the sliding sunroof
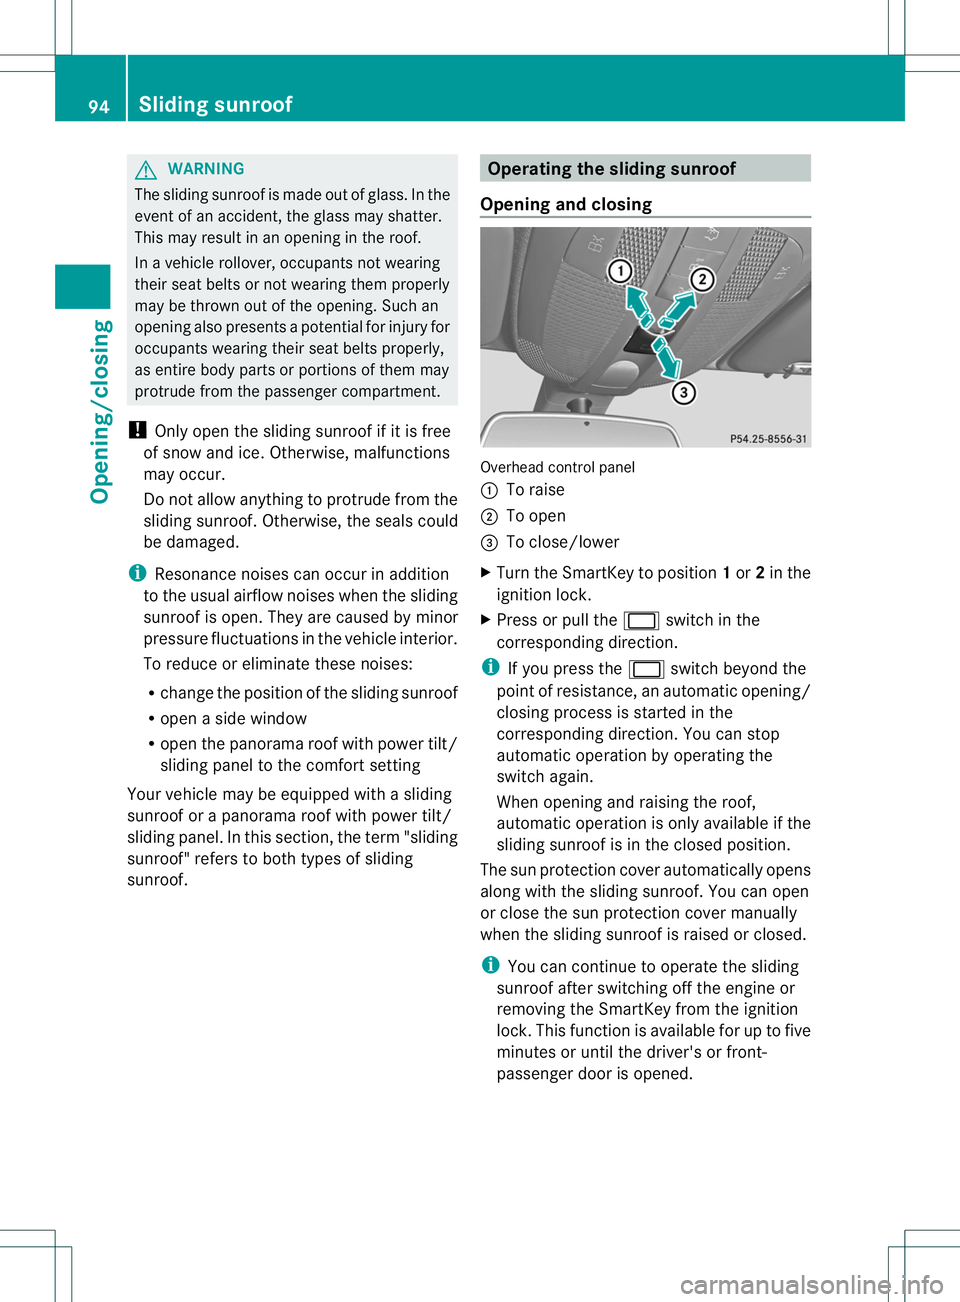
Opening and closing Overhead control panel
:
To raise
; To open
= To close/lower
X Turn the SmartKey to position 1or 2in the
ignition lock.
X Press or pull the 2switch in the
corresponding direction.
i If you press the 2switch beyond the
point of resistance, an automatic opening/
closing process is started in the
corresponding direction. You can stop
automatic operation by operating the
switch again.
When opening and raising the roof,
automatic operation is only available if the
sliding sunroof is in the closed position.
The sun protection cover automatically opens
along with the sliding sunroof .You can open
or close the sun protection cover manually
when the sliding sunroof is raised or closed.
i You can continue to operate the sliding
sunroof after switching off the engine or
removing the SmartKey from the ignition
lock. This function is available for up to five
minutes or until the driver's or front-
passenger door is opened. 94
Sliding sunroofOpening/closing
Page 164 of 364
pump nozzle, which could cause personal
injury.
G
WARNING
Do not fill diesel tanks with gasoline. Do not
mix diesel fuel with gasoline. Otherwise the
fuel system and engine could be damaged. In
addition, the vehicle could catch fire.
! Do not use gasoline to refuel vehicles with
a diesel engine. Do not use diesel to refuel
vehicles with a gasoline engine. Even small
amounts of the wrong fuel result in damage
to the fuel system and the engine.
! Do not switch on the ignition if you
accidentally refuel with the wrong fuel.
Otherwise, the fuel will enter the fuel lines.
Notify a qualified specialist workshop and
have the fuel tank and fuel lines drained
completely.
! Overfilling the fuel tank could damage the
fuel system.
! Take care not to spill any fuel on painted
surfaces. You could otherwise damage the
paintwork.
! Use a filter when refueling from a fuel can.
Otherwise, the fuel lines and/or injection
system could be blocked by particles from
the fuel can.
Further information on fuel and on fuel grades
can be found in the "Fuel" section
(Y page 351). Refueling
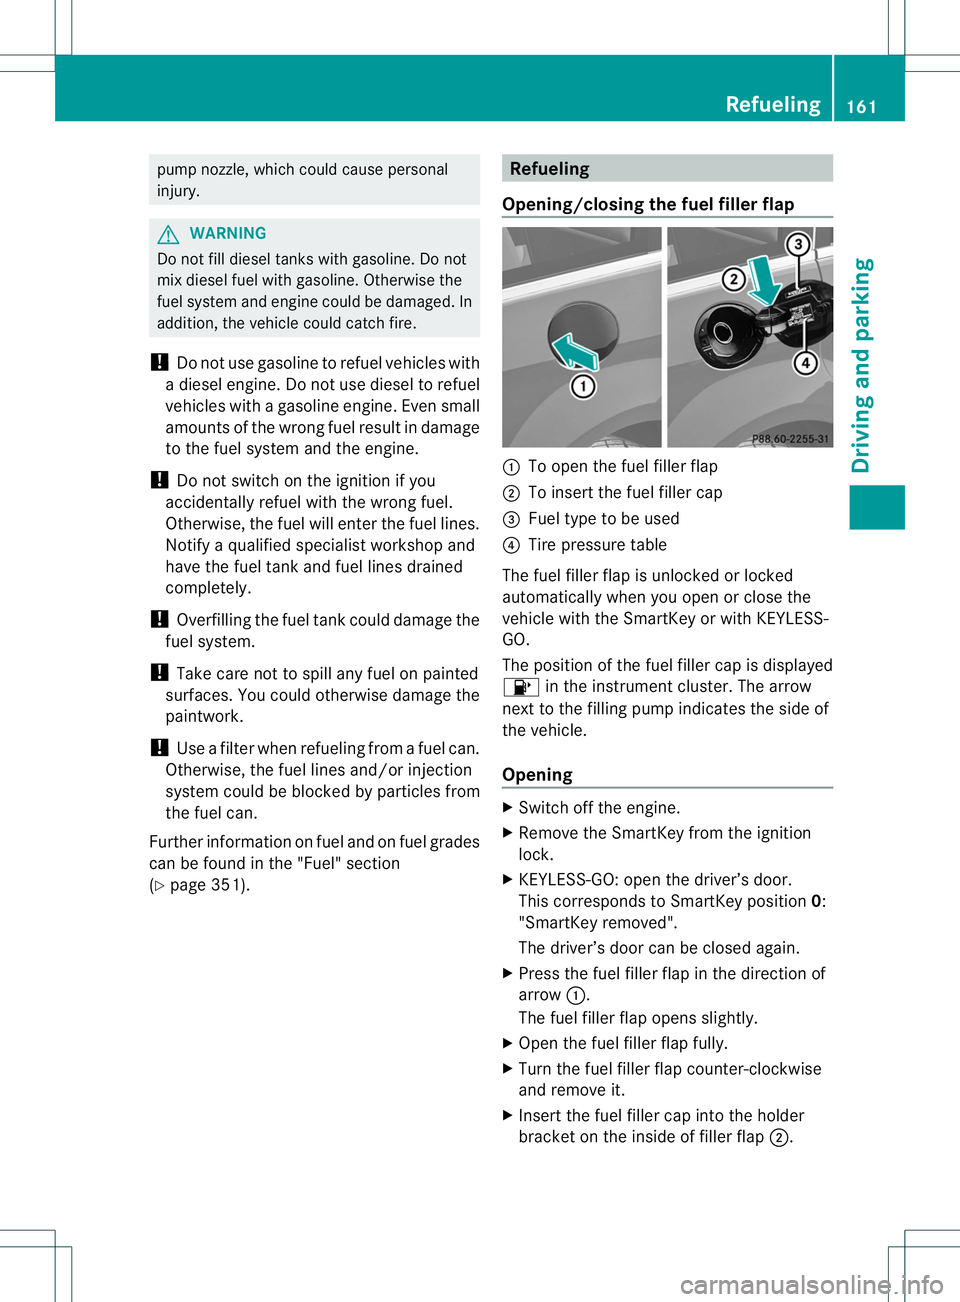
Opening/closing the fuel filler flap :
To open the fuel filler flap
; To insert the fuel filler cap
= Fuel type to be used
? Tire pressure table
The fuel filler flap is unlocked or locked
automatically when you open or close the
vehicle with the SmartKey or with KEYLESS-
GO.
The position of the fuel filler cap is displayed
8 in the instrument cluster. The arrow
nex tto the filling pump indicates the side of
the vehicle.
Opening X
Switch off the engine.
X Remove the SmartKey from the ignition
lock.
X KEYLESS-GO: open the driver’s door.
This corresponds to SmartKey position 0:
"SmartKey removed".
The driver’s door can be closed again.
X Press the fuel filler flap in the direction of
arrow :.
The fuel filler flap opens slightly.
X Open the fuel filler flap fully.
X Turn the fuel filler flap counter-clockwise
and remove it.
X Insert the fuel filler cap into the holder
bracket on the inside of filler flap ;. Refueling
161Driving and parking Z
Page 171 of 364
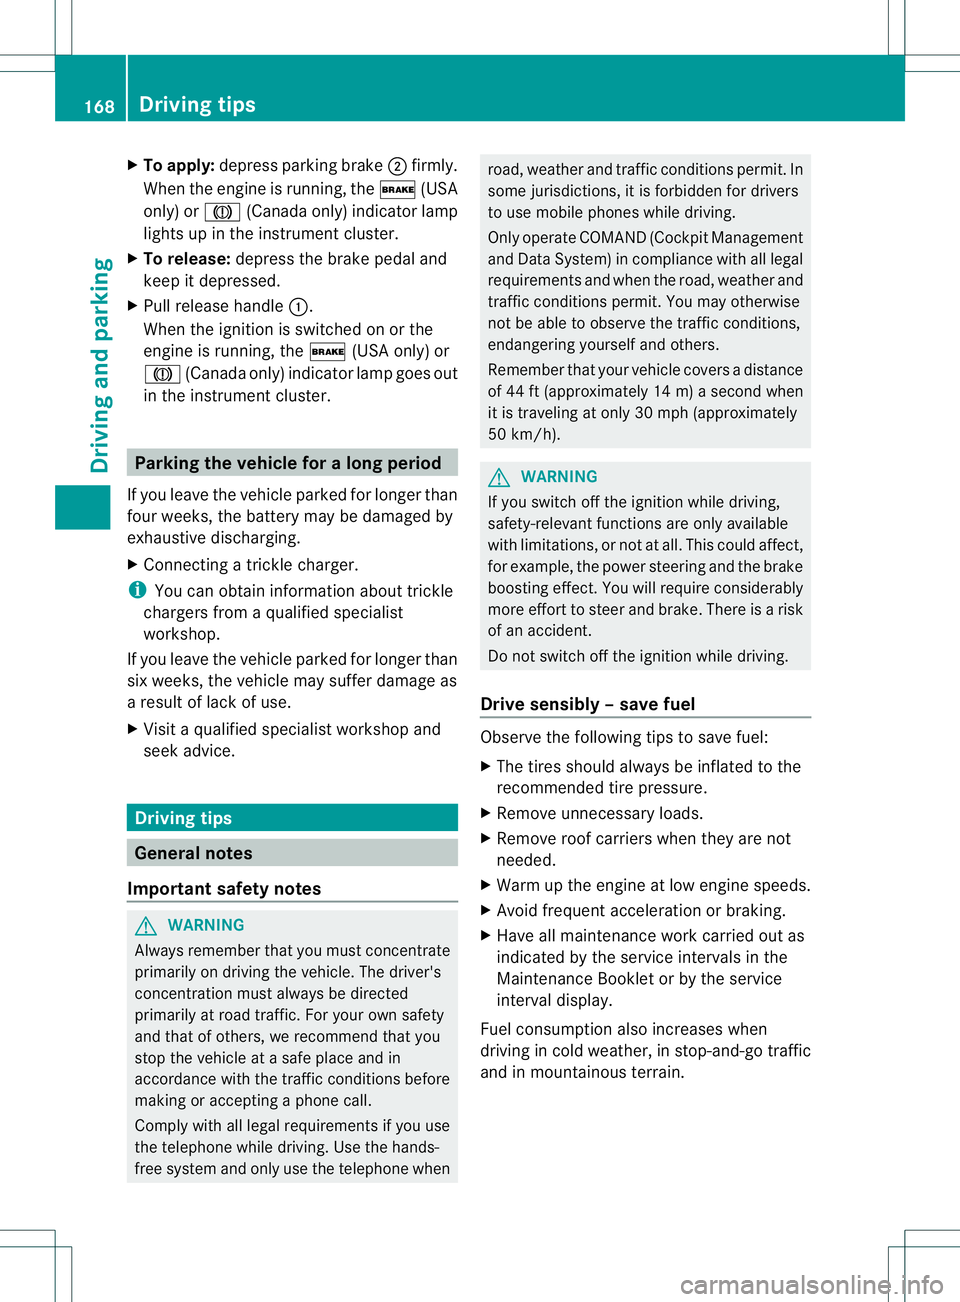
X
To apply: depress parking brake ;firmly.
Whe nthe engine is running, the $(USA
only) or J(Canada only) indicator lamp
lights up in the instrumentc luster.
X To release: depress the brake pedal and
keep it depressed.
X Pull release handle :.
When the ignition is switched on or the
engine is running, the $(USA only) or
J (Canada only) indicator lamp goes out
in the instrument cluster. Parking the vehicle for
along period
If you leave the vehicle parked for longer than
four weeks, the battery may be damaged by
exhaustive discharging.
X Connecting a trickle charger.
i You can obtain information about trickle
chargers from a qualified specialist
workshop.
If you leave the vehicle parked for longer than
six weeks, the vehicle may suffer damage as
a result of lack of use.
X Visit a qualified specialist workshop and
seek advice. Driving tips
General notes
Important safety notes G
WARNING
Always remembe rthat you must concentrate
primarily on driving the vehicle. The driver's
concentration must always be directed
primarily at road traffic. For your own safety
and that of others, we recommend that you
stop the vehicle at a safe place and in
accordance with the traffic conditions before
making or accepting a phone call.
Comply with all legal requirements if you use
the telephone while driving. Use the hands-
free system and only use the telephone when road, weather and traffic conditions permit. In
some jurisdictions, it is forbidden for drivers
to use mobile phones while driving.
Only operate COMAND (Cockpit Management
and Data System) in compliance with all legal
requirements and when the road, weather and
traffic conditions permit. You may otherwise
not be able to observe the traffic conditions,
endangering yourself and others.
Remember that your vehicle covers a distance
of 44 ft (approximately 14
m)a second when
it is traveling at only 30 mph (approximately
50 km/h). G
WARNING
If you switch off the ignition while driving,
safety-relevan tfunctions are only available
with limitations, or no tatall. This could affect,
for example, the power steering and the brake
boosting effect .You will require considerably
more effort to steer and brake. There is a risk
of an accident.
Do not switch off the ignition while driving.
Drive sensibly –save fuel Observe the following tips to save fuel:
X
The tires should always be inflated to the
recommended tire pressure.
X Remove unnecessary loads.
X Remove roof carriers whe nthey are not
needed.
X Warm up the engine at low engine speeds.
X Avoid frequent acceleration or braking.
X Have all maintenance work carried out as
indicated by the service intervals in the
Maintenance Booklet or by the service
interval display.
Fuel consumption also increases when
driving in cold weather, in stop-and-go traffic
and in mountainous terrain. 168
Driving tipsDriving and parking
Page 199 of 364
R
Bea rinm ind that the handling will be less
stable when towing a trailer than when
driving without one .Avoid sudden steering
movements.
R The vehicle/trailer combination is heavier,
accelerates more slowly, has a decreased
gradient climbing capability and a longer
braking distance.
It is more susceptible to side winds and
requires more careful steering.
R If possible, avoid abrupt braking. Depress
the brake pedal moderately at first, so that
the trailer can activate its own brakes .Then
increase the pressure on the brake pedal.
R If the automatic transmission continues to
shift back and forth between two gears
when driving up or downhill, restrict the
shift range. Select shift range 4, 3, 2,or1.
Al ower gear and lower speed reduce the
risk of engine failure.
R When driving downhill, shift to a lower gear
to utilize the engine's braking effect.
Avoid continuous brake application as this
may overheat the vehicle brakes and, if
installed, the trailer brakes.
R If the coolant temperature increases
dramatically while the air-conditioning
system is switched on, switch off the air-
conditioning system.
Coolant heat can additionally be dissipated
by opening the windows and by setting the
blower fan and the interior temperature to
maximum.
R When overtaking, pay particular attention
to the extended length of your vehicle/
trailer combination.
Due to the length of your vehicle/trailer
combination, you will have to travel an
additional distance beyond the vehicle you
are overtaking before returning to the
previous lane. Decoupling
atrailer G
WARNING
Vehicles with level control:
The vehicle is lowered as soon as you
disconnect the trailer cable. This could result
in your limbs or those of other people thata re
between the vehicle body and tires or
underneath the vehicle being trapped. There
is a risk of injury.
Make sure that nobody is in the immediate
vicinity of the wheel housings or under the
vehicle when you disconnect the trailer cable.
X Make sure that the automatic transmission
is set to position P.
X Apply the vehicle's parking brake.
X Start the engine.
X Close all doors and the tailgate.
X Apply the trailer's parking brake.
X Remove the trailer cable and decouple the
trailer.
X Switch off the engine. Permissible trailer loads and drawbar
loads
Weight specifications Permissible gross vehicle weight rating
The gross trailer weight is calculated by
adding the weight of the trailer to the weight
of the load and equipment on the trailer.
Maximu
mpermissible gross vehicle weight:
3,500 lbs (1,588 kg).
Permissible noseweight
The maximum permissible trailer drawbar
noseweight is the maximum weight with
which the trailer drawbar can be loaded:
350 lbs (158 kg).
Limit for Mercedes-Benz-approved trailer
couplings. 196
Towing
atrailerDriving an d parking
Page 206 of 364
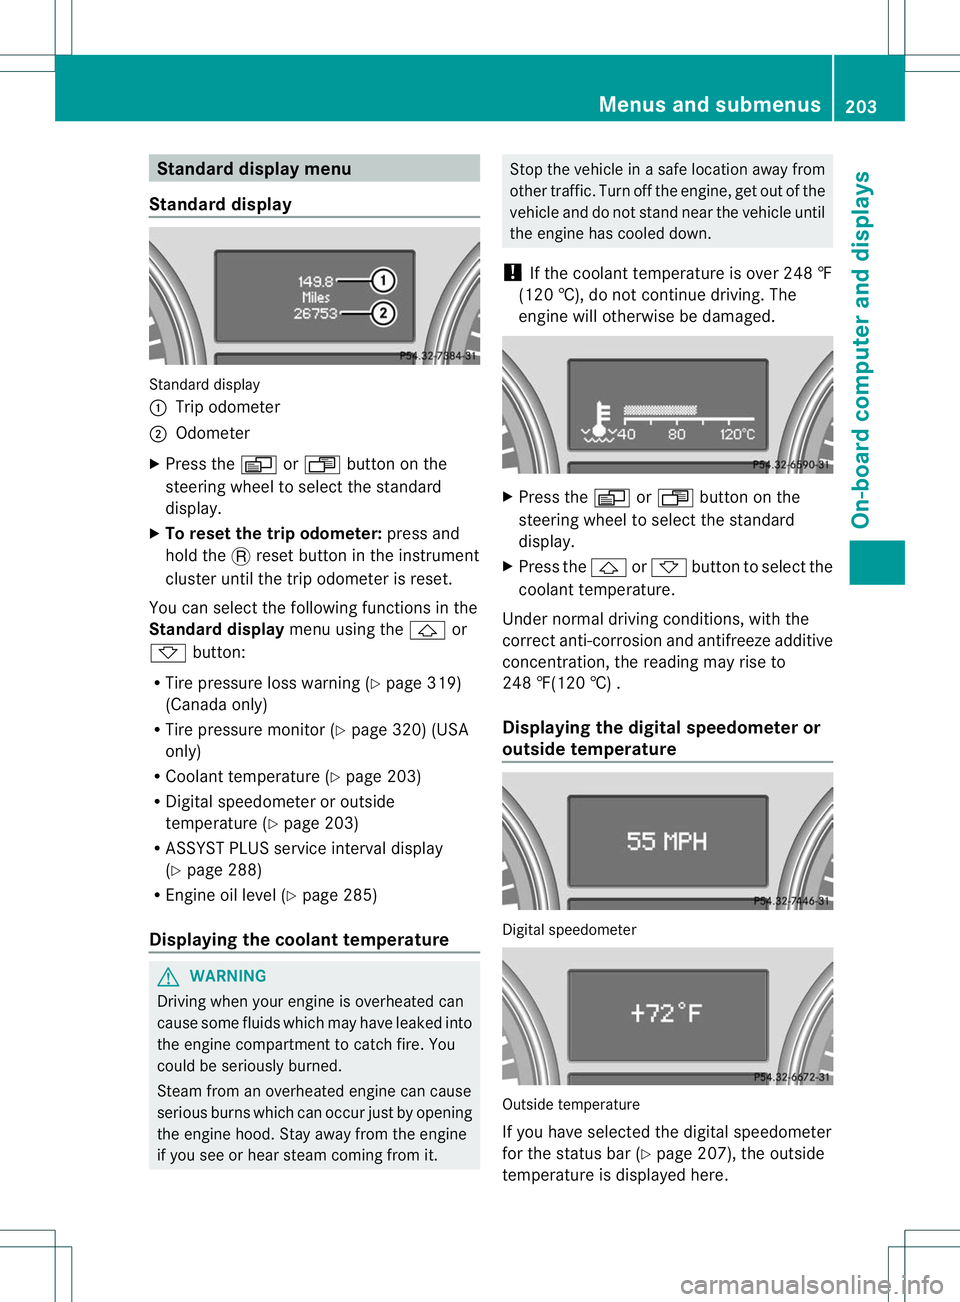
Standard display menu
Standard display Standard display
:
Trip odometer
; Odometer
X Press the VorU button on the
steering wheel to select the standard
display.
X To reset the trip odometer: press and
hold the .reset button in the instrument
cluster until the trip odometer is reset.
You can select the following functions in the
Standard display menu using the&or
* button:
R Tire pressure loss warning (Y page 319)
(Canada only)
R Tire pressure monitor (Y page 320) (USA
only)
R Coolant temperature (Y page 203)
R Digital speedometer or outside
temperature (Y page 203)
R ASSYST PLUS service interval display
(Y page 288)
R Engine oil level (Y page 285)
Displaying the coolant temperature G
WARNING
Driving when your engine is overheated can
cause some fluids which may have leaked into
the engine compartment to catch fire. You
could be seriously burned.
Steam from an overheated engine can cause
serious burns which can occur just by opening
the engine hood. Stay away from the engine
if you see or hear steam coming from it. Stop the vehicle in a safe location away from
other traffic. Turn off the engine, get out of the
vehicle and do not stand near the vehicle until
the engine has cooled down.
! If the coolant temperature is over 248 ‡
(120 †), do not continue driving. The
engine will otherwise be damaged. X
Press the VorU button on the
steering wheel to select the standard
display.
X Press the &or* button to select the
coolant temperature.
Under normal driving conditions, with the
correcta nti-corrosiona nd antifreeze additive
concentration, the reading may rise to
248 ‡(120 †) .
Displaying the digital speedomete ror
outside temperature Digital speedometer
Outside temperature
If you have selected the digital speedometer
for the status bar (Y
page 207), the outside
temperature is displayed here. Menus and submenus
203On-board computer and displays Z