headlamp MERCEDES-BENZ R-CLASS MPV 2008 Owner's Manual
[x] Cancel search | Manufacturer: MERCEDES-BENZ, Model Year: 2008, Model line: R-CLASS MPV, Model: MERCEDES-BENZ R-CLASS MPV 2008Pages: 373, PDF Size: 6.75 MB
Page 273 of 373

Display
messages 270 Display messages Possible cause/consequence Possible solution
B Top up coolant See
Owner's Manual The coolant level is too low. X
Top up the coolant, observing the warning
notes before doing so (Y page 223).
X Have the coolant system checked at a qualified
specialist workshop if the coolant needs top-
ping up more often than usual. . Left-hand Corner-
ing light
or
Right-hand Corner-
ing light The left-hand and/or right-hand cornering
lamp* is faulty. X
Replace the bulb (Y page 306).. Left-hand dipped
beam
or
Right-hand dipped
beam The right-hand or left-hand dipped-beam
headlamp is faulty. X
Halogen headlamp: replace the bulb
(Y page 306).
X Bi-xenon headlamp*: visit a qualified special-
ist workshop. . AUTO lights inop-
erative The light sensor is faulty. Constant head-
lamp mode is switched on. X
Switch the lights to manual control in the on-
board computer (Y page 132).
X Switch the lights on and off using the light
switch. . Trailer Left-hand
turn signal
or
Trailer Right-hand
turn signal There is a malfunction in the left- or right-
hand windowbag. X
Replace the bulb. Practical advi
ce
* optional
251_AKB; 5; 7, en-GB
wobuchh,
Version: 2.10.6 2008-05-11T14:51:51+02:00 - Seite 270Dateiname: 6515_1825_02_buchblock.pdf; preflight
Page 275 of 373

Display
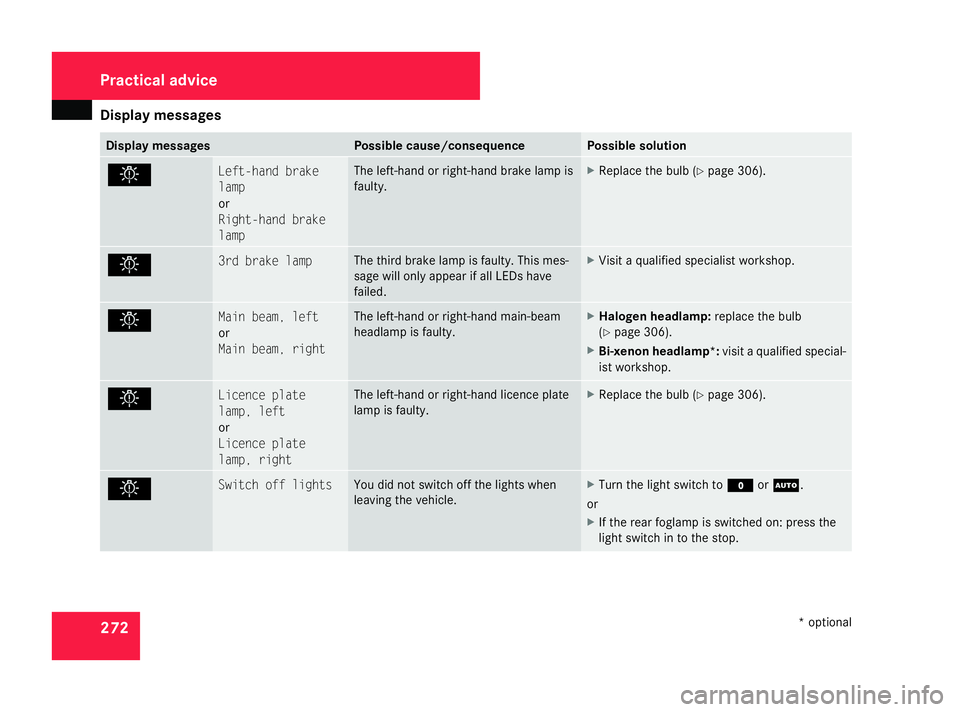
messages 272 Display messages Possible cause/consequence Possible solution
. Left-hand brake
lamp
or
Right-hand brake
lamp The left-hand or right-hand brake lamp is
faulty. X
Replace the bulb (Y page 306).. 3rd brake lamp The third brake lamp is faulty. This mes-
sage will only appear if all LEDs have
failed. X
Visit a qualified specialist workshop. . Main beam, left
or
Main beam, right The left-hand or right-hand main-beam
headlamp is faulty. X
Halogen headlamp: replace the bulb
(Y page 306).
X Bi-xenon headlamp*: visit a qualified special-
ist workshop. . Licence plate
lamp, left
or
Licence plate
lamp, right The left-hand or right-hand licence plate
lamp is faulty. X
Replace the bulb (Y page 306).. Switch off lights You did not switch off the lights when
leaving the vehicle. X
Turn the light switch to MorU.
or
X If the rear foglamp is switched on: press the
light switch in to the stop. Practical advi
ce
* optional
251_AKB; 5; 7, en-GB
wobuchh,
Version: 2.10.6 2008-05-11T14:51:51+02:00 - Seite 272Dateiname: 6515_1825_02_buchblock.pdf; preflight
Page 297 of 373

Troubleshooting
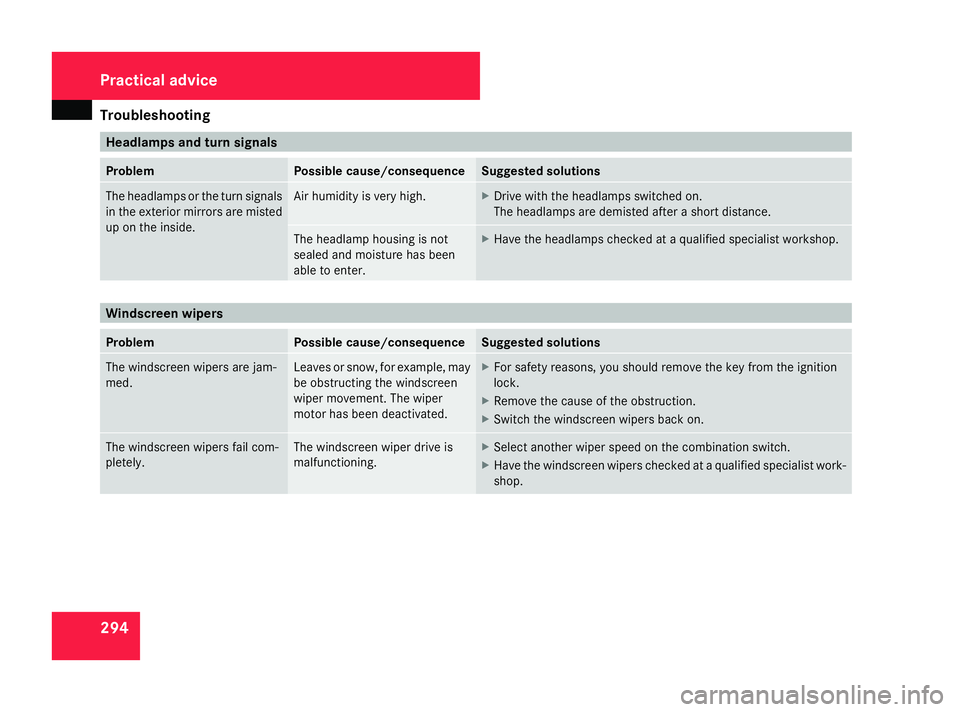
294 Headlamps and turn signals
Problem Possible cause/consequence Suggested solutions
The headlamps or the turn signals
in the exterior mirrors are misted
up on the inside. Air humidity is very high. X
Drive with the headlamps switched on.
The headlamps are demisted after a short distance. The headlamp housing is not
sealed and moisture has been
able to enter. X
Have the headlamps checked at a qualified specialist workshop. Windscreen wipers
Problem Possible cause/consequence Suggested solutions
The windscreen wipers are jam-
med. Leaves or snow, for example, may
be obstructing the windscreen
wiper movement. The wiper
motor has been deactivated. X
For safety reasons, you should remove the key from the ignition
lock.
X Remove the cause of the obstruction.
X Switch the windscreen wipers back on. The windscreen wipers fail com-
pletely. The windscreen wiper drive is
malfunctioning. X
Select another wiper speed on the combination switch.
X Have the windscreen wipers checked at a qualified specialist work-
shop. Practical advice
251_AKB; 5; 7, en-GB
wobuchh
,V ersion: 2.10.6
2008-05-11T14:51:51+02:00 - Seite 294 Dateiname: 6515_1825_02_buchblock.pdf; preflight
Page 310 of 373

Changing the bulbs
307
Front bulbs Bulb Type
1 Side lamp/park-
ing lamp W 5 W
2 Turn signal lamp PY 21 W
3 Additional turn
signal lamp
LEDs
35 4 Dipped-beam
headlamps
H7 55 W
36
or
D1S 35 W* 37 5 Main-beam
headlamps
36
/
Main-beam
spotlight* 38 H7 55 W
6 Front foglamps
with cornering
light function* H7 55 W Rear bulbs
Bulb Type
7 Third brake
lamp
LED
35 8 Brake lamp/tail
lamp/parking
lamp P 21 W
9 Turn signal lamp PY 21 W
a Reversing lamp P 21 W
b
Rear foglamp* P 21 W
c Licence plate
lamp C 5 W
Before changing bulbs
You can replace the following bulbs:
R
Dipped-beam headlamps (vehicles with
halogen headlamps)
R Main-beam headlamps (vehicles with halo-
gen headlamps) R
Side lamp and parking lamp
R Front foglamps with cornering light func-
tion*
R Turn signal lamp (front)
R Reversing lamp
R Brake lamp/tail lamp/parking lamp
R Rear fog lamp
R Turn signal lamp (rear)
R Licence plate lamp
Observe the following points:
R Use only the bulb types specified here.
R To prevent a short-circuit, switch off the
lights before changing a bulb.
R Only hold bulbs with a clean, lint-free cloth.
R Do not work with wet or greasy fingers.
R If the new bulb still does not light up, con-
sult a qualified specialist workshop, e.g. a
Mercedes-Benz Service Centre.
35 These bulbs must be replaced at a qualified specialist workshop, e.g. a Mercedes-Benz Service Centre.
36 Vehicles with halogen headlamps.
37 Vehicles with xenon headlamps*: always have these bulbs changed at a qualified specialist workshop, e.g. a Mercedes-Benz Service Centre.
38 Vehicles with bi-xenon headlamps* Practical advice
* optional
251_AKB; 5; 7, en-GB
wobuchh,
Version: 2.10.6 2008-05-11T14:51:51+02:00 - Seite 307 ZDateiname: 6515_1825_02_buchblock.pdf; preflight
Page 311 of 373

Changing the bulbs
308
i
Have the headlamp setting checked reg-
ularly at a qualified specialist workshop,
e.g. a Mercedes-Benz Service Centre. Changing the front bulbs
Replacing dipped-beam headlamps
(vehicles with halogen headlamps) 1
Housing cover for dipped-beam headlamp
2 Bulb holder for dipped-beam headlamp
X Switch off the lights.
X Open the bonnet.
X Turn housing cover 1anti-clockwise and
remove it.
X Turn bulb holder 2anti-clockwise and pull
it out.
X Pull the bulb out of bulb holder 2.X
Insert the new bulb into bulb holder 2.
X Insert bulb holder 2and turn it clockwise.
X Align housing cover 1and turn it clock-
wise.
Replacing the bulb in the main-beam
(vehicles with halogen headlamps) 1
Housing cover for main-beam headlamp
2 Bulb holder for main-beam headlamp
X Switch off the lights.
X Open the bonnet.
X Turn housing cover 1anti-clockwise and
remove it.
X Turn bulb holder 2anti-clockwise and pull
it out.
X Pull the bulb out of bulb holder 2.X
Insert the new bulb into bulb holder 2.
X Insert bulb holder 2and turn clockwise
until it engages.
X Place housing cover 1back on and turn it
clockwise until it engages.
Replacing side/parking lamp bulbs 1
Bulb holder for side/parking lamp
X Switch off the lights.
X Open the bonnet.
X Turn bulb holder 1anti-clockwise and pull
it out.
X Pull the bulb out of bulb holder 1.
X Insert the new bulb into bulb holder 1.
X Insert bulb holder 1and turn it clockwise. Practical advice
251_AKB; 5; 7, en-GB
wobuchh,
Version: 2.10.6 2008-05-11T14:51:51+02:00 - Seite 308Dateiname: 6515_1825_02_buchblock.pdf; preflight
Page 365 of 373

Service products and capacities
362 Brake fluid
Over a period of time, the brake fluid absorbs
moisture from the air; this lowers its boiling
point. G
Risk of accident
If the boiling point of the brake fluid is too
low, vapour pockets may form in the brake
system when the brakes are applied hard
(e.g. when driving downhill). This would
impair braking efficiency.
Have the brake fluid renewed every two
years with a brake fluid that has been
approved by Mercedes-Benz and have this
confirmed in the Service Booklet. i
There is usually a notice in the engine
compartment to remind you when the next
brake fluid change is due. Windscreen washer system
The washer fluid reservoir holds approxi-
mately 7.3 litres.
The headlamp cleaning system and the wind-
screen washer system are both supplied from
the washer fluid reservoir.
X At temperatures above freezing point:
Top up the washer fluid reservoir with a
mixture of water and windscreen washer
concentrate (Y page 223).
X At temperatures below freezing point:
Top up the washer fluid reservoir with a
mixture of water, antifreeze and wind-
screen washer concentrate (Y page 223).
Adapt the mixing ratio to the outside tem-
peratures. G
Risk of fire
Windscreen washer concentrate is highly
flammable. Fire, naked flames and smoking
are prohibited when windscreen washer
concentrate is being handled. Technical data
251_AKB; 5; 7, en-GB
wobuchh,
Version: 2.10.6 2008-05-11T14:51:51+02:00 - Seite 362Dateiname: 6515_1825_02_buchblock.pdf; preflight