sensor MERCEDES-BENZ R320 2010 W251 Owner's Guide
[x] Cancel search | Manufacturer: MERCEDES-BENZ, Model Year: 2010, Model line: R320, Model: MERCEDES-BENZ R320 2010 W251Pages: 364, PDF Size: 7.5 MB
Page 176 of 364
Function Recommendation/Notes
O
Interior temperature sensor
P
Adopting driver’s side settings
for all zones (Y page 180)
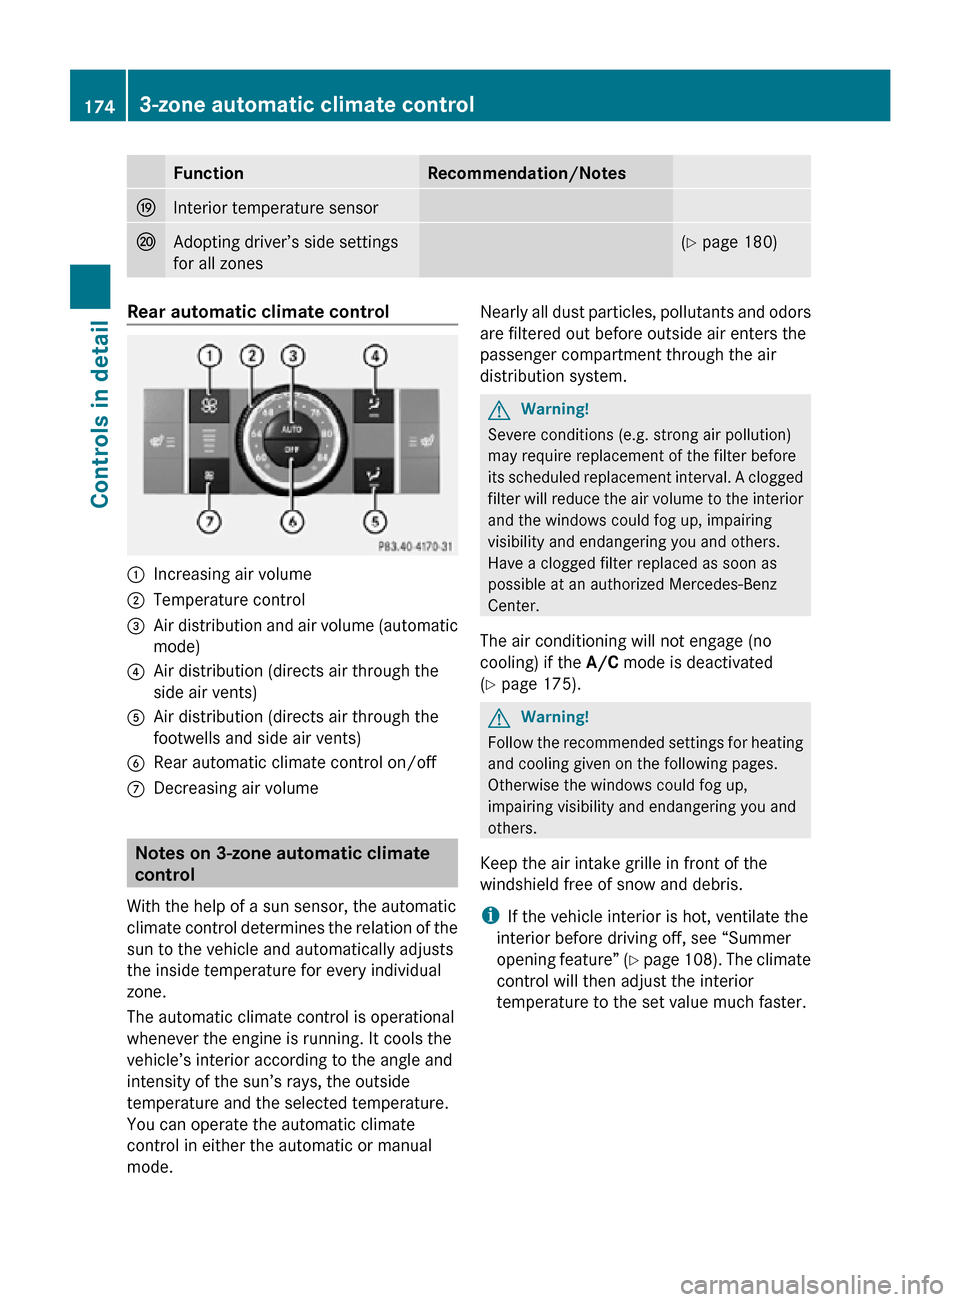
Rear automatic climate control
:
Increasing air volume
; Temperature control
= Air distribution and air volume (automatic
mode)
? Air distribution (directs air through the
side air vents)
A Air distribution (directs air through the
footwells and side air vents)
B Rear automatic climate control on/off
C Decreasing air volume Notes on 3-zone automatic climate
control
With the help of a sun sensor, the automatic
climate control determines the relation of the
sun to the vehicle and automatically adjusts
the inside temperature for every individual
zone.
The automatic climate control is operational
whenever the engine is running. It cools the
vehicle’s interior according to the angle and
intensity of the sun’s rays, the outside
temperature and the selected temperature.
You can operate the automatic climate
control in either the automatic or manual
mode. Nearly all dust particles, pollutants and odors
are filtered out before outside air enters the
passenger compartment through the air
distribution system. G
Warning!
Severe conditions (e.g. strong air pollution)
may require replacement of the filter before
its scheduled replacement interval. A clogged
filter will reduce the air volume to the interior
and the windows could fog up, impairing
visibility and endangering you and others.
Have a clogged filter replaced as soon as
possible at an authorized Mercedes-Benz
Center.
The air conditioning will not engage (no
cooling) if the A/C mode is deactivated
(Y page 175). G
Warning!
Follow the recommended settings for heating
and cooling given on the following pages.
Otherwise the windows could fog up,
impairing visibility and endangering you and
others.
Keep the air intake grille in front of the
windshield free of snow and debris.
i If the vehicle interior is hot, ventilate the
interior before driving off, see “Summer
opening feature” (Y page 108). The climate
control will then adjust the interior
temperature to the set value much faster. 174
3-zone automatic climate controlControls in detail
251_AKB; 4; 52, en-US
d2ureepe,
Version: 2.11.8.1 2009-03-23T09:22:52+01:00 - Seite 174
Page 228 of 364
hot fluid and steam will be blown out under
pressure.
R Do not spill antifreeze on hot engine parts.
Antifreeze contains ethylene glycol which
may burn if it comes into contact with hot
engine parts. X
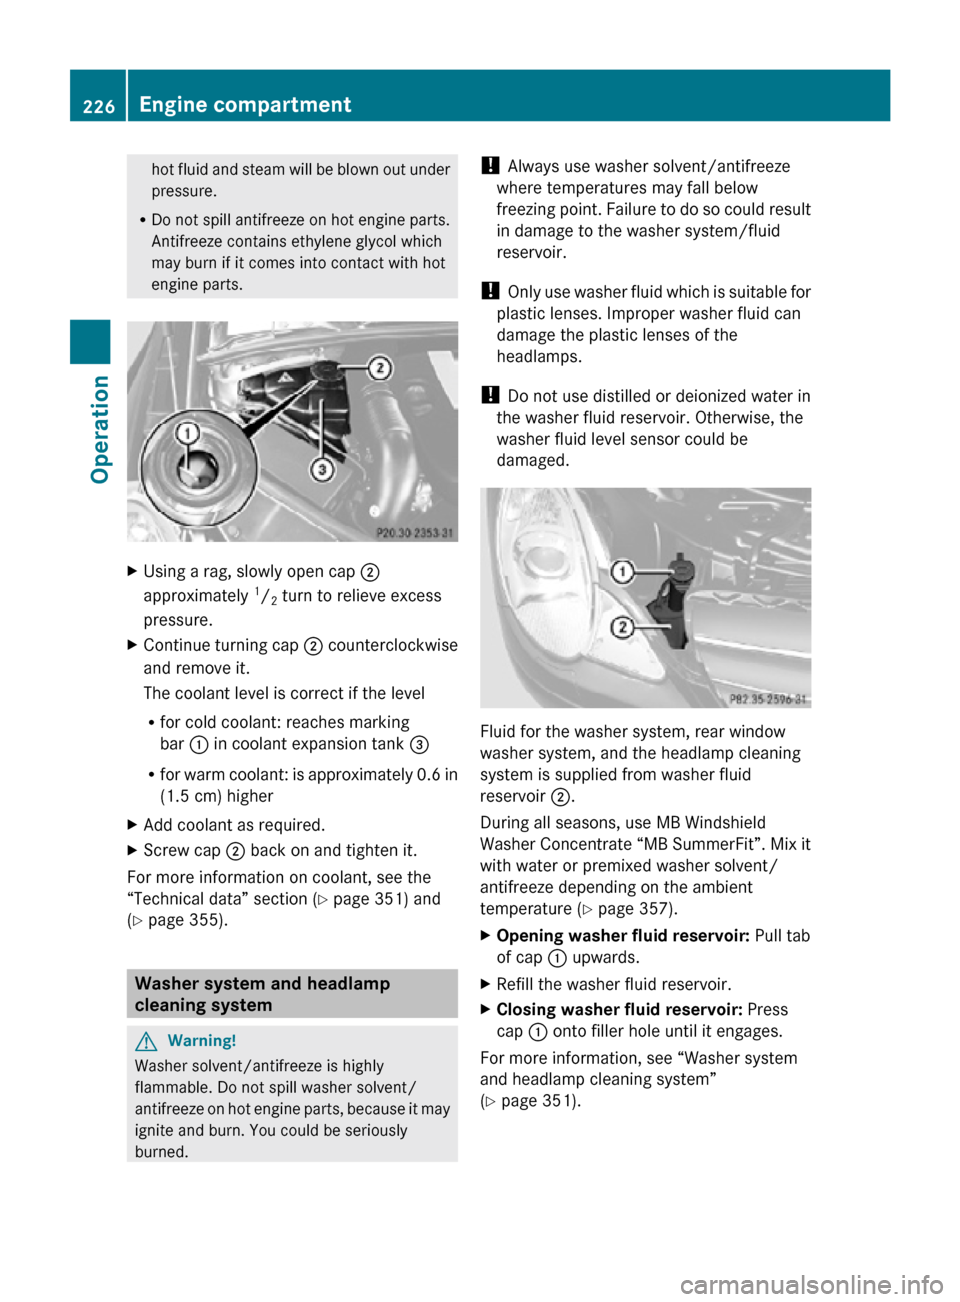
Using a rag, slowly open cap ;
approximately 1
/ 2 turn to relieve excess
pressure.
X Continue turning cap ; counterclockwise
and remove it.
The coolant level is correct if the level
R for cold coolant: reaches marking
bar : in coolant expansion tank =
R for warm coolant: is approximately 0.6 in
(1.5 cm) higher
X Add coolant as required.
X Screw cap ; back on and tighten it.
For more information on coolant, see the
“Technical data” section ( Y page 351) and
(Y page 355). Washer system and headlamp
cleaning system
G
Warning!
Washer solvent/antifreeze is highly
flammable. Do not spill washer solvent/
antifreeze on hot engine parts, because it may
ignite and burn. You could be seriously
burned. !
Always use washer solvent/antifreeze
where temperatures may fall below
freezing point. Failure to do so could result
in damage to the washer system/fluid
reservoir.
! Only use washer fluid which is suitable for
plastic lenses. Improper washer fluid can
damage the plastic lenses of the
headlamps.
! Do not use distilled or deionized water in
the washer fluid reservoir. Otherwise, the
washer fluid level sensor could be
damaged. Fluid for the washer system, rear window
washer system, and the headlamp cleaning
system is supplied from washer fluid
reservoir ;.
During all seasons, use MB Windshield
Washer Concentrate “MB SummerFit”. Mix it
with water or premixed washer solvent/
antifreeze depending on the ambient
temperature (
Y page 357).
X Opening washer fluid reservoir: Pull tab
of cap : upwards.
X Refill the washer fluid reservoir.
X Closing washer fluid reservoir: Press
cap : onto filler hole until it engages.
For more information, see “Washer system
and headlamp cleaning system”
(Y page 351). 226
Engine compartmentOperation
251_AKB; 4; 52, en-US
d2ureepe,
Version: 2.11.8.1 2009-03-23T09:22:52+01:00 - Seite 226
Page 235 of 364
The TPMS is equipped with a combination low
tire pressure/ TPMS malfunction telltale in
the
instrument cluster. Depending on how the
telltale illuminates, it indicates a low tire
pressure condition or a malfunction in the
TPMS system itself:
R If the telltale illuminates continuously, one
or more of your tires is significantly
underinflated. There is no malfunction in
the TPMS.
R If the telltale flashes for 60 seconds and
then stays illuminated, the TPMS system
itself is not operating properly.
The TPMS only functions on wheels that are
equipped with the proper electronic sensors. G
Warning!
The TPMS does not indicate a warning for
wrongly selected inflation pressures. Always
adjust
tire inflation pressure according to the
Tire and Loading Information placard or the
supplemental tire inflation pressure
information on the inside of the fuel filler flap.
The TPMS is not able to issue a warning due
to a sudden dramatic loss of pressure (e.g. tire
blowout caused by a foreign object). In this
case bring the vehicle to a halt by carefully
applying the brakes and avoiding abrupt
steering maneuvers. G
Warning!
Each tire, including the spare (if provided),
should be checked at least once a month
when cold and inflated to the inflation
pressure recommended by the vehicle
manufacturer on the Tire and Loading
Information placard on the driver’s door B-
pillar
or the tire inflation pressure label on the
inside of the fuel filler flap. If your vehicle has
tires of a different size than the size indicated
on the Tire and Loading Information placard
or the tire inflation pressure label, you should
determine the proper tire inflation pressure
for those tires.
As an added safety feature, your vehicle has
been equipped with a tire pressure monitoring system (TPMS) that illuminates a low tire
pressure telltale when one or more of your
tires are significantly underinflated.
Accordingly, when the low tire pressure
telltale
illuminates, you should stop and check
your tires as soon as possible, and inflate
them to the proper pressure. Driving on a
significantly underinflated tire causes the tire
to overheat and can lead to tire failure.
Underinflation also reduces fuel efficiency
and tire tread life, and may affect the vehicle’s
handling and stopping ability. Please note that
the TPMS is not a substitute for proper tire
maintenance, and it is the driver’s
responsibility to maintain correct tire
pressure, even if underinflation has not
reached the level to trigger illumination of the
TPMS low tire pressure telltale.
Your vehicle has also been equipped with a
TPMS malfunction indicator to indicate when
the system is not operating properly. The
TPMS malfunction indicator is combined with
the low tire pressure telltale. When the
system detects a malfunction, the telltale will
flash for approximately 1 minute and then
remain continuously illuminated. This
sequence will continue upon subsequent
vehicle start-ups as long as the malfunction
exists. When the malfunction indicator is
illuminated, the system may not be able to
detect or signal low tire pressure as intended.
TPMS malfunctions may occur for a variety of
reasons, including the installation of
incompatible replacement or alternate tires
or wheels on the vehicle that prevent the
TPMS from functioning properly. Always
check the TPMS malfunction telltale after
replacing one or more tires or wheels on your
vehicle to ensure that the replacement or
alternate tires and wheels allow the TPMS to
continue to function properly.
i If a condition causing the TPMS to
malfunction develops, it may take up to
10 minutes for the system to signal a Tires and wheels
233
Operation
251_AKB; 4; 52, en-US
d2ureepe, Version: 2.11.8.1 2009-03-23T09:22:52+01:00 - Seite 233 Z
Page 236 of 364
malfunction using the TPMS telltale
flashing and illumination sequence.
The telltale extinguishes after a few
minutes driving if the malfunction has been
corrected.
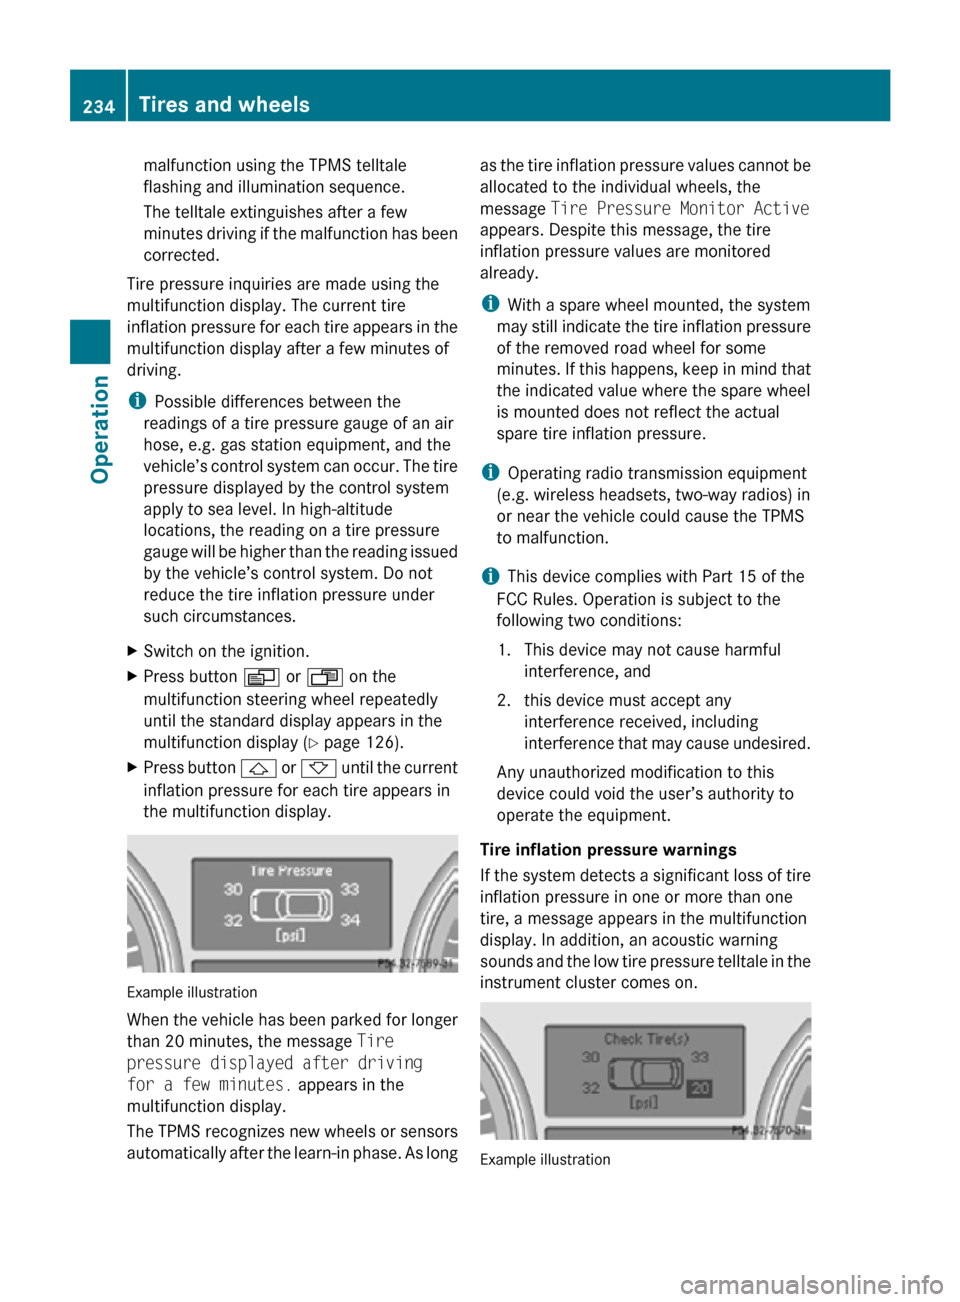
Tire pressure inquiries are made using the
multifunction display. The current tire
inflation pressure for each tire appears in the
multifunction display after a few minutes of
driving.
i Possible differences between the
readings of a tire pressure gauge of an air
hose, e.g. gas station equipment, and the
vehicle’s control system can occur. The tire
pressure displayed by the control system
apply to sea level. In high-altitude
locations, the reading on a tire pressure
gauge will be higher than the reading issued
by the vehicle’s control system. Do not
reduce the tire inflation pressure under
such circumstances.
X Switch on the ignition.
X Press button V or U on the
multifunction steering wheel repeatedly
until the standard display appears in the
multifunction display ( Y page 126).
X Press button & or * until the current
inflation pressure for each tire appears in
the multifunction display. Example illustration
When the vehicle has been parked for longer
than 20 minutes, the message Tire
pressure displayed after driving
for a few minutes. appears in the
multifunction display.
The TPMS recognizes new wheels or sensors
automatically after the learn-in phase. As long as the tire inflation pressure values cannot be
allocated to the individual wheels, the
message
Tire Pressure Monitor Active
appears. Despite this message, the tire
inflation pressure values are monitored
already.
i With a spare wheel mounted, the system
may still indicate the tire inflation pressure
of the removed road wheel for some
minutes. If this happens, keep in mind that
the indicated value where the spare wheel
is mounted does not reflect the actual
spare tire inflation pressure.
i Operating radio transmission equipment
(e.g. wireless headsets, two-way radios) in
or near the vehicle could cause the TPMS
to malfunction.
i This device complies with Part 15 of the
FCC Rules. Operation is subject to the
following two conditions:
1. This device may not cause harmful interference, and
2. this device must accept any interference received, including
interference that may cause undesired.
Any unauthorized modification to this
device could void the user’s authority to
operate the equipment.
Tire inflation pressure warnings
If the system detects a significant loss of tire
inflation pressure in one or more than one
tire, a message appears in the multifunction
display. In addition, an acoustic warning
sounds and the low tire pressure telltale in the
instrument cluster comes on. Example illustration234
Tires and wheelsOperation
251_AKB; 4; 52, en-US
d2ureepe,
Version: 2.11.8.1 2009-03-23T09:22:52+01:00 - Seite 234
Page 266 of 364
Paintwork, painted body components
!
Affixing stickers, magnets, adhesive tape
or similar materials to painted body
components may damage the paintwork.
Mercedes-Benz approved Paint Care should
be applied when water drops on the paint
surface do not “bead up”. This should
normally be done every 3 to 5 months,
depending on the climate and washing
detergent used.
Mercedes-Benz approved Paint Cleaner
should be applied if the paint surface shows
signs of embedded dirt (i.e. loss of gloss).
Do not apply any of these products or wax if
your
vehicle is parked in the sun or if the hood
is still hot.
X Use the appropriate MB-Touch-Up Stick for
quick
and provisional repairs of minor paint
damage (i.e. chips from stones, vehicle
doors, etc.).
Engine cleaning Prior to cleaning the engine compartment,
make sure to protect electrical components
and connectors from contact with water and
cleaning agents.
Corrosion protection, such as MB
Anticorrosion Wax should be applied to the
engine compartment after every engine
cleaning. Before applying, all control linkage
bushings
and joints should be lubricated. The
poly-V-belt and all pulleys should be
protected from any wax.
Vehicle washing In the winter, thoroughly remove all traces of
road salt as soon as possible.
When
washing the vehicle underbody, do not
forget to clean the inner sides of the wheels.
i Vehicles with KEYLESS-GO:
If a door handle is hit by a strong jet of
water, and a SmartKey is within approximately 3 ft (1 m) of the vehicle, it
could
be inadvertently locked or unlocked.
Hand-wash
X Do not use hot water or wash your vehicle
in direct sunlight.
X Only use a soft, wet cloth or sponge to
clean the vehicle.
X Only use a mild vehicle wash detergent,
such as Mercedes-Benz approved Car
Shampoo.
X Thoroughly spray the vehicle with a
diffused jet of water.
X Do not spray directly towards the
ventilation intake.
X Use plenty of water and rinse the sponge
and chamois frequently.
X Rinse with clean water and dry with a
chamois thoroughly.
Do not allow cleaning agents to dry on the
finish.
Automatic car wash
You can have your vehicle washed in an
automatic
car wash from the start. Brushless
car washes are preferable.
X To protect the filter system, activate the air
recirculation mode using button d on
the climate control panel.
! Do
not clean your vehicle in an automatic
touchless car wash which uses caustic
spray. Caustic spray will damage the paint
or ornamental moldings.
If the vehicle is very dirty, prewash it before
running it through the automatic car wash.
! Make sure the combination switch is set
to wiper setting $. Otherwise, the rain
sensor could activate and cause the wipers
to move unintentionally. This may lead to
vehicle damage.
Due to the width of the vehicle, fold in
exterior rear view mirrors prior to running
the vehicle through an automatic car wash
to prevent damage to the mirrors. 264
Vehicle care
Operation
251_AKB; 4; 52, en-US
d2ureepe,
Version: 2.11.8.1 2009-03-23T09:22:52+01:00 - Seite 264
Page 267 of 364
X
When taking the vehicle through an
automatic conveyor-type car wash:
Make sure the automatic transmission
remains in neutral position N. Observe
instructions, see “Remaining in neutral
position N” ( Y page 117).
When leaving the automatic car wash, make
sure the mirrors are folded out.
After running the vehicle through an
automatic car wash, wipe any wax off of the
windshield and the wiper blade inserts. This
will prevent smears and reduce wiping noise
which can be caused by residual wax on the
windshield.
Ornamental moldings X
For regular cleaning and care of ornamental
moldings, use a damp cloth.
! Do not use chrome cleaner on ornamental
moldings. Although ornamental moldings
may have chrome appearance, they could
be made of anodized aluminum that will be
damaged when cleaned with chrome
cleaner. Instead, use a damp cloth to clean
those ornamental moldings.
For very dirty ornamental moldings of
which you are sure are chrome-plated, use
a chrome cleaner. If in doubt whether an
ornamental molding is chrome-plated,
contact an authorized Mercedes-Benz
Center.
Headlamps, brake lamps, tail lamps,
side markers, turn signal lenses X
Use a mild vehicle wash detergent, such as
Mercedes-Benz approved Car Shampoo,
with plenty of water.
! Only use window cleaning solutions that
are suitable for plastic lamp lenses.
Window cleaning solutions which are not
suitable may damage the plastic lamp
lenses of the headlamps. Therefore, do not
use abrasives, solvents or cleaners that
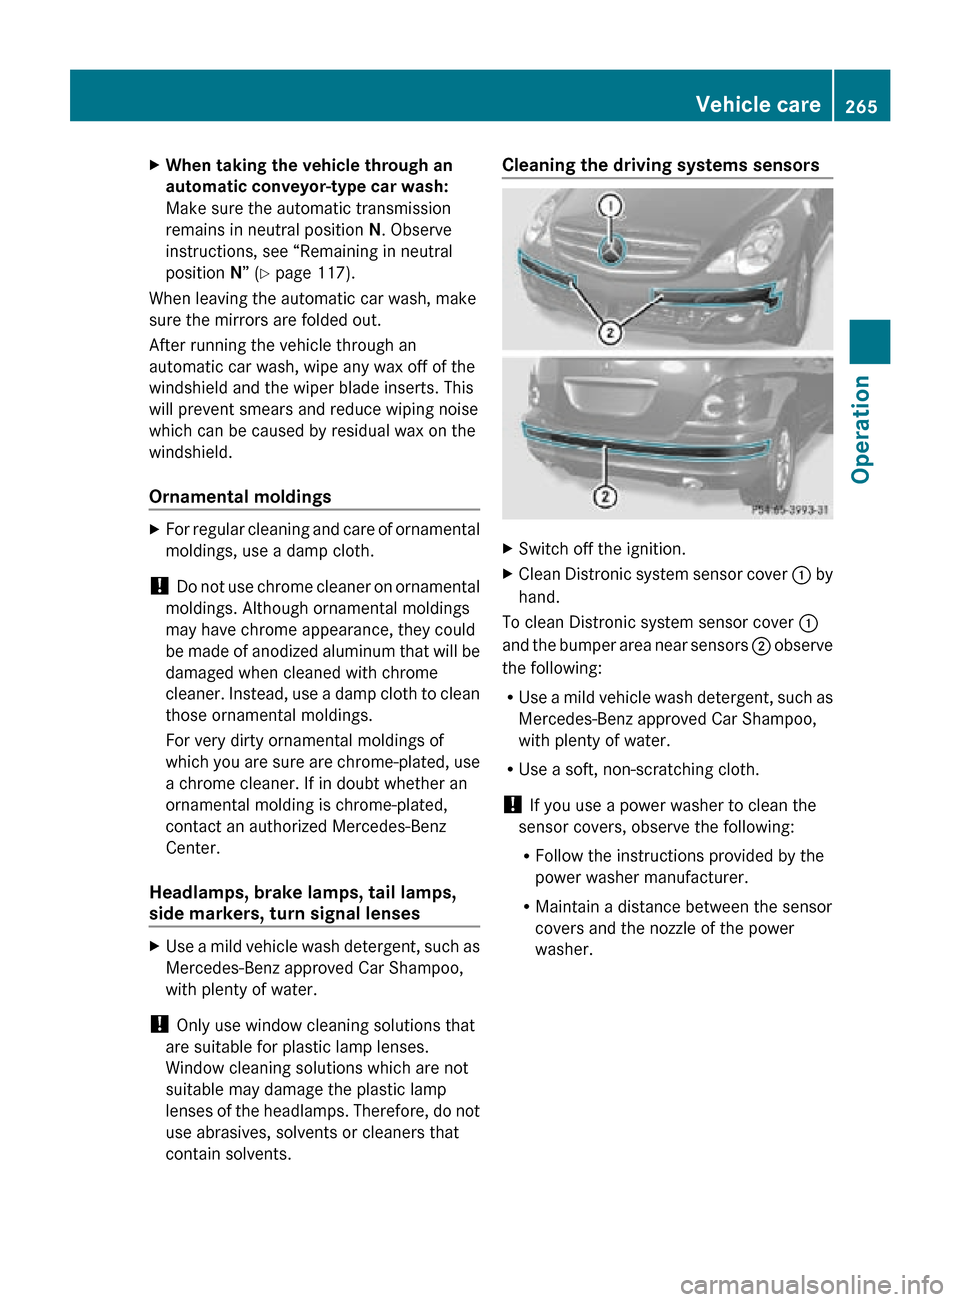
contain solvents. Cleaning the driving systems sensors
X
Switch off the ignition.
X Clean Distronic system sensor cover : by
hand.
To clean Distronic system sensor cover :
and the bumper area near sensors ; observe
the following:
R Use a mild vehicle wash detergent, such as
Mercedes-Benz approved Car Shampoo,
with plenty of water.
R Use a soft, non-scratching cloth.
! If you use a power washer to clean the
sensor covers, observe the following:
R Follow the instructions provided by the
power washer manufacturer.
R Maintain a distance between the sensor
covers and the nozzle of the power
washer. Vehicle care
265Operation
251_AKB; 4; 52, en-US
d2ureepe, Version: 2.11.8.1 2009-03-23T09:22:52+01:00 - Seite 265 Z
Page 283 of 364
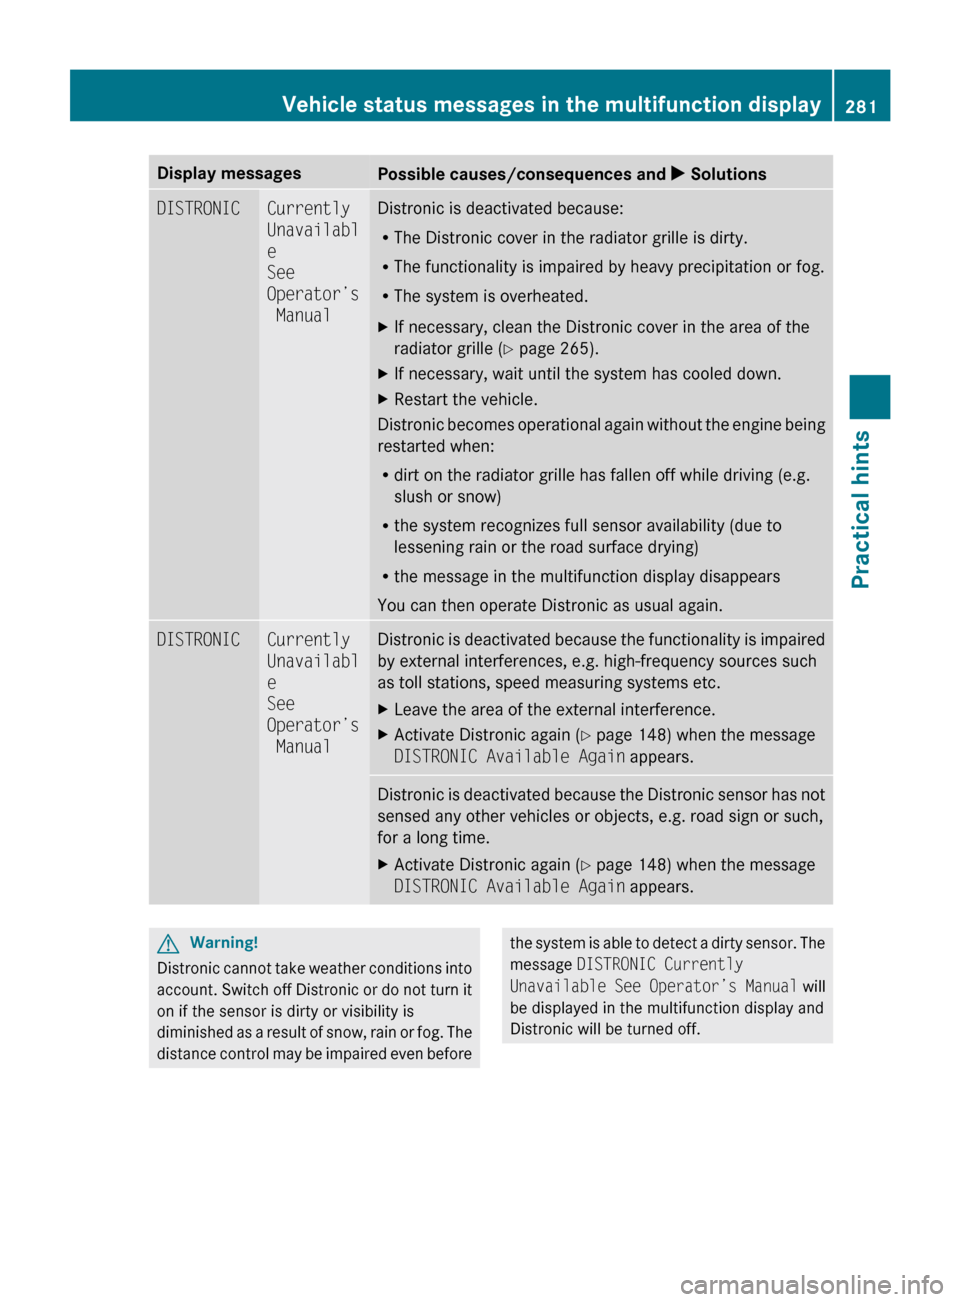
Display messages
Possible causes/consequences and
X SolutionsDISTRONIC Currently
Unavailabl
e
See
Operator’s
Manual Distronic is deactivated because:
R
The Distronic cover in the radiator grille is dirty.
R The functionality is impaired by heavy precipitation or fog.
R The system is overheated.
X If necessary, clean the Distronic cover in the area of the
radiator grille
(Y page 265).
X If necessary, wait until the system has cooled down.
X Restart the vehicle.
Distronic becomes operational again without the engine being
restarted when:
R dirt on the radiator grille has fallen off while driving (e.g.
slush or snow)
R the system recognizes full sensor availability (due to
lessening rain or the road surface drying)
R the message in the multifunction display disappears
You can then operate Distronic as usual again. DISTRONIC Currently
Unavailabl
e
See
Operator’s
Manual Distronic is deactivated because the functionality is impaired
by external interferences, e.g. high-frequency sources such
as toll stations, speed measuring systems etc.
X
Leave the area of the external interference.
X Activate Distronic again (Y page 148) when the message
DISTRONIC Available Again appears. Distronic is deactivated because the Distronic sensor has not
sensed any other vehicles or objects, e.g. road sign or such,
for a long time.
X
Activate Distronic again (Y page 148) when the message
DISTRONIC Available Again appears. G
Warning!
Distronic cannot take weather conditions into
account.
Switch off Distronic or do not turn it
on if the sensor is dirty or visibility is
diminished as a result of snow, rain or fog. The
distance control may be impaired even before the system is able to detect a dirty sensor. The
message
DISTRONIC Currently
Unavailable
See Operator’s Manual will
be displayed in the multifunction display and
Distronic will be turned off. Vehicle status messages in the multifunction display
281
Practical hints
251_AKB; 4; 52, en-US
d2ureepe,Version: 2.11.8.1 2009-03-23T09:22:52+01:00 - Seite 281 Z
Page 285 of 364
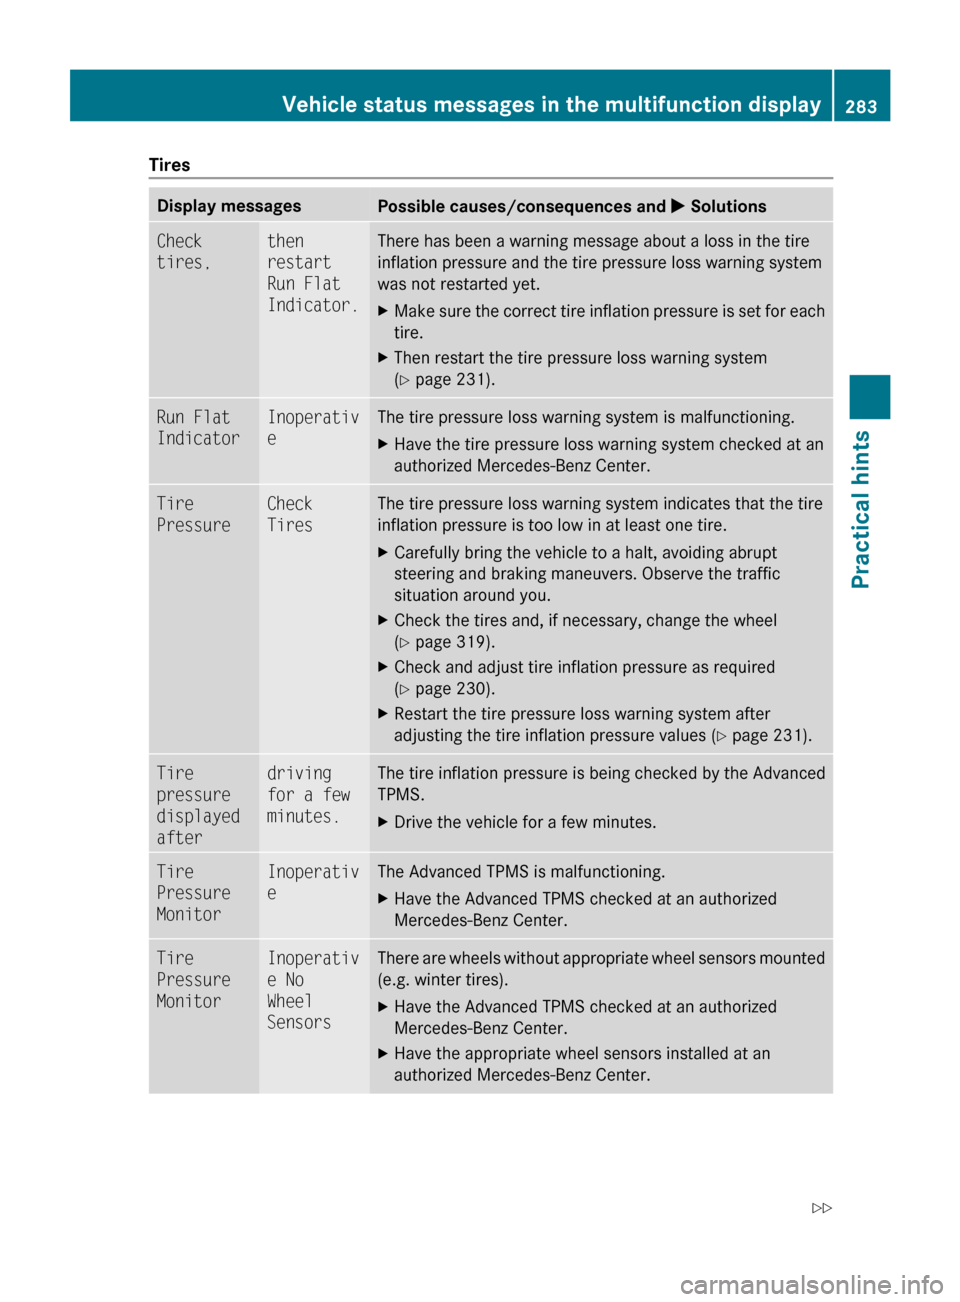
Tires
Display messages
Possible causes/consequences and
X SolutionsCheck
tires, then
restart
Run Flat
Indicator. There has been a warning message about a loss in the tire
inflation pressure and the tire pressure loss warning system
was not restarted yet.
X
Make sure the correct tire inflation pressure is set for each
tire.
X Then restart the tire pressure loss warning system
(Y page 231). Run Flat
Indicator Inoperativ
e The tire pressure loss warning system is malfunctioning.
X
Have the tire pressure loss warning system checked at an
authorized Mercedes-Benz Center. Tire
Pressure Check
Tires The tire pressure loss warning system indicates that the tire
inflation pressure is too low in at least one tire.
X
Carefully bring the vehicle to a halt, avoiding abrupt
steering and braking maneuvers. Observe the traffic
situation around you.
X Check the tires and, if necessary, change the wheel
(Y page 319).
X Check and adjust tire inflation pressure as required
(Y page 230).
X Restart the tire pressure loss warning system after
adjusting the tire inflation pressure values
(Y page 231). Tire
pressure
displayed
after driving
for a few
minutes. The tire inflation pressure is being checked by the Advanced
TPMS.
X
Drive the vehicle for a few minutes. Tire
Pressure
Monitor Inoperativ
e The Advanced TPMS is malfunctioning.
X
Have the Advanced TPMS checked at an authorized
Mercedes-Benz Center. Tire
Pressure
Monitor Inoperativ
e No
Wheel
Sensors There are wheels without appropriate wheel sensors mounted
(e.g. winter tires).
X
Have the Advanced TPMS checked at an authorized
Mercedes-Benz Center.
X Have the appropriate wheel sensors installed at an
authorized Mercedes-Benz Center. Vehicle status messages in the multifunction display
283
Practical hints
251_AKB; 4; 52, en-US
d2ureepe,Version: 2.11.8.1 2009-03-23T09:22:52+01:00 - Seite 283 Z
Page 286 of 364
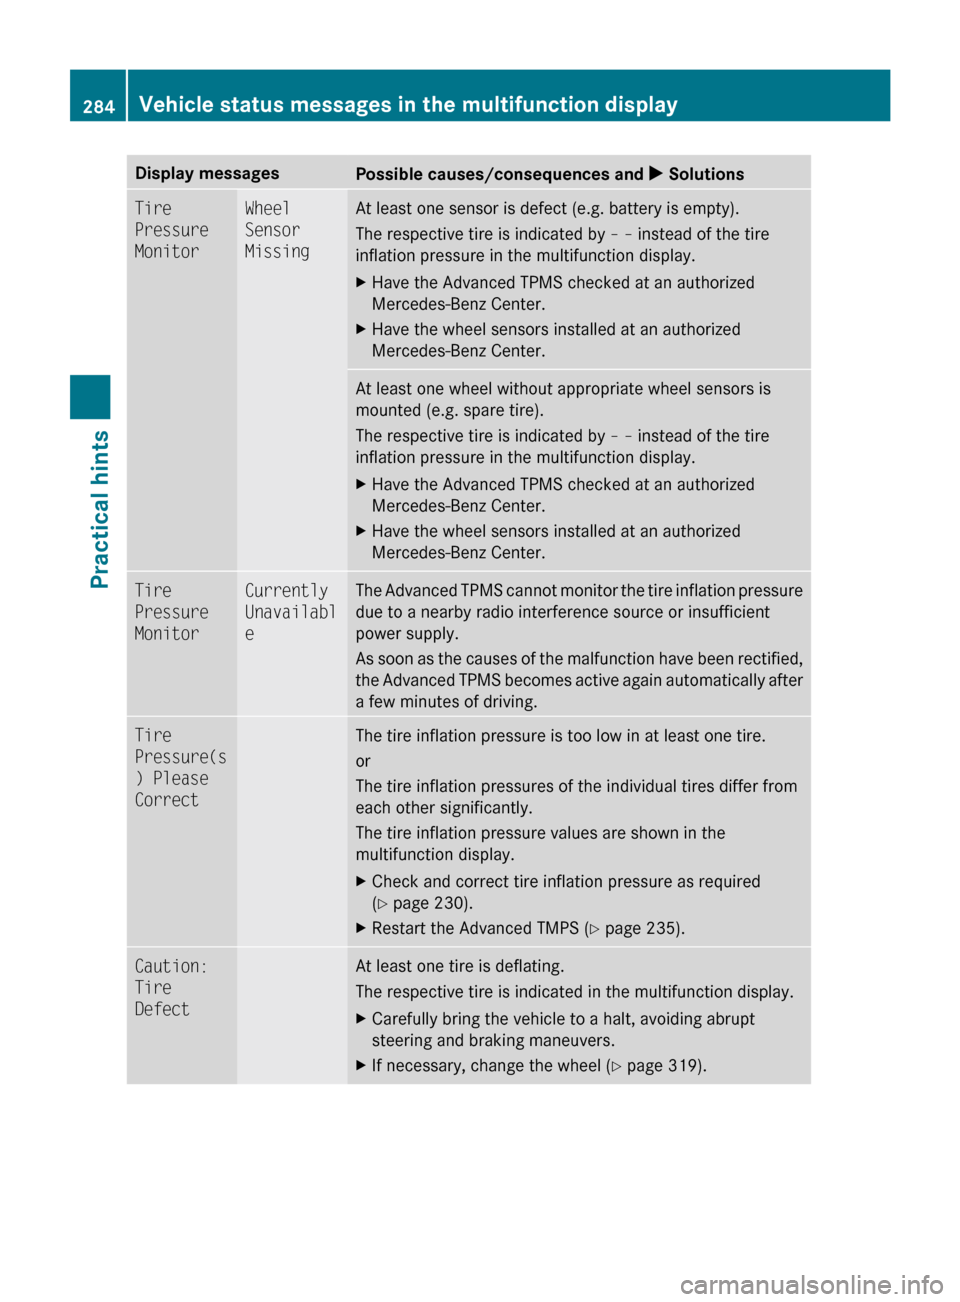
Display messages
Possible causes/consequences and
X SolutionsTire
Pressure
Monitor Wheel
Sensor
Missing At least one sensor is defect (e.g. battery is empty).
The respective tire is indicated by
– – instead of the tire
inflation pressure in the multifunction display.
X Have the Advanced TPMS checked at an authorized
Mercedes-Benz Center.
X Have the wheel sensors installed at an authorized
Mercedes-Benz Center. At least one wheel without appropriate wheel sensors is
mounted (e.g. spare tire).
The respective tire is indicated by
– – instead of the tire
inflation pressure in the multifunction display.
X Have the Advanced TPMS checked at an authorized
Mercedes-Benz Center.
X Have the wheel sensors installed at an authorized
Mercedes-Benz Center. Tire
Pressure
Monitor Currently
Unavailabl
e The Advanced TPMS cannot monitor the tire inflation pressure
due to a nearby radio interference source or insufficient
power supply.
As
soon as the causes of the malfunction have been rectified,
the Advanced TPMS becomes active again automatically after
a few minutes of driving. Tire
Pressure(s
) Please
Correct The tire inflation pressure is too low in at least one tire.
or
The tire inflation pressures of the individual tires differ from
each other significantly.
The tire inflation pressure values are shown in the
multifunction display.
X
Check and correct tire inflation pressure as required
(Y page 230).
X Restart the Advanced TMPS ( Y page 235).Caution:
Tire
Defect At least one tire is deflating.
The respective tire is indicated in the multifunction display.
X
Carefully bring the vehicle to a halt, avoiding abrupt
steering and braking maneuvers.
X If necessary, change the wheel (Y page 319). 284
Vehicle status messages in the multifunction displayPractical hints
251_AKB; 4; 52, en-US
d2ureepe,
Version: 2.11.8.1 2009-03-23T09:22:52+01:00 - Seite 284
Page 298 of 364
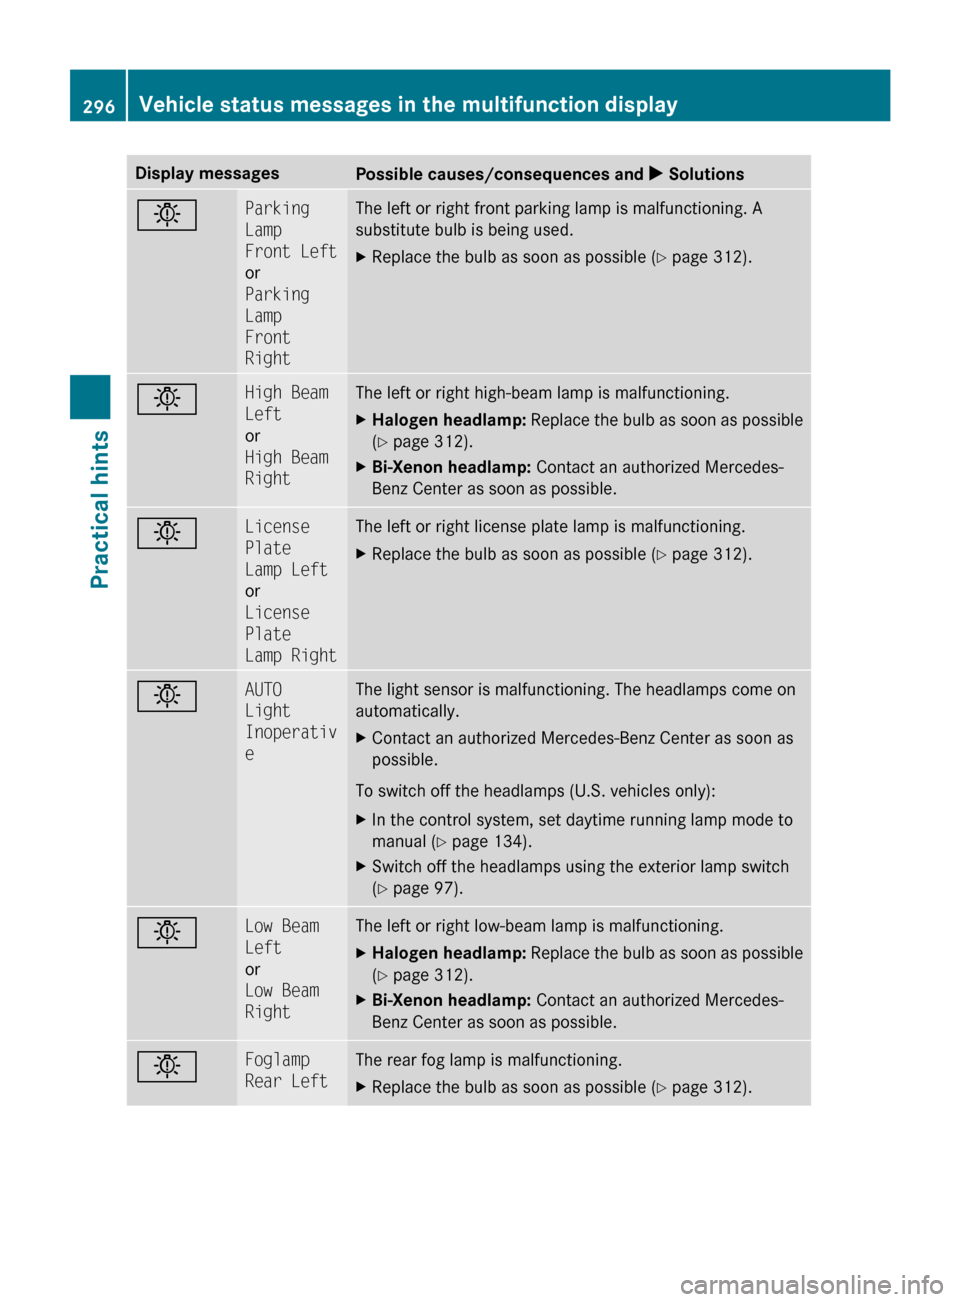
Display messages
Possible causes/consequences and
X Solutionsb Parking
Lamp
Front Left
or
Parking
Lamp
Front
Right The left or right front parking lamp is malfunctioning. A
substitute bulb is being used.
X
Replace the bulb as soon as possible (Y page 312). b High Beam
Left
or
High Beam
Right The left or right high-beam lamp is malfunctioning.
X
Halogen headlamp: Replace the bulb as soon as possible
(Y page 312).
X Bi-Xenon headlamp: Contact an authorized Mercedes-
Benz Center as soon as possible. b License
Plate
Lamp Left
or
License
Plate
Lamp Right The left or right license plate lamp is malfunctioning.
X
Replace the bulb as soon as possible (Y page 312). b AUTO
Light
Inoperativ
e The light sensor is malfunctioning. The headlamps come on
automatically.
X
Contact an authorized Mercedes-Benz Center as soon as
possible.
To switch off the headlamps (U.S. vehicles only):
X In the control system, set daytime running lamp mode to
manual
(Y page 134).
X Switch off the headlamps using the exterior lamp switch
(Y page 97). b Low Beam
Left
or
Low Beam
Right The left or right low-beam lamp is malfunctioning.
X
Halogen headlamp:
Replace the bulb as soon as possible
(Y page 312).
X Bi-Xenon headlamp: Contact an authorized Mercedes-
Benz Center as soon as possible. b Foglamp
Rear Left The rear fog lamp is malfunctioning.
X
Replace the bulb as soon as possible (Y page 312). 296
Vehicle status messages in the multifunction display
Practical hints
251_AKB; 4; 52, en-US
d2ureepe,
Version: 2.11.8.1 2009-03-23T09:22:52+01:00 - Seite 296