navigation MERCEDES-BENZ S-Class 2001 W220 Comand Manual
[x] Cancel search | Manufacturer: MERCEDES-BENZ, Model Year: 2001, Model line: S-Class, Model: MERCEDES-BENZ S-Class 2001 W220Pages: 243, PDF Size: 2.33 MB
Page 211 of 243
209
Audio
Telephone
Navigation
Index
IntroductionInfo Services and
system settings Destination memorySaving the current vehicle location in the
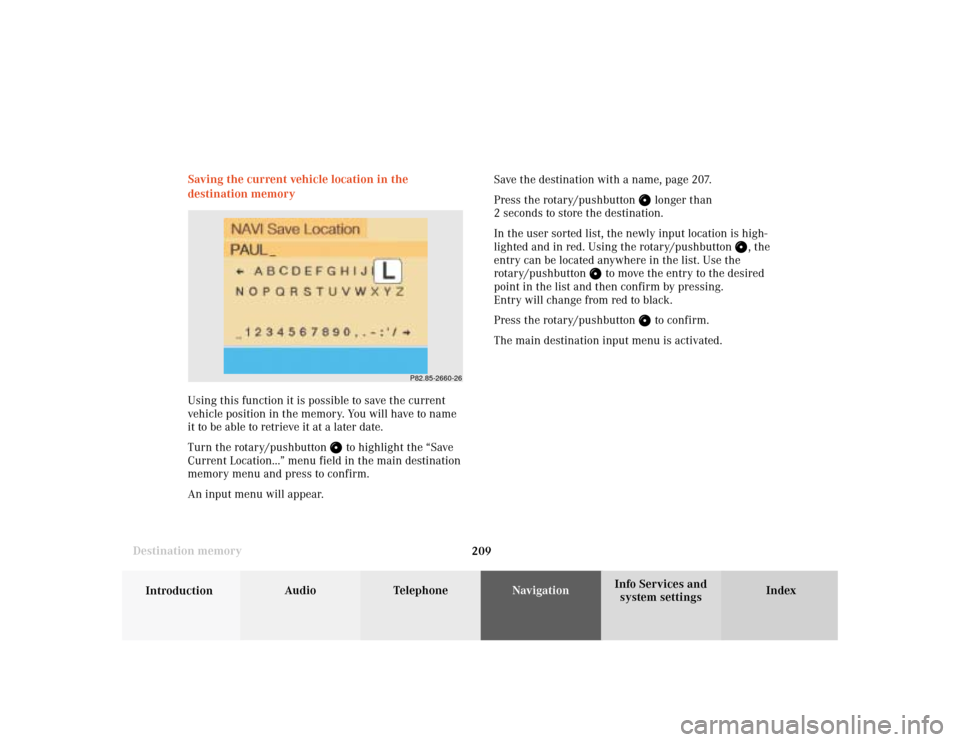
destination memory
Using this function it is possible to save the current
vehicle position in the memory. You will have to name
it to be able to retrieve it at a later date.
Turn the rotary/pushbutton
to highlight the “Save
Current Location...” menu field in the main destination
memory menu and press to confirm.
An input menu will appear.Save the destination with a name, page 207.
Press the rotary/pushbutton
longer than
2 seconds to store the destination.
In the user sorted list, the newly input location is high-
lighted and in red. Using the rotary/pushbutton
, the
entry can be located anywhere in the list. Use the
rotary/pushbutton
to move the entry to the desired
point in the list and then confirm by pressing.
Entry will change from red to black.
Press the rotary/pushbutton
to confirm.
The main destination input menu is activated.
P82.85-2660-26
Page 212 of 243
210
Audio TelephoneNavigation
Index IntroductionInfo Services and
system settings
Destination memory
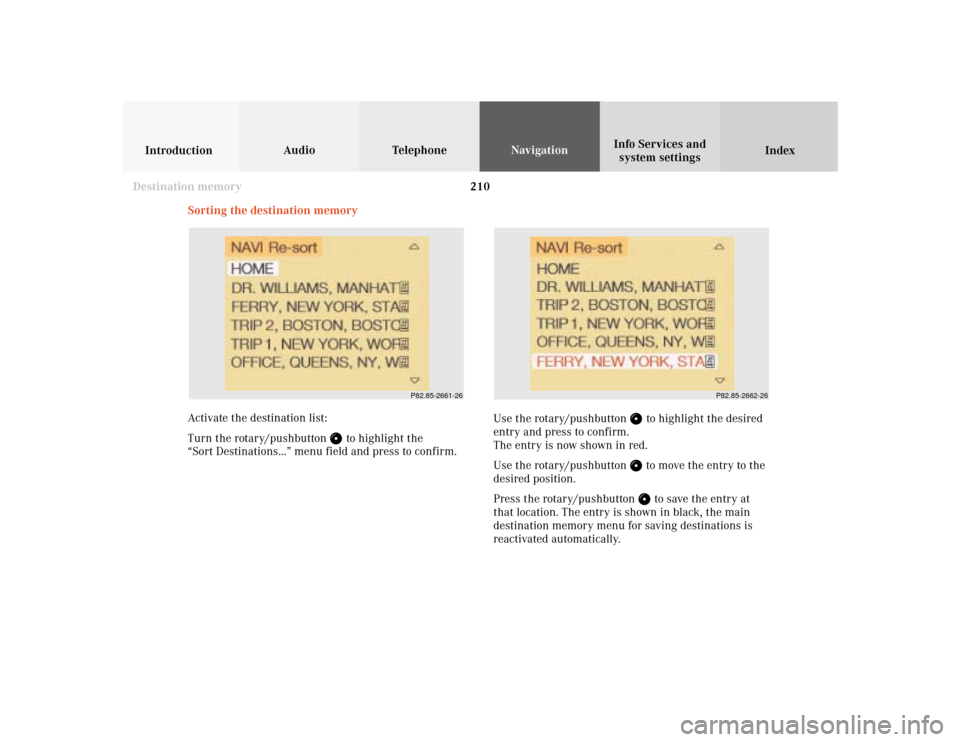
Sorting the destination memory
Activate the destination list:
Turn the rotary/pushbutton
to highlight the
“Sort Destinations...” menu field and press to confirm.Use the rotary/pushbutton
to highlight the desired
entry and press to confirm.
The entry is now shown in red.
Use the rotary/pushbutton to move the entry to the
desired position.
Press the rotary/pushbutton to save the entry at
that location. The entry is shown in black, the main
destination memory menu for saving destinations is
reactivated automatically.
P82.85-2661-26
P82.85-2662-26
Page 213 of 243
211
Audio
Telephone
Navigation
Index
IntroductionInfo Services and
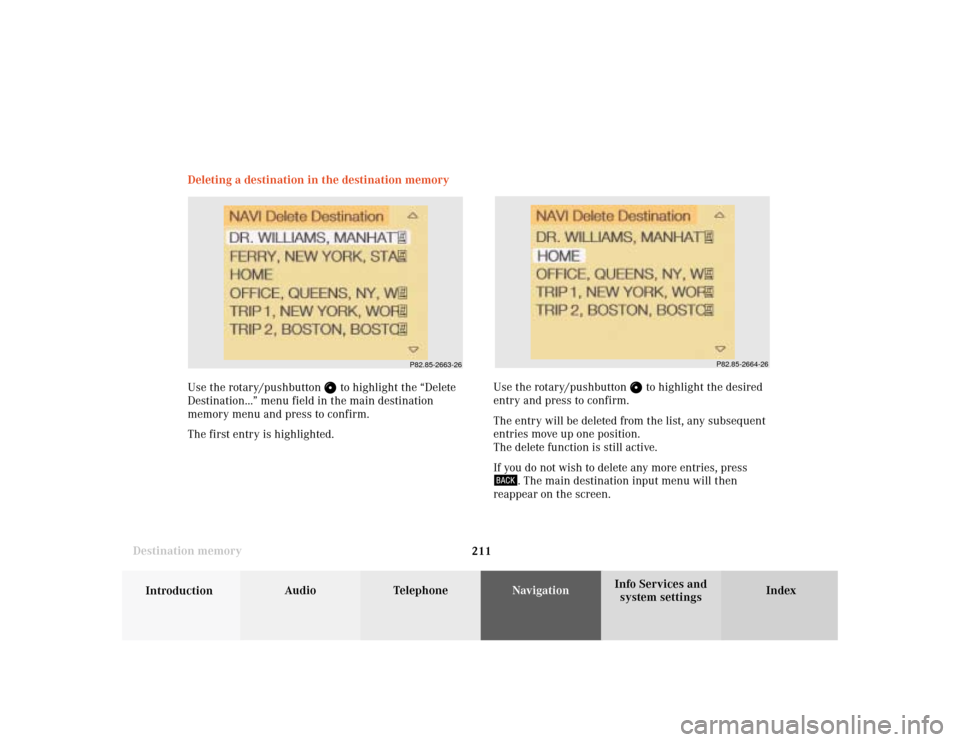
system settings Destination memoryUse the rotary/pushbutton
to highlight the desired
entry and press to confirm.
The entry will be deleted from the list, any subsequent
entries move up one position.
The delete function is still active.
If you do not wish to delete any more entries, press
. The main destination input menu will then
reappear on the screen. Deleting a destination in the destination memory
Use the rotary/pushbutton
to highlight the “Delete
Destination...” menu field in the main destination
memory menu and press to confirm.
The first entry is highlighted.
P82.85-2663-26
P82.85-2664-26
Page 214 of 243
212
Audio TelephoneNavigation
Index IntroductionInfo Services and
system settings
Destination memory
P82.85-2667-26
Entering the vehicle position
It is only necessary to enter the vehicle position when
the system is not able to position itself automatically
with the GPS.
It is only possible to enter the vehicle position in
connection with a crossroad.
Use the rotary/pushbutton
to highlight the menu
field “Settings” in the main destination input menu and
confirm by pressing.
In the “Settings” menu (page 213) use the rotary/
pushbutton
to select the menu field “Location...”.
This activates the menu for entering the location.
Now enter the city/suburb and street in the menu and
select the required entries from the respective lists.
See page 153 for how to enter a destination address.
After you have selected the street, you will see a
prompt for the intersection. Highlight the appropriate
cross street with the rotary/pushbutton
and confirm
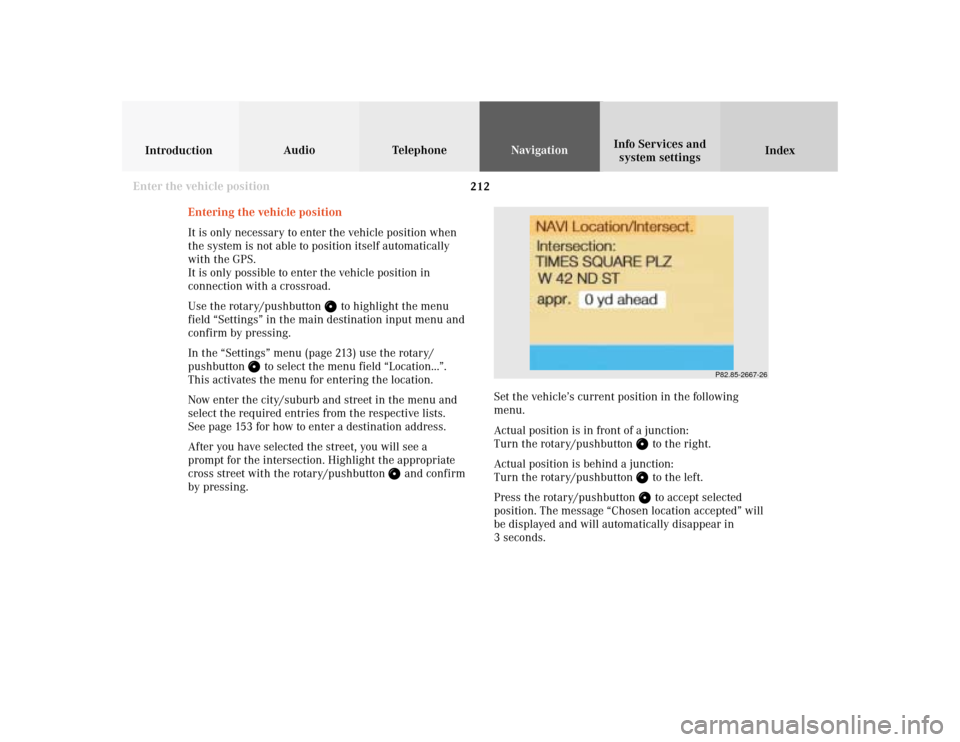
by pressing.Set the vehicle’s current position in the following
menu.
Actual position is in front of a junction:
Turn the rotary/pushbutton
to the right.
Actual position is behind a junction:
Turn the rotary/pushbutton to the left.
Press the rotary/pushbutton to accept selected
position. The message “Chosen location accepted” will
be displayed and will automatically disappear in
3 seconds.
Enter the vehicle position
Page 215 of 243
213
Audio
Telephone
Navigation
Index
IntroductionInfo Services and
system settings Destination memory
CalibrationCalibration
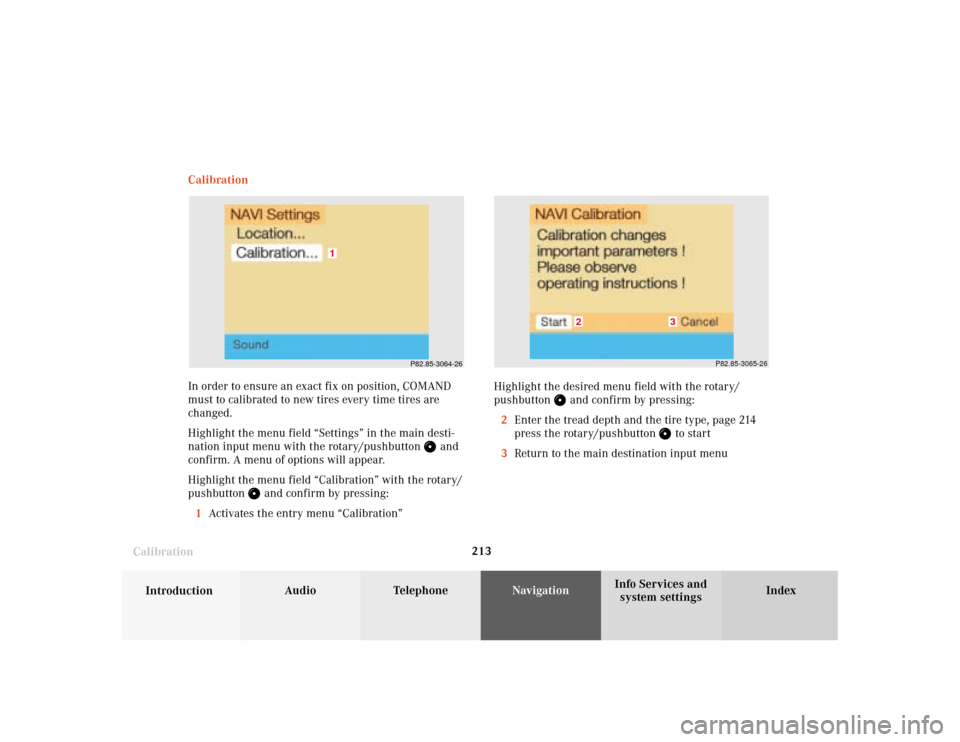
In order to ensure an exact fix on position, COMAND
must to calibrated to new tires every time tires are
changed.
Highlight the menu field “Settings” in the main desti-
nation input menu with the rotary/pushbutton
and
confirm. A menu of options will appear.
Highlight the menu field “Calibration” with the rotary/
pushbutton
and confirm by pressing:
1Activates the entry menu “Calibration”
P82.85-3064-26
1
P82.85-3065-26
3
2
Highlight the desired menu field with the rotary/
pushbutton
and confirm by pressing:
2Enter the tread depth and the tire type, page 214
press the rotary/pushbutton
to start
3Return to the main destination input menu
Page 216 of 243
214
Audio TelephoneNavigation
Index IntroductionInfo Services and
system settings
Destination memory
P82.85-2671-26
P82.85-3066-26
45
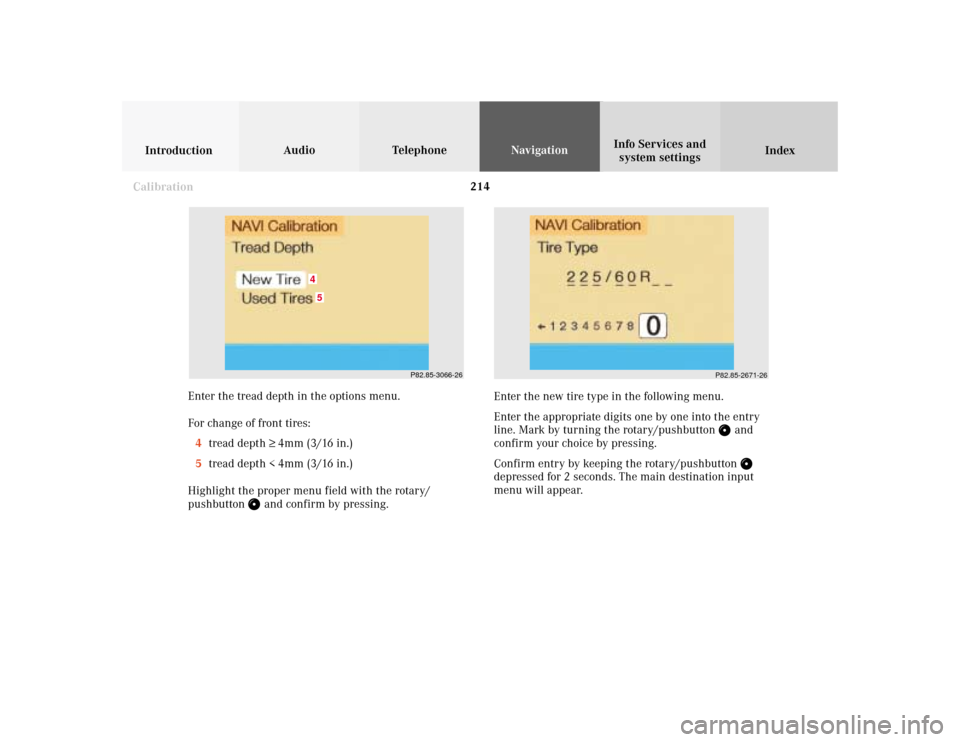
Enter the tread depth in the options menu.
For change of front tires:
4tread depth ≥ 4mm (3/16 in.)
5tread depth < 4mm (3/16 in.)
Highlight the proper menu field with the rotary/
pushbutton
and confirm by pressing.Enter the new tire type in the following menu.
Enter the appropriate digits one by one into the entry
line. Mark by turning the rotary/pushbutton
and
confirm your choice by pressing.
Confirm entry by keeping the rotary/pushbutton
depressed for 2 seconds. The main destination input
menu will appear.
Calibration
Page 218 of 243
216 System settings
Audio Introduction
Telephone Navigation IndexInfo Services and
system settings
Service
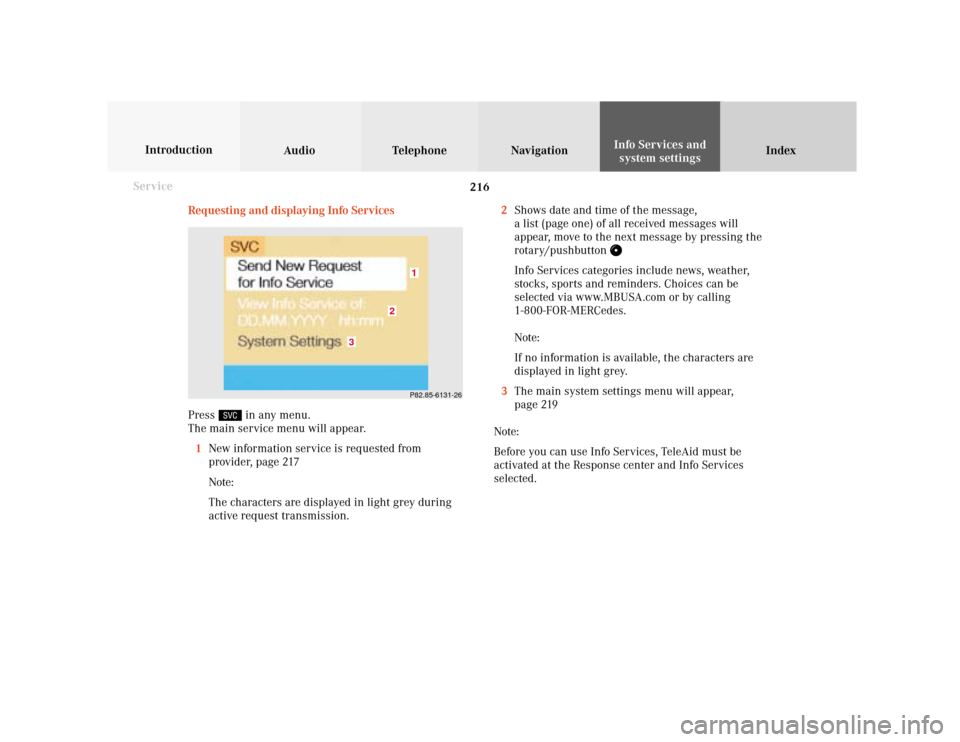
Requesting and displaying Info Services
Press
in any menu.
The main service menu will appear.
1New information service is requested from
provider, page 217
Note:
The characters are displayed in light grey during
active request transmission.2Shows date and time of the message,
a list (page one) of all received messages will
appear, move to the next message by pressing the
rotary/pushbutton
Info Services categories include news, weather,
stocks, sports and reminders. Choices can be
selected via www.MBUSA.com or by calling
1-800-FOR-MERCedes.
Note:
If no information is available, the characters are
displayed in light grey.
3The main system settings menu will appear,
page 219
Note:
Before you can use Info Services, TeleAid must be
activated at the Response center and Info Services
selected.
P82.85-6131-26
3
2
1
Page 219 of 243
System settings
Introduction Audio
Telephone NavigationIndex Info Services and
system settings 217
ServiceNote on (4):
In the following situations it is not possible to make a
request and the following messages appear:
• “Data Connection Cannot be Established” — request
has failed because Response Center cannot be
accessed
• “No Cellular Connection Available” — vehicle may
be in a cellular weak signal area
• “Cellular System Busy” — request has failed
because cellular system is busy, try again later
• “Data transmission failure” — request has failed
because a data transfer error has occured, try again
• “Tele Aid Call in Progress!” — request has failed
because SOS or Roadside call is in progress.
• “Tele Aid. Please visit workshop” - a hardware error
has been detected. Contact M-B Center.
• “To subscribe to information services dial
phone number” – you have not yet subscribed to
service
• “No information available at this time. Press SVC
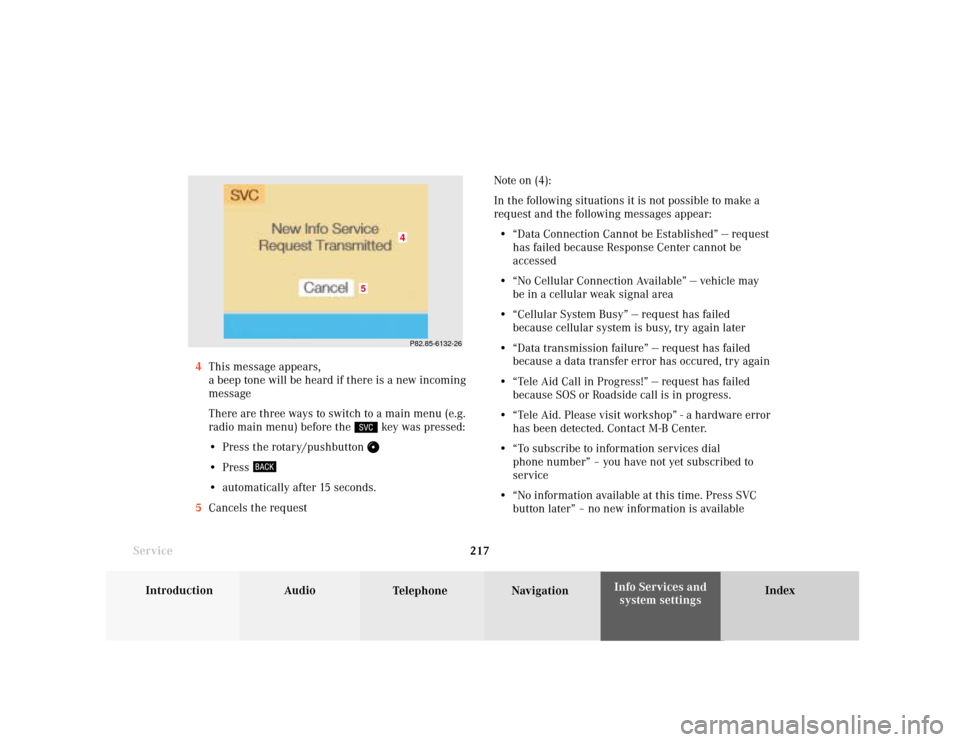
button later” – no new information is available 4This message appears,
a beep tone will be heard if there is a new incoming
message
There are three ways to switch to a main menu (e.g.
radio main menu) before the
key was pressed:
• Press the rotary/pushbutton
• Press • automatically after 15 seconds.
5Cancels the request
P82.85-6132-26
5
4
Page 220 of 243
218 System settings
Audio Introduction
Telephone Navigation IndexInfo Services and
system settings
Service
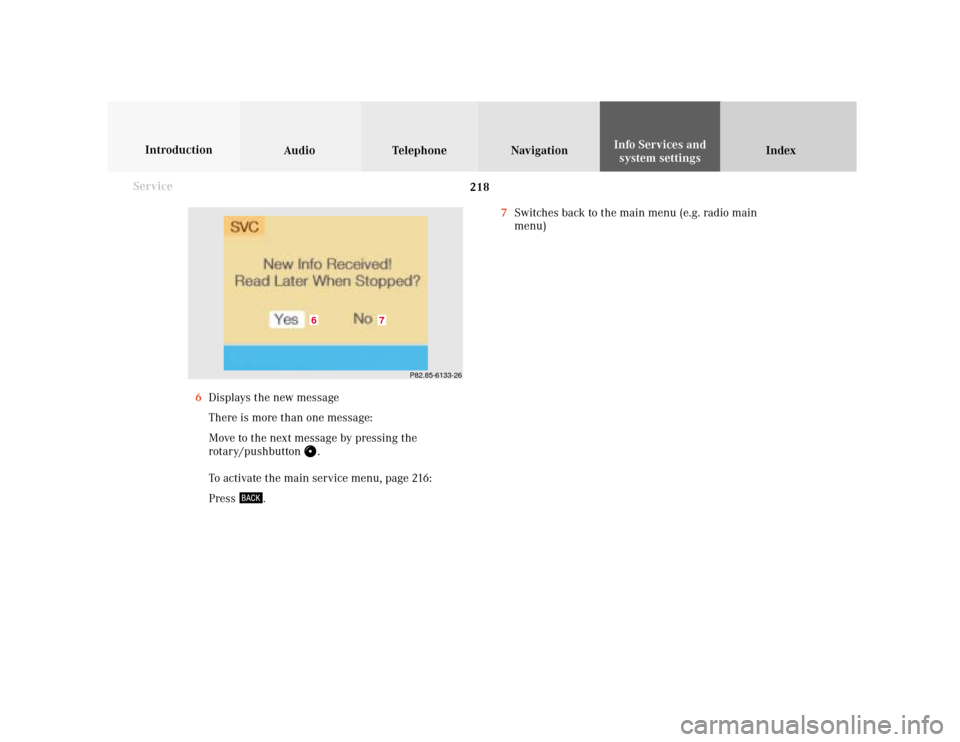
7Switches back to the main menu (e.g. radio main
menu)
6Displays the new message
There is more than one message:
Move to the next message by pressing the
rotary/pushbutton
.
To activate the main service menu, page 216:
Press
.
P82.85-6133-26
7
6
Page 221 of 243
System settings
Introduction Audio
Telephone NavigationIndex Info Services and
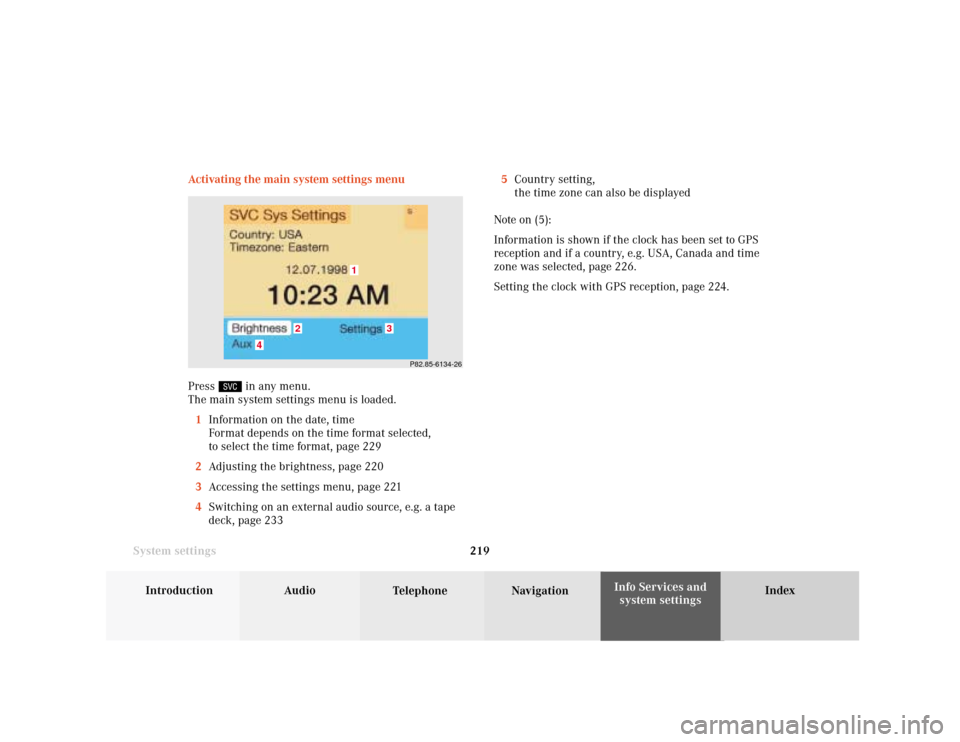
system settings 219 Activating the main system settings menu
Press
in any menu.
The main system settings menu is loaded.
1Information on the date, time
Format depends on the time format selected,
to select the time format, page 229
2Adjusting the brightness, page 220
3Accessing the settings menu, page 221
4Switching on an external audio source, e.g. a tape
deck, page 2335Country setting,
the time zone can also be displayed
Note on (5):
Information is shown if the clock has been set to GPS
reception and if a country, e.g. USA, Canada and time
zone was selected, page 226.
Setting the clock with GPS reception, page 224.
P82.85-6134-26
4
3
1
2