Head Rest MERCEDES-BENZ S-Class 2011 W221 Owner's Guide
[x] Cancel search | Manufacturer: MERCEDES-BENZ, Model Year: 2011, Model line: S-Class, Model: MERCEDES-BENZ S-Class 2011 W221Pages: 524, PDF Size: 22.53 MB
Page 104 of 524
Do not drive the vehicle without the seat head
restraints. Head restraints are intended to
help reduce injuries during an accident.
! To avoid damage to the seats and the seat
heating, observe the following information:
Rdo not spill any liquids on the seats. If
liquid is spilled on the seats, dry them as
soon as possible.
Rif the seat covers are damp or wet, do not
switch on the seat heating. The seat
heating should also not to be used to dry
the seats.
Rclean the seat covers as recommended;
see the "Interior care" section.
Rdo not transport heavy loads on the
seats. Do not place sharp objects on the
seat cushions, e.g. knives, nails or tools.
The seats should only be occupied by
passengers, if possible.
Rwhen the seat heating is in operation, do
not cover the seats with insulating
materials, e.g. blankets, coats, bags,
seat covers, child seats or booster seats.
! When you move the seats, make sure that
there are no objects in the footwell or
behind the seats. Otherwise, you could
damage the seats and the objects.
iThe head restraints in the front seats are
installed with the NECK-PRO system. For
this reason, it is not possible to remove the
head restraints from the front seats.
For design reasons, the rear-compartment
head restraints cannot be removed.
Please contact an authorized Mercedes-
Benz Center for more information.
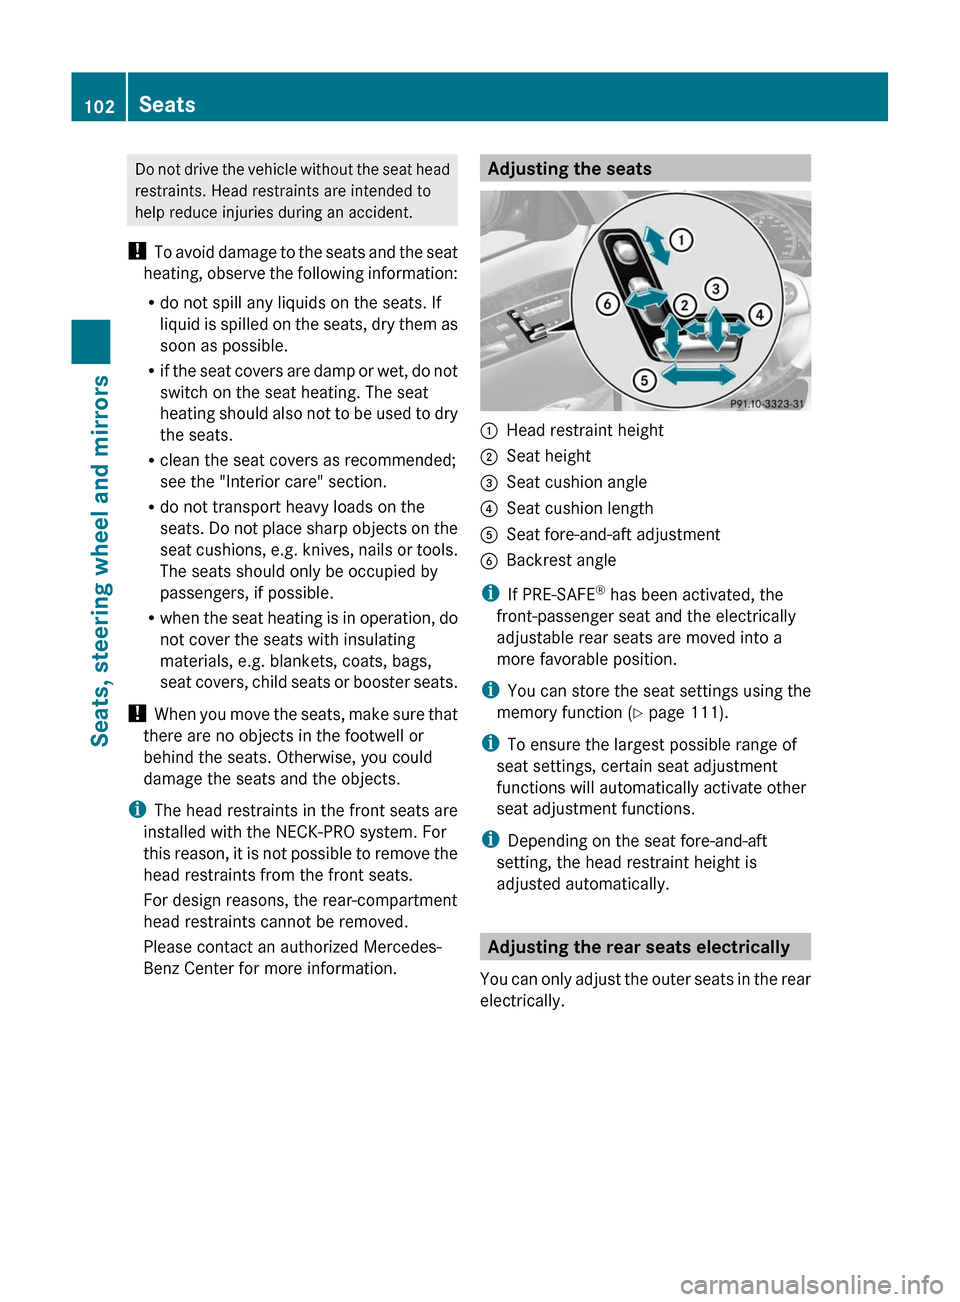
Adjusting the seats:Head restraint height;Seat height=Seat cushion angle?Seat cushion lengthASeat fore-and-aft adjustmentBBackrest angle
iIf PRE-SAFE® has been activated, the
front-passenger seat and the electrically
adjustable rear seats are moved into a
more favorable position.
iYou can store the seat settings using the
memory function (Y page 111).
iTo ensure the largest possible range of
seat settings, certain seat adjustment
functions will automatically activate other
seat adjustment functions.
iDepending on the seat fore-and-aft
setting, the head restraint height is
adjusted automatically.
Adjusting the rear seats electrically
You can only adjust the outer seats in the rear
electrically.
102SeatsSeats, steering wheel and mirrors
Page 105 of 524
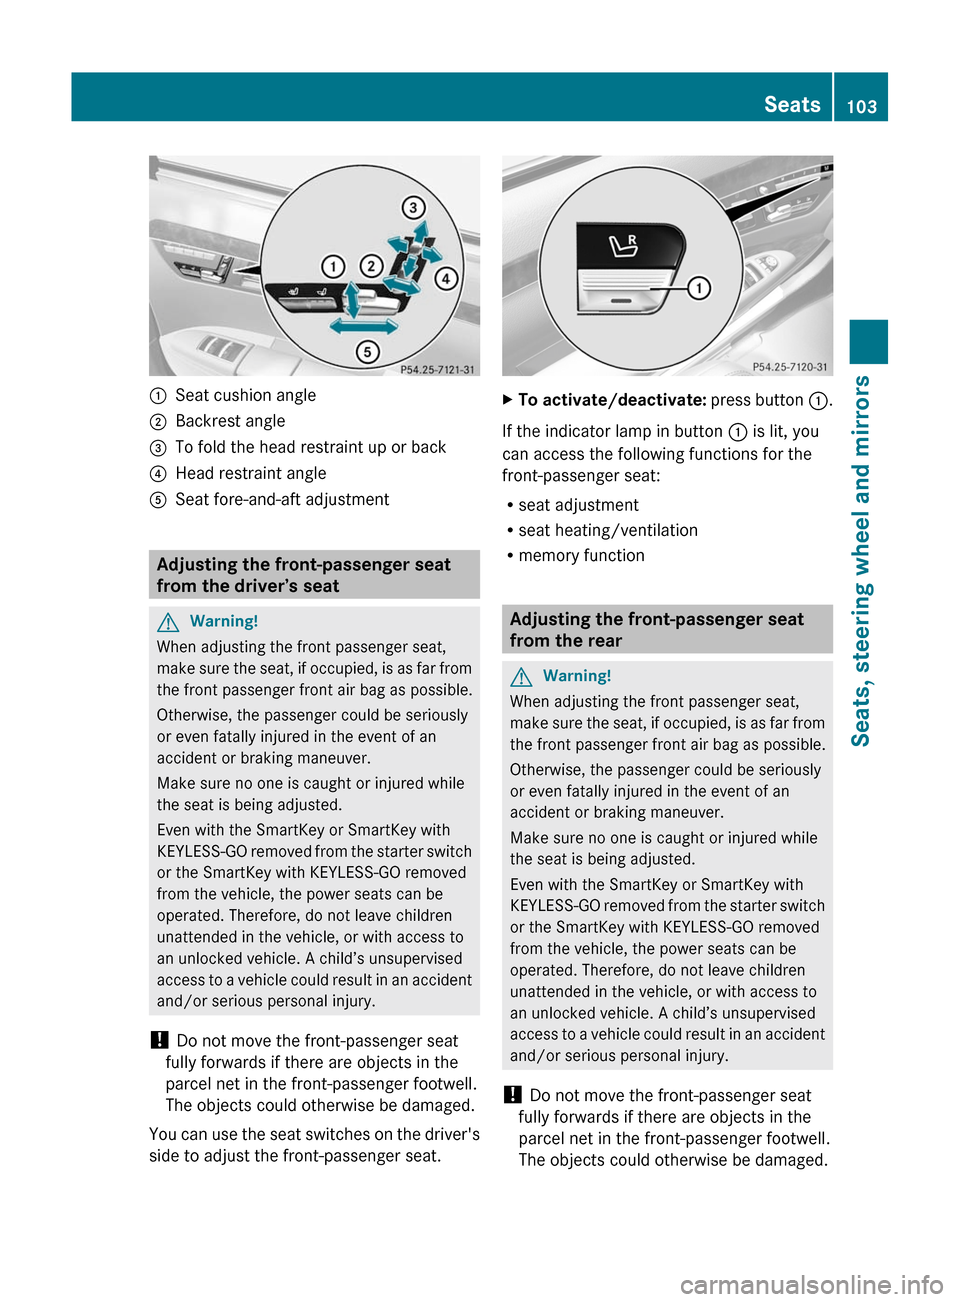
:Seat cushion angle;Backrest angle=To fold the head restraint up or back?Head restraint angleASeat fore-and-aft adjustment
Adjusting the front-passenger seat
from the driver’s seat
GWarning!
When adjusting the front passenger seat,
make sure the seat, if occupied, is as far from
the front passenger front air bag as possible.
Otherwise, the passenger could be seriously
or even fatally injured in the event of an
accident or braking maneuver.
Make sure no one is caught or injured while
the seat is being adjusted.
Even with the SmartKey or SmartKey with
KEYLESS-GO removed from the starter switch
or the SmartKey with KEYLESS-GO removed
from the vehicle, the power seats can be
operated. Therefore, do not leave children
unattended in the vehicle, or with access to
an unlocked vehicle. A child’s unsupervised
access to a vehicle could result in an accident
and/or serious personal injury.
! Do not move the front-passenger seat
fully forwards if there are objects in the
parcel net in the front-passenger footwell.
The objects could otherwise be damaged.
You can use the seat switches on the driver's
side to adjust the front-passenger seat.
XTo activate/deactivate: press button :.
If the indicator lamp in button : is lit, you
can access the following functions for the
front-passenger seat:
Rseat adjustment
Rseat heating/ventilation
Rmemory function
Adjusting the front-passenger seat
from the rear
GWarning!
When adjusting the front passenger seat,
make sure the seat, if occupied, is as far from
the front passenger front air bag as possible.
Otherwise, the passenger could be seriously
or even fatally injured in the event of an
accident or braking maneuver.
Make sure no one is caught or injured while
the seat is being adjusted.
Even with the SmartKey or SmartKey with
KEYLESS-GO removed from the starter switch
or the SmartKey with KEYLESS-GO removed
from the vehicle, the power seats can be
operated. Therefore, do not leave children
unattended in the vehicle, or with access to
an unlocked vehicle. A child’s unsupervised
access to a vehicle could result in an accident
and/or serious personal injury.
! Do not move the front-passenger seat
fully forwards if there are objects in the
parcel net in the front-passenger footwell.
The objects could otherwise be damaged.
Seats103Seats, steering wheel and mirrorsZ
Page 106 of 524
You can use the override button to disable
this function (Y page 65).
The button is located in the rear door on the
front-passenger side.
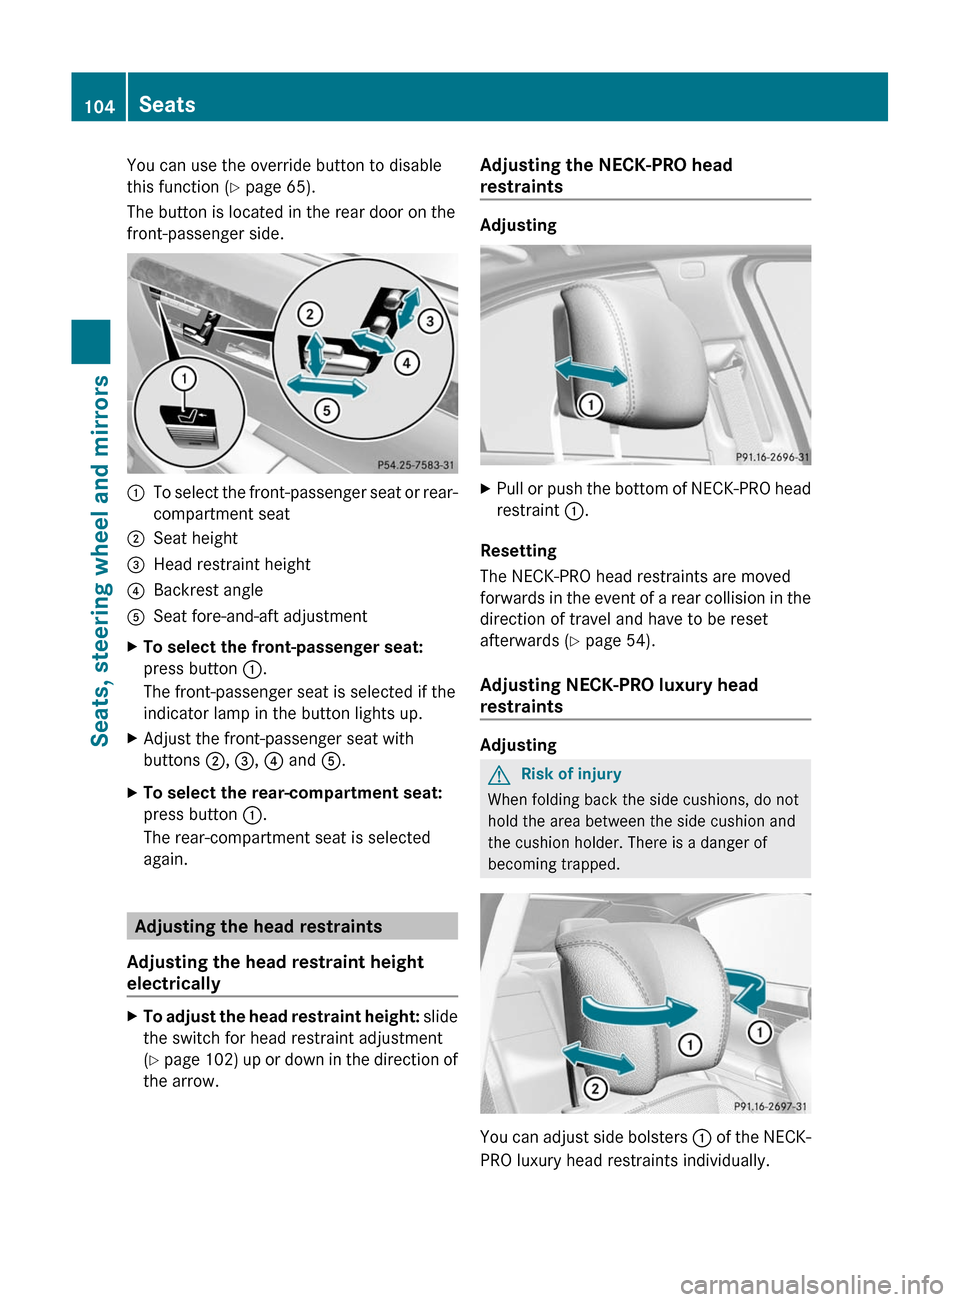
:To select the front-passenger seat or rear-
compartment seat
;Seat height=Head restraint height?Backrest angleASeat fore-and-aft adjustmentXTo select the front-passenger seat:
press button :.
The front-passenger seat is selected if the
indicator lamp in the button lights up.
XAdjust the front-passenger seat with
buttons ;, =, ? and A.
XTo select the rear-compartment seat:
press button :.
The rear-compartment seat is selected
again.
Adjusting the head restraints
Adjusting the head restraint height
electrically
XTo adjust the head restraint height: slide
the switch for head restraint adjustment
(Y page 102) up or down in the direction of
the arrow.
Adjusting the NECK-PRO head
restraints
Adjusting
XPull or push the bottom of NECK-PRO head
restraint :.
Resetting
The NECK-PRO head restraints are moved
forwards in the event of a rear collision in the
direction of travel and have to be reset
afterwards (Y page 54).
Adjusting NECK-PRO luxury head
restraints
Adjusting
GRisk of injury
When folding back the side cushions, do not
hold the area between the side cushion and
the cushion holder. There is a danger of
becoming trapped.
You can adjust side bolsters : of the NECK-
PRO luxury head restraints individually.
104SeatsSeats, steering wheel and mirrors
Page 107 of 524
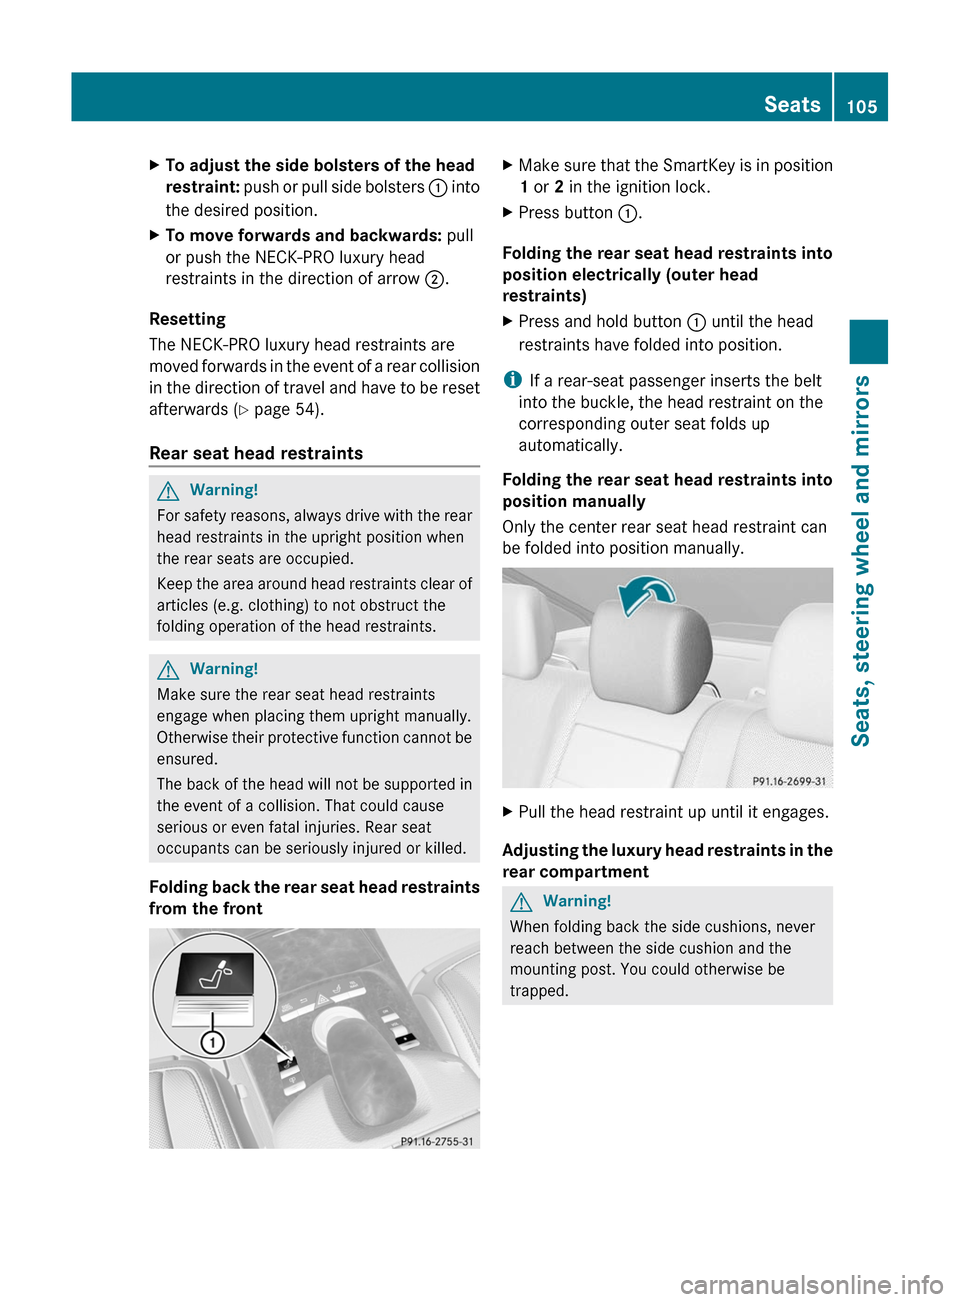
XTo adjust the side bolsters of the head
restraint: push or pull side bolsters : into
the desired position.
XTo move forwards and backwards: pull
or push the NECK-PRO luxury head
restraints in the direction of arrow ;.
Resetting
The NECK-PRO luxury head restraints are
moved forwards in the event of a rear collision
in the direction of travel and have to be reset
afterwards (Y page 54).
Rear seat head restraints
GWarning!
For safety reasons, always drive with the rear
head restraints in the upright position when
the rear seats are occupied.
Keep the area around head restraints clear of
articles (e.g. clothing) to not obstruct the
folding operation of the head restraints.
GWarning!
Make sure the rear seat head restraints
engage when placing them upright manually.
Otherwise their protective function cannot be
ensured.
The back of the head will not be supported in
the event of a collision. That could cause
serious or even fatal injuries. Rear seat
occupants can be seriously injured or killed.
Folding back the rear seat head restraints
from the front
XMake sure that the SmartKey is in position
1 or 2 in the ignition lock.
XPress button :.
Folding the rear seat head restraints into
position electrically (outer head
restraints)
XPress and hold button : until the head
restraints have folded into position.
iIf a rear-seat passenger inserts the belt
into the buckle, the head restraint on the
corresponding outer seat folds up
automatically.
Folding the rear seat head restraints into
position manually
Only the center rear seat head restraint can
be folded into position manually.
XPull the head restraint up until it engages.
Adjusting the luxury head restraints in the
rear compartment
GWarning!
When folding back the side cushions, never
reach between the side cushion and the
mounting post. You could otherwise be
trapped.
Seats105Seats, steering wheel and mirrorsZ
Page 108 of 524
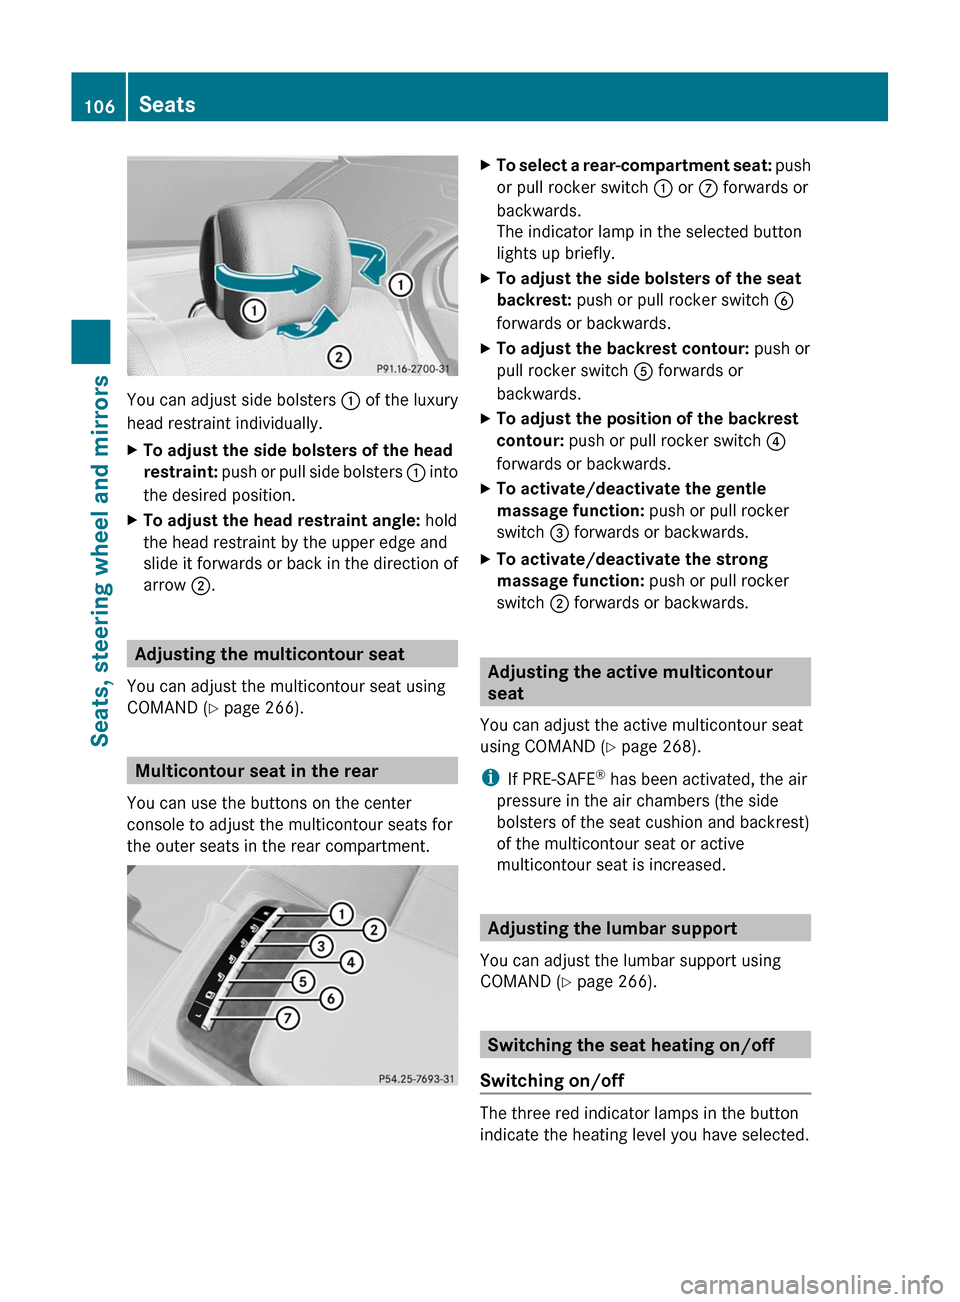
You can adjust side bolsters : of the luxury
head restraint individually.
XTo adjust the side bolsters of the head
restraint: push or pull side bolsters : into
the desired position.
XTo adjust the head restraint angle: hold
the head restraint by the upper edge and
slide it forwards or back in the direction of
arrow ;.
Adjusting the multicontour seat
You can adjust the multicontour seat using
COMAND (Y page 266).
Multicontour seat in the rear
You can use the buttons on the center
console to adjust the multicontour seats for
the outer seats in the rear compartment.
XTo select a rear-compartment seat: push
or pull rocker switch : or C forwards or
backwards.
The indicator lamp in the selected button
lights up briefly.
XTo adjust the side bolsters of the seat
backrest: push or pull rocker switch B
forwards or backwards.
XTo adjust the backrest contour: push or
pull rocker switch A forwards or
backwards.
XTo adjust the position of the backrest
contour: push or pull rocker switch ?
forwards or backwards.
XTo activate/deactivate the gentle
massage function: push or pull rocker
switch = forwards or backwards.
XTo activate/deactivate the strong
massage function: push or pull rocker
switch ; forwards or backwards.
Adjusting the active multicontour
seat
You can adjust the active multicontour seat
using COMAND (Y page 268).
iIf PRE-SAFE® has been activated, the air
pressure in the air chambers (the side
bolsters of the seat cushion and backrest)
of the multicontour seat or active
multicontour seat is increased.
Adjusting the lumbar support
You can adjust the lumbar support using
COMAND (Y page 266).
Switching the seat heating on/off
Switching on/off
The three red indicator lamps in the button
indicate the heating level you have selected.
106SeatsSeats, steering wheel and mirrors
Page 114 of 524
Rseat, backrest, head restraint position and
contour of the backrest in the lumbar
region
Ractive multicontour seat: activated/
deactivated
Rmulticontour seat: the side bolsters of the
seat cushion and the backrest as well as
the contour of the backrest in the lumbar
and shoulder regions
Rdriver's side: steering wheel position
Rdriver's side: position of the exterior
mirrors on the driver's and front-passenger
sides
GWarning
Do not activate the memory function while
driving. Activating the memory function while
driving could cause the driver to lose control
of the vehicle.
XAdjust the seat (Y page 102).XOn the driver's side, adjust the steering
wheel (Y page 108) and the exterior mirrors
(Y page 109).
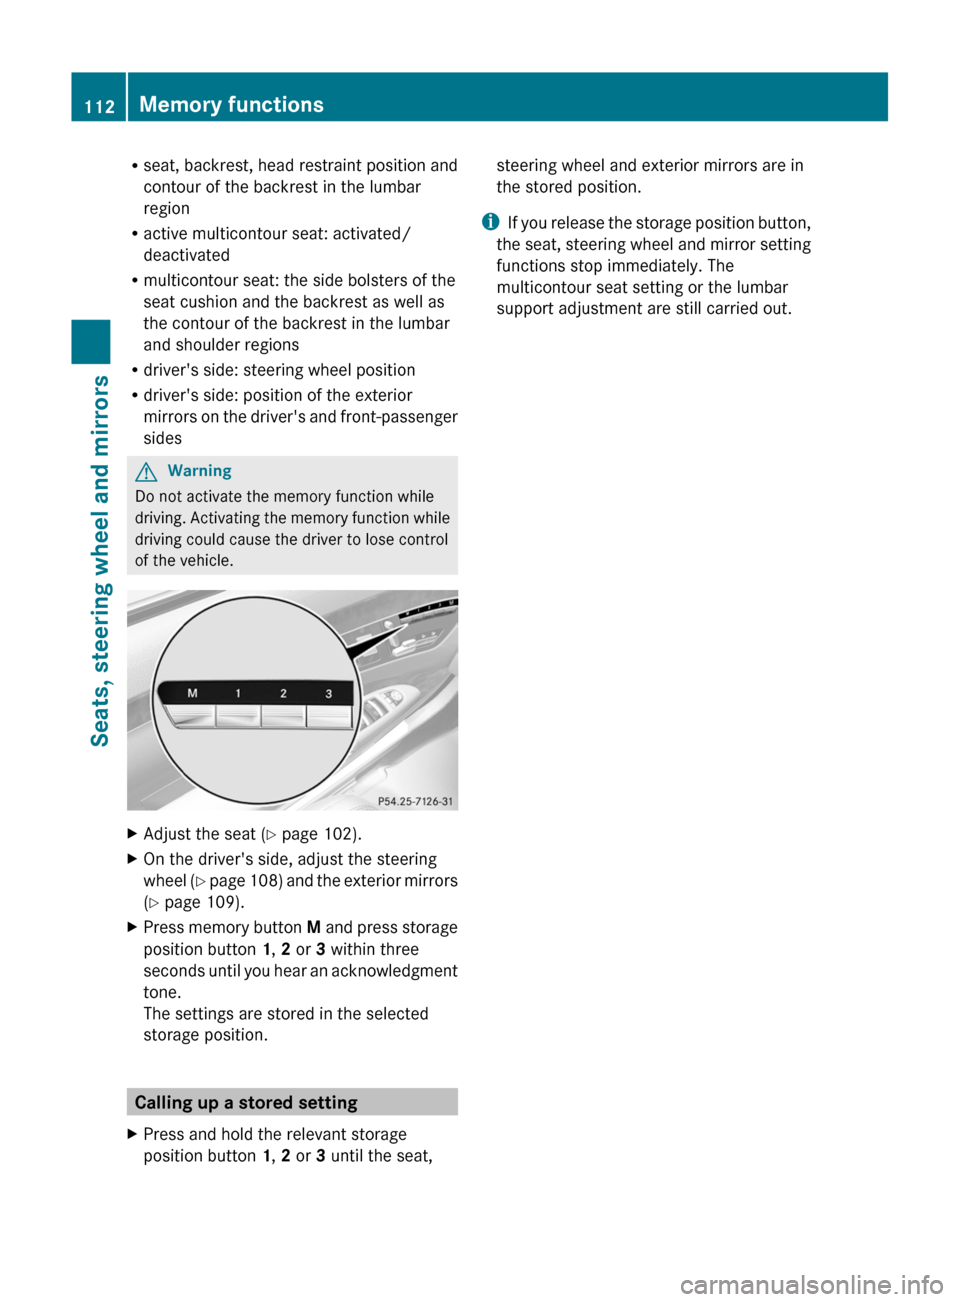
XPress memory button M and press storage
position button 1, 2 or 3 within three
seconds until you hear an acknowledgment
tone.
The settings are stored in the selected
storage position.
Calling up a stored setting
XPress and hold the relevant storage
position button 1, 2 or 3 until the seat,
steering wheel and exterior mirrors are in
the stored position.
iIf you release the storage position button,
the seat, steering wheel and mirror setting
functions stop immediately. The
multicontour seat setting or the lumbar
support adjustment are still carried out.
112Memory functionsSeats, steering wheel and mirrors
Page 126 of 524
ECOMAND: e.g. to select a station from
presets, select a track, enter directly,
enter a phone number. Rear Seat
Entertainment System: to select a
track, enter directlyFTo leave the menu (back)XPoint the remote control at the
corresponding screen and execute the
functions by pressing the corresponding
button.
i The remote control's function may be
restricted depending on the angle at which
it is pointed at the respective screen.
Selecting the screen for the remote
control
XTurn thumbwheel = until the desired
display is highlighted in the window.
Switching the screen on/off (Rear Seat
Entertainment System only)
If the key is in position 0 or 1 in the ignition
lock (see vehicle Operator's Manual), or the
key is not inserted, the screens in the rear will
switch off after 30 minutes. Before the
screens switch off, they show a message to
this effect.
You can switch the screens back on,
However, this will discharge the starter
battery.
XPoint the remote control at the rear-
compartment screen which has been
selected for remote operation.XPress button : on the remote control.
The respective rear screen switches on or
off.
i You can only switch the screens on using
the remote control if the ignition is
switched on.
Switching button lighting on/offXPress button ; on the remote control.
Depending on the previous status, the
button lighting is switched on or off.
i If you do not use the remote control for
about 15 seconds, the button lighting
switches off automatically.
Mute
XPress button B on the remote control.
The sound is switched on/off.
Adjusting the volume
This function is available for COMAND and for
the Rear Seat Entertainment System in
conjunction with corded headphones.
XPress one of buttons C on the remote
control.
The volume of the currently selected audio
or video source changes.
For COMAND, you can also adjust the
volume for phone calls and navigation
announcements.
Selecting a menu/menu item and
confirming your selection
XSelect a menu/menu item using the
=;9: buttons and press
the 9 button to confirm.124At a glanceCOMAND
Page 138 of 524
dts™
MLP™
Selecting settings for the Bang & Olufsen
sound system
Calling up the selection menu
XSelect Sound.XHighlight Bang&Olufsen.XPress W.
A selection menu appears.
A # dot in front of an entry indicates the
current setting.
Selecting the setting for True Image™
XTurn cVd or slide ZVÆ and highlight
reference or 3D sound.
XPress W.
Selecting sound mode
XSelect Sound Mode in the selection menu.XTurn cVd or slide ZVÆ and highlight left,
all or right.
XPress W.XTo exit the menu: press the % back
button beside the COMAND controller.
or
XSlide XVY.
iPlease bear the following in mind:
You will achieve the best sound results on
your Bang & Olufsen sound system by
playing high-quality audio DVDs and CDs.
MP3 tracks should have a bit rate of at least
224 kbit/s.
When playing using an iPod®, the bit rate
should also be at least 224 kbit/s.
For optimum playback quality:
XDeactivate the EQ setting on the
iPod®.
Surround-sound playback does not
function for mono signal sources, such as
the medium wave range (MW) in radio
mode.
On some stereo recordings, the sound
characteristics may differ from
conventional stereo playback.
Rear Seat Entertainment System
Components
Overview
The Rear Seat Entertainment System*
comprises:
Rtwo screens for the rear behind the front-
seat head restraints
Rthe remote control
Ra CD/DVD drive
RAUX jacks on both screens (display AUX)
and on the CD/DVD drive (drive AUX)
Rtwo sets of cordless headphones
136At a glanceCOMAND
Page 170 of 524
XSelect Continue Route Guidance and
press W to confirm.
COMAND calculates the route.
Destination or area of destination
reached
When you reach your destination, COMAND
displays a checkered flag and route guidance
is automatically ended.
For certain points of interest (e.g. airports),
you will see the Area of destination
reached message in addition to the
checkered flag.
Navigation announcements
Repeating navigation announcements
GWarning
Navigation announcements are intended to
direct you while driving without diverting your
attention from the road and driving.
Please always use this feature instead of
consulting the map display for directions.
Looking at the icons or map display can
distract you from traffic conditions and
driving, and increase the risk of an accident.
i Audible navigation announcements are
muted during a telephone call.
If you have missed an announcement, you can
call up the current announcement at any
time.
XTo show the menu: press W the COMAND
controller.XConfirm RPT in the navigation menu by
pressing W.
Switching navigation announcements
on/off
XTo switch off: press the 8 button
during an announcement.
You will briefly see the message: The
driving instructions have been
muted .XTo switch on: press W the COMAND
controller.XConfirm + in the navigation menu by
pressing W.
i COMAND automatically switches the
navigation announcements back on when:
R you have a new route calculated.
R you start the engine again after having
left the vehicle.
Reducing volume during a navigation
announcement
The volume of an active radio or video source
can be automatically reduced during a
navigation announcement.
XSelect Navi in the main function bar by
sliding ZV and turning cVd the COMAND
controller and press W to confirm.XSelect Audio Fadeout and press W to
confirm.
The function is switched on O or off ª,
depending on the previous status.
Setting the volume manually
XAdjust the volume during a navigation
announcement.
or
XSelect + in the map view with the menu
shown and adjust the volume.
Avoiding a section of the route blocked
by a traffic jam
This function blocks a section of the route
ahead of you. The length of the section of
route to be blocked can be adjusted. If
possible, COMAND calculates a detour
around the blocked section of the route.
XTo switch on navigation mode: press the
S function button once or twice.XTo show the menu: press the COMAND
controller W.168NavigationCOMAND
Page 174 of 524
The continuous blue route on the map starts
from the nearest road known to the system.
As soon as the vehicle is back on a road
known to the system, route guidance
continues in the usual way.
Route guidance from an off-map location
to a destination
If the vehicle position is outside the area
covered by the digital map, then the vehicle
is in an off-map location. COMAND is also
able to guide you to a destination even from
an off-map location.
At the start of the route guidance, you will see
the Street unknown message, an arrow and
the distance to the destination. The arrow
shows the compass heading to the road left
last.
The route is highlighted in blue from the
nearest road known to the system.
As soon as the vehicle is back on a road
known to the system, route guidance
continues in the usual way.
Off-road during route guidance
Due to road construction work, for example,
there may be differences between the data
on the digital map and the actual course of
the road.
In such cases, the system will temporarily be
unable to locate the vehicle position on the
digital map and thus considers the vehicle to
be in an off-road position.
In the display, you will see the Street
unknown message, an arrow and the distance
to the destination. The arrow shows the
compass heading to the actual destination.
As soon as the system can assign the vehicle
position to the map again, route guidance
continues in the usual way.Traffic reports
Conditions
i The SatRadio reception described below
requires optionally available SatRadio
equipment as well as a subscription to
SIRIUS XM SatRadio Traffic Message
Service. Further details on SatRadio are
available in the "SatRadio" chapter
( Y page 213).
COMAND can receive traffic reports via
SatRadio and incorporate them in the
navigation system. Traffic reports and map
icons can then be shown in the COMAND
display.
Real-time traffic reports on the map
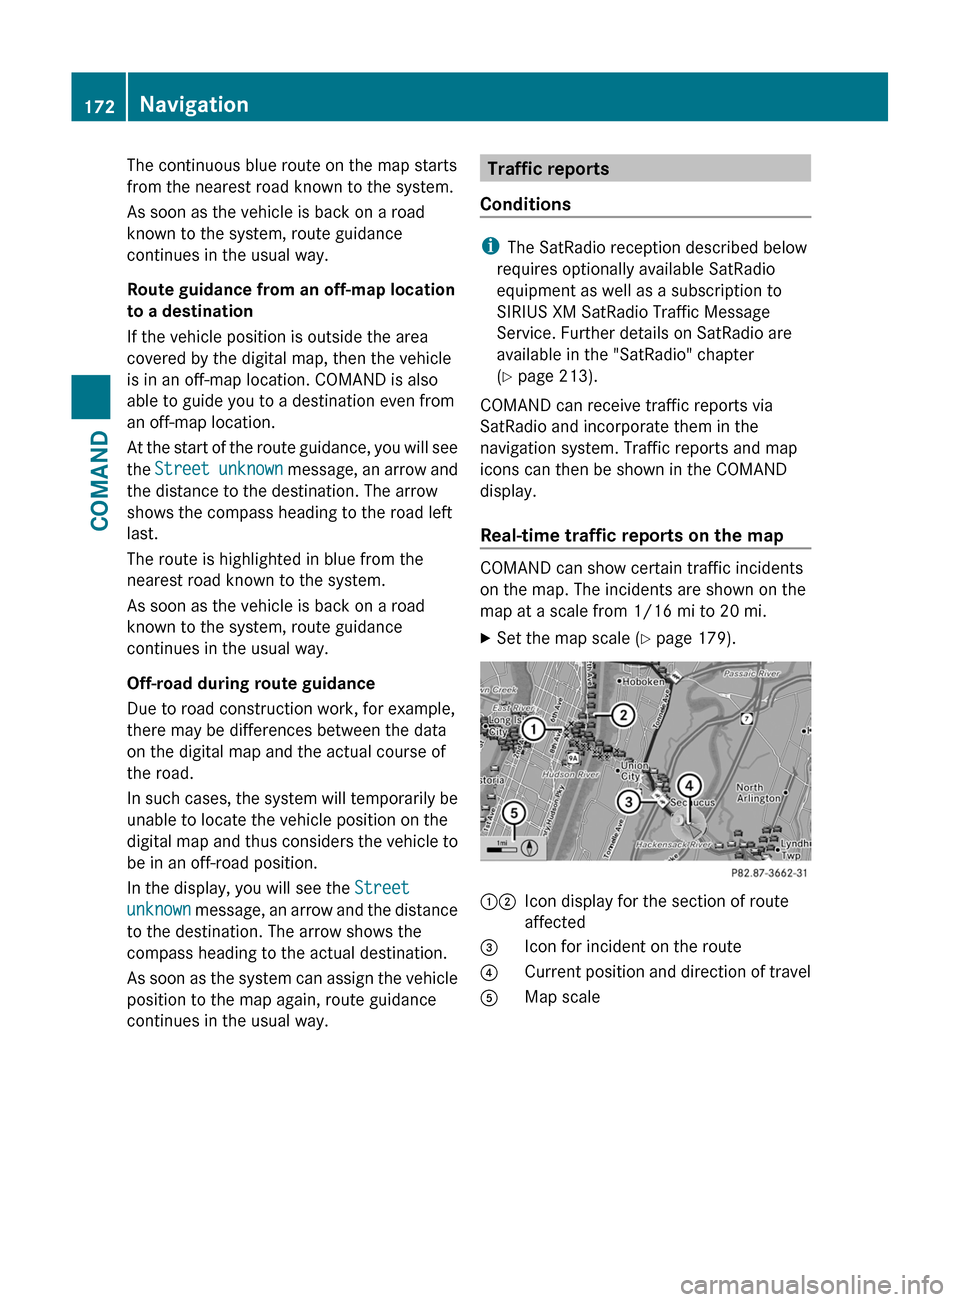
COMAND can show certain traffic incidents
on the map. The incidents are shown on the
map at a scale from 1/16 mi to 20 mi.
XSet the map scale ( Y page 179).12Icon display for the section of route
affected3Icon for incident on the route4Current position and direction of travel5Map scale172NavigationCOMAND