starter MERCEDES-BENZ S-Class 2011 W221 Owner's Manual
[x] Cancel search | Manufacturer: MERCEDES-BENZ, Model Year: 2011, Model line: S-Class, Model: MERCEDES-BENZ S-Class 2011 W221Pages: 524, PDF Size: 22.53 MB
Page 78 of 524
Vehicle equipment
i This manual describes all the standard
and optional equipment of your vehicle
which was available at the time of
purchase. Country-specific differences are
possible. Bear in mind that your vehicle
may not feature all functions described
here. This also refers to safety-related
systems and functions.
SmartKey
Important safety notes
GWarning!
When leaving the vehicle, always remove the
SmartKey from the starter switch. Always
take the SmartKey with you and lock the
vehicle. Do not leave children unattended in
the vehicle, even if they are secured in a child
restraint system, or with access to an
unlocked vehicle. A child's unsupervised
access to a vehicle could result in an accident
and/or serious personal injury. The children
could
R injure themselves on parts of the vehicle
R be seriously or fatally injured through
excessive exposure to extreme heat or cold
R injure themselves or cause an accident with
vehicle equipment that can be operated
even if the SmartKey is removed from the
starter switch or removed from the vehicle,
such as seat adjustment, steering wheel
adjustment, or the memory function
If children open a door, they could injure other
persons or get out of the vehicle and injure
themselves or be injured by following traffic.
Do not expose the child restraint system to
direct sunlight. The child restraint system's
metal parts, for example, could become very
hot, and the child could be burned by these
parts.
GWarning
Do not carry heavy or hard objects in the
passenger compartment unless they are
firmly secured in place.
Unsecured or improperly positioned cargo
increases a child's risk of injury in the event
of:
R strong braking maneuvers
R sudden changes of direction
R an accident
General information
If you cannot open or lock the vehicle with the
SmartKey, either the battery in the SmartKey
is empty, the SmartKey is faulty, or the starter
battery is discharged.
XCheck the battery in the SmartKey and
replace it if necessary ( Y page 80).XUnlock the driver's door with the
mechanical key ( Y page 84).XLock the vehicle ( Y page 84).XHave the starter battery and battery
contacts checked by an authorized
Mercedes-Benz Center.
If the SmartKey is faulty, contact Roadside
Assistance or an authorized Mercedes-Benz
Center.
SmartKey functions
General notes
i USA only:
This device complies with Part 15 of the
FCC regulations. Operation is subject to
the following conditions:
1. This device must not cause any harmful
interference, and
2. This device must be able to
accommodate interference that is
received, including interference which
could cause unwanted functions.
76SmartKeyOpening and closing
Page 84 of 524
ProblemPossible causes/consequences and M SolutionsThe engine cannot be
started using the
SmartKey.The on-board voltage is too low.XRemove the SmartKey and reinsert it into the ignition lock.XStart the engine within 30 seconds of inserting the SmartKey
into the ignition lock.XRepeat if necessary.
If the engine does not start after several attempts:
XCheck the starter battery and charge it if necessary
( Y page 468).
or
XJump-start the vehicle ( Y page 471).
or
XConsult a qualified specialist workshop.The engine cannot be
started using KEYLESS-
GO. The SmartKey is in
the vehicle.A door is open. Therefore, the SmartKey cannot be detected as
easily.XClose the door and try to start the vehicle again.There is interference from a powerful source of radio waves.XStart your vehicle with the SmartKey in the ignition lock.Doors
Important safety notes
GWarning!
When leaving the vehicle, always remove the
SmartKey from the starter switch. Always
take the SmartKey with you and lock the
vehicle. Do not leave children unattended in
the vehicle, even if they are secured in a child
restraint system, or with access to an
unlocked vehicle. A child's unsupervised
access to a vehicle could result in an accident
and/or serious personal injury. The children
could
R injure themselves on parts of the vehicle
R be seriously or fatally injured through
excessive exposure to extreme heat or cold
R injure themselves or cause an accident with
vehicle equipment that can be operated
even if the SmartKey is removed from the
starter switch or removed from the vehicle,
such as seat adjustment, steering wheel
adjustment, or the memory function
If children open a door, they could injure other
persons or get out of the vehicle and injure
themselves or be injured by following traffic.
Do not expose the child restraint system to
direct sunlight. The child restraint system's
metal parts, for example, could become very
hot, and the child could be burned by these
parts.GWarning
Do not carry heavy or hard objects in the
passenger compartment unless they are
firmly secured in place.
Unsecured or improperly positioned cargo
increases a child's risk of injury in the event
of:
R strong braking maneuvers
R sudden changes of direction
R an accident
82DoorsOpening and closing
Page 88 of 524
Opening and closing manually
Opening
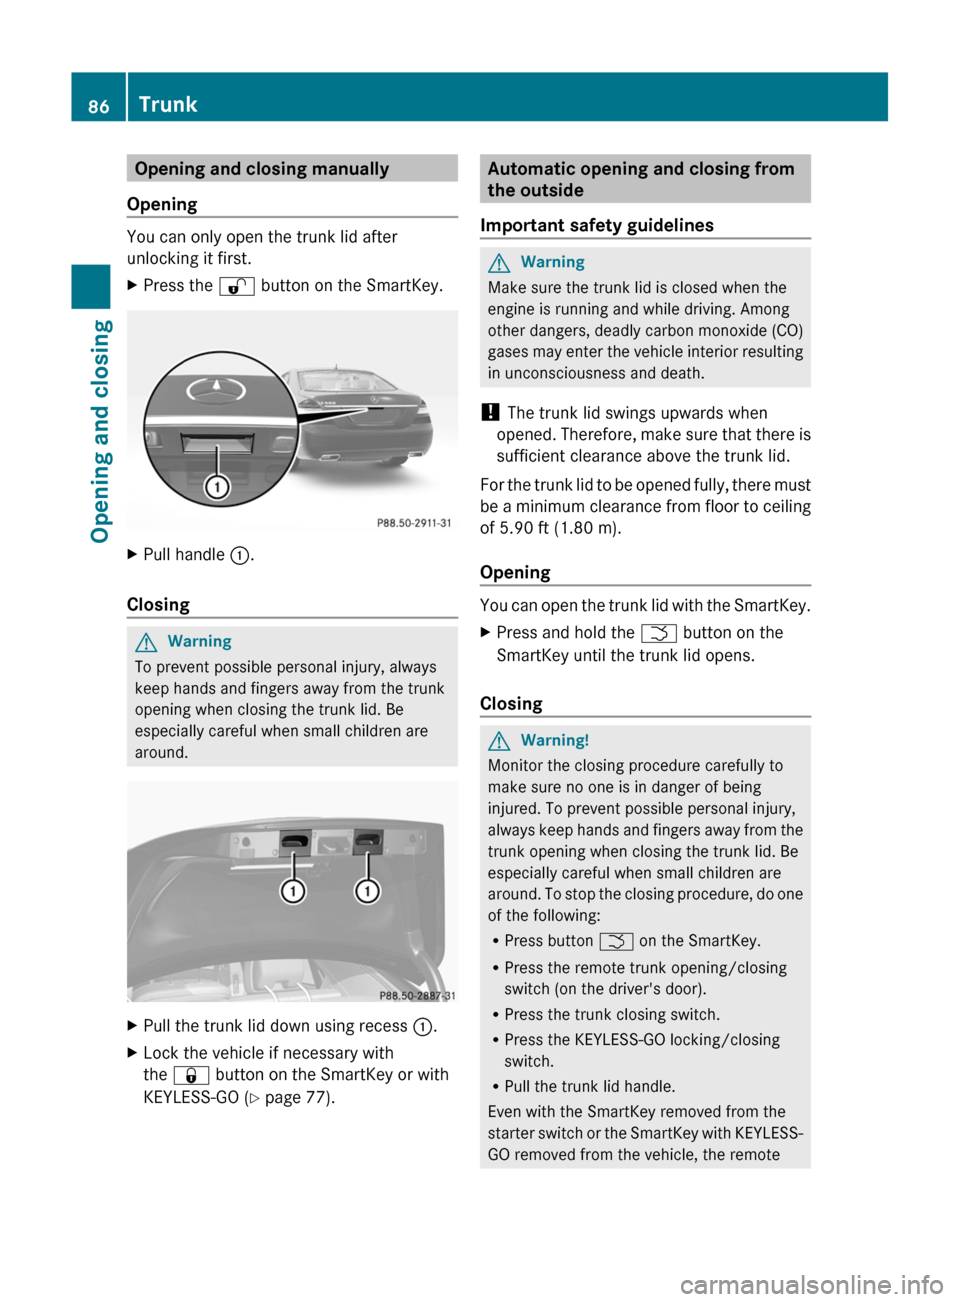
You can only open the trunk lid after
unlocking it first.
XPress the % button on the SmartKey.XPull handle :.
Closing
GWarning
To prevent possible personal injury, always
keep hands and fingers away from the trunk
opening when closing the trunk lid. Be
especially careful when small children are
around.
XPull the trunk lid down using recess :.XLock the vehicle if necessary with
the & button on the SmartKey or with
KEYLESS-GO (Y page 77).
Automatic opening and closing from
the outside
Important safety guidelines
GWarning
Make sure the trunk lid is closed when the
engine is running and while driving. Among
other dangers, deadly carbon monoxide (CO)
gases may enter the vehicle interior resulting
in unconsciousness and death.
! The trunk lid swings upwards when
opened. Therefore, make sure that there is
sufficient clearance above the trunk lid.
For the trunk lid to be opened fully, there must
be a minimum clearance from floor to ceiling
of 5.90 ft (1.80 m).
Opening
You can open the trunk lid with the SmartKey.
XPress and hold the F button on the
SmartKey until the trunk lid opens.
Closing
GWarning!
Monitor the closing procedure carefully to
make sure no one is in danger of being
injured. To prevent possible personal injury,
always keep hands and fingers away from the
trunk opening when closing the trunk lid. Be
especially careful when small children are
around. To stop the closing procedure, do one
of the following:
RPress button F on the SmartKey.
RPress the remote trunk opening/closing
switch (on the driver's door).
RPress the trunk closing switch.
RPress the KEYLESS-GO locking/closing
switch.
RPull the trunk lid handle.
Even with the SmartKey removed from the
starter switch or the SmartKey with KEYLESS-
GO removed from the vehicle, the remote
86TrunkOpening and closing
Page 89 of 524
trunk opening/closing switch can be
operated. Therefore, do not leave children
unattended in the vehicle, or with access to
an unlocked vehicle. A child's unsupervised
access to a vehicle could result in an accident
and/or serious personal injury.
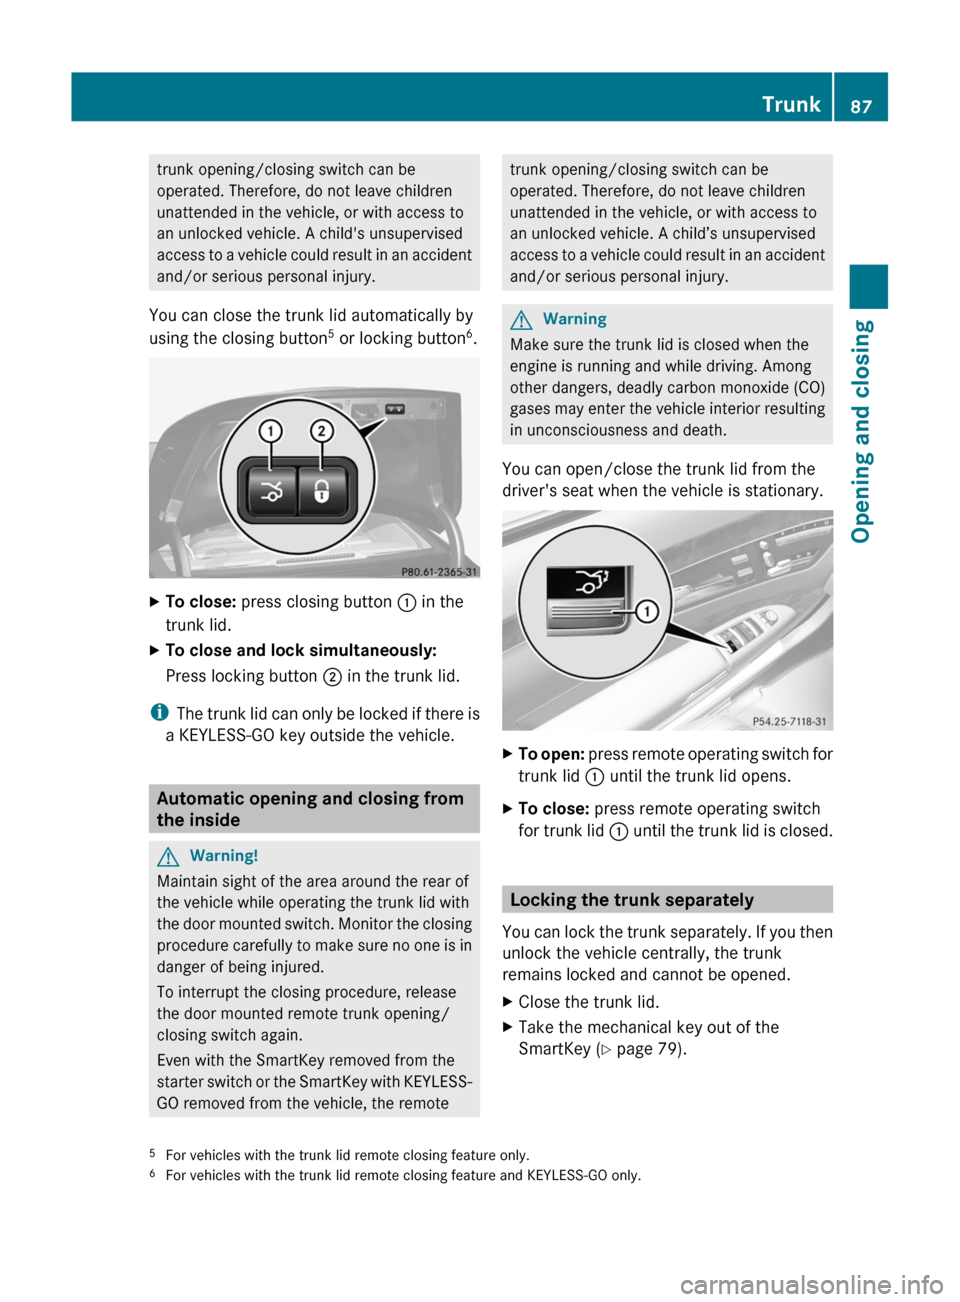
You can close the trunk lid automatically by
using the closing button5 or locking button6.
XTo close: press closing button : in the
trunk lid.
XTo close and lock simultaneously:
Press locking button ; in the trunk lid.
iThe trunk lid can only be locked if there is
a KEYLESS-GO key outside the vehicle.
Automatic opening and closing from
the inside
GWarning!
Maintain sight of the area around the rear of
the vehicle while operating the trunk lid with
the door mounted switch. Monitor the closing
procedure carefully to make sure no one is in
danger of being injured.
To interrupt the closing procedure, release
the door mounted remote trunk opening/
closing switch again.
Even with the SmartKey removed from the
starter switch or the SmartKey with KEYLESS-
GO removed from the vehicle, the remote
trunk opening/closing switch can be
operated. Therefore, do not leave children
unattended in the vehicle, or with access to
an unlocked vehicle. A child’s unsupervised
access to a vehicle could result in an accident
and/or serious personal injury.
GWarning
Make sure the trunk lid is closed when the
engine is running and while driving. Among
other dangers, deadly carbon monoxide (CO)
gases may enter the vehicle interior resulting
in unconsciousness and death.
You can open/close the trunk lid from the
driver's seat when the vehicle is stationary.
XTo open: press remote operating switch for
trunk lid : until the trunk lid opens.
XTo close: press remote operating switch
for trunk lid : until the trunk lid is closed.
Locking the trunk separately
You can lock the trunk separately. If you then
unlock the vehicle centrally, the trunk
remains locked and cannot be opened.
XClose the trunk lid.XTake the mechanical key out of the
SmartKey (Y page 79).5For vehicles with the trunk lid remote closing feature only.6For vehicles with the trunk lid remote closing feature and KEYLESS-GO only.
Trunk87Opening and closingZ
Page 95 of 524
to close without the anti-entrapment feature
for as long as you hold the switch.
Sliding sunroof
Important safety notes
Your vehicle may be installed with a sliding
sunroof or a panorama roof with power tilt/
sliding panel. In the following section, the
term "sliding sunroof" refers to both types of
sliding sunroof.
GWarning!
When leaving the vehicle, always remove the
SmartKey from the starter switch. Always
take the SmartKey with you and lock the
vehicle. Do not leave children unattended in
the vehicle, even if they are secured in a child
restraint system, or with access to an
unlocked vehicle. A child's unsupervised
access to a vehicle could result in an accident
and/or serious personal injury. The children
could
R injure themselves on parts of the vehicle
R be seriously or fatally injured through
excessive exposure to extreme heat or cold
R injure themselves or cause an accident with
vehicle equipment that can be operated
even if the SmartKey is removed from the
starter switch or removed from the vehicle,
such as seat adjustment, steering wheel
adjustment, or the memory function
If children open a door, they could injure other
persons or get out of the vehicle and injure
themselves or be injured by following traffic.
Do not expose the child restraint system to
direct sunlight. The child restraint system's
metal parts, for example, could become very
hot, and the child could be burned by these
parts.
GWarning
Do not carry heavy or hard objects in the
passenger compartment unless they are
firmly secured in place.
Unsecured or improperly positioned cargo
increases a child's risk of injury in the event
of:
R strong braking maneuvers
R sudden changes of direction
R an accidentGWarning
When opening or closing the sliding sunroof,
make sure that there is no danger of anyone
being harmed by the opening/closing
procedure.
The sliding sunroof is equipped with
automatic operation and the anti-entrapment
feature. If the movement of the sliding sunroof
is blocked during the closing procedure, the
sliding sunroof will stop and open slightly.
The sliding sunroof operates differently when
the sliding sunroof switch is pressed and held.
See the "Problems with the sliding sunroof/
panorama roof with power tilt/sliding panel"
section for more details.
The opening/closing procedure of the sliding
sunroof can be immediately halted by
releasing the sliding sunroof switch or, if the
sliding sunroof switch was moved past the
resistance point and released, by moving the
sliding sunroof switch in any direction.
GWarning
The sliding sunroof is made out of glass. In the
event of an accident, the glass may shatter.
This may result in an opening in the roof.
In a vehicle rollover, occupants not wearing
their seat belts or not wearing them properly
may be thrown out of the opening. Such an
opening also presents a potential for injury for
occupants wearing their seat belts properly,
as entire body parts or portions of them may
protrude from the passenger compartment.
! Only open the sliding sunroof if it is free
of snow and ice. Otherwise, malfunctions
may occur.
Sliding sunroof93Opening and closingZ
Page 105 of 524
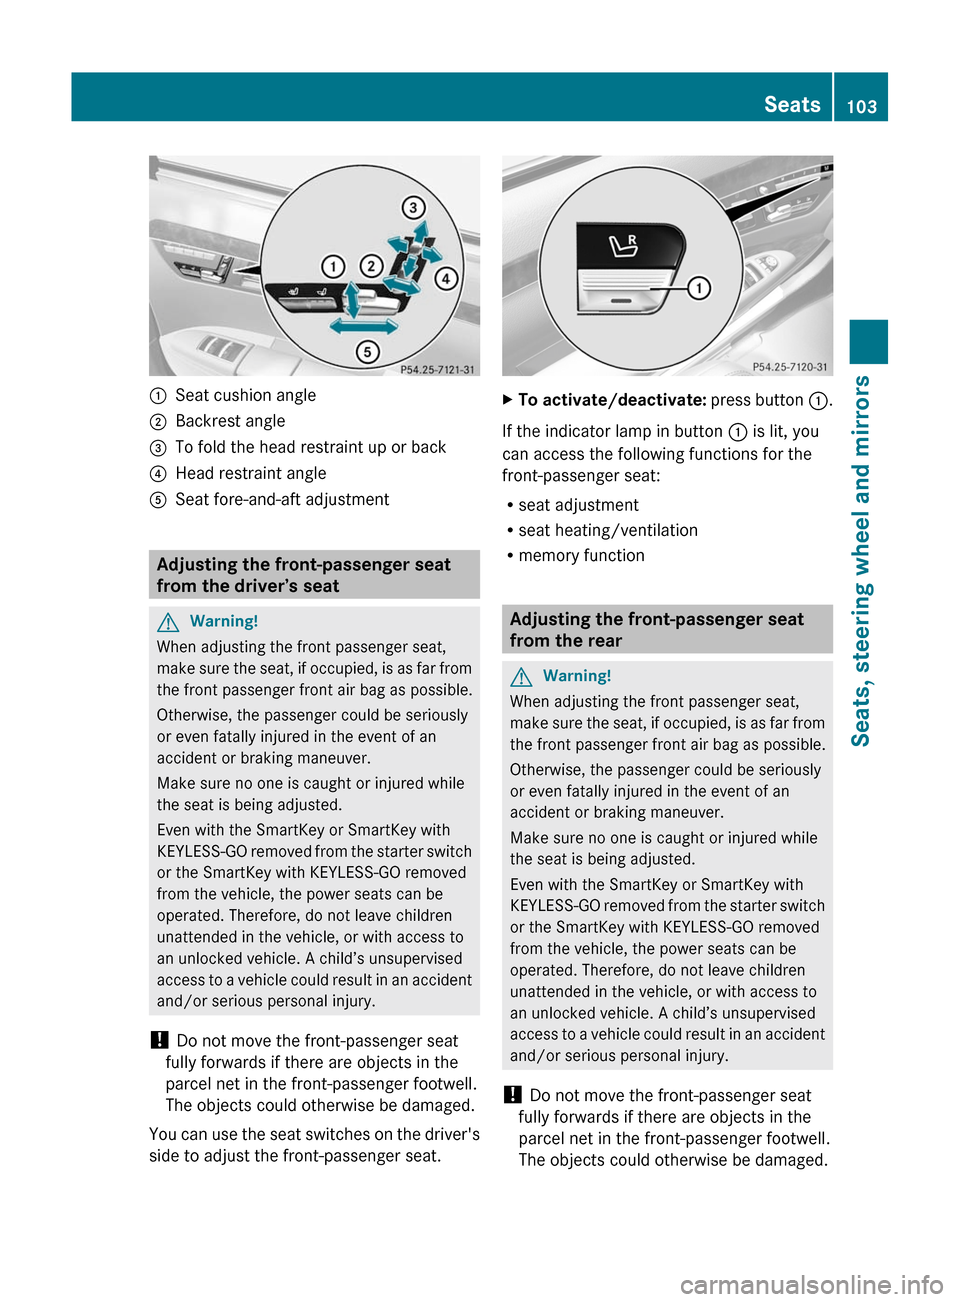
:Seat cushion angle;Backrest angle=To fold the head restraint up or back?Head restraint angleASeat fore-and-aft adjustment
Adjusting the front-passenger seat
from the driver’s seat
GWarning!
When adjusting the front passenger seat,
make sure the seat, if occupied, is as far from
the front passenger front air bag as possible.
Otherwise, the passenger could be seriously
or even fatally injured in the event of an
accident or braking maneuver.
Make sure no one is caught or injured while
the seat is being adjusted.
Even with the SmartKey or SmartKey with
KEYLESS-GO removed from the starter switch
or the SmartKey with KEYLESS-GO removed
from the vehicle, the power seats can be
operated. Therefore, do not leave children
unattended in the vehicle, or with access to
an unlocked vehicle. A child’s unsupervised
access to a vehicle could result in an accident
and/or serious personal injury.
! Do not move the front-passenger seat
fully forwards if there are objects in the
parcel net in the front-passenger footwell.
The objects could otherwise be damaged.
You can use the seat switches on the driver's
side to adjust the front-passenger seat.
XTo activate/deactivate: press button :.
If the indicator lamp in button : is lit, you
can access the following functions for the
front-passenger seat:
Rseat adjustment
Rseat heating/ventilation
Rmemory function
Adjusting the front-passenger seat
from the rear
GWarning!
When adjusting the front passenger seat,
make sure the seat, if occupied, is as far from
the front passenger front air bag as possible.
Otherwise, the passenger could be seriously
or even fatally injured in the event of an
accident or braking maneuver.
Make sure no one is caught or injured while
the seat is being adjusted.
Even with the SmartKey or SmartKey with
KEYLESS-GO removed from the starter switch
or the SmartKey with KEYLESS-GO removed
from the vehicle, the power seats can be
operated. Therefore, do not leave children
unattended in the vehicle, or with access to
an unlocked vehicle. A child’s unsupervised
access to a vehicle could result in an accident
and/or serious personal injury.
! Do not move the front-passenger seat
fully forwards if there are objects in the
parcel net in the front-passenger footwell.
The objects could otherwise be damaged.
Seats103Seats, steering wheel and mirrorsZ
Page 126 of 524
ECOMAND: e.g. to select a station from
presets, select a track, enter directly,
enter a phone number. Rear Seat
Entertainment System: to select a
track, enter directlyFTo leave the menu (back)XPoint the remote control at the
corresponding screen and execute the
functions by pressing the corresponding
button.
i The remote control's function may be
restricted depending on the angle at which
it is pointed at the respective screen.
Selecting the screen for the remote
control
XTurn thumbwheel = until the desired
display is highlighted in the window.
Switching the screen on/off (Rear Seat
Entertainment System only)
If the key is in position 0 or 1 in the ignition
lock (see vehicle Operator's Manual), or the
key is not inserted, the screens in the rear will
switch off after 30 minutes. Before the
screens switch off, they show a message to
this effect.
You can switch the screens back on,
However, this will discharge the starter
battery.
XPoint the remote control at the rear-
compartment screen which has been
selected for remote operation.XPress button : on the remote control.
The respective rear screen switches on or
off.
i You can only switch the screens on using
the remote control if the ignition is
switched on.
Switching button lighting on/offXPress button ; on the remote control.
Depending on the previous status, the
button lighting is switched on or off.
i If you do not use the remote control for
about 15 seconds, the button lighting
switches off automatically.
Mute
XPress button B on the remote control.
The sound is switched on/off.
Adjusting the volume
This function is available for COMAND and for
the Rear Seat Entertainment System in
conjunction with corded headphones.
XPress one of buttons C on the remote
control.
The volume of the currently selected audio
or video source changes.
For COMAND, you can also adjust the
volume for phone calls and navigation
announcements.
Selecting a menu/menu item and
confirming your selection
XSelect a menu/menu item using the
=;9: buttons and press
the 9 button to confirm.124At a glanceCOMAND
Page 140 of 524
Remote control
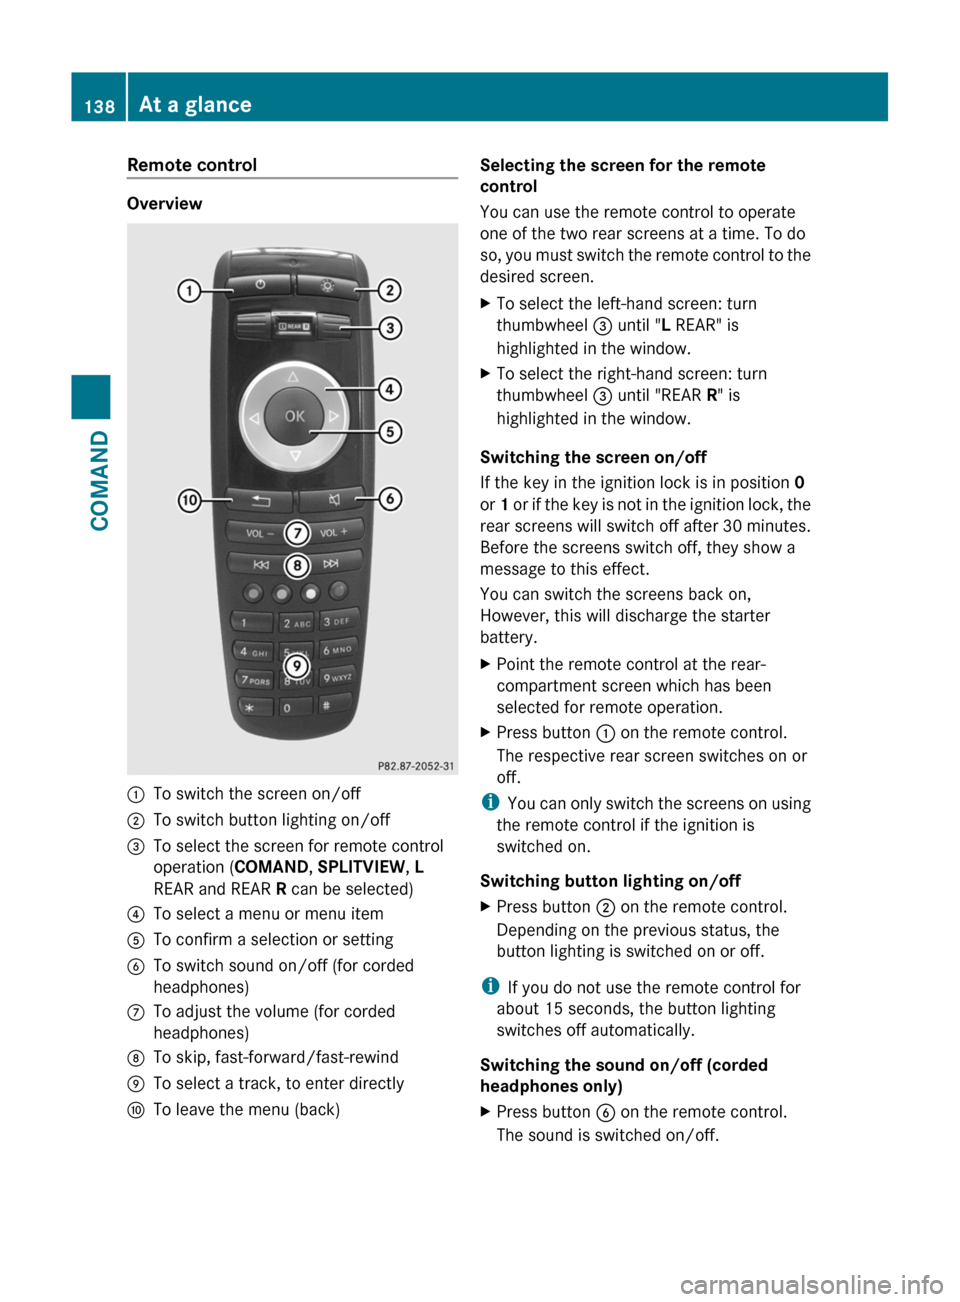
Overview
:To switch the screen on/off;To switch button lighting on/off=To select the screen for remote control
operation (COMAND, SPLITVIEW, L
REAR and REAR R can be selected)
?To select a menu or menu itemATo confirm a selection or settingBTo switch sound on/off (for corded
headphones)
CTo adjust the volume (for corded
headphones)
DTo skip, fast-forward/fast-rewindETo select a track, to enter directlyFTo leave the menu (back)Selecting the screen for the remote
control
You can use the remote control to operate
one of the two rear screens at a time. To do
so, you must switch the remote control to the
desired screen.
XTo select the left-hand screen: turn
thumbwheel = until "L REAR" is
highlighted in the window.
XTo select the right-hand screen: turn
thumbwheel = until "REAR R" is
highlighted in the window.
Switching the screen on/off
If the key in the ignition lock is in position 0
or 1 or if the key is not in the ignition lock, the
rear screens will switch off after 30 minutes.
Before the screens switch off, they show a
message to this effect.
You can switch the screens back on,
However, this will discharge the starter
battery.
XPoint the remote control at the rear-
compartment screen which has been
selected for remote operation.
XPress button : on the remote control.
The respective rear screen switches on or
off.
iYou can only switch the screens on using
the remote control if the ignition is
switched on.
Switching button lighting on/off
XPress button ; on the remote control.
Depending on the previous status, the
button lighting is switched on or off.
iIf you do not use the remote control for
about 15 seconds, the button lighting
switches off automatically.
Switching the sound on/off (corded
headphones only)
XPress button B on the remote control.
The sound is switched on/off.
138At a glanceCOMAND
Page 188 of 524
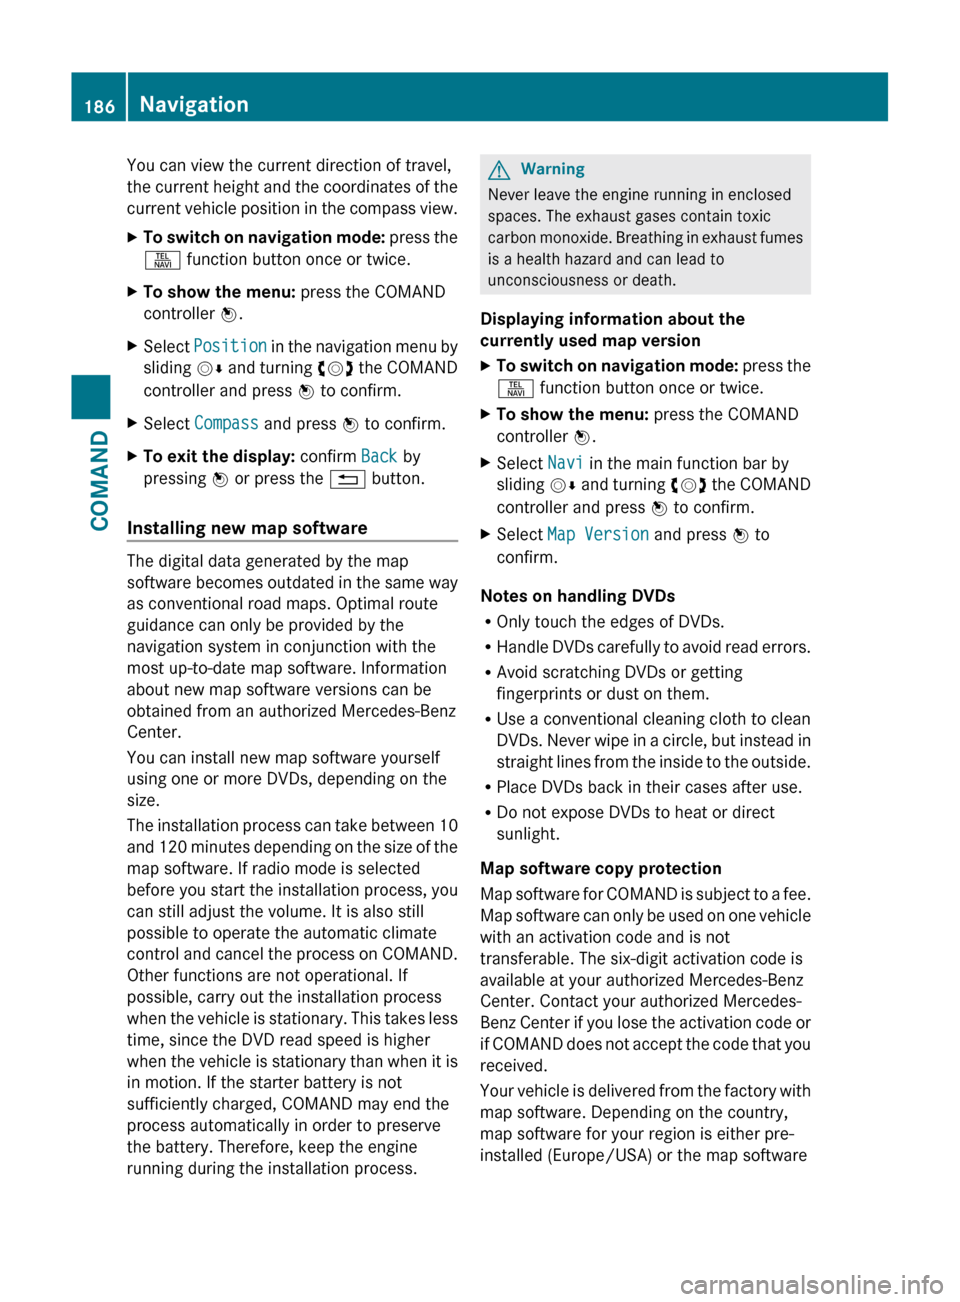
You can view the current direction of travel,
the current height and the coordinates of the
current vehicle position in the compass view.XTo switch on navigation mode: press the
S function button once or twice.XTo show the menu: press the COMAND
controller W.XSelect Position in the navigation menu by
sliding VÆ and turning cVd the COMAND
controller and press W to confirm.XSelect Compass and press W to confirm.XTo exit the display: confirm Back by
pressing W or press the % button.
Installing new map software
The digital data generated by the map
software becomes outdated in the same way
as conventional road maps. Optimal route
guidance can only be provided by the
navigation system in conjunction with the
most up-to-date map software. Information
about new map software versions can be
obtained from an authorized Mercedes-Benz
Center.
You can install new map software yourself
using one or more DVDs, depending on the
size.
The installation process can take between 10
and 120 minutes depending on the size of the
map software. If radio mode is selected
before you start the installation process, you
can still adjust the volume. It is also still
possible to operate the automatic climate
control and cancel the process on COMAND.
Other functions are not operational. If
possible, carry out the installation process
when the vehicle is stationary. This takes less
time, since the DVD read speed is higher
when the vehicle is stationary than when it is
in motion. If the starter battery is not
sufficiently charged, COMAND may end the
process automatically in order to preserve
the battery. Therefore, keep the engine
running during the installation process.
GWarning
Never leave the engine running in enclosed
spaces. The exhaust gases contain toxic
carbon monoxide. Breathing in exhaust fumes
is a health hazard and can lead to
unconsciousness or death.
Displaying information about the
currently used map version
XTo switch on navigation mode: press the
S function button once or twice.XTo show the menu: press the COMAND
controller W.XSelect Navi in the main function bar by
sliding VÆ and turning cVd the COMAND
controller and press W to confirm.XSelect Map Version and press W to
confirm.
Notes on handling DVDs
R Only touch the edges of DVDs.
R Handle DVDs carefully to avoid read errors.
R Avoid scratching DVDs or getting
fingerprints or dust on them.
R Use a conventional cleaning cloth to clean
DVDs. Never wipe in a circle, but instead in
straight lines from the inside to the outside.
R Place DVDs back in their cases after use.
R Do not expose DVDs to heat or direct
sunlight.
Map software copy protection
Map software for COMAND is subject to a fee.
Map software can only be used on one vehicle
with an activation code and is not
transferable. The six-digit activation code is
available at your authorized Mercedes-Benz
Center. Contact your authorized Mercedes-
Benz Center if you lose the activation code or
if COMAND does not accept the code that you
received.
Your vehicle is delivered from the factory with
map software. Depending on the country,
map software for your region is either pre-
installed (Europe/USA) or the map software
186NavigationCOMAND
Page 307 of 524
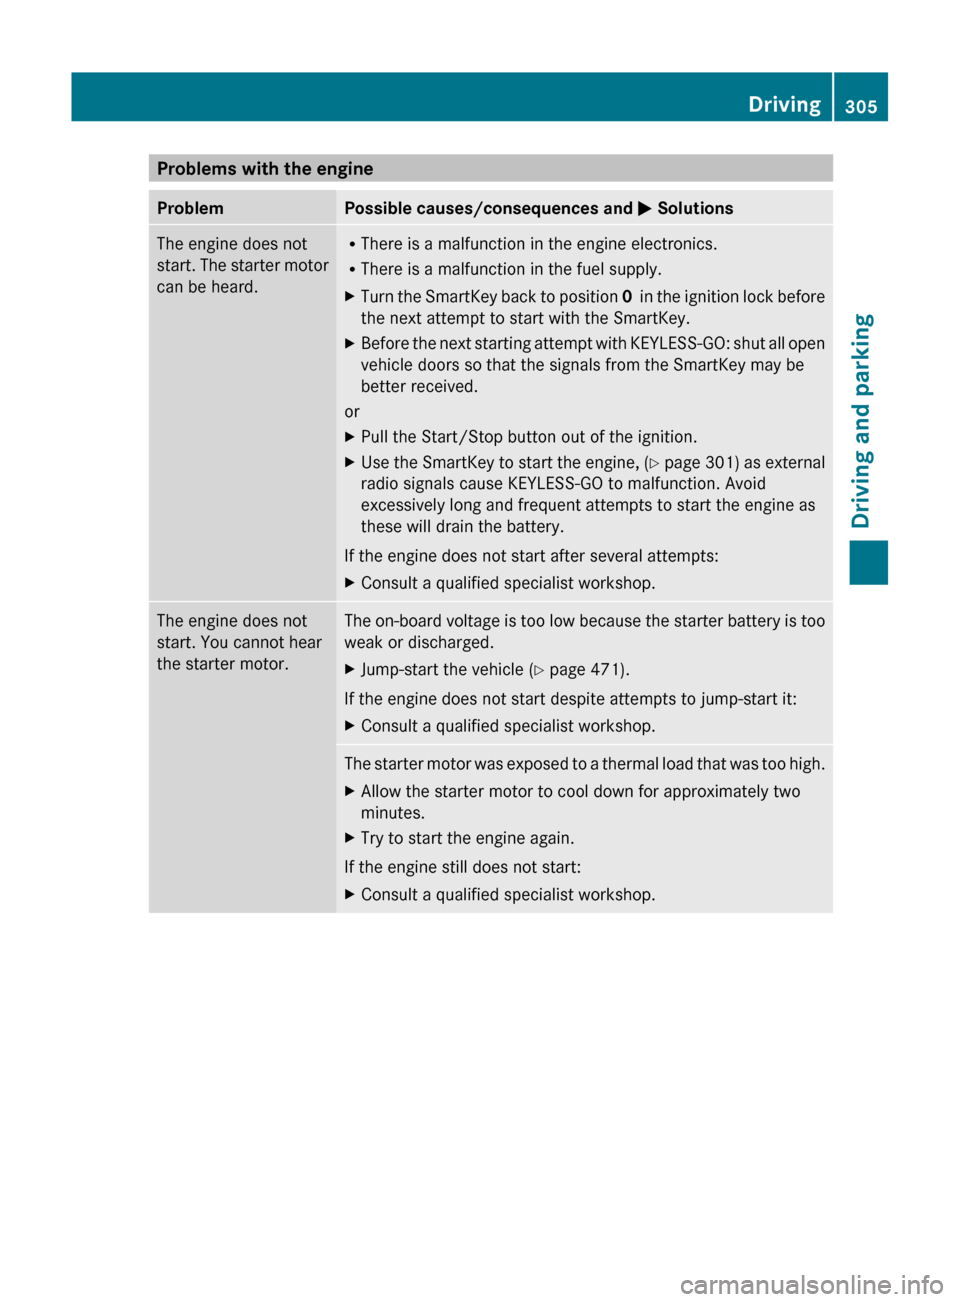
Problems with the engineProblemPossible causes/consequences and M SolutionsThe engine does not
start. The starter motor
can be heard.R There is a malfunction in the engine electronics.
R There is a malfunction in the fuel supply.XTurn the SmartKey back to position 0 in the ignition lock before
the next attempt to start with the SmartKey.XBefore the next starting attempt with KEYLESS-GO: shut all open
vehicle doors so that the signals from the SmartKey may be
better received.
or
XPull the Start/Stop button out of the ignition.XUse the SmartKey to start the engine, (Y page 301) as external
radio signals cause KEYLESS-GO to malfunction. Avoid
excessively long and frequent attempts to start the engine as
these will drain the battery.
If the engine does not start after several attempts:
XConsult a qualified specialist workshop.The engine does not
start. You cannot hear
the starter motor.The on-board voltage is too low because the starter battery is too
weak or discharged.XJump-start the vehicle ( Y page 471).
If the engine does not start despite attempts to jump-start it:
XConsult a qualified specialist workshop.The starter motor was exposed to a thermal load that was too high.XAllow the starter motor to cool down for approximately two
minutes.XTry to start the engine again.
If the engine still does not start:
XConsult a qualified specialist workshop.Driving305Driving and parkingZ