tool kit MERCEDES-BENZ S-Class 2011 W221 Owner's Manual
[x] Cancel search | Manufacturer: MERCEDES-BENZ, Model Year: 2011, Model line: S-Class, Model: MERCEDES-BENZ S-Class 2011 W221Pages: 524, PDF Size: 22.53 MB
Page 13 of 524
F
Favorites (COMAND) ......................... 118
First-aid kit ......................................... 462
First list entry Accepting ...................................... 129
Flat tire
Changing a wheel/mounting the
spare wheel ................................... 463
MOExtended run-flat system .........467
Preparing the vehicle .....................463
Raising the vehicle .........................464
Floormat ............................................. 442
Freeway information ......................... 185
Frequency input Manual ........................................... 209
Front fog lamp (display message) ... 395
Front multicontour seat
(COMAND) .......................................... 266
Front-passenger seat Adjusting from the driver's seat ..... 103
Adjusting from the rear
compartment ................................. 103
Fuel
Additives ........................................ 513
Notes ............................................. 512
Premium-grade unleaded gasoline . 512
Refueling ........................................ 313
Specifications ................................ 512
Tank content/reserve fuel .............511
Troubleshooting ............................. 316
Fuel consumption
Current (on-board computer) .........368
Notes ............................................. 319
Fuel filler cap (display message) ..... 400
Fuel filler flap Opening/closing ....... 314
Fuel level Calling up the range (on-board
computer) ...................................... 368
Fuel tank
Filling capacity ............................... 511
Function buttons (COMAND) ............ 117
Function restrictions Video DVD mode ........................... 237
Fuse allocation chart (vehicle tool
kit) ...................................................... 462Fuses
Dashboard fuse box .......................476
Engine emergency stop .................477
Fuse allocation chart .....................475
Fuse box in the engine
compartment ................................. 476
Fuse box in the rear compartment . 476
Notes ............................................. 475
G
Garage door opener Clearing the memory .....................442
Notes ............................................. 439
Opening/closing the garage door ..441
Programming the remote control ...440
Gear indicator (on-board
computer) .......................................... 371
Gear or selector lever (cleaning
guidelines) ......................................... 458
Genuine Mercedes-Benz parts ......... 508
Genuine wood trim and trim strips
(cleaning instructions) ...................... 458
Glove box ........................................... 422
Gracenote Media Database .............. 222
H
Hands-free microphone Switching on/off ........................... 198
harman/kardon ®
Logic 7 ®
Surround Sound system ................... 134
Hazard warning lamps ...................... 276
HD Radio™ ......................................... 212
Headlamp cleaning system .............. 276
Adding washer fluid .......................450
Notes ............................................. 515
Headlamp mode (daytime driving)
see Daytime running lamps
Headlamps
Cleaning ......................................... 456
Misting up ...................................... 277
Head restraint
NECK-PRO ..................................... 104
NECK-PRO luxury ........................... 104
Index11
Page 24 of 524
U
Unlocking Emergency unlocking .......................84
From inside the vehicle (central
unlocking button) ............................. 83
Using the telephone .......................... 197
V
Vanity mirror Sun visor ........................................ 429
Vehicle
Data acquisition ............................... 28
Emergency unlocking .......................84
Equipment ....................................... 24
Exterior view .................................... 30
Individual settings (on-board
computer) ...................................... 377
Loading .......................................... 490
Lowering ........................................ 467
Maintenance .................................... 25
Parking up ..................................... 318
Raising ........................................... 464
Reporting problems .........................27
Towing away .................................. 473
Tow-starting ................................... 473
Transporting .................................. 475
Vehicle data
see Technical data
Vehicle dimensions ........................... 516
Vehicle identification number see VIN
Vehicle identification plate .............. 509
Vehicle level ...................................... 336
Active Body Control .......................338
Vehicle level (display message) ....... 402
Vehicle tool kit .................................. 462
Vehicle weights ................................. 516
Video (DVD) ........................................ 371
Video DVD Fast forward/rewind ...................... 238
Operation ....................................... 236
Pause function ............................... 239
Selecting ........................................ 238
Selecting a film/title ...................... 239
Selecting a scene/chapter ............239
Stop function ................................. 239
Video DVD (on-board computer) ...... 371
Video DVD mode Switching to ................................... 237
VIN ...................................................... 509
Voice Control System Settings ......................................... 143
Volume
Adjusting ....................................... 132
Navigation announcements ...........132
Phone calls .................................... 132
W
Warning and indicator lamps ABS ................................................ 415
Brakes ........................................... 413
Check Engine ................................. 418
ESP ®
.............................................. 416
ESP ®
OFF ....................................... 417
Fuel tank ........................................ 418
Overview .......................................... 33
Reserve fuel ................................... 418
Seat belt ........................................ 414
SRS ................................................ 417
Tire pressure monitor ....................419
Warranty ............................................ 508
Waveband Switching (radio) ............................ 209
Wheel bolt tightening torque ........... 467
Wheel chock ...................................... 464
Wheels Changing/replacing .......................502
Changing a wheel .......................... 463
Checking ........................................ 480
Cleaning ......................................... 454
Mounting a wheel .......................... 466
Removing a wheel ..........................466
Storing ........................................... 503
Tightening torque ........................... 467
Wheel size/tire size .......................503
Window curtain air bag
Display message ............................ 384
Operation ......................................... 47
Windows
see Side windows
Windows (cleaning instructions) ..... 455
22Index
Page 32 of 524
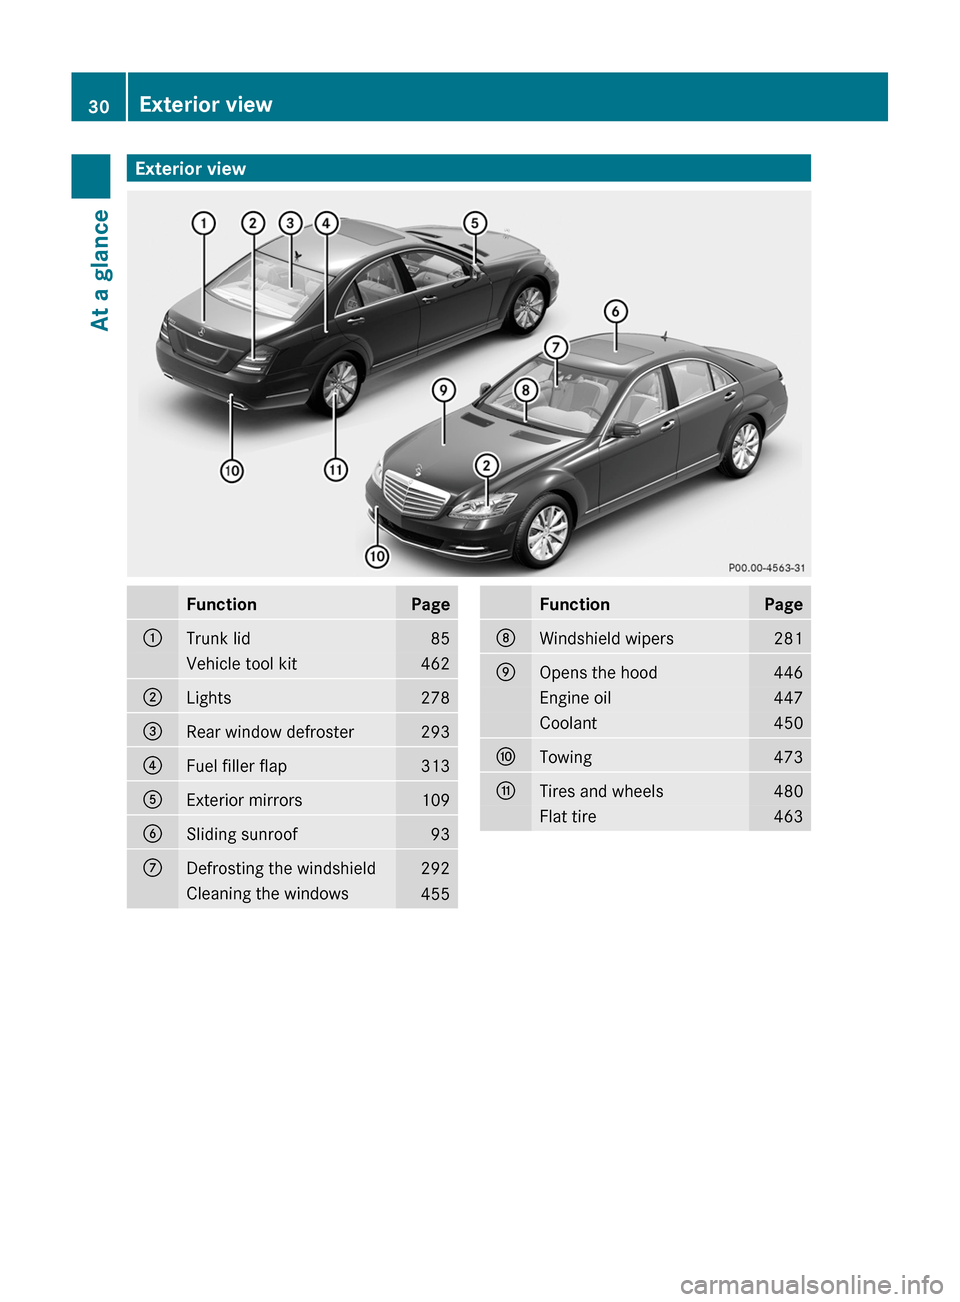
Exterior viewFunctionPage:Trunk lid85Vehicle tool kit462;Lights278=Rear window defroster293?Fuel filler flap313AExterior mirrors109BSliding sunroof93CDefrosting the windshield292Cleaning the windows455FunctionPageDWindshield wipers281EOpens the hood446Engine oil447Coolant450FTowing473GTires and wheels480Flat tire46330Exterior viewAt a glance
Page 57 of 524
XPress the base of the NECK-PRO head
restraint cushion back in the direction of
arrow ; as far as it will go.
XPush the NECK-PRO head restraint cushion
down into the guide in the direction of
arrow = as far as it will go.
XFirmly fold the NECK-PRO head restraint
cushion back in the direction of arrow :
until it engages.
XRepeat this procedure for the second
NECK-PRO head restraint.
NECK-PRO luxury head restraints
iIf you have difficulty resetting the NECK-
PRO luxury head restraints, have this work
carried out at a qualified specialist
workshop, e.g. a Mercedes Benz Service
center.
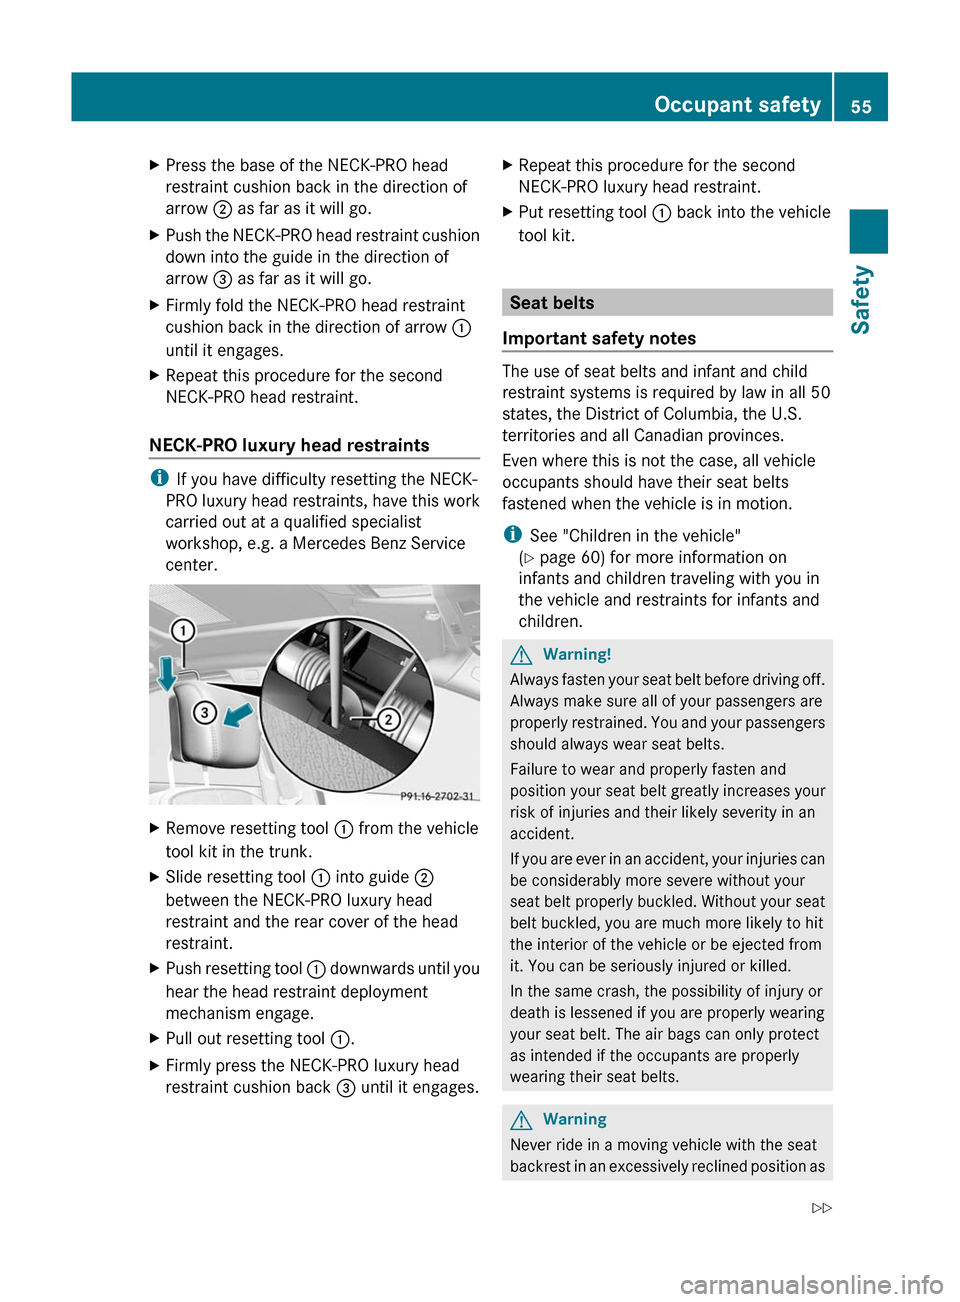
XRemove resetting tool : from the vehicle
tool kit in the trunk.
XSlide resetting tool : into guide ;
between the NECK-PRO luxury head
restraint and the rear cover of the head
restraint.
XPush resetting tool : downwards until you
hear the head restraint deployment
mechanism engage.
XPull out resetting tool :.XFirmly press the NECK-PRO luxury head
restraint cushion back = until it engages.
XRepeat this procedure for the second
NECK-PRO luxury head restraint.
XPut resetting tool : back into the vehicle
tool kit.
Seat belts
Important safety notes
The use of seat belts and infant and child
restraint systems is required by law in all 50
states, the District of Columbia, the U.S.
territories and all Canadian provinces.
Even where this is not the case, all vehicle
occupants should have their seat belts
fastened when the vehicle is in motion.
iSee "Children in the vehicle"
(Y page 60) for more information on
infants and children traveling with you in
the vehicle and restraints for infants and
children.
GWarning!
Always fasten your seat belt before driving off.
Always make sure all of your passengers are
properly restrained. You and your passengers
should always wear seat belts.
Failure to wear and properly fasten and
position your seat belt greatly increases your
risk of injuries and their likely severity in an
accident.
If you are ever in an accident, your injuries can
be considerably more severe without your
seat belt properly buckled. Without your seat
belt buckled, you are much more likely to hit
the interior of the vehicle or be ejected from
it. You can be seriously injured or killed.
In the same crash, the possibility of injury or
death is lessened if you are properly wearing
your seat belt. The air bags can only protect
as intended if the occupants are properly
wearing their seat belts.
GWarning
Never ride in a moving vehicle with the seat
backrest in an excessively reclined position as
Occupant safety55SafetyZ
Page 392 of 524
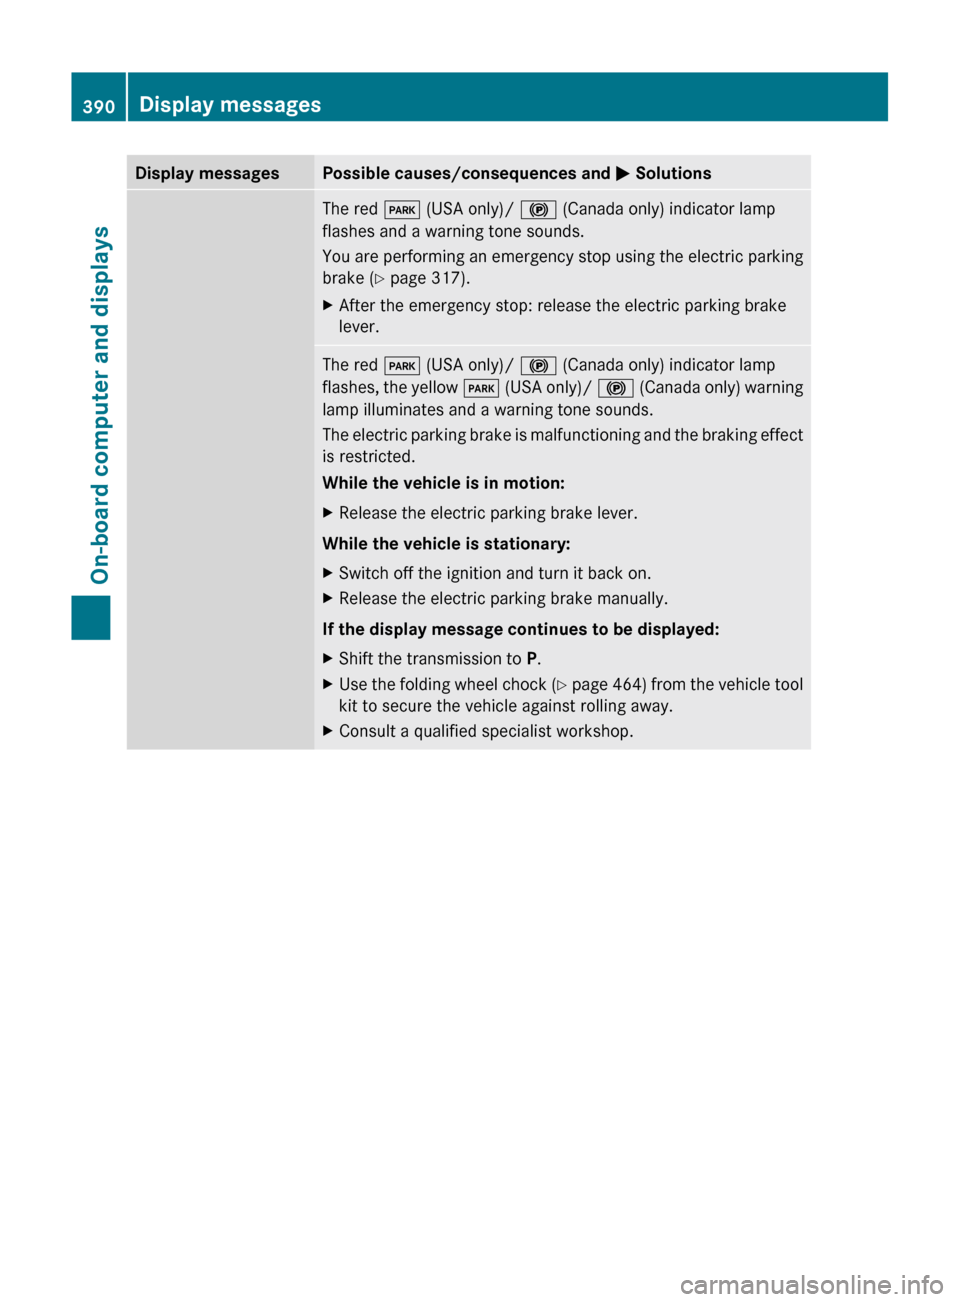
Display messagesPossible causes/consequences and M SolutionsThe red F (USA only)/ ! (Canada only) indicator lamp
flashes and a warning tone sounds.
You are performing an emergency stop using the electric parking
brake ( Y page 317).XAfter the emergency stop: release the electric parking brake
lever.The red F (USA only)/ ! (Canada only) indicator lamp
flashes, the yellow F (USA only)/ ! (Canada only) warning
lamp illuminates and a warning tone sounds.
The electric parking brake is malfunctioning and the braking effect
is restricted.
While the vehicle is in motion:XRelease the electric parking brake lever.
While the vehicle is stationary:
XSwitch off the ignition and turn it back on.XRelease the electric parking brake manually.
If the display message continues to be displayed:
XShift the transmission to P.XUse the folding wheel chock (Y page 464) from the vehicle tool
kit to secure the vehicle against rolling away.XConsult a qualified specialist workshop.390Display messagesOn-board computer and displays
Page 393 of 524
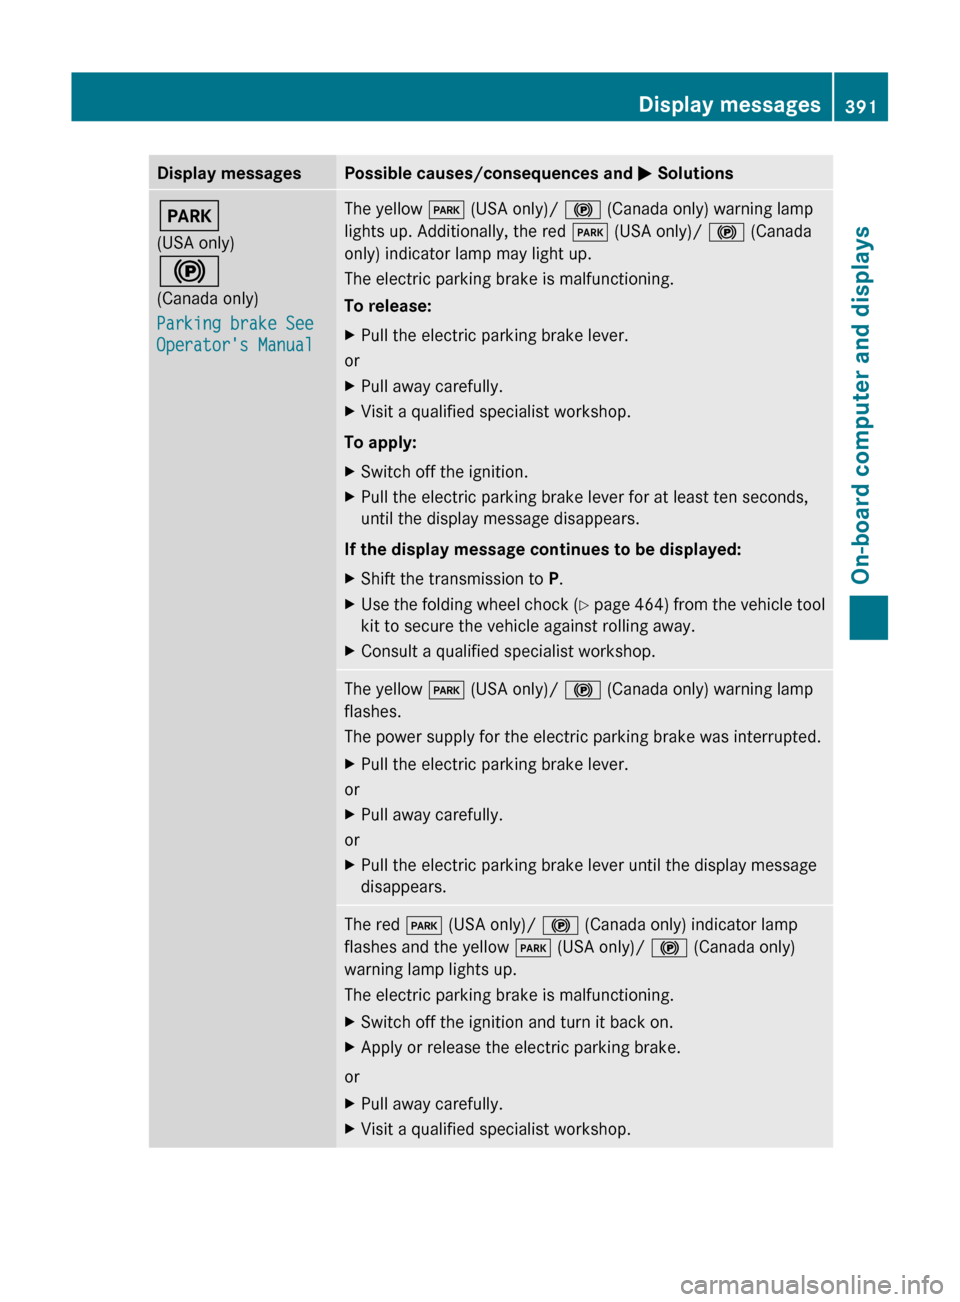
Display messagesPossible causes/consequences and M SolutionsF
(USA only)
!
(Canada only)
Parking brake See
Operator's ManualThe yellow F (USA only)/ ! (Canada only) warning lamp
lights up. Additionally, the red F (USA only)/ ! (Canada
only) indicator lamp may light up.
The electric parking brake is malfunctioning.
To release:XPull the electric parking brake lever.
or
XPull away carefully.XVisit a qualified specialist workshop.
To apply:
XSwitch off the ignition.XPull the electric parking brake lever for at least ten seconds,
until the display message disappears.
If the display message continues to be displayed:
XShift the transmission to P.XUse the folding wheel chock (Y page 464) from the vehicle tool
kit to secure the vehicle against rolling away.XConsult a qualified specialist workshop.The yellow F (USA only)/ ! (Canada only) warning lamp
flashes.
The power supply for the electric parking brake was interrupted.XPull the electric parking brake lever.
or
XPull away carefully.
or
XPull the electric parking brake lever until the display message
disappears.The red F (USA only)/ ! (Canada only) indicator lamp
flashes and the yellow F (USA only)/ ! (Canada only)
warning lamp lights up.
The electric parking brake is malfunctioning.XSwitch off the ignition and turn it back on.XApply or release the electric parking brake.
or
XPull away carefully.XVisit a qualified specialist workshop.Display messages391On-board computer and displaysZ
Page 394 of 524
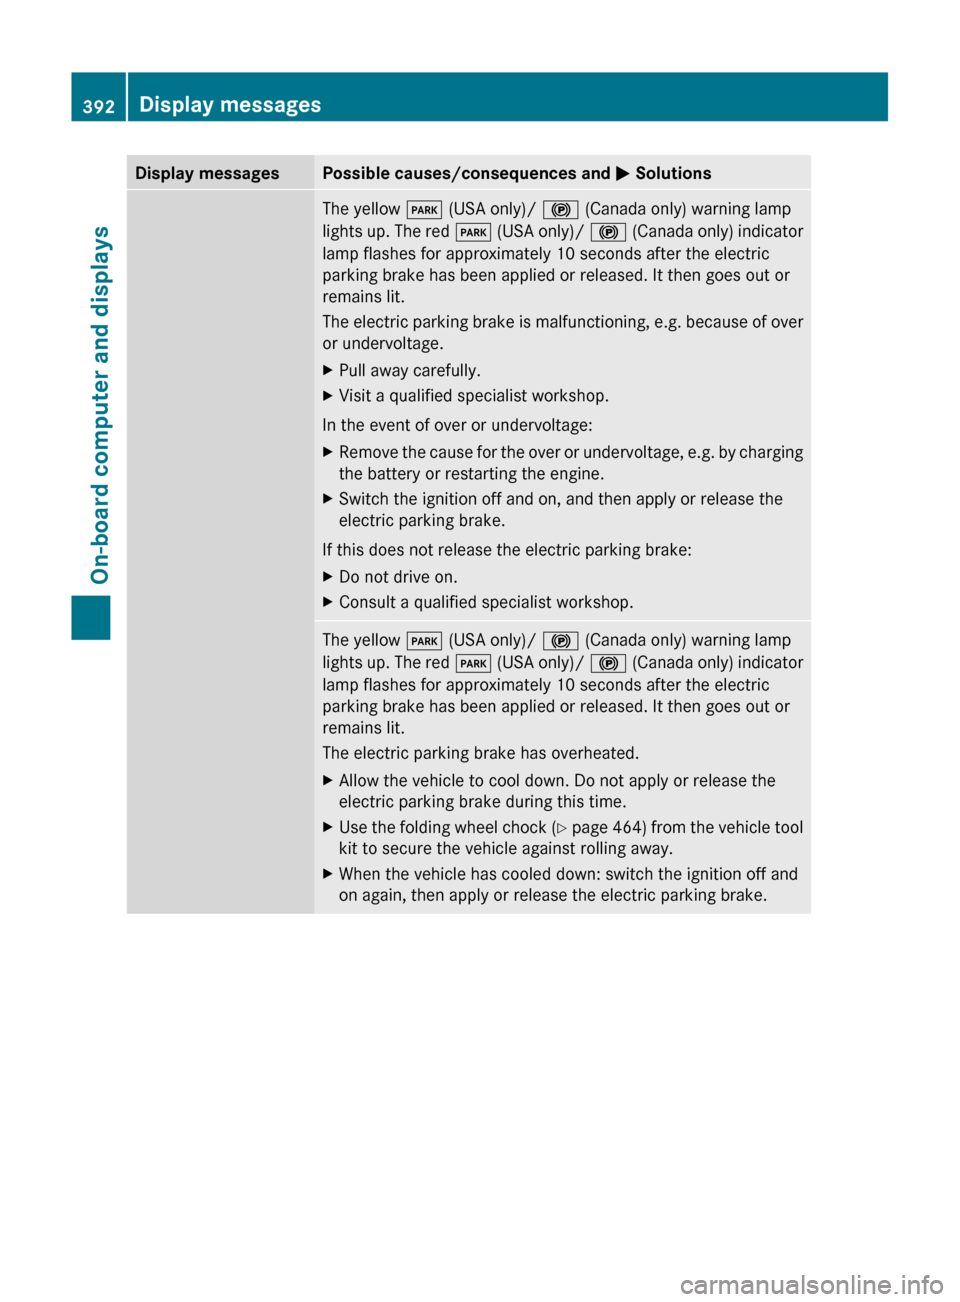
Display messagesPossible causes/consequences and M SolutionsThe yellow F (USA only)/ ! (Canada only) warning lamp
lights up. The red F (USA only)/ ! (Canada only) indicator
lamp flashes for approximately 10 seconds after the electric
parking brake has been applied or released. It then goes out or
remains lit.
The electric parking brake is malfunctioning, e.g. because of over
or undervoltage.XPull away carefully.XVisit a qualified specialist workshop.
In the event of over or undervoltage:
XRemove the cause for the over or undervoltage, e.g. by charging
the battery or restarting the engine.XSwitch the ignition off and on, and then apply or release the
electric parking brake.
If this does not release the electric parking brake:
XDo not drive on.XConsult a qualified specialist workshop.The yellow F (USA only)/ ! (Canada only) warning lamp
lights up. The red F (USA only)/ ! (Canada only) indicator
lamp flashes for approximately 10 seconds after the electric
parking brake has been applied or released. It then goes out or
remains lit.
The electric parking brake has overheated.XAllow the vehicle to cool down. Do not apply or release the
electric parking brake during this time.XUse the folding wheel chock (Y page 464) from the vehicle tool
kit to secure the vehicle against rolling away.XWhen the vehicle has cooled down: switch the ignition off and
on again, then apply or release the electric parking brake.392Display messagesOn-board computer and displays
Page 395 of 524
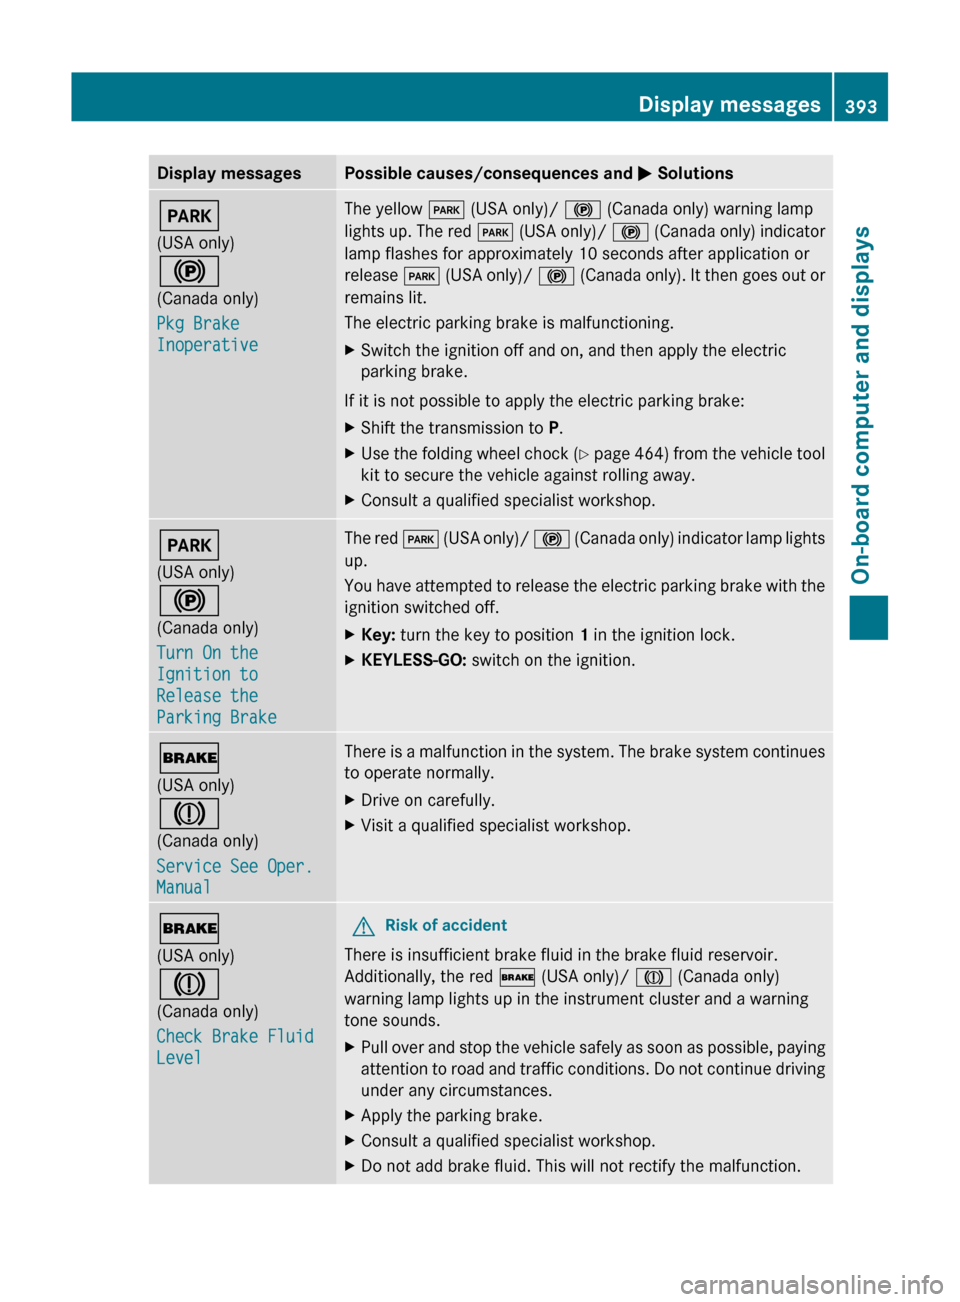
Display messagesPossible causes/consequences and M SolutionsF
(USA only)
!
(Canada only)
Pkg Brake
InoperativeThe yellow F (USA only)/ ! (Canada only) warning lamp
lights up. The red F (USA only)/ ! (Canada only) indicator
lamp flashes for approximately 10 seconds after application or
release F (USA only)/ ! (Canada only). It then goes out or
remains lit.
The electric parking brake is malfunctioning.XSwitch the ignition off and on, and then apply the electric
parking brake.
If it is not possible to apply the electric parking brake:
XShift the transmission to P.XUse the folding wheel chock (Y page 464) from the vehicle tool
kit to secure the vehicle against rolling away.XConsult a qualified specialist workshop.F
(USA only)
!
(Canada only)
Turn On the
Ignition to
Release the
Parking BrakeThe red F (USA only)/ ! (Canada only) indicator lamp lights
up.
You have attempted to release the electric parking brake with the
ignition switched off.XKey: turn the key to position 1 in the ignition lock.XKEYLESS-GO: switch on the ignition.$
(USA only)
J
(Canada only)
Service See Oper.
ManualThere is a malfunction in the system. The brake system continues
to operate normally.XDrive on carefully.XVisit a qualified specialist workshop.$
(USA only)
J
(Canada only)
Check Brake Fluid
LevelGRisk of accident
There is insufficient brake fluid in the brake fluid reservoir.
Additionally, the red $ (USA only)/ J (Canada only)
warning lamp lights up in the instrument cluster and a warning
tone sounds.
XPull over and stop the vehicle safely as soon as possible, paying
attention to road and traffic conditions. Do not continue driving
under any circumstances.XApply the parking brake.XConsult a qualified specialist workshop.XDo not add brake fluid. This will not rectify the malfunction.Display messages393On-board computer and displaysZ
Page 464 of 524
Vehicle equipment
i This manual describes all the standard
and optional equipment of your vehicle
which was available at the time of
purchase. Country-specific differences are
possible. Bear in mind that your vehicle
may not feature all functions described
here. This also refers to safety-related
systems and functions.
Where will I find...?
First-aid kit
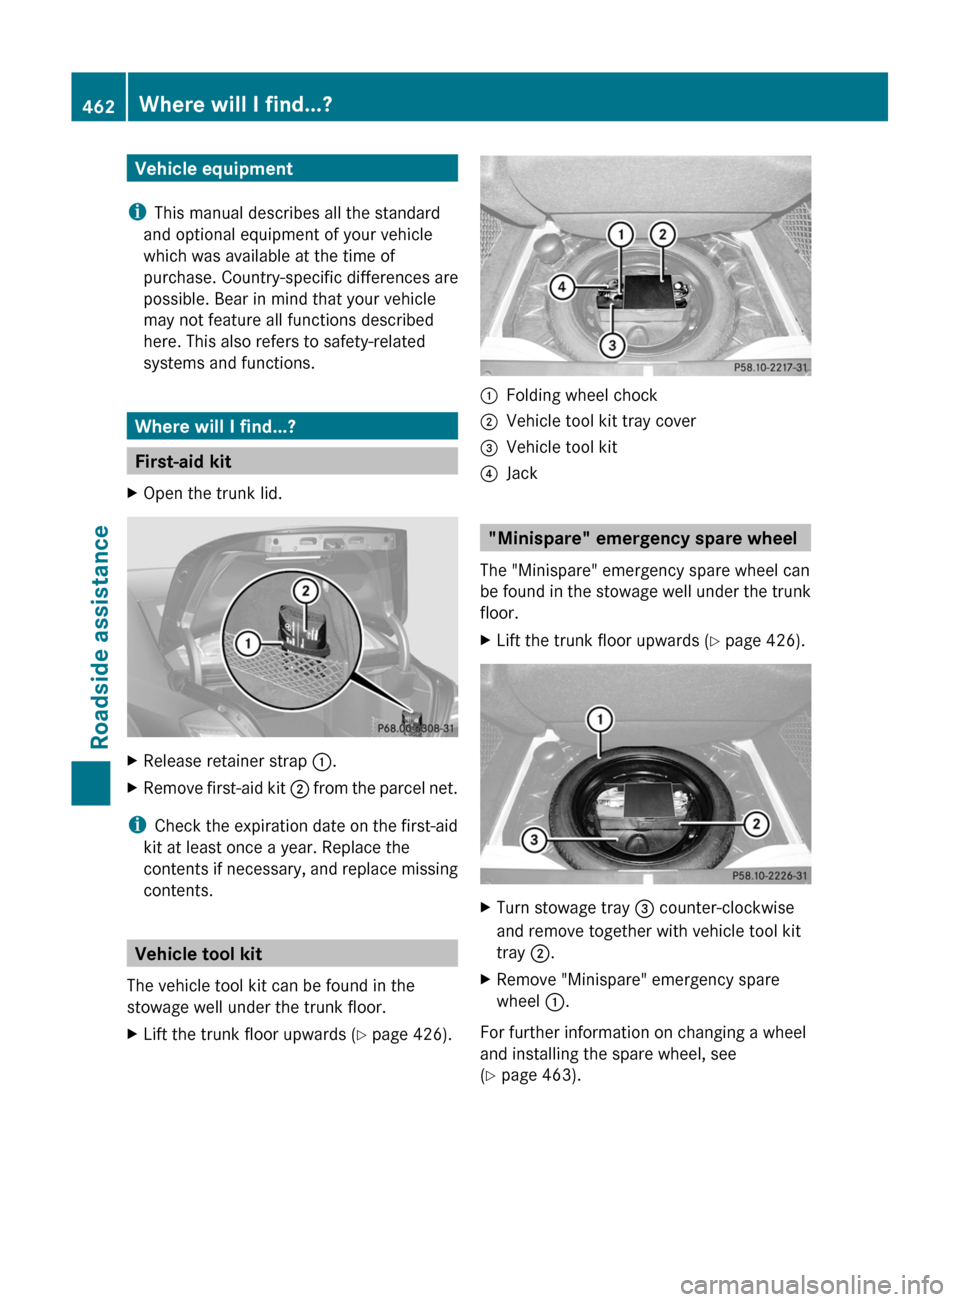
XOpen the trunk lid.XRelease retainer strap :.XRemove first-aid kit ; from the parcel net.
i
Check the expiration date on the first-aid
kit at least once a year. Replace the
contents if necessary, and replace missing
contents.
Vehicle tool kit
The vehicle tool kit can be found in the
stowage well under the trunk floor.
XLift the trunk floor upwards ( Y page 426).:Folding wheel chock;Vehicle tool kit tray cover=Vehicle tool kit?Jack
"Minispare" emergency spare wheel
The "Minispare" emergency spare wheel can
be found in the stowage well under the trunk
floor.
XLift the trunk floor upwards ( Y page 426).XTurn stowage tray = counter-clockwise
and remove together with vehicle tool kit
tray ;.XRemove "Minispare" emergency spare
wheel :.
For further information on changing a wheel
and installing the spare wheel, see
( Y page 463).
462Where will I find...?Roadside assistance
Page 465 of 524
Flat tire
Preparing the vehicle
Your vehicle may be equipped with a
"Minispare" emergency spare wheel or the
MOExtended run-flat system. ( Y page 467)
i Vehicle preparation is not necessary on
vehicles with the MOExtended run-flat
system.
XStop the vehicle as far away as possible
from traffic on solid, non-slippery and level
ground.XSwitch on the hazard warning lamps.XEngage the electric parking brake manually
( Y page 317).XBring the front wheels into the straight-
ahead position.XMove the DIRECT SELECT lever to P.XSwitch off the engine.XVehicles without KEYLESS-GO: remove
the key from the ignition lock.XVehicles with KEYLESS-GO: open the
driver's door.
The on-board electronics have status 0,
which is the same as the key having been
removed.XVehicles with KEYLESS-GO: remove the
Start/Stop button from the ignition lock
( Y page 299).XAll occupants must get out of the vehicle.
Make sure that they are not endangered as
they do so.XMake sure that no one is near the danger
area whilst a wheel is being changed.
Anyone who is not directly assisting in the
wheel change should, for example, stand
behind the barrier.XGet out of the vehicle. Pay attention to
traffic conditions when doing so.XClose the driver's door.Changing a wheel and mounting the
spare wheel
Preparing the vehicleGWarning
The wheel and tire size of the emergency
spare wheel/spare wheel may differ to that of
the damaged wheel. When using an
emergency spare wheel/spare wheel the
handling characteristics of the vehicle may
change.
Adapt your style of driving accordingly.
Never operate the vehicle with more than one
emergency spare wheel/spare wheel that
differs in size.
Only use an emergency spare wheel/spare
wheel of a differing size briefly and do not
switch off ESP ®
.
When using an emergency spare wheel, you
must not exceed the maximum speed of
50 mph (80 km/h).
GWarning
Have the different-sized emergency spare
wheel/spare wheel replaced with a new
wheel as soon as possible at a qualified
specialist workshop that has the necessary
specialist knowledge and tools to carry out
the work required. Mercedes-Benz
recommends that you use an authorized
Mercedes-Benz Center for this purpose. In
particular, work relevant to safety or on
safety-related systems must be carried out at
a qualified specialist workshop.
i Vehicles without an emergency spare
wheel/spare wheel are not equipped with
a tire-change tool kit at the factory. For
more information on which tools are
required to perform a wheel change on your
vehicle, e.g. wheel chock, alignment bolt,
or lug wrench, consult an authorized
Mercedes-Benz Center.
Flat tire463Roadside assistanceZ