oil MERCEDES-BENZ S-Class 2012 W221 Owner's Guide
[x] Cancel search | Manufacturer: MERCEDES-BENZ, Model Year: 2012, Model line: S-Class, Model: MERCEDES-BENZ S-Class 2012 W221Pages: 536, PDF Size: 25.27 MB
Page 462 of 536
XTurn cap : counterclockwise and remove
it.XAdd engine oil.
Vehicles with oil level measurement
function in the on-board computer: observe
the information in the on-board computer
when doing so. Vehicles with oil dipstick: if
the oil level is at or below the MIN mark on
the oil dipstick,
add 0.55 to 1.1 US qt (0.5 to 1.0 l) engine
oil.XReplace cap : on the filler neck and turn
clockwise.
Ensure that the cap locks into place
securely.XCheck the oil level again with the oil
dipstick ( Y page 458) or the on-board
computer ( Y page 458).
Further information on engine oil
( Y page 527).
Checking and adding other service
products
Checking the coolant level
Only check the coolant level when the vehicle
is on a level surface and the engine has cooled
down.
XTurn the SmartKey to position
2 (Y page 303) in the ignition lock.
On vehicles with KEYLESS-GO, press the
Start/Stop button twice ( Y page 303).XCheck the coolant temperature display in
the instrument cluster.
The coolant temperature must be below
158 ‡ (70 †).GWARNING
In order to avoid any potentially serious burns:
R use extreme caution when opening the
hood if there are any signs of steam or
coolant leaking from the cooling system, or
if the coolant temperature display indicates
that the coolant is overheated.
R do not remove the pressure cap on the
coolant reservoir if the coolant temperature
is above 158 ‡ (70 †). Allow the engine to
cool down before removing the cap. The
coolant reservoir contains hot fluid and is
under pressure.
R using a rag, slowly turn the cap
approximately 1
/ 2 turn to relieve excess
pressure. If opened immediately, scalding
hot fluid and steam will be blown out under
pressure.
R do not spill antifreeze on hot engine parts.
Antifreeze contains ethylene glycol which
may burn if it comes into contact with hot
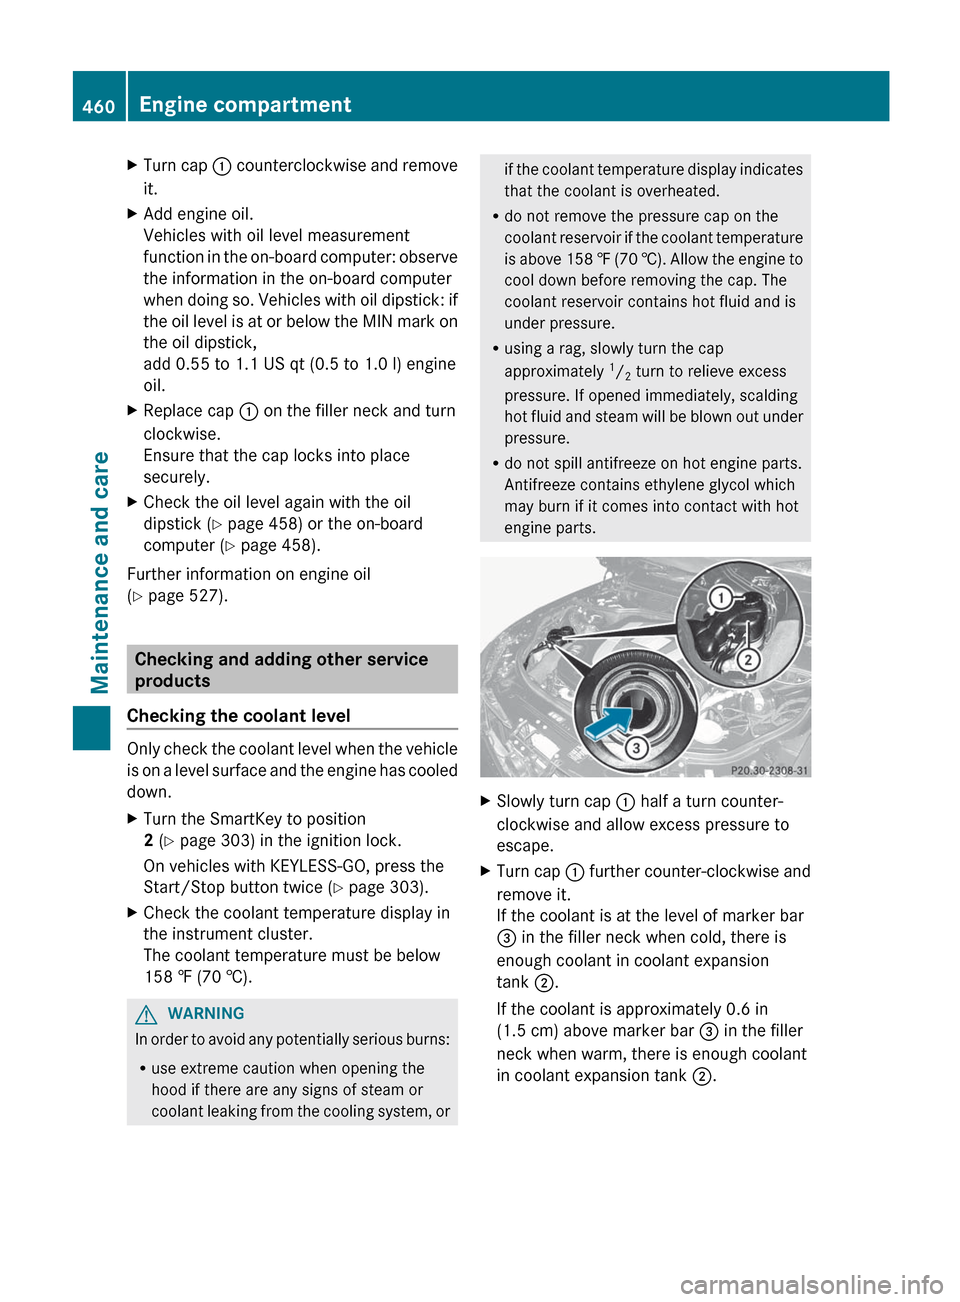
engine parts.XSlowly turn cap : half a turn counter-
clockwise and allow excess pressure to
escape.XTurn cap : further counter-clockwise and
remove it.
If the coolant is at the level of marker bar
= in the filler neck when cold, there is
enough coolant in coolant expansion
tank ;.
If the coolant is approximately 0.6 in
(1.5 cm) above marker bar = in the filler
neck when warm, there is enough coolant
in coolant expansion tank ;.460Engine compartmentMaintenance and care
Page 464 of 536
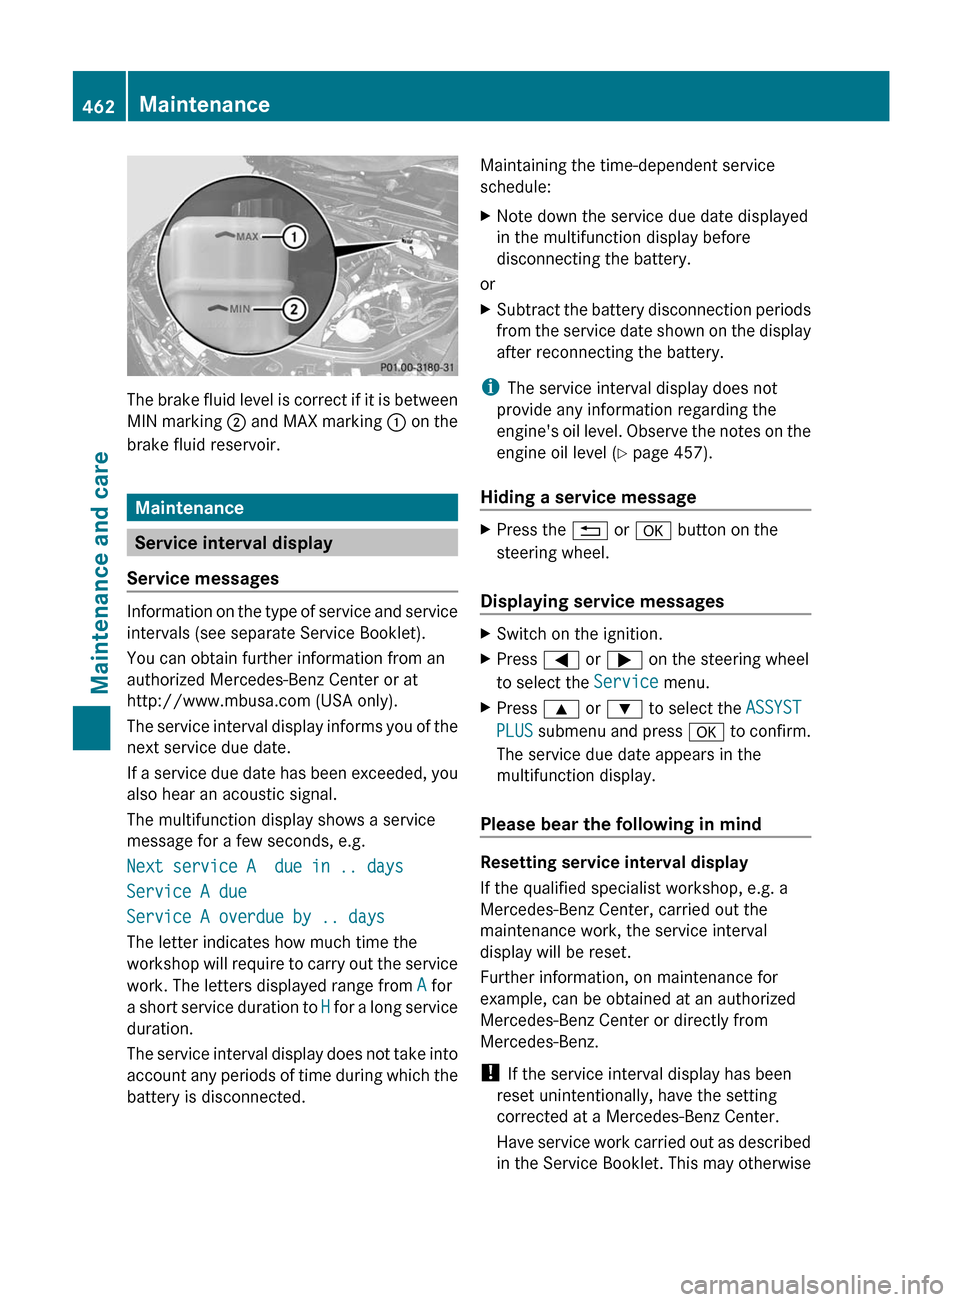
The brake fluid level is correct if it is between
MIN marking ; and MAX marking : on the
brake fluid reservoir.
Maintenance
Service interval display
Service messages
Information on the type of service and service
intervals (see separate Service Booklet).
You can obtain further information from an
authorized Mercedes-Benz Center or at
http://www.mbusa.com (USA only).
The service interval display informs you of the
next service due date.
If a service due date has been exceeded, you
also hear an acoustic signal.
The multifunction display shows a service
message for a few seconds, e.g.
Next service A due in .. days
Service A due
Service A overdue by .. days
The letter indicates how much time the
workshop will require to carry out the service
work. The letters displayed range from A for
a short service duration to H for a long service
duration.
The service interval display does not take into
account any periods of time during which the
battery is disconnected.
Maintaining the time-dependent service
schedule:XNote down the service due date displayed
in the multifunction display before
disconnecting the battery.
or
XSubtract the battery disconnection periods
from the service date shown on the display
after reconnecting the battery.
i The service interval display does not
provide any information regarding the
engine's oil level. Observe the notes on the
engine oil level ( Y page 457).
Hiding a service message
XPress the % or a button on the
steering wheel.
Displaying service messages
XSwitch on the ignition.XPress = or ; on the steering wheel
to select the Service menu.XPress 9 or : to select the ASSYST
PLUS submenu and press a to confirm.
The service due date appears in the
multifunction display.
Please bear the following in mind
Resetting service interval display
If the qualified specialist workshop, e.g. a
Mercedes-Benz Center, carried out the
maintenance work, the service interval
display will be reset.
Further information, on maintenance for
example, can be obtained at an authorized
Mercedes-Benz Center or directly from
Mercedes-Benz.
! If the service interval display has been
reset unintentionally, have the setting
corrected at a Mercedes-Benz Center.
Have service work carried out as described
in the Service Booklet. This may otherwise
462MaintenanceMaintenance and care
Page 467 of 536

Rtrim elements
R ventilation slots
Damaged seals or electrical components
can lead to leaks or failures.
Cleaning the wheels
! Do not use acidic wheel cleaning products
to remove brake dust. This could damage
wheel bolts and brake components.
! Do not park the vehicle for an extended
period straight after cleaning it, particularly
after having cleaned the wheels with wheel
cleaner. Wheel cleaners could cause
increased corrosion of the brake discs and
brake pads/linings. For this reason, you
should drive for a few minutes after
cleaning. Braking heats the brake discs and
the brake pads/linings, thus drying them.
The vehicle can then be parked.
Cleaning the paintwork
Scratches, corrosive deposits, areas affected
by corrosion and damage caused by
inadequate care cannot always be completely
repaired. In such cases, visit a qualified
specialist workshop, e.g. an authorized
Mercedes-Benz Center.
XRemove impurities immediately, where
possible, whilst avoiding rubbing too hard.XSoak insect remains with insect remover
and rinse off the treated areas afterwards.XSoak bird droppings with water and rinse
off the treated areas afterwards.XRemove coolant, brake fluid, tree resin,
oils, fuels and greases by rubbing gently
with a cloth soaked in petroleum ether or
lighter fluid.XUse tar remover to remove tar stains.XUse silicone remover to remove wax.
! Do not affix:
R stickers
R films
R magnetic plates or similar items
to painted surfaces. You could otherwise
damage the paintwork.
If water no longer forms "beads" on the paint
surface, use the paint care products
recommended and approved by Mercedes-
Benz. This is the case approximately every
three to five months, depending on the
climate conditions and the care product used.
If dirt has penetrated the paint surface or the
paint has become dull, the paint cleaner
recommended and approved by Mercedes-
Benz should be used.
Do not use these care products in the sun or
on the hood while the hood is hot.XUse a suitable touch-up stick, e.g. MB
Touch-Up Stick, to correct smaller areas of
paint damage quickly and provisionally.
Matte finish care
If your vehicle has a clear matte finish,
observe the following instructions in order to
avoid damage to the paintwork due to
incorrect care.
These notes also apply to light alloy wheels
with a clear matte finish.
! Never polish the vehicle or the light alloy
wheels. Polishing causes the finish to
shine.
! The following may cause the paint to
become shiny and thus reduce the matte
effect:
R Vigorous rubbing with unsuitable
materials.
R Frequent use of car washes.
R Washing the vehicle in direct sunlight.
! Never use paint cleaner, buffing or
polishing products, or gloss preserver, e.g.
wax. These products are only suitable for
high-gloss surfaces. Their use on vehicles
with matte finish leads to considerable
surface damage (shiny, spotted areas).
Care465Maintenance and careZ
Page 470 of 536

GWARNING
Please do not forget that your primary
responsibility is to drive the vehicle. A driver's
attention to the road must always be his/her
primary focus when driving. For your safety
and the safety of others, stop before trying to
remove window fogging or cleaning the
window in front of the Night View Assist Plus
camera.
Bear in mind that at a speed of just 30 mph
(approximately 50 km/h), your vehicle is
covering a distance of 44 feet (approximately
14 m) every second.
XFold down the camera cover by recess :.XUse a soft cloth to clean the windshield in
front of camera ;.
Cleaning the plastic trim
GWARNING
When cleaning the steering wheel boss and
dashboard, do not use cockpit sprays or
cleaning agents containing solvents. Cleaning
agents containing solvents cause the surface
to become porous, and as a result, plastic
parts may break away and be thrown around
the interior when an air bag is deployed, which
may result in severe injuries.
! Do not affix the following to plastic
surfaces:
R stickers
R films
R scented oil bottles or similar items
You can otherwise damage the plastic.
! Do not allow cosmetics, insect repellent
or sunscreen to come into contact with the
plastic trim. This maintains the high-quality
look of the surfaces.XWipe the plastic trim with a damp, lint-free
cloth, e.g. a microfiber cloth.XHeavy soiling: use car care and cleaning
products recommended and approved by
Mercedes-Benz.
The surface may change color temporarily.
Wait until the surface is dry again.
Cleaning the steering wheel and gear or
selector lever
XThoroughly wipe with a damp cloth or use
leather care agents that have been
recommended and approved by Mercedes-
Benz.
Cleaning genuine wood and trim
elements
XWipe the wooden trim and trim pieces with
a damp, lint-free cloth, e.g. a microfiber
cloth.XHeavy soiling: use car care and cleaning
products recommended and approved by
Mercedes-Benz.
! Do not use solvent-based cleaning agents
such as tar remover, wheel cleaners,
polishes or waxes. There is otherwise a risk
of damaging the surface.
468CareMaintenance and care
Page 478 of 536
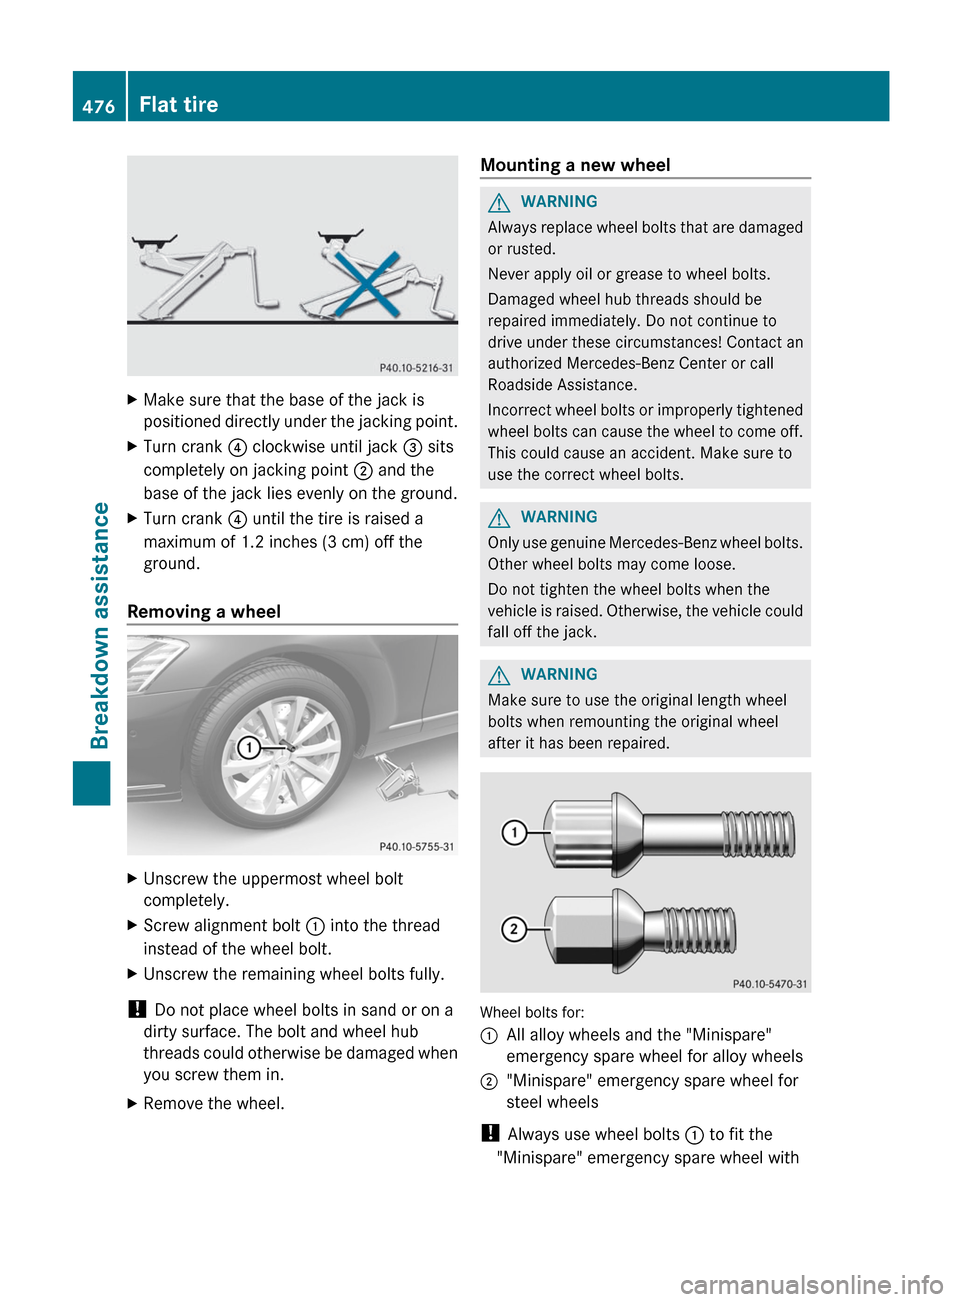
XMake sure that the base of the jack is
positioned directly under the jacking point.XTurn crank ? clockwise until jack = sits
completely on jacking point ; and the
base of the jack lies evenly on the ground.XTurn crank ? until the tire is raised a
maximum of 1.2 inches (3 cm) off the
ground.
Removing a wheel
XUnscrew the uppermost wheel bolt
completely.XScrew alignment bolt : into the thread
instead of the wheel bolt.XUnscrew the remaining wheel bolts fully.
! Do not place wheel bolts in sand or on a
dirty surface. The bolt and wheel hub
threads could otherwise be damaged when
you screw them in.
XRemove the wheel.Mounting a new wheelGWARNING
Always replace wheel bolts that are damaged
or rusted.
Never apply oil or grease to wheel bolts.
Damaged wheel hub threads should be
repaired immediately. Do not continue to
drive under these circumstances! Contact an
authorized Mercedes-Benz Center or call
Roadside Assistance.
Incorrect wheel bolts or improperly tightened
wheel bolts can cause the wheel to come off.
This could cause an accident. Make sure to
use the correct wheel bolts.
GWARNING
Only use genuine Mercedes-Benz wheel bolts.
Other wheel bolts may come loose.
Do not tighten the wheel bolts when the
vehicle is raised. Otherwise, the vehicle could
fall off the jack.
GWARNING
Make sure to use the original length wheel
bolts when remounting the original wheel
after it has been repaired.
Wheel bolts for:
:All alloy wheels and the "Minispare"
emergency spare wheel for alloy wheels;"Minispare" emergency spare wheel for
steel wheels
! Always use wheel bolts : to fit the
"Minispare" emergency spare wheel with
476Flat tireBreakdown assistance
Page 514 of 536
Kilopascal (kPa)
Metric unit for tire pressure. 6.9 kPa is the
equivalent of 1 psi. Another unit for tire
pressure is bar. There are 100 kilopascals
(kPa) to 1 bar.
Load index
In addition to the load bearing index, the load
index may also be imprinted on the sidewall
of the tire. This specifies the load bearing
capacity more precisely.
Curb weight
The weight of a vehicle with standard
equipment including the maximum capacity
of fuel, oil and coolant. It also includes the air-
conditioning system and optional equipment
if these are installed in the vehicle, but does
not include passengers or luggage.
Maximum load rating
The maximum load rating in kilograms or
pounds is the maximum weight for which a
tire is approved.
Maximum permissible tire pressure
Maximum permissible tire pressure for one
tire.
Maximum load on one tire
Maximum load on one tire. This is calculated
by dividing the maximum axle load of one axle
by two.
PSI (pounds per square inch)
A standard unit of measure for tire pressure.
Aspect ratio
Relationship between tire height and tire
width in percent.
Tire pressure
This is pressure inside the tire applying an
outward force to each square inch of the tire's
surface. The tire pressure is specified in
pounds per square inch (psi), in kilopascal
(kPa) or in bar. The tire pressure should only
be corrected when the tires are cold.
Tire pressure of cold tires
The tires are cold:
R if the vehicle has been parked without
direct sunlight on the tires for at least three
hours and
R if the vehicle has not been driven more than
1 mile (1.6 km).
Tread
The part of the tire that comes into contact
with the road.
Bead
The tire bead ensures that the tire sits
securely on the wheel. There are several steel
wires in the bead to prevent the tire from
coming loose from the wheel rim.
Sidewall
The part of the tire between the tread and the
bead.
Weight of optional extras
The combined weight of those optional extras
that weigh more than the replaced standard
part and more than 2.3 kilograms (5 lbs).
512Definition of terms for tires and loadingWheels and tires
Page 516 of 536

! On vehicles equipped with a tire pressure
monitor, electronic components are
located in the wheel.
Tire-mounting tools should not be used
near the valve. This could damage the
electronic components.
Always have the tires changed at a qualified
specialist workshop, e.g. an authorized
Mercedes-Benz Center.
Direction of rotation
Tires with a specified direction of rotation
have additional benefits, e.g. if there is a risk
of hydroplaning. You will only gain these
benefits if the correct direction of rotation is
maintained.
An arrow on the sidewall of the tire indicates
its correct direction of rotation.
You may mount a spare wheel/emergency
spare wheel against the direction of rotation.
Observe the time restriction on use as well as
the speed limit specified on the spare wheel/
emergency spare wheel.
Storing wheels
Store wheels that are not being used in a cool,
dry and preferably dark place. Protect the
tires from oil, grease, gasoline and diesel.
Cleaning the wheels
GWARNING
Do not use power washers with circular-jet
nozzles (dirt grinders) to clean your vehicle, in
particular the tires. You could otherwise
damage the tires and cause an accident.
Wheel and tire combinations
Please bear the following in mind
! For safety reasons, Mercedes-Benz
recommends that you only use Tires and
wheels which have been approved by
Mercedes-Benz specifically for your
vehicle.
These tires have been specially adapted for
use with the control systems, such as ABS
or ESP ®
, and are marked as follows:
R MO = Mercedes-Benz Original
R MOE = Mercedes-Benz Original Extended
(tires featuring run-flat characteristics)
R MO1 = Mercedes-Benz Original (only
certain AMG tires)
Mercedes-Benz Original Extended tires
may only be used on wheels that have been
specifically approved by Mercedes-Benz.
Only use tires, wheels or accessories
tested and approved by Mercedes-Benz.
Certain characteristics, e.g. handling,
vehicle noise emissions or fuel
consumption, may otherwise be adversely
affected. In addition, when driving with a
load, tire dimension variations could cause
the tires to come into contact with the
bodywork and axle components. This could
result in damage to the tires or the vehicle.
Mercedes-Benz accepts no liability for
damage resulting from the use of tires,
wheels or accessories other than those
tested and approved.
Further information about tires, wheels and
approved combinations can be obtained
from any authorized Mercedes-Benz
Center.
i The Tire and Load Information placard
with the recommended tire pressures is
attached to the B-pillar on the driver's side.
Further information about driving at high
speeds or driving with vehicle loads that are
lighter than the maximum vehicle load can
be found in the tire pressure table on the
inside of the fuel filler flap. Check tire
pressures regularly, and only when the tires
are cold. Comply with the maintenance
recommendations of the tire manufacturer
in the vehicle document wallet.514Wheel and tire combinationsWheels and tires
Page 524 of 536

iThe data shown on the identification plate
is example data. This data is different for
every vehicle and can deviate from the data
shown here. You can find the data
applicable to your vehicle on the vehicle's
identification plate.
Vehicle identification number (VIN)
The vehicle identification number (VIN) can
be found in the following locations:
R on the vehicle identification plate
( Y page 521)
R at the lower edge of the windshield
( Y page 522)
In addition to being stamped on the vehicle
identification plate, the vehicle identification
number (VIN) is also stamped onto the vehicle
body. It is under the trim behind the rear seat
armrest.
XFold down the rear seat armrest.XOpen the trim.
You will see vehicle identification number
(VIN) :.Engine number:Emission control information plate,
including the certification of both federal
and Californian emissions standards;Engine number (stamped into the
crankcase)=VIN (on the lower edge of the windshield)
Service products and capacities
Important safety notes
Service products include the following:
R fuels (e.g. gasoline, diesel)
R additives for exhaust gas aftertreatment
(DEF)
R lubricants (e.g. engine oil, transmission oil)
R coolant
R brake fluid
R windshield washer fluid
Vehicle components and their respective
lubricants must match. You should therefore
only use products that have been tested and
approved by Mercedes-Benz.
Information on tested and approved products
can be obtained at a Mercedes-Benz Center
or on the Internet at http://
www.mbusa.com (USA only).
GWARNING
Comply with all valid regulations with respect
to handling, storing and disposing of service
fluids. Otherwise, you could endanger
persons or the environment.
522Service products and capacitiesTechnical data
Page 526 of 536

CapacitiesModelCapacityFuel, coolant,
lubricants, etc.Engine oil and
filterS 550 34
S 550 4MATIC 34
S 63 AMG9.0 US qt (8.5 l)Approved engine
oilsS 600
S 65 AMG9.5 US qt (9.0 l)S 350 BlueTEC
4MATIC8.5 US qt (8.0 l)Cooling systemS 550 34
S 550 4MATIC 34Approximately 14.5 US qt
(13.7 l)MB 325.0 or
MB 326.0
anticorrosion/
antifreezeS 600Approximately 15.3 US qt
(14.5 l)S 63 AMGApproximately 12.2 US qt
(11.5 l)S 65 AMGApproximately 14.7 US qt
(13.9 l)S 350 BlueTEC
4MATICApproximately 12.0 US qt
(11.4 l)Tank capacityS 550 34
S 550 4MATIC 34
S 350 BlueTEC
4MATIC21.9 US gal (83.0 l)Gasoline engines:
premium-grade
unleaded gasoline
(at least 91 octane,
average value
between 96 RON/
86 MON)
Diesel engines:
ULTRA-LOW
SULFUR HIGHWAY
DIESEL FUEL (ULSD,
maximum sulfur
content 15 ppm)S 600
S 63 AMG
S 65 AMG23.8 US gal (90.0 l)ReserveAll models except
AMG vehicles2.9 US gal (11.0 l)AMG vehicles3.7 US gal (14.0 l)34 BlueEFFICIENCY.524Service products and capacitiesTechnical data
Page 528 of 536

RIPA
R TBA
For MTBE, the concentration should not
exceed 15%.
The concentration of methanol in gasoline
including other additives must not exceed 3%.
Using mixtures of methanol and ethanol is not
permitted. Gasohol, a mixture of 10% ethanol
and 90% unleaded gasoline, can be used.
All of these mix fuels must fulfill the fuel
requirements, e.g.:
R knock resistance
R boiling point
R vapor pressure
Diesel engines – important safety notes
! Only use commercially available ULTRA-
LOW SULFUR DIESEL FUEL (ULSD, 15 ppm
MAXIMUM SULFUR) that meets the
ASTM D975 standard. Failure to use
ULTRA-LOW SULFUR DIESEL FUEL (ULSD)
can severely damage the vehicle's exhaust
gas aftertreatment system.
! Do not fill the tank with gasoline. Do not
blend diesel fuel with gasoline or kerosene.
Otherwise, the fuel system and the engine
could be damaged.
To prevent malfunctions, diesel fuel with
improved flow characteristics is available in
the winter months. Check with your gas
station.
Information on the fuel grade can usually be
found on the gas pump. If the information
cannot be found on the gas pump, ask the gas
station personnel. For further information,
consult an authorized Mercedes-Benz Center
or go to the Internet site
http://www.mbusa.com (USA only).
Diesel engines – fuels containing
biodiesel (FAME [fatty acid methyl ester])
Mercedes-Benz USA approves the use of B5
(ULSD with a maximum of up to five percent
by volume biodiesel) for all diesel engineswith common rail direct injection (CDI) and
BlueTEC.
Pure biodiesel and diesel fuels that have a
higher percentage of biodiesel, e.g. B20, can
damage the fuel system and the engine and
are therefore not approved.
For further information, please ask the gas
station personnel. The label on the gas pump
must indicate clearly that the B5 biodiesel
blend fulfills the ULSD standard. If the label
is not clear, do not refuel the vehicle.
Do not refuel your vehicle with fuels unless
they have been approved by Mercedes-Benz.
Additives in gasoline
One of the main problems of poor fuel quality
is the forming of deposits that are caused
during the gasoline combustion process.
Mercedes-Benz recommends that you use
fuel brands that have the additives.
If you use fuels without these additives for an
extended period of time, there may be a
buildup of carbon deposits, especially on the
inlet valves and in the combustion chamber.
This could lead to engine problems, e.g.:
R longer engine warm-up phase
R uneven idle
R engine noise
R misfiring
R loss of power
Carbon deposits may form if the availability
of gasoline with relevant additives is
insufficient (in certain regions). In this case,
Mercedes-Benz recommends the use of
additives that have been approved for
Mercedes-Benz vehicles.
Consult an authorized Mercedes-Benz Center
or go to the Internet site
http://www.mbusa.com (USA only) for a list
of approved products. Observe the
instructions for use on the product label.
Do not mix other fuel additives with fuel. This
causes unnecessary costs and could damage
the engine.
526Service products and capacitiesTechnical data