Ata MERCEDES-BENZ S-Class 2012 W221 Repair Manual
[x] Cancel search | Manufacturer: MERCEDES-BENZ, Model Year: 2012, Model line: S-Class, Model: MERCEDES-BENZ S-Class 2012 W221Pages: 536, PDF Size: 25.27 MB
Page 208 of 536
XTo switch from the character bar to the
list: slide ZV the COMAND controller until
the character bar is hidden.
or
XSelect ¬.XTo call a contact: select by sliding ZVÆ
or turning cVd the COMAND controller
and press W to confirm.
i
The phone book is also available via the
on-board computer ( Y page 383).
Calling up contacts using the character
bar
XPhone book: select Name in the telephone
basic menu by sliding VÆ and turning
cVd the COMAND controller and press
W to confirm.XAddress book: select Data/Connections
in the telephone basic menu by sliding
V Æ and turning cVd the COMAND
controller and press W to confirm.XSelect Address Book and press W to
confirm.XTo select a character: select by sliding
ZV Æ or XVY the COMAND controller and
press W to confirm. Repeat this procedure
until COMAND automatically switches over
to the list.
You determine the first letter of the entry
you are looking for with the first character
you enter. If there are similar entries, the
next character which is different will be
displayed and offered for selection.
i You can also use the telephone number
keypad to enter characters.
Creating new contacts/changing
contacts
i In certain countries, this function stops
being available from a vehicle speed of
more than approximately 3 mph (5 km/h).
As soon as the speed falls below
approximately 2 mph (3 km/h), the
function becomes available again.
i You can enter address data directly into
the address book. If you store contacts in
the phone book, these are also saved in the
address book.
i Automatically imported contacts cannot
be edited. They have to be saved first
before being copied to the COMAND
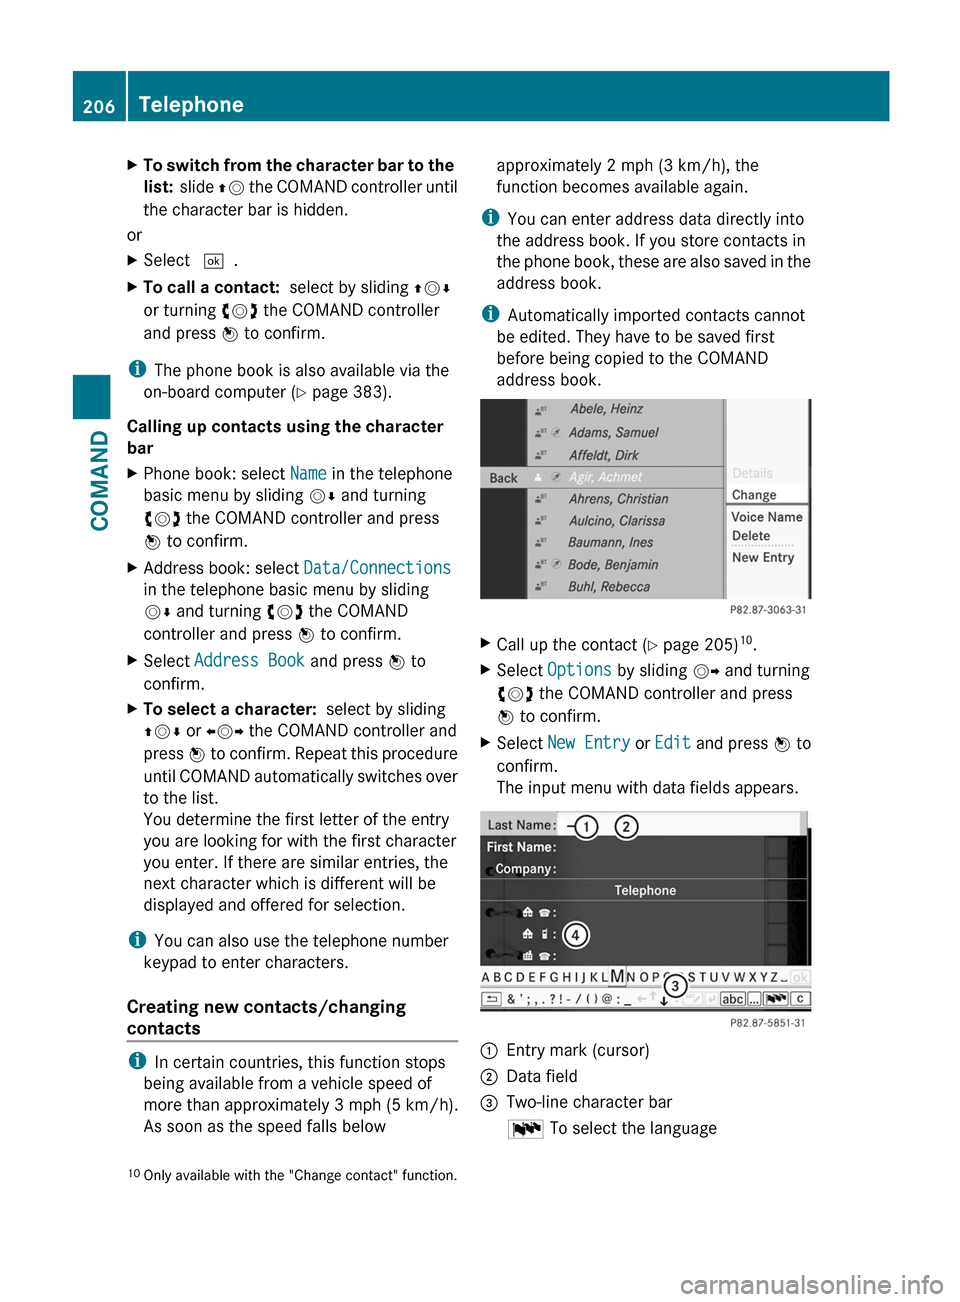
address book.XCall up the contact ( Y page 205) 10
.XSelect Options by sliding VY and turning
cVd the COMAND controller and press
W to confirm.XSelect New Entry or Edit and press W to
confirm.
The input menu with data fields appears.:Entry mark (cursor);Data field=Two-line character barB To select the language10
Only available with the "Change contact" function.206TelephoneCOMAND
Page 209 of 536
p To select the character set*/E To select uppercase and
lowercase letters% BackF To delete your selection¬ To confirm your selection?Preset phone categoryXEnter the respective data in the data fields.XTo enter data in the data field: select the
respective characters from character bar
= .XTo move the cursor in the data field:
select the respective characters from
character bar =.XTo change data fields: slide ZV the
COMAND controller until the character bar
is hidden.XSlide ZVÆ the COMAND controller and
press W to confirm.
or
XPress Æ in the character bar.XTo cancel data entry: select the %
symbol in the character bar and press W
to confirm.
If one of the data fields contains data, a
prompt will appear asking whether you
wish to store the entry.XTo save data entry: select the ¬
symbol in the character bar and press W
to confirm.
The entry is created in the phone book and
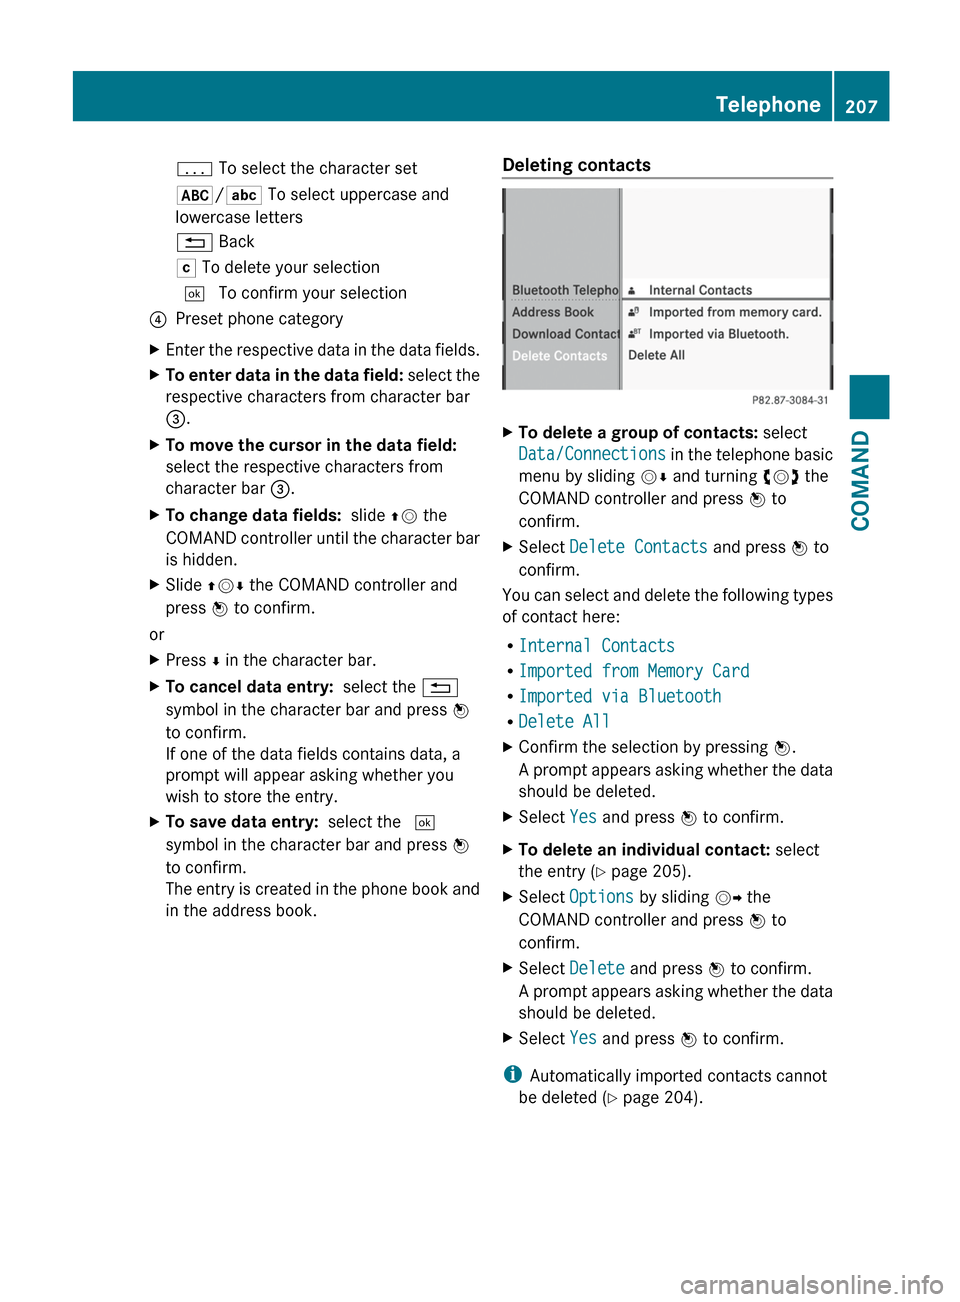
in the address book.Deleting contactsXTo delete a group of contacts: select
Data/Connections in the telephone basic
menu by sliding VÆ and turning cVd the
COMAND controller and press W to
confirm.XSelect Delete Contacts and press W to
confirm.
You can select and delete the following types
of contact here:
R Internal Contacts
R Imported from Memory Card
R Imported via Bluetooth
R Delete All
XConfirm the selection by pressing W.
A prompt appears asking whether the data
should be deleted.XSelect Yes and press W to confirm.XTo delete an individual contact: select
the entry ( Y page 205).XSelect Options by sliding VY the
COMAND controller and press W to
confirm.XSelect Delete and press W to confirm.
A prompt appears asking whether the data
should be deleted.XSelect Yes and press W to confirm.
i
Automatically imported contacts cannot
be deleted ( Y page 204).
Telephone207COMANDZ
Page 210 of 536
Calling a number stored in an entry
Using the phone book
XSelect Name in the telephone basic menu
by sliding VY and turning cVd the
COMAND controller and press W to
confirm.XCall up the contact ( Y page 205).XContact with multiple telephone
numbers (with the G symbol): press
W .
or
XPress SEND on the telephone keypad.
A list of all telephone numbers is opened.XSelect the desired number by turning
cVd the COMAND controller.XPress W.
or
XPress SEND on the telephone keypad.
The number is dialed.XContact with one telephone number
(without the G symbol): press W.
or
XPress SEND on the telephone keypad.
The number is dialed.
i You can also use the phone book in the
on-board computer to make a call
( Y page 383).
Using the address book
XSelect Data/Connections in the
telephone basic menu by sliding VÆ and
turning cVd the COMAND controller and
press W to confirm.XSelect Address Book and press W to
confirm.XCall contact ( Y page 205) and press W to
confirm.XSelect the telephone number by turning
cVd the COMAND controller and press
W to confirm.Starting route guidance to an entry
i
This function is available as soon as you
have stored a destination in the destination
memory ( Y page 179). COMAND also
stores the destination in the address book
with the complete navigable address data.
In this case, navigation can be started
without any further data input.
If the contact entry contains a postal
address, e.g. as a result of importing a
vCard, the system can also navigate to this
address. If the data is incomplete or
unclear, COMAND asks the user to enter
the relevant address data. After the entry
has been completed and navigation has
been started, COMAND replaces the
existing address with the navigable
address if necessary.
XSearch for an address book entry using the
¤ symbol.XConfirm the entry by pressing W.
Telephone numbers and addresses are
displayed.XSelect the address data field.XPress the COMAND controller.
or
XSelect Options by sliding VY the
COMAND controller and press W to
confirm.XSelect Navigate and press W to confirm.XSelect Start and press W to confirm.
Voice tags
i
Voice tags are entered via the Voice
Control System; see the separate operating
instructions for the Voice Control System.
Adding or changing a voice tag
i You can add one voice tag per address
book entry.
208TelephoneCOMAND
Page 212 of 536
Incoming calls which you could not or did not
want to answer are marked with a symbol in
front of the name or phone number.
Storing a phone number which has not
yet been stored
Introduction
For incoming calls from a person who is not
in the address book, COMAND displays the
phone number in the call list. You can save
this entry.
Storing as a new entry in the address book
XOpen a call list and select an entry
( Y page 209).XSelect Options by sliding VY the
COMAND controller and press W to
confirm.XSelect Save Number and press W to
confirm.XSelect New Entry and press W to confirm.XSelect a category for the number, e.g.
Home , and press W to confirm.XSelect a category for the phone, e.g.
Cellular Phone Number , and press W to
confirm.Number categoryDisplay (phone
book and address
book)Not ClassifiedNo symbolHome6Work\Phone categoryDisplay (phone
book and address
book)Not ClassifiedNo symbolMobile Phone¢Pager¨Phone categoryDisplay (phone
book and address
book)Car^Landline¬PreferredO
i If you have not entered the phone number
in a number and telephone category,
the ; icon will appear in the display.
XSelect Next (save) and press W to
confirm.
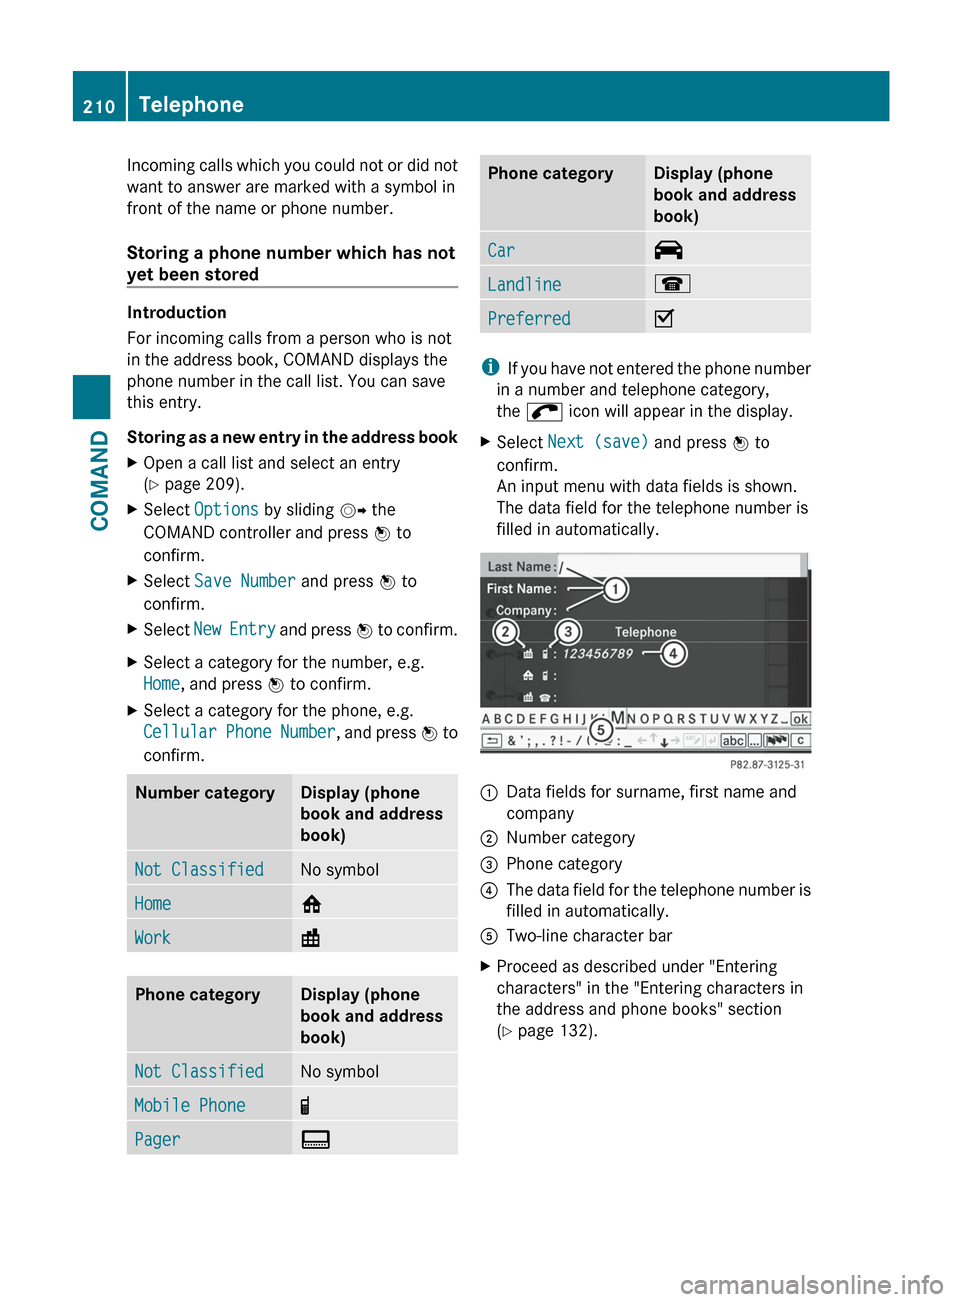
An input menu with data fields is shown.
The data field for the telephone number is
filled in automatically.:Data fields for surname, first name and
company;Number category=Phone category?The data field for the telephone number is
filled in automatically.ATwo-line character barXProceed as described under "Entering
characters" in the "Entering characters in
the address and phone books" section
( Y page 132).210TelephoneCOMAND
Page 213 of 536
Adding a phone number to an address
book entryXOpen a call list and select an entry
( Y page 209).XSelect Options by sliding VY the
COMAND controller and press W to
confirm.XSelect Save Number and press W to
confirm.XSelect Add and press W to confirm.
The search menu for address book entries
appears.XSearch for the desired entry ( Y page 205).XPress W when you have finished searching.XSelect a category for the number, e.g.
Home , and press W to confirm.XSelect a category for the phone, e.g.
Cellular Phone Number , and press W to
confirm.XSelect Next (save) and press W to
confirm.
COMAND stores the data if there are fewer
than five numbers assigned to the entry you
are searching for.
You will see a message to this effect.
If five numbers are stored for the entry you
are searching for, a prompt will appear
asking whether you wish to overwrite one
of the existing numbers.XSelect Yes or No and press W to confirm.
If you select Yes, a selection list with the
five existing numbers appears.
If you select No, the process will be aborted.XSelect the number to be overwritten in the
list by turning cVd the COMAND controller
and press W to confirm.
COMAND overwrites the selected number
with the new data.Audio
Radio mode
General information
i Portable electronic devices in the vehicle
may seriously impair radio reception.
Switching to radio mode
Option 1
XPress R the function button.
The radio display appears. You will hear the
last station played on the last waveband.
Option 2
XSelect Audio in the main function bar by
sliding ZV and turning cVd the COMAND
controller and press W to confirm.
If radio mode was the last mode selected,
it will now be active.
If another audio mode is switched on, you
can now switch to radio mode in the audio
menu.XSelect Audio by sliding ZV the COMAND
controller and pressing W to confirm.
The audio menu appears.
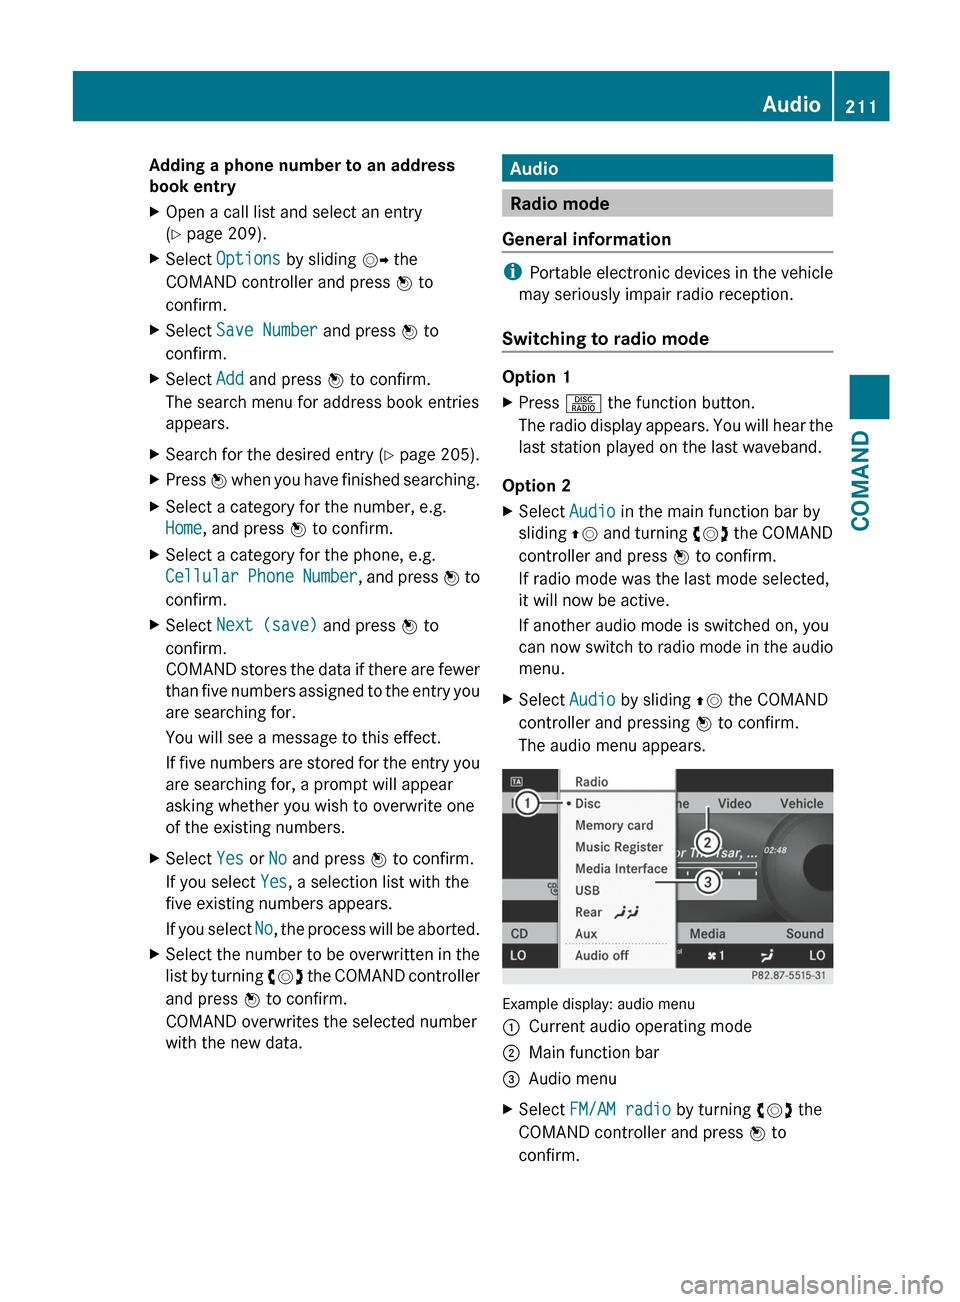
Example display: audio menu
:Current audio operating mode;Main function bar=Audio menuXSelect FM/AM radio by turning cVd the
COMAND controller and press W to
confirm.Audio211COMANDZ
Page 217 of 536
Displaying program information
This function is only available for analog FM
and digital AM/FM programs (HD Radio).
Information relevant to the current station is
shown in the display window.
XSelect Info in the radio display by sliding
V Æ and turning cVd the COMAND
controller and press W to confirm.
Information on the currently selected
station is displayed. The contents and
purpose of the information depend on the
HD Radio station.
HD Radio
Important notes
The "HD Radio" section provides detailed
information on the following:
R special functions available exclusively for
HD Radio when compared with analog AM
and FM radio
R selecting an HD Radio station
R displaying program information
i Optional HD Radio equipment is required
to make use of the HD Radio functions
described here. Registration is not
required.
i HD Radio functions offer:
R digital transmission on the same
wavebands as analog AM/FM. The
analog AM/FM stations remain in the
same position when selecting a station.
R the ability to broadcast several program
streams over a single AM/FM frequency
(e.g. HD1, HD2 etc.)
R clear, interference free reception
R on FM stations: CD quality sound; on AM
stations: analog FM station sound quality
R a wide range of data services, text-based
information – name of artist, name of
song etc. – on the display.
For further information on HD Radio, visit
http://www.hdradio.com .
i Please note that sub-programs and
program information shown in the
illustrations are dependent on the program
broadcast by the respective radio station.
The program contents may vary. The sub-
programs and programs shown in the
illustrations in this manual may therefore
differ from the sub-programs and programs
broadcast by radio stations.
Switching on HD Radio
i As HD Radio stations are broadcast in the
AM/FM wavebands, operating HD Radio is
very similar to operating analog AM/FM
radio. This section describes only those
functions that differ from standard FM
radio functions.
Operating analog FM/AM radio is described
in the "Radio" section ( Y page 211).
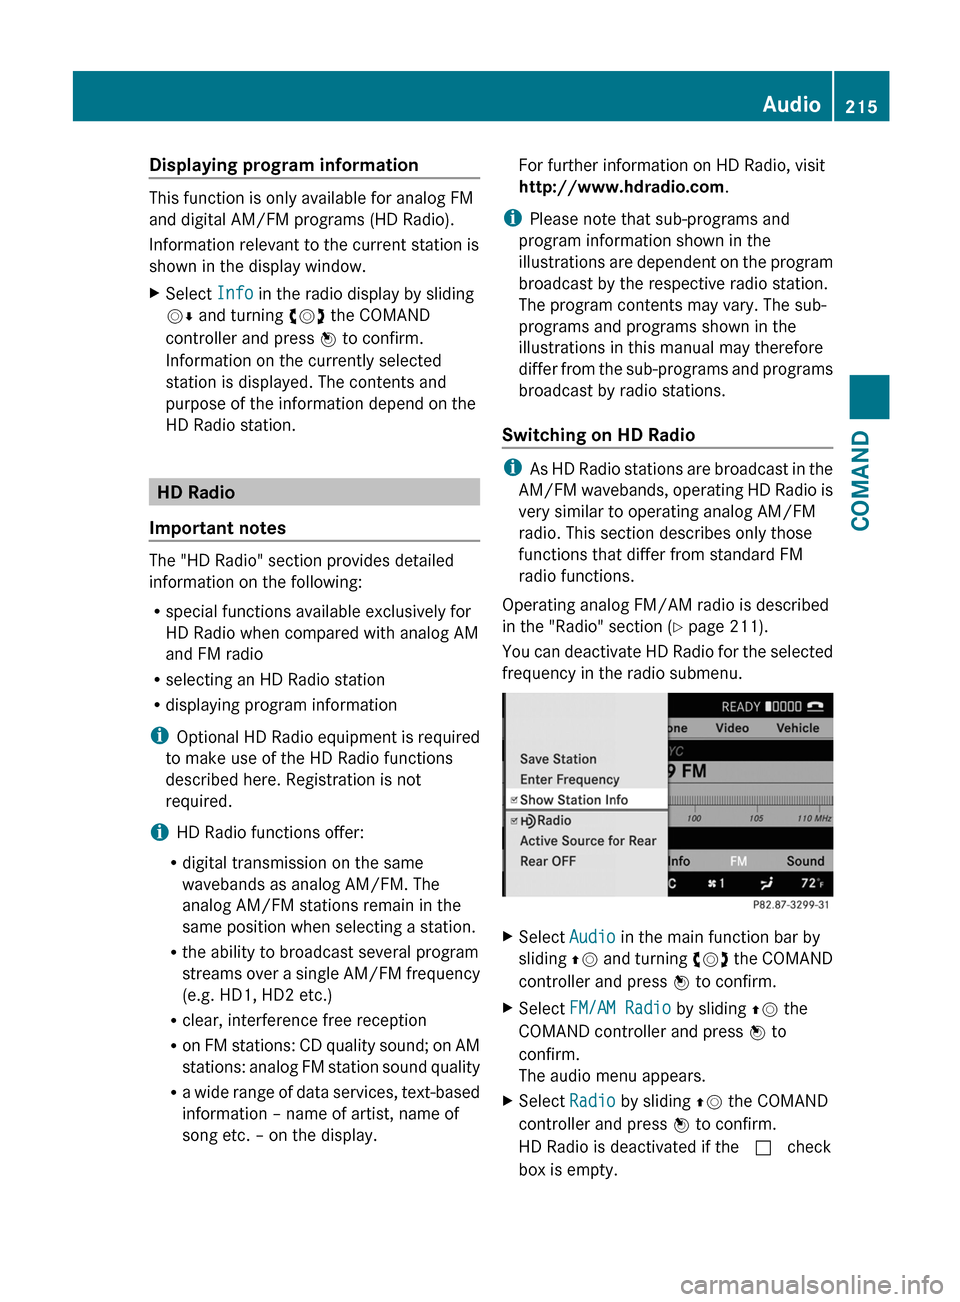
You can deactivate HD Radio for the selected
frequency in the radio submenu.
XSelect Audio in the main function bar by
sliding ZV and turning cVd the COMAND
controller and press W to confirm.XSelect FM/AM Radio by sliding ZV the
COMAND controller and press W to
confirm.
The audio menu appears.XSelect Radio by sliding ZV the COMAND
controller and press W to confirm.
HD Radio is deactivated if the c check
box is empty.Audio215COMANDZ
Page 218 of 536
You hear the analog program of this
frequency.
As soon as you change to another HD Radio
frequency, the HD Radio is reactivated.
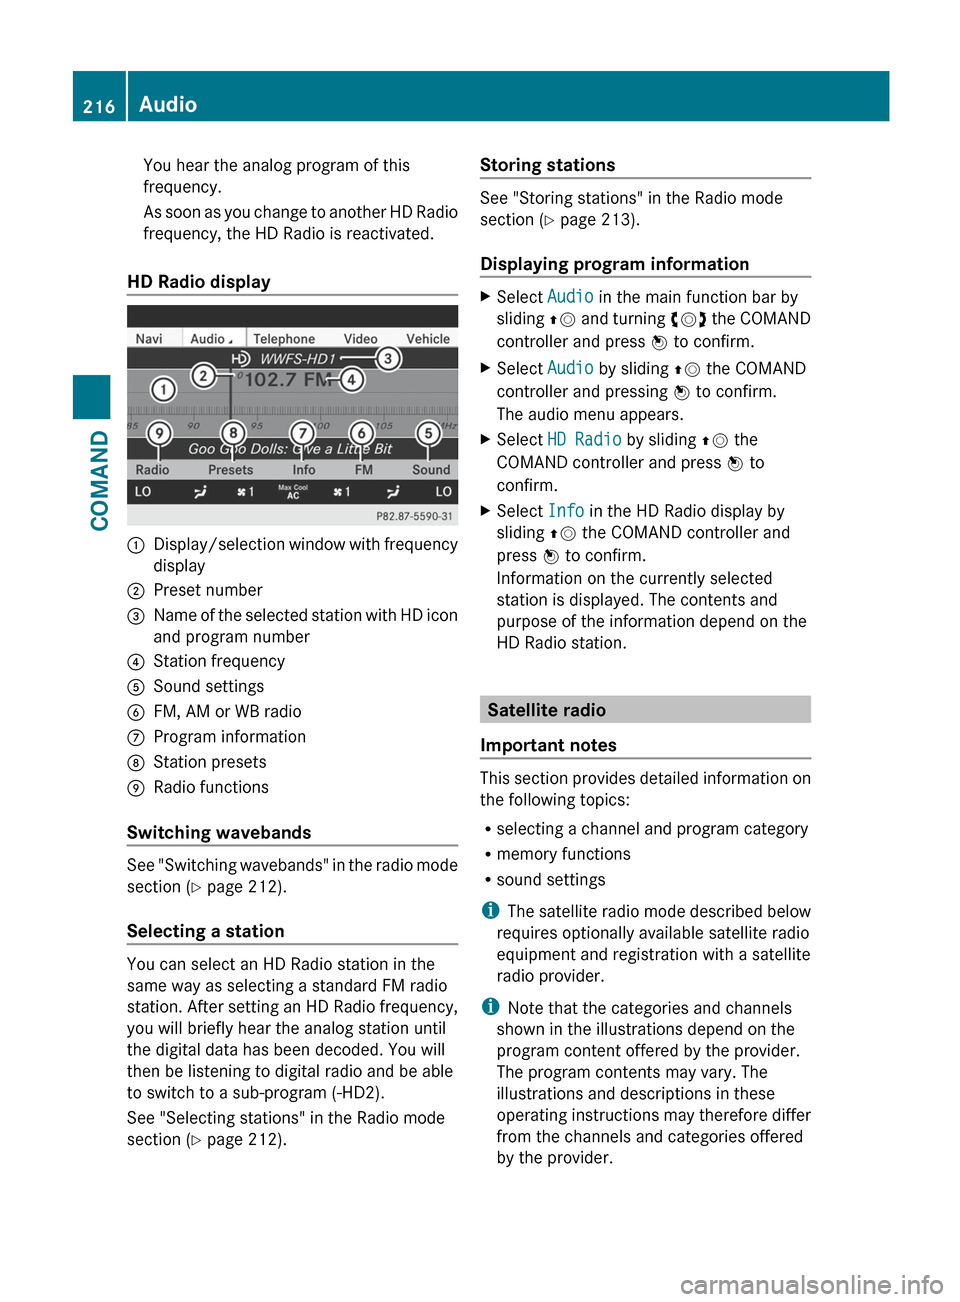
HD Radio display
1Display/selection window with frequency
display2Preset number3Name of the selected station with HD icon
and program number4Station frequency5Sound settings6FM, AM or WB radio7Program information8Station presets9Radio functions
Switching wavebands
See "Switching wavebands" in the radio mode
section ( Y page 212).
Selecting a station
You can select an HD Radio station in the
same way as selecting a standard FM radio
station. After setting an HD Radio frequency,
you will briefly hear the analog station until
the digital data has been decoded. You will
then be listening to digital radio and be able
to switch to a sub-program (-HD2).
See "Selecting stations" in the Radio mode
section ( Y page 212).
Storing stations
See "Storing stations" in the Radio mode
section ( Y page 213).
Displaying program information
XSelect Audio in the main function bar by
sliding ZV and turning cVd the COMAND
controller and press W to confirm.XSelect Audio by sliding ZV the COMAND
controller and pressing W to confirm.
The audio menu appears.XSelect HD Radio by sliding ZV the
COMAND controller and press W to
confirm.XSelect Info in the HD Radio display by
sliding ZV the COMAND controller and
press W to confirm.
Information on the currently selected
station is displayed. The contents and
purpose of the information depend on the
HD Radio station.
Satellite radio
Important notes
This section provides detailed information on
the following topics:
R selecting a channel and program category
R memory functions
R sound settings
i The satellite radio mode described below
requires optionally available satellite radio
equipment and registration with a satellite
radio provider.
i Note that the categories and channels
shown in the illustrations depend on the
program content offered by the provider.
The program contents may vary. The
illustrations and descriptions in these
operating instructions may therefore differ
from the channels and categories offered
by the provider.
216AudioCOMAND
Page 226 of 536
Selecting CD/audio DVD/MP3 discs
Selecting via the media list
XIn CD/audio DVD and MP3 mode: select
Media by sliding VÆ or turning cVd the
COMAND controller and press W to
confirm.
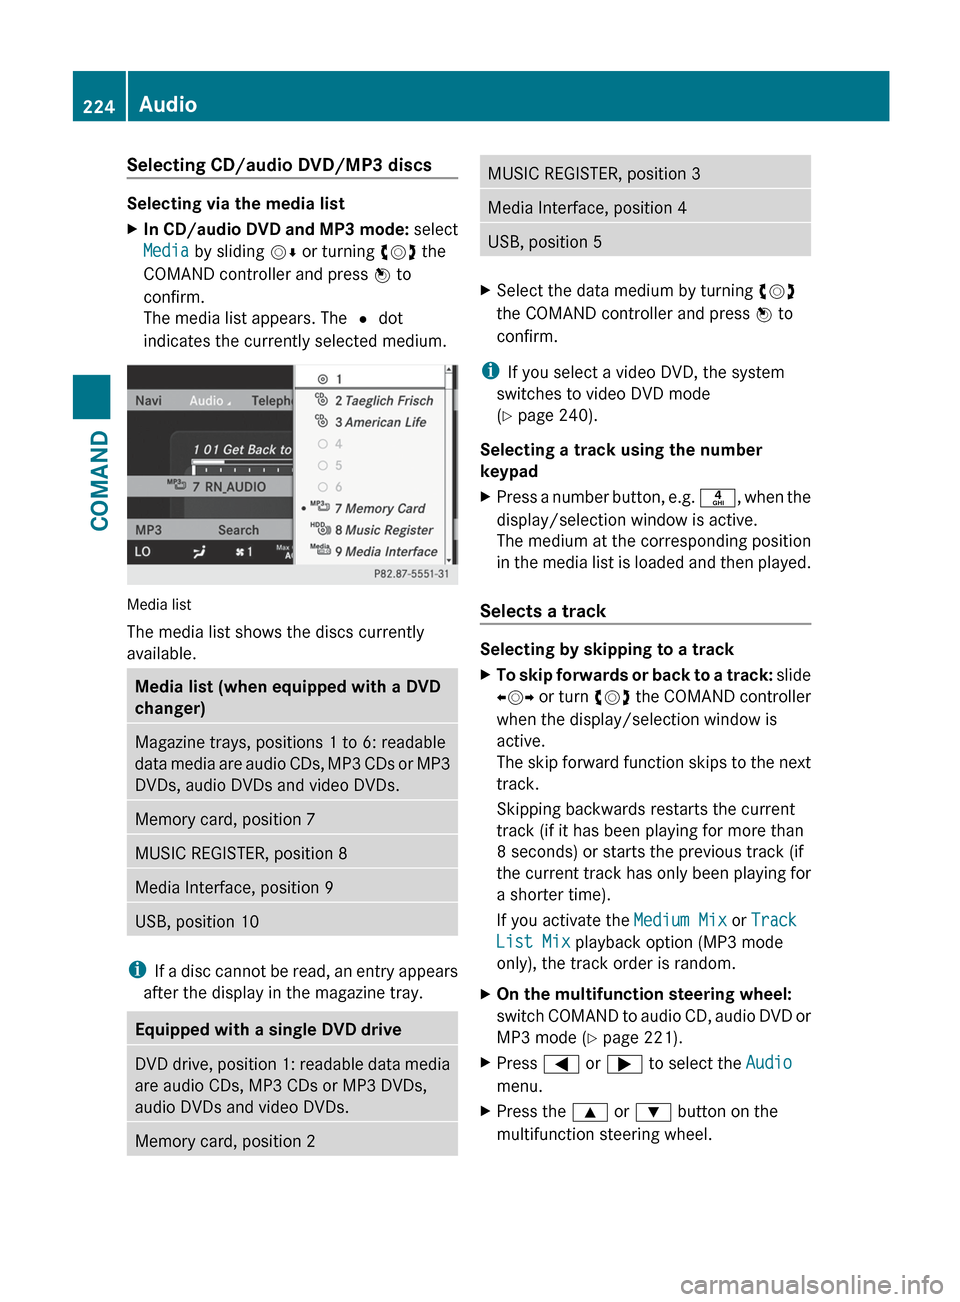
The media list appears. The # dot
indicates the currently selected medium.
Media list
The media list shows the discs currently
available.
Media list (when equipped with a DVD
changer)Magazine trays, positions 1 to 6: readable
data media are audio CDs, MP3 CDs or MP3
DVDs, audio DVDs and video DVDs.Memory card, position 7MUSIC REGISTER, position 8Media Interface, position 9USB, position 10
i If a disc cannot be read, an entry appears
after the display in the magazine tray.
Equipped with a single DVD driveDVD drive, position 1: readable data media
are audio CDs, MP3 CDs or MP3 DVDs,
audio DVDs and video DVDs.Memory card, position 2MUSIC REGISTER, position 3Media Interface, position 4USB, position 5XSelect the data medium by turning cVd
the COMAND controller and press W to
confirm.
i If you select a video DVD, the system
switches to video DVD mode
( Y page 240).
Selecting a track using the number
keypad
XPress a number button, e.g. n, when the
display/selection window is active.
The medium at the corresponding position
in the media list is loaded and then played.
Selects a track
Selecting by skipping to a track
XTo skip forwards or back to a track: slide
XVY or turn cVd the COMAND controller
when the display/selection window is
active.
The skip forward function skips to the next
track.
Skipping backwards restarts the current
track (if it has been playing for more than
8 seconds) or starts the previous track (if
the current track has only been playing for
a shorter time).
If you activate the Medium Mix or Track
List Mix playback option (MP3 mode
only), the track order is random.XOn the multifunction steering wheel:
switch COMAND to audio CD, audio DVD or
MP3 mode ( Y page 221).XPress = or ; to select the Audio
menu.XPress the 9 or : button on the
multifunction steering wheel.224AudioCOMAND
Page 227 of 536
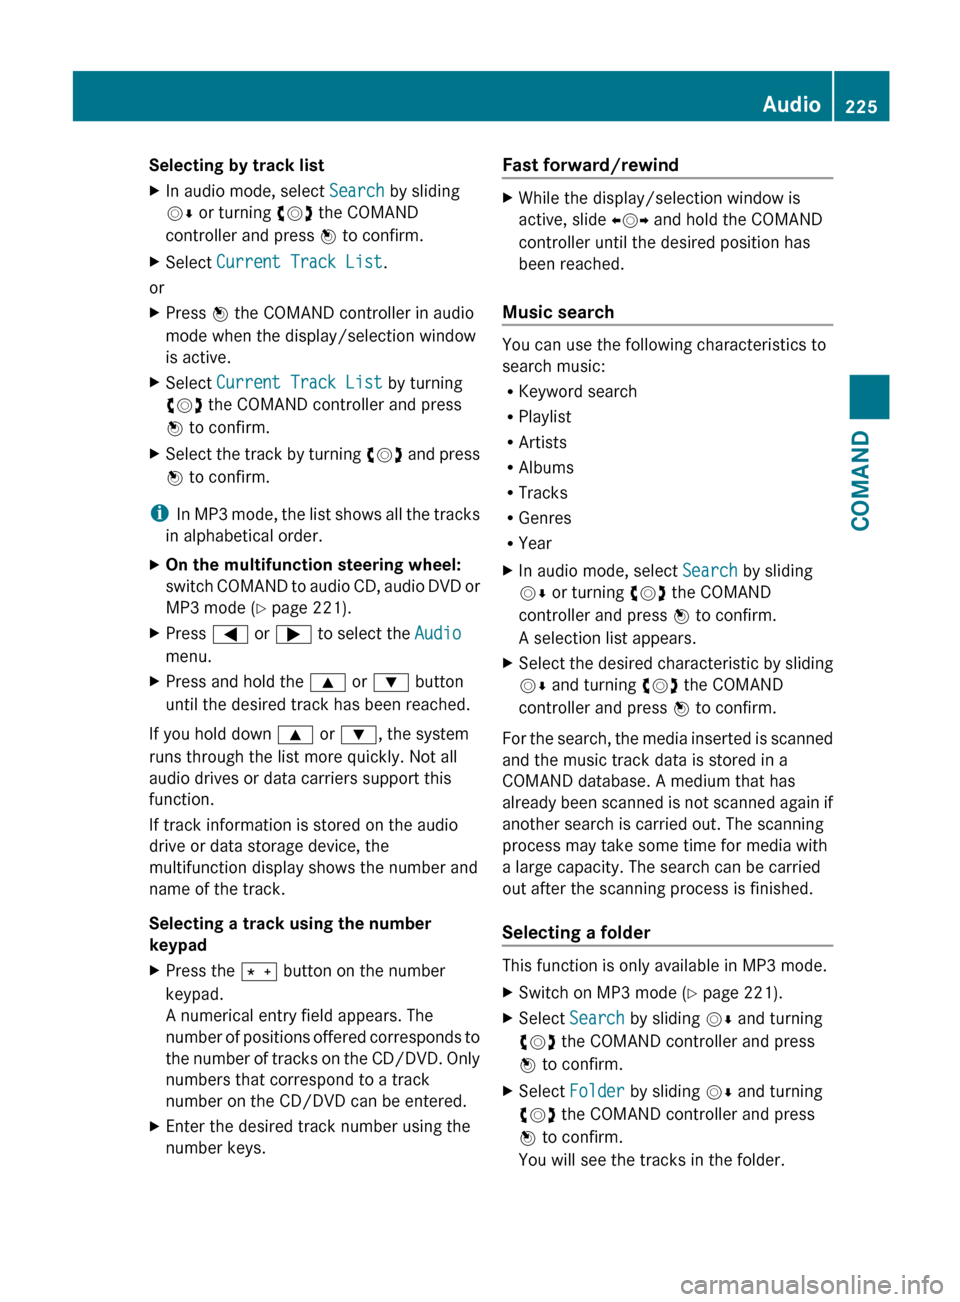
Selecting by track listXIn audio mode, select Search by sliding
V Æ or turning cVd the COMAND
controller and press W to confirm.XSelect Current Track List .
or
XPress W the COMAND controller in audio
mode when the display/selection window
is active.XSelect Current Track List by turning
cVd the COMAND controller and press
W to confirm.XSelect the track by turning cVd and press
W to confirm.
i
In MP3 mode, the list shows all the tracks
in alphabetical order.
XOn the multifunction steering wheel:
switch COMAND to audio CD, audio DVD or
MP3 mode ( Y page 221).XPress = or ; to select the Audio
menu.XPress and hold the 9 or : button
until the desired track has been reached.
If you hold down 9 or : , the system
runs through the list more quickly. Not all
audio drives or data carriers support this
function.
If track information is stored on the audio
drive or data storage device, the
multifunction display shows the number and
name of the track.
Selecting a track using the number
keypad
XPress the Ä button on the number
keypad.
A numerical entry field appears. The
number of positions offered corresponds to
the number of tracks on the CD/DVD. Only
numbers that correspond to a track
number on the CD/DVD can be entered.XEnter the desired track number using the
number keys.Fast forward/rewindXWhile the display/selection window is
active, slide XVY and hold the COMAND
controller until the desired position has
been reached.
Music search
You can use the following characteristics to
search music:
R Keyword search
R Playlist
R Artists
R Albums
R Tracks
R Genres
R Year
XIn audio mode, select Search by sliding
V Æ or turning cVd the COMAND
controller and press W to confirm.
A selection list appears.XSelect the desired characteristic by sliding
V Æ and turning cVd the COMAND
controller and press W to confirm.
For the search, the media inserted is scanned
and the music track data is stored in a
COMAND database. A medium that has
already been scanned is not scanned again if
another search is carried out. The scanning
process may take some time for media with
a large capacity. The search can be carried
out after the scanning process is finished.
Selecting a folder
This function is only available in MP3 mode.
XSwitch on MP3 mode ( Y page 221).XSelect Search by sliding VÆ and turning
cVd the COMAND controller and press
W to confirm.XSelect Folder by sliding VÆ and turning
cVd the COMAND controller and press
W to confirm.
You will see the tracks in the folder.Audio225COMANDZ
Page 228 of 536
XSelect a track by turning cVd and press
W to confirm.
The track is played and the corresponding
folder is now the active folder.
Copying music files from audio CDs to
the hard disk
Audio files can be copied from CD to
COMAND's hard disk.
XSelect Audio by sliding VÆ and turning
cVd the COMAND controller and press
W to confirm.XSwitch on CD/audio DVD or MP3 mode
( Y page 221).XSelect a medium ( Y page 224).
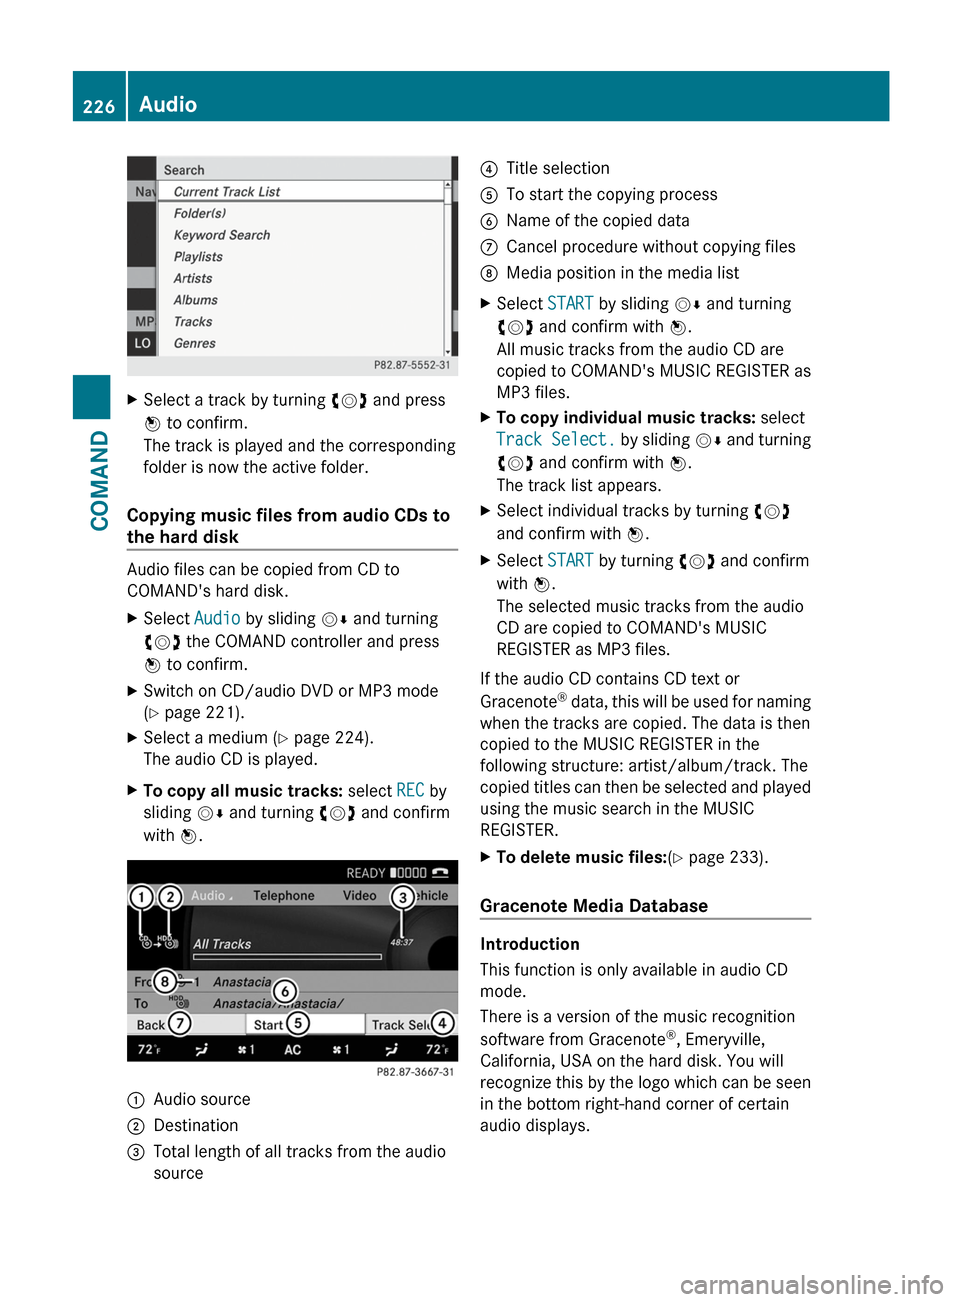
The audio CD is played.XTo copy all music tracks: select REC by
sliding VÆ and turning cVd and confirm
with W.:Audio source;Destination=Total length of all tracks from the audio
source?Title selectionATo start the copying processBName of the copied dataCCancel procedure without copying filesDMedia position in the media listXSelect START by sliding VÆ and turning
cVd and confirm with W.
All music tracks from the audio CD are
copied to COMAND's MUSIC REGISTER as
MP3 files.XTo copy individual music tracks: select
Track Select. by sliding VÆ and turning
cVd and confirm with W.
The track list appears.XSelect individual tracks by turning cVd
and confirm with W.XSelect START by turning cVd and confirm
with W.
The selected music tracks from the audio
CD are copied to COMAND's MUSIC
REGISTER as MP3 files.
If the audio CD contains CD text or
Gracenote ®
data, this will be used for naming
when the tracks are copied. The data is then
copied to the MUSIC REGISTER in the
following structure: artist/album/track. The
copied titles can then be selected and played
using the music search in the MUSIC
REGISTER.
XTo delete music files: (Y page 233).
Gracenote Media Database
Introduction
This function is only available in audio CD
mode.
There is a version of the music recognition
software from Gracenote ®
, Emeryville,
California, USA on the hard disk. You will
recognize this by the logo which can be seen
in the bottom right-hand corner of certain
audio displays.
226AudioCOMAND