door lock MERCEDES-BENZ S-Class 2013 W221 Owner's Guide
[x] Cancel search | Manufacturer: MERCEDES-BENZ, Model Year: 2013, Model line: S-Class, Model: MERCEDES-BENZ S-Class 2013 W221Pages: 542, PDF Size: 7.97 MB
Page 116 of 542

Problems with the seat ventilation
The seat ventilation has switched off
prematurely. The vehicle's electrical system
voltage is too low because too many electrical
consumers are switched on.
X Switch off electrical consumers which you
do not need, such as the rear window
defroster or interior lighting. Steering wheel
Important safety notes
G
WARNING
Do not adjust the steering wheel while driving.
Adjusting the steering wheel while driving
could cause the driver to lose control of the
vehicle.
The electrical steering wheel adjustment
feature can be operated at any time.
Therefore, do not leave children unattended
in the vehicle, or with access to an unlocked
vehicle. Achild's unsupervised access to a
vehicle could result in an accident and/or
serious personal injury. Adjusting the steering wheel
0002
To adjust the steering wheel position
(fore-and-aft adjustment)
0003 To adjust the steering wheel height i
Other topics:
R EASY-ENTRY/EXIT feature
(Y page 115)
R storing settings (Y page 118)
R operating the on-board computer
(Y page 375) Steering wheel heating
Switching on/off The steering-wheel heating heats the leather
areas of the steering wheel.
X
Make sure that the SmartKey is in position
2in the ignition lock.
X To switch on/off: turn the lever in the
direction of arrow 0002or0003.
Indicator lamp 0026lights up or goes out.
Vehicles without KEYLESS-GO: when you
remove the SmartKey from the ignition lock,
the steering wheel heating is deactivated.
Vehicles with KEYLESS-GO: when you switch
off the ignition and open the driver's door, the
steering wheel heating is deactivated.
i The steering wheel heating is deactivated
when the temperature in the vehicle
interior is higher than 86 ‡ (30 †).
i The steering wheel heating is switched off
automatically after about 24 minutes. 114
Steering wheelSeats, steering wheel and mirrors
Page 117 of 542
EASY-ENTRY/EXIT feature
Important safety notes The EASY-ENTRY/EXIT feature makes getting
in and out of your vehicle easier.
You can activate and deactivate the EASY-
ENTRY/EXIT feature usin gCOMAND
(Y page 266). G
WARNING
You must make sure no one can become
trapped or injured by the moving steering
wheel and driver's seat when the EASY-
ENTRY/EXIT feature is activated.
To stop steering wheel and seat movement,
do one of the following:
R move the seat adjustment switch.
R move the steering column adjustment
switch.
R press one of the memory function position
buttons or memory button M.
Do not leave children unattended in the
vehicle, or with access to an unlocked vehicle.
Children could open the driver's door and
unintentionally activate the EASY-ENTRY/
EXIT feature. This could result in an accident
and/or serious personal injury. G
WARNING
Let the system complete the adjustment
procedure before setting the vehicle in
motion. All steering wheel adjustment must
be completed before setting the vehicle in
motion. Driving off with the steering wheel
still adjusting could cause the driver to lose
control of the vehicle.
! Do not activate the EASY-ENTRY/EXIT
feature, if the seat backrest is reclined too
far backwards. This can damage the front
or rear seats. You must first move the
backrest to a vertical position. Position of the steering wheela
nd the
driver's seat when the EASY-ENTRY/
EXIT feature is active The steering wheel tilts upwards and the
driver's seat moves backwards if you:
R
remove the SmartKey from the ignition lock
R open the driver's door when the SmartKey
is in the ignition lock or KEYLESS-GO is in
position 1
i The steering wheel only moves upwards if
it has not already reached the upper end
stop. The driver's seat only moves
backwards if it is not already in the
rearmost position.
Position of the steering wheel and the
driver's seat for driving If you insert the SmartKey into the ignition
lock with the driver's door closed, depending
on the setting, the position of the steering
wheel and the driver's seat will be changed to
the previously set position.
The last position of the steering wheel or seat
is stored if:
R
the ignition is switched off or
R the setting is stored with the memory
function.
Crash-responsive EASY-EXIT feature If the crash-responsive EASY-EXIT feature is
triggered in an accident, the steering column
will move upwards when the driver's door is
opened. This occurs irrespective of the
position of the SmartKey in the ignition lock.
This makes it easier to exit the vehicle and
rescue the occupants.
The crash-responsive EASY-EXIT feature is
only operational if the EASY-EXIT/ENTRY
feature is activated in the on-board computer. Steering wheel
115Seats, steering wheel and mirrors Z
Page 118 of 542
Mirrors
Exterior mirrors
Adjusting the exterior mirrors G
WARNING
Exercise care when using the passenger-side
exterior rear view mirror. The mirror surface
is convex (outwardly curved surface for a
wider field of view). Objects in mirror are
closer than they appear. Check you rinterior
rear view mirror and glance over your
shoulde rbefore changing lanes.
The exterior mirrors are automatically heated
if the rear window defroster is switched on
and the outside temperature is low. X
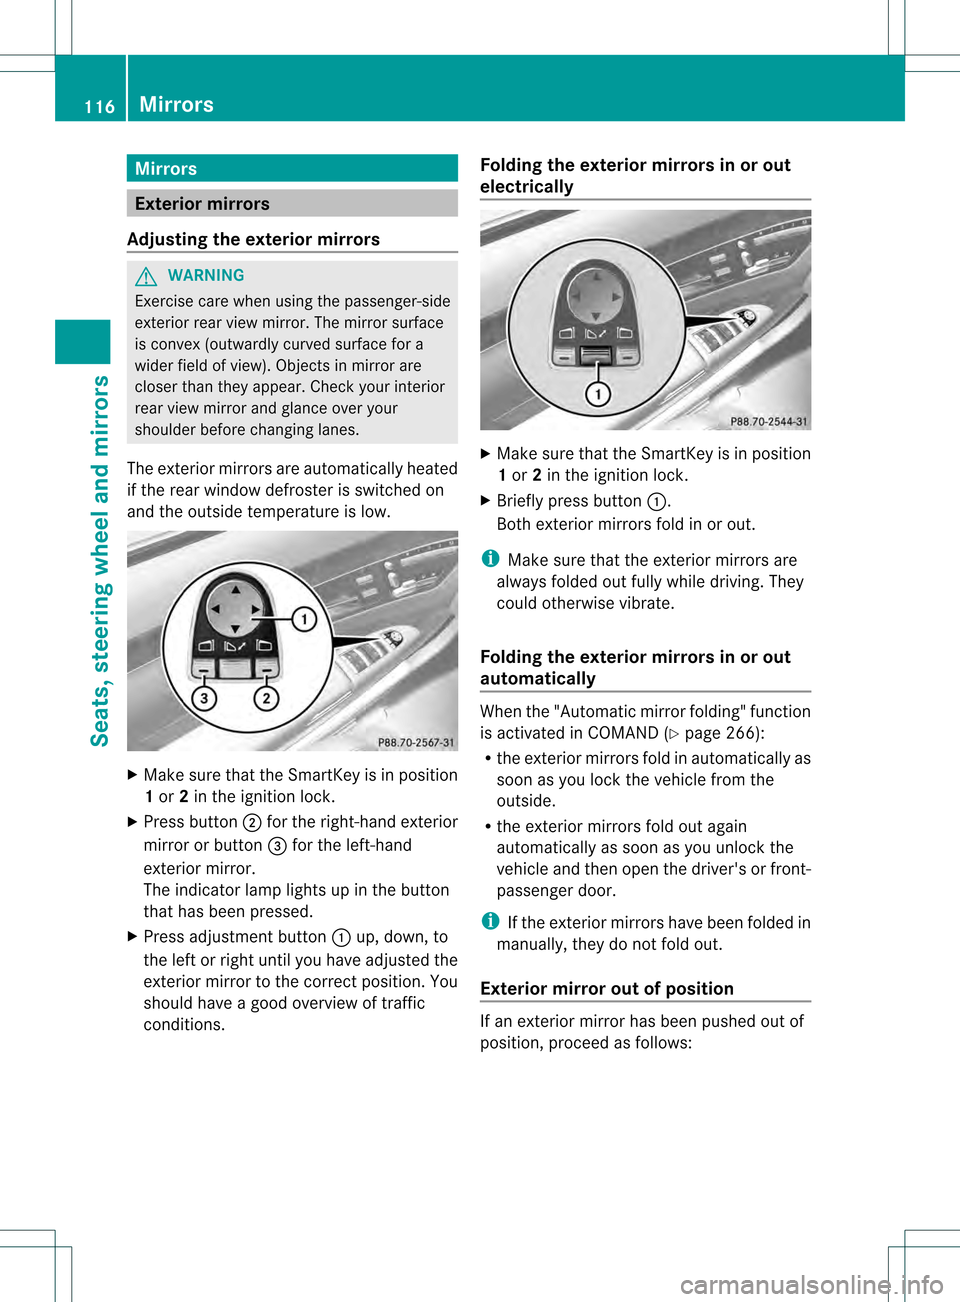
Make sure that the SmartKey is in position
1or 2in the ignition lock.
X Press button 0003for the right-hand exterior
mirror or button 0026for the left-hand
exterior mirror.
The indicator lamp lights up in the button
that has been pressed.
X Press adjustment button 0002up, down, to
the left or right until you have adjusted the
exterior mirror to the correct position .You
should have a good overview of traffic
conditions. Folding the exterior mirrors in or out
electrically
X
Make sure that the SmartKey is in position
1or 2in the ignition lock.
X Briefly press button 0002.
Both exterior mirrors fold in or out.
i Make sure that the exterior mirrors are
always folded out fully while driving. They
could otherwise vibrate.
Folding the exterior mirrors in or out
automatically When the "Automatic mirror folding" function
is activated in COMAND (Y
page 266):
R the exterior mirrors fold in automatically as
soon as you lock the vehicle from the
outside.
R the exterior mirrors fold out again
automatically as soon as you unlock the
vehicle and then open the driver's or front-
passenger door.
i If the exterior mirrors have been folded in
manually, they do not fold out.
Exterior mirror out of position If an exterior mirror has been pushed out of
position, proceed as follows:116
MirrorsSeats, steering wheel and mirrors
Page 269 of 542
lever or press the position button of the
memory function.
If there is a risk of entrapmen tby the seat, you
can also cancel the adjustmen tprocedure by
moving the switch for seat adjustment. The
steering colum nand driver's sea tstop moving
immediately.
Never leave children unsupervised in the
vehicle. They could open the driver's door and
thereby unintentionally activate the EASY-
ENTRY/EXIT feature and become trapped.
You can make a setting in COMAND so that
the steering wheel swings upwards and/or
the driver's seat moves backwards before you
get into the vehicle. You can make the
following settings:
R Off : the function is switched off.
R Steering Column :t
he steering wheel
swings upwards.
R Steering Column and Seat :t
he steering
wheel swings upwards and the driver’s seat
moves backwards. X
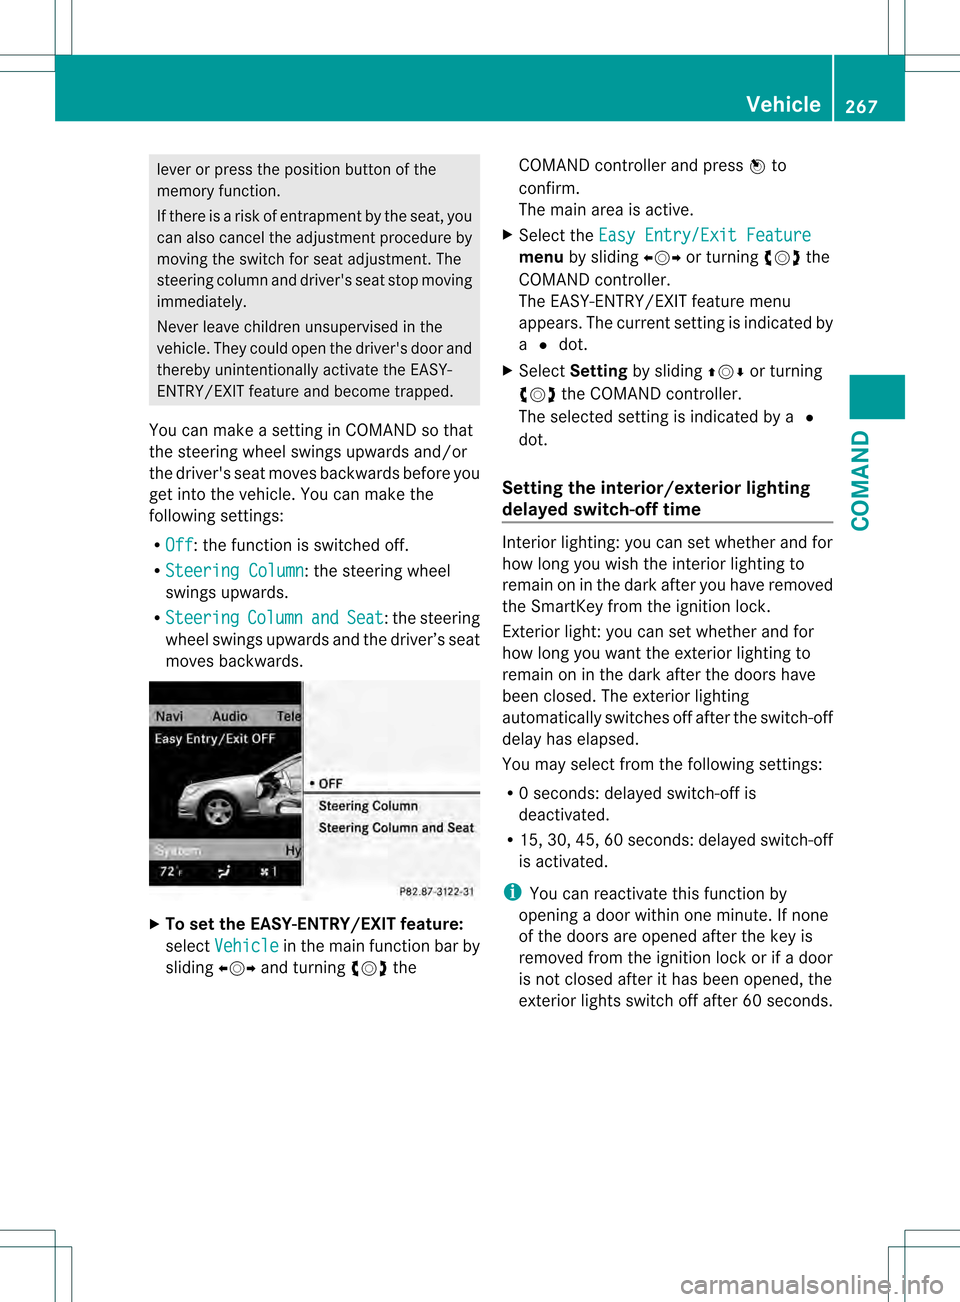
To set the EASY-ENTRY/EXIT feature:
select Vehicle in the main function bar by
sliding 003C001C003Dand turning 0031001C0032the COMAND controller and press
0021to
confirm.
The main area is active.
X Select the Easy Entry/Exit Feature menu
by sliding 003C001C003Dor turning 0031001C0032the
COMAND controller.
The EASY-ENTRY/EXIT feature menu
appears. The current setting is indicated by
a 002C dot.
X Select Setting by sliding 002A001C0006or turning
0031001C0032 the COMAND controller.
The selected setting is indicated by a 002C
dot.
Setting the interior/exterior lighting
delayed switch-off time Interior lighting: you can set whether and for
how long you wish the interior lighting to
remain on in the dark after you have removed
the SmartKey from the ignition lock.
Exterior light: you can set whether and for
how long you want the exterior lighting to
remain on in the dark after the doors have
been closed. The exterior lighting
automatically switches off after the switch-off
delay has elapsed.
You may select from the following settings:
R
0s econds: delayed switch-off is
deactivated.
R 15, 30, 45, 60 seconds: delayed switch-off
is activated.
i You can reactivate this function by
opening a door within one minute. If none
of the doors are opened after the key is
removed from the ignition lock or if a door
is not closed after it has been opened, the
exterior lights switch off after 60 seconds. Vehicle
267COMAND Z
Page 270 of 542
X
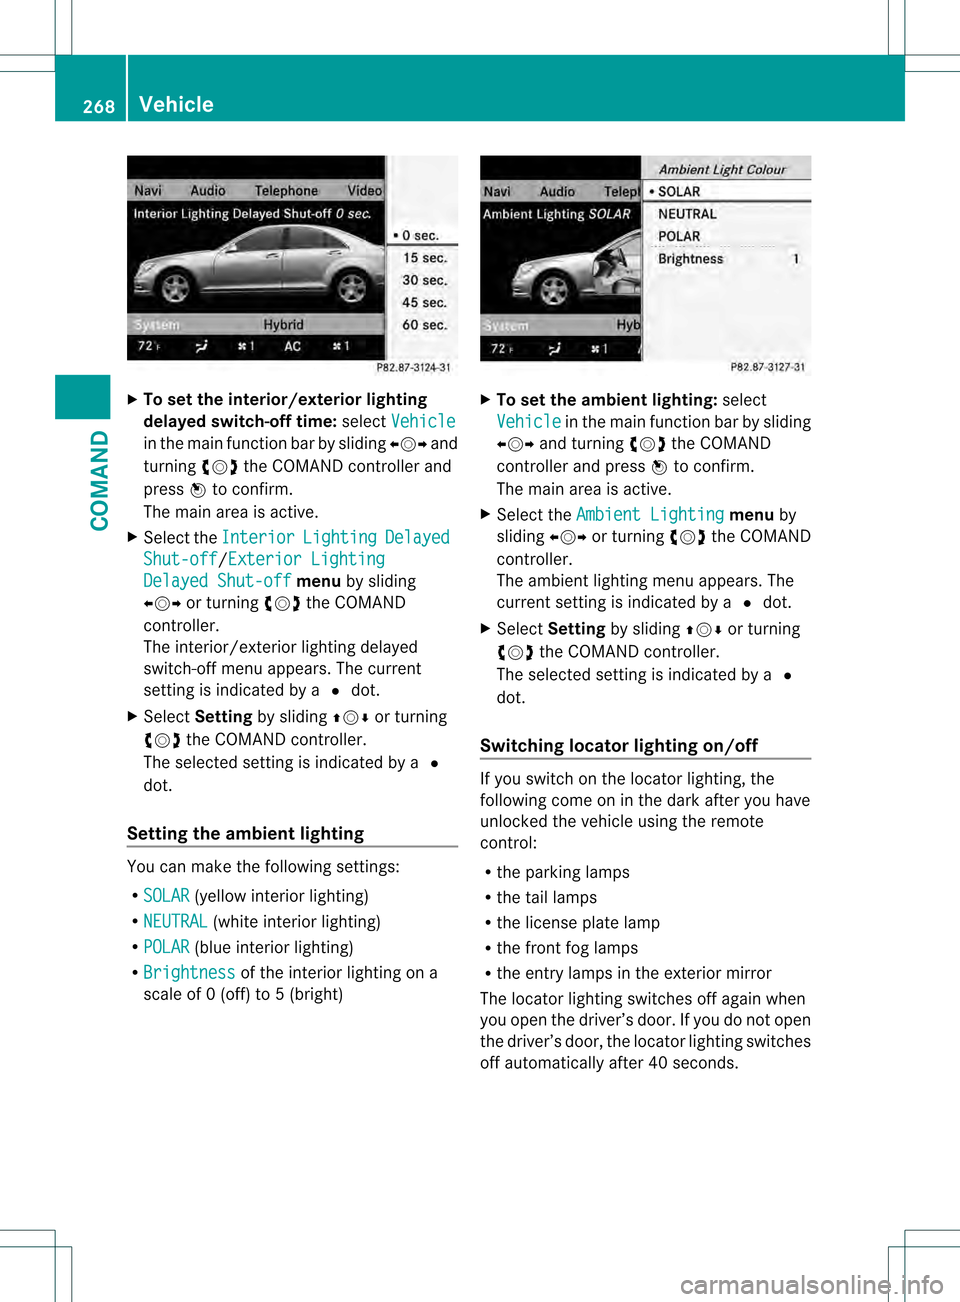
To se tthe interior/exterio rlighting
delayed switch-off time: selectVehicle in the main function bar by sliding
003C001C003Dand
turning 0031001C0032the COMAND controller and
press 0021to confirm.
The main area is active.
X Selec tthe Interior Lighting Delayed
Shut-off /Exterior Lighting
Delayed Shut-off menu
by sliding
003C001C003D or turning 0031001C0032the COMAND
controller.
The interior/exterior lighting delayed
switch-off menu appears. The current
setting is indicated by a 002Cdot.
X Select Setting by sliding 002A001C0006or turning
0031001C0032 the COMAND controller.
The selected setting is indicated by a 002C
dot.
Setting the ambient lighting You can make the following settings:
R
SOLAR (yellow interior lighting)
R NEUTRAL (white interior lighting)
R POLAR (blue interior lighting)
R Brightness of the interior lighting on a
scale of 0 (off) to 5 (bright) X
To set the ambient lighting: select
Vehicle in the main function bar by sliding
003C001C003D and turning 0031001C0032the COMAND
controller and press 0021to confirm.
The main area is active.
X Select the Ambient Lighting menu
by
sliding 003C001C003Dor turning 0031001C0032the COMAND
controller.
The ambient lighting menu appears. The
current setting is indicated by a 002Cdot.
X Select Setting by sliding 002A001C0006or turning
0031001C0032 the COMAND controller.
The selected setting is indicated by a 002C
dot.
Switching locator lighting on/off If you switch on the locator lighting, the
following come on in the dark after you have
unlocked the vehicle using the remote
control:
R
the parking lamps
R the tail lamps
R the license plate lamp
R the front fog lamps
R the entry lamps in the exterior mirror
The locator lighting switches off again when
you open the driver’s door. If you do not open
the driver’s door, the locator lighting switches
off automatically after 40 seconds. 268
VehicleCOMAND
Page 282 of 542

Useful information
i This Operator's Manual describes all
models and all standard and optional
equipment of your vehicle available at the
time of publication of the Operator's
Manual. Country-specific differences are
possible. Please note that your vehicle may
not be equipped with all features
described. This also applies to safety-
related systems and functions.
i Please read the information on qualified
specialist workshops (Y page 31).Exterior lighting
Important safety notes
For reasons of safety, Mercedes-Benz
recommends that you drive with the lights
switched on even during the daytime. In some
countries, operation of the headlamps varies
due to legal requirements and self-imposed
obligations. Information about driving abroad
To convert to symmetrical low beam
when driving abroad: switch the headlamps
to symmetrical low beam in countries in
which traffic drives on the opposite side of the
road from the country where the vehicle is
registered. This prevents glare to oncoming
traffic. Symmetrical lights do not illuminate
as large an area of the edge of the road.
Have the headlamps converted at a qualified
specialist workshop as close to the border as
possible before driving in these countries.
To convert to asymmetrical low beam
after returning: have the headlamps
converted back to asymmetrical low beam at
a qualified specialist workshop as soon as
possible after crossing the border and
returning to the original country. Light switch
Operation Depending on the date of manufacture of your
vehicle, the
000Dor0004 symbol for the
automatic headlamp mode/daytime running
lamps is located on the light switch. 0005000E
Left-hand standing lamps
00060010 Right-hand standing lamps
0007000E Lights off/daytime running lamps
000B000D Automatic headlamp mode/daytime
running lamps
000C0012 Parking lamps, license plate and
instrumen tcluste rlighting
000D000A Low-beam/high-beam headlamps
000E000B Front fog lamps 11
000F000D Rear fog lamp
The tur nsignals, high-beam headlamps and
the high-beam flasher are operated using the
combination switch (Y page 283).
! Switch off the parking lamps and standing
lamps when you leave the vehicle. This
prevents the battery fro mdischarging.
The exterior lighting (except the parking/
standing lamps) switches off automatically if
you:
R remove the SmartKey fro mthe ignition lock
R open the driver's door with the SmartKey
in position 0
If you hear a warning tone when you leave the
vehicle, the lights may still be switched on.
11 Only vehicles with Bi-Xenon headlamps without the Intelligent Light System are equipped with front fog lamps. 280
Exterior lightingLights and windshield wipers
Page 288 of 542
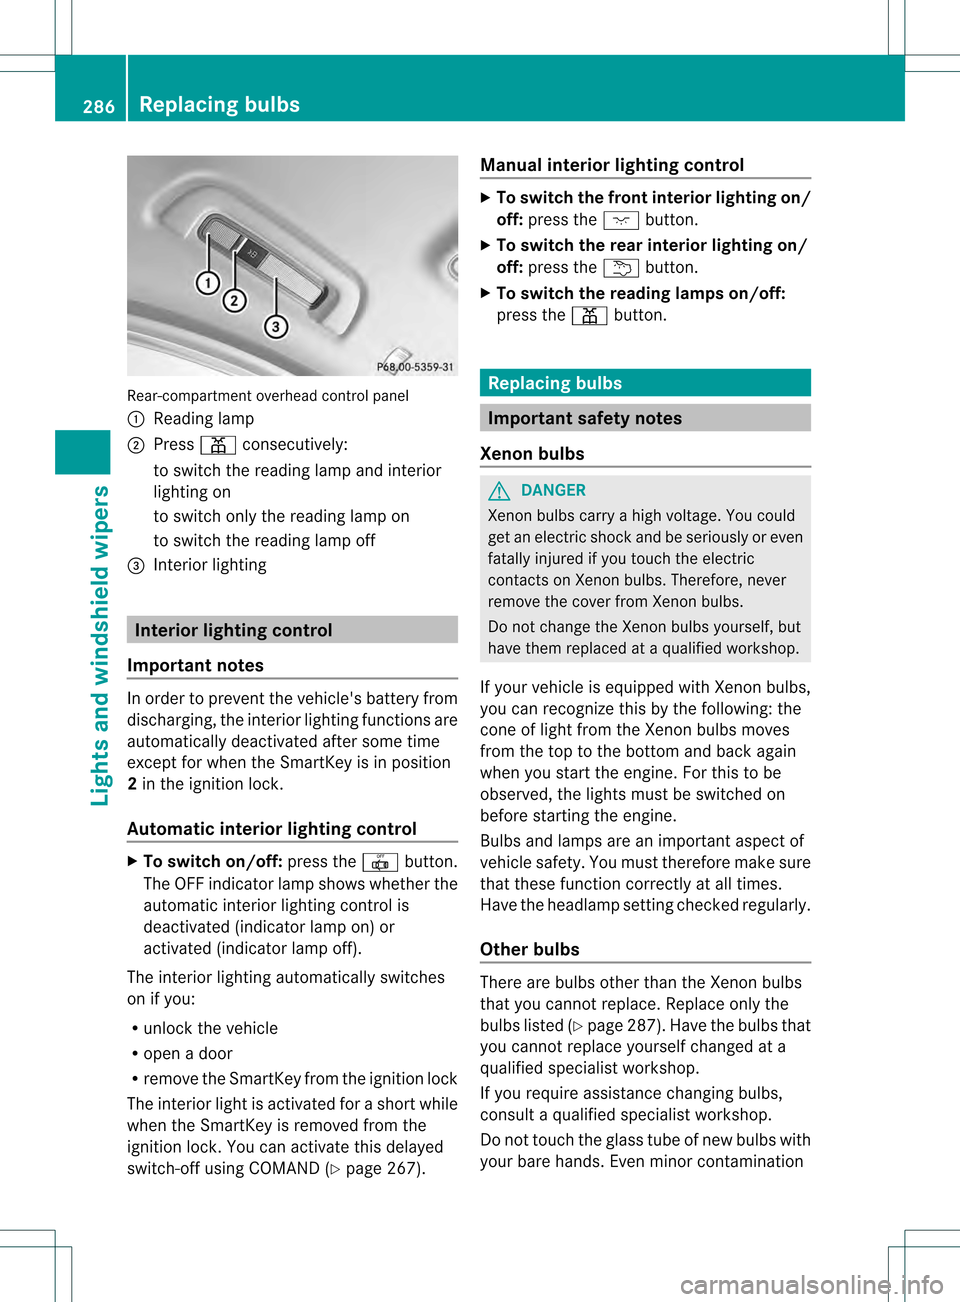
Rear-compartmen
toverhead control panel
0002 Reading lamp
0003 Press 0011consecutively:
to switch the reading lamp and interior
lighting on
to switch only the reading lamp on
to switch the reading lamp off
0026 Interior lighting Interior lighting control
Important notes In order to prevent the vehicle's battery from
discharging, the interior lighting functions are
automatically deactivated after some time
except for when the SmartKey is in position
2
in the ignition lock.
Automatic interio rlighting control X
To switch on/off: press the0018button.
The OFF indicator lamp shows whether the
automatic interior lighting control is
deactivated (indicator lamp on) or
activated (indicator lamp off).
The interior lighting automatically switches
on if you:
R unloc kthe vehicle
R open a door
R remove the SmartKey from the ignition lock
The interior light is activated for a short while
when the SmartKey is removed from the
ignition lock. You can activate this delayed
switch-off using COMAND (Y page 267).Manual interior lighting control X
To switch the front interior lighting on/
off: press the 0004button.
X To switch the rear interior lighting on/
off: press the 0001button.
X To switch the reading lamps on/off:
press the 0011button. Replacing bulbs
Important safety notes
Xenon bulbs G
DANGER
Xenon bulbs carry a high voltage. You could
get an electric shock and be seriously or even
fatally injured if you touch the electric
contacts on Xenon bulbs. Therefore, never
remove the cover from Xenon bulbs.
Do not change the Xenon bulbs yourself, but
have them replaced at a qualified workshop.
If your vehicle is equipped with Xenon bulbs,
you can recognize this by the following: the
cone of light from the Xenon bulbs moves
from the top to the bottom and back again
when you start the engine. For this to be
observed, the lights must be switched on
before starting the engine.
Bulbs and lamps are an important aspect of
vehicle safety. You must therefore make sure
that these function correctly at all times.
Have the headlamp setting checked regularly.
Other bulbs There are bulbs other than the Xenon bulbs
that you cannot replace. Replace only the
bulbs listed (Y
page 287). Have the bulbs that
you cannot replace yourself changed at a
qualified specialist workshop.
If you require assistance changing bulbs,
consult a qualified specialist workshop.
Do not touch the glass tube of new bulbs with
your bare hands. Even minor contamination 286
Replacing bulbsLights and windshield wipers
Page 292 of 542

Hold the windshield wiper arm firmly when
you change the wiper blade. If you release
the windshield wiper arm withou
tawiper
blade and it falls onto th ewindshield, the
windshield may be damaged by the force of
the impact.
Mercedes-Ben zrecommends that you have
the wiper blades replaced by aqualified
specialist workshop, e.g. at an authorized
Mercedes-Ben zCenter.
! Always position the windshield wiper
arms vertically before folding them away
from the windshield. By doing so, you will
avoid damage to the hood.
! To avoid damaging the wiper blades,
make sure that you touch only the wiper
arm of the wiper.
Changing the windshield wiper blades Moving the wiper blades to
avertical
position
Vehicles without KEYLESS-GO
X Turn the SmartKey to position 1or 2in the
ignitio nlock.
X Set the windshield wipers to
position 0014.
X When the wiper arms have reached a
vertical position, turn the SmartKey to
position 0and remove it from the ignition
lock.
Vehicles with KEYLESS-GO
X Switch off the engine.
X Remove your foot from the brake pedal.
X Set the windshield wipers to
position 0014.
X Press the Start/Stop button repeatedly
until the windshield wipers start.
X When the wiper arms have reached a
vertical position, press the Start/Stop
button. Removing the wiper blades
X
Fold the wiper arm away from the
windshield until it engages.
X Set the wiper blade at right angles to the
wiper arm. X
Remove the wiper blade from the retaining
pin on the wiper arm in the direction of the
arrow.
Installing the wiper blades
X Push the new wiper blade ontot he
retaining pin on the wiper arm in the
opposite direction to the arrow.
Make sure that the wiper blade slides fully
onto the retaining pin on the wiper arm.
X Turn the wiper blade parallel to the wiper
arm.
X Fold the wiper arm back onto the
windshield. Problems with the windshield wipers
The windshield wipers are obstructed Leaves or snow, for example, may be
obstructing the windshield wiper movement.
The wiper motor has been deactivated.
X
For safety reasons, you should remove the
SmartKey from the ignition lock.
or
X Switch off the engine using the Start/Stop
button and open the driver's door.
X Remove the cause of the obstruction.
X Switch the windshield wipers back on. 290
Windshield wipersLights and windshield wipers
Page 310 of 542
i
You do not have to remove the Start/Stop
button from the ignition lock when you
leave the vehicle. However, you should
always take the SmartKey with you when
leaving the vehicle. The vehicle can be
started with the Start/Stop button and the
electrical equipmen tcan be operated while
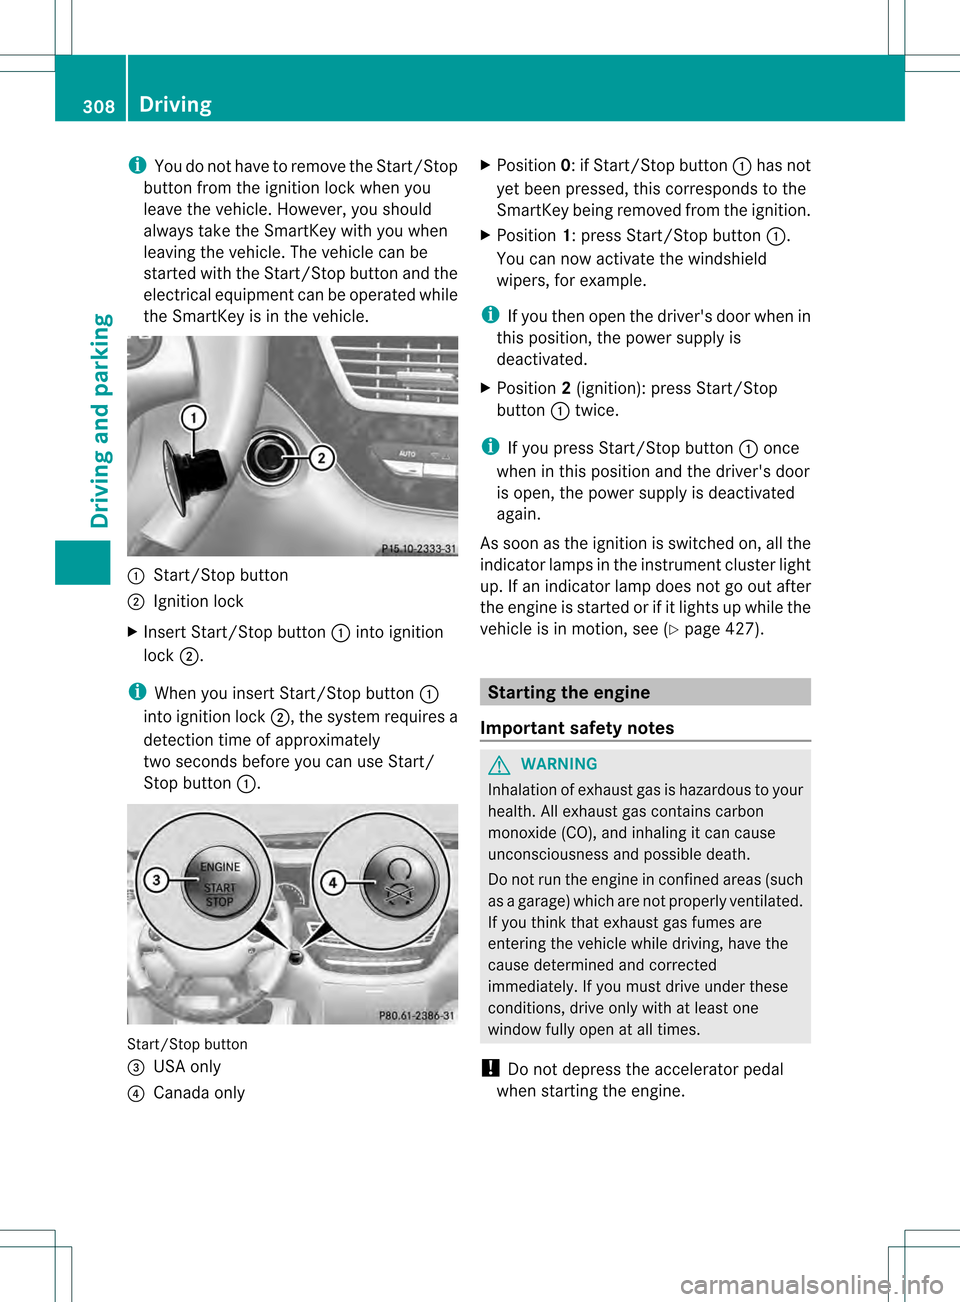
the SmartKey is in th evehicle. 0002
Start/Stop button
0003 Ignition lock
X Insert Start/Stop button 0002into ignition
lock 0003.
i When you insert Start/Stop button 0002
into ignition lock 0003, the system requires a
detection time of approximately
two seconds before you can use Start/
Stop button 0002. Start/Stop button
0026 USA only
0025 Canada only X
Position 0: if Start/Stop button 0002has not
yet been pressed, this corresponds to the
SmartKey being removed from the ignition.
X Position 1: press Start/Stop button 0002.
You can now activate the windshield
wipers, for example.
i If you then open the driver's door when in
this position, the power supply is
deactivated.
X Position 2(ignition): press Start/Stop
button 0002twice.
i If you press Start/Stop button 0002once
when in this position and the driver's door
is open, the power supply is deactivated
again.
As soon as the ignition is switched on, all the
indicator lamps in the instrument cluster light
up. If an indicator lamp does not go out after
the engine is started or if it lights up while the
vehicle is in motion, see (Y page 427). Starting the engine
Important safety notes G
WARNING
Inhalation of exhaust gas is hazardous to your
health. All exhaust gas contains carbon
monoxide (CO), and inhaling it can cause
unconsciousness and possible death.
Do not run the engin einconfined areas (such
as a garage) which are not properly ventilated.
If you think that exhaust gas fumes are
entering the vehicle while driving, have the
cause determined and corrected
immediately. If you must drive under these
conditions, drive only with at least one
window fully open at all times.
! Do not depress the accelerator pedal
when starting the engine. 308
DrivingDriving and parking
Page 312 of 542
the parking lock released. If you do not
depress the brake pedal, yo
ucan move the
DIRECT SELECT lever but the parking lock
remains engaged.
X Depress the brake pedal and keep it
depressed.
X Shift the transmission to position Dor R.
X Release the brake pedal.
X Carefully depress the accelerato rpedal.
The electric parking brake (Y page 328) is
automatically released.
The red 0005(USA only) or 000A(Canada
only) indicator lamp in the instrument
cluster goes out.
i The vehicle locks centrally once you have
pulled away. The locking knobs in the doors
drop down.
You can open the doors from the inside at
any time.
You can also deactivate the automatic
locking feature (Y page 269).
i Upshifts take place at higher engine
speeds after a cold start .This helps the
catalytic converter to reach its operating
temperature more quickly.
Hill starta ssist Hill start assist helps you when pulling away
forwards or in reverse on an uphill gradient.
It holds the vehicle for a short time after you
have removed your foot from the brake pedal.
This gives you enough time to move your foot
from the brake pedal to the accelerator pedal
and to depress it before the vehicle begins to
roll. G
WARNING
Never leave the vehicle when it is held by hill
start assist. After approximately one second,
hill start assist will no longer brake your
vehicle and it could roll away. X
Take your foot off the brake pedal.
i Once you have taken your foot off the
brake pedal, the vehicle is held for around
one second.
X Pull away.
Hill start assist will not function if:
R you are pulling away on a level road or on
a downhill gradient.
R the transmission is in position N.
R the electric parking brake is applied.
R ESP ®
is malfunctioning. ECO start/stop function
General notes i
Hybrid vehicles: the ECO start/stop
function cannot be deactivated.
The ECO start/stop function is only available
for the S 63 AMG.
The ECO start/stop function is only available
in drive program C.
The ECO start/stop function switches the
engine off automatically when the vehicle
stops moving.
The engine starts automatically when the
driver wants to pull away again. The ECO
start/stop function thereby helps you to
reduce the fuel consumption and emissions
of your vehicle.
The ECO start/stop function is activated each
time the engine is switched on. If all
conditions for automatic engine switch-off
are fulfilled (Y page 311), the green 0010
symbol is shown in the multifunction display
and the Stop/Start active message
appears. If not all the conditions are fulfilled,
the 0010 symbol is shown in yellow and the
Stop/Start inactive message is shown.
If the ECO start/stop function is deactivated
(Y page 311), the 0010symbol is not shown. 310
DrivingDriving and parking