height adjustment MERCEDES-BENZ S-Class 2013 W221 Owner's Manual
[x] Cancel search | Manufacturer: MERCEDES-BENZ, Model Year: 2013, Model line: S-Class, Model: MERCEDES-BENZ S-Class 2013 W221Pages: 542, PDF Size: 7.97 MB
Page 22 of 542

Rolle
rsunblind
Panorama roof with power tilt/
sliding panel .................................. 100
Rea rside windows ........................... 96
Rea rwindow .................................. 445
Rea rwindow (COMAND )................ 266
Roller sunblind of the panorama
roof with power tilt/sliding panel
Operating (front roller sunblind) ....101
Operating (rea rroller sunblind) ......101
Roof carrier ........................................ 442
Roof lining and carpets (cleaning
guidelines) ......................................... 476
Roof load (maximum) ........................537
Route (navigation) Displaying the distance to the
destination ..................................... 176
Route overview .............................. 176
Selecting an alternative route ........175
Setting route options (avoiding:
highways, toll roads, tunnels,
ferries) ........................................... 156
Setting the route type (short
route, fast route, dynamic route or
economi croute) ............................ 156
Starting calculation ........................160
see Route guidance (navigation)
Route guidance
Canceling ...................................... .173
Continuing ..................................... 173
Destination reached ......................174
Lane recommendations .................172
Off-road ......................................... 177
Traffi creports ................................ 178
Route guidance (navigation) ............379
Route guidance (on-board
computer) .......................................... 379
Route information see Dynami croute guidance/TMC S
Safety Children in the vehicle .....................66
Child restraint systems ....................66Occupant Classification System
(OCS) ............................................... 54
Overview of occupant safety
systems ........................................... 48
Safety notes
Audio CD/DVD and MP3 mode .....225
Operating safety ............................ 120
Video DVD mode ........................... 245
Safety systems
see Driving safety systems
SatRadio ............................................. 221
Displaying information ...................224
Registering .................................... 221
Selecting acategor y...................... 222
Screen
Selecting for remote control (Rear
Seat Entertainment System) ..........144
Switching on/off (Rear Seat
Entertainment System) ..................129
see Display
SD memory card
Loading .......................................... 226
Seat belts
Adjusting the driver's and front-
passenger sea tbelt ......................... 64
Adjusting the height ......................... 64
Automatic comfort-fit feature ..........66
Belt force limiters ............................ 65
Cleaning ......................................... 476
Correct usage .................................. 62
Emergency Tensioning Devices ....... .65
Fastening ......................................... 63
Important safety guidelines .............61
Releasing ......................................... 64
Safety guidelines ............................. 49
Specia lseat belt retractor ...............68
Switching belt adjustment on/off
(on-board computer) ......................388
Warning lamp ................................. 426
Warning lamp (function) ................... 64
Seats
Active multicontour seat ....... .112, 276
Adjusting (electrically). ..................108
Adjusting (rear compartment) ........108
Adjusting lumba rsuppor t.............. 112
Adjusting the head restraint ..........110
Cleaning the cover .........................476
Correct driver's sea tposition ........106 20
Index
Page 65 of 542

keep both feet on the floor in front of the
seat.
R Whe nusing a seat belt to secure infant
restraints, toddler restraints, or children in
booster seats, always follow the child seat
manufacturer's instructions. G
WARNING
Do not pass seat belts over sharp edges. They
could tear.
Do not allow the seat belt to get caught in the
door or in the seat adjustment mechanism.
This could damage the seat belt.
Never attempt to make modifications to seat
belts. This could impair the effectiveness of
the seat belts.
Fastening seat belts G
WARNING
According to accident statistics, children are
safer when properly restrained on the rear
seats than on the front-passenger seat. Thus,
we strongly recommend that children be
placed in the rear seat whenever possible.
Regardless of seating position, children 12
years old and under must be seated and
properly secured in an appropriately sized
child restraint system or booster seat
recommended for the size and weight of the
child. For additional information, see the
"Children in the vehicle" section.
Ac hild's risk of serious or fatal injuries is
significantly increased if the child restraints
are not properly secured in the vehicle and/
or the child is not properly secured in the child
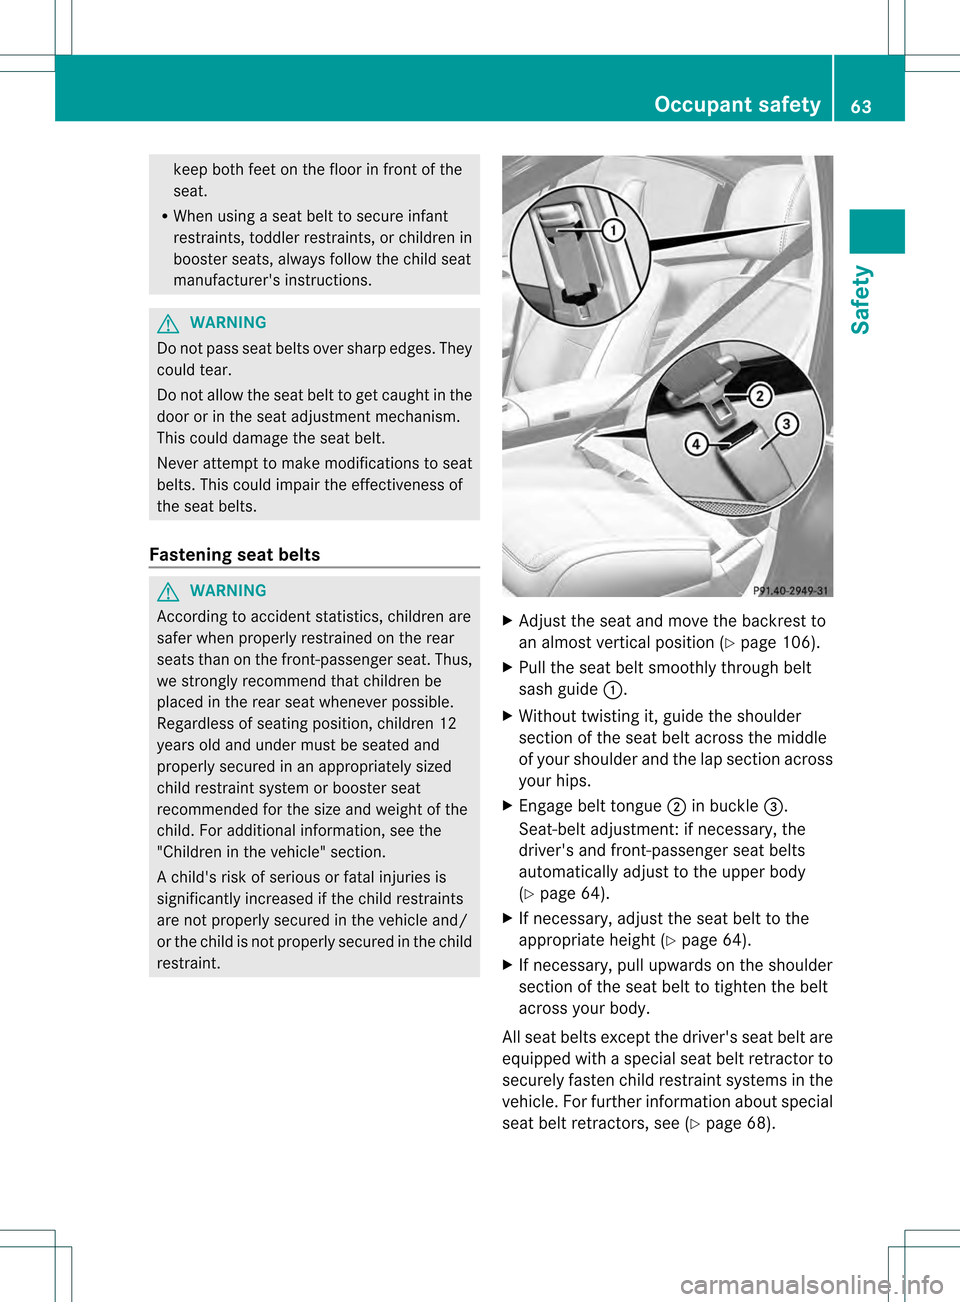
restraint. X
Adjust the seat and move the backrest to
an almost vertical position (Y page 106).
X Pull the seat belt smoothly through belt
sash guide 0002.
X Without twisting it, guide the shoulder
section of the seat belt across the middle
of your shoulder and the lap section across
your hips.
X Engage belt tongue 0003in buckle 0026.
Seat-belt adjustment:ifn ecessary, the
driver's and front-passenger seat belts
automatically adjust to the upper body
(Y page 64).
X If necessary, adjust the seat belt to the
appropriate height (Y page 64).
X If necessary, pull upwards on the shoulder
section of the seat belt to tighten the belt
across your body.
All seat belts except the driver's seat belt are
equipped with a special seat belt retractor to
securely fasten child restraint systems in the
vehicle. For further information about special
seat belt retractors, see (Y page 68). Occupant safety
63Safety Z
Page 66 of 542

For more information abou
treleasing the seat
belt with release button 0025, see "Releasing
seat belts" (Y page 64).
Seat belt adjustment The seat-belt adjustment function adjusts the
driver's and front-passenger seat belt to the
upper body of the occupants.
The belt strap is tightened slightly when:
R
you engage the belt tongue in the belt
buckle and you then turn the SmartKey to
position 2in the ignition lock.
R the SmartKey is in position 2in the ignition
lock and you then engage the belt tongue
in the buckle.
The seat-belt adjustment will apply a
retraction force if any slack is detected
between the occupan tand the sea tbelt. Do
not hold on to the seat belt tightly while it is
adjusting. You can switch the seat-belt
adjustment on and off in the on-board
computer (Y page 388).
The seat-belt adjustment is an integral part of
the PRE-SAFE ®
convenience function. More
information about PRE-SAFE ®
can be found
in the "PRE-SAFE ®
(preventative occupant
protection)" section (Y page 59).
Belt height adjustment You can adjust the seat belt height on the
driver's seat and the front-passenger seat.
Adjust the height so that the upper part of the
seat belt is routed across the center of your
shoulder. X
To raise: slide the belt sash guide upwards.
The belt sash guide engages in various
positions.
X To lower: press and hold belt sash guide
release 0002.
X Slide the belt sash guide downwards.
X Release belt sash guide release 0002and
make sure that the belt sash guide has
engaged.
The seat belts for the outer seats in the rear
are adjusted automatically.
Releasing seat belts X
Press release button 0025(Ypage 63) and
guide belt tongue 0003back towards belt
sash guide 0002.
! Make sure that the seat belt is fully rolled
up. Otherwise, the seat belt or belt tongue
will be trapped in the door or in the seat
mechanism. This could damage the door,
the door trim panel and the seat belt.
Damaged seat belts can no longer fulfill
their protective function and must be
replaced. Visit a qualified specialist
workshop.
Belt warning for the driver and front
passenger Regardless of whether the driver's and front-
passenger seat belts have already been
fastened, the
001Bseat belt warning lamp will
light up for six seconds each time the engine
is started. It then goes out if the driver and
the fron tpassenger have fastened their seat
belts.
If the driver's seat belt is no tfastened when
the engine is started, an additional warning
tone will sound. The warning tone goes out
after approximately six seconds or once the
driver's seat belt is fastened. 64
Occupant safetySafety
Page 70 of 542

G
WARNING
When leaving the vehicle, always remove the
SmartKey from the ignition lock. Always take
the SmartKey with you and lock the vehicle.
Do not leave children unattended in the
vehicle, even if they are secured in a child
restraint system, or with access to an
unlocked vehicle. Achild's unsupervised
access to a vehicle could result in an accident
and/or serious personal injury. The children
could:
R injure themselves on parts of the vehicle
R be seriously or fatally injured through
excessive exposure to extreme heat or cold
R injure themselves or cause an accident with
vehicle equipment that can be operated
even if the SmartKey is removed from the
ignition lock or removed from the vehicle,
such as seat adjustment, steering wheel
adjustment, or the memory function
If children open a door, they could injure other
persons or get out of the vehicle and injure
themselves or be injured by following traffic.
Do not expose the child restraint system to
direct sunlight. The child restraint system's
metal parts, for example, could become very
hot, and the child could be burned on these
parts. G
WARNING
Do not carry heavy or hard objects in the
passenger compartmentort runk unless they
are firmly secured in place.
Unsecured or improperly positioned cargo
increases a child's risk of injury in the event
of
R strong braking maneuvers
R sudden changes of direction
R an accident
Special seat beltr etractorAll seat belts except th
edriver's seat belta re
equipped with a special seat beltr etractor.
When activated, the special seat belt retractor ensures the seat belt will not
slacken once the child restraint system has
been secured.
Installing a child restraint system:
X
Always comply with the manufacturer's
installation instructions.
X Pull the seat belt smoothly from the inertia
reel.
X Engage the seat belt tongue in the belt
buckle.
Activating the special seat belt retractor:
X Pull the seat belt out fully and let the inertia
reel retract it again.
While the seat belt is retracting, you should
hear a ratcheting sound. The special seat
belt retractor is enabled.
X Push down on the child restraint system to
take up any slack.
Removing a child restraint system/
deactivating the special seat belt retractor:
X Always comply with the manufacturer's
installation instructions.
X Press the seat belt release button and
guide the belt tongue to the belt outlet.
The special seat belt retractor is
deactivated. G
WARNING
Never release the seat belt buckle while the
vehicle is in motion, since the special seat belt
retractor will be deactivated.
LATCH-type (ISOFIX) child seat anchors
in the rear G
WARNING
Children that are too large for a child restraint
must travel in seats using normal seat belts.
Position shoulder belt across the chest and
shoulder, not face or neck.
Ab ooster seat may be necessary to achieve
proper seat belt positioning for children over
41 lb (18 kg) until they reach a height where 68
Children in the vehicleSafety
Page 110 of 542

Do not drive the vehicle withou
tthe seat head
restraints. Head restraints are intended to
help reduce injuries during an accident.
! To avoid damage to the seats and the seat
heating, observe the following information:
R keep liquids from spilling on the seats. If
liquid is spilled on the seats, dry them as
soon as possible.
R if the seat covers are damp or wet, do not
switch on the seat heating. The seat
heating should also not be used to dry
the seats.
R clean the seat covers as recommended;
see the "Interior care" section.
R do not transport heavy loads on the
seats. Do not place sharp objects on the
seat cushions, e.g. knives, nails or tools.
The seats should only be occupied by
passengers, if possible.
R when the seat heating is in operation, do
not cover the seats with insulating
materials, e.g. blankets, coats, bags,
seat covers, child seats or booster seats.
! Make sure that there are no objects in the
footwell or behind the seats when resetting
the seats. There is a risk that the seats
and/or the objects could be damaged.
i The head restraints in the front seats are
equipped with the NECK-PRO system. For
this reason, it is not possible to remove the
head restraints from the front seats.
For design reasons, the rear-compartment
head restraints cannot be removed.
For more information, contact a qualified
specialist workshop. Adjusting the seats
0002
Head restraint height
0003 Seat height
0026 Seat cushion angle
0025 Seat cushion length
0023 Seat fore-and-aft adjustment
0024 Backrest angle
i If PRE-SAFE ®
has been activated, the
front-passenger seat and the electrically
adjustable rear seats are moved into a
more favorable position.
i You can store the seat settings using the
memory function (Y page 118).
i To ensure the largest possible range of
seat settings, certain seat adjustment
functions will automatically activate other
seat adjustment functions.
i Depending on the seat fore-and-aft
setting, the head restraint height is
adjusted automatically. Adjusting the rear seat electrically
You can only adjust the outer seats in the rear
electrically. 108
SeatsSeats, steering wheel and mirrors
Page 112 of 542

You can use the override button to disable
this function (Y
page 71).
The button is located in the rear door on the
front-passenge rside. 0002
To selec tthe front-passenger seat or rear-
compartment seat
0003 Seat height
0026 Head restraint height
0025 Backrest angle
0023 Seat fore-and-aft adjustment
X To selectt he front-passenge rseat:
press button 0002.
The front-passenger seat is selected if the
indicator lamp in the button lights up.
X Adjust the front-passenger seat with
buttons 0003,0026,0025and 0023.
X To select the rear-compartment seat:
press button 0002.
The rear-compartment seat is selected
again. Adjusting the head restraints
Adjusting the head restraint height
electrically X
To adjust th ehead restraint height: slide
the switch for head restrain tadjustment
(Y page 108 )up or down in the direction of
the arrow. Adjusting the NECK-PRO head
restraints Adjusting
X
Pull or push the bottom of NECK-PRO head
restraint 0002.
Resetting
The NECK-PRO head restraints are moved
forwards in the event of a rear collision in the
direction of travel and have to be reset
afterwards (Y page 60).
Adjusting NECK-PRO luxury head
restraints Adjusting
G
WARNING
When folding back the side cushions, do not
hold the area between the side cushion and
the cushion holder. There is a danger of
becoming trapped. You can adjust side bolsters
0002of the NECK-
PRO luxury head restraints individually. 110
SeatsSeats, steering wheel and mirrors
Page 116 of 542

Problems with the seat ventilation
The seat ventilation has switched off
prematurely. The vehicle's electrical system
voltage is too low because too many electrical
consumers are switched on.
X Switch off electrical consumers which you
do not need, such as the rear window
defroster or interior lighting. Steering wheel
Important safety notes
G
WARNING
Do not adjust the steering wheel while driving.
Adjusting the steering wheel while driving
could cause the driver to lose control of the
vehicle.
The electrical steering wheel adjustment
feature can be operated at any time.
Therefore, do not leave children unattended
in the vehicle, or with access to an unlocked
vehicle. Achild's unsupervised access to a
vehicle could result in an accident and/or
serious personal injury. Adjusting the steering wheel
0002
To adjust the steering wheel position
(fore-and-aft adjustment)
0003 To adjust the steering wheel height i
Other topics:
R EASY-ENTRY/EXIT feature
(Y page 115)
R storing settings (Y page 118)
R operating the on-board computer
(Y page 375) Steering wheel heating
Switching on/off The steering-wheel heating heats the leather
areas of the steering wheel.
X
Make sure that the SmartKey is in position
2in the ignition lock.
X To switch on/off: turn the lever in the
direction of arrow 0002or0003.
Indicator lamp 0026lights up or goes out.
Vehicles without KEYLESS-GO: when you
remove the SmartKey from the ignition lock,
the steering wheel heating is deactivated.
Vehicles with KEYLESS-GO: when you switch
off the ignition and open the driver's door, the
steering wheel heating is deactivated.
i The steering wheel heating is deactivated
when the temperature in the vehicle
interior is higher than 86 ‡ (30 †).
i The steering wheel heating is switched off
automatically after about 24 minutes. 114
Steering wheelSeats, steering wheel and mirrors