traffic sign MERCEDES-BENZ S-Class 2013 W221 Owner's Manual
[x] Cancel search | Manufacturer: MERCEDES-BENZ, Model Year: 2013, Model line: S-Class, Model: MERCEDES-BENZ S-Class 2013 W221Pages: 542, PDF Size: 7.97 MB
Page 15 of 542
Opening/closing the garage door
..459
Programming (button in the rear-
view mirror) ................................... 457
Gear indicator (on-board
computer) .......................................... 381
Gear or selector lever (cleaning
guidelines) ......................................... 476
Genuine Mercedes-Benz parts .........528
Glove box ........................................... 438
GPS reception .................................... 155
Gracenote Media Database ..............231 H
Handbrake see Parking brake
Harman/kardon ®
Logic 7 ®
surround sound system see Surround sound (harman/
kardon ®
surround sound system)
Hazard warning lamps ......................283
HD Radio™ ......................................... 219
Heading up (navigation) ...................188
Headlamp cleaning system Notes ............................................. 537
Headlamps
Adding fluid to cleaning system .....468
Cleaning system (function) ............282
Fogging up ..................................... 285
see Automatic headlamp mode
Headphones
Changing batteries ........................251
Function overview ..........................146
Indicator lamp ................................ 147
Selecting ascree n......................... 146
Switching on/off ........................... 146
Head restraints
Adjusting ....................................... 110
Adjusting (electrically). ..................110
Adjusting (rear) .............................. 111
NECK-PR O..................................... 110
NECK-PR Oluxur y........................... 110
see NECK-PRO head restraints/
NECK-PRO luxury head restraints
Heating
see Climate control High-beam headlamps
Changing bulbs (vehicles with
halogen daytime running lamps) ....288
Changing bulbs (vehicles with LED
daylight lamps) .............................. 288
Display message ............................ 406
Switching Adaptive Highbeam
Assist on/off ................................. 284
Switching on/off ........................... 283
Hill start assist .................................. 310
HOLD function Display message ............................ 415
Function/notes ............................. 346
Home
see Home address
Home address
Entering and saving .......................160
Selecting from the destination
memory ......................................... 163
Hood
Closing .......................................... .463
Display message ............................ 423
Opening ......................................... 462
Hydroplaning ..................................... 333 I
Ignition lock see Key positions
Immobilizer .......................................... 79
In-car hotspot see separate operating instructions
Incident (traffic report) .....................178
Indicator lamps see Warning and indicator lamps
Indicators
see Turn signals
Insectp rotection on the radiator ....463
Instrument cluster Overview .......................................... 37
Warning and indicator lamps ...........38
Instrument lighting
see Instrument cluster lighting
Interface (USB, iPod ®
)
see Medi aInterface
Interior lighting ......................... 267, 285
Ambient light (COMAND) ...............268
Automatic control ..........................286 Index
13
Page 27 of 542
Traction
......................................... 513
Traction (definition) .......................520
Trea dwear ..................................... 513
Uniform Tire Quality Grading
Standard s...................................... 513
Uniform Tire Quality Grading
Standard s(definition) .................... 518
Unladen weight (definition) ............519
Wea rindicato r(definition) .............520
Whee lrim (definition ).................... 518
see Flat tire
Tonal properties
see Sound settings
Top Tether ............................................ 69
Towing Important safety guidelines ...........490
Installing the towing eye ................490
Removing the towing eye. ..............491
With the rear axle raised ................491
Towing away
With both axles on the ground .......491
Tow-starting
Emergency engine starting ............492
Important safety notes ..................490
Track
Selecting (CD, DVD, MP3) .............. 229
Traffic Announcements (TA)
Switching off .................................. 138
Traffic jam function ........................... 175
Traffic jam message see Dynami croute guidance/TMC
Traffic reports
Real-time traffic report ..................181
Switching on/off ........................... 178
Transfer case ..................................... 321
Transmission see Automatic transmission
Transporting the vehicle ..................492
Treble ,adjusting (sound) ..................139
Trim pieces (cleaning instructions) .476
Trip computer (on-board
computer) .......................................... 378
Trip meter see Trip odometer
Trip odometer
Calling up ....................................... 378
Resetting (on-board computer) ......379 Trunk
Emergency release ....................94, 95
Important safety notes ....................91
Limiting the opening angle ............. 269
Locking separatel y........................... 94
Opening/closing (automatically
from inside) ...................................... 93
Opening/closing (automatically
from outside) ................................... 93
Trunk lid
Display message ............................ 423
Opening/closing .............................. 91
Power closing feature ......................90
Trunk lid opening height
restriction .......................................... 269
Turn signals Display message ............................ 405
Switching on/off ........................... 283
TV
Automatic picture shutoff ..............244
Picture settings .............................. 244
Type identification plate
see Vehicle identification plate U
Unlocking Emergency unlocking .......................90
From inside the vehicle (central
unlocking button) ............................. 89
USB
see Medi aInterface V
Vanity mirror (in the sun visor) ........ 444
Vehicle Correct us e...................................... 31
Data acquisition ............................... 32
Display message ............................ 422
Emergency unlocking ................. 90, 91
Equipment ....................................... 28
Individua lsettings .......................... 387
Limited Warranty ............................. 32
Loading .......................................... 508
Locking (in an emergency) ...............91
Locking (SmartKey) .......................... 82
Lowering ........................................ 483 Index
25
Page 122 of 542
Useful information
i This Operator's Manual describes all
models and all standard and optional
equipment of your vehicle available at the
time of publication of the Operator's
Manual. Country-specific differences are
possible. Please note that your vehicle may
not be equipped with all features
described. This also applies to safety-
related systems and functions.
i Please read the information on qualified
specialist workshops (Y page 31).Introduction
Operating safety
Important safety notes G
WARNING
Vehicles with HYBRID :ensure tha tyou read
the "HYBRID" supplement. You may otherwise
fail to recognize dangers. G
WARNING
Making alterations to electronic components
can cause malfunctions.
Radio, satellite radio, amplifier, DVD changer,
navigation module, phone and voice control
are networked. If one component is not
functional or if it has been incorrectly
removed/replaced, this could impair the
operation of other components.
This could seriously jeopardize the
operational safety of your vehicle.
We recommend that you always have
maintenance work on electronic components
carried out at an authorized Mercedes-Benz
Center. G
WARNING
In order to avoid distraction which could lead
to an accident, the driver should enter system
settings while the vehicle is at a standstill, and operate the system only when permitted by
road, weather and traffic conditions.
Bear in mind that at a speed of just 30 mph
(approximately 50 km/h), your car covers a
distance of 44 feet (approximately 14 m) every
second.
COMAND supplies you with information to
help you select your route more easily and
guide you conveniently and safely to your
destination
.For safety reasons, we
encourage the driver to stop the vehicle in a
safe place before answering or placing a call,
or consulting the COMAND screen to read
navigational maps, instructions, or
downloaded information. G
WARNING
While the navigation system provides
directional assistance, the driver must remain
focused on safe driving behavior, especially
attention to traffic and street signs, and
should utilize the system's audio cues while
driving.
The navigation system does not supply any
information on stop signs, yield signs, traffic
regulations or traffic safety rules. Their
observance always remains in the driver's
personal responsibility. DVD maps do not
cover all areas nor all routes within an area. G
WARNING
This equipment complies with FCC radiation
exposure limits set forth for uncontrolled
equipment and meets the FCC radio
frequency (RF) Exposure Guidelines in
Supplement C to OET65.
This equipment has very low levels of RF
energy that is deemed to comply without
maximum permissive exposure evaluation
(MPE). But it is desirable that it should be
installed and operated with at least 8inches
(20 cm) and more between the radiator and a
person's body (excluding extremities: hands,
wrists, fee tand legs.) 120
IntroductionCOMAND
Page 156 of 542
change accordingly
.Ifthe selected language
is not supported by the Voice Control System,
"English" will be selected.
X Select Vehicle by turning
0031001C0032the
COMAND controller and press 0021to
confirm.
X Select System and press
0021to confirm.
X Select Language and press
0021to confirm.
The list of languages appears. The 002Cdot
indicates the current setting.
X Select the language by turning 0031001C0032the
COMAND controller and press 0021to
confirm.
COMAND loads the selected language and
sets it. Reset function
You can reset COMAND to the factory
settings. Amongst other things, this will
delete all personal data (e.g. station presets,
address book entries, entries in the
destination memory and in the list of previous
destinations in the navigation system).
Resetting is recommended before selling or
transferring ownership of your vehicle, for
example.
X Select Vehicle in the main function bar by
turning 0031001C0032the COMAND controller and
press 0021to confirm.
X Select System by turning
0031001C0032the
COMAND controller and press 0021to
confirm.
X Select Reset and press
0021to confirm.
Ap rompt appears asking whethe ryou wish
to reset.
X Select Yes or
No and press
0021to confirm.
If you select No , the process will be aborted.
If you select Yes , another prompt appears
asking whether you really wish to reset.
X Select Yes or
No and press
0021to confirm.
If you select Yes , a message will be shown.
COMAND is reset and restarted. If you select
No , the process will be aborted.
Navigation
Introduction
Safety notes G
WARNING
For safety reasons, only enter a destination
when the vehicle is stationary. When the
vehicle is in motion, apassenger should enter
the destination .Study manual and select
route before driving.
Bear in mind that at a speed of just 30 mph
(approximately 50 km/h), your vehicle is
covering a distance of 44 fee t(approximately
14 m) every second.
COMAND calculates the rout eto the
destination without taking account of the
following:
R Traffic lights
R Stop and right-of-way-signs
R Lane merging
R Parking or stopping prohibited areas
R Other road and traffic rules and regulations
R Narrow bridges G
WARNING
COMAND may give incorrect navigation
commands if the data in the digital map does
not correspond with the actual road/traffic
situation. Digital maps do not cover all areas
nor all routes within an area. For example, if
the traffic routing has been changed or the
direction of a one-way road has been
reversed.
For this reason, you must always observe
applicable road and traffic rules and
regulations during your journey. Road and
traffic rules and regulations always have
priority over the navigation commands
generated by the system. 154
NavigationCOMAND
Page 172 of 542
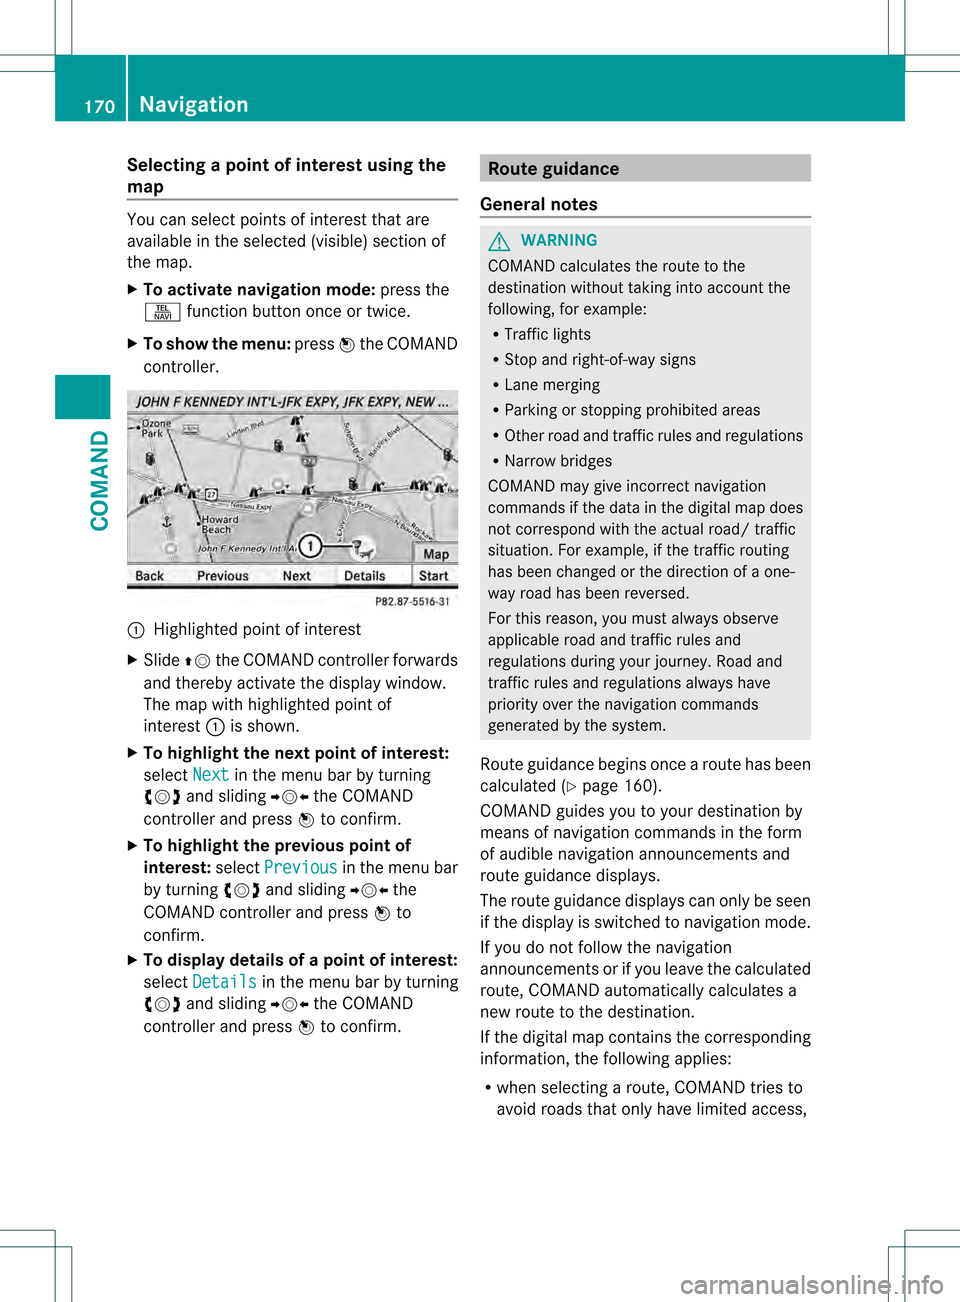
Selecting
apoint of interes tusing the
map You can select points of interest that are
available in the selected (visible) section of
the map.
X
To activate navigation mode: press the
0011 function button once or twice.
X To show the menu: press0021the COMAND
controller. 0002
Highlighted point of interest
X Slide 002A001Cthe COMAND controller forwards
and thereby activate the display window.
The map with highlighted point of
interest 0002is shown.
X To highlight the next point of interest:
select Next in the menu bar by turning
0031001C0032 and sliding 003D001C003Cthe COMAND
controller and press 0021to confirm.
X To highlight the previous point of
interest: selectPrevious in the menu bar
by turning 0031001C0032and sliding 003D001C003Cthe
COMAND controller and press 0021to
confirm.
X To display details of a point of interest:
select Details in the menu bar by turning
0031001C0032 and sliding 003D001C003Cthe COMAND
controller and press 0021to confirm. Route guidance
General notes G
WARNING
COMAND calculates the route to the
destination without taking into account the
following, for example:
R Traffic lights
R Stop and right-of-way signs
R Lane merging
R Parking or stopping prohibited areas
R Other road and traffic rules and regulations
R Narrow bridges
COMAND may give incorrect navigation
commands if the data in the digital map does
not correspond with the actual road/ traffic
situation. For example, if the traffic routing
has been changed or the direction of a one-
way road has been reversed.
For this reason, you must always observe
applicable road and traffic rules and
regulations during your journey. Road and
traffic rules and regulations always have
priority over the navigation commands
generated by the system.
Route guidance begins once aroute has been
calculated (Y page 160).
COMAND guides you to your destination by
means of navigation commands in the form
of audible navigation announcements and
route guidance displays.
The route guidance displays can only be seen
if the display is switched to navigation mode.
If you do not follow the navigation
announcements or if you leave the calculated
route, COMAND automatically calculates a
new route to the destination.
If the digital map contains the corresponding
information, the following applies:
R when selecting a route, COMAND tries to
avoid roads that only have limited access, 170
NavigationCOMAND
Page 180 of 542
destination
0002.You will hear the
announcement:" Please follow the arrow on
the display".
Route guidance from an off-road location
to a destination
If the vehicle position is within the area
covered by the digital map, but the map does
not contain any information about that
location, the vehicle is in an off-road location.
COMAND is also able to guide you to a
destination even from an off-road location.
At the start of the route guidance, you will see
the Street unknown message, an arrow and
the distance to the destination. The direction
arrow shows the linear direction to the actual
destination.
The continuous blue line on the map starts at
the street which you left last.
As soon as the vehicle is back on a road
known to the system, route guidance
continues in the usual way.
Off-road during route guidance
Due to roadworks, for example, there may be
differences between the data on the digital
map and the actual course of the road.
In such cases, the system will temporarily be
unable to locate the vehicle position on the
digital map and thus considers the vehicle to
be in an off-road position.
In the display, you will see the Streetunknown message, an arrow and the distance
to the destination. The arrow shows the
compass heading to the last road you were
driving on.
As soon as the system can assign the vehicle
position to the map again, route guidance
continues in the usual way.
Route guidance on roads that are not
completely digitalized
COMAND attempts to avoid roads that have
not been completely digitalized. If the
vehicle's position or the destination is located
in an area that has not been completely digitalized, then no active route guidance is
performed. Instead, the map shows a dashed
route along the roads and the target direction
is shown with an arrow. You hear the
announcement
:"You will enter an area,
where turn-by-turn guidance can not be
provided. Please follow the arrow on the
display". Once these roads have been left,
regular route guidance is resumed. Traffic reports
Prerequisite i
The SatRadio mode described below
requires optional satellite radio equipment
and a subscription to SIRIUS XM Satellite
Radio Traffic Message Service .Further
details on SatRadio are available in the
"SatRadio" section (Y page 221).
COMAND can receive traffic reports via
SatRadio and incorporate them in the
navigation system. Traffic messages and map
symbols can then be shown in the COMAND
display.
COMAND uses high quality traffic data.
Nevertheless, there may be differences
between the traffic reports received and the
actual road and traffic conditions.
Switching traffic reports on/off X
To switch on: set the route type to
Dynamic Route 7
(Y page 156).
X To switch off: select theFast Route or
Short Route route type (Y
page 156).
i COMAND calculates a new route if you
change the route type setting with route
guidance active. If you change the route
type setting when route guidance is
inactive, COMAND uses th enew setting for
the nextr oute guidance.
7 Traffic reports are not available in all countries. 178
NavigationCOMAND
Page 184 of 542
6
Repor ttext
0014 First exit/intersection after the affected
route section ends
X To scroll within arepor tort o access
the next report: turn0031001C0032 the COMAND
controller.
X To return to the list of messages: press
0021 or slide 003C001C003Dthe COMAND controller.
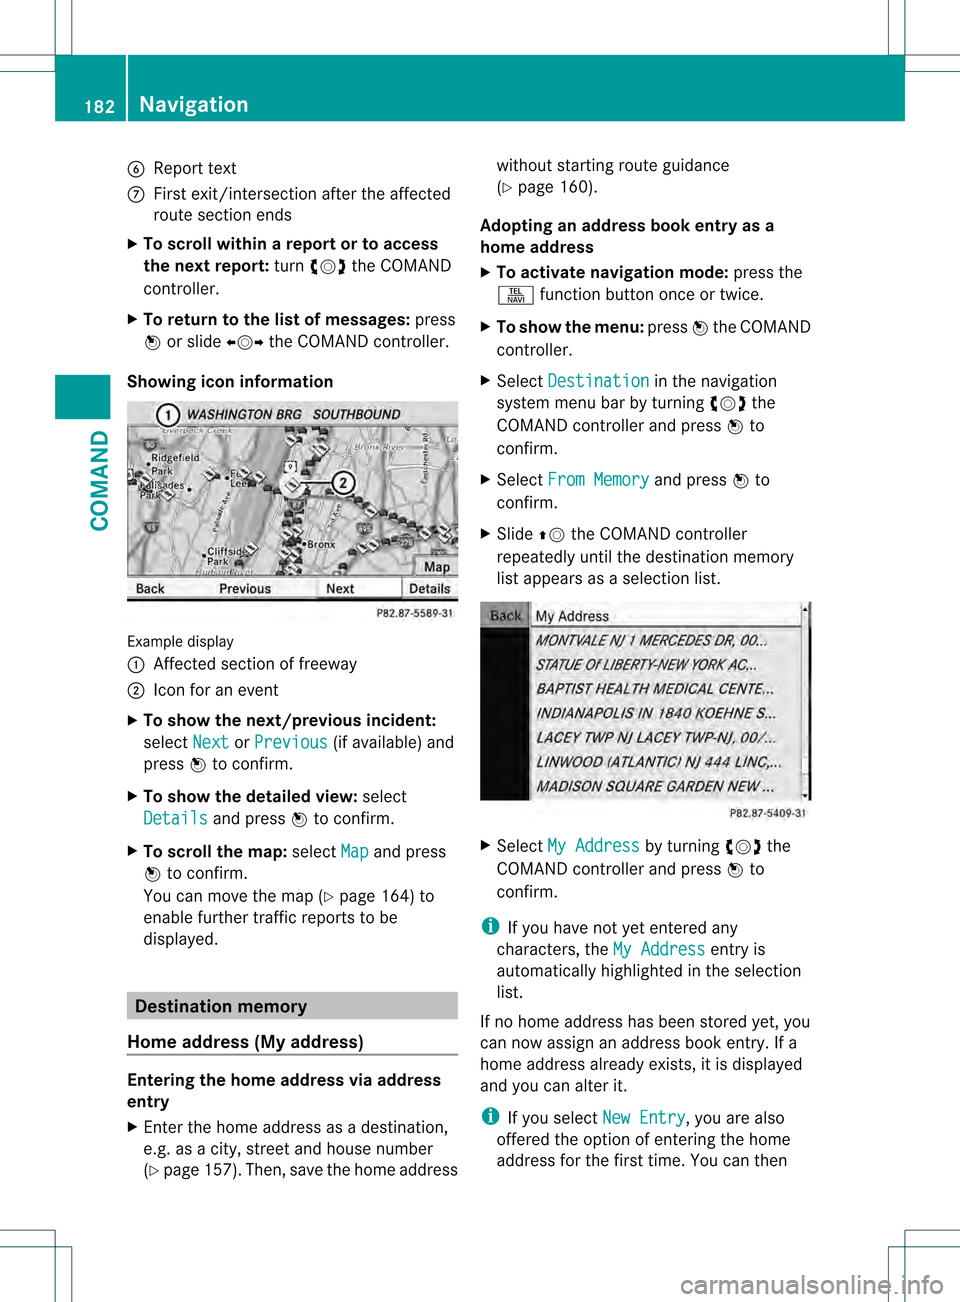
Showing icon information Example display
0002
Affected section of freeway
0003 Icon for an event
X To show the next/previous incident:
select Next or
Previous (if available) and
press 0021to confirm.
X To show the detailed view: select
Details and press
0021to confirm.
X To scroll the map: selectMap and press
0021 to confirm.
You can move the map (Y page 164) to
enable further traffic reports to be
displayed. Destination memory
Home address (My address) Entering the home address via address
entry
X Enter the home address as a destination,
e.g .as a city, street and house number
(Y page 157). Then, save the home address without starting route guidance
(Y
page 160).
Adopting an address book entry as a
home address
X To activate navigation mode: press the
0011 function button once or twice.
X To show the menu: press0021the COMAND
controller.
X Select Destination in the navigation
system menu bar by turning 0031001C0032the
COMAND controller and press 0021to
confirm.
X Select From Memory and press
0021to
confirm.
X Slide 002A001Cthe COMAND controller
repeatedly until the destination memory
list appears as a selection list. X
Select My Address by turning
0031001C0032the
COMAND controller and press 0021to
confirm.
i If you have not yet entered any
characters, the My Address entry is
automatically highlighted in the selection
list.
If no home address has been stored yet, you
can now assign an address book entry. If a
home address already exists, it is displayed
and you can alter it.
i If you select New Entry , you are also
offered the option of entering the home
address for the first time. You can then 182
NavigationCOMAND
Page 247 of 542
Changing the picture format
X
Press 0021the COMAND controller to show
the menu.
X Select Video by sliding
001C0006and turning
0031001C0032 the COMAND controller and press
0021 to confirm.
X Select Video DVD and press
0021to confirm.
X Select DVD-V and press
0021to confirm.
The DVD- Vmenu appears. The ädot in
front of a menu item indicates the current
setting.
X Select Auto ,
16:9 optimized ,
4:3 or
Widescreen and press
0021to confirm.
X Select a setting by turning 0031001C0032the
COMAND controller and press 0021to
confirm. Video DVD mode
Safety notes G
WARNING
COMAND is classified as a Class 1laser
product .You must not open the casing. If you
open the casing, or if the casing is faulty or
damaged, there is a risk of exposure to
invisible laser radiation. This may damage
your eyes, or those of others.
COMAND does not contain any parts that can
be serviced by the user. For safety reasons,
all maintenance work must be carried out by
qualified aftersales technicians. G
WARNING
Only when the vehicle is stationary should
you:
R load a disc
R eject a disc
There is a risk of being distracted from the
road and traffic conditions if this is done while
the vehicle is in motion. Notes about discs There may be playback problems when
playing copied discs. There are a large variety
of discs, DVD authoring software, writing
software and writers available. This variety
means that there is no guarantee that the
system will be able to play discs that you have
copied yourself.
! Do not affix stickers or labels to the discs,
as they could peel off and damage
COMAND. Stickers can cause the disc to
bend, which can result in read errors and
disc recognition problems.
! COMAND is designed to accommodate
discs which comply with the EN 60908
standard. You can therefore only use discs
with a maximum thickness of 1.3 mm.
If you insert thicker discs, e.g. those that
contain data on both sides (DVD on one
side and audio data on the other), they
cannot be ejected and can damage
COMAND.
Use round discs with a diameter of 12 cm.
Do not use discs with a diameter of 8 cm,
even with an adapter.
DVD playback conditions If video DVDsdon
ot conform to the NTSC or
PAL TV standards, they may create picture,
sound or other problems during playback.
COMAND can play back video DVDs
produced according to the following
standards:
R region code 1orregion code 0(no region
code)
i If you insert a video DVD with a different
regio ncode, you will see a message to this
effect.
R PAL or NTSC standard
You will generally find the relevant details
either on the DVD itself or on the DVD case.
i COMAND is set to region code 1 at the
factory. This setting can be changed at an Video
245COMAND Z
Page 282 of 542

Useful information
i This Operator's Manual describes all
models and all standard and optional
equipment of your vehicle available at the
time of publication of the Operator's
Manual. Country-specific differences are
possible. Please note that your vehicle may
not be equipped with all features
described. This also applies to safety-
related systems and functions.
i Please read the information on qualified
specialist workshops (Y page 31).Exterior lighting
Important safety notes
For reasons of safety, Mercedes-Benz
recommends that you drive with the lights
switched on even during the daytime. In some
countries, operation of the headlamps varies
due to legal requirements and self-imposed
obligations. Information about driving abroad
To convert to symmetrical low beam
when driving abroad: switch the headlamps
to symmetrical low beam in countries in
which traffic drives on the opposite side of the
road from the country where the vehicle is
registered. This prevents glare to oncoming
traffic. Symmetrical lights do not illuminate
as large an area of the edge of the road.
Have the headlamps converted at a qualified
specialist workshop as close to the border as
possible before driving in these countries.
To convert to asymmetrical low beam
after returning: have the headlamps
converted back to asymmetrical low beam at
a qualified specialist workshop as soon as
possible after crossing the border and
returning to the original country. Light switch
Operation Depending on the date of manufacture of your
vehicle, the
000Dor0004 symbol for the
automatic headlamp mode/daytime running
lamps is located on the light switch. 0005000E
Left-hand standing lamps
00060010 Right-hand standing lamps
0007000E Lights off/daytime running lamps
000B000D Automatic headlamp mode/daytime
running lamps
000C0012 Parking lamps, license plate and
instrumen tcluste rlighting
000D000A Low-beam/high-beam headlamps
000E000B Front fog lamps 11
000F000D Rear fog lamp
The tur nsignals, high-beam headlamps and
the high-beam flasher are operated using the
combination switch (Y page 283).
! Switch off the parking lamps and standing
lamps when you leave the vehicle. This
prevents the battery fro mdischarging.
The exterior lighting (except the parking/
standing lamps) switches off automatically if
you:
R remove the SmartKey fro mthe ignition lock
R open the driver's door with the SmartKey
in position 0
If you hear a warning tone when you leave the
vehicle, the lights may still be switched on.
11 Only vehicles with Bi-Xenon headlamps without the Intelligent Light System are equipped with front fog lamps. 280
Exterior lightingLights and windshield wipers
Page 334 of 542
more firmly. Maintain a safe distance from
vehicles in front.
After driving on a wet road or having the
vehicle washed, brake firmly while paying
attention to the traffic conditions. This will
warm up the brake discs, thereby drying them
more quickly and protecting them against
corrosion.
Limited braking performance on salt-
treated roads G
WARNING
The layer of saltont he brake discs and the
brake pads/linings may cause a delay in the
braking effect, resulting in a significantly
longer braking distance, which could lead to
an accident.
To avoid this danger, you should:
R occasionally brake carefully, without
putting other road users at risk, when you
are driving on salted roads. This helps to
remove any salt that may have started to
build up on the brake discs and the brake
pads/linings.
R maintain a greater distance to the vehicle
ahead and drive with particular care.
R carefully apply the brakes at the end of a
trip and immediately after commencing a
new trip, so that salt residues are removed
from the brake discs.
Servicing the brakes !
If the red brake warning lamp lights up in
the instrumentc luster and you hear a
warning tone while the engine is running,
the brake fluid level may be too low.
Observe additional warning messages in
the multifunction display.
The brake fluid level may be too low due to
brake pad wear or leaking brake lines.
Have the brake system checked
immediately. This work should be carried
out at a qualified specialist workshop. All checks and maintenance work on the
brake system must be carried out at a
qualified specialist workshop. Consult a
qualified specialist workshop to arrange this.
Have brake pads installed and brake fluid
replaced at a qualified specialist workshop. G
WARNING
If brake pads or brake fluid other than those
recommended are used, the braking
properties of the vehicle can be degraded to
an extent that safe braking is substantially
impaired. This could result in an accident.
! Vehicles with 4MATIC: function or
performance tests may only be carried out
on a 2-axle dynamometer. If you are
planning to have the vehicle tested on such
a dynamometer, contact an authorized
Mercedes-Benz Center to obtain further
information first. Otherwise, you could
damage the drive train or the brake system.
! Vehicles with 4MATIC: as the ESP®
system operates automatically, the engine
and the ignition must be switched off
(SmartKey in position 0or 1in the ignition
lock or Start/Stop button in position 0or
1) when the electric parking brake is being
tested on a brake dynamometer.
Braking maneuvers triggere dautomatically
by ESP ®
may seriously damage the brake
system.
! Vehicles with 4MATIC: as the ESP®
system operates automatically, the engine
and the ignition system must be switched
off (SmartKey in position 0or 1in the
ignition lock or Start/Stop button in
position 0or 1) when:
R testing the electric parking brake on a
brake dynamometer.
R you intend to have the vehicle towed with
one of the axles raised.
Braking maneuvers triggered automatically
by ESP ®
may seriously damage the brake
system. 332
Driving tipsDriving and pa
rking