ECO mode MERCEDES-BENZ S-Class 2014 W222 Comand Manual
[x] Cancel search | Manufacturer: MERCEDES-BENZ, Model Year: 2014, Model line: S-Class, Model: MERCEDES-BENZ S-Class 2014 W222Pages: 278, PDF Size: 6.65 MB
Page 210 of 278
The following options are available:
R
Normal Track Sequence Normal Track Sequence
The tracks are played in the normal order
(e.g. track 1, 2, 3, etc.).
R Random Medium
Random Medium
All the tracks on the medium are played in
random order.
R Random Track Mix
Random Track Mix
The tracks in the currently active track list
are played in random order. Bluetooth
®
audio mode Connecting Bluetooth
®
audio devices
Prerequisites Bluetooth
®
audio mode requires a
Bluetooth ®
-capable audio device.
Before using Bluetooth ®
audio mode, you
must check your Bluetooth ®
audio device for
the following (see the Bluetooth ®
audio
device's operating instructions):
R Bluetooth ®
audio profile
The Bluetooth ®
audio device must support
the A2DP and AVRCP Bluetooth ®
audio
profiles.
R Bluetooth ®
visibility
Certain Bluetooth ®
audio devices require
more than simply activating the
Bluetooth ®
function. In addition, your
device must be made "visible" to other
devices.
R Bluetooth ®
device name
This device name is predetermined but can
usually be changed. To make a clear
selection of the Bluetooth ®
device
possible, Mercedes-Benz recommends
that you customize the device name (see
the Bluetooth ®
audio device's operating
instructions). i
A2DP (Advanced AudioDistribution
Profile): Bluetooth ®
audio profile for audio
data transmission
AVRCP (Audio VideoRemote Control
Profile): Bluetooth ®
audio profile for audio
data playback.
i The Bluetooth ®
device must be visible for
authorization. After authorization,
COMAND even finds the Bluetooth ®
device
when it is not visible.
COMAND
X Activate the Bluetooth ®
function in
COMAND (Y page 45).
General notes Before using your Bluetooth
®
audio device
with COMAND for the first time, you will need
to authorize it.
When you authorize a new Bluetooth ®
audio
device, it is connected automatically.
Connection involves first searching for a
Bluetooth ®
audio device and then authorizing
it.
You can authorize up to fifteen Bluetooth ®
devices.
i If you authorize a mobile phone that
supports Bluetooth ®
audio, the A2DP and
AVRCP Bluetooth ®
audio profiles are
connected automatically.
The mobile phone is then entered:
R in the Bluetooth ®
telephone list
(Y page 124)
R in the Bluetooth ®
device list
(Y page 209)
Mercedes-Benz recommends authorizing a
mobile phone in Bluetooth ®
telephony
(Y page 125). 208
Bluetooth ®
audio modeMedia
Page 212 of 278
Option 1: entering the passkey
X
You can find information on this in the
"Authorizing (registering) a mobile phone"
section (Y page 125).
After successful authorization, the
Bluetooth ®
audio device is connected and
starts playing.
Option 2: Secure Simple Pairing
i The Bluetooth ®
audio device must
support Bluetooth ®
version 2.1 for
connection via Secure Simple Pairing.
COMAND creates a six-digit code, which is
displayed on both devices that are to be
connected
For some Bluetooth ®
audio devices, the
pairing must be confirmed within 10
seconds.
X If the number code displayed on
COMAND and on the Bluetooth ®
audio
device is the same, select Yes Yes: press the
controller.
If you select Yes
Yes, authorization continues
and the Bluetooth ®
audio device is
connected. Playback starts.
If you select No
No, authorization will be
canceled. External authorization
If COMAND does not find your Bluetooth ®
audio device, this may be due to particular
security settings on your Bluetooth ®
audio
device. In this case, check whether your
Bluetooth ®
audio device can locate
COMAND.
The Bluetooth ®
device name of COMAND is
MB Bluetooth
MB Bluetooth.
X
Switch on Bluetooth ®
audio mode
(Y page 212).
X To select Options Options: slide 005200C5and press
the controller. X
To select Bluetooth Audio Devices Bluetooth Audio Devices:
press the controller.
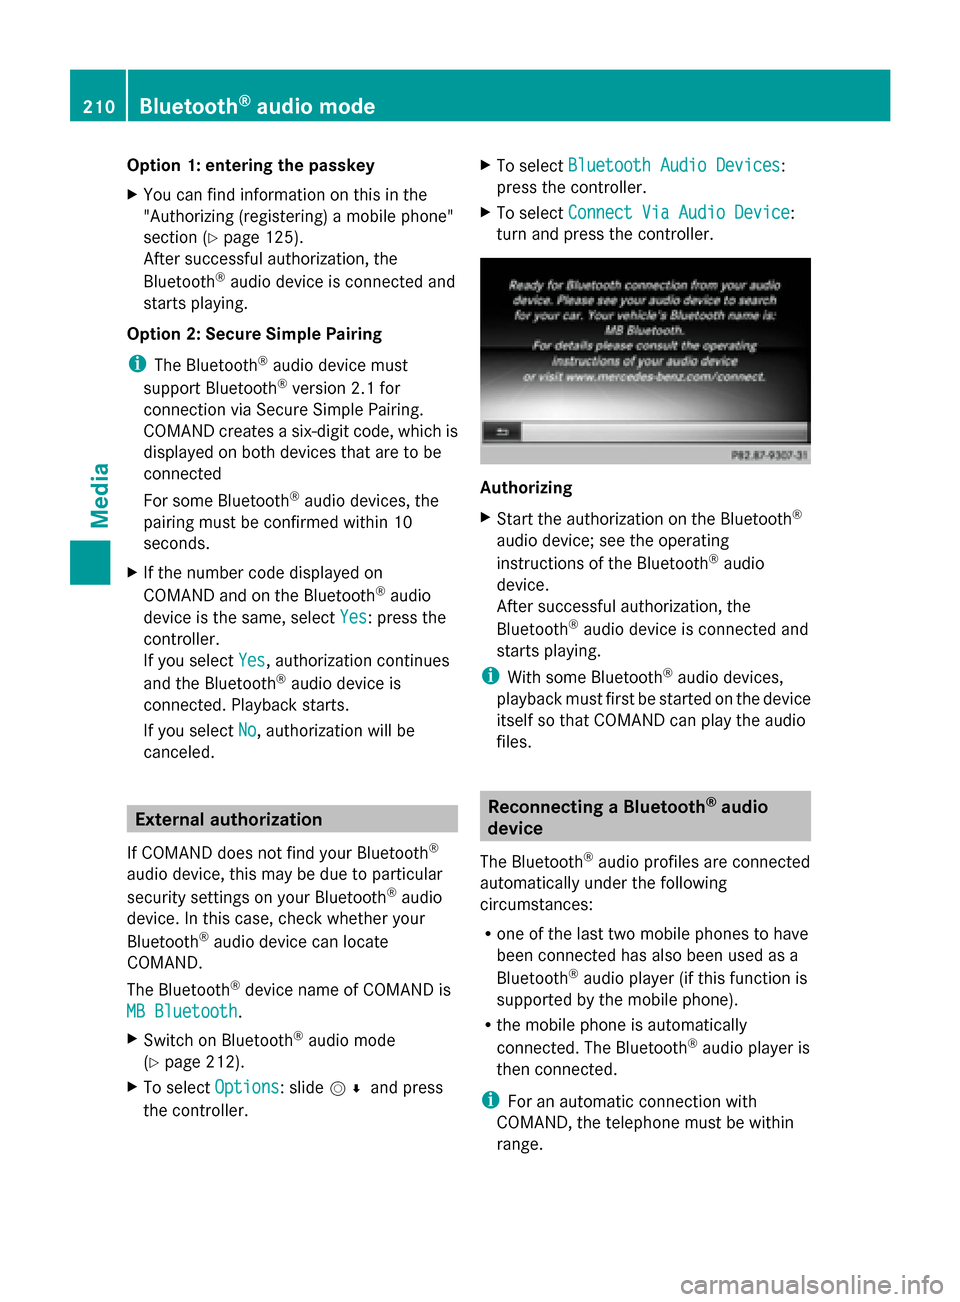
X To select Connect Via Audio Device Connect Via Audio Device:
turn and press the controller. Authorizing
X
Start the authorization on the Bluetooth ®
audio device; see the operating
instructions of the Bluetooth ®
audio
device.
After successful authorization, the
Bluetooth ®
audio device is connected and
starts playing.
i With some Bluetooth ®
audio devices,
playback must first be started on the device
itself so that COMAND can play the audio
files. Reconnecting a Bluetooth
®
audio
device
The Bluetooth ®
audio profiles are connected
automatically under the following
circumstances:
R one of the last two mobile phones to have
been connected has also been used as a
Bluetooth ®
audio player (if this function is
supported by the mobile phone).
R the mobile phone is automatically
connected. The Bluetooth ®
audio player is
then connected.
i For an automatic connection with
COMAND, the telephone must be within
range. 210
Bluetooth ®
audio modeMedia
Page 213 of 278
For most Bluetooth
®
audio devices, the
"automatic connection" must be activated
by checking a box. Depending on the
device used, this prompt often takes place
when authorizing (see the Bluetooth ®
audio
device operating instructions).
If the No Bluetooth Audio Device
No Bluetooth Audio Device
Connected
Connected message appears, you have two
options to reconnect the Bluetooth ®
audio
device.
Option 1:
X To confirm Connect Last Device Connect Last Device in the
basic display: press the controller.
If COMAND can locate the Bluetooth ®
audio device, it will be connected and will
start playing.
Option 2:
X To select Options
Options: slide 005200C5and press
the controller.
X To select Bluetooth Audio Devices Bluetooth Audio Devices:
press the controller.
X To select a Bluetooth ®
audio device: turn
and press the controller.
If the Bluetooth ®
audio device has been
authorized, playback starts. Bluetooth
®
audio device and
simultaneous search for mobile
phones
i When searching for a mobile phone or a
new Bluetooth ®
audio device, the
connection to an already activated
Bluetooth ®
audio device is separated
(Y page 124).
In the Bluetooth ®
audio basic display, you will
see the No Bluetooth Audio Device
No Bluetooth Audio Device
Connected
Connected message and the Connect ConnectLast
Last
Device
Device menu item cannot be selected. Displaying details
X To select a Bluetooth ®
audio device from
the Bluetooth ®
device list: turn the
controller.
X To select the symbol to the right of the
Bluetooth ®
audio device: slide 00520096the
controller.
X To select Details
Details: turn and press the
controller.
The following information concerning the
selected mobile phone is shown:
R Bluetooth ®
name
R Bluetooth ®
address
R availability status (shown after an
update)
R authorization status
X To close the detailed display: press the
0038 button. De-authorizing (deregistering) a
Bluetooth
®
audio device
X To select a Bluetooth ®
audio device from
the Bluetooth ®
device list: turn the
controller.
X To select the symbol to the right of the
Bluetooth ®
audio device: slide 00520096and
press the controller.
X To select Deauthorize
Deauthorize: press the
controller.
A prompt appears asking whether you
really wish to de-authorize this device.
X To select Yes YesorNo
No: turn and press the
controller.
If you select Yes
Yes, the device will be deleted
from the Bluetooth ®
device list.
If you select No
No, the process will be
canceled.
i Before re-authorizing the Bluetooth ®
audio device, you should also delete the
device name MB Bluetooth MB Bluetooth from your
Bluetooth ®
audio device's Bluetooth ®
list Bluetooth
®
audio mode 211Media Z
Page 214 of 278
(see the Bluetooth
®
audio device's
operating instructions). Switching to Bluetooth
®
audio mode
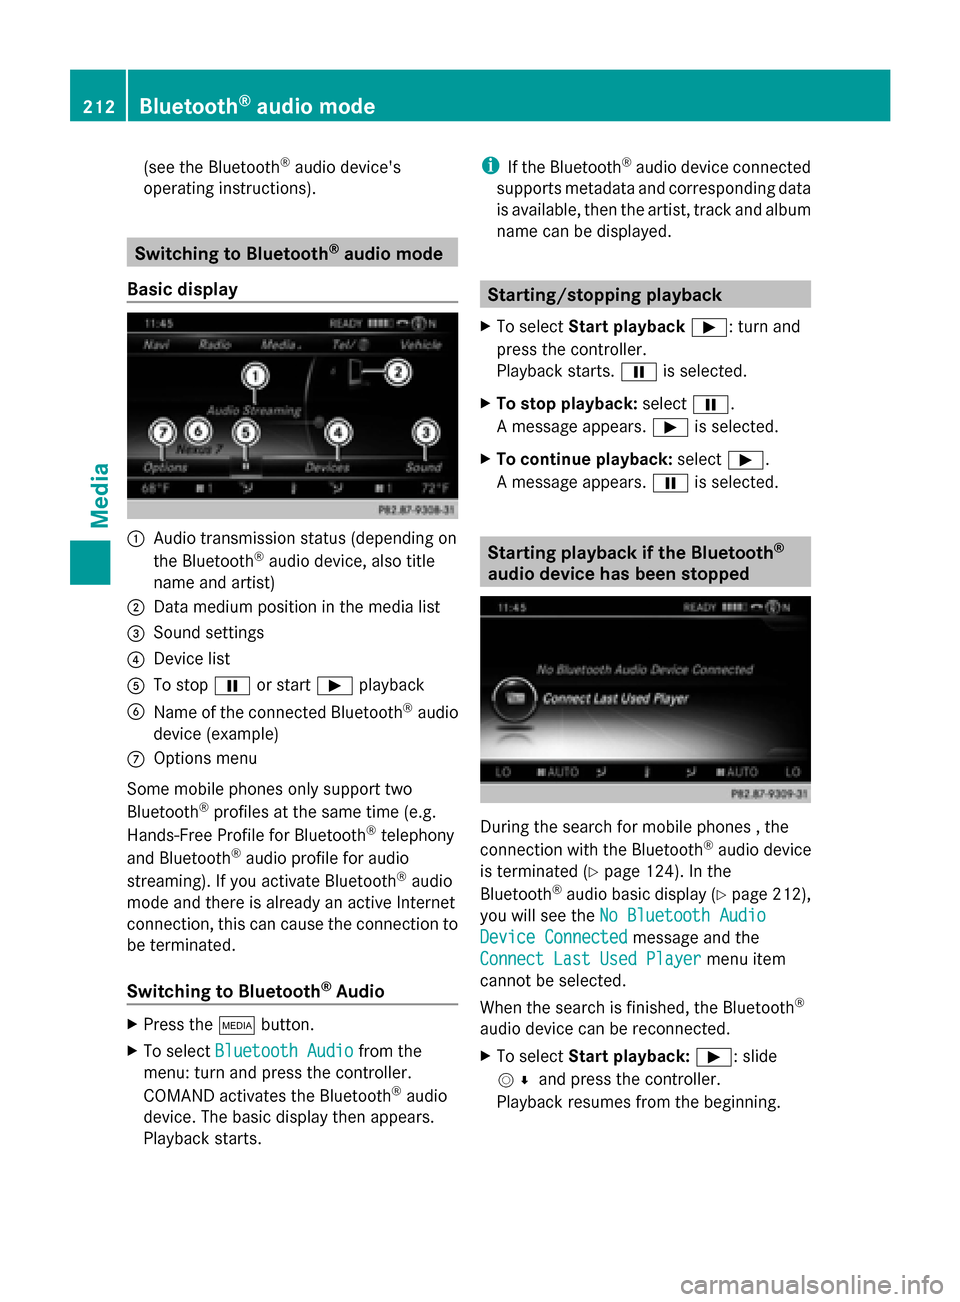
Basic display 0043
Audio transmission status (depending on
the Bluetooth ®
audio device, also title
name and artist)
0044 Data medium position in the media list
0087 Sound settings
0085 Device list
0083 To stop 00CFor start 00D0playback
0084 Name of the connected Bluetooth ®
audio
device (example)
006B Options menu
Some mobile phones only support two
Bluetooth ®
profiles at the same time (e.g.
Hands-Free Profile for Bluetooth ®
telephony
and Bluetooth ®
audio profile for audio
streaming). If you activate Bluetooth ®
audio
mode and there is already an active Internet
connection, this can cause the connection to
be terminated.
Switching to Bluetooth ®
Audio X
Press the 00FDbutton.
X To select Bluetooth Audio Bluetooth Audio from the
menu: turn and press the controller.
COMAND activates the Bluetooth ®
audio
device. The basic display then appears.
Playback starts. i
If the Bluetooth ®
audio device connected
supports metadata and corresponding data
is available, then the artist, track and album
name can be displayed. Starting/stopping playback
X To select Start playback 00D0: turn and
press the controller.
Playback starts. 00CFis selected.
X To stop playback: select00CF.
A message appears. 00D0is selected.
X To continue playback: select00D0.
A message appears. 00CFis selected. Starting playback if the Bluetooth
®
audio device has been stopped During the search for mobile phones , the
connection with the Bluetooth
®
audio device
is terminated (Y page 124). In the
Bluetooth ®
audio basic display (Y page 212),
you will see the No Bluetooth Audio No Bluetooth Audio
Device Connected
Device Connected message and the
Connect Last Used Player
Connect Last Used Player menu item
cannot be selected.
When the search is finished, the Bluetooth ®
audio device can be reconnected.
X To select Start playback: 00D0: slide
005200C5 and press the controller.
Playback resumes from the beginning. 212
Bluetooth ®
audio modeMedia
Page 219 of 278
R
Composers
Composers
R Videos
Videos
R Photos
Photos
i The functions are available as soon as the
entire media content has been read and
analyzed.
If the same device is reconnected with
unchanged media content, these functions
are available more quickly.
When connecting Apple ®
devices, the
categories “Folder”, “Year” and “Photos”
are not available. X
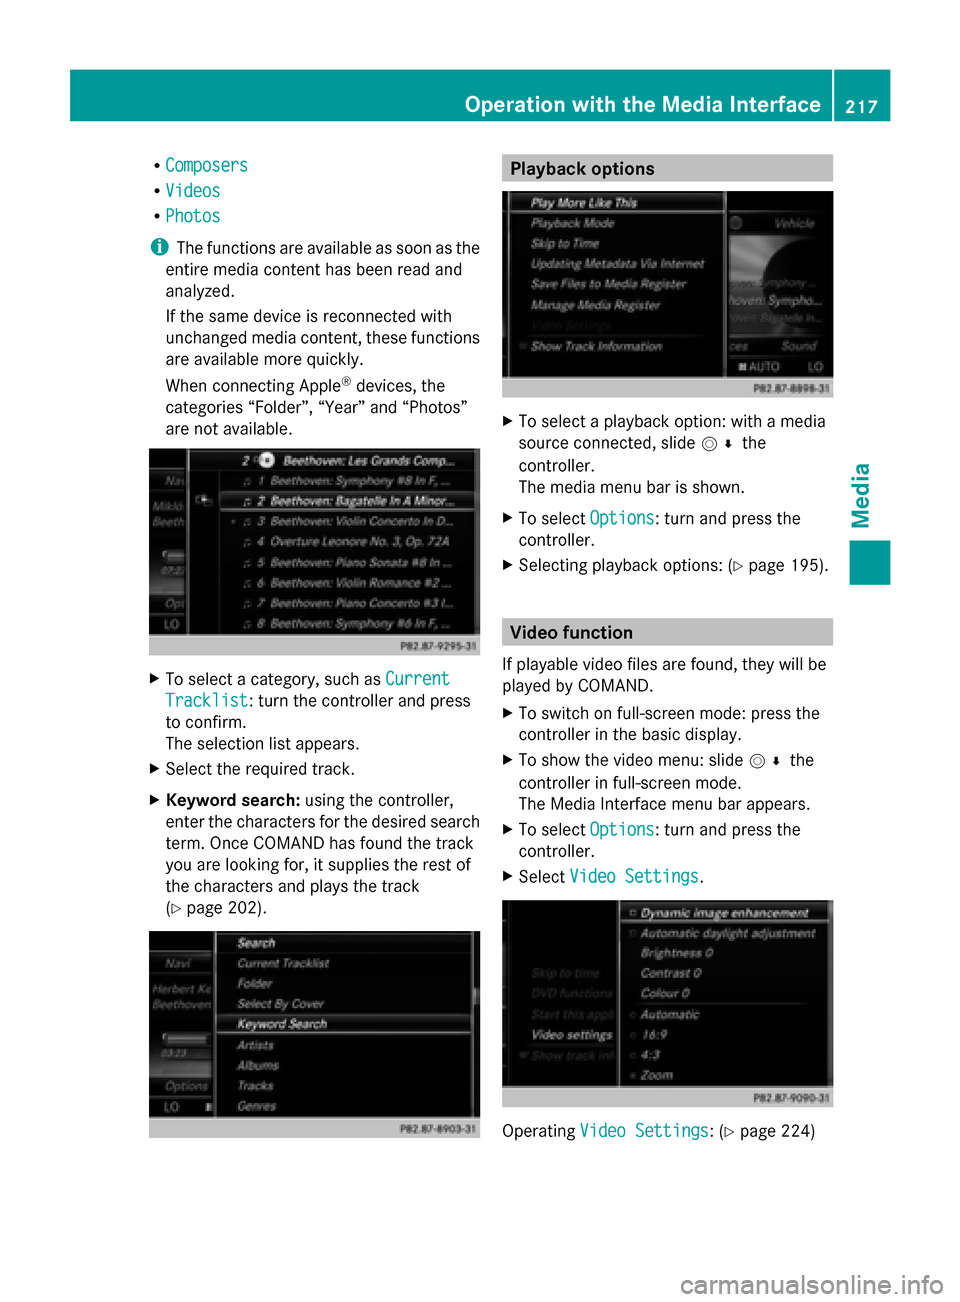
To select a category, such as Current
Current
Tracklist Tracklist: turn the controller and press
to confirm.
The selection list appears.
X Select the required track.
X Keyword search: using the controller,
enter the characters for the desired search
term. Once COMAND has found the track
you are looking for, it supplies the rest of
the characters and plays the track
(Y page 202). Playback options
X
To select a playback option: with a media
source connected, slide 005200C5the
controller.
The media menu bar is shown.
X To select Options Options: turn and press the
controller.
X Selecting playback options: (Y page 195). Video function
If playable video files are found, they will be
played by COMAND.
X To switch on full-screen mode: press the
controller in the basic display.
X To show the video menu: slide 005200C5the
controller in full-screen mode.
The Media Interface menu bar appears.
X To select Options
Options: turn and press the
controller.
X Select Video Settings Video Settings. Operating
Video Settings
Video Settings: (Y page 224) Operation with the Media Interface
217Media Z
Page 223 of 278
a distance of 44 feet (approximately 14 m)
every second. Notes on discs
! Do not affix stickers or labels to the discs.
They could peel off and damage COMAND.
Stickers can cause the disc to bend, which
can result in read errors and disc
recognition problems.
! COMAND is designed to play discs that
comply with the EN 60908 standard.
Therefore, you can only use discs with a
maximum thickness of 1.3 mm.
If you insert thicker discs, e.g. those that
contain data on both sides (DVD on one
side and audio data on the other), they
cannot be ejected and can damage the
device.
Only use round discs with a diameter of
12 cm. Do not use discs with a diameter of
8 cm, even with an adapter.
The variety of data media, burners and burn
software means there is no guarantee that
the system will be able to play discs that you
have copied yourself. DVD playback conditions
If video DVDs do not conform to the NTSC or
PAL TV standards, they may create picture,
sound or other problems during playback.
COMAND is capable of playing back video
DVDs produced according to the following
standards:
R Region code 1 or region code 0 (no region
code)
R PAL or NTSC standard
You will generally find the relevant details
either on the DVD itself or on the DVD case.
i If you insert a video DVD with a different
region code, a message to this effect
appears. i
COMAND is set to region code 1 at the
factory. This setting can be changed at an
authorized Mercedes-Benz Center. It is also
possible to play video DVDs with a different
region code, provided that they are
produced in accordance with the PAL or
NTSC TV standard. The region code can be
changed up to five times. Control options
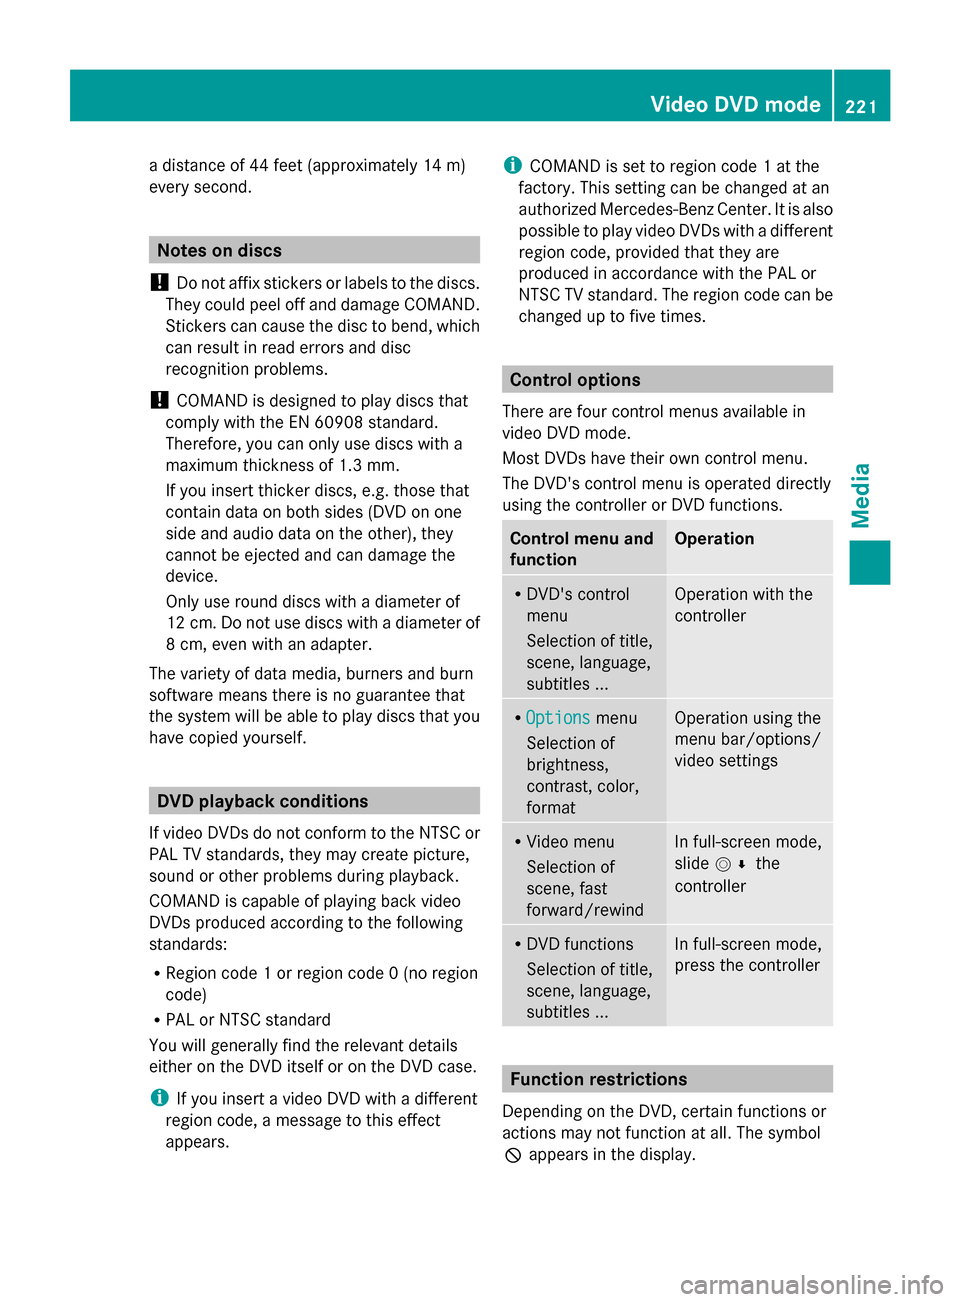
There are four control menus available in
video DVD mode.
Most DVDs have their own control menu.
The DVD's control menu is operated directly
using the controller or DVD functions. Control menu and
function Operation
R
DVD's control
menu
Selection of title,
scene, language,
subtitles ... Operation with the
controller
R
Options Options menu
Selection of
brightness,
contrast, color,
format Operation using the
menu bar/options/
video settings
R
Video menu
Selection of
scene, fast
forward/rewind In full-screen mode,
slide
005200C5 the
controller R
DVD functions
Selection of title,
scene, language,
subtitles ... In full-screen mode,
press the controller
Function restrictions
Depending on the DVD, certain functions or
actions may not function at all. The symbol
0047 appears in the display. Video DVD mode
221Media Z
Page 239 of 278
VIP & BAL selection
Sound optimization for a specific seat, e.g.
Rear
Rear Left
Leftcan be selected using the VIP
VIP&
&
BAL Selection
BAL Selection setting.
X To display the menu bars: slide 00520064the
controller in media mode.
X To select Sound
Sound in the menu bar: turn and
press the controller.
The menu with the last accessed setting
appears.
X Turn the controller until VIP & BAL
VIP & BAL
Selection Selection is in the center.
X To activate the left-hand rotary menu to
switch VIP & BAL Selection
VIP & BAL Selection on and off:
slide 00520064the controller.
X To activate VIP & BAL Selection
VIP & BAL Selection : turn
the controller until ON
ON is active.
X To activate the right-hand rotary menu:
slide 00520096the controller.
X To set the desired VIP
VIP & &BAL
BAL Selection
Selection:
turn the controller.
The segment, text and image show the
selected setting, e.g. for Rear Left Rear Left
X To return to the menu: slide 00970052the
controller.
X To return to the basic menu: press the
0038 button briefly. Setting the sound profile
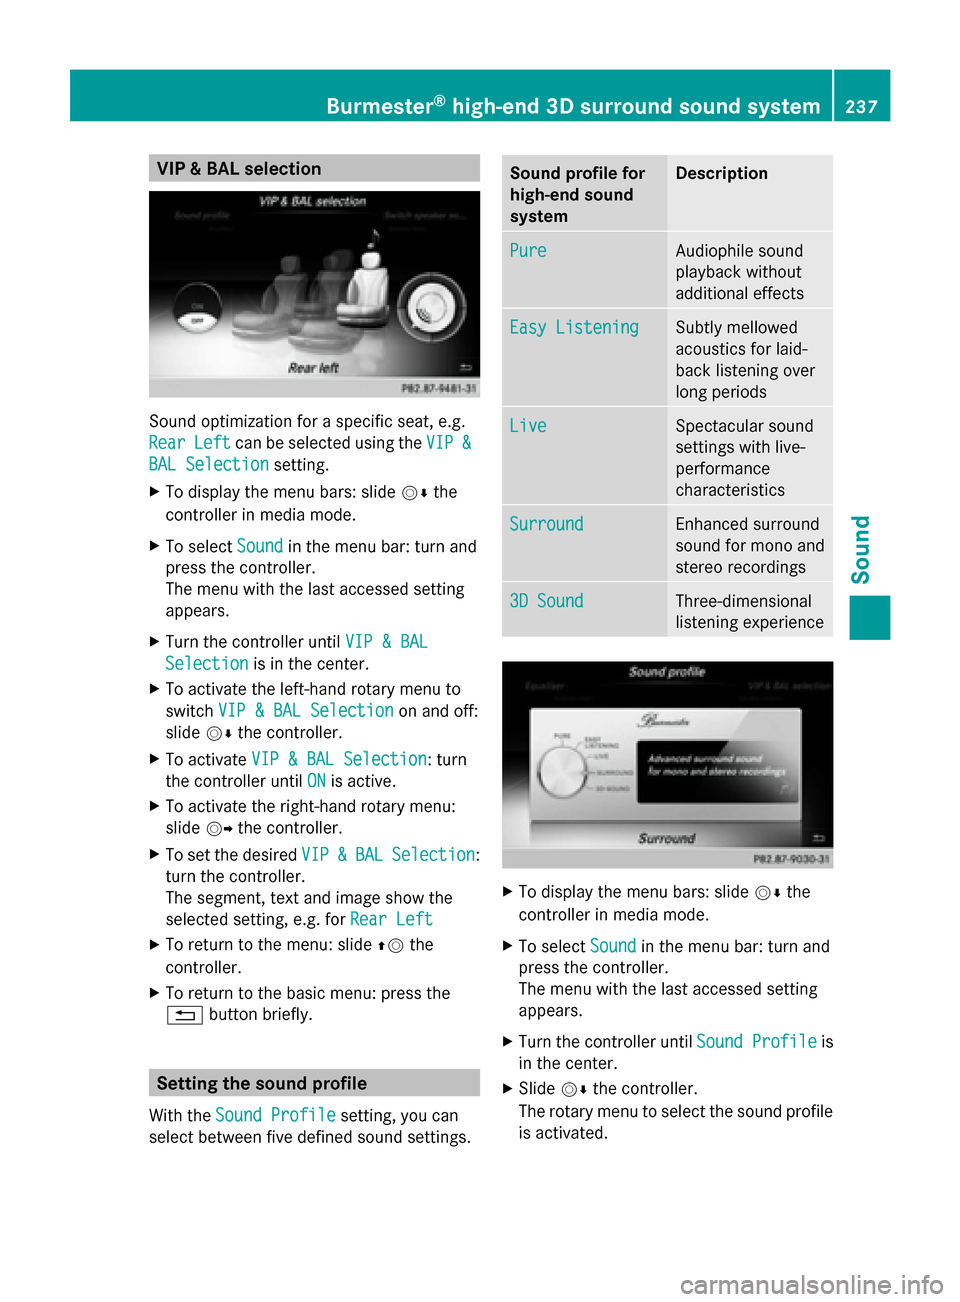
With the Sound Profile Sound Profile setting, you can
select between five defined sound settings. Sound profile for
high-end sound
system Description
Pure Pure Audiophile sound
playback without
additional effects
Easy Listening Easy Listening Subtly mellowed
acoustics for laid-
back listening over
long periods
Live Live Spectacular sound
settings with live-
performance
characteristics
Surround Surround Enhanced surround
sound for mono and
stereo recordings
3D Sound 3D Sound Three-dimensional
listening experience
X
To display the menu bars: slide 00520064the
controller in media mode.
X To select Sound Soundin the menu bar: turn and
press the controller.
The menu with the last accessed setting
appears.
X Turn the controller until Sound Profile Sound Profileis
in the center.
X Slide 00520064the controller.
The rotary menu to select the sound profile
is activated. Burmester
®
high-end 3D surround sound system 237Sound
Page 251 of 278
X
Select Language
Language using the00630064
buttons and press the 008Bbutton to confirm.
The list of languages appears. A 0036dot
indicates the current setting.
X Select the language using the 00630064
buttons and press the 008Bbutton to confirm.
The system activates the corresponding
language. Switching the display design
X Select Vehicle
Vehicle using the
006300640059 buttons on the
remote control and press the 008Bbutton to
confirm.
X Select System Settings
System Settings using the0064
00590065 buttons on the remote control
and press the 008Bbutton to confirm.
You see the system settings menu on the
selected rear screen.
X Select Display
Display using the 00630064
buttons on the remote control and press
the 008Bbutton to confirm.
X Select Day Mode
Day Mode, Night Mode Night Mode or
Automatic
Automatic using the00630064 buttons
and press the 008Bbutton to confirm.
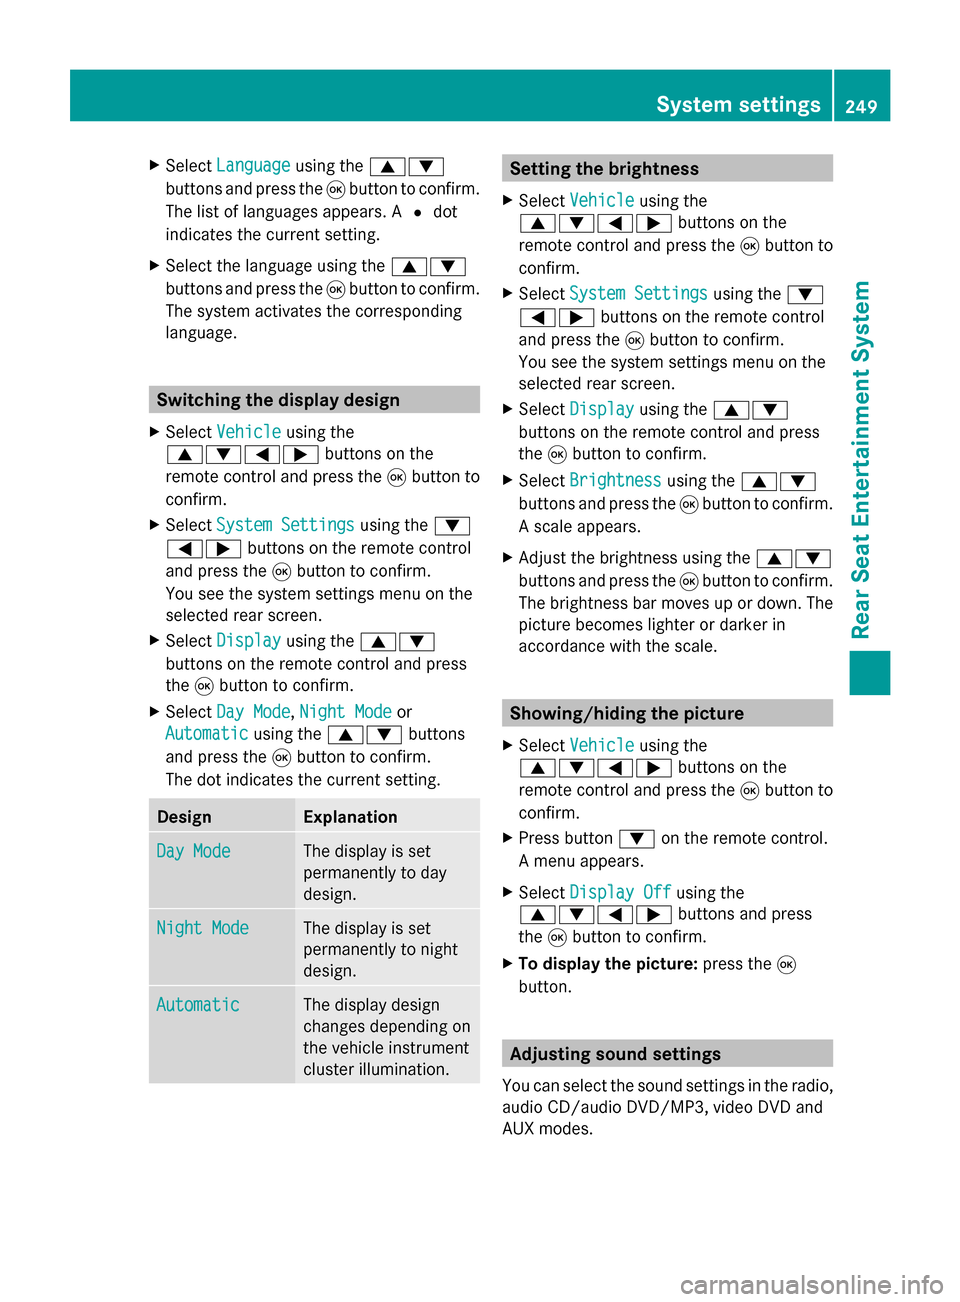
The dot indicates the current setting. Design Explanation
Day Mode Day Mode The display is set
permanently to day
design. Night Mode
Night Mode The display is set
permanently to night
design. Automatic Automatic The display design
changes depending on
the vehicle instrument
cluster illumination. Setting the brightness
X Select Vehicle Vehicle using the
006300640059 buttons on the
remote control and press the 008Bbutton to
confirm.
X Select System Settings
System Settings using the0064
00590065 buttons on the remote control
and press the 008Bbutton to confirm.
You see the system settings menu on the
selected rear screen.
X Select Display
Display using the 00630064
buttons on the remote control and press
the 008Bbutton to confirm.
X Select Brightness Brightness using the00630064
buttons and press the 008Bbutton to confirm.
A scale appears.
X Adjust the brightness using the 00630064
buttons and press the 008Bbutton to confirm.
The brightness bar moves up or down. The
picture becomes lighter or darker in
accordance with the scale. Showing/hiding the picture
X Select Vehicle Vehicle using the
006300640059 buttons on the
remote control and press the 008Bbutton to
confirm.
X Press button 0064on the remote control.
A menu appears.
X Select Display Off
Display Off using the
006300640059 buttons and press
the 008Bbutton to confirm.
X To display the picture: press the008B
button. Adjusting sound settings
You can select the sound settings in the radio,
audio CD/audio DVD/MP3, video DVD and
AUX modes. System settings
249Rear Seat Entertainment System Z
Page 256 of 278
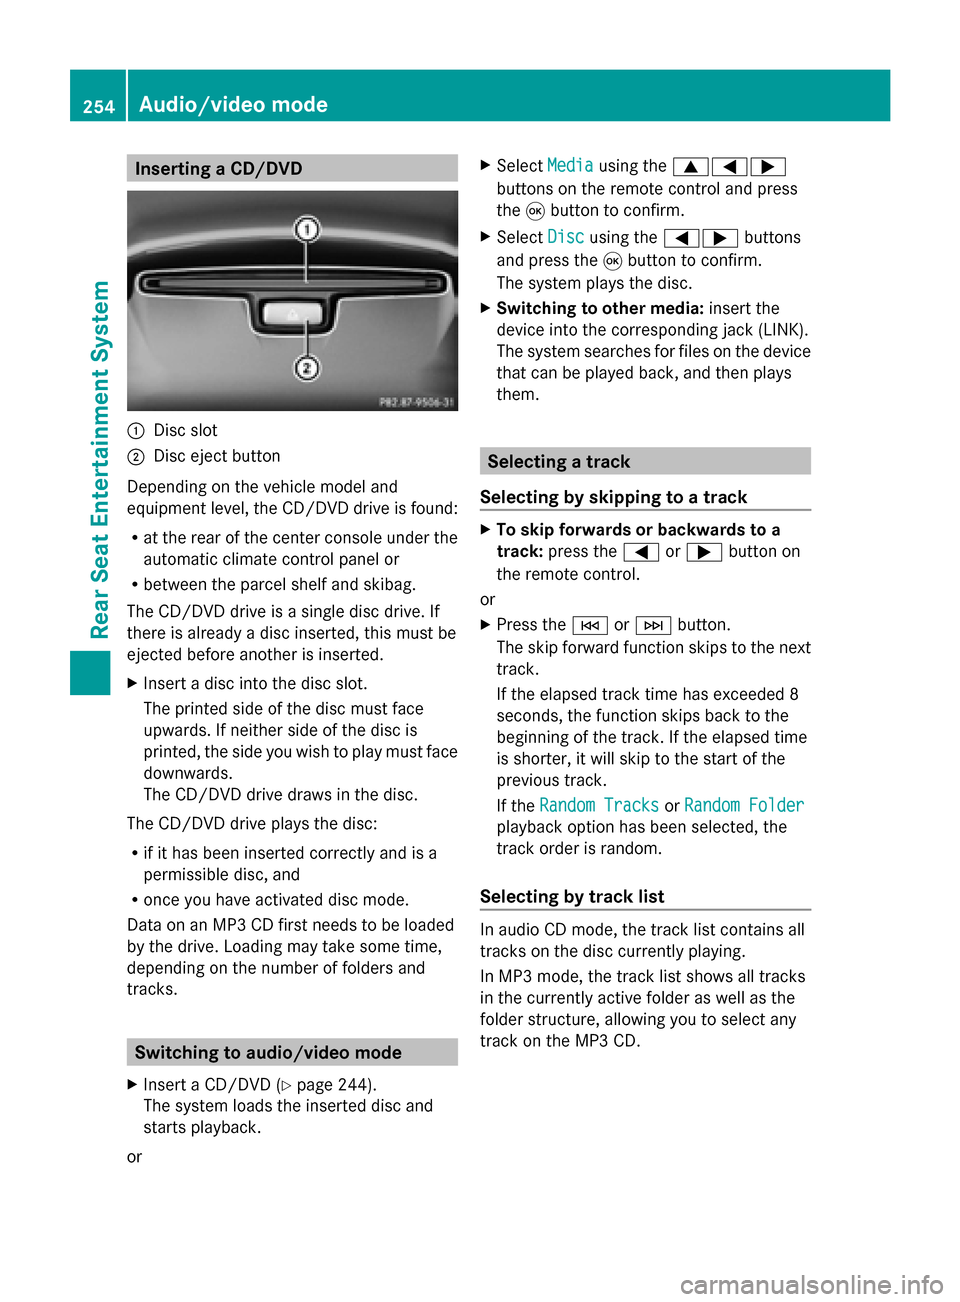
Inserting a CD/DVD
0043
Disc slot
0044 Disc eject button
Depending on the vehicle model and
equipment level, the CD/DVD drive is found:
R at the rear of the center console under the
automatic climate control panel or
R between the parcel shelf and skibag.
The CD/DVD drive is a single disc drive. If
there is already a disc inserted, this must be
ejected before another is inserted.
X Insert a disc into the disc slot.
The printed side of the disc must face
upwards. If neither side of the disc is
printed, the side you wish to play must face
downwards.
The CD/DVD drive draws in the disc.
The CD/DVD drive plays the disc:
R if it has been inserted correctly and is a
permissible disc, and
R once you have activated disc mode.
Data on an MP3 CD first needs to be loaded
by the drive. Loading may take some time,
depending on the number of folders and
tracks. Switching to audio/video mode
X Insert a CD/DVD (Y page 244).
The system loads the inserted disc and
starts playback.
or X
Select Media Mediausing the 006300590065
buttons on the remote control and press
the 008Bbutton to confirm.
X Select Disc Discusing the 00590065 buttons
and press the 008Bbutton to confirm.
The system plays the disc.
X Switching to other media: insert the
device into the corresponding jack (LINK).
The system searches for files on the device
that can be played back, and then plays
them. Selecting a track
Selecting by skipping to a track X
To skip forwards or backwards to a
track: press the 0059or0065 button on
the remote control.
or
X Press the 0048or0049 button.
The skip forward function skips to the next
track.
If the elapsed track time has exceeded 8
seconds, the function skips back to the
beginning of the track. If the elapsed time
is shorter, it will skip to the start of the
previous track.
If the Random Tracks Random Tracks orRandom Folder
Random Folder
playback option has been selected, the
track order is random.
Selecting by track list In audio CD mode, the track list contains all
tracks on the disc currently playing.
In MP3 mode, the track list shows all tracks
in the currently active folder as well as the
folder structure, allowing you to select any
track on the MP3 CD. 254
Audio/video modeRea
r Seat Entertainment System
Page 257 of 278
X
Select Search
Search using the 006400590065
buttons on the remote control and press
the 008Bbutton to confirm.
X Select Current Track List
Current Track List using the
00630064 buttons and press the 008Bbutton
to confirm.
The track list appears. The 0036dot indicates
the current track.
X Select the track using the 00630064
buttons and press the 008Bbutton to confirm.
Making a selection by entering the track
number directly This function is only available in Media mode.
X Press button 007Eon the remote control.
The track entry display appears.
Example: track 2
X Press number button 2.
Example: track 12
X Press the corresponding number keys in
rapid succession.
X Wait for approximately three seconds after
making the entry.
You will hear the track which has been
entered. The corresponding basic menu
then reappears.
i It is not possible to enter numbers that
exceed the number of tracks on the CD or
in the currently active folder. Fast forwarding/rewinding
X With the display/selection window active,
press the 0059or0065 button on the
remote control repeatedly until you reach
the desired position.
or
X Press and hold the 0048or0049 button
until the desired position is reached. Selecting a folder
This function is only available in MP3 mode.
X Select Search Search using the 006400590065
buttons on the remote control and press
the 008Bbutton to confirm.
X Select Folder Folder using the 006400590065
buttons and press the 008Bbutton to confirm.
The folder content appears.
X To switch to the next folder up: press the
0059 button on the remote control.
The display shows the next folder up.
X Select the folder with the 00630064
buttons and press the 008Bbutton to confirm.
You will see the tracks in the folder.
X Select the track using the 00630064
buttons and press the 008Bbutton to confirm.
The track is played and the corresponding
folder is now the active folder. Pause/Playback
X To pause playback: press the0065/
00CF button on the remote control.
The 00CF display changes to 00D0.
X To continue playback: press the0065/
00CF button.
The 00D0 display changes to 00CF. Playback options
X Select Options Options using the 006400590065
buttons and press the 008Bbutton to confirm.
X The options list appears. The 0036dot
indicates the option currently selected.
X Select Normal
Normal Track
TrackSequence
Sequence ,Random
Random
Tracks
Tracks orRandom Folder
Random Folder using the
00630064 buttons and press the 008Bbutton
to confirm.
The option is switched on. For all options
except Normal Track Sequence Normal Track Sequence, you will Audio/video mode
255Rear Seat Entertainment System Z