fuel MERCEDES-BENZ S-Class 2014 W222 User Guide
[x] Cancel search | Manufacturer: MERCEDES-BENZ, Model Year: 2014, Model line: S-Class, Model: MERCEDES-BENZ S-Class 2014 W222Pages: 434, PDF Size: 29.51 MB
Page 88 of 434
X
To unlock the vehicle: touch the inner
surface of the door handle.
X To lock the vehicle: touch sensor
surface 0043or0044.
X Convenience closing feature: touch
recessed sensor surface 0044for an
extended period.
Further information on the convenience
closing feature (Y page 100).
X To unlock the trunk lid: pull the handle on
the trunk lid. Changing the settings of the locking
system
You can change the settings of the locking
system. This means that only the driver's door
and the fuel filler flap are unlocked when the
vehicle is unlocked. This is useful if you
frequently travel on your own.
X To change the setting: press and hold
down the 0036and0037 buttons
simultaneously for approximately six
seconds until the battery check lamp
flashes twice (Y page 87).
i If the setting of the locking system is
changed within the signal range of the
vehicle, pressing the 0037or0036 button:
R locks or
R unlocks the vehicle
The SmartKey now functions as follows:
X To unlock the driver's door: press the
0036 button once.
X To unlock centrally: press the0036
button twice.
X To lock centrally: press the0037button. The KEYLESS-GO function is changed as
follows:
X
To unlock the driver's door: touch the
inner surface of the door handle on the
driver's door.
X To unlock centrally: touch the inner
surface of the door handle on the front-
passenger door or the rear door.
X To lock centrally: press the locking button
on one of the door handles.
X To restore the factory settings: press
and hold down the 0036and0037 buttons
simultaneously for approximately six
seconds until the battery check lamp
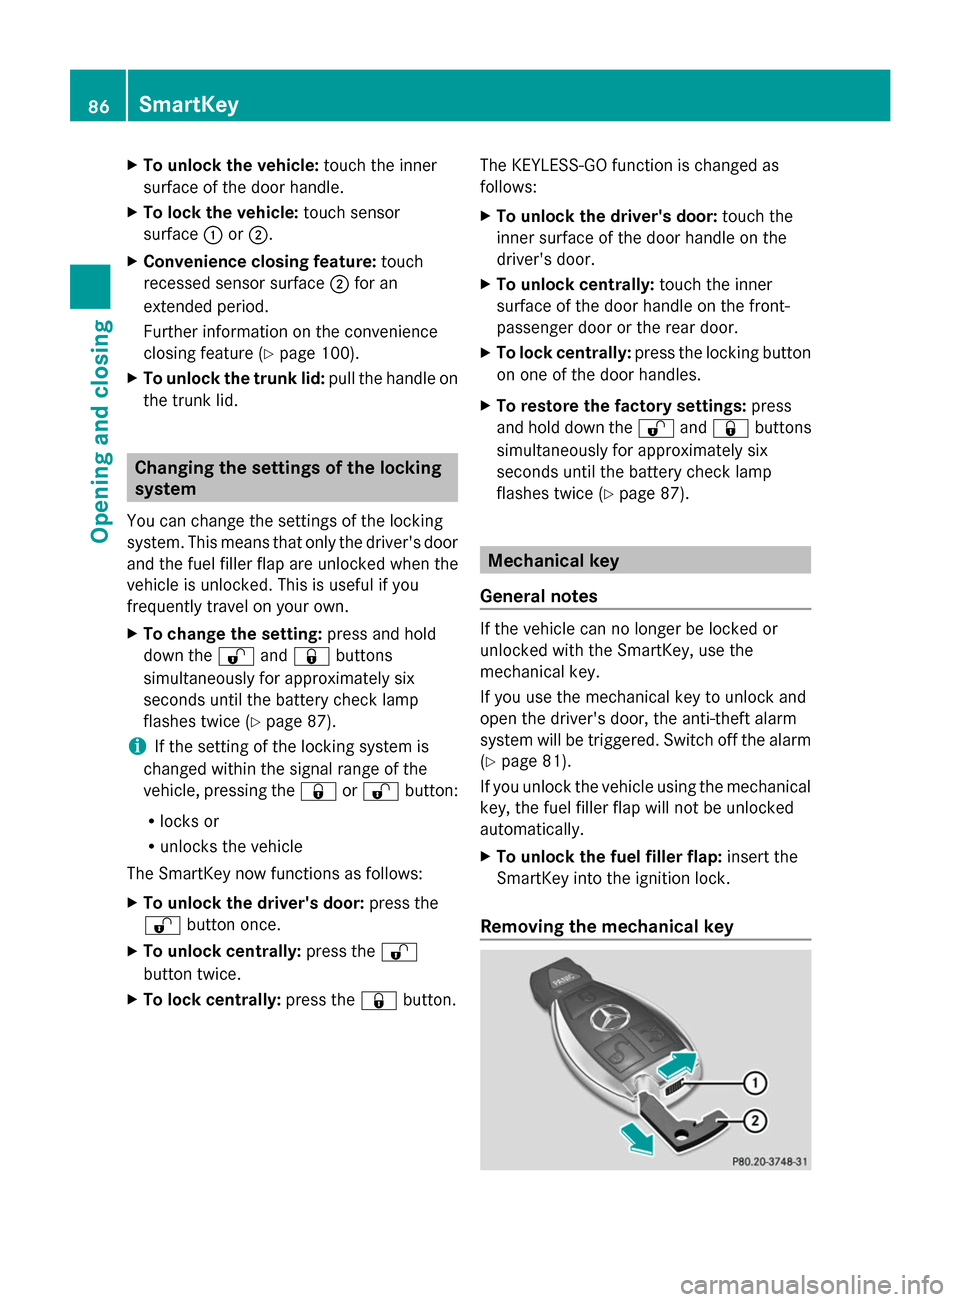
flashes twice (Y page 87). Mechanical key
General notes If the vehicle can no longer be locked or
unlocked with the SmartKey, use the
mechanical key.
If you use the mechanical key to unlock and
open the driver's door, the anti-theft alarm
system will be triggered. Switch off the alarm
(Y
page 81).
If you unlock the vehicle using the mechanical
key, the fuel filler flap will not be unlocked
automatically.
X To unlock the fuel filler flap: insert the
SmartKey into the ignition lock.
Removing the mechanical key 86
SmartKeyOpening and closing
Page 93 of 434
cold, there is a risk of injury, possibly even
fatal. Never leave children unattended in the
vehicle.
You should preferably place luggage or loads
in the cargo compartment. Observe the
loading guidelines (Y page 316).Unlocking and opening doors from
the inside
You can open a door from inside the vehicle
even if it has been locked. You can only open
the rear doors from inside the vehicle if they
are not secured by the child-proof locks
(Y page 69). If the vehicle has been locked
with the SmartKey or with KEYLESS-GO,
opening a door from the inside will trigger the
anti-theft alarm system. Switch off the alarm
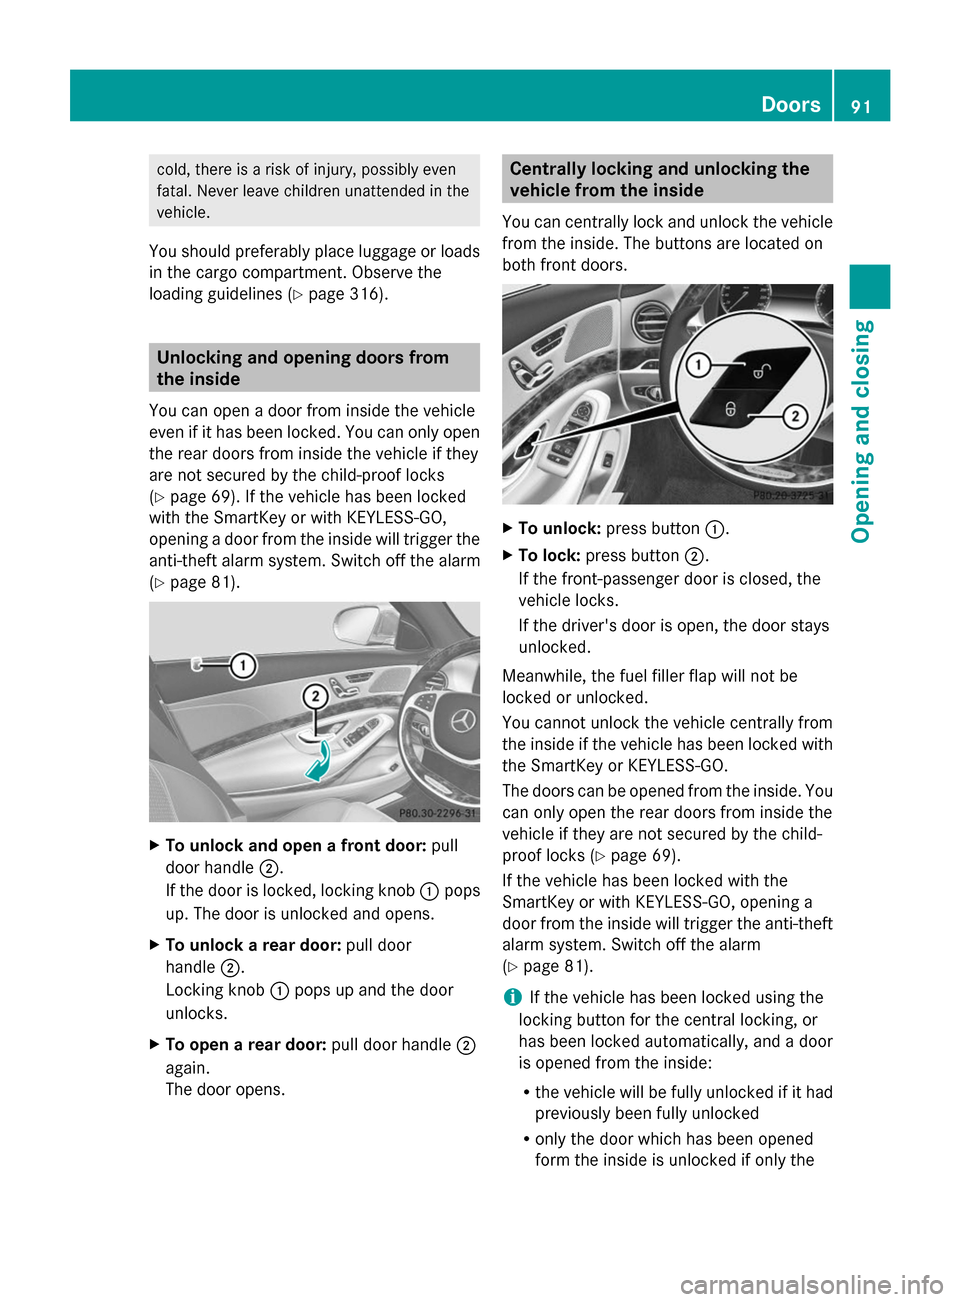
(Y page 81). X
To unlock and open a front door: pull
door handle 0044.
If the door is locked, locking knob 0043pops
up. The door is unlocked and opens.
X To unlock a rear door: pull door
handle 0044.
Locking knob 0043pops up and the door
unlocks.
X To open a rear door: pull door handle0044
again.
The door opens. Centrally locking and unlocking the
vehicle from the inside
You can centrally lock and unlock the vehicle
from the inside. The buttons are located on
both front doors. X
To unlock: press button 0043.
X To lock: press button 0044.
If the front-passenger door is closed, the
vehicle locks.
If the driver's door is open, the door stays
unlocked.
Meanwhile, the fuel filler flap will not be
locked or unlocked.
You cannot unlock the vehicle centrally from
the inside if the vehicle has been locked with
the SmartKey or KEYLESS-GO.
The doors can be opened from the inside. You
can only open the rear doors from inside the
vehicle if they are not secured by the child-
proof locks (Y page 69).
If the vehicle has been locked with the
SmartKey or with KEYLESS-GO, opening a
door from the inside will trigger the anti-theft
alarm system. Switch off the alarm
(Y page 81).
i If the vehicle has been locked using the
locking button for the central locking, or
has been locked automatically, and a door
is opened from the inside:
R the vehicle will be fully unlocked if it had
previously been fully unlocked
R only the door which has been opened
form the inside is unlocked if only the Doors
91Opening and closing Z
Page 95 of 434
Locking the vehicle (mechanical key)
If the vehicle can no longer be locked with the
SmartKey or KEYLESS-GO, use the
mechanical key.
X Open the driver's door.
X Close the front-passenger door, the rear
doors and the trunk lid.
X Press the locking button (Y page 91).
X Check whether the locking knobs on the
front-passenger door and the rear doors
are still visible. Press down the locking
knobs by hand, if necessary.
X Close the driver's door.
X Take the mechanical key out of the
SmartKey (Y page 86).
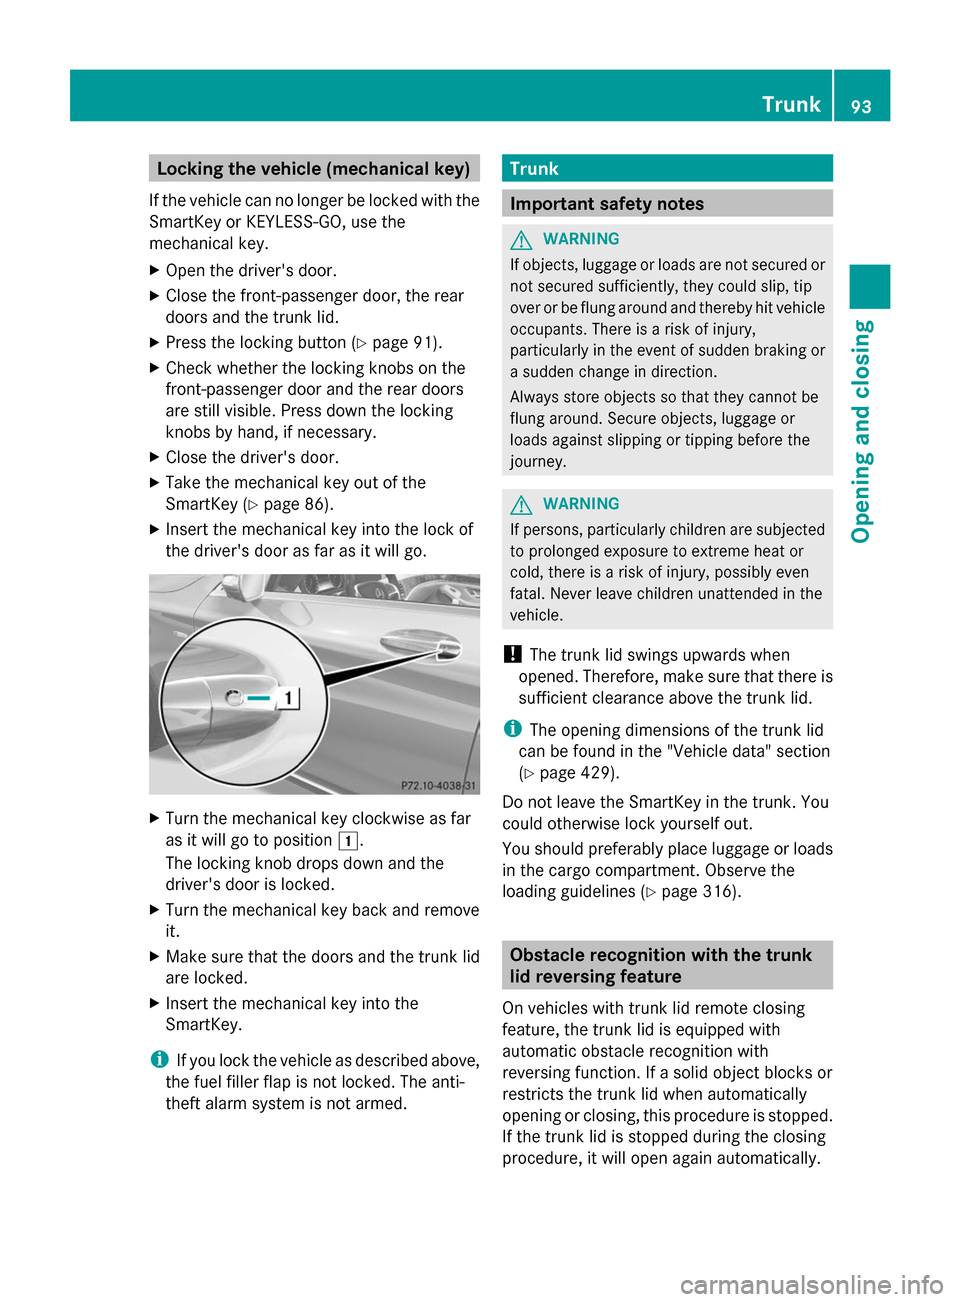
X Insert the mechanical key into the lock of
the driver's door as far as it will go. X
Turn the mechanical key clockwise as far
as it will go to position 0047.
The locking knob drops down and the
driver's door is locked.
X Turn the mechanical key back and remove
it.
X Make sure that the doors and the trunk lid
are locked.
X Insert the mechanical key into the
SmartKey.
i If you lock the vehicle as described above,
the fuel filler flap is not locked. The anti-
theft alarm system is not armed. Trunk
Important safety notes
G
WARNING
If objects, luggage or loads are not secured or
not secured sufficiently, they could slip, tip
over or be flung around and thereby hit vehicle
occupants. There is a risk of injury,
particularly in the event of sudden braking or
a sudden change in direction.
Always store objects so that they cannot be
flung around. Secure objects, luggage or
loads against slipping or tipping before the
journey. G
WARNING
If persons, particularly children are subjected
to prolonged exposure to extreme heat or
cold, there is a risk of injury, possibly even
fatal. Never leave children unattended in the
vehicle.
! The trunk lid swings upwards when
opened. Therefore, make sure that there is
sufficient clearance above the trunk lid.
i The opening dimensions of the trunk lid
can be found in the "Vehicle data" section
(Y page 429).
Do not leave the SmartKey in the trunk. You
could otherwise lock yourself out.
You should preferably place luggage or loads
in the cargo compartment. Observe the
loading guidelines (Y page 316). Obstacle recognition with the trunk
lid reversing feature
On vehicles with trunk lid remote closing
feature, the trunk lid is equipped with
automatic obstacle recognition with
reversing function. If a solid object blocks or
restricts the trunk lid when automatically
opening or closing, this procedure is stopped.
If the trunk lid is stopped during the closing
procedure, it will open again automatically. Trunk
93Opening and closing Z
Page 171 of 434
Useful information
............................170
Notes on breaking-in a new vehicle 170
Driving ............................................... 170
Automatic transmission ...................179
Refueling ............................................ 187
Parking ............................................... 190
Driving tips ........................................ 193
Driving systems ................................ 199 169Driving and parking
Page 177 of 434
Hill start assist
Hill start assist helps you when pulling away
forwards or in reverse on an uphill gradient.
It holds the vehicle for a short time after you
have removed your foot from the brake pedal.
This gives you enough time to move your foot
from the brake pedal to the accelerator pedal
and to depress it before the vehicle begins to
roll. G
WARNING
After a short time, hill start assist will no
longer brake your vehicle and it could roll
away. There is a risk of an accident and injury.
Therefore, quickly move your foot from the
brake pedal to the accelerator pedal. Never
leave the vehicle when it is held by hill start
assist.
X Remove your foot from the brake pedal.
The vehicle is then held for about a second.
X Pull away.
Hill start assist is not active if:
R you are pulling away on a level road or on
a downhill gradient.
R the transmission is in position N.
R the electric parking brake is applied.
R ESP ®
is malfunctioning. ECO start/stop function
Introduction The ECO start/stop function switches the
engine off automatically if the vehicle is
stopped under certain conditions.
The engine starts automatically when the
driver wants to pull away again. The ECO
start/stop function thereby helps you to
reduce the fuel consumption and emissions
of your vehicle. Important safety notes G
WARNING
If the engine is switched off automatically and
you exit the vehicle, the engine is restarted
automatically. The vehicle may begin moving.
There is a risk of accident and injury.
If you wish to exit the vehicle, always turn off
the ignition and secure the vehicle against
rolling away.
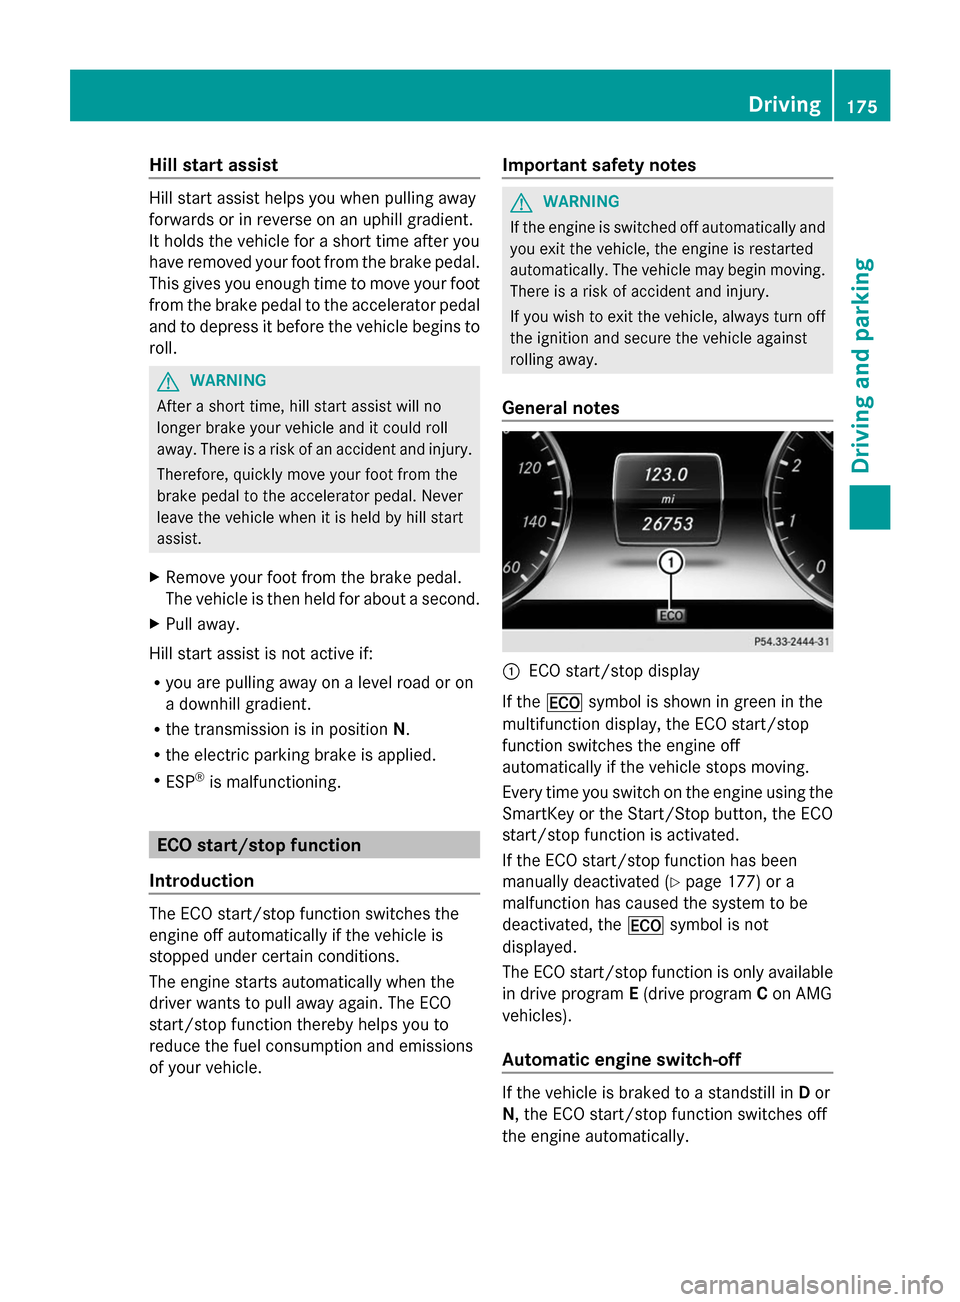
General notes 0043
ECO start/stop display
If the 00A7 symbol is shown in green in the
multifunction display, the ECO start/stop
function switches the engine off
automatically if the vehicle stops moving.
Every time you switch on the engine using the
SmartKey or the Start/Stop button, the ECO
start/stop function is activated.
If the ECO start/stop function has been
manually deactivated (Y page 177) or a
malfunction has caused the system to be
deactivated, the 00A7symbol is not
displayed.
The ECO start/stop function is only available
in drive program E(drive program Con AMG
vehicles).
Automatic engine switch-off If the vehicle is braked to a standstill in
Dor
N, the ECO start/stop function switches off
the engine automatically. Driving
175Driving and parking Z
Page 180 of 434
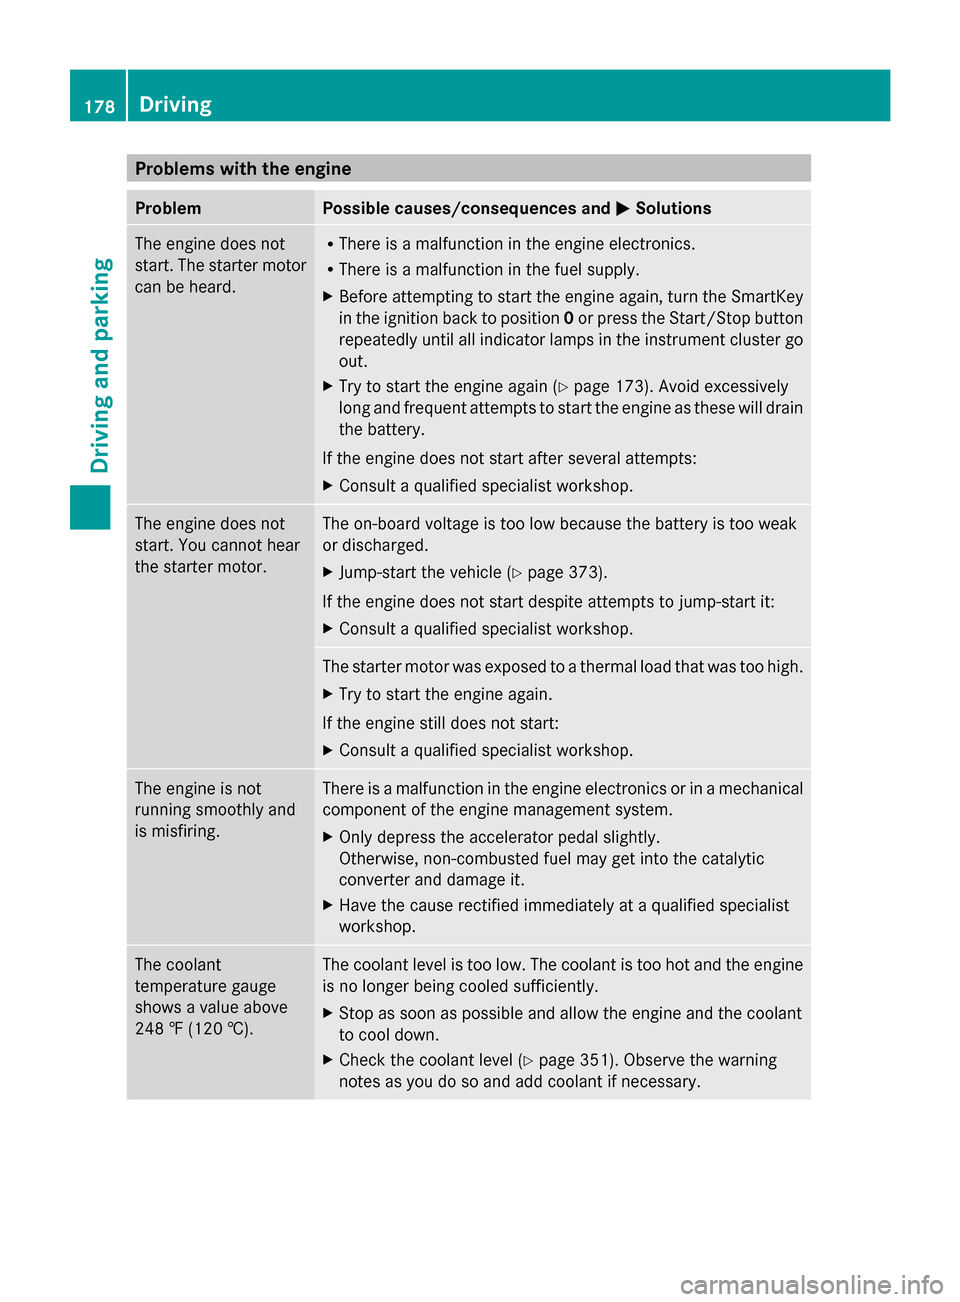
Problems with the engine
Problem Possible causes/consequences and
0050
0050Solutions The engine does not
start. The starter motor
can be heard. R
There is a malfunction in the engine electronics.
R There is a malfunction in the fuel supply.
X Before attempting to start the engine again, turn the SmartKey
in the ignition back to position 0or press the Start/Stop button
repeatedly until all indicator lamps in the instrument cluster go
out.
X Try to start the engine again (Y page 173). Avoid excessively
long and frequent attempts to start the engine as these will drain
the battery.
If the engine does not start after several attempts:
X Consult a qualified specialist workshop. The engine does not
start. You cannot hear
the starter motor. The on-board voltage is too low because the battery is too weak
or discharged.
X
Jump-start the vehicle (Y page 373).
If the engine does not start despite attempts to jump-start it:
X Consult a qualified specialist workshop. The starter motor was exposed to a thermal load that was too high.
X
Try to start the engine again.
If the engine still does not start:
X Consult a qualified specialist workshop. The engine is not
running smoothly and
is misfiring. There is a malfunction in the engine electronics or in a mechanical
component of the engine management system.
X
Only depress the accelerator pedal slightly.
Otherwise, non-combusted fuel may get into the catalytic
converter and damage it.
X Have the cause rectified immediately at a qualified specialist
workshop. The coolant
temperature gauge
shows a value above
248 ‡ (120 †). The coolant level is too low. The coolant is too hot and the engine
is no longer being cooled sufficiently.
X Stop as soon as possible and allow the engine and the coolant
to cool down.
X Check the coolant level (Y page 351). Observe the warning
notes as you do so and add coolant if necessary. 178
DrivingDriving and parking
Page 186 of 434
R
the vehicle pulling away more gently in
forward and reverse gears, unless the
accelerator pedal is depressed fully
R increased sensitivity. This improves driving
stability on slippery road surfaces, for
example
R the automatic transmission shifting up
sooner. This results in the vehicle being
driven at lower engine speeds and the
wheels being less likely to spin
Drive program Sis characterized by the
following:
R sporty engine settings
R the vehicle pulling away in first gear
R the automatic transmission shifting up
later
R the fuel consumption possibly being higher
as a result of the later automatic
transmission shift points
Manual drive program M General notes
In this drive program, you can briefly change
gear yourself by using the steering wheel
paddle shifters. The transmission must be in
position D.
You can activate manual drive program Min
the E(C in AMG vehicles) and Sautomatic
drive programs.
i AMG vehicles: as well as temporary drive
program M, you can also activate
permanent drive program M.
Further information about permanent drive
program M(Y page 185).
Activating
X Shift the transmission to position D.
X Pull the left or right steering wheel paddle
shifter (Y page 183).
Manual drive program Mis temporarily
activated.
All vehicles except AMG vehicles: M and
the selected gear appear in the
multifunction display. Shifting gears
If you pull on the left or right steering wheel
paddle shifter, the automatic transmission
switches to manual drive program
Mfor a
limited amount of time. Depending on which
paddle shifter is pulled, the automatic
transmission immediately shifts into the next
gear down or up, if permitted.
X To shift up: pull the right-hand steering
wheel paddle shifter (Y page 183).
The automatic transmission shifts up to the
next gear.
i If the maximum engine speed on the
currently engaged gear is reached and you
continue to accelerate, the automatic
transmission automatically shifts up in
order to prevent engine damage.
i AMG vehicles: the automatic
transmission will not shift up to the next
gear when the engine speed is very low.
X To shift down: pull on the left-hand
steering wheel paddle shifter
(Y page 183).
The automatic transmission shifts down to
the next gear.
i If the engine exceeds the maximum
engine speed when shifting down, the
automatic transmission protects against
engine damage by not shifting down.
i Automatic down shifting occurs when
coasting.
Shift recommendation 184
Automatic transmissionDriving an
d parking
Page 187 of 434
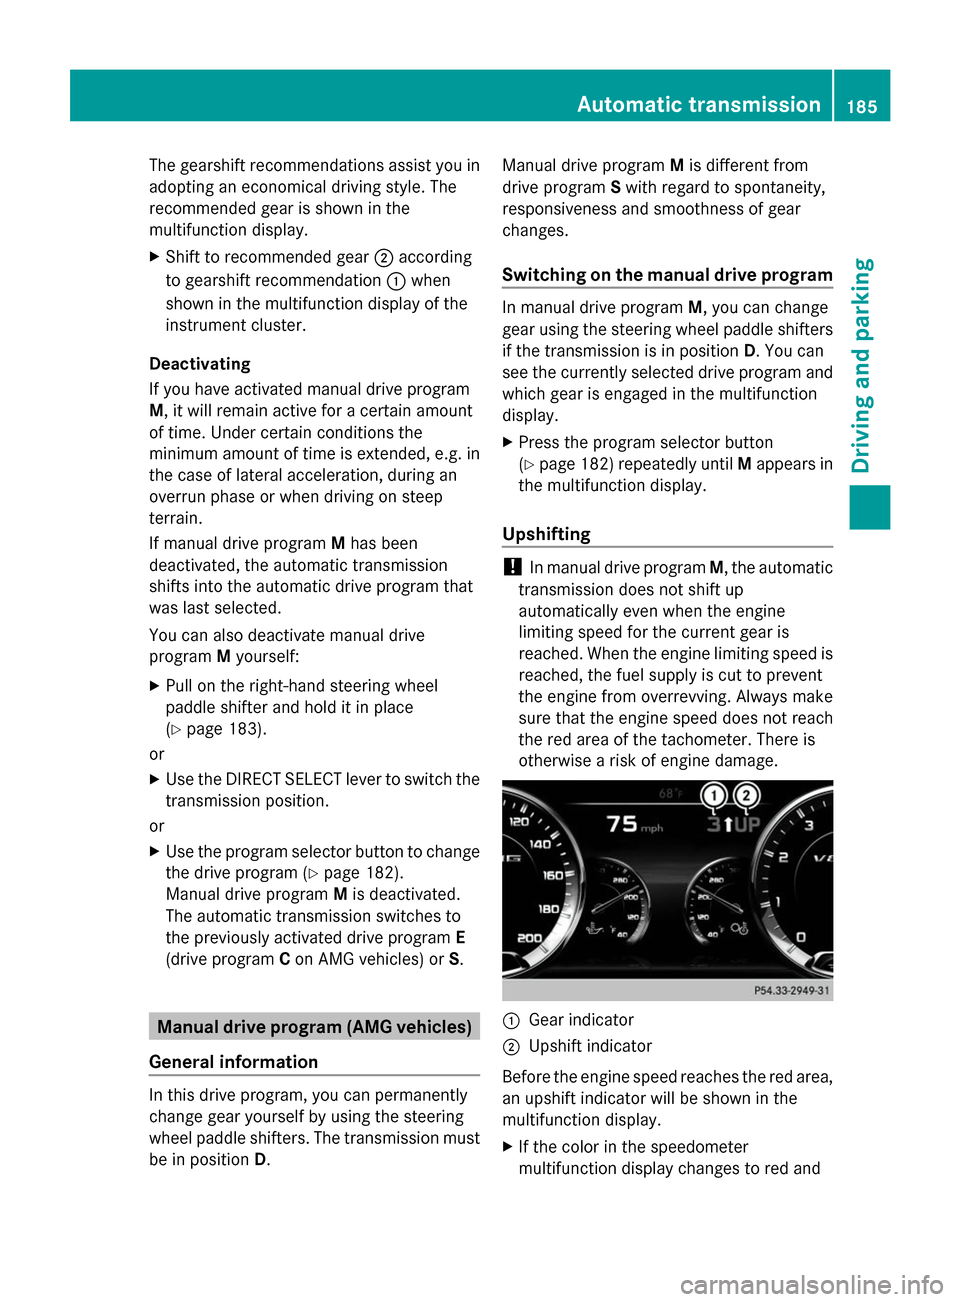
The gearshift recommendations assist you in
adopting an economical driving style. The
recommended gear is shown in the
multifunction display.
X Shift to recommended gear 0044according
to gearshift recommendation 0043when
shown in the multifunction display of the
instrument cluster.
Deactivating
If you have activated manual drive program
M, it will remain active for a certain amount
of time. Under certain conditions the
minimum amount of time is extended, e.g. in
the case of lateral acceleration, during an
overrun phase or when driving on steep
terrain.
If manual drive program Mhas been
deactivated, the automatic transmission
shifts into the automatic drive program that
was last selected.
You can also deactivate manual drive
program Myourself:
X Pull on the right-hand steering wheel
paddle shifter and hold it in place
(Y page 183).
or
X Use the DIRECT SELECT lever to switch the
transmission position.
or
X Use the program selector button to change
the drive program (Y page 182).
Manual drive program Mis deactivated.
The automatic transmission switches to
the previously activated drive program E
(drive program Con AMG vehicles) or S. Manual drive program (AMG vehicles)
General information In this drive program, you can permanently
change gear yourself by using the steering
wheel paddle shifters. The transmission must
be in position D. Manual drive program
Mis different from
drive program Swith regard to spontaneity,
responsiveness and smoothness of gear
changes.
Switching on the manual drive program In manual drive program
M, you can change
gear using the steering wheel paddle shifters
if the transmission is in position D. You can
see the currently selected drive program and
which gear is engaged in the multifunction
display.
X Press the program selector button
(Y page 182) repeatedly until Mappears in
the multifunction display.
Upshifting !
In manual drive program M, the automatic
transmission does not shift up
automatically even when the engine
limiting speed for the current gear is
reached. When the engine limiting speed is
reached, the fuel supply is cut to prevent
the engine from overrevving. Always make
sure that the engine speed does not reach
the red area of the tachometer. There is
otherwise a risk of engine damage. 0043
Gear indicator
0044 Upshift indicator
Before the engine speed reaches the red area,
an upshift indicator will be shown in the
multifunction display.
X If the color in the speedometer
multifunction display changes to red and Automatic transmission
185Driving and parking Z
Page 189 of 434
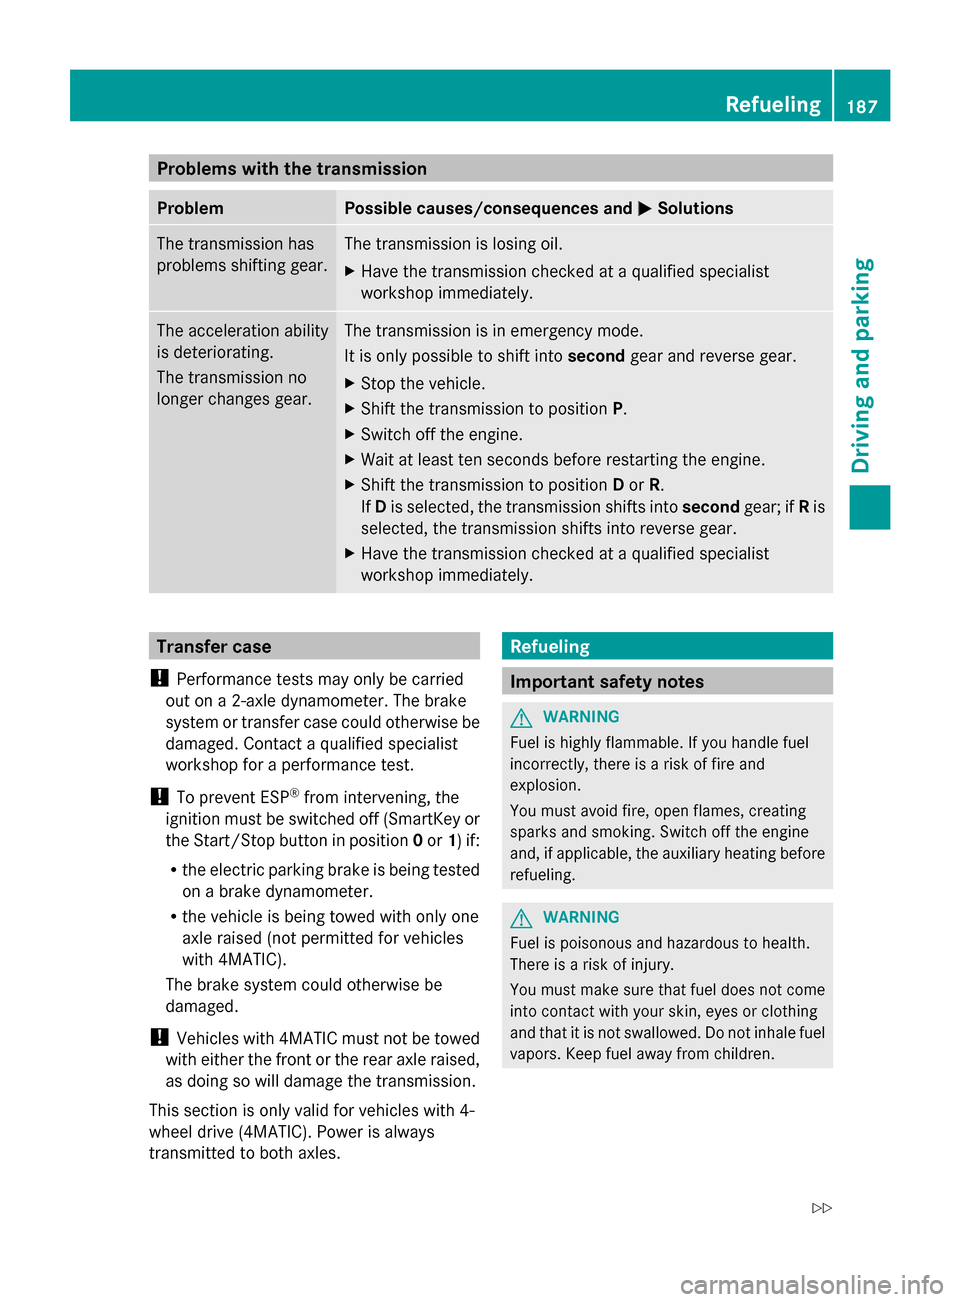
Problems with the transmission
Problem Possible causes/consequences and
0050
0050Solutions The transmission has
problems shifting gear. The transmission is losing oil.
X
Have the transmission checked at a qualified specialist
workshop immediately. The acceleration ability
is deteriorating.
The transmission no
longer changes gear. The transmission is in emergency mode.
It is only possible to shift into
secondgear and reverse gear.
X Stop the vehicle.
X Shift the transmission to position P.
X Switch off the engine.
X Wait at least ten seconds before restarting the engine.
X Shift the transmission to position Dor R.
If D is selected, the transmission shifts into secondgear; ifRis
selected, the transmission shifts into reverse gear.
X Have the transmission checked at a qualified specialist
workshop immediately. Transfer case
! Performance tests may only be carried
out on a 2-axle dynamometer. The brake
system or transfer case could otherwise be
damaged. Contact a qualified specialist
workshop for a performance test.
! To prevent ESP ®
from intervening, the
ignition must be switched off (SmartKey or
the Start/Stop button in position 0or 1) if:
R the electric parking brake is being tested
on a brake dynamometer.
R the vehicle is being towed with only one
axle raised (not permitted for vehicles
with 4MATIC).
The brake system could otherwise be
damaged.
! Vehicles with 4MATIC must not be towed
with either the front or the rear axle raised,
as doing so will damage the transmission.
This section is only valid for vehicles with 4-
wheel drive (4MATIC). Power is always
transmitted to both axles. Refueling
Important safety notes
G
WARNING
Fuel is highly flammable. If you handle fuel
incorrectly, there is a risk of fire and
explosion.
You must avoid fire, open flames, creating
sparks and smoking. Switch off the engine
and, if applicable, the auxiliary heating before
refueling. G
WARNING
Fuel is poisonous and hazardous to health.
There is a risk of injury.
You must make sure that fuel does not come
into contact with your skin, eyes or clothing
and that it is not swallowed. Do not inhale fuel
vapors. Keep fuel away from children. Refueling
187Driving and parking
Z
Page 190 of 434
If you or others come into contact with fuel,
observe the following:
R Wash away fuel from skin immediately
using soap and water.
R If fuel comes into contact with your eyes,
immediately rinse them thoroughly with
clean water. Seek medical assistance
without delay.
R If fuel is swallowed, seek medical
assistance without delay. Do not induce
vomiting.
R Immediately change out of clothing which
has come into contact with fuel. G
WARNING
Electrostatic buildup can create sparks and
ignite fuel vapors. There is a risk of fire and
explosion.
Always touch the vehicle body before opening
the fuel filler flap or touching the fuel pump
nozzle. Any existing electrostatic buildup is
thereby discharged.
Do not get into the vehicle again during the
refueling process. Otherwise, electrostatic
charge could build up again.
! Do not use diesel to refuel vehicles with a
gasoline engine. Do not switch on the
ignition if you accidentally refuel with the
wrong fuel. Otherwise, the fuel will enter
the fuel system. Even small amounts of the
wrong fuel could result in damage to the
fuel system and the engine. Notify a
qualified specialist workshop and have the
fuel tank and fuel lines drained completely.
! Overfilling the fuel tank could damage the
fuel system.
! Take care not to spill any fuel on painted
surfaces. You could otherwise damage the
paintwork.
! Use a filter when refueling from a fuel can.
Otherwise, the fuel lines and/or injection
system could be blocked by particles from
the fuel can. If you overfill the fuel tank, fuel could spray
out when the fuel pump nozzle is removed.
For further information on fuel and fuel quality
(Y page 423). Refueling
General information Pay attention to the important safety notes
(Y
page 187).
If you unlock/lock the vehicle from the
outside, the fuel filler flap also unlocks/locks.
The position of the fuel filler cap is shown in
the instrument cluster 00B6. The arrow next
to the filling pump indicates the side of the
vehicle.
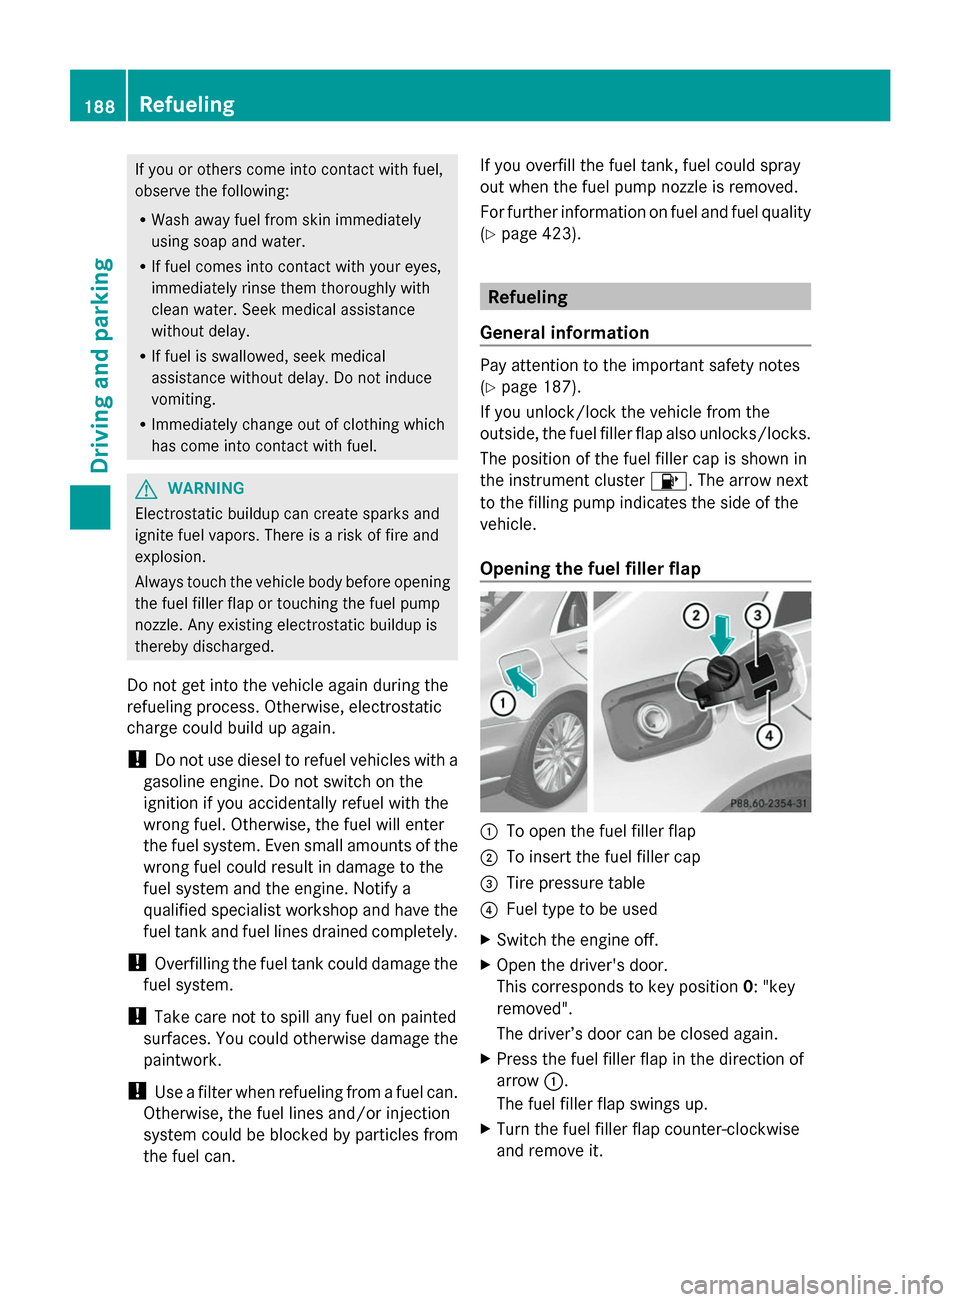
Opening the fuel filler flap 0043
To open the fuel filler flap
0044 To insert the fuel filler cap
0087 Tire pressure table
0085 Fuel type to be used
X Switch the engine off.
X Open the driver's door.
This corresponds to key position 0: "key
removed".
The driver’s door can be closed again.
X Press the fuel filler flap in the direction of
arrow 0043.
The fuel filler flap swings up.
X Turn the fuel filler flap counter-clockwise
and remove it. 188
RefuelingDriving and parking