key battery MERCEDES-BENZ S-Class 2014 W222 Owner's Manual
[x] Cancel search | Manufacturer: MERCEDES-BENZ, Model Year: 2014, Model line: S-Class, Model: MERCEDES-BENZ S-Class 2014 W222Pages: 434, PDF Size: 29.51 MB
Page 7 of 434
Anti-lock braking system
see ABS (Anti-lock Braking System)
Anti-Theft Alarm system
see ATA (Anti-Theft Alarm system)
Armrest
Stowage compartment ..................318
Ashtray ............................................... 326
Assistance display (on-board
computer) .......................................... 258
Assistance menu (on-board
computer) .......................................... 259
ASSYST PLUS Displaying a service message ........352
Hiding a service message ..............352
Notes ............................................. 352
Resetting the service interval
displa y........................................... 353
Service message ............................ 352
Special service requirements ......... 353
ATA (Anti-Theft Alarm system)
Activating/deactivating ...................81
Function .......................................... .81
Switching off the alarm ....................81
ATTENTION ASSIST
Activating/deactivating .................261
Display message ............................ 287
Function/notes ............................. 234
Authorized Mercedes-Benz Center
see Qualified specialist workshop
Authorized Workshop
see Qualified specialist workshop
AUTO lights
Display message ............................ 282
see Lights
Automatic engine start (ECO start/
stop function) .................................... 176
Automatic engine switch-off (ECO
start/stop function) ..........................175
Automatic headlamp mode ..............138
Automatic transmission Automatic drive program ...............183
Changing gea r............................... 182
DIRECT SELECT lever .....................179
Display message ............................ 297
Driving tips .................................... 182
Emergency running mode ..............187
Engaging drive position .................. 180 Engaging neutral
............................ 180
Engaging park position
automatically ................................. 179
Engaging reverse gear ...................179
Engaging the park position ............179
Kickdown ....................................... 182
Manual drive program ....................184
Manual drive program (AMG
vehicles) ........................................ 185
Overview ........................................ 179
Problem (malfunction) ...................187
Program selector button ................182
Pulling away ................................... 174
Starting the engine ........................174
Steering wheel paddle shifters ......183
Transmission position displa y........ 181
Transmission positions ..................181
Automatic transmission
emergency mode ............................... 187 B
BAS (Brake Assist System) .................71
BAS PLUS (Brake Assist System
PLUS) with Cross-Traffic Assist
Function/notes ................................ 72
BAS PLUS Q (Brake Assist System
PLUS) with Cross-Traffic Assist Important safety notes ....................72
Battery (SmartKey)
Checking .......................................... 87
Important safety notes ....................87
Replacing ......................................... 87
Battery (vehicle)
Charging ........................................ 371
Display message ............................ 285
Important safety notes ..................369
Jump starting ................................. 373
Belt
see Seat belts
Belt bag ................................................ 63
Belt force limiter Activation ......................................... 62
Function .......................................... .62
Blind Spot Assist
see Active Blind Spot Assist
Brake Assist
see BAS (Brake Assist System) Index
5
Page 19 of 434
Important safety notes
..................423
Refrigerant (air-conditioning
system) .......................................... 428
Washer fluid .................................. .427
Settings
Factory (on-board computer) .........263
On-board computer .......................259
SETUP (on-board computer) .............264
Side impact air bag .............................49
Side marker lamp (display
message) ............................................ 282
Side windows Cleaning ......................................... 357
Convenience closing feature .......... 100
Convenience opening feature ........100
Important safety information ...........99
Opening/closing .............................. 99
Problem (malfunction) ...................102
Resetting ....................................... 101
Sliding sunroof
see Panorama roof with power
tilt/sliding panel
SmartKey
Changing the battery .......................87
Changing the programming .............86
Checking the battery .......................87
Convenience closing feature .......... 101
Convenience opening feature ........100
Display message ............................ 300
Door central locking/unlocking .......85
Important safety notes ....................84
Loss ................................................. 89
Mechanical key ................................ 86
Overview .......................................... 84
Positions (ignition lock) .................171
Problem (malfunction) .....................89
Starting the engine ........................174
Snow chains ...................................... 387
Sockets Center console .............................. 328
General notes ................................ 328
Rear compartment .........................328
Trunk ............................................. 329
Specialist workshop ............................ 27
Special seat belt retractor .................. 66
Speed, controlling see Cruise control Speedometer
Activating/deactivating the
additional speedometer .................263
Digital ............................................ 252
In the Instrument cluster .................33
Selecting the unit of measurement 262
see Instrument cluster
SRS (Supplemental Restraint
System)
Display message ............................ 276
Introduction ..................................... 45
Warning lamp ................................. 307
Warning lamp (function) ................... 45
Standing lamps
Display message ............................ 282
Switching on/off ........................... 139
Start/Stop button
Starting the engine ........................174
Start/stop function
see ECO start/stop function
Starting (engine) ................................ 173
STEER CONTROL .................................. 80
Steering Warning lamps ............................... 313
Steering (display message) ..............299
Steering Assist (DISTRONIC PLUS) Display message ............................ 293
Steering wheel
Adjusting (electrically) ...................127
Button overview ............................... 35
Buttons (on-board computer) ......... 249
Cleaning ......................................... 360
EASY ENTRY/EXIT feature .............129
Important safety notes ..................127
Paddle shifters ............................... 183
Steering wheel heating ..................128
Storing settings (memory function) 133
Steering wheel heating
Problem (malfunction) ...................129
Switching on/off ........................... 128
Steering wheel paddle shifters ........183
Stowage areas ................................... 316
Stowage compartments Armrest (under) ............................. 318
Center console .............................. 317
Center console in rear
compartment ................................. 319 Index
17
Page 82 of 434
system checked at a qualified specialist
workshop.
Function X
To activate/deactivate: activate or
deactivate PRE-SAFE ®
Brake in the on-
board computer (Y page 260).
If the PRE-SAFE ®
Brake is not activated, the
00D4 symbol appears in the multifunction
display.
Starting at a speed of around 4 mph
(7 km/h), this function warns you if you
rapidly approach a vehicle in front. An
intermittent warning tone will then sound and
the 00BA distance warning lamp will light up
in the instrument cluster.
X Brake immediately to defuse the situation.
or
X Take evasive action provided it is safe to do
so.
i If there is an increased risk of collision,
preventive passenger protection measures
(PRE-SAFE ®
) are activated.
If the risk of collision with the vehicle in front
remains and you do not brake, take evasive
action or accelerate significantly, the vehicle
may perform automatic emergency braking,
up to the point of full brake application.
Automatic emergency braking is not
performed until immediately prior to an
imminent accident.
You can prevent the intervention of the PRE-
SAFE ®
Brake at any time by:
R depressing the accelerator pedal further
R activating kickdown.
R releasing the brake pedal
The braking action of PRE-SAFE ®
Brake is
ended automatically if:
R you maneuver to avoid the obstacle.
R there is no longer a risk of collision.
R there is no longer an obstacle detected in
front of your vehicle. STEER CONTROL
General information STEER CONTROL helps you by transmitting a
noticeable steering force to the steering
wheel in the direction required for vehicle
stabilization.
This steering assistance is provided in
particular if:
R
both right wheels or both left wheels are on
a wet or slippery road surface when you
brake.
R the vehicle starts to skid.
Important safety notes i
Observe the "Important safety notes"
section (Y page 70).
No steering support is provided from STEER
CONTROL, if:
R ESP ®
is malfunctioning.
R the steering is malfunctioning.
Power steering will, however, continue to
function. Theft deterrent locking system
Immobilizer
The immobilizer prevents your vehicle from
being started without the correct SmartKey.
X To activate with the SmartKey: remove
the SmartKey from the ignition lock.
X To activate with KEYLESS-GO: switch the
ignition off and open the driver's door.
X To deactivate: switch on the ignition.
When leaving the vehicle, always take the
SmartKey with you and lock the vehicle.
Anyone can start the engine if a valid
SmartKey has been left inside the vehicle.
i The immobilizer is always deactivated
when you start the engine.
In the event that the engine cannot be
started when the starter battery is fully 80
Theft deterrent locking systemSafety
Page 88 of 434
X
To unlock the vehicle: touch the inner
surface of the door handle.
X To lock the vehicle: touch sensor
surface 0043or0044.
X Convenience closing feature: touch
recessed sensor surface 0044for an
extended period.
Further information on the convenience
closing feature (Y page 100).
X To unlock the trunk lid: pull the handle on
the trunk lid. Changing the settings of the locking
system
You can change the settings of the locking
system. This means that only the driver's door
and the fuel filler flap are unlocked when the
vehicle is unlocked. This is useful if you
frequently travel on your own.
X To change the setting: press and hold
down the 0036and0037 buttons
simultaneously for approximately six
seconds until the battery check lamp
flashes twice (Y page 87).
i If the setting of the locking system is
changed within the signal range of the
vehicle, pressing the 0037or0036 button:
R locks or
R unlocks the vehicle
The SmartKey now functions as follows:
X To unlock the driver's door: press the
0036 button once.
X To unlock centrally: press the0036
button twice.
X To lock centrally: press the0037button. The KEYLESS-GO function is changed as
follows:
X
To unlock the driver's door: touch the
inner surface of the door handle on the
driver's door.
X To unlock centrally: touch the inner
surface of the door handle on the front-
passenger door or the rear door.
X To lock centrally: press the locking button
on one of the door handles.
X To restore the factory settings: press
and hold down the 0036and0037 buttons
simultaneously for approximately six
seconds until the battery check lamp
flashes twice (Y page 87). Mechanical key
General notes If the vehicle can no longer be locked or
unlocked with the SmartKey, use the
mechanical key.
If you use the mechanical key to unlock and
open the driver's door, the anti-theft alarm
system will be triggered. Switch off the alarm
(Y
page 81).
If you unlock the vehicle using the mechanical
key, the fuel filler flap will not be unlocked
automatically.
X To unlock the fuel filler flap: insert the
SmartKey into the ignition lock.
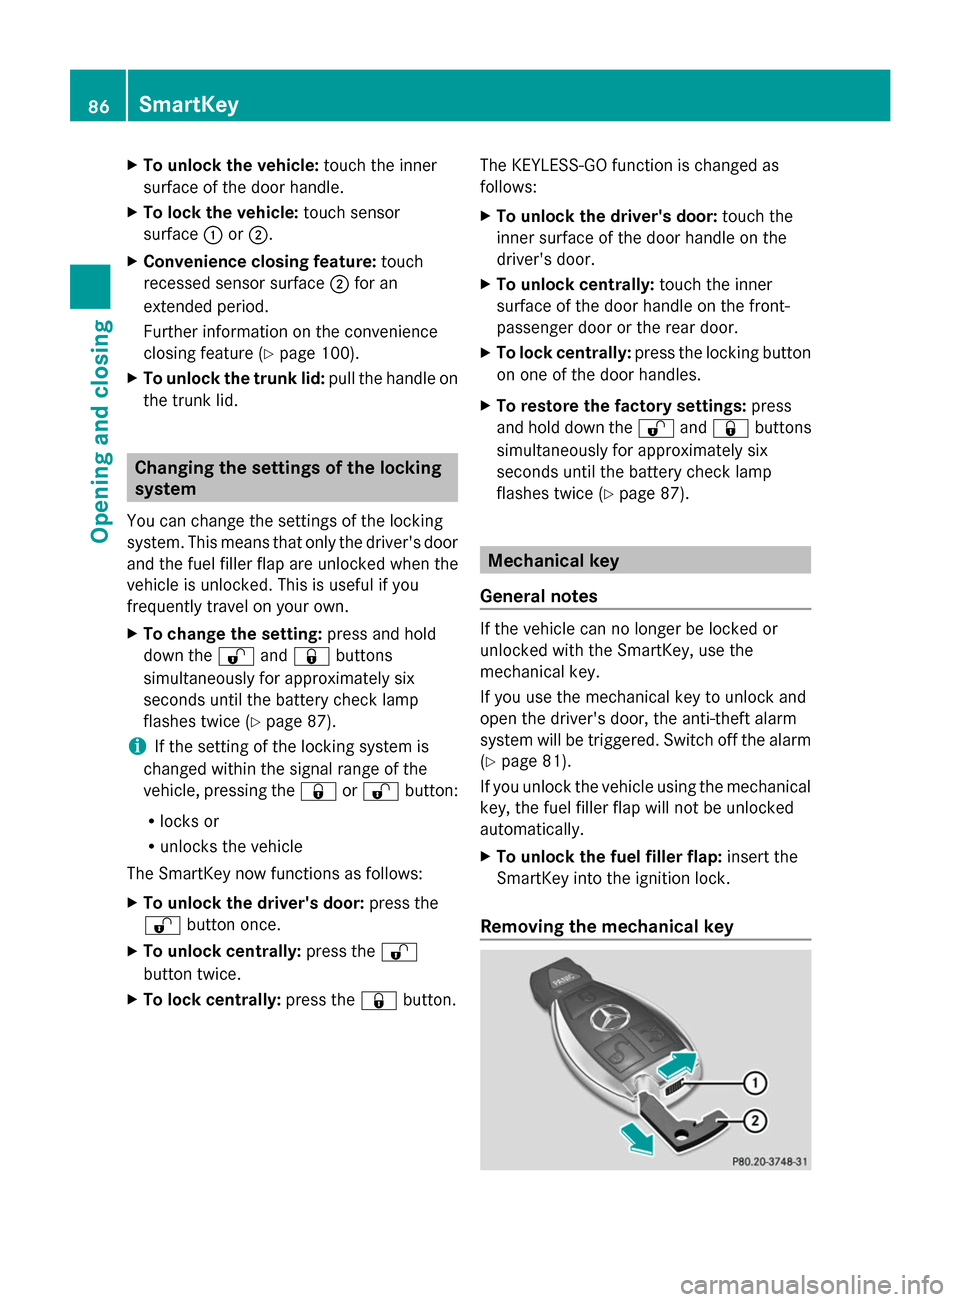
Removing the mechanical key 86
SmartKeyOpening and closing
Page 89 of 434
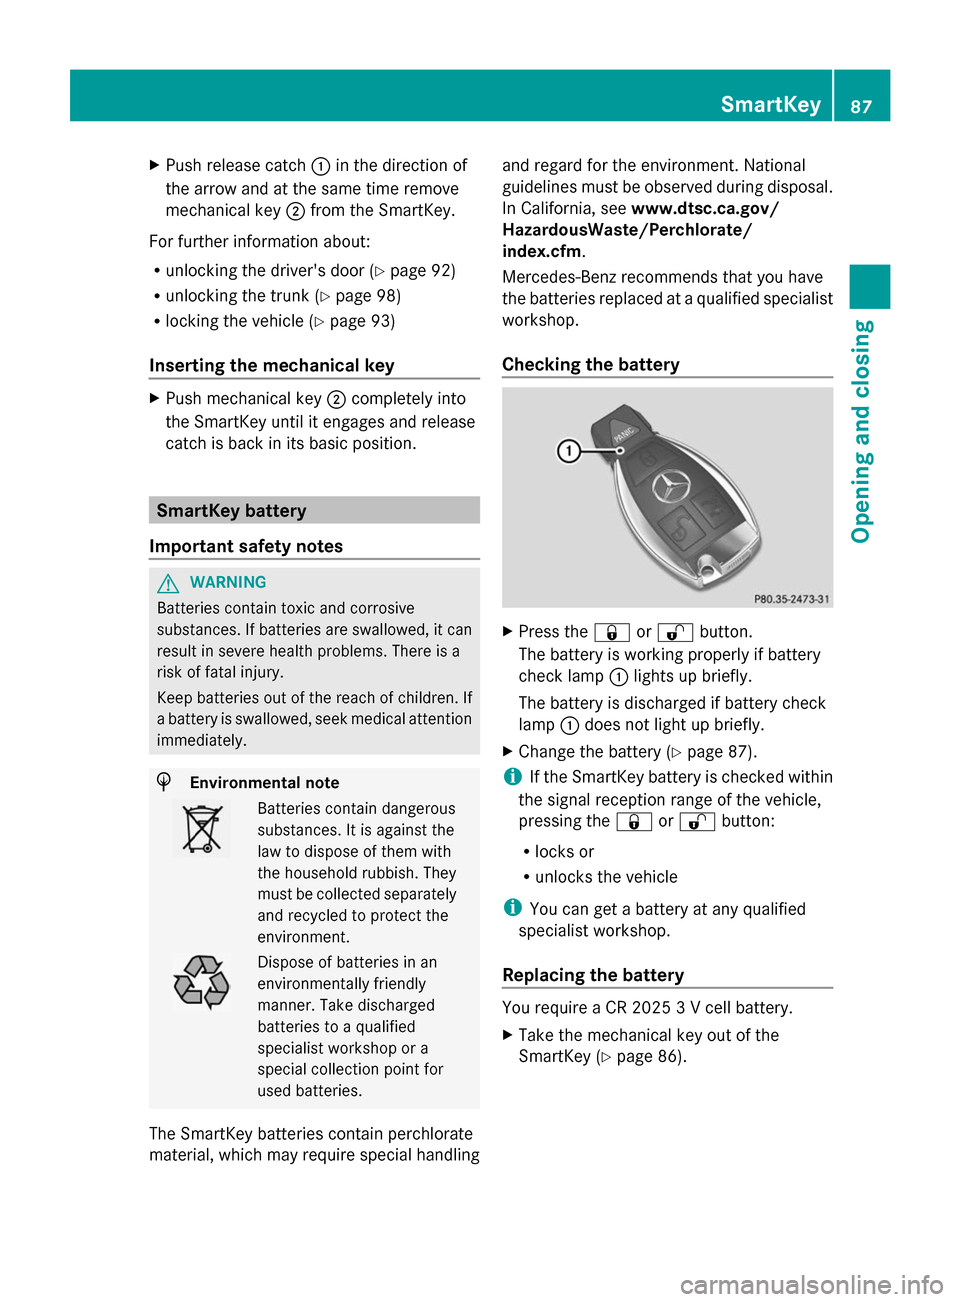
X
Push release catch 0043in the direction of
the arrow and at the same time remove
mechanical key 0044from the SmartKey.
For further information about:
R unlocking the driver's door (Y page 92)
R unlocking the trunk (Y page 98)
R locking the vehicle (Y page 93)
Inserting the mechanical key X
Push mechanical key 0044completely into
the SmartKey until it engages and release
catch is back in its basic position. SmartKey battery
Important safety notes G
WARNING
Batteries contain toxic and corrosive
substances. If batteries are swallowed, it can
result in severe health problems. There is a
risk of fatal injury.
Keep batteries out of the reach of children. If
a battery is swallowed, seek medical attention
immediately. H
Environmental note Batteries contain dangerous
substances. It is against the
law to dispose of them with
the household rubbish. They
must be collected separately
and recycled to protect the
environment.
Dispose of batteries in an
environmentally friendly
manner. Take discharged
batteries to a qualified
specialist workshop or a
special collection point for
used batteries.
The SmartKey batteries contain perchlorate
material, which may require special handling and regard for the environment. National
guidelines must be observed during disposal.
In California, see
www.dtsc.ca.gov/
HazardousWaste/Perchlorate/
index.cfm .
Mercedes-Benz recommends that you have
the batteries replaced at a qualified specialist
workshop.
Checking the battery X
Press the 0037or0036 button.
The battery is working properly if battery
check lamp 0043lights up briefly.
The battery is discharged if battery check
lamp 0043does not light up briefly.
X Change the battery (Y page 87).
i If the SmartKey battery is checked within
the signal reception range of the vehicle,
pressing the 0037or0036 button:
R locks or
R unlocks the vehicle
i You can get a battery at any qualified
specialist workshop.
Replacing the battery You require a CR 2025 3 V cell battery.
X
Take the mechanical key out of the
SmartKey (Y page 86). SmartKey
87Opening and closing Z
Page 90 of 434
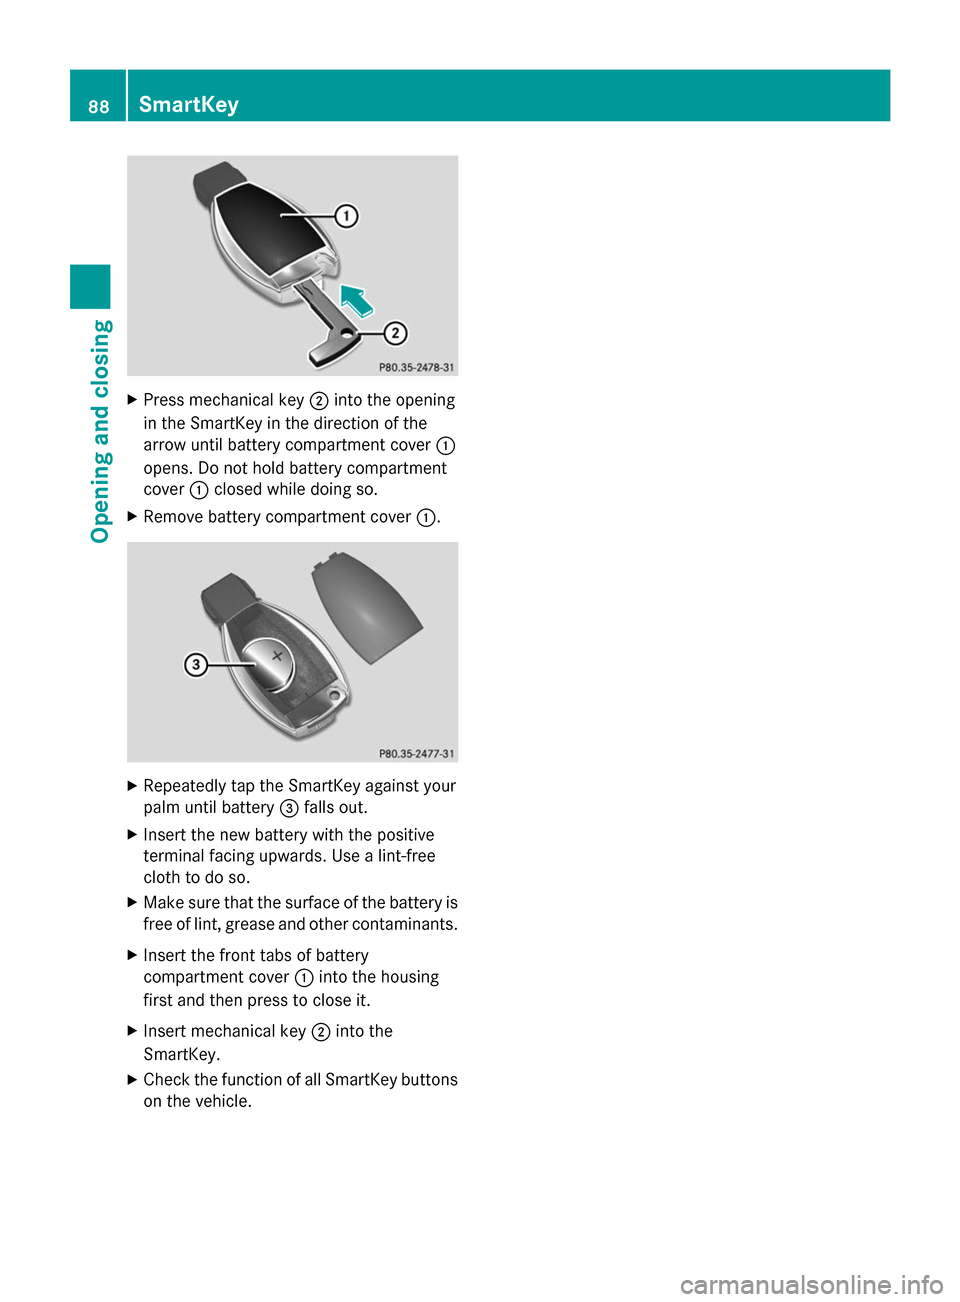
X
Press mechanical key 0044into the opening
in the SmartKey in the direction of the
arrow until battery compartment cover 0043
opens. Do not hold battery compartment
cover 0043closed while doing so.
X Remove battery compartment cover 0043.X
Repeatedly tap the SmartKey against your
palm until battery 0087falls out.
X Insert the new battery with the positive
terminal facing upwards. Use a lint-free
cloth to do so.
X Make sure that the surface of the battery is
free of lint, grease and other contaminants.
X Insert the front tabs of battery
compartment cover 0043into the housing
first and then press to close it.
X Insert mechanical key 0044into the
SmartKey.
X Check the function of all SmartKey buttons
on the vehicle. 88
SmartKeyOpening and closing
Page 91 of 434
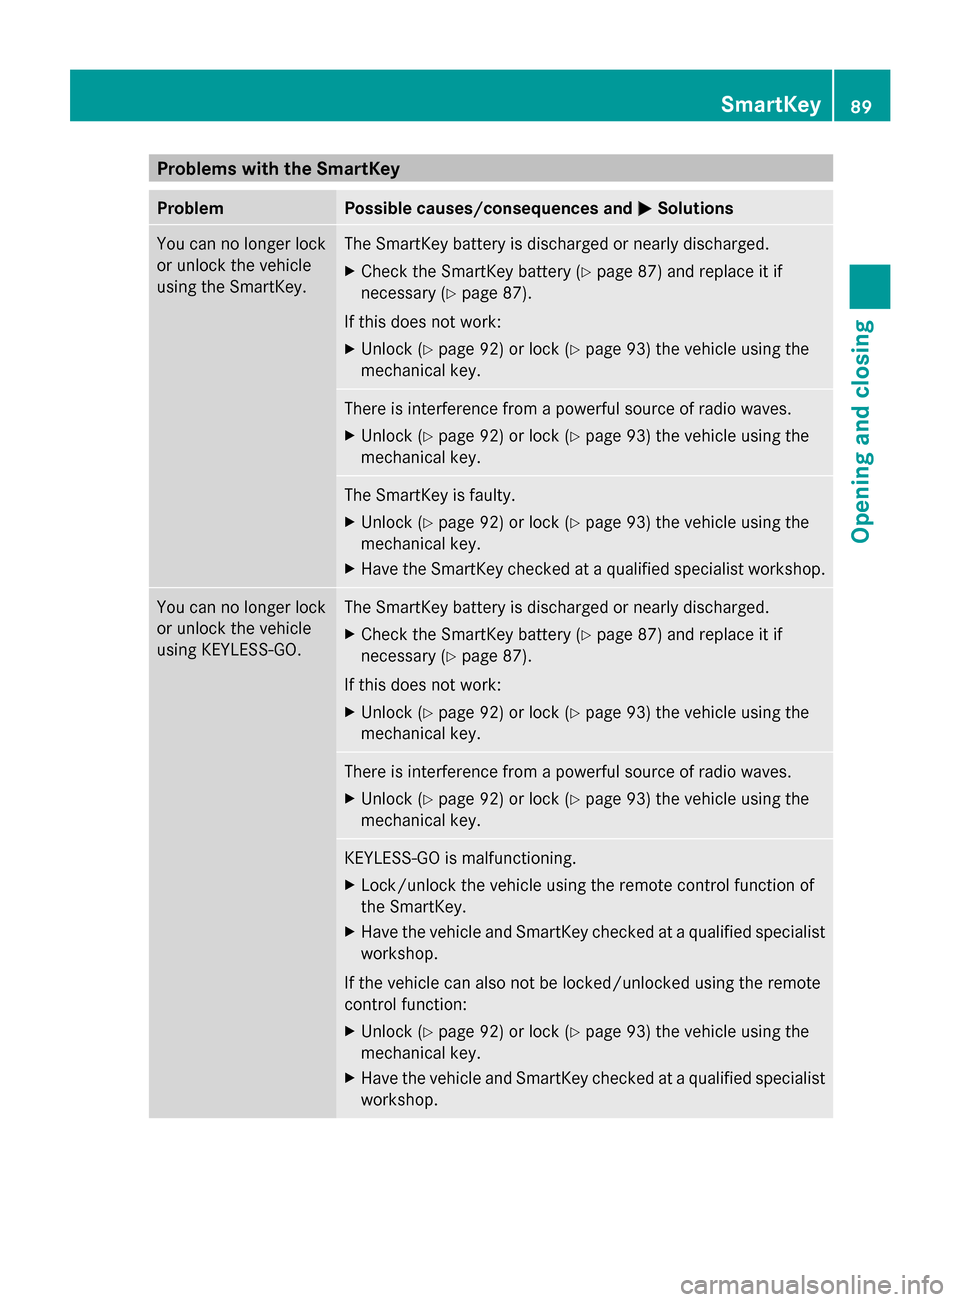
Problems with the SmartKey
Problem Possible causes/consequences and
0050
0050Solutions You can no longer lock
or unlock the vehicle
using the SmartKey. The SmartKey battery is discharged or nearly discharged.
X
Check the SmartKey battery (Y page 87) and replace it if
necessary (Y page 87).
If this does not work:
X Unlock (Y page 92) or lock (Y page 93) the vehicle using the
mechanical key. There is interference from a powerful source of radio waves.
X
Unlock (Y page 92) or lock (Y page 93) the vehicle using the
mechanical key. The SmartKey is faulty.
X
Unlock (Y page 92) or lock (Y page 93) the vehicle using the
mechanical key.
X Have the SmartKey checked at a qualified specialist workshop. You can no longer lock
or unlock the vehicle
using KEYLESS-GO. The SmartKey battery is discharged or nearly discharged.
X
Check the SmartKey battery (Y page 87) and replace it if
necessary (Y page 87).
If this does not work:
X Unlock (Y page 92) or lock (Y page 93) the vehicle using the
mechanical key. There is interference from a powerful source of radio waves.
X
Unlock (Y page 92) or lock (Y page 93) the vehicle using the
mechanical key. KEYLESS-GO is malfunctioning.
X
Lock/unlock the vehicle using the remote control function of
the SmartKey.
X Have the vehicle and SmartKey checked at a qualified specialist
workshop.
If the vehicle can also not be locked/unlocked using the remote
control function:
X Unlock (Y page 92) or lock (Y page 93) the vehicle using the
mechanical key.
X Have the vehicle and SmartKey checked at a qualified specialist
workshop. SmartKey
89Opening and closing Z
Page 92 of 434
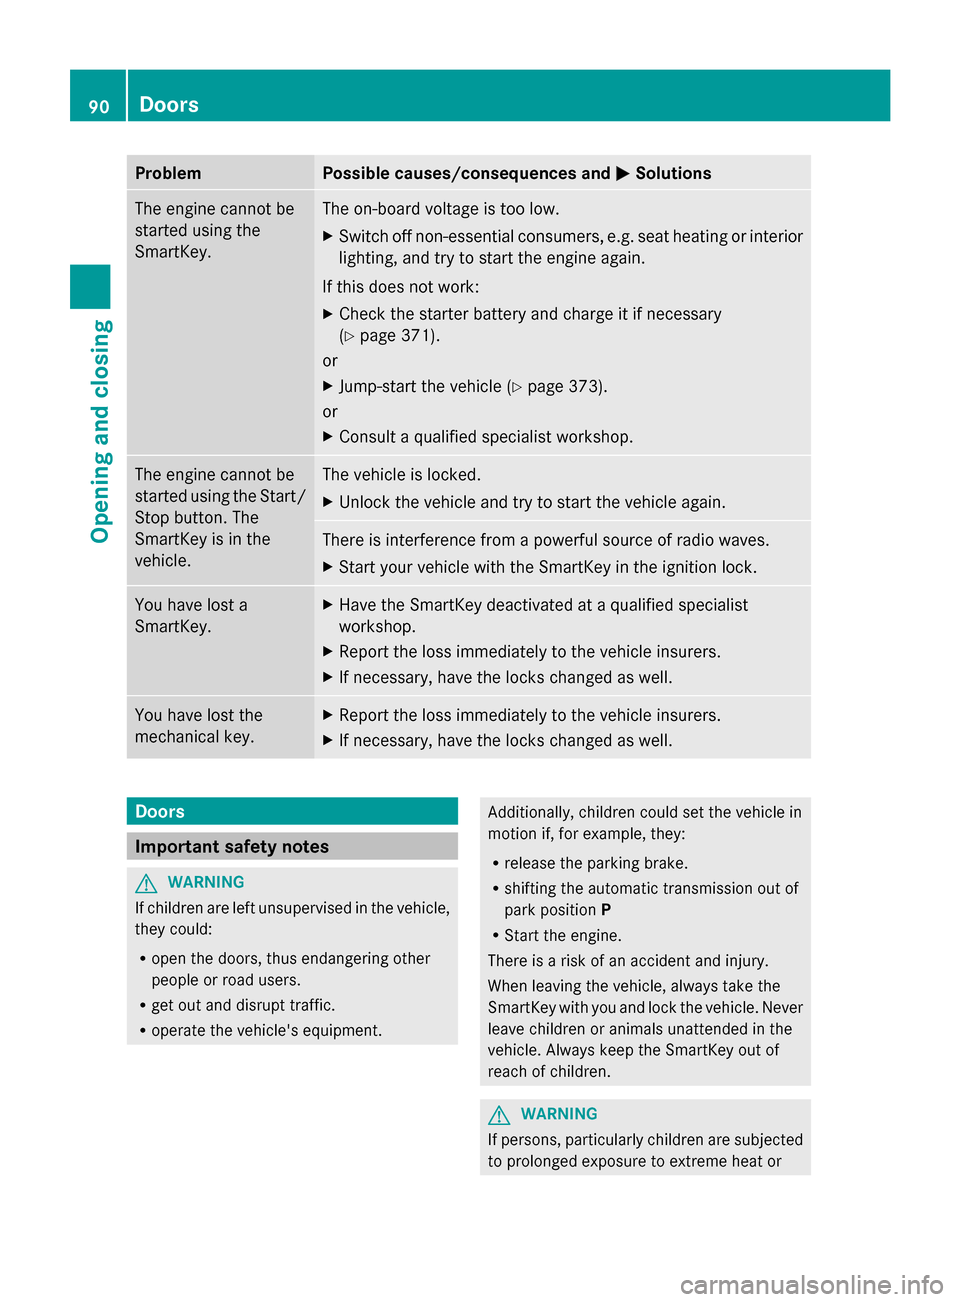
Problem Possible causes/consequences and
0050
0050Solutions The engine cannot be
started using the
SmartKey. The on-board voltage is too low.
X
Switch off non-essential consumers, e.g. seat heating or interior
lighting, and try to start the engine again.
If this does not work:
X Check the starter battery and charge it if necessary
(Y page 371).
or
X Jump-start the vehicle (Y page 373).
or
X Consult a qualified specialist workshop. The engine cannot be
started using the Start/
Stop button. The
SmartKey is in the
vehicle. The vehicle is locked.
X
Unlock the vehicle and try to start the vehicle again. There is interference from a powerful source of radio waves.
X
Start your vehicle with the SmartKey in the ignition lock. You have lost a
SmartKey. X
Have the SmartKey deactivated at a qualified specialist
workshop.
X Report the loss immediately to the vehicle insurers.
X If necessary, have the locks changed as well. You have lost the
mechanical key. X
Report the loss immediately to the vehicle insurers.
X If necessary, have the locks changed as well. Doors
Important safety notes
G
WARNING
If children are left unsupervised in the vehicle,
they could:
R open the doors, thus endangering other
people or road users.
R get out and disrupt traffic.
R operate the vehicle's equipment. Additionally, children could set the vehicle in
motion if, for example, they:
R
release the parking brake.
R shifting the automatic transmission out of
park position P
R Start the engine.
There is a risk of an accident and injury.
When leaving the vehicle, always take the
SmartKey with you and lock the vehicle. Never
leave children or animals unattended in the
vehicle. Always keep the SmartKey out of
reach of children. G
WARNING
If persons, particularly children are subjected
to prolonged exposure to extreme heat or 90
DoorsOpening and closing
Page 100 of 434
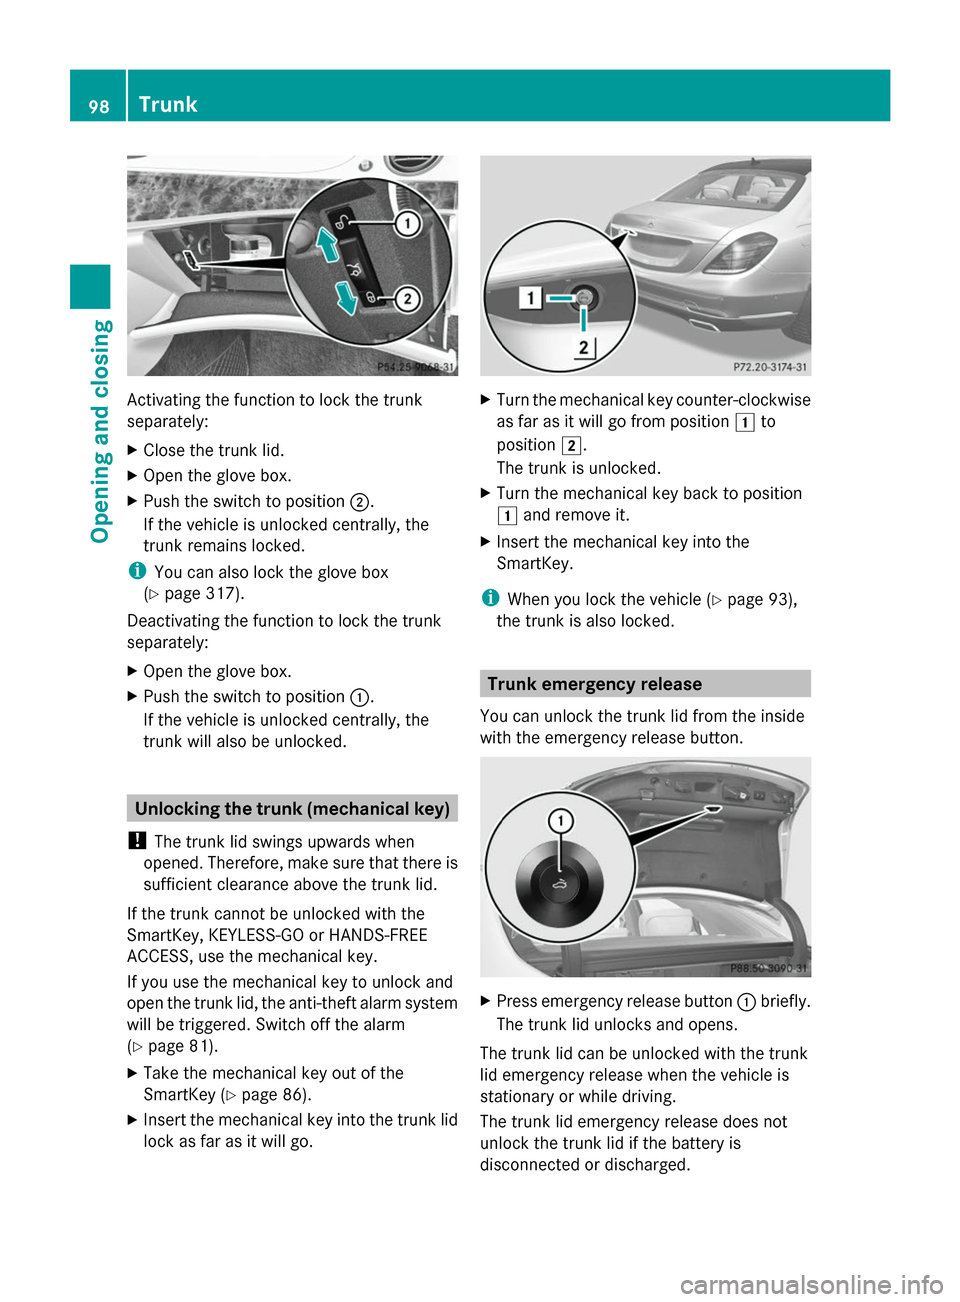
Activating the function to lock the trunk
separately:
X Close the trunk lid.
X Open the glove box.
X Push the switch to position 0044.
If the vehicle is unlocked centrally, the
trunk remains locked.
i You can also lock the glove box
(Y page 317).
Deactivating the function to lock the trunk
separately:
X Open the glove box.
X Push the switch to position 0043.
If the vehicle is unlocked centrally, the
trunk will also be unlocked. Unlocking the trunk (mechanical key)
! The trunk lid swings upwards when
opened. Therefore, make sure that there is
sufficient clearance above the trunk lid.
If the trunk cannot be unlocked with the
SmartKey, KEYLESS-GO or HANDS-FREE
ACCESS, use the mechanical key.
If you use the mechanical key to unlock and
open the trunk lid, the anti-theft alarm system
will be triggered. Switch off the alarm
(Y page 81).
X Take the mechanical key out of the
SmartKey (Y page 86).
X Insert the mechanical key into the trunk lid
lock as far as it will go. X
Turn the mechanical key counter-clockwise
as far as it will go from position 0047to
position 0048.
The trunk is unlocked.
X Turn the mechanical key back to position
0047 and remove it.
X Insert the mechanical key into the
SmartKey.
i When you lock the vehicle (Y page 93),
the trunk is also locked. Trunk emergency release
You can unlock the trunk lid from the inside
with the emergency release button. X
Press emergency release button 0043briefly.
The trunk lid unlocks and opens.
The trunk lid can be unlocked with the trunk
lid emergency release when the vehicle is
stationary or while driving.
The trunk lid emergency release does not
unlock the trunk lid if the battery is
disconnected or discharged. 98
TrunkOpening and closing
Page 127 of 434
Adjusting the active multicontour
seat
The active multicontour seat can be adjusted
using COMAND (see the separate operating
instructions). Multicontour seat in the rear
You can use the Rear Seat Entertainment
System to adjust the multicontour seats for
the outer seats (see the separate operating
instructions). Adjusting the 4-way lumbar support
The 4-way lumbar support can be adjusted
with COMAND (see the separate operating
instructions). Switching the seat heating on/off
Activating/deactivating G
WARNING
Repeatedly switching on the seat heating can
cause the seat cushion and backrest pads to
become very hot. The health of persons with
limited temperature sensitivity or a limited
ability to react to excessively high
temperatures may be affected or they may
even suffer burn-like injuries. There is a risk
of injury.
Therefore, do not switch the seat heating on
repeatedly. For vehicles equipped with the Warmth
Comfort package: the armrest in the door and
the rear armrest or the rear-compartment
center console can also be heated when you
switch on the seat heating of one of the front
or rear seats. This can be set with COMAND
(see the separate operating instructions).
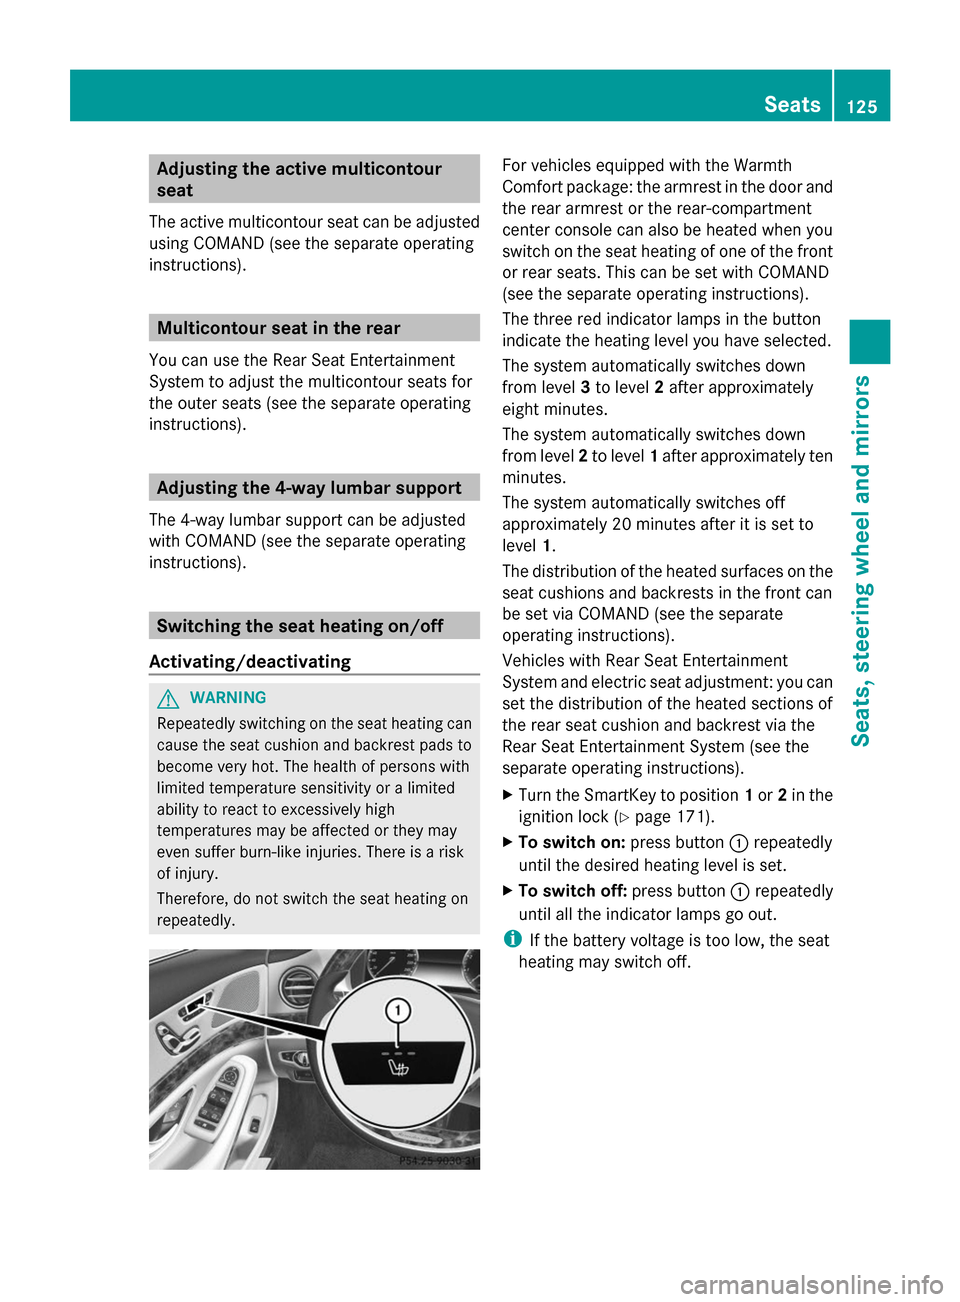
The three red indicator lamps in the button
indicate the heating level you have selected.
The system automatically switches down
from level
3to level 2after approximately
eight minutes.
The system automatically switches down
from level 2to level 1after approximately ten
minutes.
The system automatically switches off
approximately 20 minutes after it is set to
level 1.
The distribution of the heated surfaces on the
seat cushions and backrests in the front can
be set via COMAND (see the separate
operating instructions).
Vehicles with Rear Seat Entertainment
System and electric seat adjustment: you can
set the distribution of the heated sections of
the rear seat cushion and backrest via the
Rear Seat Entertainment System (see the
separate operating instructions).
X Turn the SmartKey to position 1or 2in the
ignition lock (Y page 171).
X To switch on: press button0043repeatedly
until the desired heating level is set.
X To switch off: press button0043repeatedly
until all the indicator lamps go out.
i If the battery voltage is too low, the seat
heating may switch off. Seats
125Seats, steering wheel and mirrors Z