audio MERCEDES-BENZ S-Class 2015 W222 Comand Manual
[x] Cancel search | Manufacturer: MERCEDES-BENZ, Model Year: 2015, Model line: S-Class, Model: MERCEDES-BENZ S-Class 2015 W222Pages: 298, PDF Size: 6.39 MB
Page 24 of 298
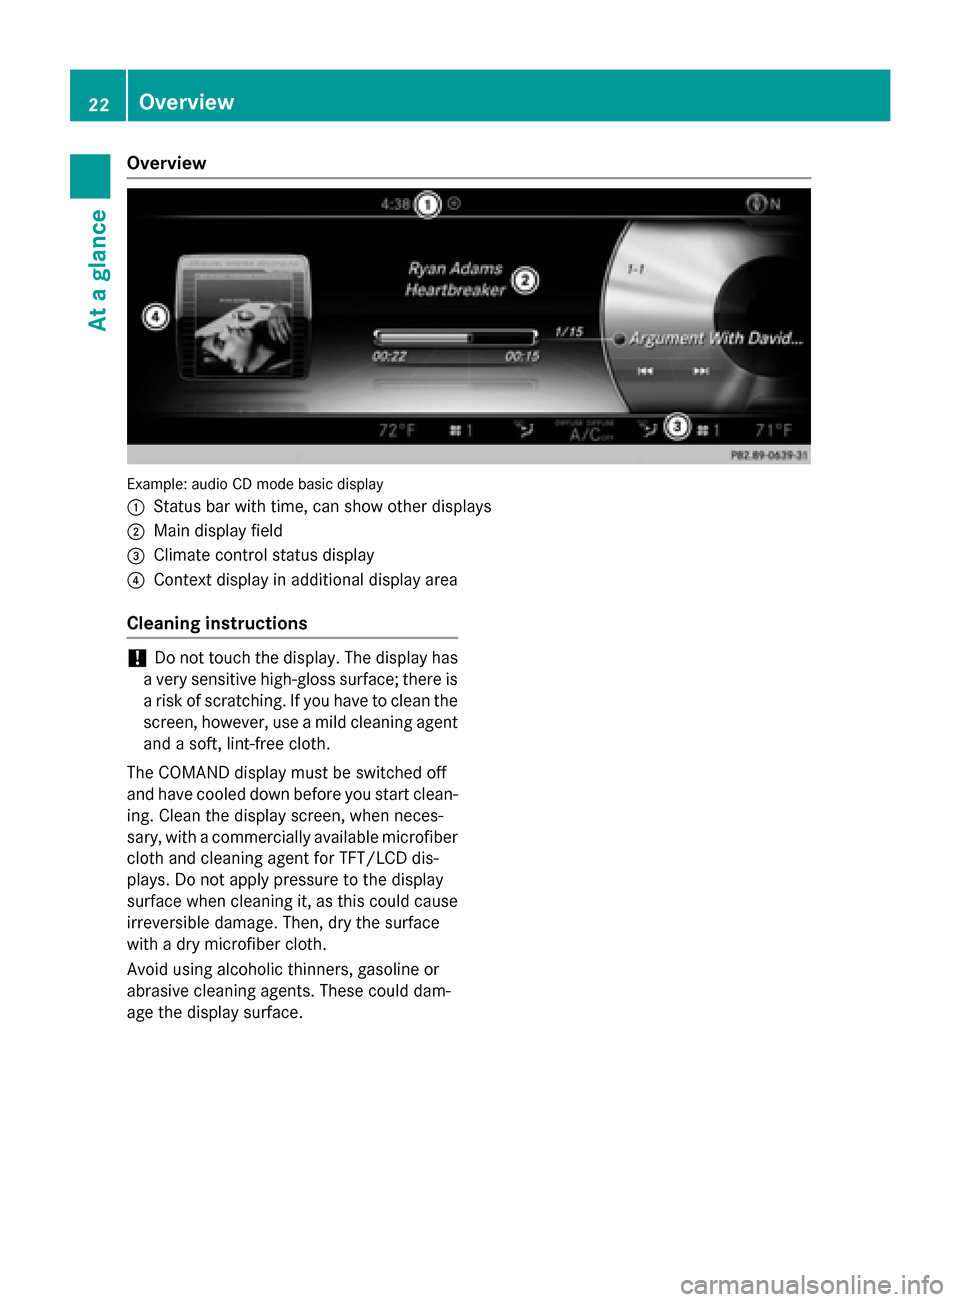
Overview
Example: audio CD mode basic display
0043 Status bar with time, can show other displays
0044 Main display field
0087 Climate control status display
0085 Context display in additional display area
Cleaning instructions !
Do not touch the display. The display has
a very sensitive high-gloss surface; there is a risk of scratching. If you have to clean the
screen, however, use a mild cleaning agent
and a soft, lint-free cloth.
The COMAND display must be switched off
and have cooled down before you start clean- ing. Clean the display screen, when neces-
sary, with a commercially available microfiber cloth and cleaning agent for TFT/LCD dis-
plays. Do not apply pressure to the display
surface when cleaning it, as this could cause
irreversible damage. Then, dry the surface
with a dry microfiber cloth.
Avoid using alcoholic thinners, gasoline or
abrasive cleaning agents. These could dam-
age the display surface. 22
OverviewAt a glance
Page 28 of 298
Switching the sound on or off
Media source sound X
Press the thumbwheel beside the control-
ler.
or X Press the 0063button on the multifunction
steering wheel.
i If the audio output is switched off, the
status line will show the 0063symbol. If
you switch the media source or change the volume, the sound is automatically
switched on.
i Even if the sound is switched off, you will
still hear navigation system announce-
ments.
Switching navigation announcements
off and on again X
To switch off navigation announce-
ments: press the thumbwheel beside the
controller during the announcement.
The Spoken
Spoken driving driving recommendations
recommendations
have been deactivated
have been deactivated message
appears.
X To switch navigation announcements
back on: switch COMAND off and then on
again (Y page 25).
or
X Start a new route calculation (Y page 86).
or
X Select 006A: while route guidance is active,
show the menu and press the controller
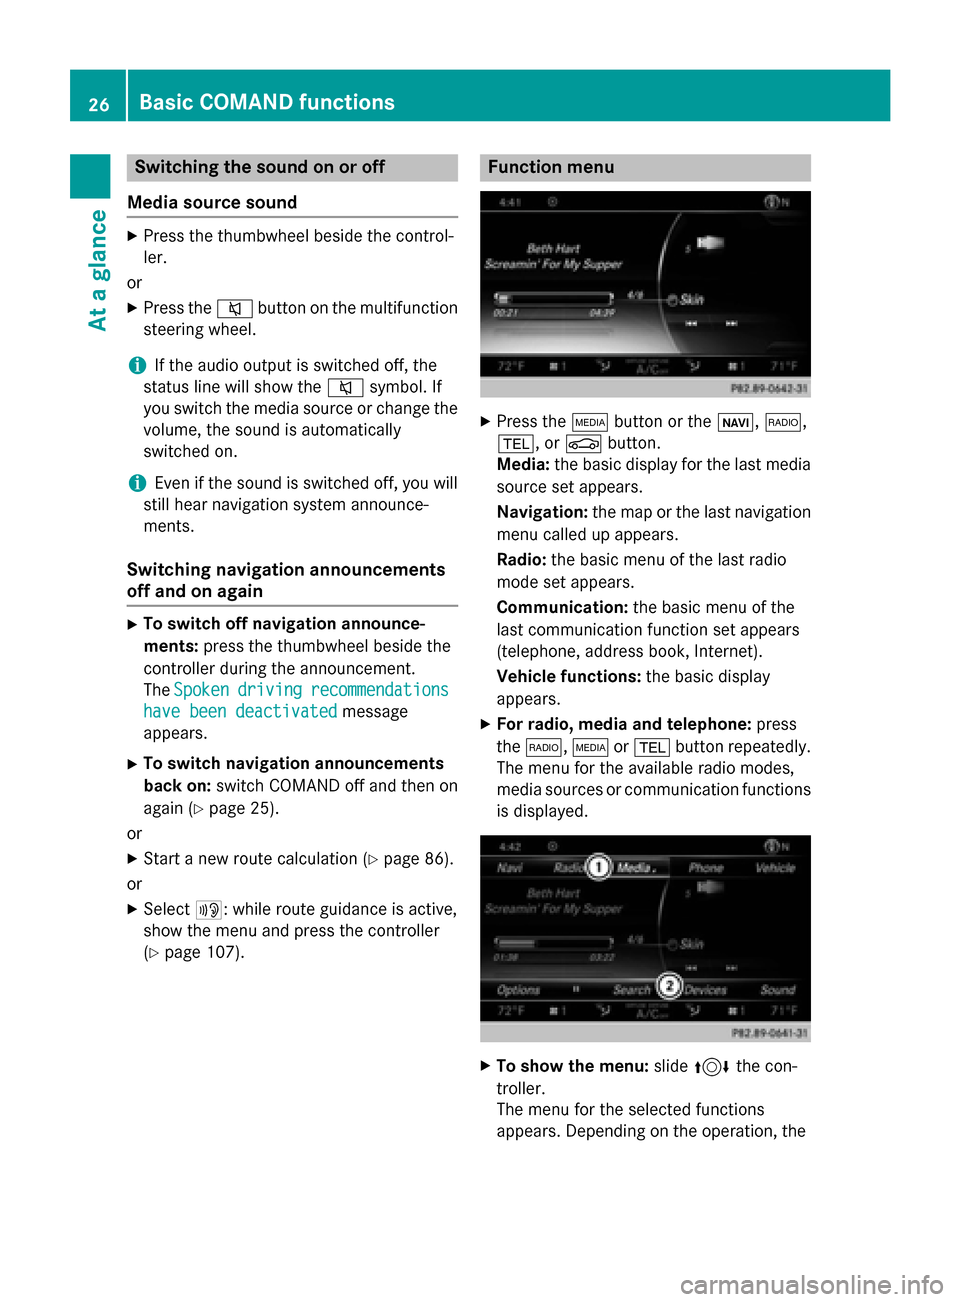
(Y page 107). Function menu
X
Press the 00FDbutton or the 00CB,002A,
002B, or 00D4button.
Media: the basic display for the last media
source set appears.
Navigation: the map or the last navigation
menu called up appears.
Radio: the basic menu of the last radio
mode set appears.
Communication: the basic menu of the
last communication function set appears
(telephone, address book, Internet).
Vehicle functions: the basic display
appears.
X For radio, media and telephone: press
the 002A, 00FDor002B button repeatedly.
The menu for the available radio modes,
media sources or communication functions
is displayed. X
To show the menu: slide4 the con-
troller.
The menu for the selected functions
appears. Depending on the operation, the 26
Basic COMAND functionsAt a glance
Page 29 of 298
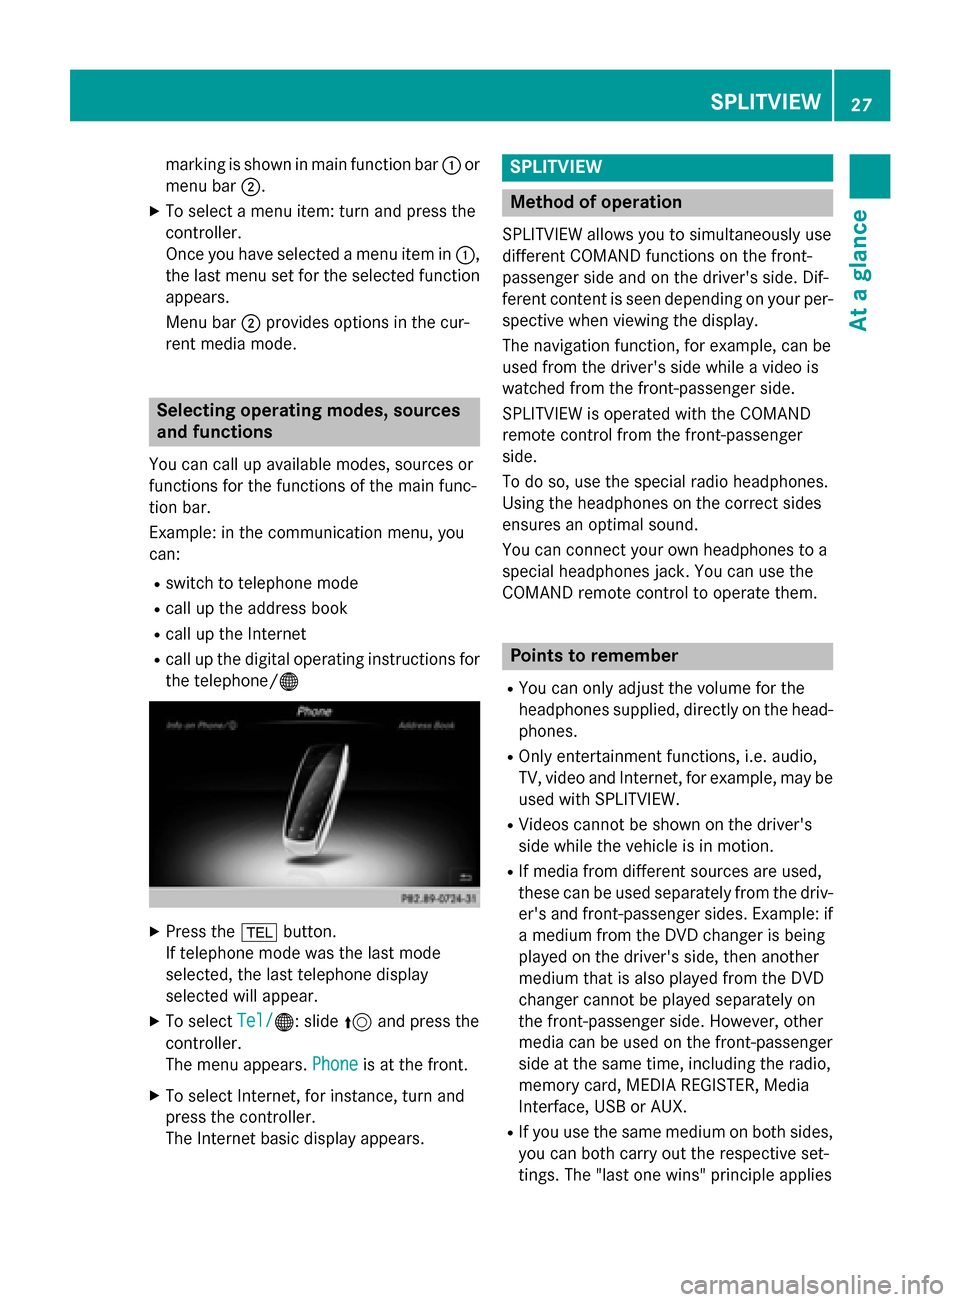
marking is shown in main function bar
0043or
menu bar 0044.
X To select a menu item: turn and press the
controller.
Once you have selected a menu item in 0043,
the last menu set for the selected function appears.
Menu bar 0044provides options in the cur-
rent media mode. Selecting operating modes, sources
and functions
You can call up available modes, sources or
functions for the functions of the main func-
tion bar.
Example: in the communication menu, you
can:
R switch to telephone mode
R call up the address book
R call up the Internet
R call up the digital operating instructions for
the telephone/00A7 X
Press the 002Bbutton.
If telephone mode was the last mode
selected, the last telephone display
selected will appear.
X To select Tel/ Tel/00A7: slide 5and press the
controller.
The menu appears. Phone Phoneis at the front.
X To select Internet, for instance, turn and
press the controller.
The Internet basic display appears. SPLITVIEW
Method of operation
SPLITVIEW allows you to simultaneously use
different COMAND functions on the front-
passenger side and on the driver's side. Dif-
ferent content is seen depending on your per- spective when viewing the display.
The navigation function, for example, can be
used from the driver's side while a video is
watched from the front-passenger side.
SPLITVIEW is operated with the COMAND
remote control from the front-passenger
side.
To do so, use the special radio headphones.
Using the headphones on the correct sides
ensures an optimal sound.
You can connect your own headphones to a
special headphones jack. You can use the
COMAND remote control to operate them. Points to remember
R You can only adjust the volume for the
headphones supplied, directly on the head-
phones.
R Only entertainment functions, i.e. audio,
TV, video and Internet, for example, may be
used with SPLITVIEW.
R Videos cannot be shown on the driver's
side while the vehicle is in motion.
R If media from different sources are used,
these can be used separately from the driv-
er's and front-passenger sides. Example: ifa medium from the DVD changer is being
played on the driver's side, then another
medium that is also played from the DVD
changer cannot be played separately on
the front-passenger side. However, other
media can be used on the front-passenger
side at the same time, including the radio,
memory card, MEDIA REGISTER, Media
Interface, USB or AUX.
R If you use the same medium on both sides,
you can both carry out the respective set-
tings. The "last one wins" principle applies SPLITVIEW
27At a glance
Page 32 of 298
X
Select a type of search inquiry, such as
Enter search term
Enter search term.
An input field appears.
X Enter the destination using the COMAND
remote control and press the 0070button.
The Google™ results list appears.
X Select the destination using the COMAND
remote control.
A menu appears.
X Select Set as Destination Set as Destination.
X The prompt Accept the navigation
Accept the navigation
data from Mercedes-Benz Apps?
data from Mercedes-Benz Apps?
appears on the driver's side.
X Select Yes
YesorNo
No.
If you select Yes
Yes, the navigation data is
used for route guidance. Touchpad
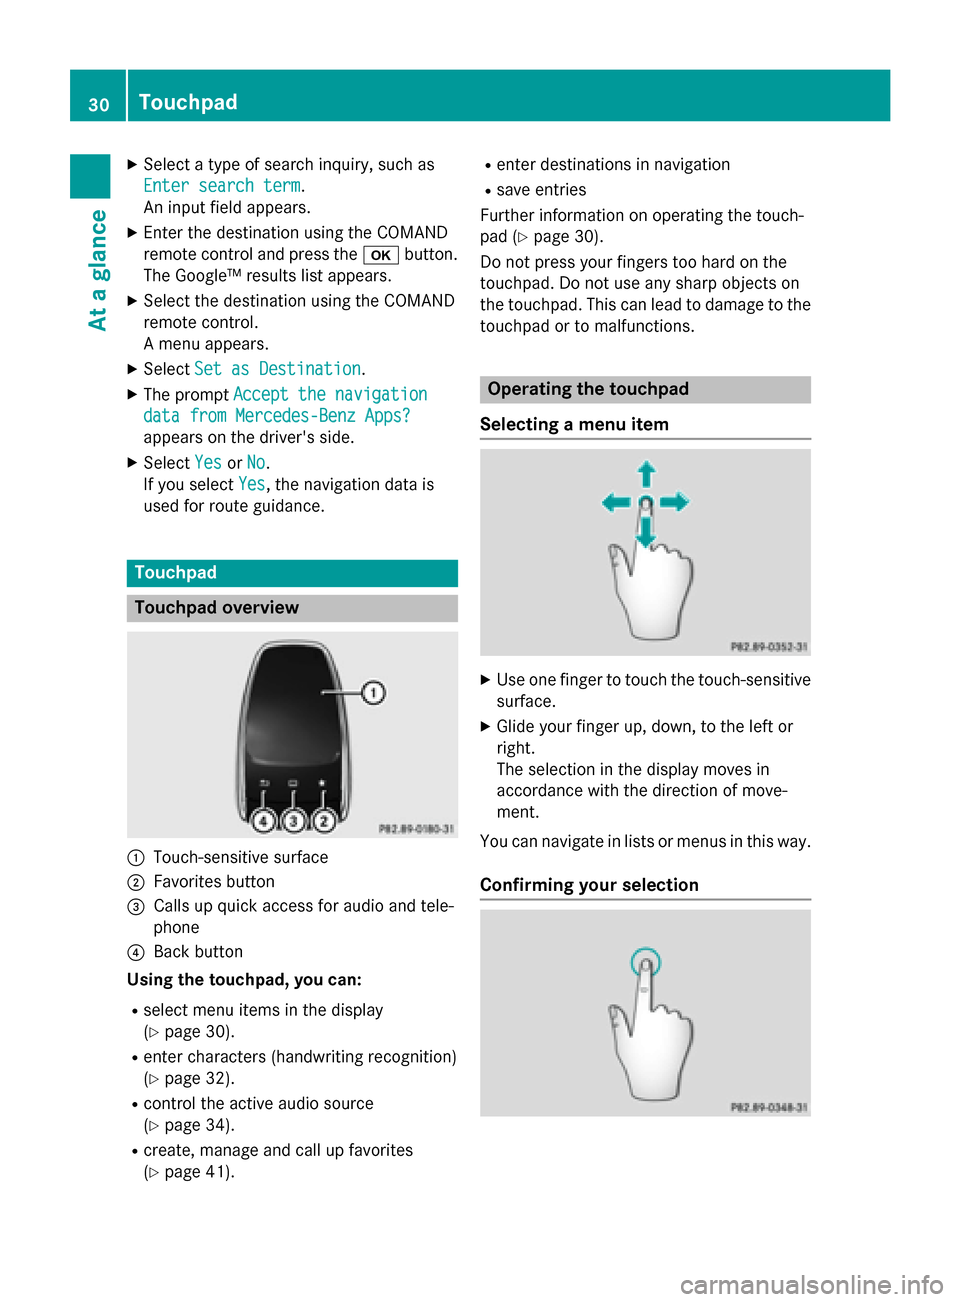
Touchpad overview
0043
Touch-sensitive surface
0044 Favorites button
0087 Calls up quick access for audio and tele-
phone
0085 Back button
Using the touchpad, you can:
R select menu items in the display
(Y page 30).
R enter characters (handwriting recognition)
(Y page 32).
R control the active audio source
(Y page 34).
R create, manage and call up favorites
(Y page 41). R
enter destinations in navigation
R save entries
Further information on operating the touch-
pad (Y page 30).
Do not press your fingers too hard on the
touchpad. Do not use any sharp objects on
the touchpad. This can lead to damage to the
touchpad or to malfunctions. Operating the touchpad
Selecting a menu item X
Use one finger to touch the touch-sensitive
surface.
X Glide your finger up, down, to the left or
right.
The selection in the display moves in
accordance with the direction of move-
ment.
You can navigate in lists or menus in this way.
Confirming your selection 30
TouchpadAt a glance
Page 33 of 298
X
Use one finger to press the touch-sensitive
surface until you reach the pressure point.
A menu, an option or an application is
started.
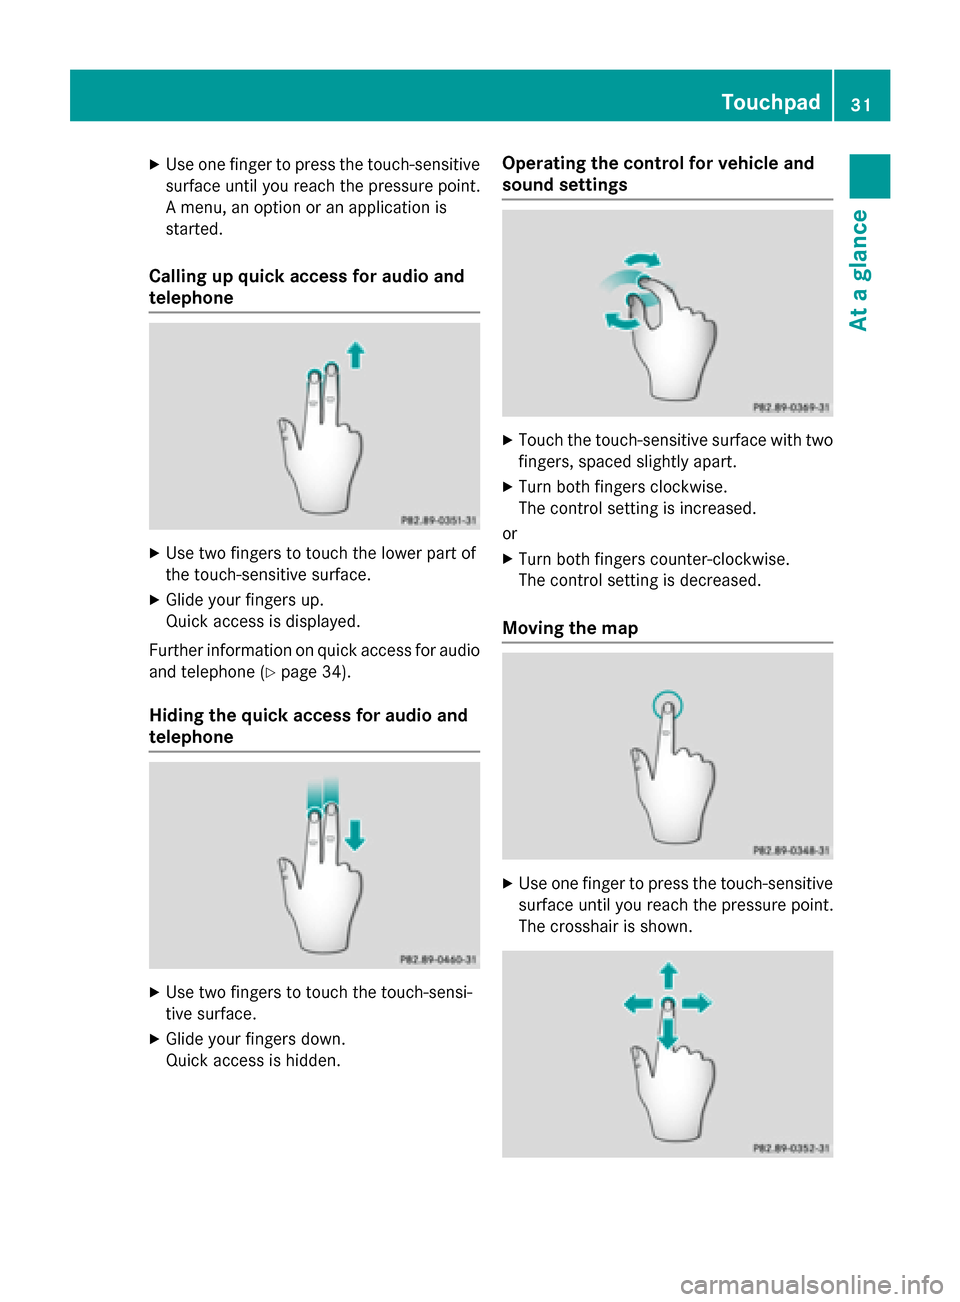
Calling up quick access for audio and
telephone X
Use two fingers to touch the lower part of
the touch-sensitive surface.
X Glide your fingers up.
Quick access is displayed.
Further information on quick access for audio
and telephone (Y page 34).
Hiding the quick access for audio and
telephone X
Use two fingers to touch the touch-sensi-
tive surface.
X Glide your fingers down.
Quick access is hidden. Operating the control for vehicle and
sound settings
X
Touch the touch-sensitive surface with two
fingers, spaced slightly apart.
X Turn both fingers clockwise.
The control setting is increased.
or X Turn both fingers counter-clockwise.
The control setting is decreased.
Moving the map X
Use one finger to press the touch-sensitive
surface until you reach the pressure point.
The crosshair is shown. Touchpad
31At a glance
Page 36 of 298
X
Press the touchpad.
A symbol is shown.
X To select 0054: glide your finger to the left
or right and press.
The list of available input languages
appears.
X To select a language: glide up or down and
press.
The input language for handwriting recog-
nition has been changed.
Searching in lists The phone book search is used as an exam-
ple.
You determine the first letter of the contact
you are looking for with the first character you enter.
X Draw the letter on the touchpad surface.
The first contact with the selected first
character is highlighted in the phone book.
Further information on handwriting recog-
nition on the touchpad (Y page 32).
X Draw additional letters on the touchpad
surface one after another.
X To complete the search and return to the
phone book: press the touchpad.
Switching between the controller and
the touchpad as input device Prerequisite: an input line for text, numbers or
characters has been selected.
X To switch from character entry using
the controller to handwriting recogni-
tion on the touchpad: use one finger to
press the touchpad.
Handwriting recognition on the touchpad is
active.
X To switch from handwriting recognition
on the touchpad to character entry
using the controller: press the controller.
Character entry using the controller is
active. Quick access for audio and telephone
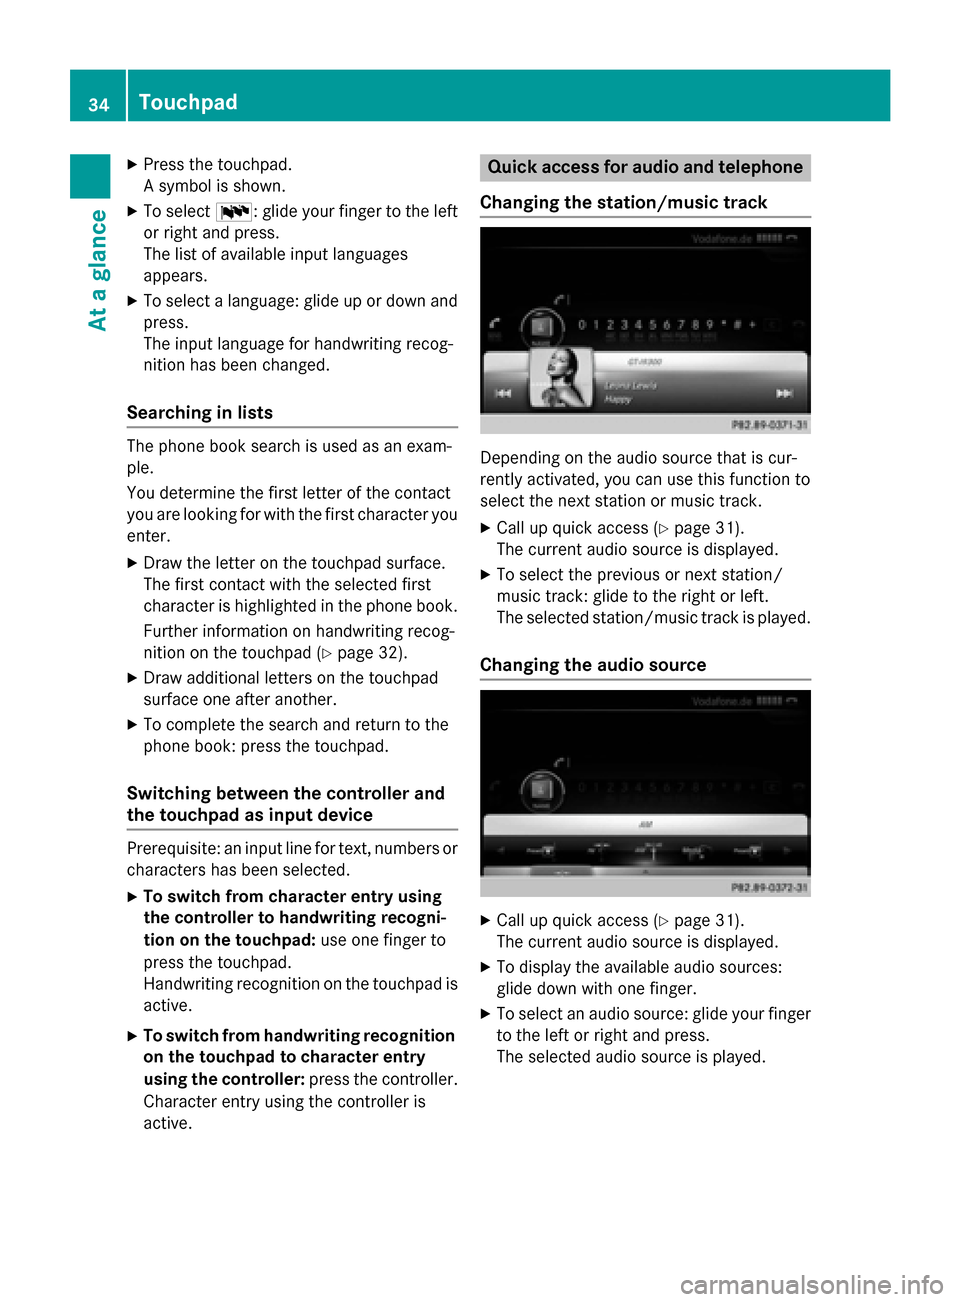
Changing the station/music track Depending on the audio source that is cur-
rently activated, you can use this function to
select the next station or music track.
X Call up quick access (Y page 31).
The current audio source is displayed.
X To select the previous or next station/
music track: glide to the right or left.
The selected station/music track is played.
Changing the audio source X
Call up quick access (Y page 31).
The current audio source is displayed.
X To display the available audio sources:
glide down with one finger.
X To select an audio source: glide your finger
to the left or right and press.
The selected audio source is played. 34
TouchpadAt a glance
Page 38 of 298
MEDIUM Function/location
Media Register Media found in the
MEDIA REGISTER.
Media Interface 1
Media Interface 2 Devices connected
to USB ports 1 and
2. USB ports 1 and 2
are located under
the center console
armrest in the rear
compartment. Bluetooth Audio Devices connected
with COMAND via
Bluetooth
®
. TV Television
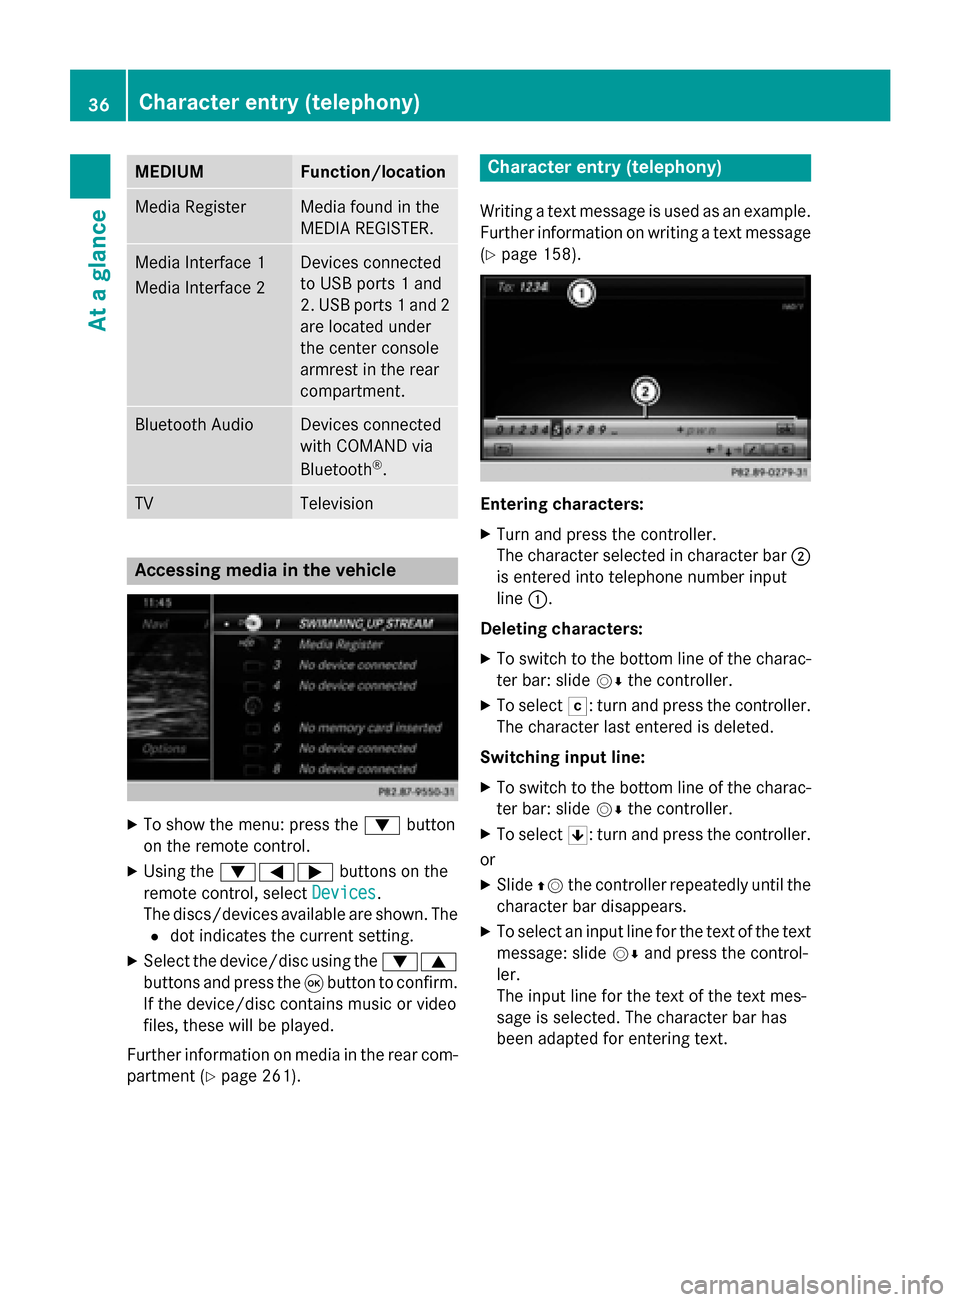
Accessing media in the vehicle
X
To show the menu: press the 0064button
on the remote control.
X Using the 006400590065 buttons on the
remote control, select Devices
Devices .
The discs/devices available are shown. The 0036 dot indicates the current setting.
X Select the device/disc using the 00640063
buttons and press the 008Bbutton to confirm.
If the device/disc contains music or video
files, these will be played.
Further information on media in the rear com-
partment (Y page 261). Character entry (telephony)
Writing a text message is used as an example. Further information on writing a text message
(Y page 158). Entering characters:
X Turn and press the controller.
The character selected in character bar 0044
is entered into telephone number input
line 0043.
Deleting characters:
X To switch to the bottom line of the charac-
ter bar: slide 00520064the controller.
X To select 0042: turn and press the controller.
The character last entered is deleted.
Switching input line:
X To switch to the bottom line of the charac-
ter bar: slide 00520064the controller.
X To select 0060: turn and press the controller.
or X Slide 00970052the controller repeatedly until the
character bar disappears.
X To select an input line for the text of the text
message: slide 00520064and press the control-
ler.
The input line for the text of the text mes-
sage is selected. The character bar has
been adapted for entering text. 36
Character entry (telephony)At a glance
Page 53 of 298
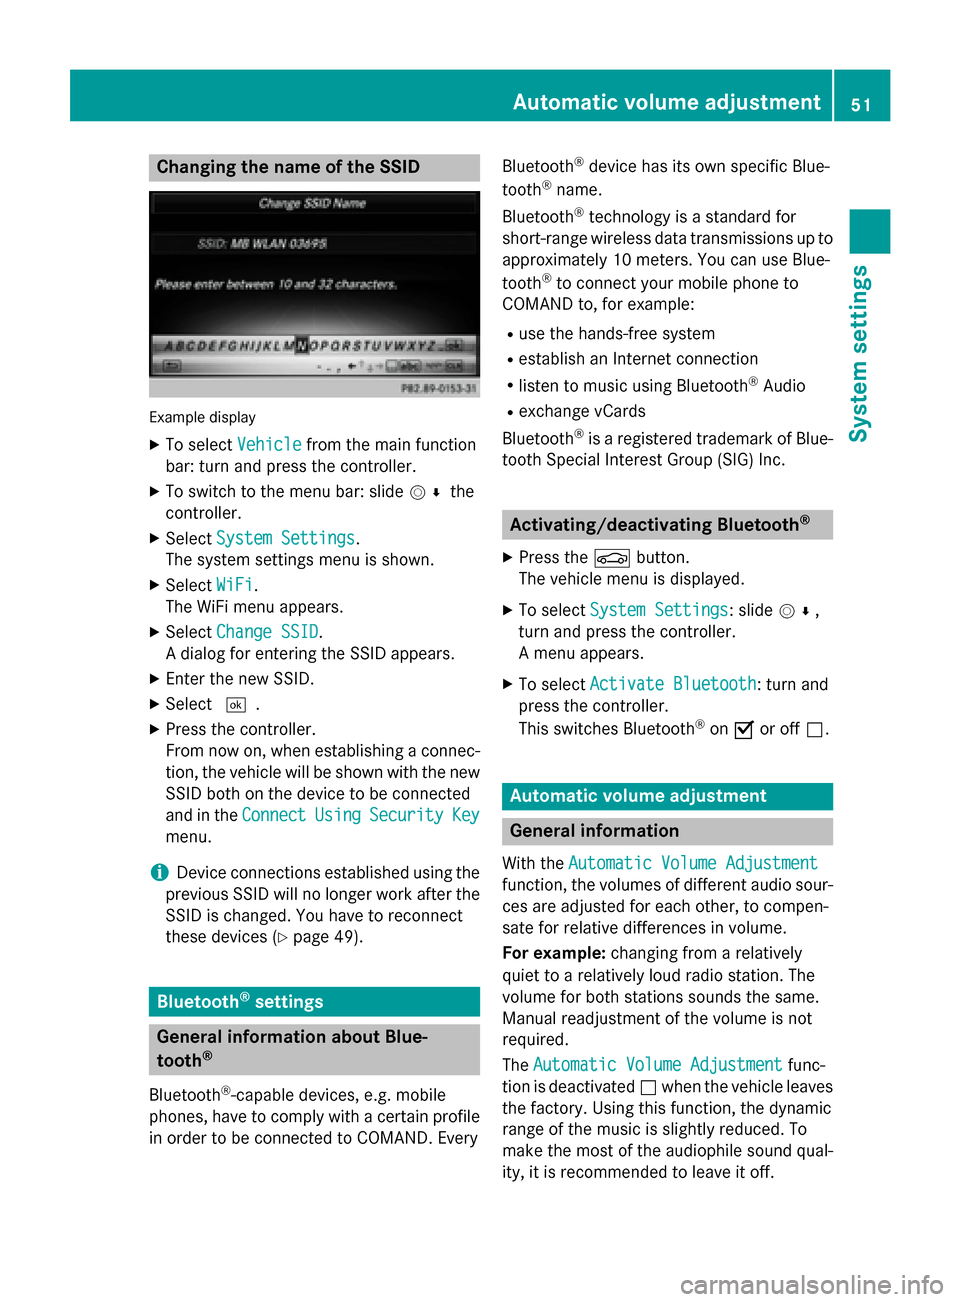
Changing the name of the SSID
Example display
X To select Vehicle
Vehicle from the main function
bar: turn and press the controller.
X To switch to the menu bar: slide 005200C5the
controller.
X Select System Settings
System Settings.
The system settings menu is shown.
X Select WiFi
WiFi.
The WiFi menu appears.
X Select Change SSID
Change SSID.
A dialog for entering the SSID appears.
X Enter the new SSID.
X Select 0054.
X Press the controller.
From now on, when establishing a connec- tion, the vehicle will be shown with the new SSID both on the device to be connected
and in the Connect
Connect Using UsingSecurity
Security Key
Key
menu.
i Device connections established using the
previous SSID will no longer work after the
SSID is changed. You have to reconnect
these devices (Y page 49). Bluetooth
®
settings General information about Blue-
tooth ®
Bluetooth ®
-capable devices, e.g. mobile
phones, have to comply with a certain profile
in order to be connected to COMAND. Every Bluetooth
®
device has its own specific Blue-
tooth ®
name.
Bluetooth ®
technology is a standard for
short-range wireless data transmissions up to
approximately 10 meters. You can use Blue-
tooth ®
to connect your mobile phone to
COMAND to, for example:
R use the hands-free system
R establish an Internet connection
R listen to music using Bluetooth ®
Audio
R exchange vCards
Bluetooth ®
is a registered trademark of Blue-
tooth Special Interest Group (SIG) Inc. Activating/deactivating Bluetooth
®
X Press the 00D4button.
The vehicle menu is displayed.
X To select System Settings
System Settings: slide 005200C5,
turn and press the controller.
A menu appears.
X To select Activate Bluetooth Activate Bluetooth : turn and
press the controller.
This switches Bluetooth ®
on 0073 or off 0053. Automatic volume adjustment
General information
With the Automatic Volume Adjustment Automatic Volume Adjustment
function, the volumes of different audio sour- ces are adjusted for each other, to compen-
sate for relative differences in volume.
For example: changing from a relatively
quiet to a relatively loud radio station. The
volume for both stations sounds the same.
Manual readjustment of the volume is not
required.
The Automatic Volume Adjustment Automatic Volume Adjustment func-
tion is deactivated 0053when the vehicle leaves
the factory. Using this function, the dynamic
range of the music is slightly reduced. To
make the most of the audiophile sound qual- ity, it is recommended to leave it off. Automatic volume adjustment
51System settings
Page 84 of 298
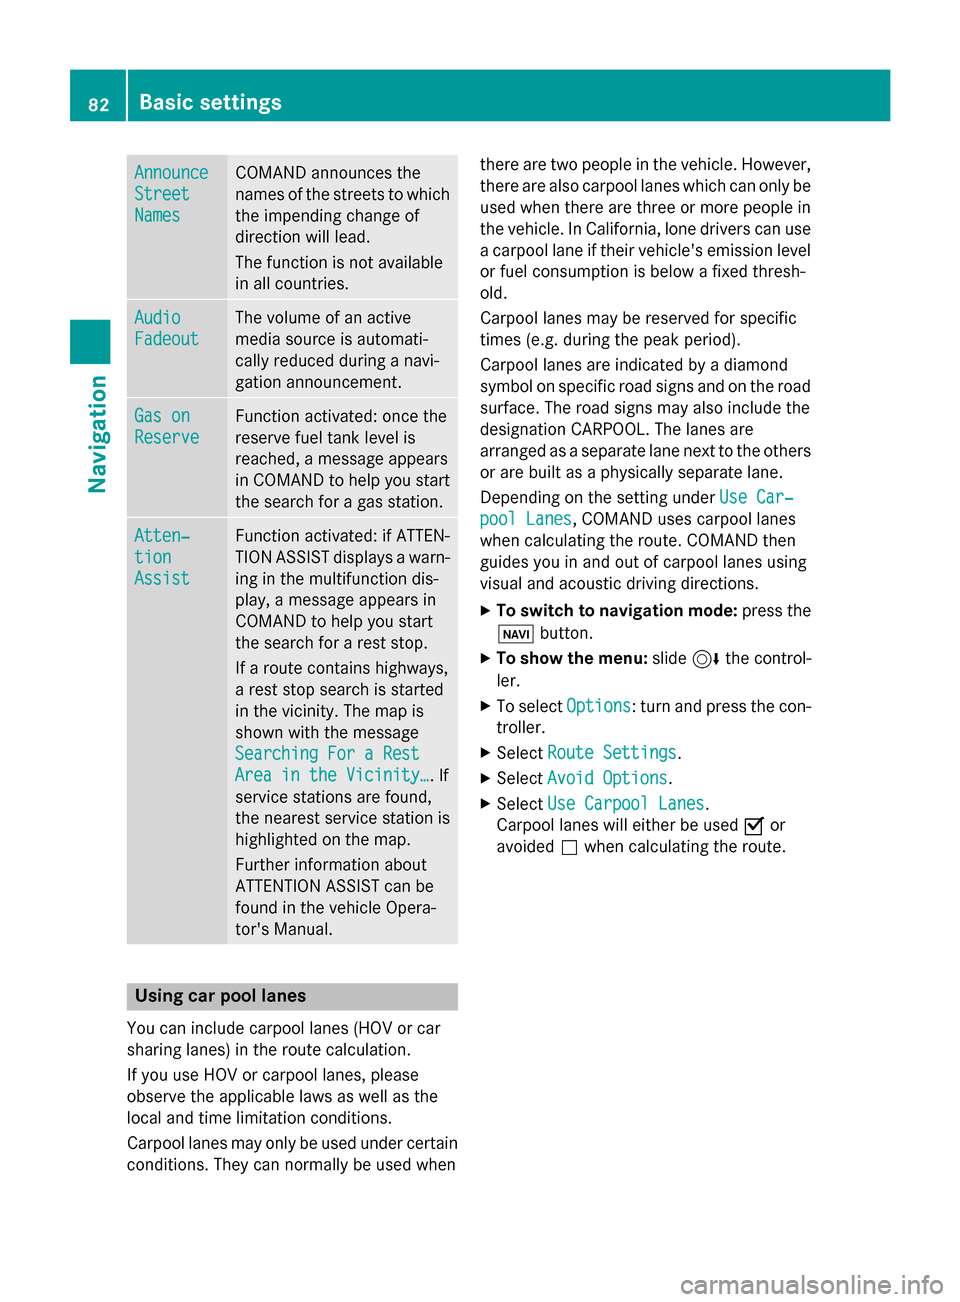
Announce
Announce
Street Street
Names Names COMAND announces the
names of the streets to which the impending change of
direction will lead.
The function is not available
in all countries. Audio Audio
Fadeout Fadeout The volume of an active
media source is automati-
cally reduced during a navi-
gation announcement.
Gas on Gas on
Reserve Reserve Function activated: once the
reserve fuel tank level is
reached, a message appears
in COMAND to help you start the search for a gas station. Atten‐ Atten‐
tion tion
Assist Assist Function activated: if ATTEN-
TION ASSIST displays a warn-
ing in the multifunction dis-
play, a message appears in
COMAND to help you start
the search for a rest stop.
If a route contains highways,
a rest stop search is started
in the vicinity. The map is
shown with the message
Searching For a Rest Searching For a Rest
Area in the Vicinity… Area in the Vicinity…. If
service stations are found,
the nearest service station is
highlighted on the map.
Further information about
ATTENTION ASSIST can be
found in the vehicle Opera-
tor's Manual. Using car pool lanes
You can include carpool lanes (HOV or car
sharing lanes) in the route calculation.
If you use HOV or carpool lanes, please
observe the applicable laws as well as the
local and time limitation conditions.
Carpool lanes may only be used under certain
conditions. They can normally be used when there are two people in the vehicle. However,
there are also carpool lanes which can only be
used when there are three or more people in
the vehicle. In California, lone drivers can use
a carpool lane if their vehicle's emission level or fuel consumption is below a fixed thresh-
old.
Carpool lanes may be reserved for specific
times (e.g. during the peak period).
Carpool lanes are indicated by a diamond
symbol on specific road signs and on the road surface. The road signs may also include the
designation CARPOOL. The lanes are
arranged as a separate lane next to the others
or are built as a physically separate lane.
Depending on the setting under Use Car‐ Use Car‐
pool Lanes
pool Lanes, COMAND uses carpool lanes
when calculating the route. COMAND then
guides you in and out of carpool lanes using
visual and acoustic driving directions.
X To switch to navigation mode: press the
00CB button.
X To show the menu: slide6the control-
ler.
X To select Options Options: turn and press the con-
troller.
X Select Route Settings
Route Settings.
X Select Avoid Options
Avoid Options.
X Select Use Carpool Lanes
Use Carpool Lanes.
Carpool lanes will either be used 0073or
avoided 0053when calculating the route. 82
Basic settingsNavigation
Page 190 of 298
X
To select Mercedes-Benz Apps
Mercedes-Benz Apps: turn and
press the controller.
The available Mercedes-Benz Apps Mercedes-Benz Apps are
displayed.
X To select the desired App: turn and press
the controller.
Additional Mercedes-Benz Apps can be pur-
chased on the Mercedes-Benz website. You
can find further information under: http://
apps.mercedes-benz.com/apps/
The available features are country-depend-
ent. Closing Mercedes-Benz Apps
X Press the 0038button.
The Internet menu appears.
or
X Press the 0038button for longer than two
seconds.
The Mercedes-Benz Apps menu or the
Internet menu appears. Adjusting the settings of individual
Apps
X To call up the telephone menu: press the
002B button.
X To switch to the main function bar: slide
5 the controller.
X To select TEL/ TEL/00A7: press the controller.
X To select Internet
Internet: turn and press the
controller.
The menu with the Internet functions is dis-
played.
X To select Mercedes-Benz Apps
Mercedes-Benz Apps: turn and
press the controller.
X To highlight the desired app: turn the con-
troller.
X To select G: slide 9the controller.
The current app settings are displayed. Resetting adjustments
With the reset function, all Mercedes-Benz
Apps settings are reset to the factory set-
tings. X To call up the telephone menu: press the
002B button.
X To switch to the main function bar: slide
5 the controller.
X To select TEL/
TEL/00A7: press the controller.
X To select Internet
Internet: turn and press the
controller.
The menu with the Internet functions is dis-
played.
X To select Mercedes-Benz Apps Mercedes-Benz Apps: turn and
press the controller.
The available Mercedes-Benz Apps Mercedes-Benz Apps are
displayed.
X To select G: slide 9the controller.
X To select Reset
Reset: turn and press the con-
troller.
A prompt appears asking whether you
really wish to reset.
X SelectYes YesorNo
No.
If you select Yes Yesthe settings are reset.
If you select No
Nothe process is canceled. Internet radio
General notes
A good Internet connection is required for
error-free audio data transmission. Connect-
ing your mobile phone to the vehicle's exte-
rior antenna via the phone bracket ensures
the best possible reception.
i Bear in mind that a relatively large volume
of data can be transmitted when using
Internet radio. An average 128 kbit per sec-
ond data transfer rate can transfer 56 MB of data in one hour.
The data transfer rate of a station is dis-
played while receiving data. 188
Internet radioOnline and Internet functions