change time MERCEDES-BENZ S-Class 2015 W222 Owner's Guide
[x] Cancel search | Manufacturer: MERCEDES-BENZ, Model Year: 2015, Model line: S-Class, Model: MERCEDES-BENZ S-Class 2015 W222Pages: 502, PDF Size: 9.59 MB
Page 278 of 502
R
you switch on the turn signals. In this
event, the warnings are suppressed for a
certain period of time.
R a driving safety system intervenes, e.g.
ABS, BAS or ESP ®
.
R you accelerate hard, e.g. kickdown.
R you brake hard.
R you steer actively, e.g. swerve to avoid an
obstacle or change lanes quickly.
R you cut the corner on a sharp bend.
In order that you are warned only when nec-
essary and in good time if you cross the lane marking, the system recognizes certain con-
ditions and warns you accordingly.
The warning vibration occurs earlier if:
R you approach the outer lane marking on a
bend.
R the road has very wide lanes, e.g. a high-
way.
R the system recognizes solid lane markings.
The warning vibration occurs later if:
R the road has narrow lanes.
R you cut the corner on a bend. PLUG-IN HYBRID operation
Points to remember
General notes Hybrid technology combines a fuel efficient
internal combustion engine with a powerful
electric motor. In HYBRIDmode, the hybrid
system automatically selects the most effi-
cient operating mode for every driving situa-
tion. Drive the vehicle in the usual manner.
To save fuel, in HYBRIDmode, the hybrid
system switches off the combustion engine
as often as possible during the journey when power output requirements are low. When
power output requirements are low, the elec-
tric motor powers the vehicle. The engine is
switched on, even while the vehicle is in
motion, when a higher power output is
required. The engine is usually switched off when the vehicle is stationary. Consequently,
there is usually no engine idling as with com-
bustion engine vehicles.
For pulling away and accelerating, the electric motor supports the internal combustion
engine using the power stored in the high-
voltage battery. This energy is also used for
driving in partially electric mode, to operate
the electric refrigerant compressor and sup-
port the 12 V on-board electrical system. In
this way the hybrid drive helps to reduce your
vehicle's fuel consumption.
Observe the driving tips on PLUG-IN HYBRID
operation (Y page 287).
Recuperative Brake System If you release the accelerator pedal when the
vehicle is in motion, overrun recuperation is
initiated. The electric motor is operated as a
generator when in overrun mode and when
you brake. Hybrid technology converts the
kinetic energy of the vehicle into electricity
and stores it in the high-voltage battery.
Observe the important safety notes for the
Recuperative Brake System (Y page 48). Important safety notes
If the engine is switched off by the ECO start/
stop function and you open the driver's door:
R a message appears in the multifunction dis-
play and
R a warning tone sounds
Further information (Y page 340).
All of the vehicle's systems remain active, if:
R the vehicle is stationary
R the combustion engine is switched off and
R the READY indicator in the instrument clus-
ter lights up
If you remove your foot from the brake pedal
while in transmission position D or R, the
vehicle may pull away automatically.
Observe the notes on the READY display of
the ECO start/stop function (Y page 288).276
PLUG-IN HYBRID operationDriving and pa
rking
Page 304 of 502
Route guidance active
No change of direction announced
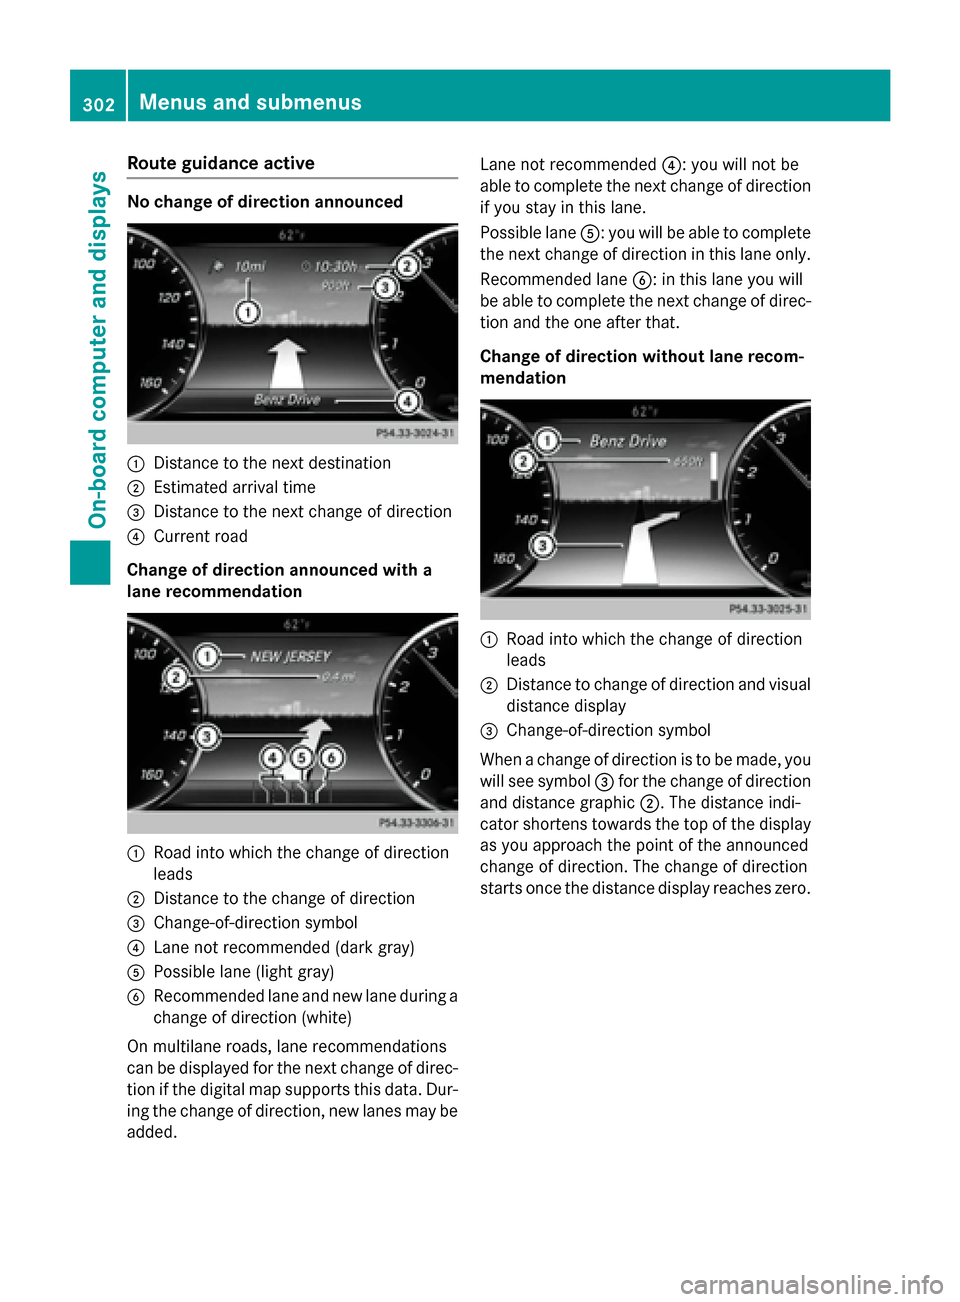
:
Distance to the next destination
; Estimated arrival time
= Distance to the next change of direction
? Current road
Change of direction announced with a
lane recommendation :
Road into which the change of direction
leads
; Distance to the change of direction
= Change-of-direction symbol
? Lane not recommended (dark gray)
A Possible lane (light gray)
B Recommended lane and new lane during a
change of direction (white)
On multilane roads, lane recommendations
can be displayed for the next change of direc- tion if the digital map supports this data. Dur-
ing the change of direction, new lanes may be added. Lane not recommended
?: you will not be
able to complete the next change of direction
if you stay in this lane.
Possible lane A: you will be able to complete
the next change of direction in this lane only.
Recommended lane B: in this lane you will
be able to complete the next change of direc- tion and the one after that.
Change of direction without lane recom-
mendation :
Road into which the change of direction
leads
; Distance to change of direction and visual
distance display
= Change-of-direction symbol
When a change of direction is to be made, you will see symbol =for the change of direction
and distance graphic ;. The distance indi-
cator shortens towards the top of the display as you approach the point of the announced
change of direction. The change of direction
starts once the distance display reaches zero. 302
Menus and submenusOn-board computer and displays
Page 306 of 502
X
To select a waveband or station mem-
ory: press abriefly.
X Use : or9 to select the waveband
or station memory.
X Press ato confirm the selection.
i Storing the station in COMAND; see the
separate operating instructions.
i SIRIUS XM satellite radio functions like a
normal radio.
You can find further information on radio
mode in the "Satellite radio" section of the
separate COMAND operating instructions. Media menu
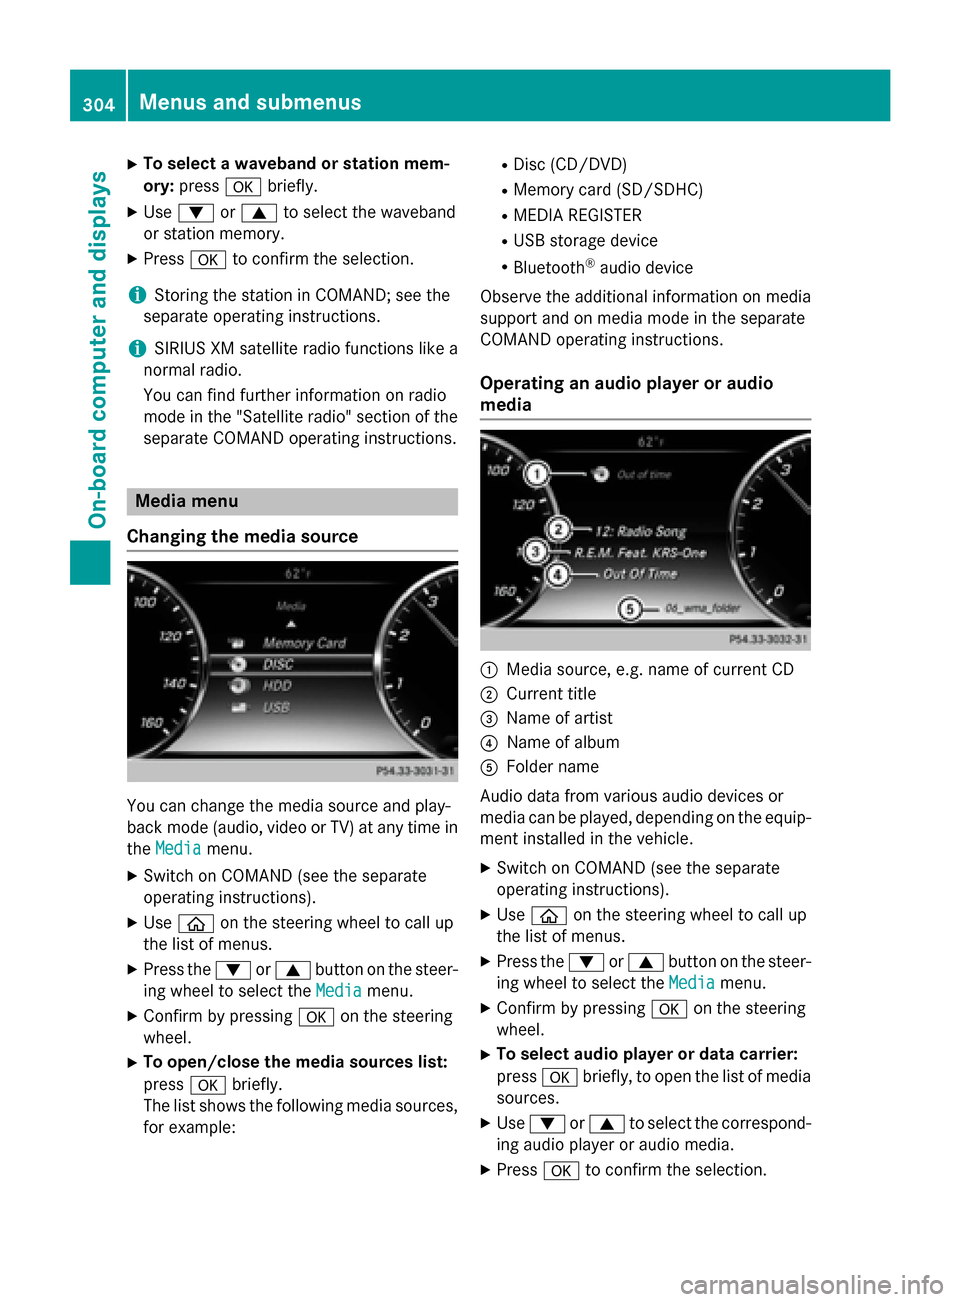
Changing the media source You can change the media source and play-
back mode (audio, video or TV) at any time in
the Media
Media menu.
X Switch on COMAND (see the separate
operating instructions).
X Use ò on the steering wheel to call up
the list of menus.
X Press the :or9 button on the steer-
ing wheel to select the Media
Media menu.
X Confirm by pressing aon the steering
wheel.
X To open/close the media sources list:
press abriefly.
The list shows the following media sources,
for example: R
Disc (CD/DVD)
R Memory card (SD/SDHC)
R MEDIA REGISTER
R USB storage device
R Bluetooth ®
audio device
Observe the additional information on media
support and on media mode in the separate
COMAND operating instructions.
Operating an audio player or audio
media :
Media source, e.g. name of current CD
; Current title
= Name of artist
? Name of album
A Folder name
Audio data from various audio devices or
media can be played, depending on the equip-
ment installed in the vehicle.
X Switch on COMAND (see the separate
operating instructions).
X Use ò on the steering wheel to call up
the list of menus.
X Press the :or9 button on the steer-
ing wheel to select the Media Mediamenu.
X Confirm by pressing aon the steering
wheel.
X To select audio player or data carrier:
press abriefly, to open the list of media
sources.
X Use : or9 to select the correspond-
ing audio player or audio media.
X Press ato confirm the selection. 304
Menus and submenusOn-board computer and displays
Page 312 of 502
X
Press ato confirm.
The current selection is displayed.
X To activate/deactivate: press thea
button again.
When Active Blind Spot Assist is activated, gray radar waves propagating backwards
appear next to the vehicle in the Assis‐
Assis‐
tance Info Display tance Info Display menu in the multi-
function display.
For further information about Active Blind
Spot Assist, see (Y page 270).
Setting ATTENTION ASSIST X Use ò on the steering wheel to call up
the list of menus.
X Press the :or9 button on the steer-
ing wheel to select the Settings Settingsmenu.
X Confirm by pressing aon the steering
wheel.
X Use : or9 to select the DriveAs‐
DriveAs‐
sist
sist submenu.
X Press ato confirm.
X Press the :or9 button to select
Attention Assist
Attention Assist.
X Press ato confirm.
X Press the :or9 button to set Off
Off,
Standard
Standard orSensitive
Sensitive .
X Press the abutton to confirm the selec-
tion.
When ATTENTION ASSIST is deactivated, the é symbol appears in the Assistance
Assistance
Graphic
Graphic menu in the multifunction display
when the ignition is on.
For further information about ATTENTION
ASSIST, see (Y page 264).
Activating/deactivating Active Lane
Keeping Assist X Use ò on the steering wheel to call up
the list of menus.
X Press the :or9 button on the steer-
ing wheel to select the Settings Settingsmenu.
X Confirm by pressing aon the steering
wheel. X
Use : or9 to select the DriveAs‐
DriveAs‐
sist
sist submenu.
X Press ato confirm.
X Press the :or9 button to select
Lane Keeping Assist
Lane Keeping Assist.
X Press ato confirm.
The current selection Standard
StandardorAdap‐
Adap‐
tive
tive is displayed.
X To change the setting: pressaagain.
For further information about Active Lane
Keeping Assist, see (Y page 273).
Hybrid submenu (plug-in hybrid vehi-
cles) Setting the maximum charge current
Before charging the high-voltage battery,
check the maximum permissible charge cur-
rent for the relevant power socket.
If there are no charge current settings on the charging cable, set the maximum charge cur-
rent.
The maximum charge current values in the
on-board computer may deviate from the
charging cable values.
X Use ò on the steering wheel to call up
the list of menus.
X Press the :or9 button on the steer-
ing wheel to select the Settings
Settings menu.
X Confirm by pressing aon the steering
wheel.
X Use : or9 to select the Hybrid Hybridsub-
menu.
X Press ato confirm.
X Press :or9 to select the Maximum
Maximum
Charge Current
Charge Current function.
You will see the selected setting.
X Press the abutton to save the setting.
Setting the departure time
With the Departure Time Departure Time function you can
set the time by which pre-entry climate con-
trol is to be complete and the high voltage
battery fully charged. 310
Menus and submenusOn-board computer and displays
Page 374 of 502
Useful information
i This Operator's Manual describes all
models and all standard and optional equip- ment of your vehicle available at the time of
publication of the Operator's Manual.
Country-specific differences are possible.
Please note that your vehicle may not be
equipped with all features described. This
also applies to safety-related systems and
functions.
i Read the information on qualified special-
ist workshops (Y page 29). Stowage areas
Loading guidelines
G
WARNING
Combustion engines emit poisonous exhaust
gases such as carbon monoxide. Exhaust
gases can enter the vehicle interior if the
trunk lid is open when the engine is running,
especially if the vehicle is in motion. There is a risk of poisoning.
Always switch off the engine before opening
the trunk lid. Never drive with the trunk lid
open. G
WARNING
If objects, luggage or loads are not secured or not secured sufficiently, they could slip, tip
over or be flung around and thereby hit vehicle
occupants. There is a risk of injury, particu-
larly in the event of sudden braking or a sud-
den change in direction.
Always store objects so that they cannot be
flung around. Secure objects, luggage or
loads against slipping or tipping before the
journey. G
WARNING
The exhaust tail pipe and tail pipe trim can
become very hot. If you come into contact
with these parts of the vehicle, you could burn
yourself. There is a risk of injury. Always be particularly careful around the
exhaust tail pipe and the tail pipe trim. Allow
these components to cool down before touch-
ing them.
The handling characteristics of a laden vehi-
cle are dependent on the distribution of the
load within the vehicle. For this reason, you
should observe the following notes when
transporting a load:
R Never exceed the maximum permissible
gross vehicle weight or the gross axle
weight rating of the vehicle (including occu-
pants). The values are specified on the vehi-
cle identification plate on the B-pillar of the
driver's door.
R The trunk is the preferred place to carry
objects.
R Position heavy loads as far forwards as pos-
sible and as low down in the trunk as pos-
sible.
R The load must not protrude above the
upper edge of the seat backrests.
R Always place the load behind unoccupied
seats if possible.
R Secure the load with sufficiently strong and
wear-resistant tie-downs. Pad sharp edges
for protection. Stowage spaces
Important safety notes G
WARNING
If you do not correctly store objects in the
vehicle interior, they can slip or be flung
around, thus striking vehicle occupants.
There is a risk of injury, especially when brak- ing or abruptly changing directions.
R Always store objects so that they cannot be
flung around in these or in similar situa-
tions.
R Always make sure that objects do not pro-
trude from stowage compartments, parcel
nets or stowage nets. 372
Stowage areasStowage and features
Page 424 of 502
Useful information
i This Operator's Manual describes all
models and all standard and optional equip- ment of your vehicle available at the time of
publication of the Operator's Manual.
Country-specific differences are possible.
Please note that your vehicle may not be
equipped with all features described. This
also applies to safety-related systems and
functions.
i Read the information on qualified special-
ist workshops (Y page 29). Where will I find...?
Vehicle tool kit
General notes The towing eye is located in the stowage well
under the trunk floor.
i Apart from certain country-specific varia-
tions, the vehicles are not equipped with a
tire-change tool kit. Some tools for chang-
ing a wheel are specific to the vehicle. For
more information on which tire changing
tools are required and approved to perform
a wheel change on your vehicle, consult a
qualified specialist workshop.
Tools required for changing a wheel may
include, for example:
R Jack
R Wheel chock
R Lug wrench
R Ratchet wrench
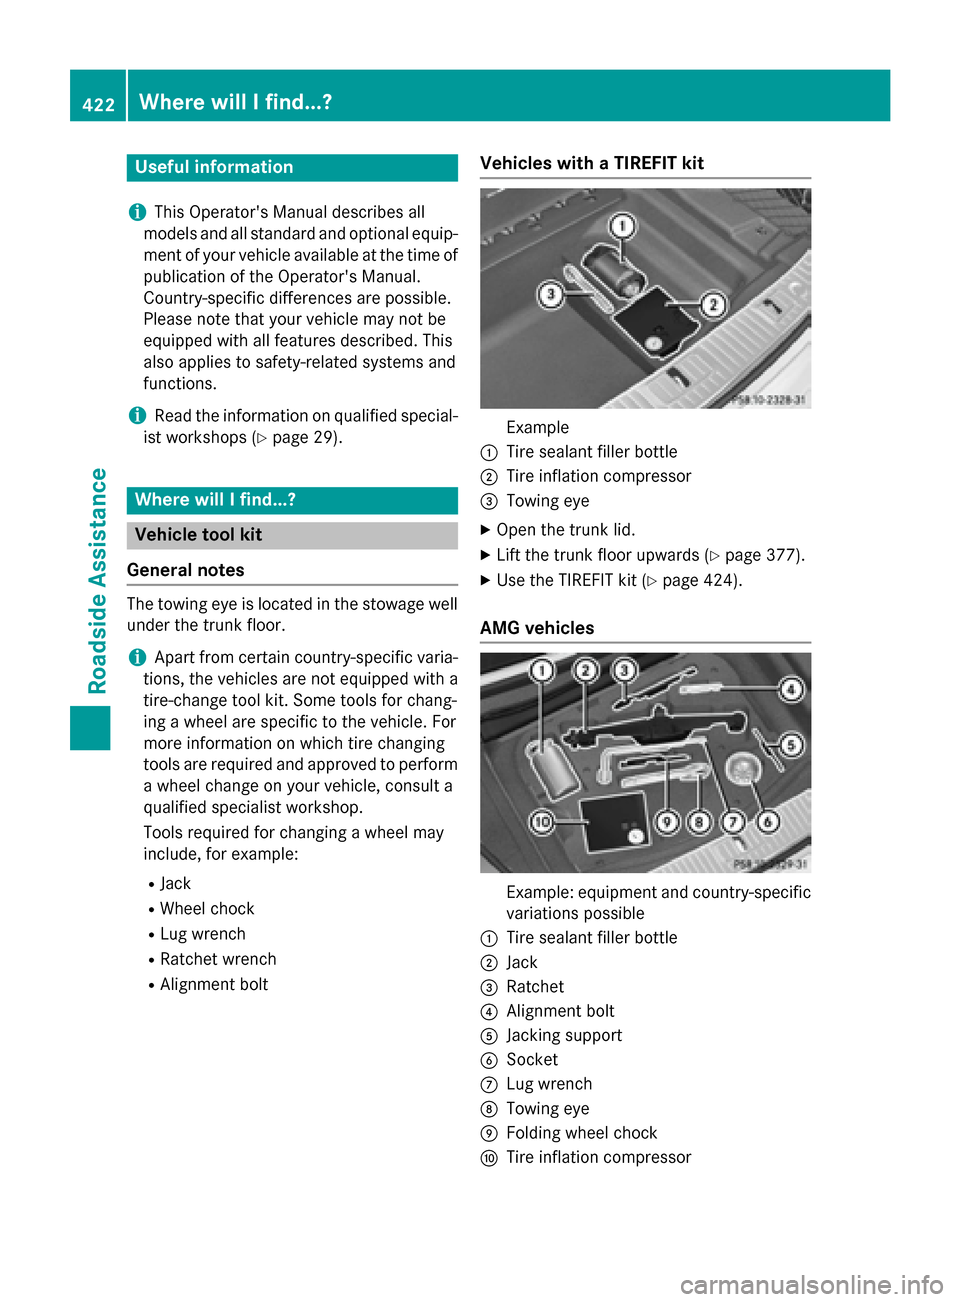
R Alignment bolt Vehicles with a TIREFIT kit Example
: Tire sealant filler bottle
; Tire inflation compressor
= Towing eye
X Open the trunk lid.
X Lift the trunk floor upwards (Y page 377).
X Use the TIREFIT kit (Y page 424).
AMG vehicles Example: equipment and country-specific
variations possible
: Tire sealant filler bottle
; Jack
= Ratchet
? Alignment bolt
A Jacking support
B Socket
C Lug wrench
D Towing eye
E Folding wheel chock
F Tire inflation compressor 422
Where will I find...?Roadside Assistance
Page 427 of 502
R
Immediately change out of clothing which
has come into contact with tire sealant.
R If an allergic reaction occurs, seek medical
attention immediately.
! Do not operate the tire inflation compres-
sor for longer than eight minutes at a time
without a break. It may otherwise overheat.
The tire inflation compressor can be oper-
ated again once it has cooled down.
Comply with the manufacturer’s safety
instructions on the sticker on the tire inflation compressor.
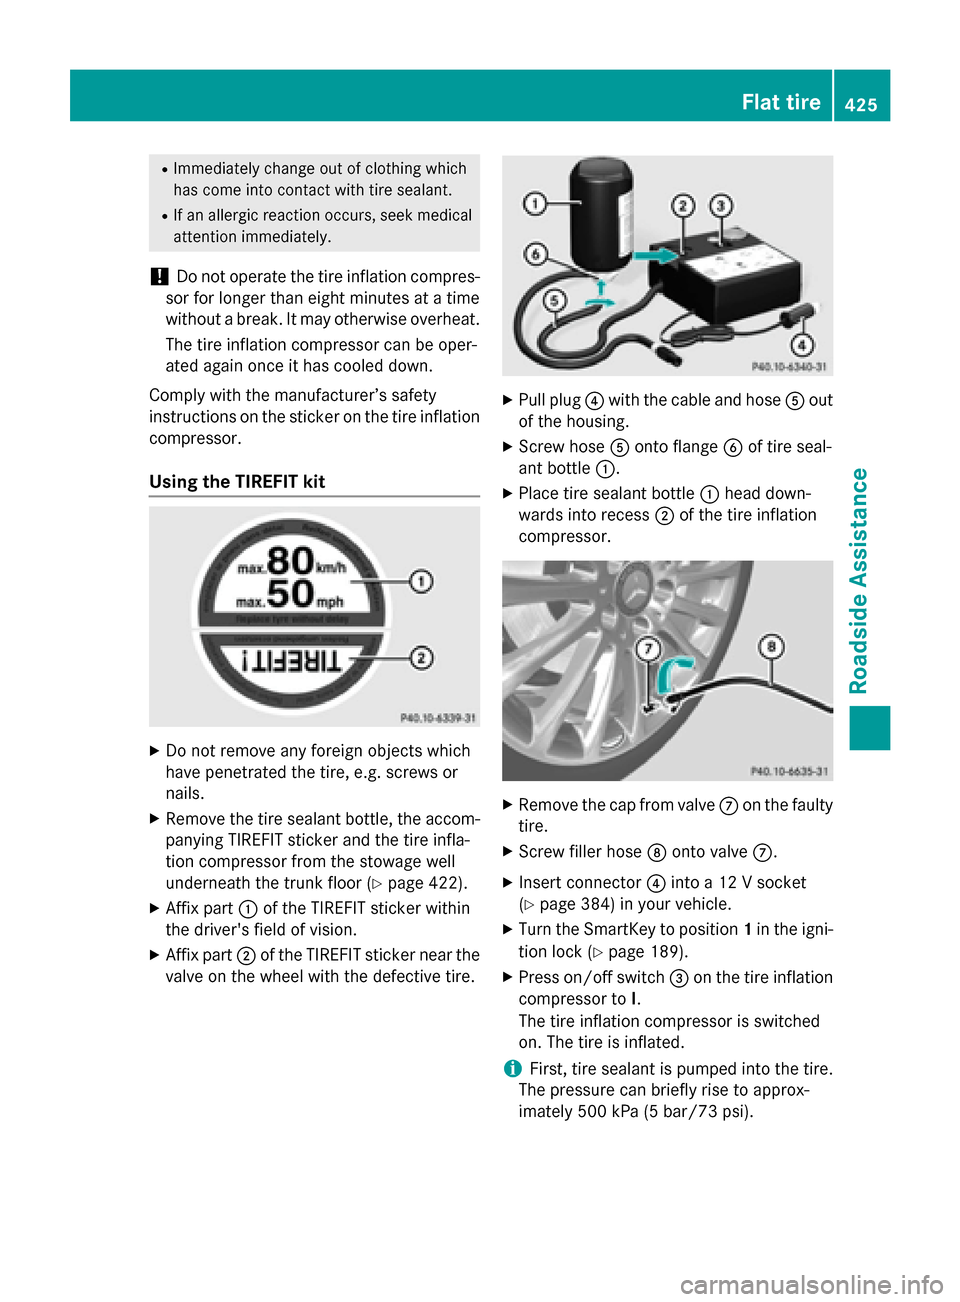
Using the TIREFIT kit X
Do not remove any foreign objects which
have penetrated the tire, e.g. screws or
nails.
X Remove the tire sealant bottle, the accom-
panying TIREFIT sticker and the tire infla-
tion compressor from the stowage well
underneath the trunk floor (Y page 422).
X Affix part :of the TIREFIT sticker within
the driver's field of vision.
X Affix part ;of the TIREFIT sticker near the
valve on the wheel with the defective tire. X
Pull plug ?with the cable and hose Aout
of the housing.
X Screw hose Aonto flange Bof tire seal-
ant bottle :.
X Place tire sealant bottle :head down-
wards into recess ;of the tire inflation
compressor. X
Remove the cap from valve Con the faulty
tire.
X Screw filler hose Donto valve C.
X Insert connector ?into a 12 V socket
(Y page 384) in your vehicle.
X Turn the SmartKey to position 1in the igni-
tion lock (Y page 189).
X Press on/off switch =on the tire inflation
compressor to I.
The tire inflation compressor is switched
on. The tire is inflated.
i First, tire sealant is pumped into the tire.
The pressure can briefly rise to approx-
imately 500 kPa (5 bar/73 psi). Flat tire
425Roadside Assistance Z
Page 453 of 502
new sensors. As long as a clear allocation of
the tire pressure value to the individual
wheels is not possible, the Tire Pressure
Tire Pressure
Monitor Active Monitor Active display message is shown
instead of the tire pressure display. The tire
pressures are already being monitored.
Tire pressure monitor warning mes-
sages If the tire pressure monitor detects a pressure
loss in one or more tires, a warning message is shown in the multifunction display and the
yellow tire pressure monitor warning lamp
comes on.
R If the Please Correct Tire Pressure
Please Correct Tire Pressure
message appears in the multifunction dis-
play, the tire pressure in at least one tire is too low and must be corrected at the next
opportunity.
R If the Check
Check Tires Tiresmessage appears in the
multifunction display, the tire pressure in
one or more tires has dropped significantly and the tires must be checked.
R If the Warning Tire Malfunction
Warning Tire Malfunction
appears in the multifunction display, the
tire pressure in one or more tires has drop- ped suddenly and the tires must be
checked.
Observe the instructions and safety notes in
the display messages in the "Tires" section
(Y page 348).
i If the wheel positions on the vehicle are
rotated, the tire pressures may be dis-
played for the wrong positions for a short
time. This is rectified after a few minutes of driving, and the tire pressures are displayedfor the correct positions.
Restarting the tire pressure monitor When you restart the tire pressure monitor, all
existing warning messages are deleted and
the warning lamps go out. The monitor uses
the currently set tire pressures as the refer-
ence values for monitoring. In most cases, the
tire pressure monitor will automatically detect the new reference values after you
have changed the tire pressure. However, you
can also define reference values manually as described here. The tire pressure monitor
then monitors the new tire pressure values.
X Set the tire pressure to the value recom-
mended for the corresponding driving sit-
uation on the Tire and Loading Information
placard on the driver's side
B-pillar (Y page 445).
Additional tire pressure values for different loads can also be found on the tire pressure
table on the inside of the fuel filler flap
(Y page 445).
X Make sure that the tire pressure is correct
on all four wheels.
X Make sure that the SmartKey is in position
2 in the ignition lock.
X Use ò on the steering wheel to call up
the list of menus.
X Press the 9or: button on the steer-
ing wheel to select the Service
Service menu.
X Press the abutton.
X Press the 9or: button to select
Tire Pressure Tire Pressure.
X Press the abutton.
The multifunction display shows the cur-
rent tire pressure for the individual tires or
the Tire Tire pressure
pressure will
willbe
bedisplayed
displayed
after driving a few minutes after driving a few minutes mes-
sage.
X Press the :button.
The Use Current Pressures as New Use Current Pressures as New
Reference Values
Reference Values message appears in
the multifunction display.
If you wish to confirm the restart: X Press the abutton.
The Tire Press. Monitor Restarted
Tire Press. Monitor Restarted
message appears in the multifunction dis-
play.
After driving for a few minutes, the system checks whether the current tire pressures
are within the specified range. The new tire
pressures are then accepted as reference
values and monitored. Tire pressure
451Wheels and tires Z
Page 454 of 502
If you wish to cancel the restart:
X Press the %button.
The tire pressure values stored at the last
restart will continue to be monitored.
Radio type approval for the tire pres-
sure monitor Country Radio type approval number
USA FCC ID: MRXMW2433A
FCC ID: MRXGG4
FCC ID: MRXMC34MA4
Canada IC: 2546A-MW2433A
IC: 2546A-GG4
IC: 2546A-MC34MA4
Tire pressure loss warning system
(Canada only)
General notes While the vehicle is in motion, the tire pres-
sure loss warning system monitors the set
tire pressure using the rotational speed of the wheels. This enables the system to detect
significant pressure loss in a tire. If the speed
of rotation of a wheel changes as a result of a loss of pressure, a corresponding warning
message will appear in the multifunction dis- play.
You can recognize the tire pressure loss warn-
ing by the Run Flat Indicator Active
Run Flat Indicator Active
Press 'OK' to Restart Press 'OK' to Restart message which
appears in the Service
Servicemenu of the multi-
function display. Information on the message
display can be found in the "Restarting the tire
pressure loss warning system" section
(Y page 452).
Important safety notes The tire pressure warning system does not
warn you of an incorrectly set tire pressure.
Observe the notes on the recommended tire
pressure (Y page 445). The tire pressure loss warning does not
replace the need to regularly check the tire
pressure. An even loss of pressure on several
tires at the same time cannot be detected by
the tire pressure loss warning system.
The tire pressure monitor is not able to warn
you of a sudden loss of pressure, e.g. if the
tire is penetrated by a foreign object. In the
event of a sudden loss of pressure, bring the
vehicle to a halt by braking carefully. Avoid
abrupt steering maneuvers.
The function of the tire pressure loss warning system is limited or delayed if:
R snow chains are mounted on your vehicle's
tires.
R road conditions are wintry.
R you are driving on sand or gravel.
R you adopt a very sporty driving style (cor-
nering at high speeds or driving with high
rates of acceleration).
R you are driving with a heavy load (in the
vehicle or on the roof).
Restarting the tire pressure loss warn-
ing system Restart the tire pressure loss warning system
if you have:
R changed the tire pressure
R changed the wheels or tires
R mounted new wheels or tires
X Before restarting, make sure that the tire
pressures are set properly on all four tires
for the respective operating conditions.
The recommended tire pressure can be
found on the Tire and Loading Information
placard on the B-pillar on the driver's side.
Additionally, a tire pressure table is
attached to the fuel filler flap. The tire pres-
sure loss warning system can only give reli-
able warnings if you have set the correct
tire pressure. If an incorrect tire pressure is 452
Tire pressureWheels and ti
res
Page 468 of 502
Rotate the wheels before a clear wear pattern
has formed on the tires. Front tires typically
wear more on the shoulders and the rear tires in the center.
If your vehicle's tire configuration allows, you
can rotate the wheels according to the inter-
vals in the tire manufacturer's warranty book in your vehicle documents. If no warranty
book is available, the tires should be rotated
every 3,000 to 6,000 miles (5,000 to
10,000 km), or earlier if tire wear requires.
Ensure the direction of rotation is maintained.
Clean the contact surfaces of the wheel and
the brake disc thoroughly every time a wheel
is rotated. Check the tire pressure and, if nec- essary, restart the tire pressure loss warningsystem (Y page 452) or the tire pressure
monitor (Y page 451). Direction of rotation
Tires with a specified direction of rotation
have additional benefits, e.g. if there is a risk of hydroplaning. These advantages can only
be gained if the tires are installed correspond-
ing to the direction of rotation.
An arrow on the sidewall of the tire indicates its correct direction of rotation. Storing wheels
Store wheels that are not being used in a cool, dry and preferably dark place. Protect the
tires from oil, grease, gasoline and diesel. Mounting a wheel
Preparing the vehicle X
Stop the vehicle on solid, non-slippery and
level ground.
X Apply the electric parking brake manually.
X Bring the front wheels into the straight-
ahead position.
X Shift the transmission to position P.X
Make sure that "normal" level is selected
for AIRMATIC (Y page 246).
X Switch off the engine.
X Open the driver's door.
The on-board electronics now have status
0. This is the same as the SmartKey having
been removed.
X Remove Start/Stop button from ignition
lock (Y page 189).
or, if the SmartKey is inserted in the ignition
lock:
X Remove the SmartKey from the ignition
lock.
X If included in the vehicle equipment,
remove the tire-change tool kit from the
vehicle.
X Secure the vehicle to prevent it from rolling
away.
Securing the vehicle to prevent it from
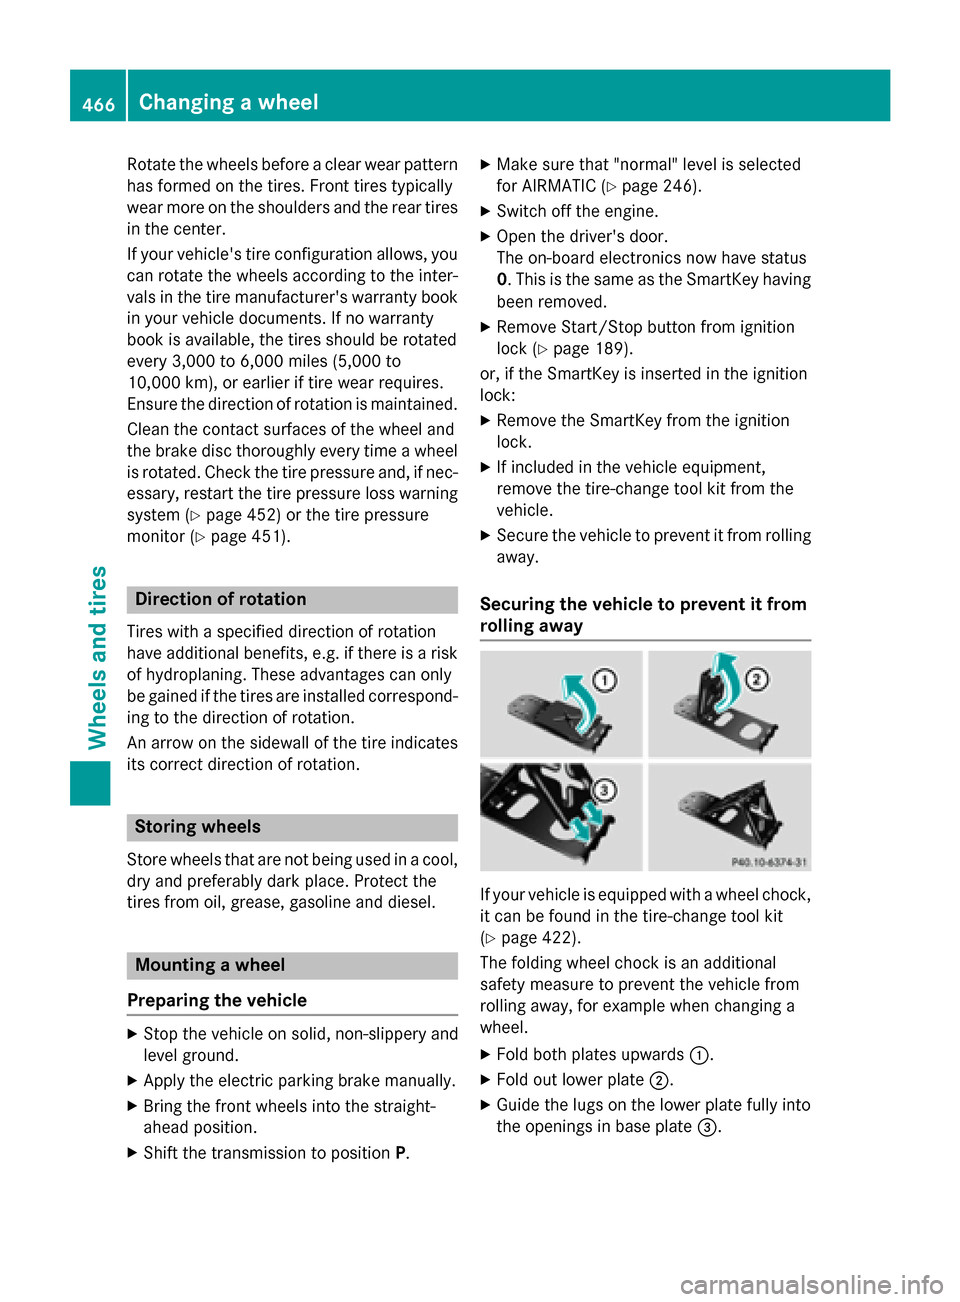
rolling away If your vehicle is equipped with a wheel chock,
it can be found in the tire-change tool kit
(Y page 422).
The folding wheel chock is an additional
safety measure to prevent the vehicle from
rolling away, for example when changing a
wheel.
X Fold both plates upwards :.
X Fold out lower plate ;.
X Guide the lugs on the lower plate fully into
the openings in base plate =.466
Changing a wheelWheels and
tires