tire pressure MERCEDES-BENZ S-Class 2015 W222 Owner's Manual
[x] Cancel search | Manufacturer: MERCEDES-BENZ, Model Year: 2015, Model line: S-Class, Model: MERCEDES-BENZ S-Class 2015 W222Pages: 502, PDF Size: 9.59 MB
Page 22 of 502
Technical data
Capacities ...................................... 489
Information .................................... 488
Tires/wheels ................................. 471
Vehicle data ................................... 495
Telephone
Accepting a call (multifunction
steering wheel) .............................. 306
Display message ............................ 353
Introduction ................................... 305
Menu (on-board computer) ............ 305
Number from the phone book ........ 306
Redialing ........................................ 306
Rejecting/ending a call ................. 306
Temperature
Coolant .......................................... 294
Coolant (on-board computer) ......... 307
Engine oil (on-board computer) ...... 314
Outside temperature ...................... 295
Setting (climate control) ................ 173
Tire pressure
Calling up (on-board computer) ..... 449
Checking manuall y........................ 448
Display message ............................ 348
Important safety notes .................. 449
Maximum ....................................... 448
Not reached (TIREFIT) .................... 426
Notes ............................................. 447
Reached (TIREFIT) .......................... 426
Recommended ............................... 445
Tire pressure loss warning system
General notes ................................ 452
Important safety notes .................. 452
Restarting ...................................... 452
Tire pressure monitor
Checking the tire pressure elec-
tronically ........................................ 450
Function/note s............................. 449
General notes ................................ 449
Important safety notes .................. 449
Radio type approval for the tire
pressure monitor ........................... 452
Restarting ...................................... 451
Warning lamp ................................. 368
Warning message .......................... 451
TIREFIT kit .......................................... 424
Tires
Aspect ratio (definition) ................. 464 Average weight of the vehicle
occupants (definition) .................... 463
Bar (definition) ............................... 463
Changing a whee l.......................... 465
Characteristics .............................. 463
Checking ........................................ 443
Curb weight (definition) ................. 464
Definition of terms ......................... 463
Direction of rotation ...................... 466
Display message ............................ 348
Distribution of the vehicle occu-
pants (definition) ............................ 465
DOT (Department of Transporta-
tion) (definition) ............................. 463
DOT, Tire Identification Number
(TIN) ............................................... 462
GAWR (Gross Axle Weight Rating)
(definition) ..................................... 463
GVW (Gross Vehicle Weight) (def-
inition) ........................................... 464
GVWR (Gross Vehicle Weight Rat- ing) (definition) .............................. 464
Important safety notes .................. 442
Increased vehicle weight due to
optional equipment (definition) ...... 463
Kilopascal (kPa) (definition) ........... 464
Labeling (overview) ........................ 459
Load bearing index (definition) ...... 465
Load index ..................................... 462
Load index (definition) ................... 464
Maximum load on a tire (defini-
tion) ............................................... 464
Maximum loaded vehicle weight
(definition) ..................................... 464
Maximum permissible tire pres-
sure (definition) ............................. 464
Maximum tire load ......................... 462
Maximum tire load (definition) ....... 464
MOExtended tire s.......................... 444
Optional equipment weight (defi-
nition) ............................................ 465
PSI (pounds per square inch) (def-
inition) ........................................... 464
Replacing ....................................... 465
Service life ..................................... 444
Sidewall (definition) ....................... 465
Speed rating (definition) ................ 464
Storing ........................................... 466 20
Index
Page 23 of 502
Structure and characteristics
(definition) ..................................... 463
Summer tires in winter .................. 444
Temperature .................................. 459
TIN (Tire Identification Number)
(definition) ..................................... 465
Tire bead (definition) ...................... 465
Tire pressure (definition) ................ 464
Tire pressures (recommended) ...... 463
Tire size (data )............................... 471
Tire size designation, load-bearing capacity, speed rating .................... 459
Tire tread ....................................... 443
Tire tread (definition) ..................... 465
Total load limit (definition) ............. 465
Traction ......................................... 458
Traction (definition) ....................... 465
Tread wear ..................................... 458
Uniform Tire Quality Grading
Standards ...................................... 458
Uniform Tire Quality Grading
Standards (definition) .................... 463
Wear indicator (definition) ............. 465
Wheel and tire combination ........... 473
Wheel rim (definition) .................... 463
see Flat tire
Top Tether ............................................ 73
Tow-starting
Emergency engine starting ............ 438
Important safety notes .................. 435
Towing away
Important safety guidelines ........... 435
Installing the towing eye ................ 436
Notes for 4MATIC vehicles ............ 438
Removing the towing eye ............... 436
With both axles on the ground ....... 436
With the rear axle raised ................ 437
Towing eye ......................................... 422
Transfer case ..................................... 205
Transmission
see Automatic transmission
Transporting the vehicle .................. 437
Trim pieces (cleaning instruc-
tions) .................................................. 418
Trip computer (on-board com-
puter) .................................................. 300 Trip odometer
Calling up ....................................... 299
Resetting (on-board computer) ...... 301
Trunk
Emergency release ........................ 105
Important safety notes .................. 100
Locking separately ......................... 104
Opening/closing (automatically
from inside) ................................... 104
Opening/closing (automatically
from outside) ................................. 101
Opening/closing (from outside,
HANDS-FREE ACCESS) .................. 102
Opening/closing (manually from
outside) ......................................... 101
Power closing .................................. 98
Trunk lid
Display message ............................ 352
Obstacle recognition ...................... 100
Opening dimensions ...................... 495
Opening/closing ............................ 100
Trunk load (maximum) ...................... 495
Turn signals
Display message ............................ 333
Switching on/of f........................... 152
Two-way radio
Windshield (infrared reflective) ...... 401
Type identification plate
see Vehicle identification plate U
Unlocking Emergency unlocking ....................... 98
From inside the vehicle (central
unlocking button) ............................. 97 V
Vanity mirror (in the sun visor) ........ 381
Vehicle
Correct use ...................................... 29
Data acquisition ............................... 30
Display message ............................ 351
Equipment ....................................... 25
Individual settings .......................... 308
Limited Warranty ............................. 30
Loading .......................................... 453
Locking (in an emergency) ............... 99 Index
21
Page 24 of 502
Locking (SmartKey) .......................... 91
Lowering ........................................ 470
Maintenance .................................... 26
Operating safety .............................. 27
Parking for a long period ................ 223
Pulling away ................................... 192
Raising ........................................... 467
Reporting problems ......................... 29
Securing from rolling away ............ 466
Towing away .................................. 435
Transporting .................................. 437
Unlocking (in an emergency) ........... 98
Unlocking (SmartKey) ...................... 91
Vehicle data ................................... 495
Vehicle dimensions ........................... 495
Vehicle emergency locking ................ 99
Vehicle Homepage
Data protection .............................. 219
Functions ....................................... 220
General information ....................... 219
Internet connection ....................... 220
Vehicle identification number
see VIN
Vehicle identification plate .............. 488
Vehicle level
Active Body Control ABC ............... 244
Display message ............................ 341
Vehicle maintenance
see ASSYST PLUS
Vehicle tool kit .................................. 422
Video
Operating the DVD ......................... 305
VIN ...................................................... 488 W
Warning Stickers ........................................... 46
Warning and indicator lamps
ABS ................................................ 358
Brakes ........................................... 357
Check Engine ................................. 363
Coolant .......................................... 364
Distance warning ........................... 367
ESP ®
.............................................. 360
ESP ®
OFF ....................................... 361
Fuel tank ........................................ 363
Hybrid system ................................ 366 Overview .......................................... 36
Parking brake ................................ 362
PASSENGER AIR BAG ...................... 50
RBS (Recuperative Brake Sys-
tem) ............................................... 366
Reserve fue
l................................... 363
Restraint system ............................ 362
Seat belt ........................................ 355
Steering ......................................... 369
Tire pressure monitor .................... 368
Warranty .............................................. 25
Washer fluid
Display message ............................ 353
Wheel and tire combination
see Tires
Wheel bolt tightening torque ........... 470
Wheel chock ...................................... 466
Wheels
Changing a whee l.......................... 465
Checking ........................................ 443
Cleaning ......................................... 414
Important safety notes .................. 442
Interchanging/changing ................ 465
Mounting a new whee l................... 470
Mounting a whee l.......................... 466
Removing a whee l.......................... 469
Storing ........................................... 466
Tightening torque ........................... 470
Wheel size/tire size ....................... 471
Window curtain air bag
Operation ......................................... 59
Windows
see Side windows
Windshield
Defrosting ...................................... 175
Infrared reflective .......................... 401
Windshield washer fluid
see Windshield washer system
Windshield washer system
Adding washer fluid ....................... 409
Notes ............................................. 494
Windshield wipers
Problem (malfunction) ................... 161
Replacing the wiper blades ............ 158
Switching on/of f........................... 157
Winter driving
Important safety notes .................. 444
Slippery road surfaces ................... 228 22
Index
Page 26 of 502
Protection of the environment
General notes
H
Environmental note
Daimler's declared policy is one of compre-
hensive environmental protection.
The objectives are for the natural resources
that form the basis of our existence on this
planet to be used sparingly and in a manner
that takes the requirements of both nature
and humanity into account.
You too can help to protect the environment
by operating your vehicle in an environmen-
tally responsible manner.
Fuel consumption and the rate of engine,
transmission, brake and tire wear are affected by these factors:
R operating conditions of your vehicle
R your personal driving style
You can influence both factors. You should
bear the following in mind:
Operating conditions:
R avoid short trips as these increase fuel con-
sumption.
R always make sure that the tire pressures
are correct.
R do not carry any unnecessary weight.
R remove roof racks once you no longer need
them.
R a regularly serviced vehicle will contribute
to environmental protection. You should
therefore adhere to the service intervals.
R always have service work carried out at a
qualified specialist workshop.
Personal driving style:
R do not depress the accelerator pedal when
starting the engine.
R do not warm up the engine when the vehicle
is stationary.
R drive carefully and maintain a safe distance
from the vehicle in front.
R avoid frequent, sudden acceleration and
braking. R
change gear in good time and use each gear
only up to Ôof its maximum engine speed.
R switch off the engine in stationary traffic.
R keep an eye on the vehicle's fuel consump-
tion. H
Environmental note
Have a defective high-voltage battery dis-
posed of in an environmentally-responsible
manner. Contact a qualified specialist work-
shop which has the necessary specialist
knowledge and tools to carry out the work
required. Mercedes-Benz recommends that
you use an authorized Mercedes-Benz Center
for this purpose. Environmental concerns and recom-
mendations
Wherever the operating instructions require
you to dispose of materials, first try to regen-
erate or re-use them. Observe the relevant
environmental rules and regulations when
disposing of materials. In this way you will
help to protect the environment. Genuine Mercedes-Benz parts
H
Environmental note
Daimler AG also supplies reconditioned major
assemblies and parts which are of the same
quality as new parts. They are covered by the same Limited Warranty entitlements as new
parts.
! Air bags and Emergency Tensioning Devi-
ces, as well as control units and sensors for
these restraint systems, may be installed in the following areas of your vehicle:
R doors
R door pillars
R door sills
R seats
R cockpit 24
Introduction
Page 38 of 502
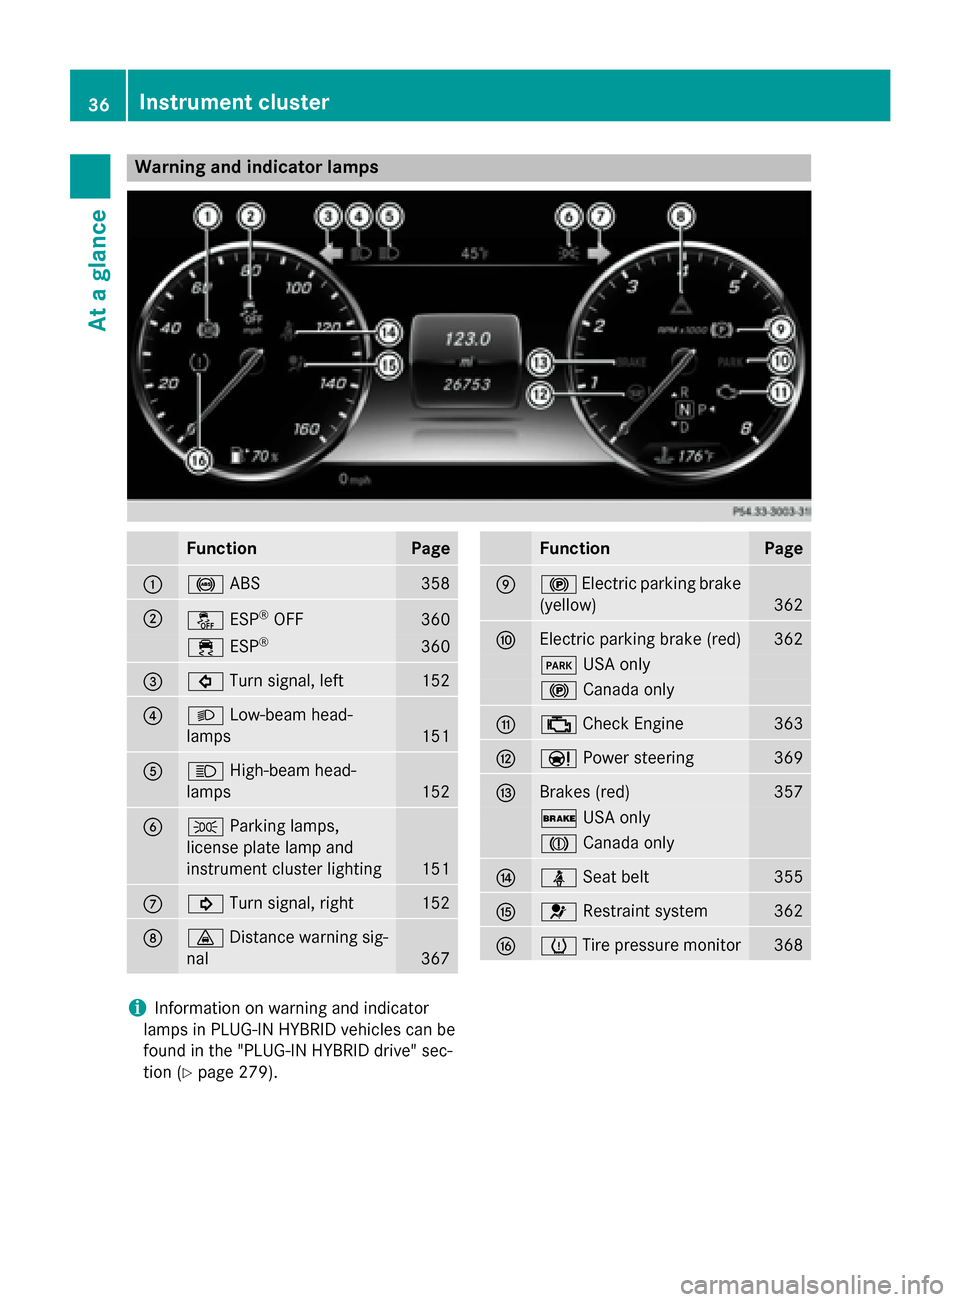
Warning and indicator lamps
Function Page
:
!
ABS 358
;
å
ESP®
OFF 360
÷
ESP® 360
=
#
Turn signal, left 152
?
L
Low-beam head-
lamps 151
A
K
High-beam head-
lamps 152
B
T
Parking lamps,
license plate lamp and
instrument cluster lighting 151
C
!
Turn signal, right 152
D
·
Distance warning sig-
nal 367 Function Page
E
!
Electric parking brake
(yellow) 362
F
Electric parking brake (red) 362
F
USA only !
Canada only G
;
Check Engine 363
H
Ð
Power steering 369
I
Brakes (red) 357
$
USA only J
Canada only J
ü
Seat belt 355
K
6
Restraint system 362
L
h
Tire pressure monitor 368
i
Information on warning and indicator
lamps in PLUG-IN HYBRID vehicles can be
found in the "PLUG-IN HYBRID drive" sec-
tion (Y page 279). 36
Instrument clusterAt a glance
Page 78 of 502
When the override feature is activated, the
controls in the rear compartment are disabled
for:
R the rear side windows
R adjustment of the front-passenger seat
from the rear compartment
R the sunblinds:
- of the rear side windows
- of the rear window
- in the roof Pets in the vehicle
G
WARNING
If you leave animals unattended or unsecured in the vehicle, they could press buttons or
switches, for example.
As a result, they could:
R activate vehicle equipment and become
trapped, for example
R activate or deactivate systems, thereby
endangering other road users
Unsecured animals could also be flung around
the vehicle in the event of an accident or sud- den steering or braking, thereby injuring vehi-
cle occupants. There is a risk of an accident
and injury.
Never leave animals unattended in the vehi-
cle. Always secure animals properly during
the journey, e.g. use a suitable animal trans-
port box. Driving safety systems
Overview of driving safety systems
In this section, you will find information about the following driving safety systems:
R ABS (Anti-lock BrakingSystem)
(Y page 76)
R BAS ( Brake Assist System) (Y page 77)
R BAS PLUS (Brake AssistSystem PLUS) with
Cross-Traffic Assist (Y page 77)R
COLLISION PREVENTION ASSIST PLUS
(distance warning function and Adaptive
Brake Assist) (Y page 79)
R ESP ®
(Electronic StabilityProgram)
(Y page 81)
R EBD ( Electronic Brake force Distribution)
(Y page 83)
R ADAPTIVE BRAKE (Y page 84)
R PRE-SAFE ®
Brake (Y page 84)
R STEER CONTROL (Y page 86) Important safety notes
If you fail to adapt your driving style or if you
are inattentive, the driving safety systems can
neither reduce the risk of an accident nor
override the laws of physics. Driving safety
systems are merely aids designed to assist
driving. You are responsible for maintaining
the distance to the vehicle in front, for vehicle
speed, for braking in good time and for stay-
ing in lane. Always adapt your driving style to
suit the prevailing road and weather condi-
tions and maintain a safe distance from the
vehicle in front. Drive carefully.
The driving safety systems described only
work as effectively as possible when there is
adequate contact between the tires and the
road surface. Please pay special attention to
the notes on tires, recommended minimum
tire tread depths, etc. (Y page 442).
In wintry driving conditions, always use winter
tires (M+S tires) and if necessary, snow
chains. Only in this way will the driving safety systems described in this section work as
effectively as possible. ABS (Anti-lock Braking System)
General information ABS regulates brake pressure in such a way
that the wheels do not lock when you brake.
This allows you to continue steering the vehi-
cle when braking. 76
Driving safety systemsSafety
Page 209 of 502
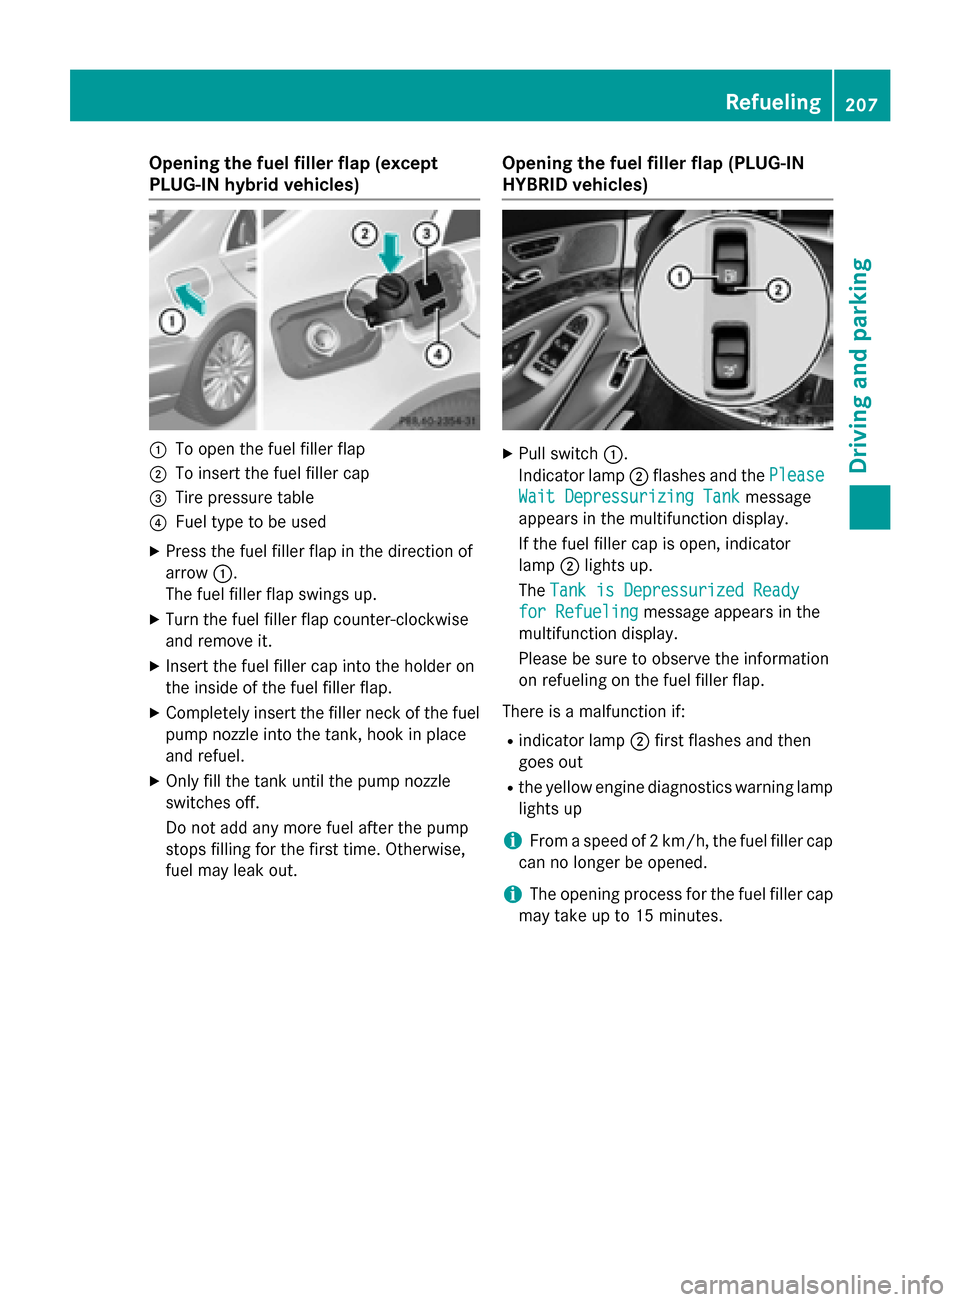
Opening the fuel filler flap (except
PLUG-IN hybrid vehicles)
:
To open the fuel filler flap
; To insert the fuel filler cap
= Tire pressure table
? Fuel type to be used
X Press the fuel filler flap in the direction of
arrow :.
The fuel filler flap swings up.
X Turn the fuel filler flap counter-clockwise
and remove it.
X Insert the fuel filler cap into the holder on
the inside of the fuel filler flap.
X Completely insert the filler neck of the fuel
pump nozzle into the tank, hook in place
and refuel.
X Only fill the tank until the pump nozzle
switches off.
Do not add any more fuel after the pump
stops filling for the first time. Otherwise,
fuel may leak out. Opening the fuel filler flap (PLUG-IN
HYBRID vehicles) X
Pull switch :.
Indicator lamp ;flashes and the Please Please
Wait Depressurizing Tank
Wait Depressurizing Tank message
appears in the multifunction display.
If the fuel filler cap is open, indicator
lamp ;lights up.
The Tank is Depressurized Ready Tank is Depressurized Ready
for Refueling
for Refueling message appears in the
multifunction display.
Please be sure to observe the information
on refueling on the fuel filler flap.
There is a malfunction if: R indicator lamp ;first flashes and then
goes out
R the yellow engine diagnostics warning lamp
lights up
i From a speed of 2 km/h, the fuel filler cap
can no longer be opened.
i The opening process for the fuel filler cap
may take up to 15 minutes. Refueling
207Driving and parking Z
Page 210 of 502
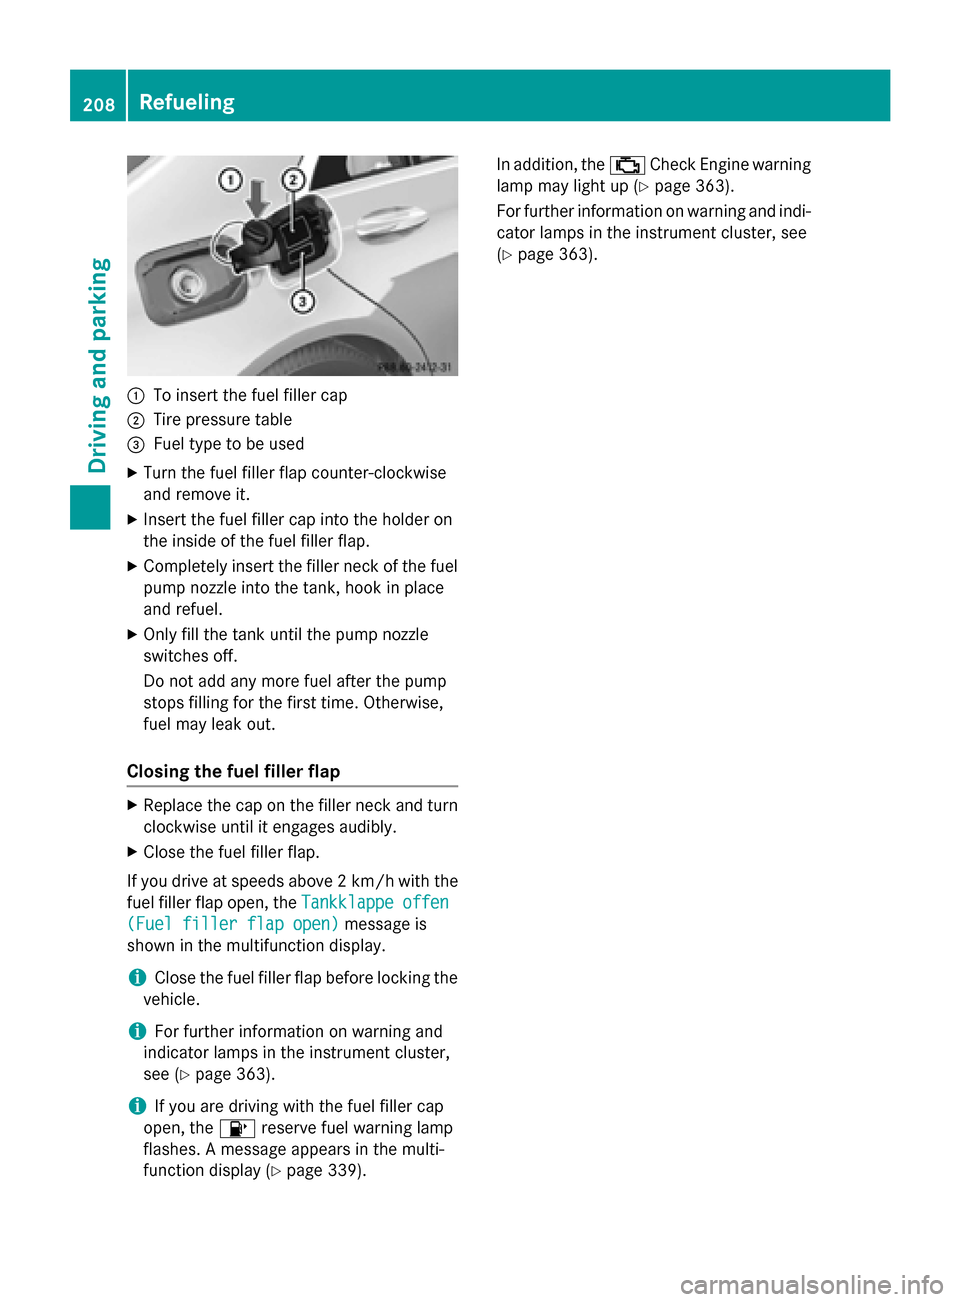
:
To insert the fuel filler cap
; Tire pressure table
= Fuel type to be used
X Turn the fuel filler flap counter-clockwise
and remove it.
X Insert the fuel filler cap into the holder on
the inside of the fuel filler flap.
X Completely insert the filler neck of the fuel
pump nozzle into the tank, hook in place
and refuel.
X Only fill the tank until the pump nozzle
switches off.
Do not add any more fuel after the pump
stops filling for the first time. Otherwise,
fuel may leak out.
Closing the fuel filler flap X
Replace the cap on the filler neck and turn
clockwise until it engages audibly.
X Close the fuel filler flap.
If you drive at speeds above 2 km/hw ith the
fuel filler flap open, the Tankklappe
Tankklappe offen offen
(Fuel filler flap open)
(Fuel filler flap open) message is
shown in the multifunction display.
i Close the fuel filler flap before locking the
vehicle.
i For further information on warning and
indicator lamps in the instrument cluster,
see (Y page 363).
i If you are driving with the fuel filler cap
open, the 8reserve fuel warning lamp
flashes. A message appears in the multi-
function display (Y page 339). In addition, the
;Check Engine warning
lamp may light up (Y page 363).
For further information on warning and indi- cator lamps in the instrument cluster, see
(Y page 363). 208
RefuelingDriving and parking
Page 226 of 502
Driving tips
General driving tips
Important safety notes G
WARNING
If you switch off the ignition while driving,
safety-relevant functions are only available
with limitations, or not at all. This could affect, for example, the power steering and the brake
boosting effect. You will require considerably
more effort to steer and brake. There is a risk of an accident.
Do not switch off the ignition while driving. G
WARNING
If you operate mobile communication equip-
ment while driving, you will be distracted from traffic conditions. You could also lose controlof the vehicle. There is a risk of an accident.
Only operate this equipment when the vehicleis stationary.
Observe the legal requirements for the coun- try in which you are driving. Some jurisdic-
tions prohibit the driver from using a mobile
phone while driving a vehicle.
If you make a call while driving, always use
hands-free mode. Only operate the telephone
when the traffic situation permits. If you are
unsure, pull over to a safe location and stop
before operating the telephone.
Bear in mind that at a speed of only 30 mph
(approximately 50 km/h), the vehicle covers
a distance of 44 ft (approximately 14 m) per
second.
Drive sensibly – save fuel Observe the following tips to save fuel:
X The tires should always be inflated to the
recommended tire pressure.
X Remove unnecessary loads.
X Remove roof racks when they are not nee-
ded.
X Warm up the engine at low engine speeds. X
Avoid frequent acceleration or braking.
X Have all maintenance work carried out as
indicated by the service intervals in the
Maintenance Booklet or by the service
interval display.
Fuel consumption also increases when driv-
ing in cold weather, in stop-start traffic and in
hilly terrain.
Drinking and driving G
WARNING
Drinking and driving and/or taking drugs and driving are very dangerous combinations.
Even a small amount of alcohol or drugs can
affect your reflexes, perceptions and judg-
ment.
The possibility of a serious or even fatal acci-
dent is greatly increased when you drink or
take drugs and drive.
Do not drink or take drugs and drive or allow
anyone to drive who has been drinking or tak-
ing drugs.
Emission control G
WARNING
Combustion engines emit poisonous exhaust
gases such as carbon monoxide. Inhaling
these exhaust gases leads to poisoning. There is a risk of fatal injury. Therefore never leave
the engine running in enclosed spaces with-
out sufficient ventilation.
Certain engine systems are designed to keep
the level of poisonous components in exhaust fumes within legal limits.
These systems only work at peak efficiency if they are serviced exactly in accordance with
the manufacturer's specifications. For this
reason, all work on the engine must be carried
out by qualified and authorized Mercedes-
Benz technicians.
The engine settings must not be changed
under any circumstances. Furthermore, all
specific service work must be carried out at 224
Driving tipsDriving and pa
rking
Page 227 of 502
regular intervals and in accordance with the
Mercedes-Benz service requirements. Details
can be found in the Maintenance Booklet. ECO display
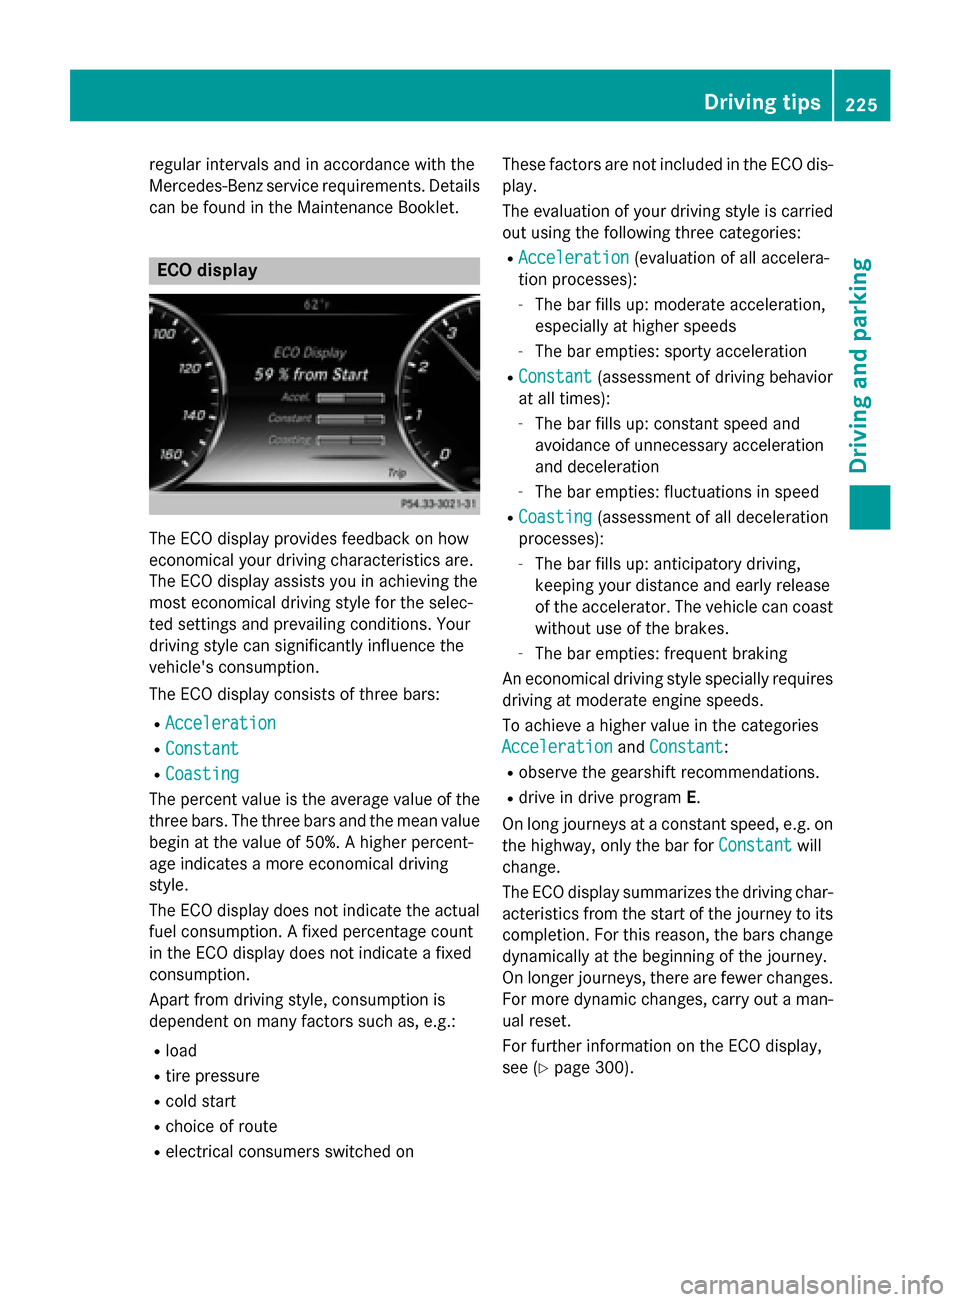
The ECO display provides feedback on how
economical your driving characteristics are.
The ECO display assists you in achieving the
most economical driving style for the selec-
ted settings and prevailing conditions. Your
driving style can significantly influence the
vehicle's consumption.
The ECO display consists of three bars:
R Acceleration
Acceleration
R Constant Constant
R Coasting
Coasting
The percent value is the average value of the three bars. The three bars and the mean value
begin at the value of 50%. A higher percent-
age indicates a more economical driving
style.
The ECO display does not indicate the actual fuel consumption. A fixed percentage count
in the ECO display does not indicate a fixed
consumption.
Apart from driving style, consumption is
dependent on many factors such as, e.g.:
R load
R tire pressure
R cold start
R choice of route
R electrical consumers switched on These factors are not included in the ECO dis-
play.
The evaluation of your driving style is carried
out using the following three categories:
R Acceleration
Acceleration (evaluation of all accelera-
tion processes):
- The bar fills up: moderate acceleration,
especially at higher speeds
- The bar empties: sporty acceleration
R Constant
Constant (assessment of driving behavior
at all times):
- The bar fills up: constant speed and
avoidance of unnecessary acceleration
and deceleration
- The bar empties: fluctuations in speed
R Coasting Coasting (assessment of all deceleration
processes):
- The bar fills up: anticipatory driving,
keeping your distance and early release
of the accelerator. The vehicle can coast
without use of the brakes.
- The bar empties: frequent braking
An economical driving style specially requires driving at moderate engine speeds.
To achieve a higher value in the categories
Acceleration
Acceleration andConstant Constant :
R observe the gearshift recommendations.
R drive in drive program E.
On long journeys at a constant speed, e.g. on
the highway, only the bar for Constant
Constantwill
change.
The ECO display summarizes the driving char- acteristics from the start of the journey to its completion. For this reason, the bars change
dynamically at the beginning of the journey.
On longer journeys, there are fewer changes. For more dynamic changes, carry out a man- ual reset.
For further information on the ECO display,
see (Y page 300). Driving tips
225Driving and parking Z