parking brake MERCEDES-BENZ S CLASS 2017 Workshop Manual
[x] Cancel search | Manufacturer: MERCEDES-BENZ, Model Year: 2017, Model line: S CLASS, Model: MERCEDES-BENZ S CLASS 2017Pages: 382, PDF Size: 12.12 MB
Page 338 of 382
R
It is particularly important to observe the described order when connecting and disconnecting
the jumper cables. R
Never connect or disconnect the battery terminals while the engine is running.
G WARNING
A discharged battery can freeze at temperatures below freezing point. When jump-starting the
vehicle or charging the battery, gases can escape from the battery. There is a risk of an explosion.
Allow the frozen battery to thaw out before charging it or jump-starting.
If, at low temperatures, the indicator lamps/warning lamps in the instrument cluster do not light up,
it is highly likely that the discharged battery has frozen. In this case, you may neither charge the
battery nor jump-start the vehicle. The service life of a thawed-out battery may be shorter. The
starting characteristics can be impaired, particularly at low temperatures. Have the thawed-out
battery checked at a qualified specialist workshop.
All vehicles:
! Avoid repeated and lengthy starting attempts. Otherwise, the catalytic converter could be
damaged by the non-combusted fuel.
Do not start the vehicle using a rapid charging device. If your vehicle's battery is discharged, the
engine can be jump-started from another vehicle or from a second battery using jumper cables.
Observe the following points: R
The battery is not accessible in all vehicles. If the other vehicle's battery is not accessible, jump-
start the vehicle using a second battery or a jump-starting device. R
You may only jump-start the vehicle when the engine and exhaust system are cold. R
All vehicles except Mercedes-AMG vehicles: do not start the engine if the battery is frozen. Let
the battery thaw first. R
Jump-starting may be performed only using batteries with a nominal voltage of 12 V. R
Only use jumper cables which have a sufficient cross-section and insulated terminal clamps. R
If the battery is fully discharged, leave the battery that is being used to jump-start connected for
a few minutes before attempting to start. This charges the battery slightly. R
Make sure that the two vehicles do not touch.
Make sure that: R
the jumper cables are not damaged. R
when the jumper cables are connected to the battery, uninsulated sections of the terminal clamp
do not come into contact with other metal sections. R
the jumper cables cannot come into contact with parts which can move when the engine is
ru nning, such as the V-belt pulley or the fan. X
Secure the vehicle by applying the electric parking brake. X
Shift the transmission to position P .X
Make sure that the ignition is switched off. All indicator lamps in the instrument cluster must be
off. When using the SmartKey, turn the SmartKey to position 0 in the ignition lock and remove it
( Y
page 145).X
Switch off all electrical consumers, e.g. rear window defroster, lighting, etc. X
Open the hood.336
Jump-starting
Breakdown assistance
Page 340 of 382
Jump-starting is not considered to be a normal operating condition.
i Jumper cables and further information regarding jump-starting can be obtained at any qualified
specialist workshop.
Towing and tow-starting
Important safety notes Hybrid vehicles: make sure that you read the
separate operating instructions. You could oth-
erwise fail to recognize dangers, e.g. due to high
voltage.
G WARNING
Functions relevant to safety are restricted or
no longer available if: R
the engine is not running. R
the brake system or the power steering is
malfunctioning. R
there is a malfunction in the voltage supply
or the vehicle's electrical system.
If your vehicle is being towed, much more
force may be necessary to steer or brake.
There is a risk of an accident.
In such cases, use a tow bar. Before towing,
make sure that the steering moves freely.
G WARNING
When towing or tow-starting another vehicle
and its weight is greater than the permissible
gross weight of your vehicle, the: R
the towing eye could detach itself R
the vehicle/trailer combination could roll-
over.
There is a risk of an accident.
When towing or tow-starting another vehicle,
its weight should not be greater than the per-
missible gross weight of your vehicle.
Details on the permissible gross vehicle weight
of your vehicle can be found on the vehicle iden-
tification plate ( Y
page 370).
! When Active Brake Assist, Distance Pilot
DISTRONIC or the HOLD function is activated,
the vehicle brakes automatically in certain
situations. To avoid damage to the vehicle, deactivate
these systems in the following or similar sit-
uations: R
when towing the vehicle R
in the car wash
! Make sure that the electric parking brake is
released. If the electric parking brake is faulty,
visit a qualified specialist workshop.
! Secure the tow rope or tow bar to the towing
eye only. Otherwise, the vehicle could
become damaged.
! Do not use the towing eyes for recovery pur-
poses as this could damage the vehicle. If in
doubt, recover the vehicle with a crane.
! When towing, pull away slowly and
smoothly. If the tractive power is too high, the
vehicles could be damaged.
! Shift the automatic transmission to N an d
do not open the driver's or front passenger's
door during towing. The automatic transmis-
sion may otherwise shift to position P , which
could damage the transmission.
! Do not tow with sling-type equipment. This
could damage the vehicle.
! The vehicle can be towed a maximum of
30 miles (50km). The towing speed of 30 mph
(50 km/ h) must not be exceeded.
If the vehicle has to be towed more than
30 miles (50km), the entire vehicle must be
raised and transported.
It is better to have the vehicle transported than
to have it towed away.
If the vehicle has suffered transmission damage,
have it transported on a transporter or trailer.
The automatic transmission must be in position
N when the vehicle is being towed.
If the automatic transmission cannot be shifted
to position N , have the vehicle transported on a
transporter or trailer.338
Towing and tow-starting
Breakdown assistance
Page 341 of 382
The battery must be connected and charged.
Otherwise, you: R
cannot turn the SmartKey to position 2 in the
ignition lock R
cannot release the electric parking brake R
cannot shift the automatic transmission to
position N
Disarm the automatic locking feature before the
vehicle is towed ( Y
page 84). You could other-
wise be locked out when pushing or towing the
vehicle.
If the vehicle is in a dangerous area, it can be
towed out of that area with both axles on the
ground. In this case, the towing distance must
not be greater than 165 ft (50 m) and must not
exceed a towing speed of 6 mph (10 km/h). For
longer distances, have the vehicle loaded and
transported.
Installing/removing the towing eye
Installing the towing eye
G WARNING
The exhaust tail pipe may be very hot. There is
a risk of burns when removing the rear cover.
Do not touch the exhaust pipe. Take particular
care when removing the rear cover.
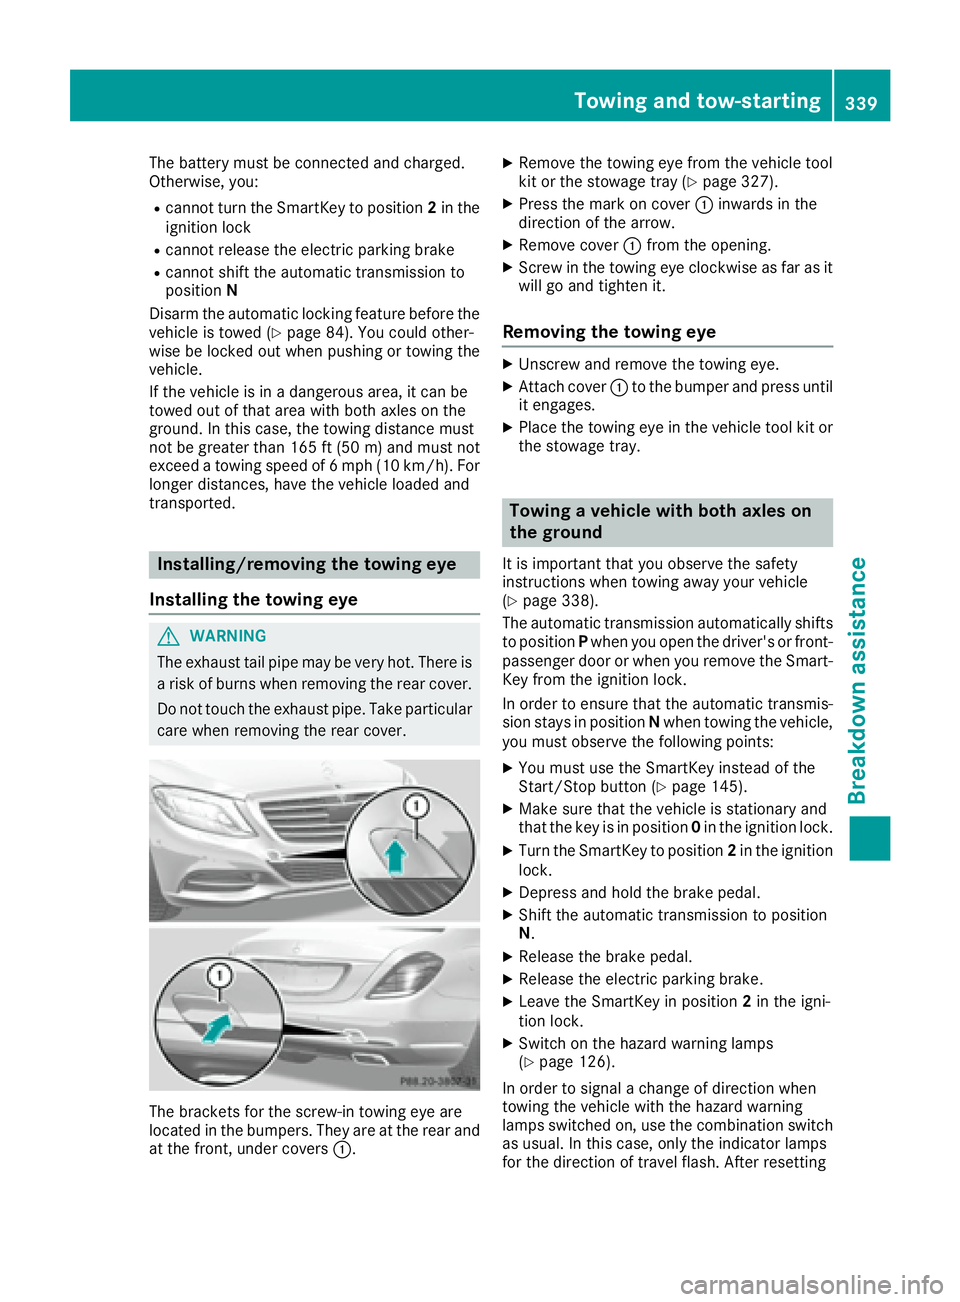
The brackets for the screw-in towing eye are
located in the bumpers. They are at the rear and
at the front, under covers C . X
Remove the towing eye from the vehicle tool
kit or the stowage tray ( Y
page 327).X
Press the mark on cover C inwards in the
direction of the arrow. X
Remove cover C from the opening.X
Screw in the towing eye clockwise as far as it
will go and tighten it.
Removing the towing eye X
Unscrew and remove the towing eye. X
Attach cover C to the bumper and press until
it engages. X
Place the towing eye in the vehicle tool kit or
the stowage tray.
Towing a vehicle with both axles on
the ground It is important that you observe the safety
instructions when towing away your vehicle
( Y
page 338).
The automatic transmission automatically shifts
to position P when you open the driver's or front-
passenger door or when you remove the Smart-
Key from the ignition lock.
In order to ensure that the automatic transmis-
sion stays in position N when towing the vehicle,
you must observe the following points: X
You must use the SmartKey instead of the
Start/Stop button ( Y
page 145).X
Make sure that the vehicle is stationary and
that the key is in position 0 in the ignition lock.X
Turn the SmartKey to position 2 in the ignition
lock. X
Depress and hold the brake pedal. X
Shift the automatic transmission to position
N . X
Release the brake pedal. X
Release the electric parking brake. X
Leave the SmartKey in position 2 in the igni-
tion lock. X
Switch on the hazard warning lamps
( Y
page 126).
In order to signal a change of direction when
towing the vehicle with the hazard warning
lamps switched on, use the combination switch
as usual. In this case, only the indicator lamps
for the direction of travel flash. After resettingTowing and tow-starting 339
Breakdown assistance Z
Page 342 of 382
the combination switch, the hazard warning
lamp starts flashing again.
Transporting the vehicle
General notes
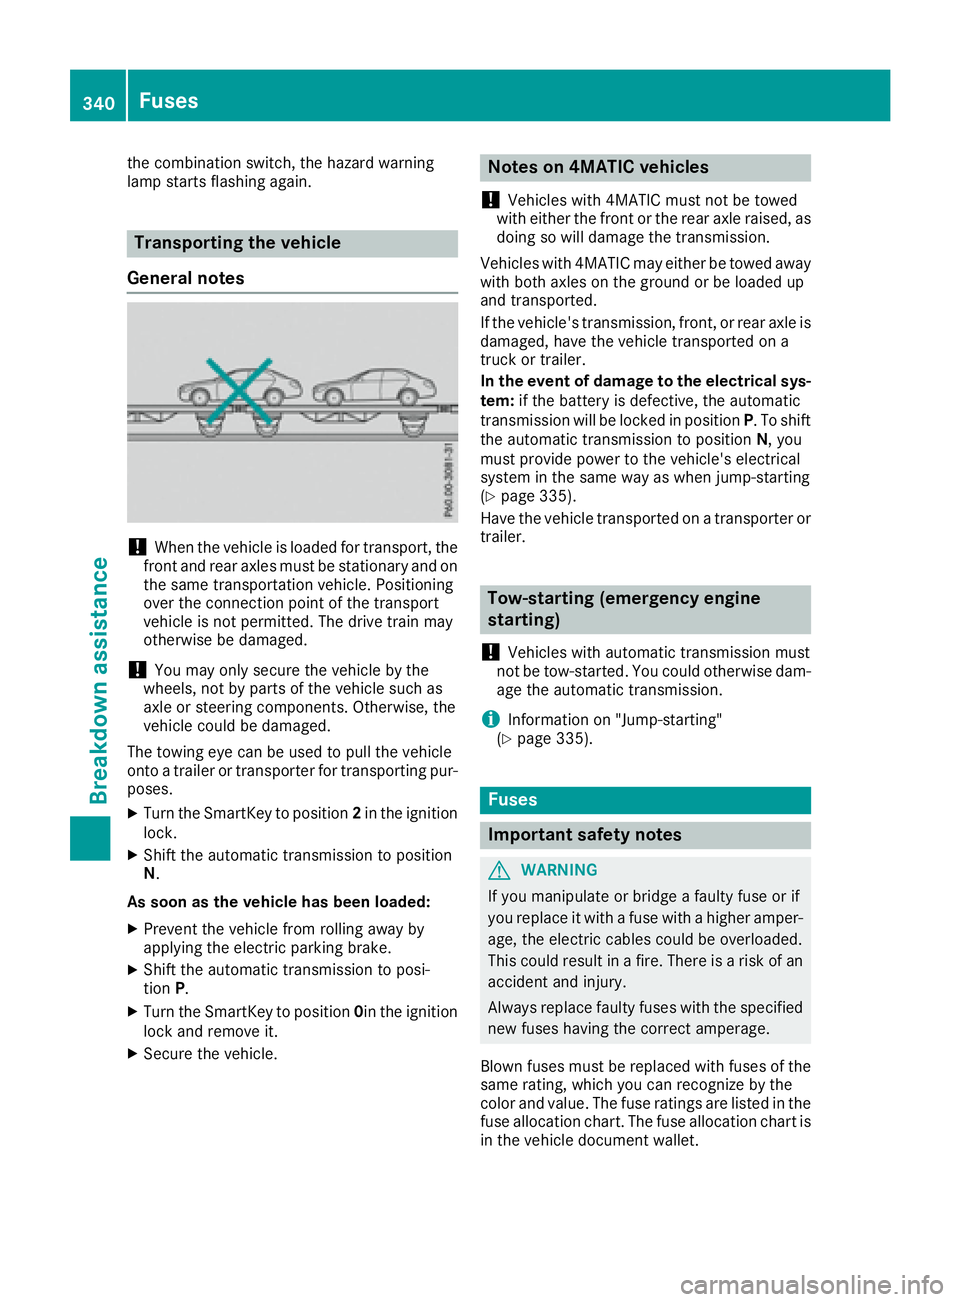
! When the vehicle is loaded for transport, the
front and rear axles must be stationary and on
the same transportation vehicle. Positioning
over the connection point of the transport
vehicle is not permitted. The drive train may
otherwise be damaged.
! You may only secure the vehicle by the
wheels, not by parts of the vehicle such as
axle or steering components. Otherwise, the
vehicle could be damaged.
The towing eye can be used to pull the vehicle
onto a trailer or transporter for transporting pur-
poses. X
Turn the SmartKey to position 2 in the ignition
lock. X
Shift the automatic transmission to position
N .
As soon as the vehicle has been loaded: X
Prevent the vehicle from rolling away by
applying the electric parking brake. X
Shift the automatic transmission to posi-
tion P .X
Turn the SmartKey to position 0 in the ignition
lock and remove it. X
Secure the vehicle. Notes on 4MATIC vehicles
! Vehicles with 4MATIC must not be towed
with either the front or the rear axle raised, as
doing so will damage the transmission.
Vehicles with 4MATIC may either be towed away
with both axles on the ground or be loaded up
and transported.
If the vehicle's transmission, front, or rear axle is
damaged, have the vehicle transported on a
truck or trailer.
In the event of damage to the electrical sys-
tem: if the battery is defective, the automatic
transmission will be locked in position P . To shift
the automatic transmission to position N , you
must provide power to the vehicle's electrical
system in the same way as when jump-starting
( Y
page 335).
Have the vehicle transported on a transporter or
trailer.
Tow-starting (emergency engine
starting)
! Vehicles with automatic transmission must
not be tow-started. You could otherwise dam-
age the automatic transmission.
i Information on "Jump-starting"
( Y
page 335).
Fuses
Important safety notes
G WARNING
If you manipulate or bridge a faulty fuse or if
you replace it with a fuse with a higher amper-
age, the electric cables could be overloaded.
This could result in a fire. There is a risk of an
accident and injury.
Always replace faulty fuses with the specified
new fuses having the correct amperage.
Blown fuses must be replaced with fuses of the
same rating, which you can recognize by the
color and value. The fuse ratings are listed in the
fuse allocation chart. The fuse allocation chart is
in the vehicle document wallet.340
Fuses
Breakdown assistance
Page 345 of 382
Important safety notes
G WARNIN G
If wheels and tires of th e wrong siz e are used,
th e whee l brakes or suspension component s
may be damaged. Ther e is a ris k of an acci-
dent.
Always replace wheels and tires wit h those
that fulfill th e specification s of th e original
part .
When replacing wheels, mak e sur e to use th e
correct: R
designation R
model
When replacing tires , mak e sur e to use th e
correct: R
designation R
manufacturer R
model
G WARNIN G
A flat tire severely impairs th e driving , steer -
ing and braking characteristics of th e vehicle.
Ther e is a ris k of accident.
Tires without run-flat characteristics :R
do no t driv e wit h a flat tire.R
immediately replace th e flat tire wit h your
emergenc y spar e whee l or spar e wheel, or
consult a qualified specialist workshop.
Tires wit h run-flat characteristics :R
pay attention to th e information and warn -
ing notice s on MOExtended tires (tire s wit h
run-flat characteristics).
Accessories that are no t approve d for your vehi-
cle by Mercedes-Ben z or are no t bein g used cor-
rectl y can impair th e operating safety.
Before purchasing and usin g non-approve d
accessories, visit a qualified specialist work-
sho p and inquire about :R
suitabilit yR
legal stipulation sR
factory recommendation s Information on th e sizes and types of wheels and
tires for your vehicl e can be foun d under
"Wheel/tire combinations" ( Y
page 367).
Information on tire pressur e can be found:R
on th e vehicle's Tir e and Loading Information
placard on th e B-pillar ( Y
page 353)R
in th e tire pressur e table in th e fuel filler flap
( Y
page 162) R
under "Tir e pressure" ( Y
page 346)
Operation
Information on driving Chec k th e tire pressur e when th e vehicl e is
heavily laden and adjust prio r to a trip.
While driving , pay attention to vibrations, noises
and unusual handlin g characteristics , e.g. pull-
ing to on e side . This may indicat e that th e
wheels or tires are damaged. If you suspec t that
a tire is defective, reduce your spee d immedi-
ately. Stop th e vehicl e as soo n as possible to
chec k th e wheels and tires for damage. Hidden
tire damag e could also be causing th e unusual
handlin g characteristics . If you fin d no sign s of
damage, hav e th e tires and wheels checke d at a
qualified specialist workshop.
When parking your vehicle, mak e sur e that th e
tires do no t get deformed by th e cur b or other
obstacles. If they canno t be avoided, driv e ove r
obstacles suc h as curbs slowly and at an obtuse
angle. Otherwise, you may damag e th e wheels
or tires .
Regular checking of wheels and tires
G WARNIN G
Damaged tires can caus e tire inflation pres-
sur e loss . As a result , you could lose control of
your vehicle. Ther e is a ris k of accident.
Chec k th e tires regularly for sign s of damag e
and replace any damaged tires immediately.
Chec k wheels and tires for damag e at least once
a month . Chec k wheels and tires after driving
off-road or on roug h roads. Damaged wheels
can caus e a loss of tire pressure.
Pay particular attention to damag e suc h as:R
cut s in th e tires R
punctures in th e tiresOperation 343
Wheels and tires Z
Page 365 of 382
Always observe the instructions and safety
notes in the "Mounting a wheel" section
( Y
page 363).
The wear patterns on the front and rear tires
differ, depending on the operating conditions.
Rotate the wheels before a clear wear pattern
has formed on the tires. Front tires typically
wear more on the shoulders and the rear tires in
the center.
On vehicles that have the same size front and
rear wheels, you can rotate the wheels accord-
ing to the intervals in the tire manufacturer's
warranty book in your vehicle documents. If no
warranty book is available, the tires should be
rotate every 3,000 to 6,000 mile s (5,00 0 to
10,000 km). Earlier may be necessary, depend-
ing on the degree of tire wear. Do not change the
direction of wheel rotation.
Clean the contact surfaces of the wheel and the
brake disc thoroughly every time a wheel is rota-
ted. Check the tire pressure and, if necessary,
restart the tire pressure loss warning system
( Y
page 352) or the tire pressure monitor
( Y
page 351).
Direction of rotation Tires with a specified direction of rotation have
additional benefits, e.g. if there is a risk of hydro-
planing. These advantages can only be gained if
the tires are installed corresponding to the
direction of rotation.
An arrow on the sidewall of the tire indicates its
correct direction of rotation.
Storing wheels Store wheels that are not being used in a cool,
dry and preferably dark place. Protect the tires
from oil, grease, gasoline and diesel.
Mounting a wheel
Preparing the vehicle X
Stop the vehicle on solid, non-slippery and
level ground. X
Apply the electric parking brake manually. X
Bring the front wheels into the straight-ahead
position. X
Shift the transmission to position P . X
Make sure that the vehicle level is set to "Nor-
mal" for AIRMATIC ( Y
page 182) or Active
Body Control (ABC) ( Y
page 180).X
Switch off the engine. X
Open the driver's door.
The vehicle electronics now have status 0 .
This is the same as the SmartKey having been
removed. X
Remove Start/Stop button from ignition lock
( Y
page 145).
or, if the SmartKey is inserted in the ignition
lock: X
Remove the SmartKey from the ignition lock. X
Make sure that the engine cannot be started
via your smartphone ( Y
page 147).X
If included in the vehicle equipment, remove
the tire-change tool kit from the vehicle. X
Safeguard the vehicle against rolling away.
Securing the vehicle to prevent it from
rolling away
If your vehicle is equipped with a wheel chock, it
can be found in the tire-change tool kit
( Y
page 327).
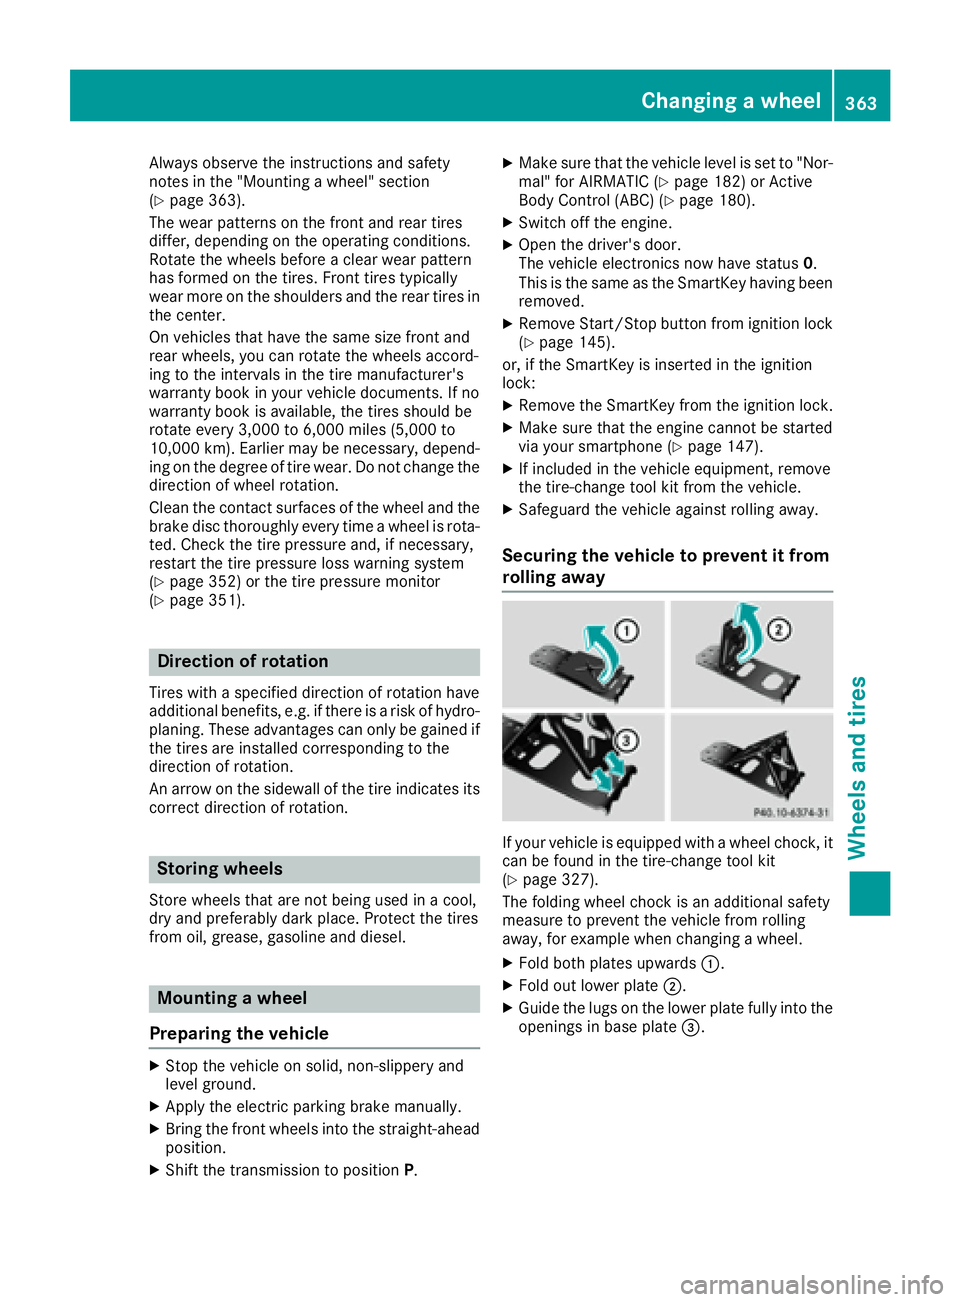
The folding wheel chock is an additional safety
measure to prevent the vehicle from rolling
away, for example when changing a wheel. X
Fold both plates upwards C .X
Fold out lower plate D .X
Guide the lugs on the lower plate fully into the
openings in base plate
Page 366 of 382
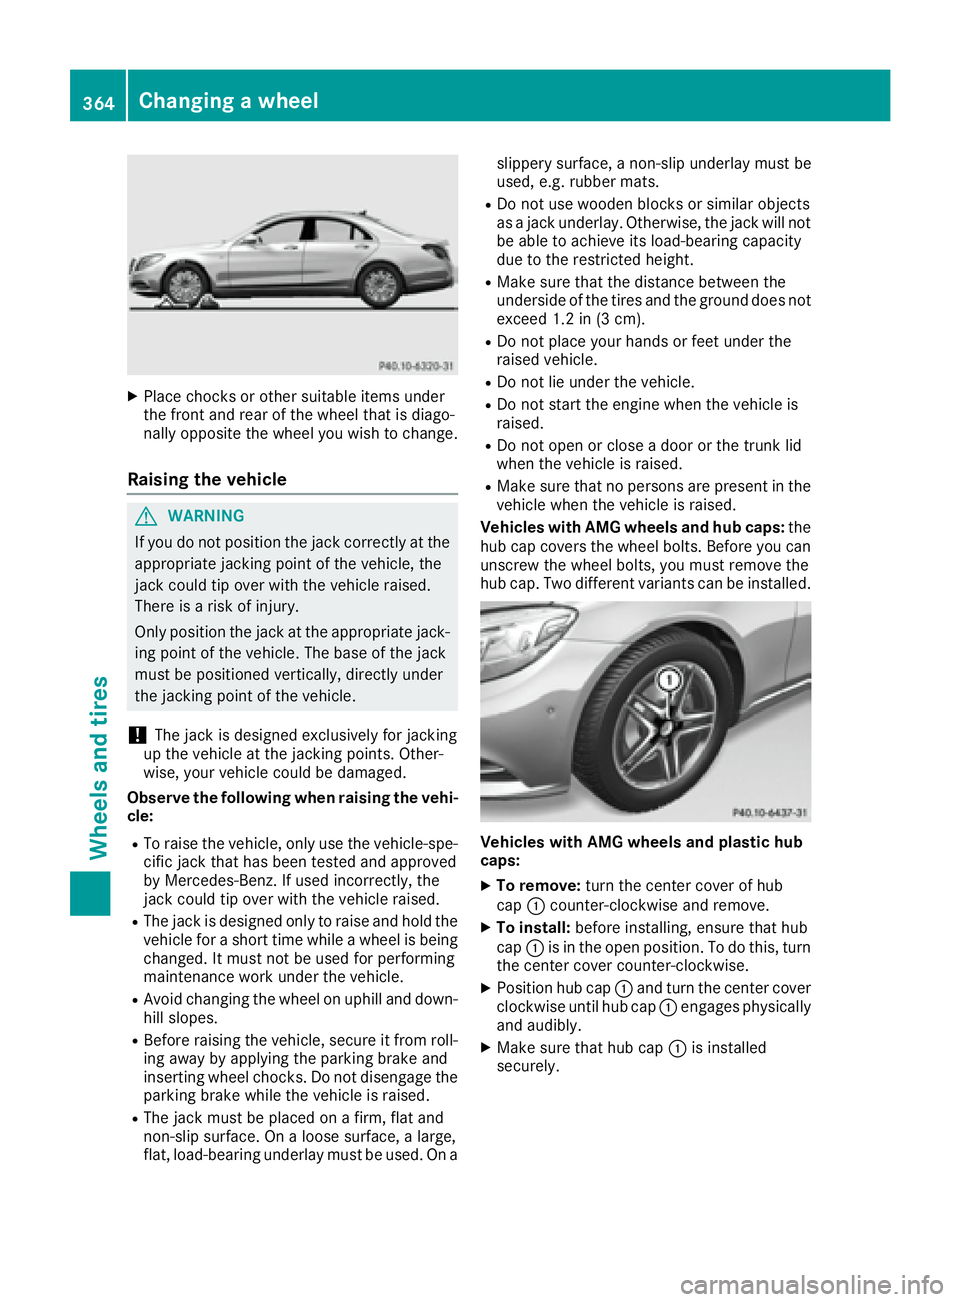
X
Place chocks or other suitable items under
the front and rear of the wheel that is diago-
nally opposite the wheel you wish to change.
Raising the vehicle
G WARNING
If you do not position the jack correctly at the
appropriate jacking point of the vehicle, the
jack could tip over with the vehicle raised.
There is a risk of injury.
Only position the jack at the appropriate jack-
ing point of the vehicle. The base of the jack
must be positioned vertically, directly under
the jacking point of the vehicle.
! The jack is designed exclusively for jacking
up the vehicle at the jacking points. Other-
wise, your vehicle could be damaged.
Observe the following when raising the vehi-
cle: R
To raise the vehicle, only use the vehicle-spe-
cific jack that has been tested and approved
by Mercedes-Benz. If used incorrectly, the
jack could tip over with the vehicle raised. R
The jack is designed only to raise and hold the
vehicle for a short time while a wheel is being
changed. It must not be used for performing
maintenance work under the vehicle. R
Avoid changing the wheel on uphill and down-
hill slopes. R
Before raising the vehicle, secure it from roll-
ing away by applying the parking brake and
inserting wheel chocks. Do not disengage the
parking brake while the vehicle is raised. R
The jack must be placed on a firm, flat and
non-slip surface. On a loose surface, a large,
flat, load-bearing underlay must be used. On a slippery surface, a non-slip underlay must be
used, e.g. rubber mats. R
Do not use wooden blocks or similar objects
as a jack underlay. Otherwise, the jack will not
be able to achieve its load-bearing capacity
due to the restricted height. R
Make sure that the distance between the
underside of the tires and the ground does not
exceed 1.2 in (3 cm). R
Do not place your hands or feet under the
raised vehicle. R
Do not lie under the vehicle. R
Do not start the engine when the vehicle is
raised. R
Do not open or close a door or the trunk lid
when the vehicle is raised. R
Make sure that no persons are present in the
vehicle when the vehicle is raised.
Vehicles with AMG wheels and hub caps: the
hub cap covers the wheel bolts. Before you can
unscrew the wheel bolts, you must remove the
hub cap. Two different variant s
can be installed.
Vehicles with AMG wheels and plastic hub
caps: X
To remove: turn the center cover of hub
cap C counter-clockwise and remove. X
To install: before installing, ensure that hub
cap C is in the open position. To do this, turn
the center cover counter-clockwise. X
Position hub cap C and turn the center cover
clockwise until hub cap C engages physically
and audibly. X
Make sure that hub cap C is installed
securely.364
Changing a wheel
Wheels and tires