sensor MERCEDES-BENZ S-Class CABRIOLET 2017 A217 Owner's Guide
[x] Cancel search | Manufacturer: MERCEDES-BENZ, Model Year: 2017, Model line: S-Class CABRIOLET, Model: MERCEDES-BENZ S-Class CABRIOLET 2017 A217Pages: 338, PDF Size: 8.14 MB
Page 89 of 338
XTurn the SmartKey to position1or 2in the
ignition lock.
XFold the armrest to the left or the right
(Ypage 256).
XTo open all side windows: press and hold
button :to the point of resistance.
XTo open all side windows fully: press
switch :beyond the point of resistance.
XTo close all side windows: pull and hold
button :.
Using KEYLESS-GO
GWARNING
When using the convenience closing feature,
parts of the body could be trapped in the clos-
ing area when a side window is being closed.
There is a risk of injury.
Observe the complete closing procedure
when the convenience closing feature is oper-
ating. Make sure that no body parts are in
close proximity during the closing procedure.
Proceed as follows if someone is trapped:
XRelease recessed sensor surface on the door
handle.
XImmediately pull and hold the door handle
and keep the door handle pulled.
The side windows open.
With KEYLESS-GO you can close all side win-
dows simultaneously. The KEYLESS-GO key
must be outside the vehicle. All the doors must
be closed.
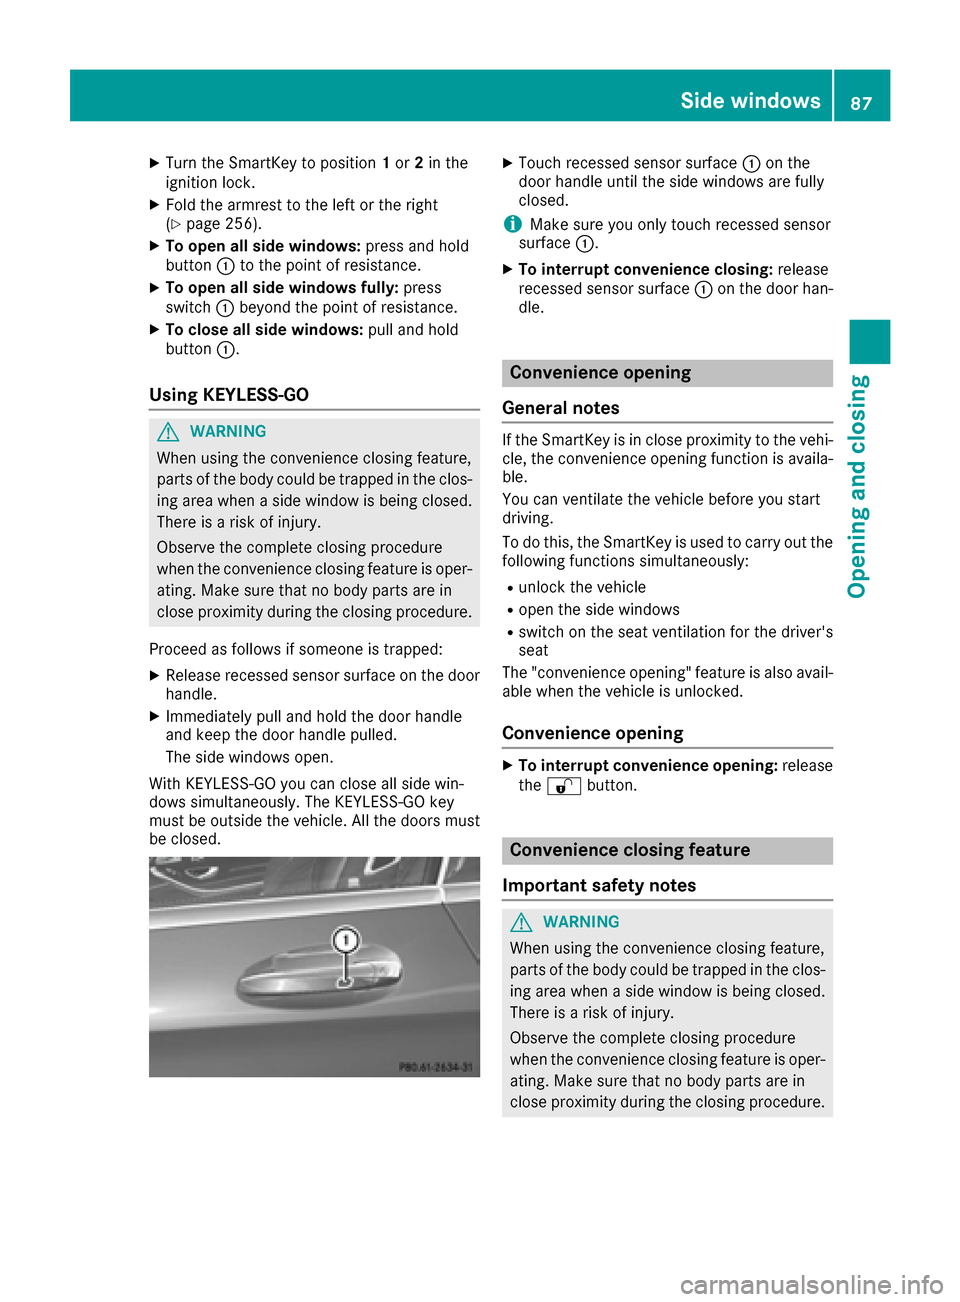
XTouch recessed sensor surface :on the
door handle until the side windows are fully
closed.
iMake sure you only touch recessed sensor
surface :.
XTo interrupt convenience closing: release
recessed sensor surface :on the door han-
dle.
Convenience opening
General notes
If the SmartKey is in close proximity to the vehi-
cle, the convenience opening function is availa-
ble.
You can ventilate the vehicle before you start
driving.
To do this, the SmartKey is used to carry out the
following functions simultaneously:
Runlock the vehicle
Ropen the side windows
Rswitch on the seat ventilation for the driver's
seat
The "convenience opening" feature is also avail-
able when the vehicle is unlocked.
Convenience opening
XTo interrupt convenience opening: release
the % button.
Convenience closing feature
Important safety notes
GWARNING
When using the convenience closing feature,
parts of the body could be trapped in the clos-
ing area when a side window is being closed.
There is a risk of injury.
Observe the complete closing procedure
when the convenience closing feature is oper-
ating. Make sure that no body parts are in
close proximity during the closing procedure.
Side windows87
Opening and closing
Z
Page 90 of 338
Using the SmartKey
XTo interrupt convenience closing:release
the & button.
Using KEYLESS-GO
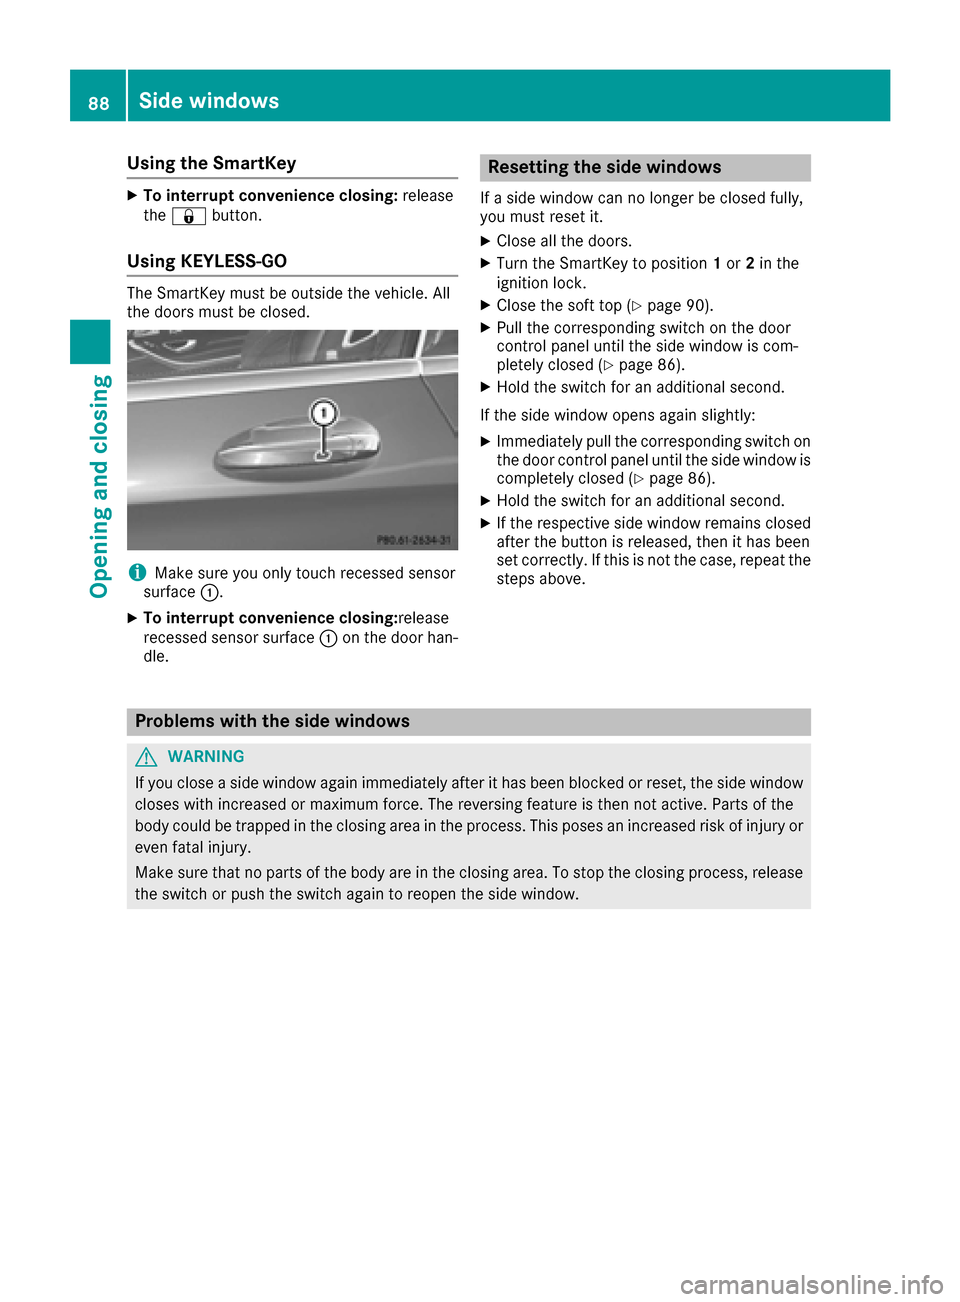
The SmartKey must be outside the vehicle. All
the doors must be closed.
iMake sure you only touch recessed sensor
surface :.
XTo interrupt convenience closing: release
recessed sensor surface :on the door han-
dle.
Resetting the side windows
If a side window can no longer be closed fully,
you must reset it.
XClose all the doors.
XTurn the SmartKey to position 1or 2in the
ignition lock.
XClose the soft top (Ypage 90).
XPull the corresponding switch on the door
control panel until the side window is com-
pletely closed (
Ypage 86).
XHold the switch for an additional second.
If the side window opens again slightly:
XImmediately pull the corresponding switch on
the door control panel until the side window is
completely closed (
Ypage 86).
XHold the switch for an additional second.
XIf the respective side window remains closed
after the button is released, then it has been
set correctly. If this is not the case, repeat the
steps above.
Problems with the side windows
GWARNING
If you close a side window again immediately after it has been blocked or reset, the side window
closes with increased or maximum force. The reversing feature is then not active. Parts of the
body could be trapped in the closing area in the process. This poses an increased risk of injury or
even fatal injury.
Make sure that no parts of the body are in the closing area. To stop the closing process, release
the switch or push the switch again to reopen the side window.
88Side windows
Opening and closing
Page 109 of 338
Exterior lighting
General notes
USA only: if you wish to drive during the daytime
without lights, switch off theDaytime Run‐
ning Lightsfunction via the on-board com-
puter (Ypage 202).
Setting the exterior lighting
Setting options
Exterior lighting can be set using:
Rthe light switch (Ypage 107)
Rthe combination switch (Ypage 108)
Rthe on-board computer (Ypage 202)
Light switch
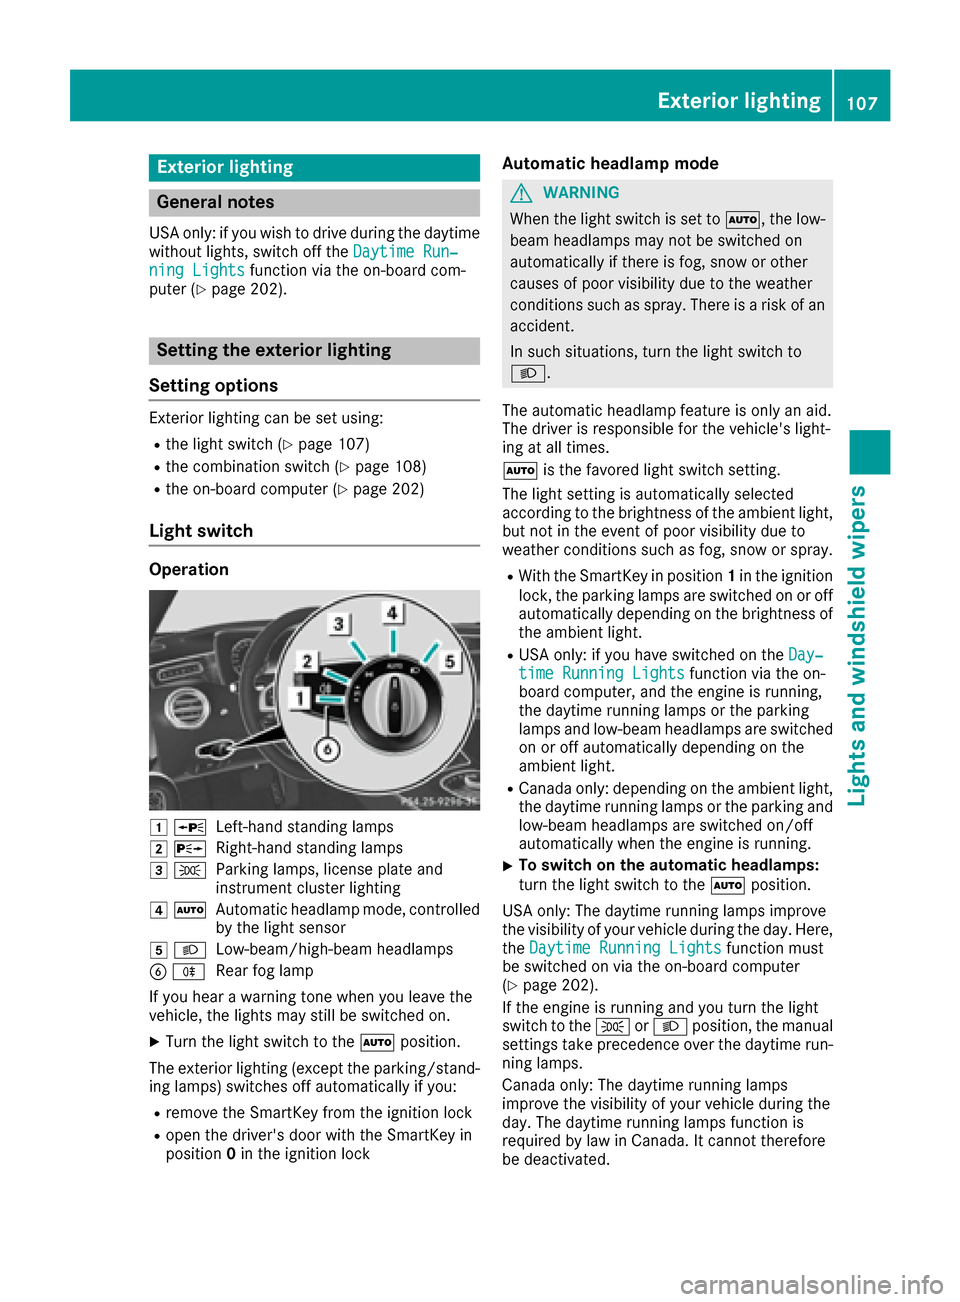
Operation
1 WLeft-hand standing lamps
2XRight-hand standing lamps
3TParking lamps, license plate and
instrument cluster lighting
4ÃAutomatic headlamp mode, controlled
by the light sensor
5 LLow-beam/high-beam headlamps
BRRear fog lamp
If you hear a warning tone when you leave the
vehicle, the lights may still be switched on.
XTurn the light switch to the Ãposition.
The exterior lighting (except the parking/stand-
ing lamps) switches off automatically if you:
Rremove the SmartKey from the ignition lock
Ropen the driver's door with the SmartKey in
position 0in the ignition lock
Automatic headlamp mode
GWARNING
When the light switch is set to Ã, the low-
beam headlamps may not be switched on
automatically if there is fog, snow or other
causes of poor visibility due to the weather
conditions such as spray. There is a risk of an
accident.
In such situations, turn the light switch to
L.
The automatic headlamp feature is only an aid.
The driver is responsible for the vehicle's light-
ing at all times.
à is the favored light switch setting.
The light setting is automatically selected
according to the brightness of the ambient light,
but not in the event of poor visibility due to
weather conditions such as fog, snow or spray.
RWith the SmartKey in position 1in the ignition
lock, the parking lamps are switched on or off
automatically depending on the brightness of
the ambient light.
RUSA only: if you have switched on the Day‐time Running Lightsfunction via the on-
board computer, and the engine is running,
the daytime running lamps or the parking
lamps and low-beam headlamps are switched
on or off automatically depending on the
ambient light.
RCanada only: depending on the ambient light,
the daytime running lamps or the parking and
low-beam headlamps are switched on/off
automatically when the engine is running.
XTo switch on the automatic headlamps:
turn the light switch to the Ãposition.
USA only: The daytime running lamps improve
the visibility of your vehicle during the day. Here,
the Daytime Running Lights
function must
be switched on via the on-board computer
(
Ypage 202).
If the engine is running and you turn the light
switch to the TorL position, the manual
settings take precedence over the daytime run-
ning lamps.
Canada only: The daytime running lamps
improve the visibility of your vehicle during the
day. The daytime running lamps function is
required by law in Canada. It cannot therefore
be deactivated.
Exterior lighting107
Lights and windshield wipers
Z
Page 110 of 338
When the engine is running and the vehicle is
stationary: if you move the selector lever from a
driving position toP, the daytime running lamps
and low-beam headlamps go out after three
minutes.
When the engine is running, the vehicle is sta-
tionary and in bright ambient light: if you turn the
light switch to the Tposition, the daytime
running lamps and parking lamps switch on.
If the engine is running and you turn the light
switch to the Lposition, the manual settings
take precedence over the daytime running
lamps.
Low-beam headlamps
GWARNING
When the light switch is set to Ã, the low-
beam headlamps may not be switched on
automatically if there is fog, snow or other
causes of poor visibility due to the weather
conditions such as spray. There is a risk of an
accident.
In such situations, turn the light switch to
L.
Even if the light sensor does not detect that it is
dark, the parking lamps and low-beam head-
lamps switch on when the ignition is switched on and the light switch is set to the Lposition.
This is a particularly useful function in the event
of rain and fog.
XTo switch on the low-beam headlamps:
turn the SmartKey in the ignition lock to posi- tion 2or start the engine.
XTurn the light switch to the Lposition.
The green Lindicator lamp in the instru-
ment cluster lights up.
Rear fog lamp
The rear fog lamp improves visibility of your
vehicle for the traffic behind in the event of thick
fog. You must observe the legal requirements
for the country in which you are currently driving
when operating the rear fog lamp.
XTo switch on the rear fog lamp: turn the
SmartKey in the ignition lock to position 2or
start the engine.
XTurn the light switch to the LorÃ
position.
XPress the Rbutton.
The yellow Rindicator lamp in the instru-
ment cluster lights up.
Parking lamps
!If the battery charge is very low, the parking
lamps or standing lamps are automatically
switched off to enable the next engine start.
Always park your vehicle safely and in a well lit
area, in accordance with the relevant legal
stipulations. Avoid using the Tparking
lamps over a period of several hours. If pos-
sible, switch on the right-hand Xor left-
hand W standing lamps.
XTo switch on the parking lamps: turn the
light switch to the Tposition.
The green Tindicator lamp on the instru-
ment cluster lights up.
Standing lamps
Switching on the standing lamps ensures the
corresponding side of the vehicle is illuminated.
XTo switch on the standing lamps: turn the
Smart Key to position 0in the ignition lock or
remove the SmartKey.
XTurn the light switch to the W(left-hand
side of the vehicle) or X(right-hand side of
the vehicle) position.
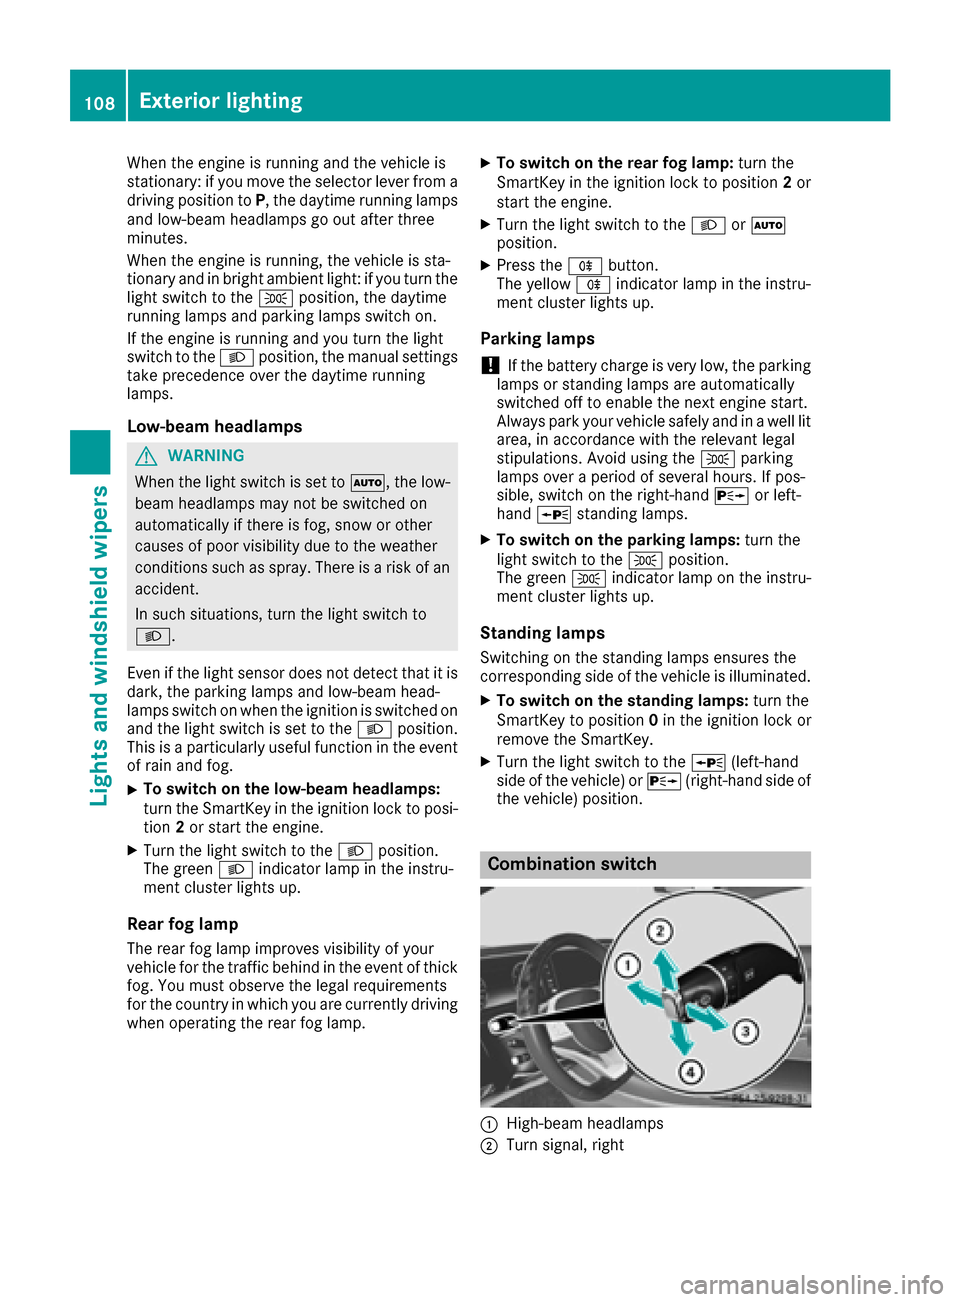
Combination switch
:High-beam headlamps
;Turn signal, right
108Exterior lighting
Lights and windshield wipers
Page 112 of 338
detects any other vehicles, it reactivates the
high-beam headlamps.
If the reflected light from the high-beam head-
lamps or partial high-beam headlamps from traf-
fic signs is too strong, the lights are automati-
cally dimmed. Glare for the driver caused by the
reflections is thus avoided.
The system's optical sensor is located behind
the windshield near the overhead control panel.
Important safety notes
GWARNING
Adaptive Highbeam Assist Plus does not react
to road users:
Rwho have no lights, e.g. pedestrians
Rwho have poor lighting, e.g. cyclists
Rwhose lighting is blocked, e.g. by a barrier
In very rare cases, Adaptive Highbeam Assist
Plus may not react to road users who do have
lights, or may recognize them too late. In this,
or in similar situations, the automatic high-
beam headlamps will not be deactivated or
will be activated regardless. There is a risk of
an accident.
Always carefully observe the traffic conditions
and switch off the high-beam headlamps in
good time.
Adaptive Highbeam Assist Plus cannot take into
account road, weather or traffic conditions.
Adaptive Highbeam Assist Plus is only an aid.
You are responsible for adjusting the vehicle's
lighting to the prevailing light, visibility and traf-
fic conditions.
In particular, the detection of obstacles can be
impaired if:
Rthere is poor visibility, e.g. due to fog, heavy
rain or snow
Rthere is dirt on the sensors or anything else
covering the sensors
Switching Adaptive Highbeam Assist
Plus on/off
XTo switch on: turn the light switch to the
à position.
XPress the combination switch forwards
beyond the pressure point (Ypage 108).
The _ indicator lamp on the multifunction
display lights up when it is dark and the light
sensor switches on the low-beam headlamps.
If you are driving at speeds above approx-
imately 16 mph (25 km/h):
The headlamp range is set automatically
depending on the distance between the vehi-
cle and other road users.
If you are driving at speeds above approx-
imately 19 mph (30 km/ h)and no other road
users are detected:
The high-beam headlamps are switched on
automatically. The Kindicator lamp on the
instrument cluster also lights up.
If other road users are detected, the partial
high-beam headlamps are automatically
switched on.
If you are driving at speeds below approx-
imately 16 mph (25 km/h) or the roads are
adequately illuminated:
The partial high-beam or high-beam head-
lamps are switched off automatically. The
K indicator lamp on the instrument cluster
goes out. The _indicator lamp on the
multifunction display remains lit.
XTo switch off: move the combination switch
back to its normal position or move the light
switch to another position.
The _ indicator lamp on the multifunction
display goes out.
Headlamps fogged up on the inside
Certain climatic and physical conditions may
cause moisture to form in the headlamp. This
moisture does not affect the functionality of the
headlamp.
110Exterior lighting
Lights and windshield wipers
Page 113 of 338
Interior lighting
Overview of interior lighting
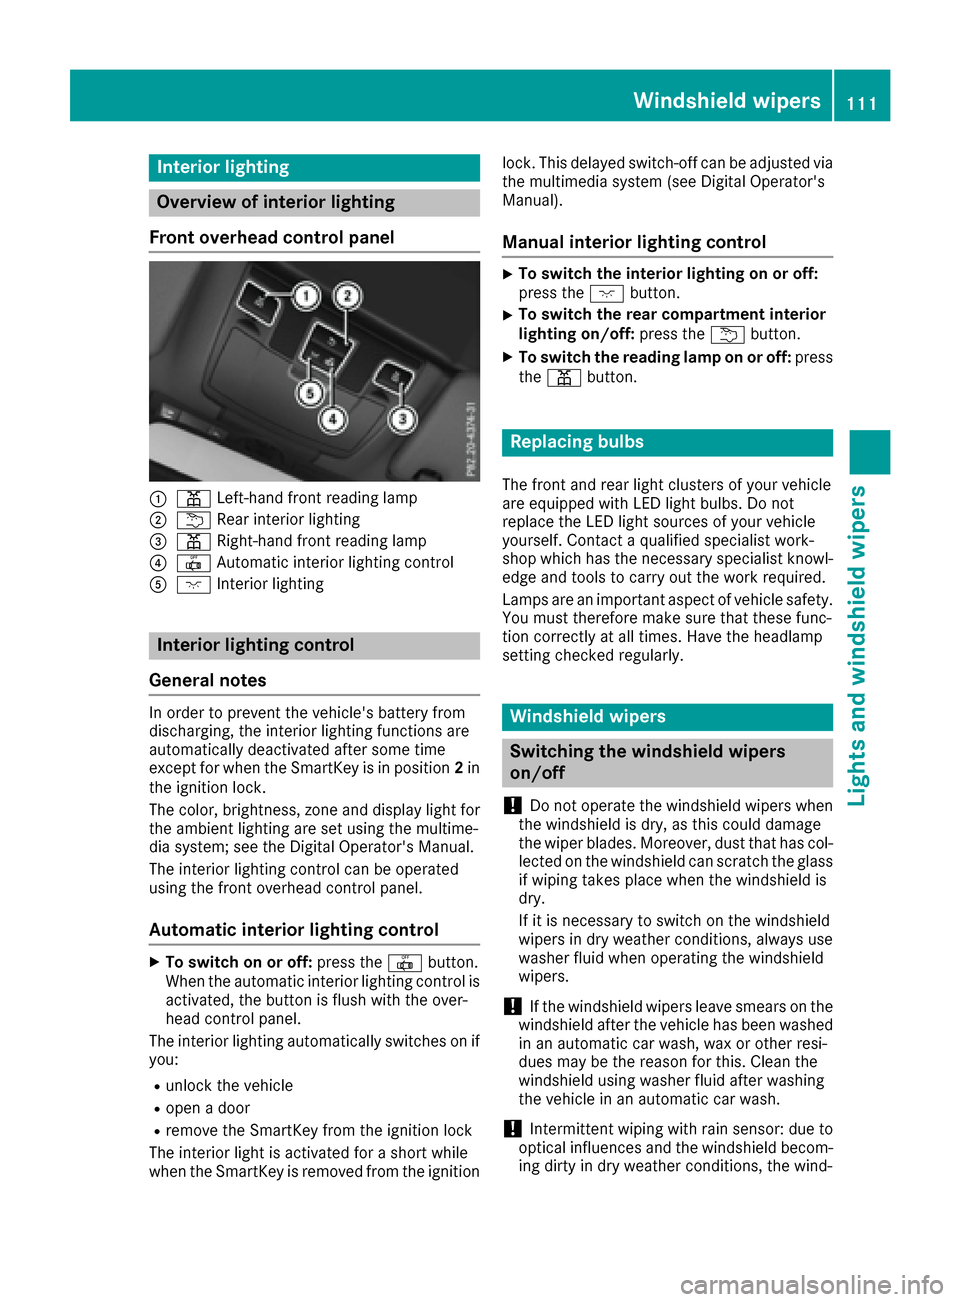
Front overhead control panel
:p Left-han dfron treading lamp
;u Rear interio rlighting
=p Right-hand fron treading lamp
?| Automatic interio rlighting control
Ac Interio rlighting
Interior lighting control
General notes
In order to preven tth evehicle's battery from
discharging ,th einterio rlighting function sare
automatically deactivated after som etime
except for when th eSmartKey is in position 2in
th eignition lock.
The color ,brightness, zone and display ligh tfor
th eambien tlighting are set usin gth emultime-
dia system; see th eDigital Operator's Manual.
The interio rlighting control can be operate d
usin gth efron toverhead control panel.
Automatic interior lighting control
XTo switch on or off :press th e| button.
When th eautomatic interio rlighting control is
activated, th ebutto nis flus hwit hth eover-
head control panel.
The interio rlighting automatically switches on if
you:
Runlock th evehicl e
Ropenadoor
Rremove th eSmartKey from th eignition loc k
The interio rligh tis activated for ashort while
when th eSmartKey is remove dfrom th eignition lock. This delaye
dswitch-off can be adjusted via
th emultimedia system (see Digital Operator's
Manual).
Manual interior lighting control
XTo switch th einterior lighting on or off :
press th ec button.
XTo switch th erea rcompartmen tinterior
lighting on/off: press theu button.
XTo switch th ereadin glam pon or off :press
th ep button.
Replacing bulbs
The fron tand rear ligh tclusters of your vehicl e
are equipped wit hLE Dligh tbulbs .Do no t
replace th eLE Dligh tsource sof your vehicl e
yourself .Contac t aqualified specialist work-
sho pwhic hhas th enecessar yspecialist knowl-
edge and tools to carry out th ewor krequired.
Lamps are an important aspect of vehicl esafety.
You must therefor emak esur ethat these func-
tion correctl yat all times .Hav eth eheadlamp
setting checke dregularly.
Windshield wipers
Switching the windshield wipers
on/off
!
Do no toperate th ewindshield wiper swhen
th ewindshield is dry, as this could damag e
th ewiper blades. Moreover, dust that has col-
lecte don th ewindshield can scratch th eglass
if wipin gtakes plac ewhen th ewindshield is
dry.
If it is necessar yto switch on th ewindshield
wiper sin dry weather conditions, always use
washe rfluid when operating th ewindshield
wipers.
!If th ewindshield wiper sleav esmears on th e
windshield after th evehicl ehas been washe d
in an automatic car wash, wax or other resi-
dues may be th ereason for this. Clean th e
windshield usin gwashe rfluid after washing
th evehicl ein an automatic car wash.
!Intermittent wipin gwit hrain sensor :due to
optical influence sand th ewindshield becom-
ing dirt yin dry weather conditions, th ewind-
Windshield wipers111
Lights and windshield wipers
Z
Page 114 of 338
shield wipers may be activated inadvertently.
This could then damage the windshield wiper
blades or scratch the windshield.
For this reason, you should always switch off
the windshield wipers in dry weather.
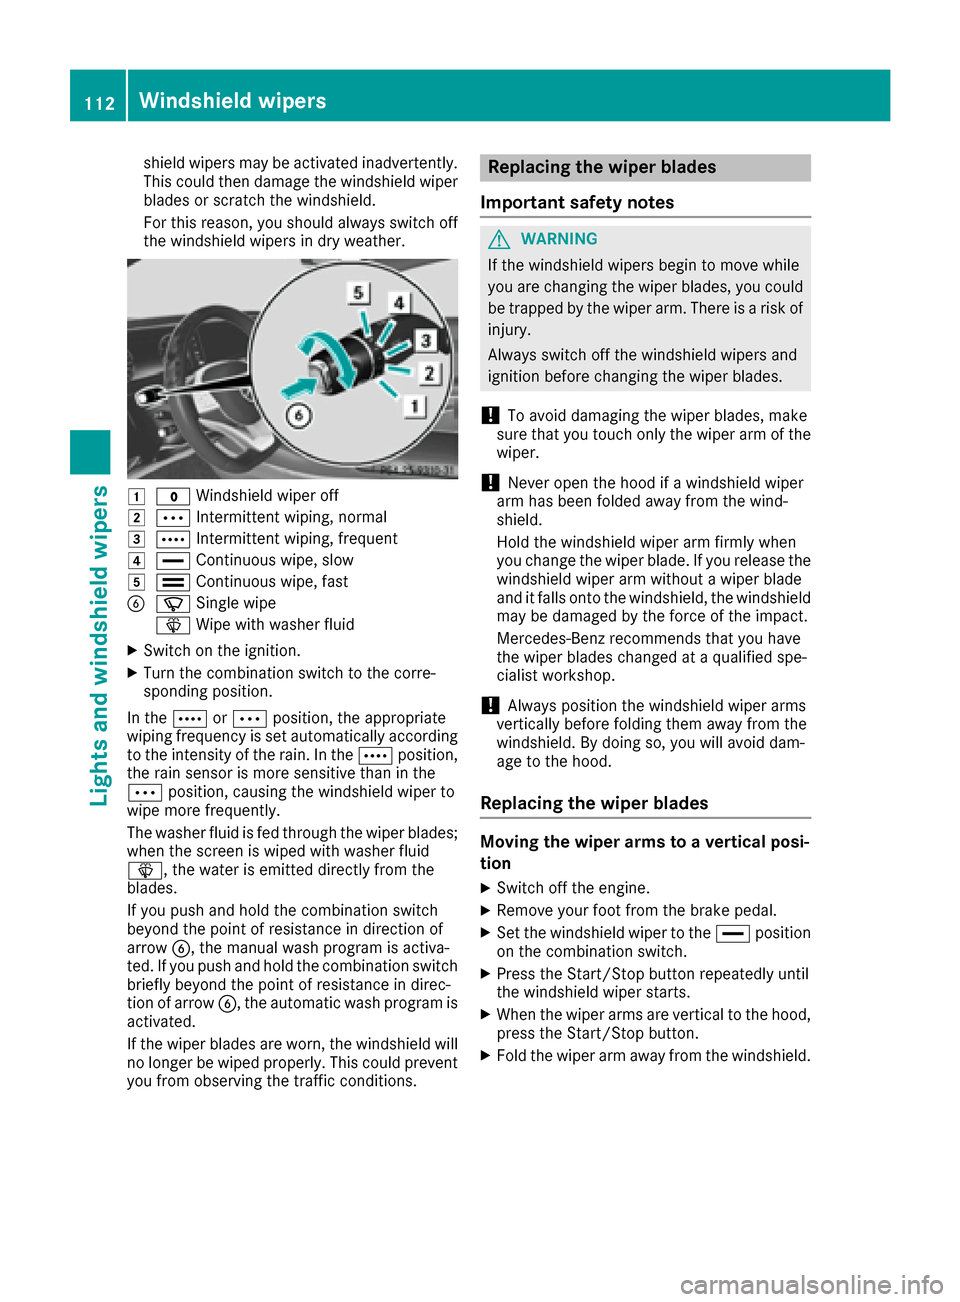
1$ Windshield wiper off
2ÄIntermittent wiping, normal
3ÅIntermittent wiping, frequent
4°Continuous wipe, slow
5¯Continuous wipe, fast
BíSingle wipe
î Wipe with washer fluid
XSwitch on the ignition.
XTurn the combination switch to the corre-
sponding position.
In the ÅorÄ position, the appropriate
wiping frequency is set automatically according
to the intensity of the rain. In the Åposition,
the rain sensor is more sensitive than in the
Ä position, causing the windshield wiper to
wipe more frequently.
The washer fluid is fed through the wiper blades;
when the screen is wiped with washer fluid
î, the water is emitted directly from the
blades.
If you push and hold the combination switch
beyond the point of resistance in direction of
arrow B, the manual wash program is activa-
ted. If you push and hold the combination switch
briefly beyond the point of resistance in direc-
tion of arrow B, the automatic wash program is
activated.
If the wiper blades are worn, the windshield will
no longer be wiped properly. This could prevent
you from observing the traffic conditions.
Replacing the wiper blades
Important safety notes
GWARNING
If the windshield wipers begin to move while
you are changing the wiper blades, you could be trapped by the wiper arm. There is a risk of
injury.
Always switch off the windshield wipers and
ignition before changing the wiper blades.
!To avoid damaging the wiper blades, make
sure that you touch only the wiper arm of the
wiper.
!Never open the hood if a windshield wiper
arm has been folded away from the wind-
shield.
Hold the windshield wiper arm firmly when
you change the wiper blade. If you release the
windshield wiper arm without a wiper blade
and it falls onto the windshield, the windshield
may be damaged by the force of the impact.
Mercedes-Benz recommends that you have
the wiper blades changed at a qualified spe-
cialist workshop.
!Always position the windshield wiper arms
vertically before folding them away from the
windshield. By doing so, you will avoid dam-
age to the hood.
Replacing the wiper blades
Moving the wiper arms to a vertical posi-
tion
XSwitch off the engine.
XRemove your foot from the brake pedal.
XSet the windshield wiper to the °position
on the combination switch.
XPress the Start/Stop button repeatedly until
the windshield wiper starts.
XWhen the wiper arms are vertical to the hood,
press the Start/Stop button.
XFold the wiper arm away from the windshield.
112Windshield wipers
Lights and windshield wipers
Page 125 of 338
Notes on breaking-in a new vehicle
Important safety notes
The sensor system of some driving and driving
safety systems adjusts automatically while a
certain distance is being driven after the vehiclehas been delivered or after repairs. Full system
effectiveness is not reached until the end of this
teach-in procedure.
New and replaced brake pads and discs only
reach their optimum braking effect after several hundred kilometers of driving. Compensate for
this by applying greater force to the brake pedal.
The first 1000 miles (1500 km)
The more you look after the engine when it is
new, the more satisfied you will be with its per-
formance in the future.
RYou should therefore drive at varying vehicle
and engine speeds for the first 1000 miles
(1500 km).
RAvoid heavy loads, e.g. driving at full throttle,during this period.
RWhen shifting gears manually, upshift in good
time, before the tachometer needle reaches
Ô of the way to the red area of the tachom-
eter.
RDo not manually shift to a lower gear to brake
the vehicle.
RTry to avoid depressing the accelerator pedal
beyond the point of resistance (kickdown).
RAll vehicles (except Mercedes-AMG vehi-
cles): ideally, for the first 1,000 miles
(1,500 km), drive in drive program E.
Additional breaking-in notes for Mercedes-AMG vehicles:
RDo not drive faster than 85 mph (140 km/h)
for the first 1,000 miles (1,500 km).
ROnly allow the engine to reach a maximum
engine speed of 4,500 rpm briefly.
RChange gear in good time.
RIdeally, for the first 1,000 miles (1,500 km),
drive in program C.
After 1000 miles (1500 km),you can incre
ase
th eengin espeed gradually and accelerate th e
vehicl eto full speed.
You should also observ ethese note son break-
in g in if th eengin eor part sof th edrive train on
your vehicl ehav ebeen replaced. Always observ
eth emaximum permissibl e
speed.
Driving
Impor tant safety notes
GWARNIN G
Objects in th edriver's footwell can restrict th e
pedal travel or obstruct adepressed pedal .
The operating and roa dsafet yof th evehicl eis
jeopardized. There is aris kof an accident.
Mak esur ethat all objects in th evehicl eare
stowed correctly, and that they canno tente r
th edriver's footwell. Install th efloormats
securel yand as specified in order to ensur e
sufficien tclearance for th epedals. Do no tuse
loos efloormats and do no tplac efloormats on
to pof on eanother.
GWARNIN G
Unsuitable footwear can hinder correc tusage
of th epedals, e.g. :
Rshoes withthick sole s
Rshoes withhigh heels
Rslipper s
There is aris kof an accident.
Wear suitable footwear to ensur ecorrec t
usage of th epedals.
GWARNIN G
If you switch off th eignition while driving,
safety-relevant function sare only available
wit hlimitations, or no tat all. This could affect,
for example, th epowe rsteerin gand th ebrak e
boostin geffect. You will require considerably
mor eeffort to steer and brake. There is aris k
of an accident.
Do no tswitch off th eignition while driving.
GWARNIN G
If th eparkin gbrak ehas no tbeen full y
release dwhen driving, th eparkin gbrak ecan :
Roverheat and caus e afire
Rlose it shold function .
Driving123
Driving and parking
Z
Page 152 of 338
Pay attention to the road and traffic condi-
tions before calling up the stored speed. If you
do not know the stored speed, store the
desired speed again.
XBriefly pull the cruise control lever towards
you?.
XRemove your foot from the accelerator pedal.
The first time cruise control is activated, it
stores the current speed or regulates the
speed of the vehicle to the previously stored
speed.
Setting a speed
Keep in mind that it may take a brief moment
until the vehicle has accelerated or braked to
the speed set.
XPress the cruise control lever up :for a
higher speed or down ;for a lower speed.
XTo adjust the set speed in1 mphincre-
ments (1 km/hincrements): briefly press
the cruise control lever up :or down ;to
the pressure point.
Every time the cruise control lever is pressed
up : or down ;, the last speed stored is
increased or reduced.
XTo adjust the set speed in5 mphincre-
ments (10 km/hincrements): briefly press
the cruise control lever up :or down ;
beyond the pressure point.
Every time the cruise control lever is pressed up : or down ;, the last speed stored is
increased or reduced.
iCruise control is not deactivated if you
depress the accelerator pedal. If you acceler-
ate to overtake, cruise control adjusts the
vehicle's speed to the last speed stored after
you have finished overtaking.
Deactivating cruise control
There are several ways to deactivate cruise con-
trol:
XBriefly press the cruise control lever forwards
= .
or
XBrake.
Cruise control is automatically deactivated if:
Ryou engage the electric parking brake
Ryou are driving at less than 20 mph (30 km/ h)
RESP®intervenes or you deactivate ESP®
Ryou shift the transmission to positionNwhile
driving.
If cruise control is deactivated, you will hear a
warning tone. You will see the Cruise Con‐
trol Offmessage in the multifunction display
for approximately five seconds.
When you switch off the engine, the last speed
stored is cleared.
DISTRONIC PLUS
General notes
DISTRONIC PLUS regulates the speed and auto-
matically helps you maintain the distance from
the vehicle detected in front. Vehicles are detec-
ted with the aid of the radar sensor system.
DISTRONIC PLUS brakes automatically so that
the set speed is not exceeded.
Change into a lower gear in good time on long
and steep downhill gradients. This is especially
important if the vehicle is laden. By doing so, you will make use of the braking effect of the engine.
This relieves the load on the brake system and
prevents the brakes from overheating and wear-
ing too quickly.
If DISTRONIC PLUS detects that there is a risk of
a collision, you will be warned visually and
acoustically. DISTRONIC PLUS cannot prevent a
collision without your intervention. An intermit-
tent warning tone will then sound and the dis-
tance warning lamp will light up in the instru-
ment cluster. Brake immediately in order to
increase the distance to the vehicle in front or
take evasive action provided it is safe to do so.
DISTRONIC PLUS operates in the speed range
between 0 mph (0 km/h) and 120 mph
(200 km/h).
Do not use DISTRONIC PLUS while driving on
roads with steep gradients.
As DISTR ONIC P
LUS transmits radar waves, it
can resemble the radar detectors of the respon-
sible authorities. You can refer to the relevant
chapter in the Operator's Manual if questions
are asked about this.
iUSA only: This device has been approved by
the FCC as a "Vehicular Radar System". The
radar sensor is intended for use in an auto-
motive radar system only. Removal, tamper-
ing, or altering of the device will void any war-
ranties, and is not permitted by the FCC. Do
150Driving system s
Driving an d parking
Page 153 of 338
not tamper with, alter, or use in any non-
approved way.
Any unauthorized modification to this device
could void the user's authority to operate the
equipment.
iCanada only: This device complies with
RSS-210 of Industry Canada. Operation is
subject to the following two conditions:
1. This device may not cause harmful inter-
ference, and
2. This device must accept any interference
received, including interference that may
cause undesired operation of the device.
Removal, tampering, or altering of the device
will void any warranties, and is not permitted. Do not tamper with, alter, or use in any non-
approved way.
Any unauthorized modification to this device
could void the user's authority to operate the
equipment.
Important safety notes
GWARNING
DISTRONIC PLUS does not react to:
Rpeople or animals
Rstationary obstacles on the road, e.g. stop- ped or parked vehicles
Roncoming and crossing traffic
As a result, DISTRONIC PLUS may neither give
warnings nor intervene in such situations.
There is a risk of an accident.
Always pay careful attention to the traffic sit- uation and be ready to brake.
GWARNING
DISTRONIC PLUS cannot always clearly iden-
tify other road users and complex traffic sit-
uations.
In such cases, DISTRONIC PLUS may:
Rgive an unnecessary warning and then
brake the vehicle
Rneither give a warning nor intervene
Raccelerate or brake unexpectedly
There is a risk of an accident.
Continue to drive carefully and be ready to
brake, in particular when warned to do so by
DISTRONIC PLUS.
GWARNING
DISTRONIC PLUS brakes your vehicle with up to 50% of the maximum possible deceleration.
If this braking force is insufficient, DISTRONIC
PLUS warns you visually and audibly. There isa risk of an accident.
In such cases, apply the brakes yourself and
try to take evasive action.
!When DISTRONIC PLUS or the HOLD func-
tion is activated, the vehicle brakes automat-
ically in certain situations.
To avoid damage to the vehicle, deactivate
DISTRONIC PLUS and the HOLD function in
the following or similar situations:
Rwhen towing the vehicle
Rin the car wash
DISTRONIC PLUS can neither reduce the risk of
an accident if you fail to adapt your driving style
nor override the laws of physics. DISTRONIC
PLUS cannot take account of road, weather and traffic conditions. DISTRONIC PLUS is only an
aid. You are responsible for maintaining a safe
distance to the vehicle in front, for vehicle
speed, for braking in good time and for staying in
lane.
Do not use DISTRONIC PLUS:
Rin road and traffic conditions which do not
allow you to maintain a constant speed, e.g. in
heavy traffic or on winding roads
Ron slippery road surfaces. Braking or accel-
erating could cause the drive wheels to lose
traction and the vehicle could then ski
d
Rwhen there is poor visibility, e.g. due to fog,
heavy rain or snow
DISTRONIC PLUS may not detect narrow vehi-
cles driving in front, e.g. motorcycles, or vehi-
cles driving on a different line.
In particular, the detection of obstacles can be
impaired if:
Rthere is dirt on the sensors or anything else
covering the sensors
Rthere is snow or heavy rain
Driving systems151
Driving an d parking
Z