tow MERCEDES-BENZ S-CLASS COUPE 2014 User Guide
[x] Cancel search | Manufacturer: MERCEDES-BENZ, Model Year: 2014, Model line: S-CLASS COUPE, Model: MERCEDES-BENZ S-CLASS COUPE 2014Pages: 413, PDF Size: 12.76 MB
Page 28 of 413
G
WARNING
If you connect equipment to a diagnostics
connection in the vehicle, it can affect the
operation of the vehicle systems. This may
affect the operating safety of the vehicle.
There is a risk of an accident.
Do not connect any equipment to a diagnos-
tics connection in the vehicle. G
WARNING
Objects in the driver's footwell may restrict
the clearance around the pedals or block a
depressed pedal. This jeopardises the oper-
ating and road safety of the vehicle. There is a risk of an accident.
Stow all objects securely in the vehicle so that
they do not get into the driver's footwell.
Always fit the floormats securely and as pre-
scribed in order to ensure that there is always sufficient room for the pedals. Do not use
loose floormats and do not place several floor- mats on top of one another.
! If the engine is switched off and equip-
ment on the diagnostics connection is
used, the starter battery may discharge.
Connecting equipment to the diagnostics
connection can lead to emissions monitoring information being reset, for example. This
may lead to the vehicle failing to meet the
requirements of the next emissions test dur-
ing the main inspection. Qualified specialist workshop
A qualified specialist workshop has the nec-
essary special skills, tools and qualifications
to correctly carry out any necessary work on
your vehicle. This particularly applies to work
relevant to safety.
Observe the notes in the Service Booklet.
Always have the following work carried out at a qualified specialist workshop:
R work relevant to safety
R service and maintenance work R
repair work
R modifications, installations and conver-
sions
R work on electronic components
Mercedes-Benz recommends that you use a
Mercedes-Benz Service Centre. Vehicle registration
Mercedes-Benz may ask its Service Centres
to carry out technical inspections on certain
vehicles. The quality or safety of the vehicle is
improved as a result of the inspection.
Mercedes-Benz can only inform you about
vehicle checks if it has your registration data.
It is possible that your vehicle has not yet
been registered in your name in the following
cases:
R if your vehicle was not purchased at an
authorised specialist dealer.
R if your vehicle has not yet been examined at
a Mercedes-Benz Service Centre.
It is advisable to register your vehicle with a
Mercedes-Benz Service Centre.
Inform Mercedes-Benz as soon as possible
about any change in address or vehicle own-
ership. You can do this at a Mercedes-Benz
Service Centre, for example. Correct use
If you remove any warning stickers, you or
others could fail to recognise certain dangers.
Leave warning stickers in position.
Observe the following information when driv- ing your vehicle:
R the safety notes in this manual
R the technical data in this manual
R traffic rules and regulations
R laws and safety standards pertaining to
motor vehicles Introduction
25 Z
Page 43 of 413

Rear seats
Function Page
:
Stowage box in the seat
backrest
317
Cover for skibag 317
Coolbox 324
;
Stowage compartment in
the rear seat armrest
317 Function Page
=
Cup holders 321
?
Stowage compartment in
the centre console
317
Power socket 32340
Rear seatsAt a glance
Page 50 of 413
R
you unlock the seat backrest and fold it
forwards.
R no one is sitting on the co-driver's side
(after approximately 5 seconds).
If you then press seat-belt extender but-
ton ?, seat-belt extender =no longer
extends. X
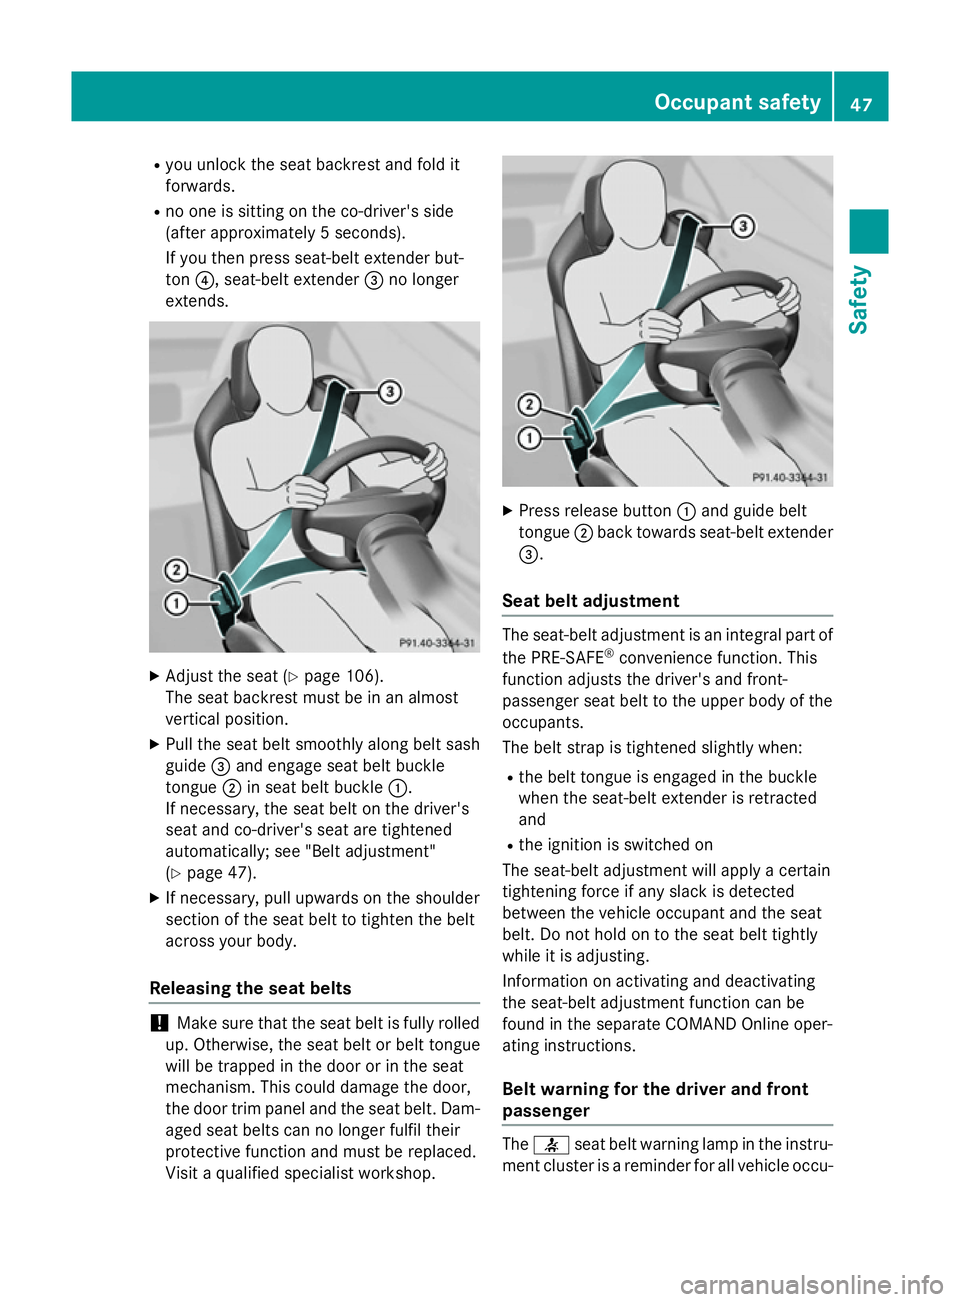
Adjust the seat (Y page 106).
The seat backrest must be in an almost
vertical position.
X Pull the seat belt smoothly along belt sash
guide =and engage seat belt buckle
tongue ;in seat belt buckle :.
If necessary, the seat belt on the driver's
seat and co-driver's seat are tightened
automatically; see "Belt adjustment"
(Y page 47).
X If necessary, pull upwards on the shoulder
section of the seat belt to tighten the belt
across your body.
Releasing the seat belts !
Make sure that the seat belt is fully rolled
up. Otherwise, the seat belt or belt tongue
will be trapped in the door or in the seat
mechanism. This could damage the door,
the door trim panel and the seat belt. Dam- aged seat belts can no longer fulfil their
protective function and must be replaced.
Visit a qualified specialist workshop. X
Press release button :and guide belt
tongue ;back towards seat-belt extender
=.
Seat belt adjustment The seat-belt adjustment is an integral part of
the PRE-SAFE ®
convenience function. This
function adjusts the driver's and front-
passenger seat belt to the upper body of the
occupants.
The belt strap is tightened slightly when:
R the belt tongue is engaged in the buckle
when the seat-belt extender is retracted
and
R the ignition is switched on
The seat-belt adjustment will apply a certain
tightening force if any slack is detected
between the vehicle occupant and the seat
belt. Do not hold on to the seat belt tightly
while it is adjusting.
Information on activating and deactivating
the seat-belt adjustment function can be
found in the separate COMAND Online oper-
ating instructions.
Belt warning for the driver and front
passenger The
7 seat belt warning lamp in the instru-
ment cluster is a reminder for all vehicle occu- Occupant safety
47Safety Z
Page 60 of 413
Deployment of belt tensioners and air-
bags
Important safety notes G
WARNING
After the airbag deploys, the airbag parts are
hot. There is a risk of injury.
Do not touch the airbag parts. Have a
deployed airbag replaced at a qualified spe-
cialist workshop as soon as possible. G
WARNING
Pyrotechnic seat belt tensioners that have
been deployed are no longer operational and
are unable to perform their intended protec-
tive function. This poses an increased risk of
injury or even fatal injury.
Therefore, have pyrotechnic belt tensioners
which have been triggered immediately
replaced at a qualified specialist workshop.
Mercedes-Benz recommends that you have
the vehicle towed to a qualified specialist
workshop after an accident. Take this into
account, particularly if a seat belt tensioner
was triggered or an airbag was deployed.
An electric motor is used by PRE-SAFE ®
to
trigger the tightening of the seat belt in haz-
ardous situations. This procedure is reversi-
ble.
If the belt tensioners are triggered or an air-
bag is deployed, you will hear a bang, and a
small amount of powder may also be
released. The 6restraint system warning
lamp lights up.
Only in rare cases will the bang affect your
hearing. In general, the powder released is
not hazardous to health but may cause short- term breathing difficulties to persons suffer-
ing from asthma or other pulmonary condi-
tions. Provided it is safe to do so, you should
leave the vehicle immediately or open the
window in order to prevent breathing difficul- ties. Operation During the first stage of a collision, the
restraint system control unit evaluates impor-
tant physical data relating to vehicle deceler-
ation or acceleration, such as:
R duration
R direction
R intensity
Based on the evaluation of this data, the
restraint system control unit triggers the seat
belt tensioners in the event of a head-on or
rear collision.
A seat belt tensioner can only be triggered if:
R the ignition is switched on
R the components of the restraint system are
operational; see "Restraint system warning
lamp" (Y page 43)
R the belt tongue has engaged in the belt
buckle of the respective front seat
The seat belt tensioners in the rear compart-
ment are triggered independently of the lock
status of the seat belts.
If the restraint system control unit detects a
high severity of an accident, in certain head-
on collisions, additional components of the
restraint system are deployed independently
of each another:
R front airbags and driver's kneebag
R windowbag, if the system determines that
deployment can offer additional protection to that provided by the seat belt
On vehicles with the automatic front-
passenger front airbag deactivation system:
depending on the person in the front-
passenger seat, the front-passenger front air-
bag is either disabled or enabled. The front-
passenger front airbag can only be deployed
in an accident if the PASSENGER AIR BAG ON indicator lamp is lit. Observe the information
on the PASSENGER AIR BAG indicator lamps
(Y page 43).
Your vehicle has two-stage front airbags. In
the first deployment stage, the front airbag is
filled with propellant gas to reduce the risk of Occupant safety
57Safety Z
Page 64 of 413
In addition, they may operate vehicle equip-
ment and become trapped. There is a risk of
an accident and injury.
When leaving the vehicle, always take the key with you and lock the vehicle. Never leave
children unattended in the vehicle. G
WARNING
If persons (particularly children) are exposed
to heat or cold for a prolonged period, there is a risk of serious or even fatal injuries. Never
leave persons (particularly children) unatten-
ded in the vehicle. G
WARNING
If the child restraint system is placed in direct sunlight, the parts could become very hot.
Children could be suffer burns by touching
these parts, in particular on the metallic parts
of the child restraint system. There is a risk of injury.
If you and your child leave the vehicle, always
make sure that the child restraint system is
not in direct sunlight. Cover it with a blanket, for example. If the child restraint system has
been exposed to direct sunlight, leave it to
cool down before securing the child in it.
Never leave children unattended in the vehi-
cle.
Make sure that all vehicle occupants are
seated properly with a correctly fastened seat
belt. This applies particularly to children.
Observe the safety notes on the seat belt
(Y page 44) and the information on the cor-
rect use of the seat belt (Y page 45).Child restraint system
Observe the instructions for correct use of
the child restraint system (Y page 65).
For safety reasons, Mercedes-Benz recom-
mends that you only use a child restraint sys- tem recommended by Mercedes-Benz
(Y page 67). G
WARNING
If the child restraint system is incorrectly fit-
ted on the seat position suitable for this pur-
pose, it cannot perform its intended protec-
tive function. In the event of an accident,
sharp braking or a sudden change in direction, the child may not be held securely. There is an
increased risk of serious or even fatal injuries.
Observe the manufacturer's installation
instructions and the correct use for the child
restraint system. Make sure that the entire
surface of the child restraint system is resting
on the seat surface. Never place objects
under or behind the child restraint system,
e.g. cushions. Only use child restraint sys-
tems with the original cover designed for
them. Only replace damaged covers with gen- uine covers. G
WARNING
If the child restraint system is fitted incor-
rectly or is not secured, it can come loose in
the event of an accident, heavy braking or a
sudden change in direction. The child
restraint system could be thrown about, strik- ing vehicle occupants. There is an increased
risk of injury, possibly even fatal.
Always fit child restraint systems properly,
even if they are not being used. Make sure
that you observe the child restraint system
manufacturer's installation instructions.
You will find further information on stowing
objects, luggage and loads securely under
"Loading guidelines" (Y page 314). G
WARNING
Child restraint systems or their securing sys-
tems that have been damaged or subjected to a load in an accident cannot perform their
intended protective function. In the event of
an accident, sharp braking or a sudden
change in direction, the child may not be held securely. There is an increased risk of serious
or even fatal injuries.
Immediately replace child restraint systems
that have been damaged or subjected to a Children in the vehicle
61Safety
Z
Page 79 of 413
Drive on carefully. Have ESP
®
checked at a
qualified specialist workshop.
! Vehicles with 4MATIC: switch off the igni-
tion when the electric parking brake is
being tested using a dynamometer.
Application of the brakes by ESP ®
may oth-
erwise destroy the brake system.
Vehicles without 4MATIC: when towing your
vehicle with the rear axle raised, it is impor-
tant that you observe the notes on ESP ®
(Y page 369).
ESP ®
is deactivated if the åwarning lamp
in the instrument cluster lights up continu-
ously when the engine is running.
If the ÷ warning lamp lights up continu-
ously, ESP ®
is not available due to a malfunc-
tion.
Observe the information on warning lamps
(Y page 304) and display messages which
may be shown in the instrument cluster
(Y page 266).
Only use wheels with the recommended tyre
sizes. Only then will ESP ®
function properly.
Characteristics of ESP ®General notes
If the
÷ ESP warning lamp goes out before
beginning the journey, ESP ®
is automatically
active.
If ESP ®
intervenes, the ÷ESP®
warning
lamp flashes in the instrument cluster.
If ESP ®
intervenes:
X Do not deactivate ESP ®
under any circum-
stances.
X When pulling away, only depress the accel-
erator pedal as far as is necessary.
X Adapt your driving style to suit the prevail-
ing road and weather conditions. ECO start/stop function
The ECO start/stop function switches the
engine off automatically if the vehicle stops
moving. When pulling away again, the engine
starts automatically. ESP ®
remains in its pre-
viously selected status. Example:if ESP®
was deactivated before the engine was
switched off, ESP ®
remains deactivated when
the engine is switched on again.
Deactivating/activating ESP ® Important safety notes
i Observe the "Important safety notes" sec-
tion (Y page 69).
You can select between the following states
of ESP ®
:
R ESP ®
is activated
R ESP ®
is deactivated G
WARNING
If you deactivate ESP ®
, ESP ®
no longer sta-
bilises the vehicle. There is an increased risk
of skidding and an accident.
Only deactivate ESP ®
in the situations descri-
bed in the following.
It may be best to deactivate ESP ®
in the fol-
lowing situations:
R when using snow chains
R in deep snow
R on sand or gravel
i Activate ESP ®
as soon as the situations
described above no longer apply. ESP ®
will
otherwise not be able to stabilise the vehi-
cle if the vehicle starts to skid or a wheel
starts to spin.
Deactivating/activating ESP ®
You can deactivate or activate ESP ®
via the
on-board computer.
X To deactivate: (Ypage 257).
The å ESP®
OFF warning lamp in the
instrument cluster lights up. 76
Driving safety systemsSafety
Page 84 of 413
X
To stop the alarm using KEYLESS-GO:
grasp the outside door handle. The key
must be outside the vehicle.
The alarm is switched off.
or X Press the Start/Stop button on the dash-
board. The key must be inside the vehicle.
The alarm is switched off.
The alarm is not switched off, even if you
close the open door that has triggered it, for
example.
i If the alarm stays on for more than
30 seconds, the Mercedes‑Benz emer-
gency call system automatically sends a
message to the Customer Assistance
Centre. This is done by means of a text
message or a data connection. The emer-
gency call system sends a message or
establishes a data connection provided
that:
R you have subscribed to the
Mercedes‑Benz emergency call system
R the Mercedes‑ Benz emergency call sys-
tem has been activated properly
R the necessary mobile phone network is
available Tow-away protection
Function An audible and visual alarm is triggered if your
vehicle's angle of inclination is altered while
tow-away protection is primed. This can occur if the vehicle is jacked up on one side, for
example.
Priming X
Make sure that: R
the doors are closed
R the boot lid is closed
Only then is the tow-away protection
primed.
X Lock the vehicle with the key or KEYLESS-
GO.
Tow-away protection is primed after
approximately 60 second s.
Switching off X
Unlo ck the vehicle with the key or KEY-
LESS-GO.
or X Insert the key into the ignition lock.
Tow-away protection is switched off auto-
matically.
Deactivating You can deactivate the tow-away protection
using COMAND Online. You can find informa- tion about deactivating the tow-away protec-
tion in the separate COMAND Online operat-
ing instructions. Interior motion sensor
Function When the interior motion sensor is primed, a
visual and audible alarm is triggered if move-
ment is detected in the vehicle interior. This
can occur if someone reaches into the vehicle
interior, for example.
Priming X
Make sure that:
R the side windows are closed
R there are no objects, e.g. mascots, hang-
ing on the rear-view mirror or on the grab handles on the roof trim
This will prevent false alarms.
X Make sure that: Protection against theft
81Safety Z
Page 94 of 413
The doors can then be opened from the inside
after the vehicle has been locked from the
outside. The anti-theft alarm system is trig-
gered if the door is opened from the inside.
Switch off the alarm .
All countries: G
WARNING
If children are left unsupervised in the vehicle, they can:
R open doors and endanger other persons or
road users
R climb out and be injured by the traffic
R operate vehicle equipment and, for exam-
ple, trap themselves.
Children could also set the vehicle in motion, for example by:
R releasing the parking brake
R shifting the automatic transmission out of
park position P
R starting the engine.
There is a risk of an accident and injury.
When leaving the vehicle, always take the key
with you and lock the vehicle. Never leave
children unattended in the vehicle. Always
keep the key out of reach of children.
Stow luggage or loads preferably in the boot. Observe the loading guidelines (Y page 314).Unlocking and opening the doors
from the inside
i When a door is opened, the side window
on that side opens slightly. When the door
is closed, the side window is raised again.
! The side windows will not open/close if
the battery is discharged or if the side win-
dows have iced up. It will then not be pos-
sible to close the door. Do not attempt to
force the door to close. You could other-
wise damage the door or the side window.
Only for the United Kingdom: if the vehicle
has been locked with the key or with KEY-
LESS-GO, the double lock function is activa- ted as standard. It is then not possible to open
the doors from inside the vehicle. You can
deactivate the double lock function by deac-
tivating the interior motion sensor . The doors can then be opened from the inside after thevehicle has been locked from the outside. The
anti-theft alarm system is triggered if the door
is opened from the inside. Switch off the
alarm (Y page 80).
For all countries except the United King-
dom:
You can open a door from inside the vehicle
even if it has been locked. If the vehicle has
previously been locked with the key or with
KEYLESS-GO, opening a door from the inside will trigger the anti-theft alarm system.
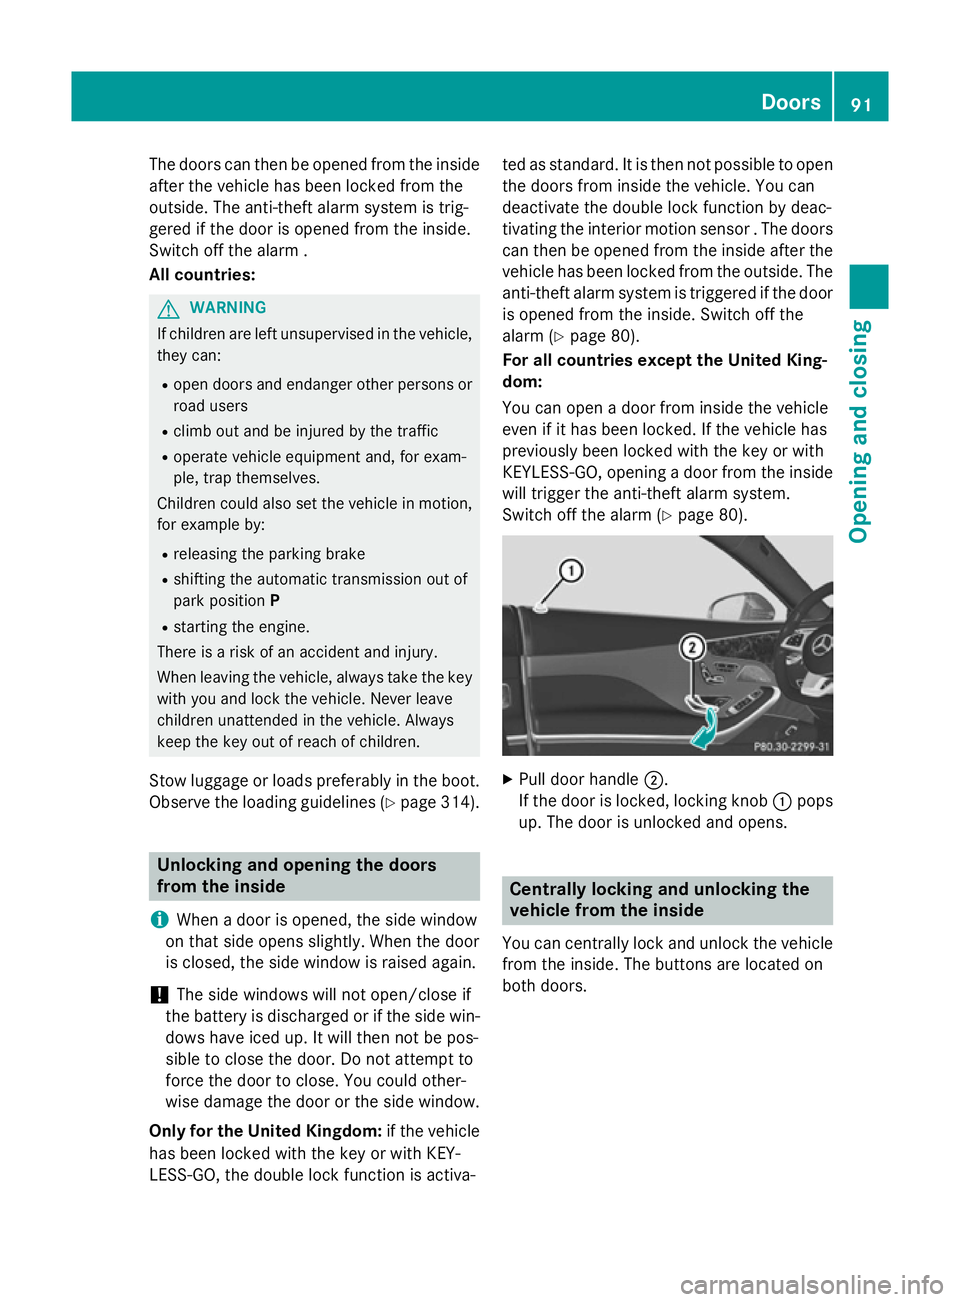
Switch off the alarm (Y page 80). X
Pull door handle ;.
If the door is locked, locking knob :pops
up. The door is unlocked and opens. Centrally locking and unlocking the
vehicle from the inside
You can centrally lock and unlock the vehicle from the inside. The buttons are located on
both doors. Doors
91Opening and closing Z
Page 95 of 413
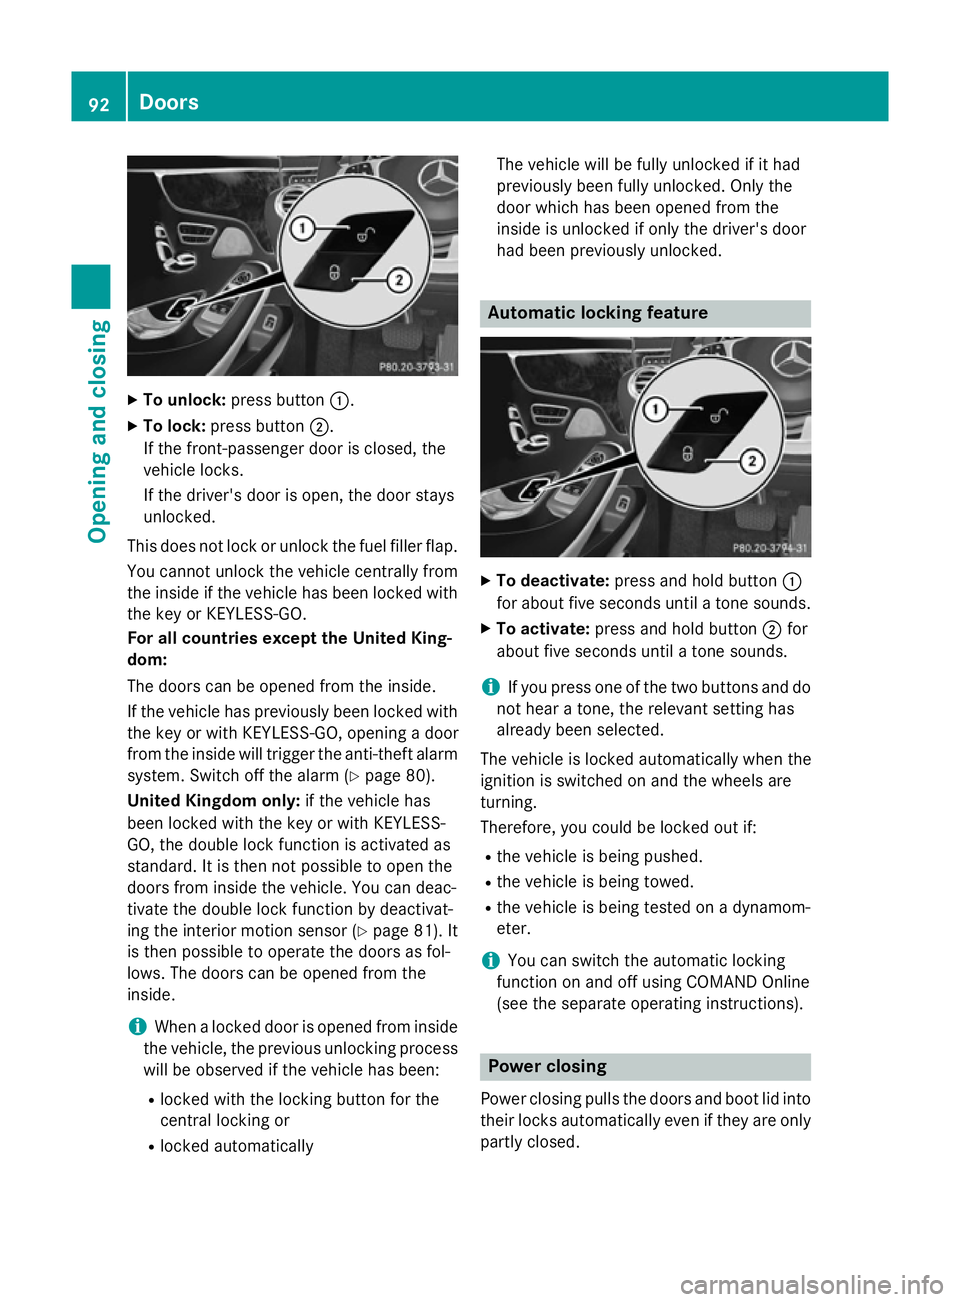
X
To unlock: press button :.
X To lock: press button ;.
If the front-passenger door is closed, the
vehicle locks.
If the driver's door is open, the door stays
unlocked.
This does not lock or unlock the fuel filler flap. You cannot unlock the vehicle centrally from
the inside if the vehicle has been locked with
the key or KEYLESS-GO.
For all countries except the United King-
dom:
The doors can be opened from the inside.
If the vehicle has previously been locked with the key or with KEYLESS-GO, opening a door
from the inside will trigger the anti-theft alarmsystem. Switch off the alarm (Y page 80).
United Kingdom only: if the vehicle has
been locked with the key or with KEYLESS-
GO, the double lock function is activated as
standard. It is then not possible to open the
doors from inside the vehicle. You can deac-
tivate the double lock function by deactivat-
ing the interior motion sensor (Y page 81). It
is then possible to operate the doors as fol-
lows. The doors can be opened from the
inside.
i When a locked door is opened from inside
the vehicle, the previous unlocking process
will be observed if the vehicle has been:
R locked with the locking button for the
central locking or
R locked automatically The vehicle will be fully unlocked if it had
previously been fully unlocked. Only the
door which has been opened from the
inside is unlocked if only the driver's door
had been previously unlocked. Automatic locking feature
X
To deactivate: press and hold button :
for about five seconds until a tone sounds.
X To activate: press and hold button ;for
about five seconds until a tone sounds.
i If you press one of the two buttons and do
not hear a tone, the relevant setting has
already been selected.
The vehicle is locked automatically when the
ignition is switched on and the wheels are
turning.
Therefore, you could be locked out if:
R the vehicle is being pushed.
R the vehicle is being towed.
R the vehicle is being tested on a dynamom-
eter.
i You can switch the automatic locking
function on and off using COMAND Online
(see the separate operating instructions). Power closing
Power closing pulls the doors and boot lid into
their locks automatically even if they are only partly closed. 92
DoorsOpening and closing
Page 97 of 413
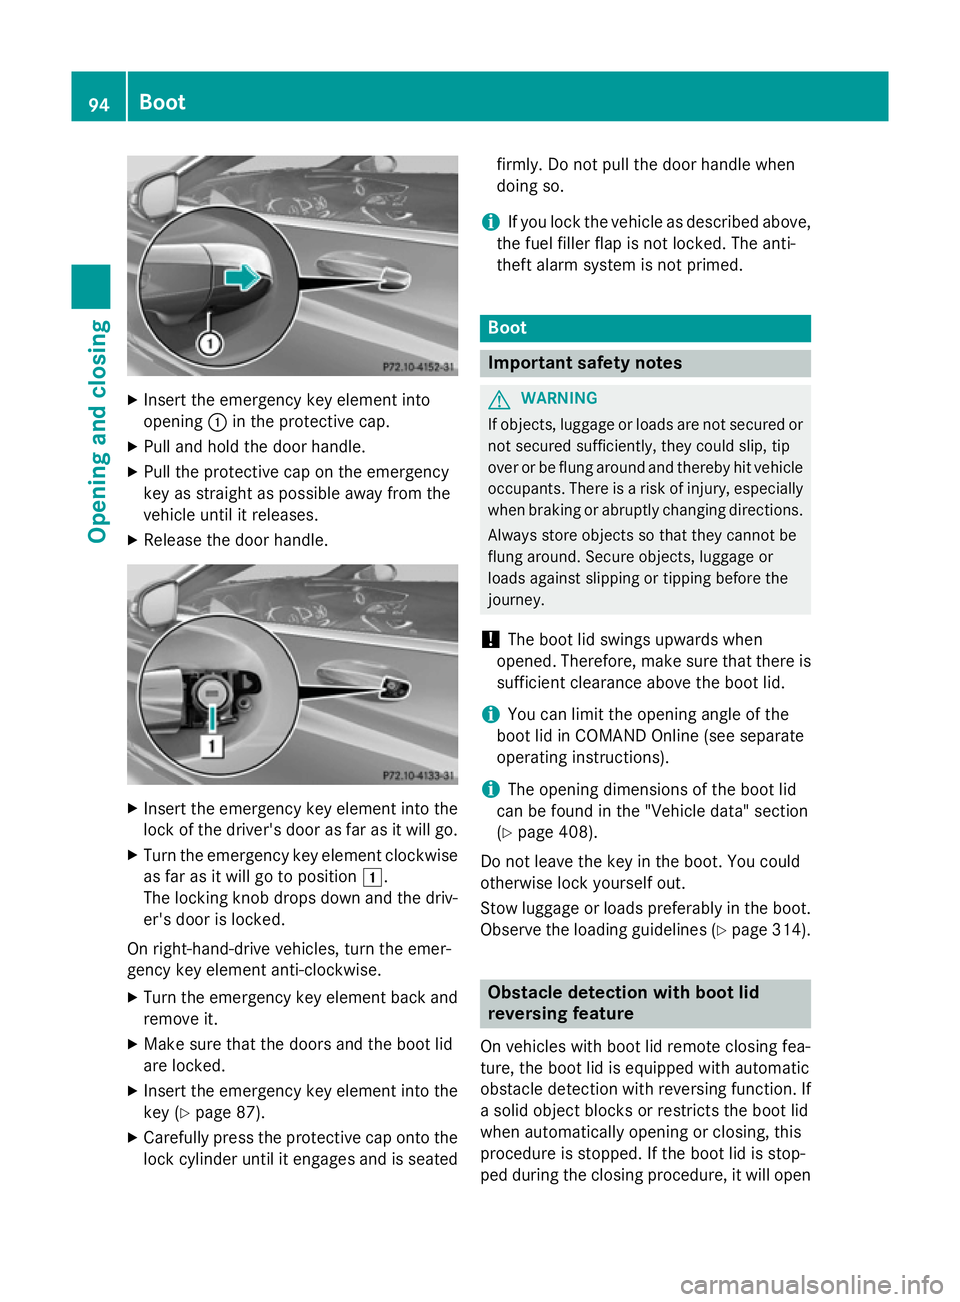
X
Insert the emergency key element into
opening :in the protective cap.
X Pull and hold the door handle.
X Pull the protective cap on the emergency
key as straight as possible away from the
vehicle until it releases.
X Release the door handle. X
Insert the emergency key element into the
lock of the driver's door as far as it will go.
X Turn the emergency key element clockwise
as far as it will go to position 1.
The locking knob drops down and the driv- er's door is locked.
On right-hand-drive vehicles, turn the emer-
gency key element anti-clockwise.
X Turn the emergency key element back and
remove it.
X Make sure that the doors and the boot lid
are locked.
X Insert the emergency key element into the
key (Y page 87).
X Carefully press the protective cap onto the
lock cylinder until it engages and is seated firmly. Do not pull the door handle when
doing so.
i If you lock the vehicle as described above,
the fuel filler flap is not locked. The anti-
theft alarm system is not primed. Boot
Important safety notes
G
WARNING
If objects, luggage or loads are not secured or not secured sufficiently, they could slip, tip
over or be flung around and thereby hit vehicle
occupants. There is a risk of injury, especially when braking or abruptly changing directions.
Always store objects so that they cannot be
flung around. Secure objects, luggage or
loads against slipping or tipping before the
journey.
! The boot lid swings upwards when
opened. Therefore, make sure that there is sufficient clearance above the boot lid.
i You can limit the opening angle of the
boot lid in COMAND Online (see separate
operating instructions).
i The opening dimensions of the boot lid
can be found in the "Vehicle data" section
(Y page 408).
Do not leave the key in the boot. You could
otherwise lock yourself out.
Stow luggage or loads preferably in the boot.
Observe the loading guidelines (Y page 314). Obstacle detection with boot lid
reversing feature
On vehicles with boot lid remote closing fea-
ture, the boot lid is equipped with automatic
obstacle detection with reversing function. If
a solid object blocks or restricts the boot lid
when automatically opening or closing, this
procedure is stopped. If the boot lid is stop-
ped during the closing procedure, it will open 94
BootOpening and closing